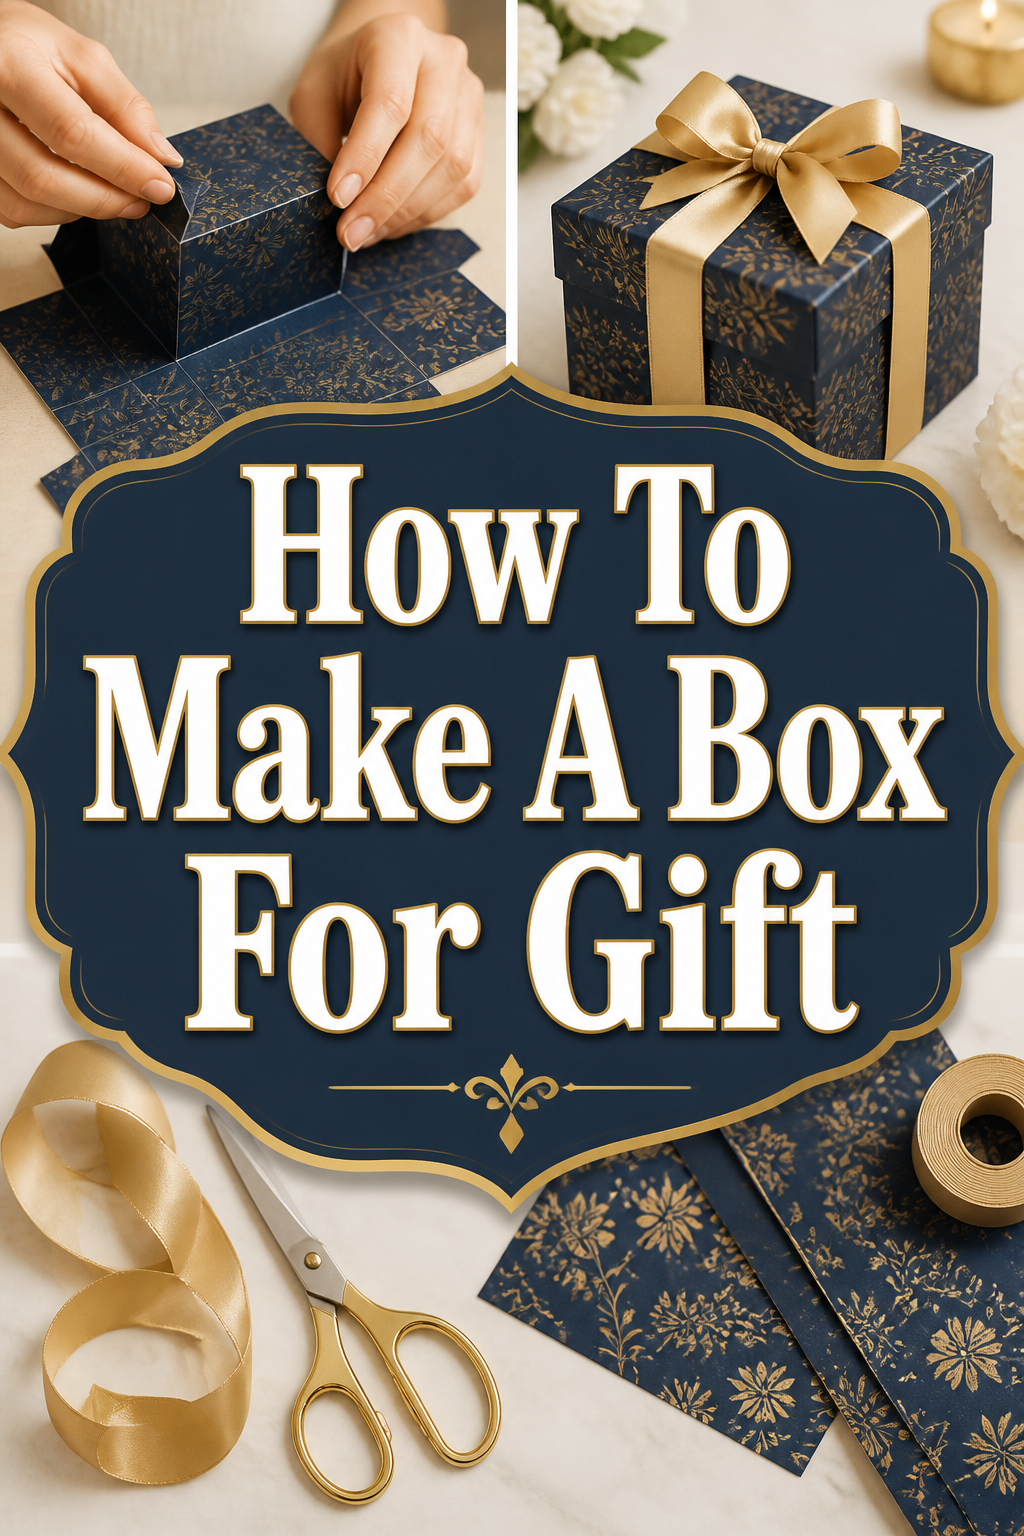
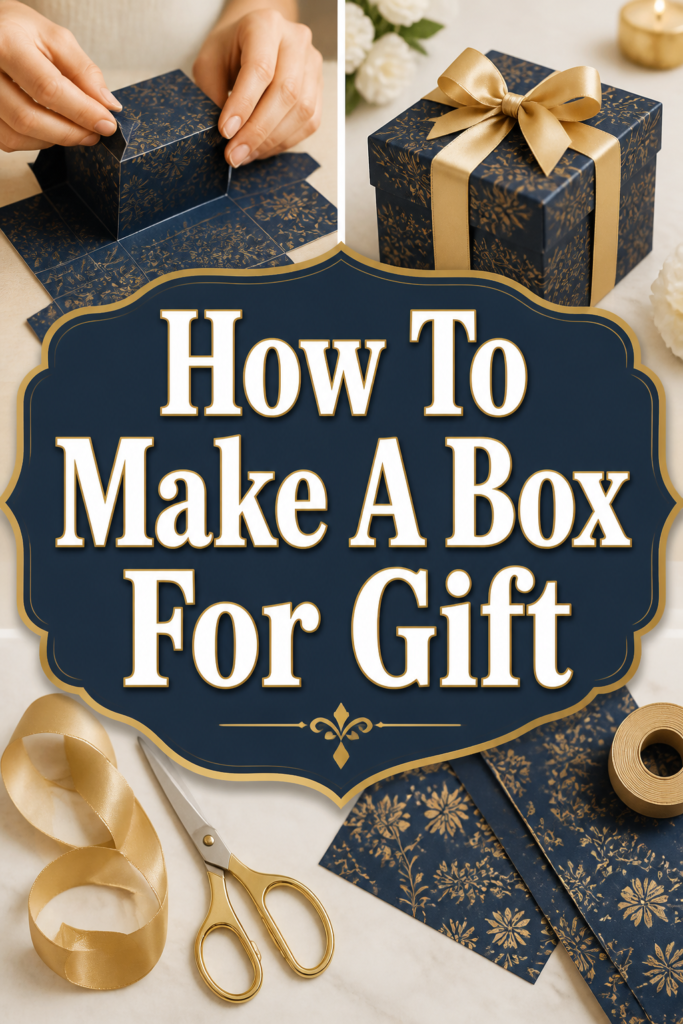
🎁 How To Make A Box For Gift
There’s a special joy in giving a gift, and that feeling is only amplified when the presentation is as thoughtful as the present itself. I’ve spent countless hours crafting personalized touches for friends and family, and nothing quite compares to seeing their delight at a beautifully packaged, handmade box. This guide distills years of hands-on experience, showing you exactly how to create a stunning gift box that adds a personal touch to any occasion.
You don’t need to be a crafting expert to make something truly unique. Follow these steps, and you’ll be amazed at what you can create with just a few simple materials. Let’s get started on adding that extra layer of love to your next gift.
Quick Overview
Creating a custom gift box is a rewarding project that elevates any present. You’ll learn to measure, cut, score, fold, and glue your way to a beautiful, personalized container. The process is straightforward and offers plenty of room for creative expression.
- Time needed: 1-2 hours (depending on complexity and decoration)
- Difficulty: Beginner
- What you’ll need: Cardstock, ruler, pencil, scissors or craft knife, scoring tool, glue, decorative items
Step-by-Step Instructions
Step 1: Gather Your Materials
Before you begin, ensure you have all the necessary supplies ready. Having everything at hand makes the process smoother and more enjoyable. A clean, flat workspace is also essential for accurate measurements and cuts.
Choose your cardstock carefully. Look for a weight that is sturdy enough to hold its shape but not so thick that it’s difficult to fold or score. Decorative patterns or solid colors are both great choices, depending on your gift’s theme.
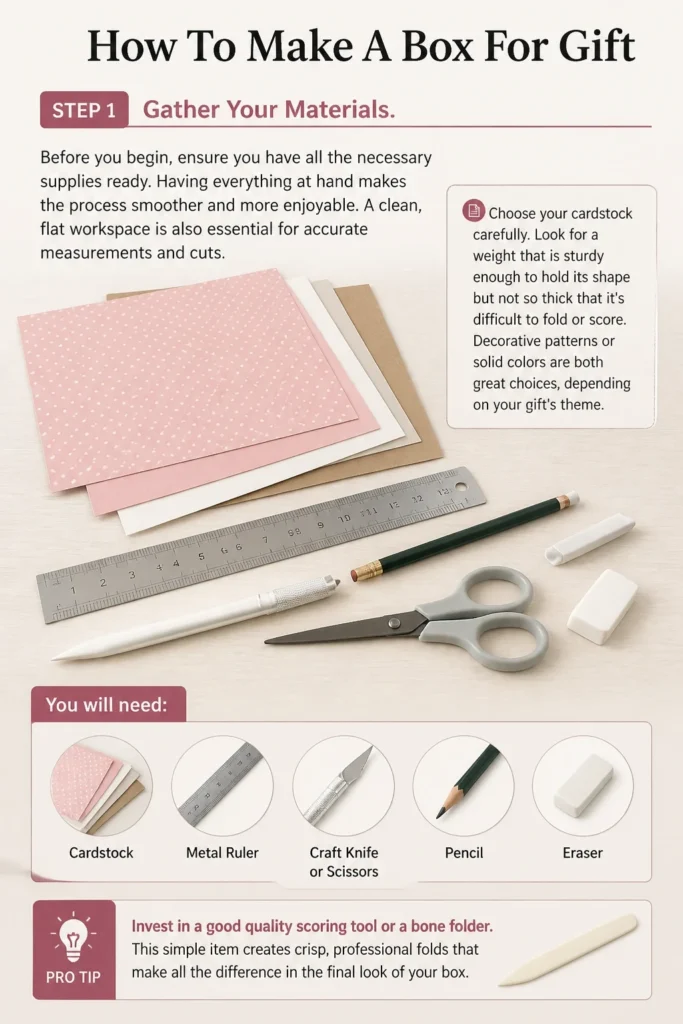
You will need a metal ruler for precise measurements and straight lines. A sharp craft knife or sturdy scissors are vital for clean cuts. Don’t forget a pencil for marking and an eraser for any stray lines.
Pro Tip: Invest in a good quality scoring tool or a bone folder. This simple item creates crisp, professional folds that make all the difference in the final appearance of your box. If you don’t have one, the back of a butter knife can work in a pinch.
Step 2: Measure and Mark Your Paper
The foundation of a well-made box lies in accurate measurements. Start by determining the desired dimensions for your finished gift box. Consider the item you’re placing inside to ensure a perfect fit.
For a basic square or rectangular box, you’ll create a single template on your cardstock. Let’s say you want a box that is 4 inches long, 4 inches wide, and 2 inches deep. You will need to calculate the total length and width of your paper.
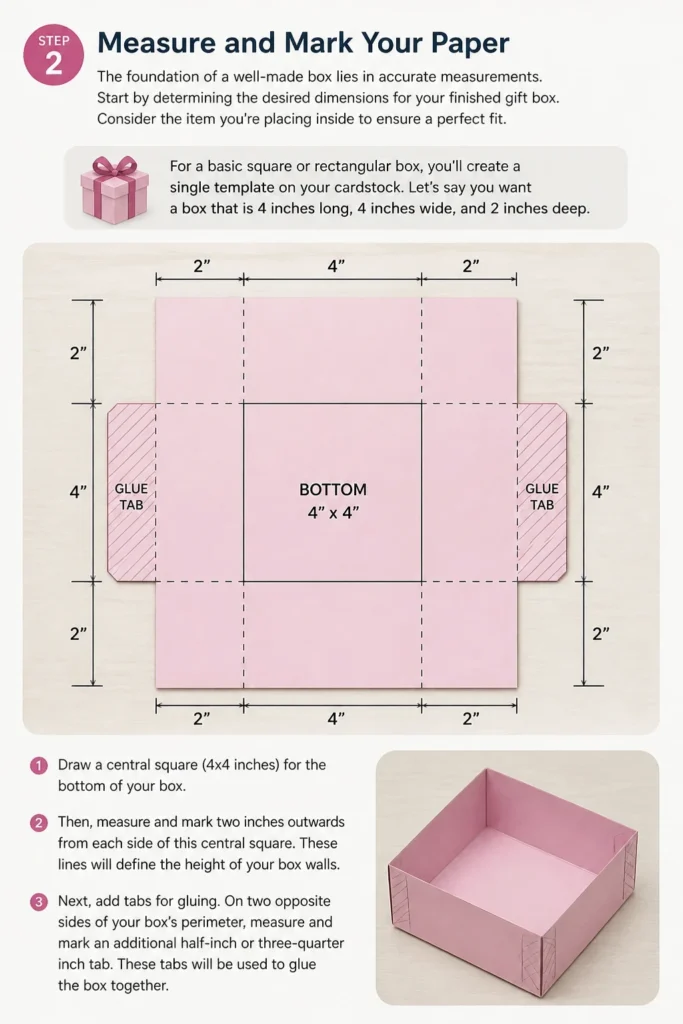
Draw a central square (4×4 inches) for the bottom of your box. Then, measure and mark two inches outwards from each side of this central square. These lines will define the height of your box walls.
Next, add tabs for gluing. On two opposite sides of your box’s perimeter, measure and mark an additional half-inch or three-quarter inch tab. These tabs will secure the box walls together.
Pro Tip: Always double-check your measurements before cutting. A small error here can lead to a crooked box later on. Use a light hand with your pencil so marks are easy to erase.
Step 3: Cut Out Your Box Template
With all your lines marked, it’s time to carefully cut out your box template. Precision here is key to a professional-looking finish. Take your time and use a sharp blade or scissors.
Use a craft knife and a self-healing mat for the cleanest, straightest cuts. Always place your ruler firmly along the pencil lines and cut away from your body. If using scissors, make long, even strokes rather than short, choppy ones.
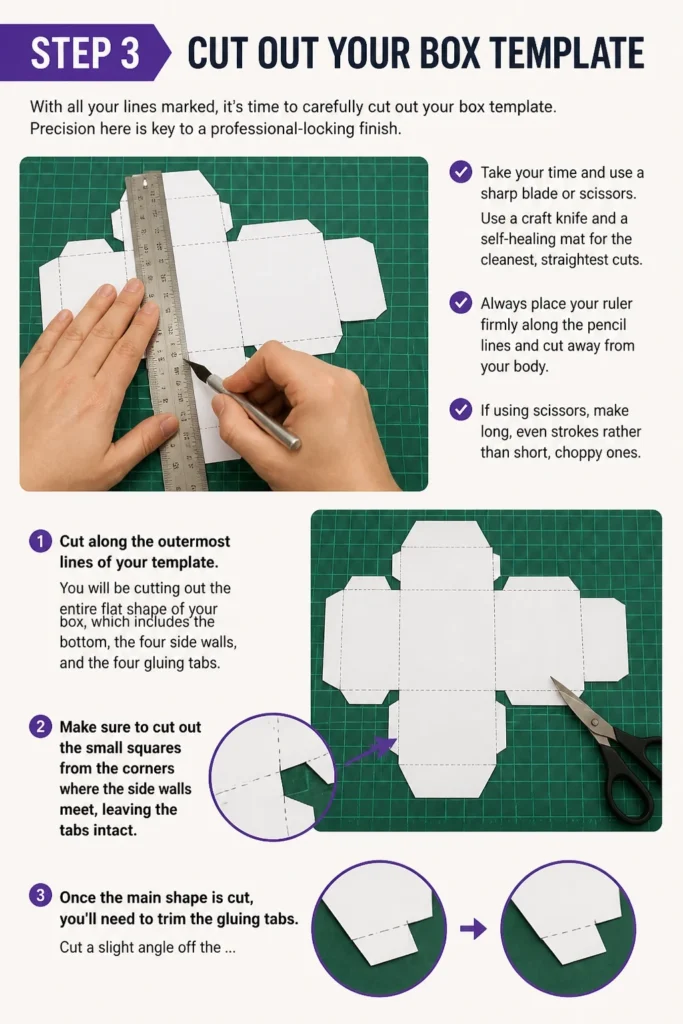
Cut along the outermost lines of your template. You will be cutting out the entire flat shape of your box, which includes the bottom, the four side walls, and the four gluing tabs. Make sure to cut out the small squares from the corners where the side walls meet, leaving the tabs intact.
Once the main shape is cut, you’ll need to trim the gluing tabs. Cut a slight angle off the corners of each tab. This angle helps them tuck in neatly and reduces bulk when you assemble the box, creating a smoother seam.
Step 4: Score the Fold Lines
Scoring is the secret to crisp, professional folds. It creates a crease in the paper, making it easier to fold precisely along your marked lines without tearing or wrinkling the cardstock. This step is crucial for a tidy box.
Place your ruler along each interior pencil line that defines where your box will fold. These are the lines separating the bottom of the box from the side walls, and the lines separating the side walls from the gluing tabs.
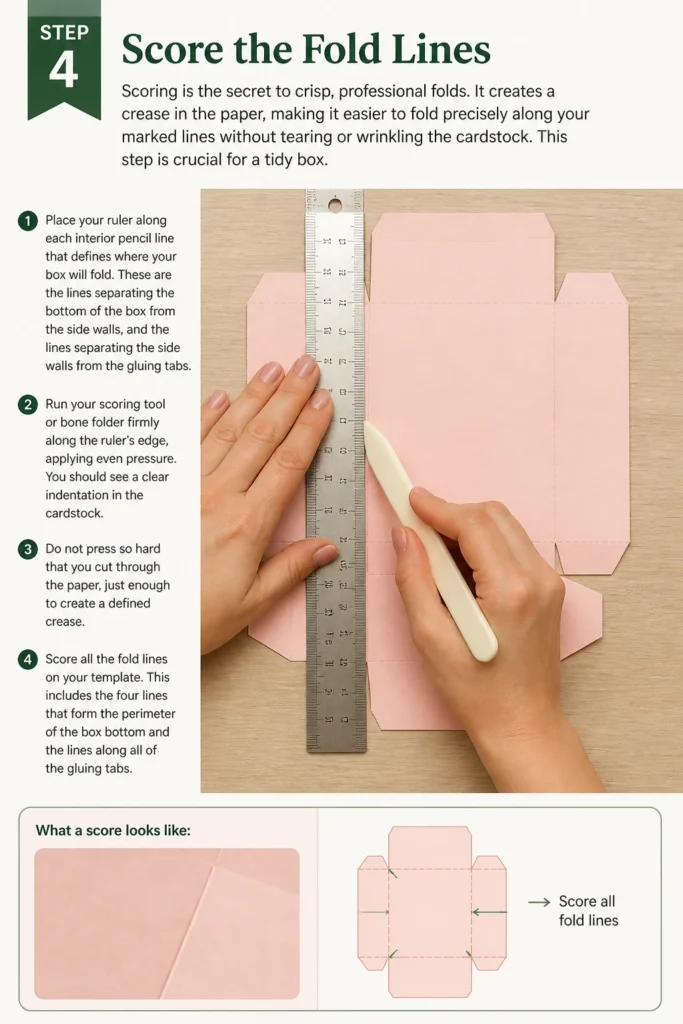
Run your scoring tool or bone folder firmly along the ruler’s edge, applying even pressure. You should see a clear indentation in the cardstock. Do not press so hard that you cut through the paper, just enough to create a defined crease.
Score all the fold lines on your template. This includes the four lines that form the perimeter of the box bottom and the lines that separate the tabs from the side walls. Ensure all lines are scored accurately before moving on.
Pro Tip: Score on the side of the paper that will be the inside of the box. This prevents any visible scoring marks from showing on the exterior of your finished gift box, keeping it looking pristine.
Step 5: Fold the Box
Now that your template is scored, the box will practically fold itself. This is where you start to see your flat piece of cardstock transform into a three-dimensional shape. Take care to align edges perfectly.
Gently fold each scored line inwards towards the center of your template. Press firmly along the folds using your fingers or a bone folder to create sharp creases. This helps the box maintain its structure.
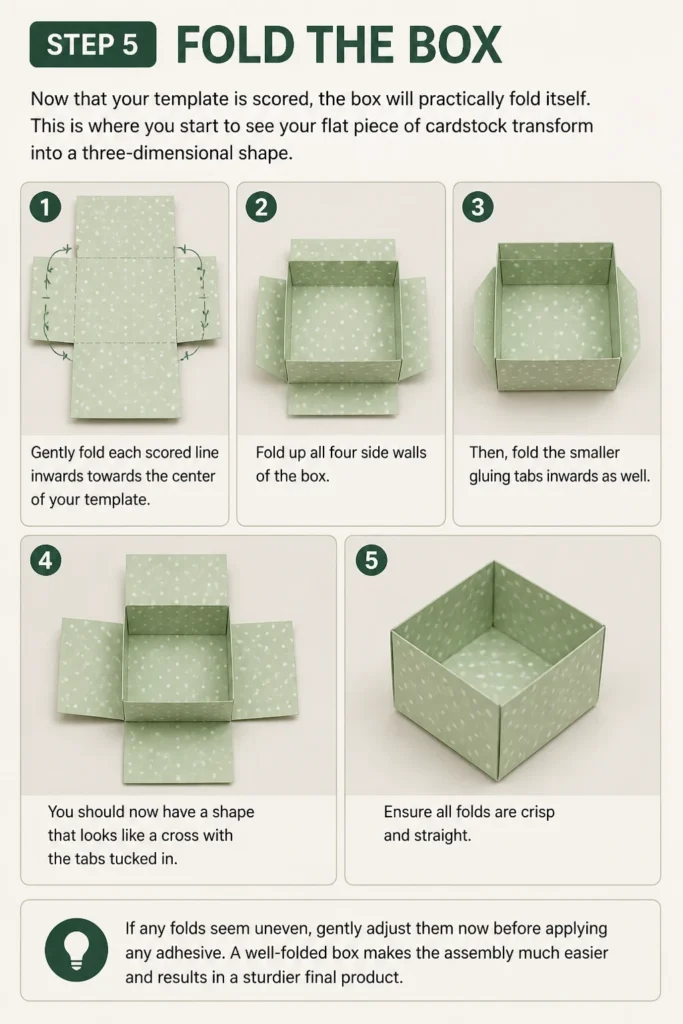
Fold up all four side walls of the box. Then, fold the smaller gluing tabs inwards as well. You should now have a shape that looks like a cross with the tabs tucked in.
Ensure all folds are crisp and straight. If any folds seem uneven, gently adjust them now before applying any adhesive. A well-folded box makes the assembly much easier and results in a sturdier final product.
Step 6: Apply Adhesive
Choosing the right adhesive and applying it correctly is vital for a strong, lasting box. Too much glue can cause wrinkling or seep out, while too little will result in a weak bond.
Select a strong, quick-drying craft glue or double-sided tape. White craft glue works well, but allow sufficient drying time. Double-sided tape offers instant adhesion and less mess, which can be a great advantage.
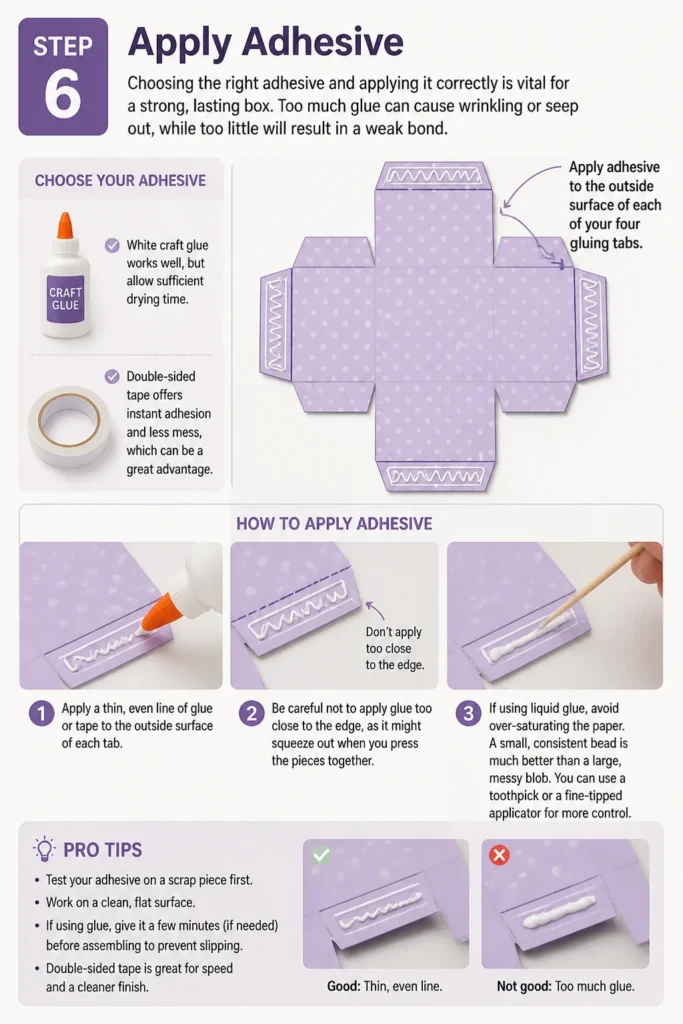
Apply a thin, even line of glue or tape to the outside surface of each of your four gluing tabs. Be careful not to apply glue too close to the edge, as it might squeeze out when you press the pieces together.
If using liquid glue, avoid over-saturating the paper. A small, consistent bead is much better than a large, messy blob. You can use a toothpick or a fine-tipped applicator for more control.
Pro Tip: For a super strong hold, use a combination of double-sided tape for initial positioning and a tiny bit of liquid glue along the edges for a permanent bond. This gives you the best of both worlds.
Step 7: Assemble the Box
This is the moment your flat template becomes a functional gift box. Work carefully and methodically to align the edges and create a neat, secure structure.
Starting with one side, bring a side wall up so that its gluing tab aligns with the inside of the adjacent side wall. Press the tab firmly against the wall, ensuring a snug fit. Hold it in place for a few moments to allow the adhesive to bond.
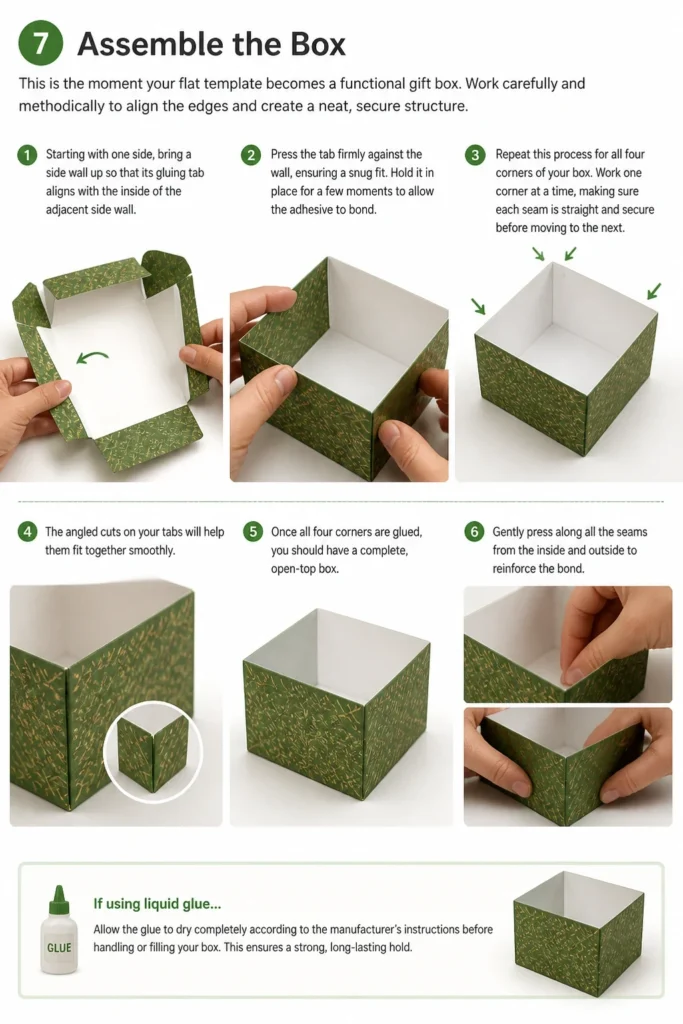
Repeat this process for all four corners of your box. Work one corner at a time, making sure each seam is straight and secure before moving to the next. The angled cuts on your tabs will help them fit together smoothly.
Once all four corners are glued, you should have a complete, open-top box. Gently press along all the seams from the inside and outside to reinforce the bond. If using liquid glue, allow the box to dry completely before handling it too much.
Step 8: Decorate Your Gift Box
Now for the fun part: personalizing your box! This is where you can let your creativity shine and tailor the box to the recipient and the occasion. The possibilities are endless.
Add ribbons, bows, or twine around the box for an elegant touch. You can tie a simple knot or create an elaborate bow, depending on your style. Consider colors that complement the cardstock you chose.
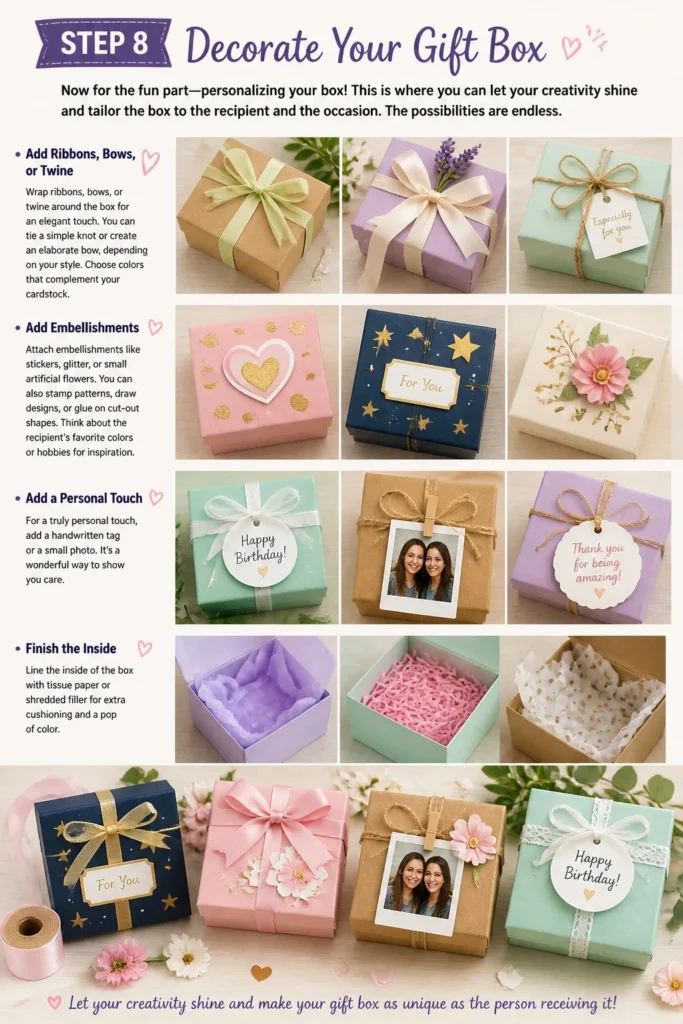
Attach embellishments like stickers, glitter, or small artificial flowers. You can also stamp patterns, draw designs, or glue on cut-out shapes. Think about the recipient’s favorite colors or hobbies for inspiration.
For a truly personal touch, consider adding a handwritten tag or a small photo. You can also line the inside of the box with tissue paper or shredded filler for extra cushioning and a pop of color. Let your imagination guide you to create something truly special.
Common Mistakes to Avoid
Inaccurate Measurements
Many people rush through the measuring phase, leading to frustrating problems later. If your initial lines are even slightly off, your box will not align correctly, resulting in crooked sides or gaps. Always use a ruler, take your time, and double-check every measurement before making any cuts. Precision here saves a lot of rework.
Rushing the Scoring
Skipping the scoring step or doing it too lightly makes folding difficult and often results in cracked or uneven creases. Proper scoring ensures clean, crisp folds that give your box a professional finish. Use consistent, firm pressure with your scoring tool along a ruler to create a distinct groove without cutting through the paper.
Using Too Much Glue
It’s tempting to use a lot of glue for a strong hold, but excessive adhesive can seep out, wrinkle the paper, and create a messy appearance. A thin, even bead of glue or a strip of double-sided tape is usually sufficient. Less is often more when it comes to adhesives, ensuring a clean and tidy finish.
Forgetting to Decorate
While the structural integrity of the box is important, don’t overlook the decorative phase. A plain box, even if perfectly constructed, misses an opportunity to add a personal touch. Plan your decorations as you make the box, considering the recipient’s tastes and the occasion, to truly make the gift special.
Troubleshooting
Box Sides Don’t Align
If you find your box sides aren’t lining up perfectly, the most common culprit is inaccurate initial measurements or cuts. Even a millimeter off can cause noticeable misalignment. Go back and re-measure your template carefully, ensuring all lines are parallel and perpendicular as needed.
Another reason might be uneven folding. If your folds aren’t crisp and straight, the walls won’t stand upright properly. Gently re-crease your fold lines using a bone folder or ruler to sharpen them. Sometimes, holding the glued seams firmly until completely dry can help correct minor misalignments.
Glue Isn’t Holding
If your seams are coming apart, the glue might not be strong enough, or you might not have used enough of it. Ensure you are using a strong craft adhesive specifically designed for paper or cardstock. Check the product’s drying time and instructions.
Also, make sure you are applying enough pressure for long enough when bonding the pieces. Sometimes, using small clips or rubber bands to hold the seams together while the glue dries can provide the necessary pressure for a strong bond. If all else fails, consider switching to a strong double-sided tape for a more immediate hold.
Cardstock Tears During Scoring
Tearing during scoring usually means you’re applying too much pressure or your scoring tool is too sharp for the cardstock’s thickness. Different cardstocks have varying strengths, so adjust your pressure accordingly. Practice on a scrap piece first.
If your scoring tool feels too sharp, try using a duller edge, like the back of a butter knife or a dried-out ballpoint pen. Alternatively, if the cardstock is very thick, you might need to make two lighter scoring passes rather than one heavy one to create the crease without tearing.
Key Takeaways
- Precision is Paramount: Accurate measurements and cuts are the foundation of a perfectly constructed gift box.
- Scoring is Essential: Don’t skip scoring; it ensures crisp, professional folds and prevents paper from tearing.
- Less is More with Glue: Use thin, even layers of adhesive to avoid wrinkles, mess, and long drying times.
- Personalize Your Creation: Decoration is where your box truly comes alive and reflects your thoughtfulness.
- Practice Makes Perfect: Your first box might not be flawless, but each attempt improves your skills and confidence.
Frequently Asked Questions
What type of paper is best for making a gift box?
Cardstock is generally the best choice for gift boxes due to its sturdiness and ability to hold shape. Look for cardstock in the 65lb to 110lb range (176-300 gsm). Thicker cardstock provides more durability, while thinner options are easier to fold. The best choice often depends on the size and weight of the gift inside.
Can I make gift boxes in different sizes and shapes?
Absolutely! Once you understand the basic principles of measurement and construction, you can adapt them to virtually any size or shape. The key is to draw your template accurately, ensuring that the base, walls, and tabs all correspond to your desired dimensions. You can even experiment with hexagonal or octagonal boxes with a bit more planning.
How do I make a matching lid for my box?
Making a lid involves creating a separate, slightly larger box template. For a snug fit, the lid’s base dimensions (length and width) should be about 1/16 to 1/8 inch (1.5mm to 3mm) larger than your box’s base dimensions. The height of the lid can be whatever you prefer, often 1 to 2 inches. Follow the same steps for cutting, scoring, and assembling the lid as you did for the main box.
Is hot glue suitable for assembling gift boxes?
Hot glue can be used, but it’s often not ideal for paper crafts. It dries very quickly, which leaves little room for adjustment, and it can create bulky seams or melt certain types of paper. White craft glue or strong double-sided tape usually provide a cleaner, more flexible, and equally strong bond without the risk of damage or bulk.
Our Top Recommended Finds
- Self-Healing Cutting Mat: Protects your workspace and provides a stable surface for precise cuts with a craft knife.
- Bone Folder: Essential for creating crisp, professional folds and creases without damaging your cardstock.
- Craft Knife with Extra Blades: Offers superior precision for cutting straight lines and intricate shapes compared to scissors.
Your Next Creative Project Starts Now
You’ve now learned the foundational skills to craft a beautiful, personalized gift box. This isn’t just about making a container; it’s about adding a piece of your heart to every present you give. The satisfaction of a handmade item, from the gift itself to its thoughtful wrapping, is truly unmatched.
Imagine the delight on someone’s face when they receive a gift presented in a box you made with your own hands. This skill opens up a world of creative possibilities, letting you tailor every gift presentation to perfection. Don’t let this knowledge sit idle. Gather your materials today and start crafting your very first personalized gift box.