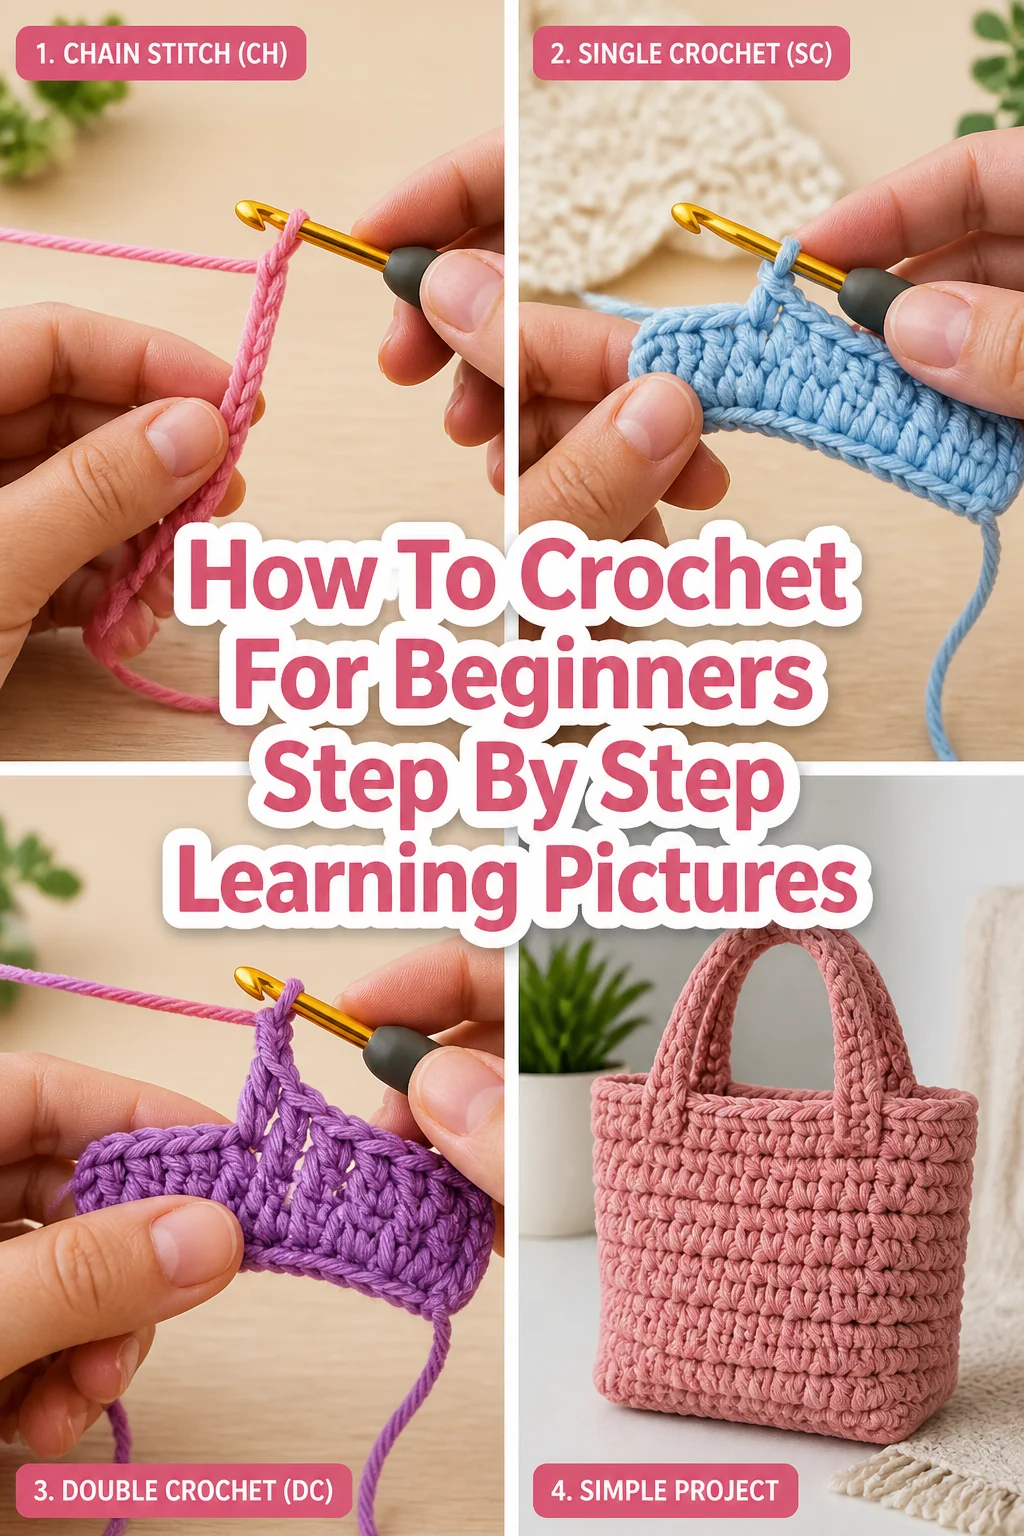
🧶 How To Crochet For Beginners Step By Step Learning Pictures

Beginner-friendly templates, step-by-step guides,
and weekly project ideas in your inbox.
Learning to crochet opens up a world of creativity and relaxation. I remember my own first hesitant stitches, transforming a simple strand of yarn into something tangible. This guide will walk you through each fundamental step, building your confidence from the very first loop.
You’ll soon be creating beautiful, handmade items with ease.

Quick Overview
This comprehensive guide will teach you the essential techniques to start crocheting, from holding your tools to completing your first project. You’ll understand the basic stitches and how to troubleshoot common issues.
- Time needed: 2-4 hours for initial learning and practice
- Difficulty: Beginner
- What you’ll need: Yarn, crochet hook, scissors, tapestry needle
Step-by-Step Instructions
Step 1: Gather Your Essential Supplies
Before you begin, ensure you have the right tools. A medium-weight yarn, often labeled as ‘worsted weight’ or ‘aran,’ is ideal for beginners. Choose a light color so your stitches are easy to see.
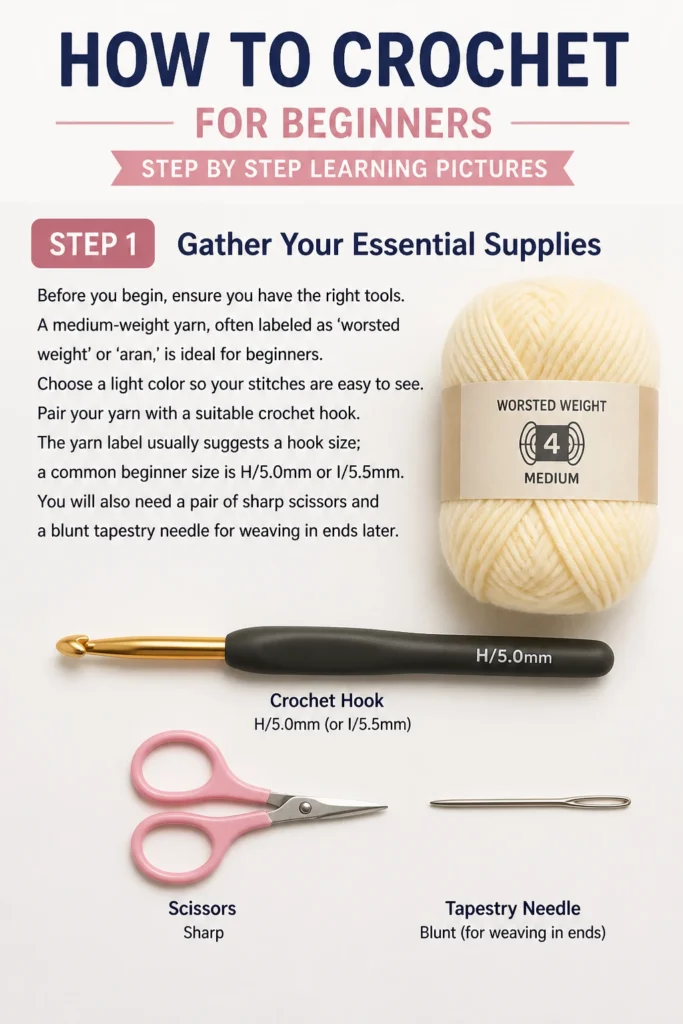
Pair your yarn with a suitable crochet hook. The yarn label usually suggests a hook size; a common beginner size is H/5.0mm or I/5.5mm. You will also need a pair of sharp scissors and a blunt tapestry needle for weaving in ends later.
Step 2: Learn How to Hold Your Hook and Yarn
Holding your tools comfortably is key to good tension. There are two main ways to hold a crochet hook: the pencil grip or the knife grip. Experiment to see which feels natural for you.
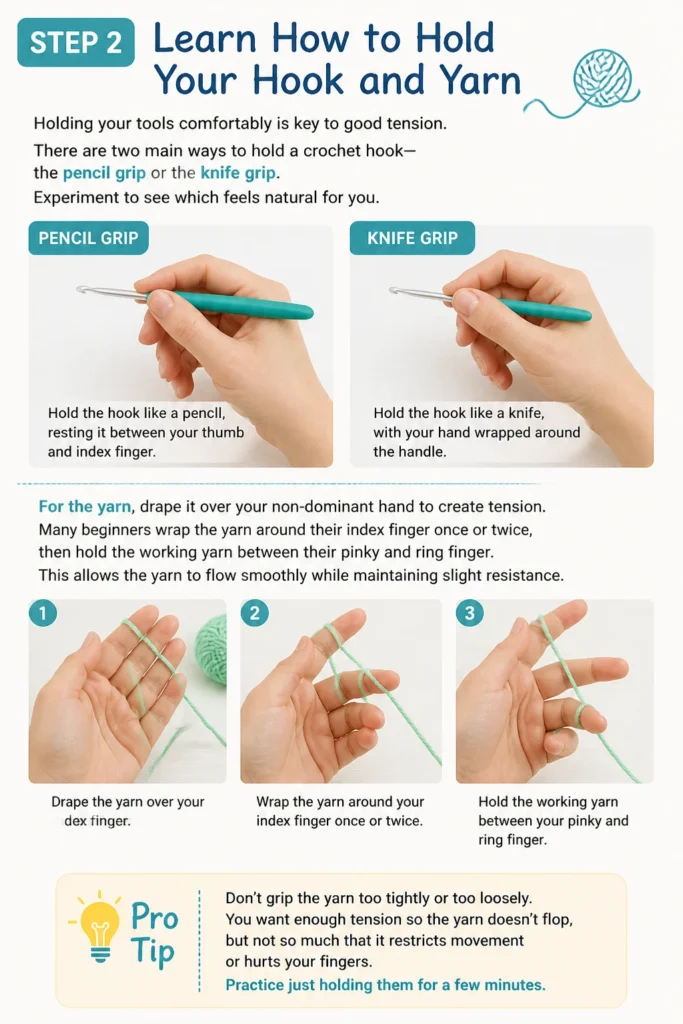
For the yarn, drape it over your non-dominant hand to create tension. Many beginners wrap the yarn around their index finger once or twice, then hold the working yarn between their pinky and ring finger. This allows the yarn to flow smoothly while maintaining slight resistance.
Pro Tip: Don’t grip the yarn too tightly or too loosely. You want enough tension so the yarn doesn’t flop, but not so much that it restricts movement or hurts your fingers. Practice just holding them for a few minutes.
Step 3: Create Your First Slip Knot
The slip knot is the very first loop on your hook, from which all your stitches will grow. Take the tail end of your yarn and loop it over the working yarn to form a circle. Insert your crochet hook into this circle.
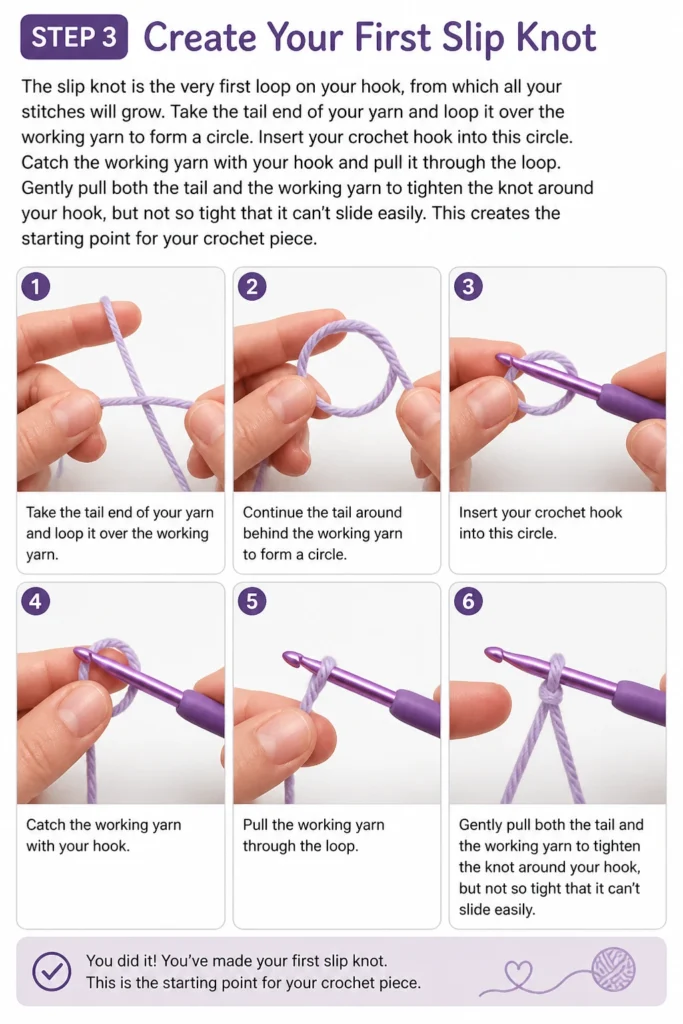
Catch the working yarn with your hook and pull it through the loop. Gently pull both the tail and the working yarn to tighten the knot around your hook, but not so tight that it can’t slide easily. This creates the starting point for your crochet piece.
Step 4: Master the Foundation Chain (Chain Stitch)
The foundation chain forms the base of most crochet projects. With the slip knot on your hook, wrap the yarn from back to front over your hook; this is called “yarn over” (YO). Pull the yarn you just “yarned over” through the loop already on your hook.
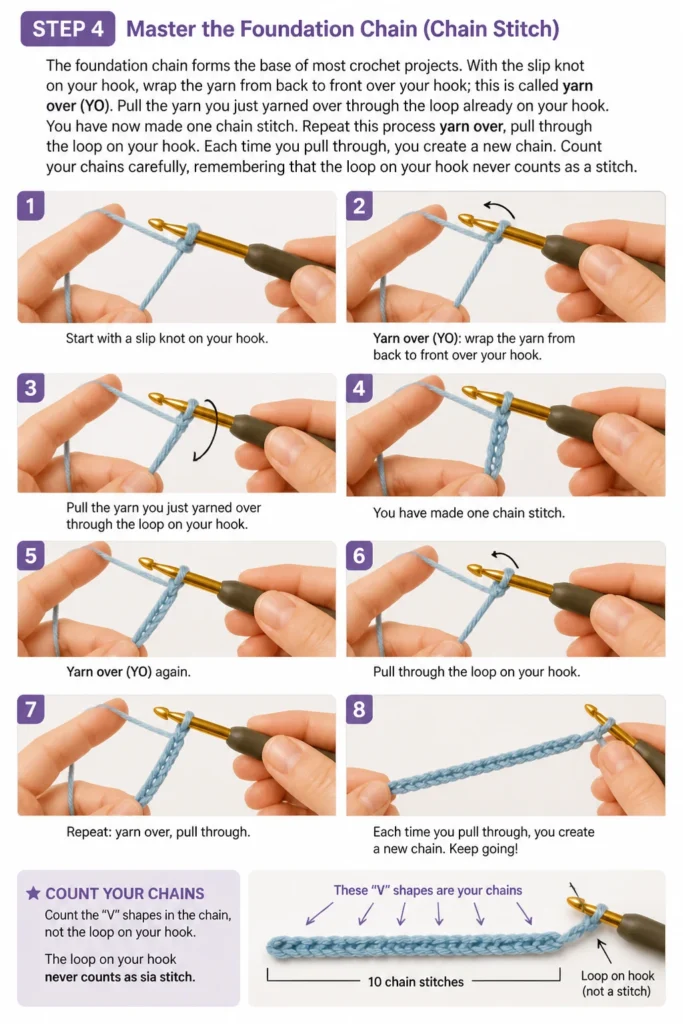
You have now made one chain stitch. Repeat this process: yarn over, pull through the loop on your hook. Each time you pull through, you create a new chain. Count your chains carefully, remembering that the loop on your hook never counts as a stitch.
Step 5: Practice the Single Crochet Stitch
The single crochet (sc) is one of the most fundamental stitches. To begin, skip the first chain closest to your hook and insert your hook into the center of the second chain. Yarn over your hook.
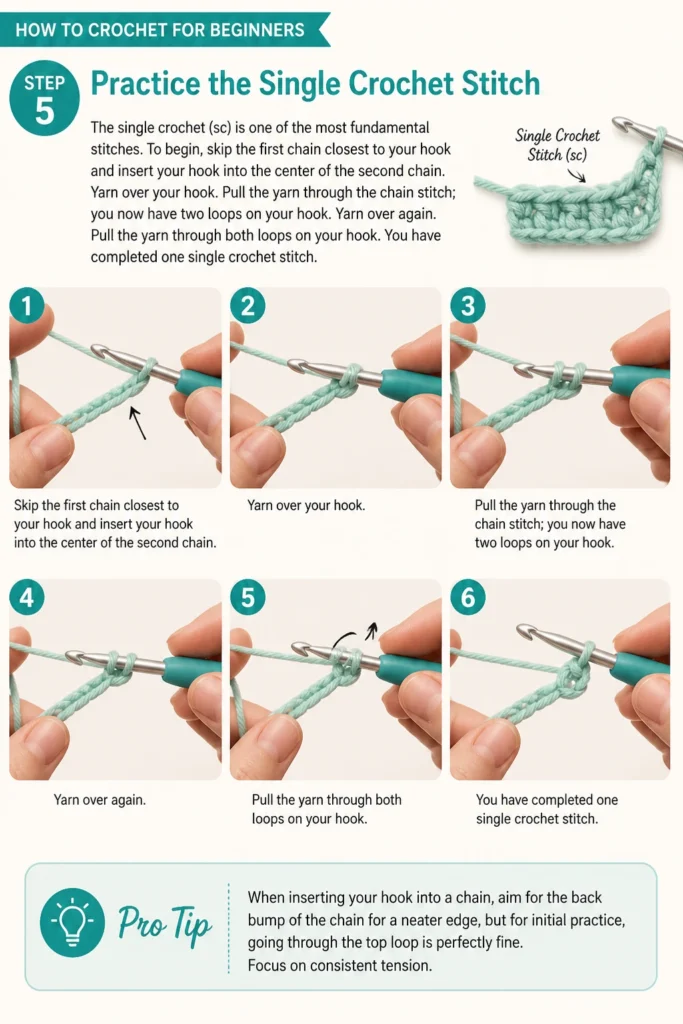
Pull the yarn through the chain stitch; you now have two loops on your hook. Yarn over again. Pull the yarn through both loops on your hook. You have completed one single crochet stitch.
Pro Tip: When inserting your hook into a chain, aim for the “back bump” of the chain for a neater edge, but for initial practice, going through the top loop is perfectly fine. Focus on consistent tension.
Step 6: Learn to Turn Your Work
Once you reach the end of your first row of single crochets, you need to turn your work to start the next row. To do this, make one chain stitch (chain 1). This chain stitch is called a “turning chain.”
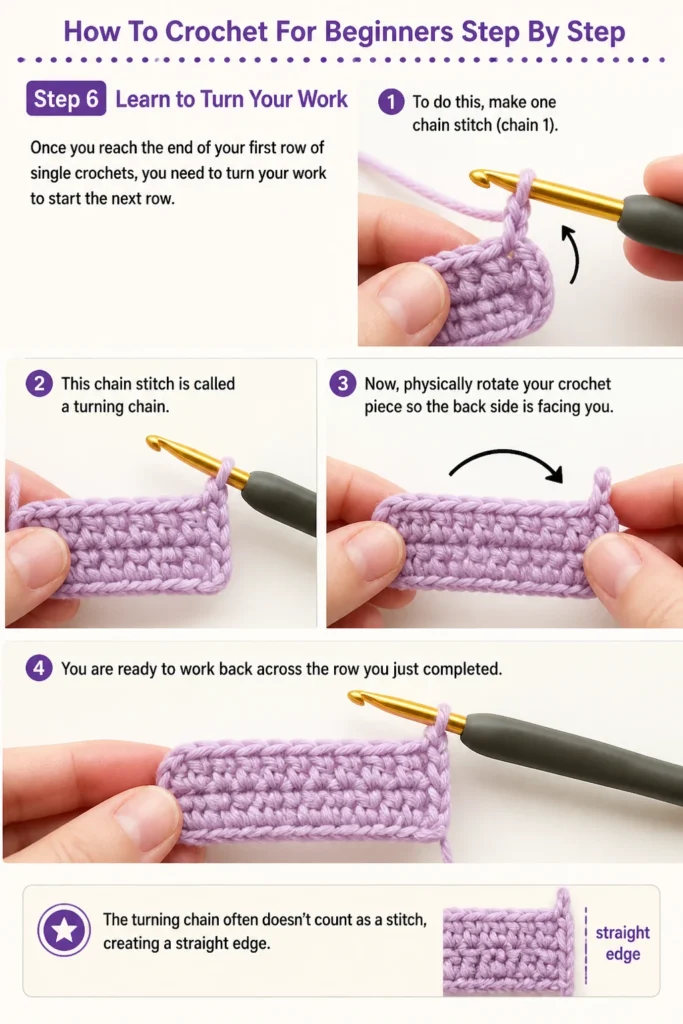
Now, physically rotate your crochet piece so the back side is facing you. You are ready to work back across the row you just completed. The turning chain often doesn’t count as a stitch, creating a straight edge.
Step 7: Crochet Your Second Row and Beyond
After turning, skip the turning chain you just made and insert your hook into the first single crochet stitch of the previous row. This is a common point of confusion for beginners. Look for the “V” shape at the top of the stitch.
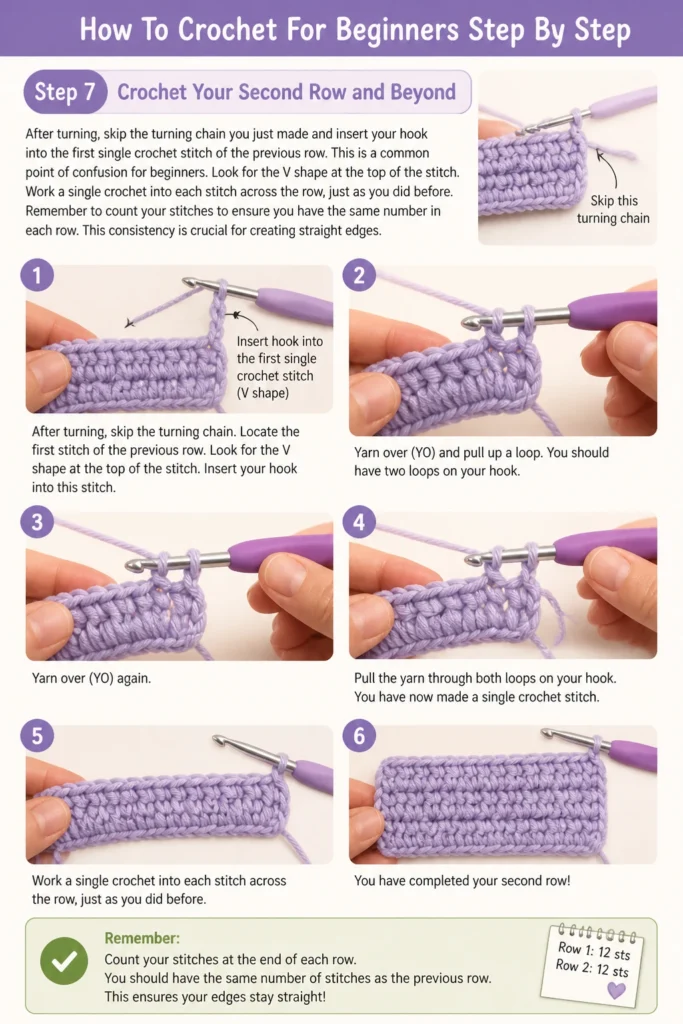
Work a single crochet into each stitch across the row, just as you did before. Remember to count your stitches to ensure you have the same number in each row. This consistency is crucial for creating straight edges.
Step 8: Fasten Off Your Work
When you’ve finished your practice swatch or project, you need to secure your stitches so they don’t unravel. Make one final chain stitch. Cut your working yarn, leaving a tail about 6 inches long.
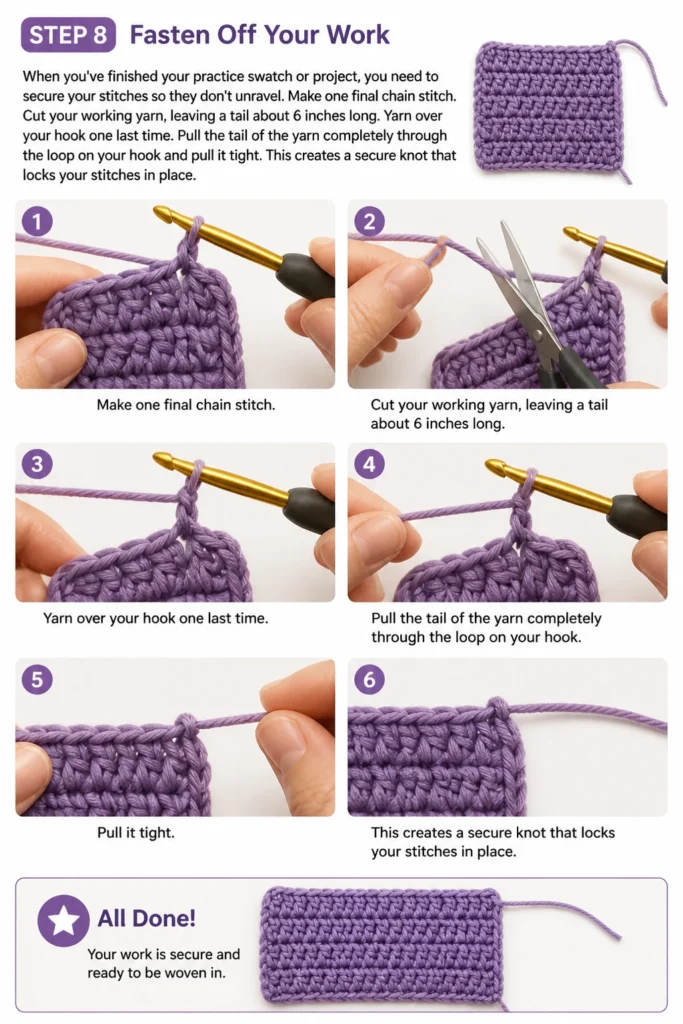
Yarn over your hook one last time. Pull the tail of the yarn completely through the loop on your hook and pull it tight. This creates a secure knot that locks your stitches in place.
Step 9: Weave in Your Ends
The final step for a neat finish is to weave in any loose yarn tails. Thread one of the yarn tails onto your tapestry needle. Gently weave the needle through several stitches in various directions on the wrong side of your fabric.
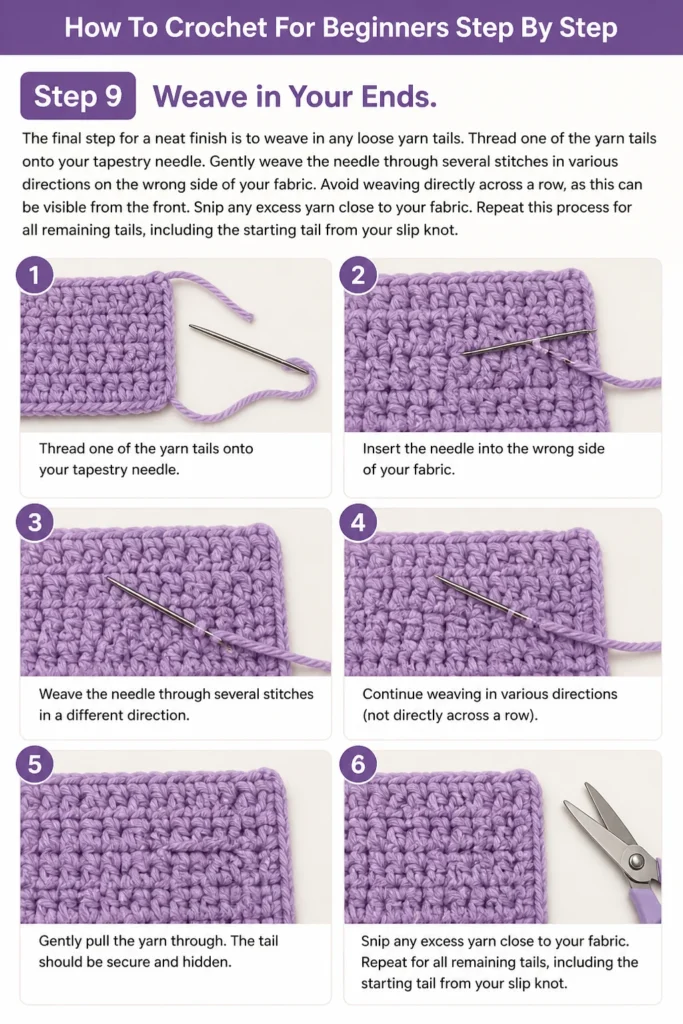
Avoid weaving directly across a row, as this can be visible from the front. Snip any excess yarn close to your fabric. Repeat this process for all remaining tails, including the starting tail from your slip knot.
Common Mistakes to Avoid
Inconsistent Tension
One of the most frequent challenges for beginners is maintaining even tension. This results in some stitches being too tight and others too loose, making your fabric look uneven and holey in places. Practice consistently wrapping the yarn around your fingers and adjusting your grip until the yarn flows smoothly and creates uniform stitches.
Missing Stitches at Row Ends
It’s easy to accidentally skip the first or last stitch of a row, causing your work to narrow or widen. Always count your stitches at the end of each row. When turning, remember to insert your hook into the first actual stitch of the previous row, not the turning chain itself (unless your pattern specifically instructs you to).
Incorrect Hook Size for Yarn
Using a hook that is too large or too small for your yarn can lead to problems. A hook too large creates a loose, gappy fabric, while a hook too small makes a stiff, dense piece that’s hard to work. Always check the yarn label for the recommended hook size and start there.
Troubleshooting
My Work is Curling
If your crochet piece starts to curl, it often means your tension is too tight, or you’re not using a large enough hook for your yarn. Try relaxing your grip on the yarn and hook. You might also consider going up one hook size to create looser stitches, which can help your fabric lie flat.
My Edges Are Uneven
Uneven edges are almost always a sign of inconsistent stitch counting or skipping stitches at the beginning or end of rows. Make sure you are always working into the correct first and last stitches. Placing stitch markers in the first and last stitch of each row can be incredibly helpful for keeping your edges straight.
My Stitches Look Messy or Inconsistent
This is very common when you’re first learning. It usually indicates that you need more practice with tension and hand placement. Don’t be discouraged. Keep practicing the basic single crochet stitch in rows. Your muscle memory will develop, and your stitches will naturally become more uniform and neat over time.
Key Takeaways
- Start with light-colored, medium-weight yarn and a corresponding hook for easy visibility.
- Practice holding your hook and yarn until you find a comfortable grip that allows for consistent tension.
- Master the slip knot and chain stitch as the foundation for all crochet projects.
- The single crochet is a fundamental stitch; focus on evenness before moving to more complex patterns.
- Always count your stitches at the end of each row to maintain straight edges and consistent sizing.
- Don’t be afraid to unravel and re-do sections; practice is essential for improvement.
Frequently Asked Questions
What’s the best yarn for beginners?
Worsted weight (also known as aran) acrylic yarn is highly recommended for beginners. It’s affordable, widely available, easy to work with, and doesn’t split easily. Its medium thickness makes stitches visible and easy to manipulate.
How do I read a crochet pattern?
Crochet patterns use abbreviations for stitches and techniques (e.g., sc for single crochet, ch for chain). Most patterns include a key to these abbreviations. You’ll also learn to understand instructions like “ch 1, turn” or “sc in next 5 stitches.” Start with simple patterns designed for beginners.
Can I use any hook with any yarn?
While you can physically combine any hook and yarn, it’s not always ideal. The yarn label suggests a hook size to achieve a desired fabric density and drape. Using a hook too small for thick yarn creates stiff fabric, while a hook too large for thin yarn makes a very loose, gappy material.
What is the difference between US and UK crochet terms?
This is a crucial distinction! The same stitch names can refer to different stitches in US and UK patterns. For example, a “single crochet” in US terms is equivalent to a “double crochet” in UK terms. Always check if a pattern specifies US or UK terminology before you begin.
Our Top Recommended Finds
- Ergonomic Crochet Hook Set: These hooks have comfortable handles that reduce hand fatigue, making long practice sessions more enjoyable.
- Beginner-Friendly Yarn Pack: A small collection of light-colored, worsted-weight acrylic yarns allows you to practice without a huge commitment.
- Locking Stitch Markers: These small plastic clips help you keep track of your first and last stitches, ensuring straight edges and accurate counting.
Your Crochet Journey Begins Now
You now have all the fundamental knowledge to pick up your hook and yarn today. Don’t wait; the best way to learn is by doing. Start with a simple chain, then try a few rows of single crochet.
Imagine the satisfaction of creating your very first handmade scarf or dishcloth. Take the plunge and discover the joy of crochet.
Beginner-friendly templates, step-by-step guides,
and weekly project ideas in your inbox.