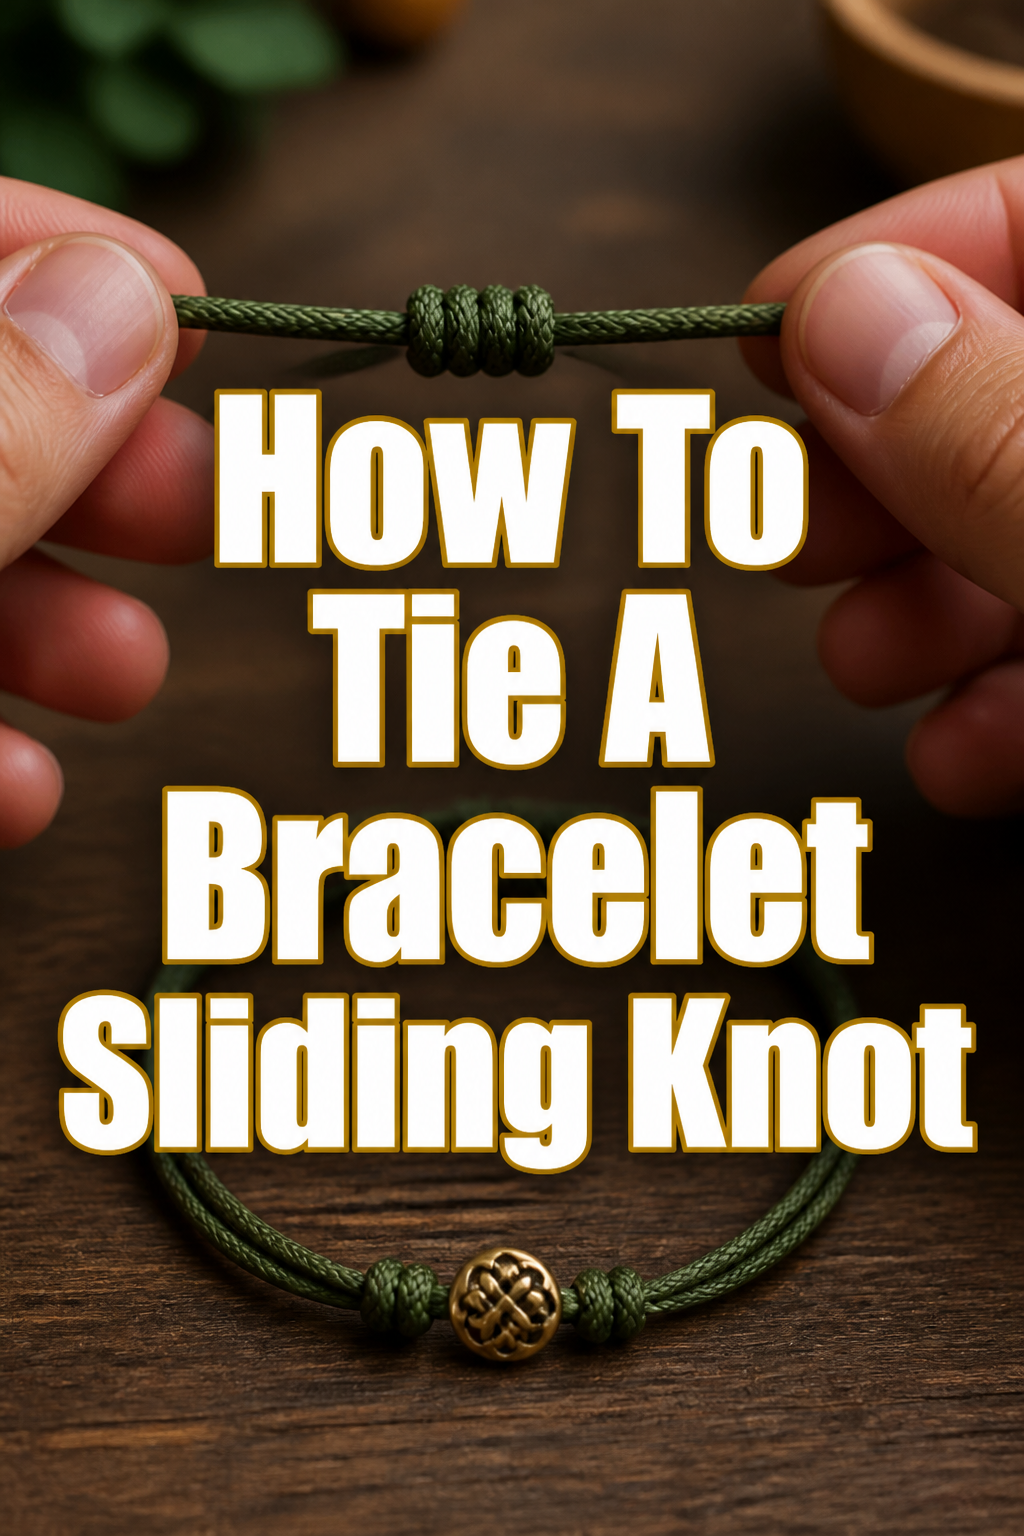
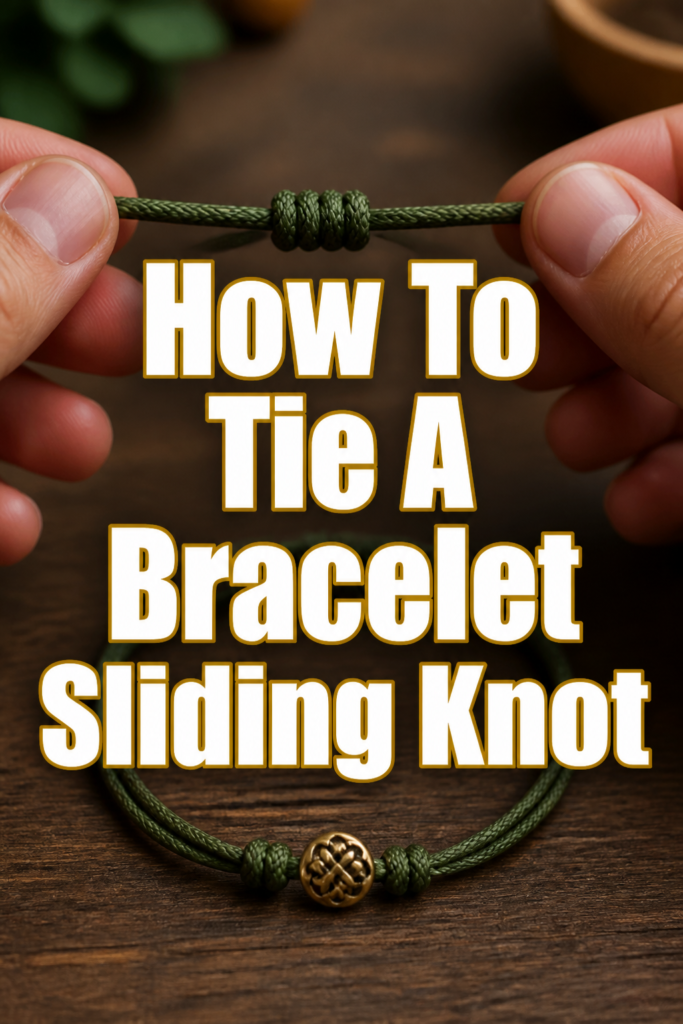
⭐ How To Tie A Bracelet Sliding Knot

Beginner-friendly templates, step-by-step guides,
and weekly project ideas in your inbox.
I remember the first time I tried to make a friendship bracelet for a friend and realized I had no way to make it adjustable.
After hours of trial and error with various knots, I finally mastered the sliding square knot, which has since become the foundation of every piece of jewelry I create.
This guide is built on years of hands-on experience to ensure your bracelets are both professional-looking and perfectly functional.
Quick Overview
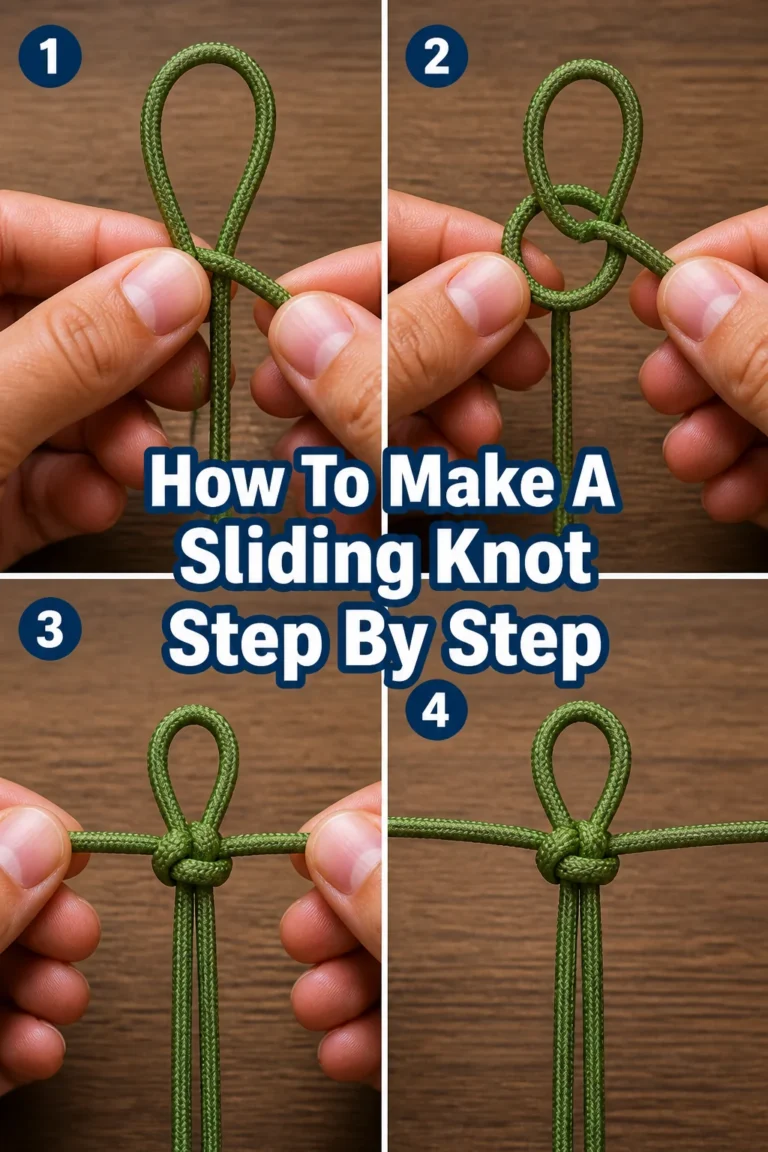
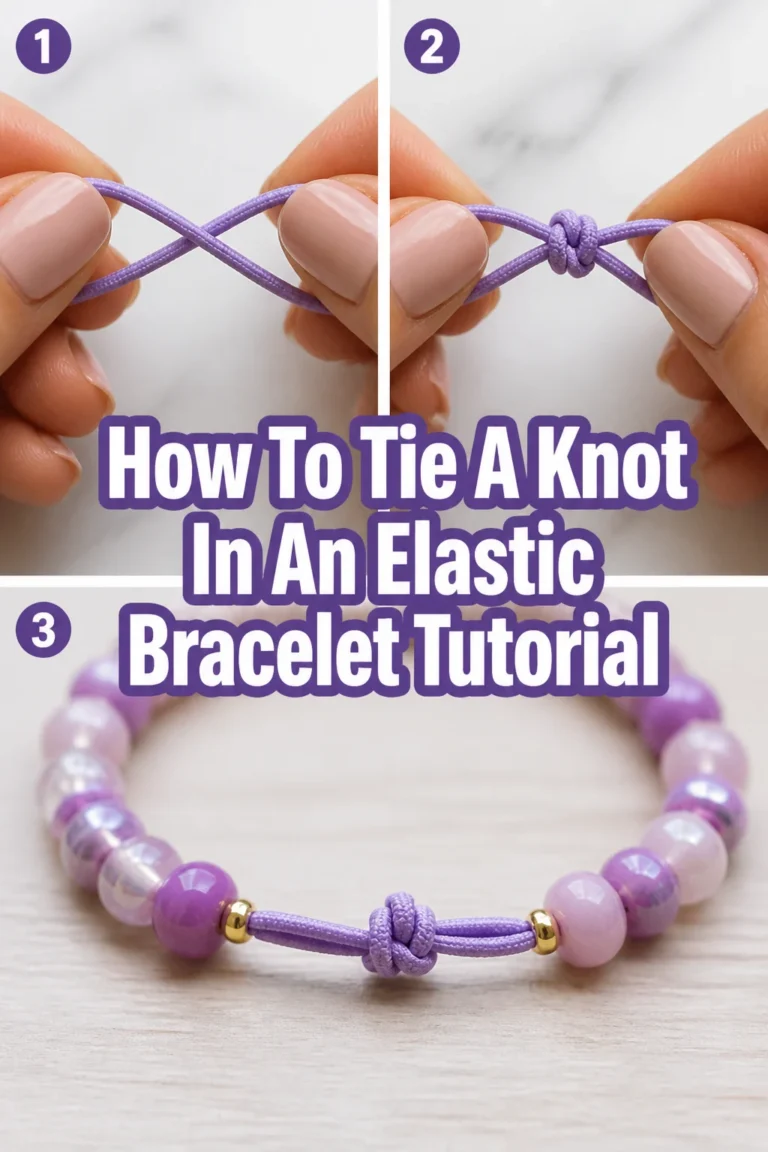
The sliding knot is a versatile closure that allows a bracelet to expand and contract, making it a “one size fits all” solution.
- Time needed: 10-15 minutes
- Difficulty: Beginner
- What you’ll need: Two ends of a bracelet cord, a separate 12-inch piece of cord, scissors, and a lighter or jewelry glue.
Step-by-Step Instructions
Step 1: Prepare Your Workspace and Cord
Clear a flat surface where you can lay your bracelet down without it moving around too much.
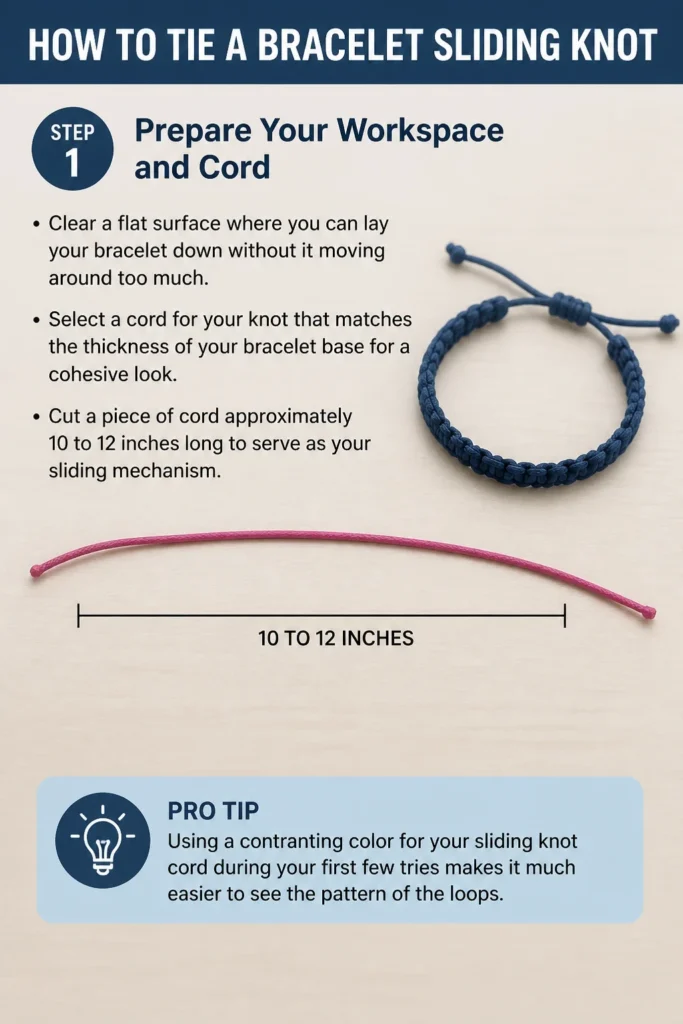
Select a cord for your knot that matches the thickness of your bracelet base for a cohesive look.
Cut a piece of cord approximately 10 to 12 inches long to serve as your sliding mechanism.
Pro Tip: Using a contrasting color for your sliding knot cord during your first few tries makes it much easier to see the pattern of the loops.
Step 2: Overlap the Bracelet Ends
Lay the two ends of your finished bracelet flat on the table so they are pointing in opposite directions.
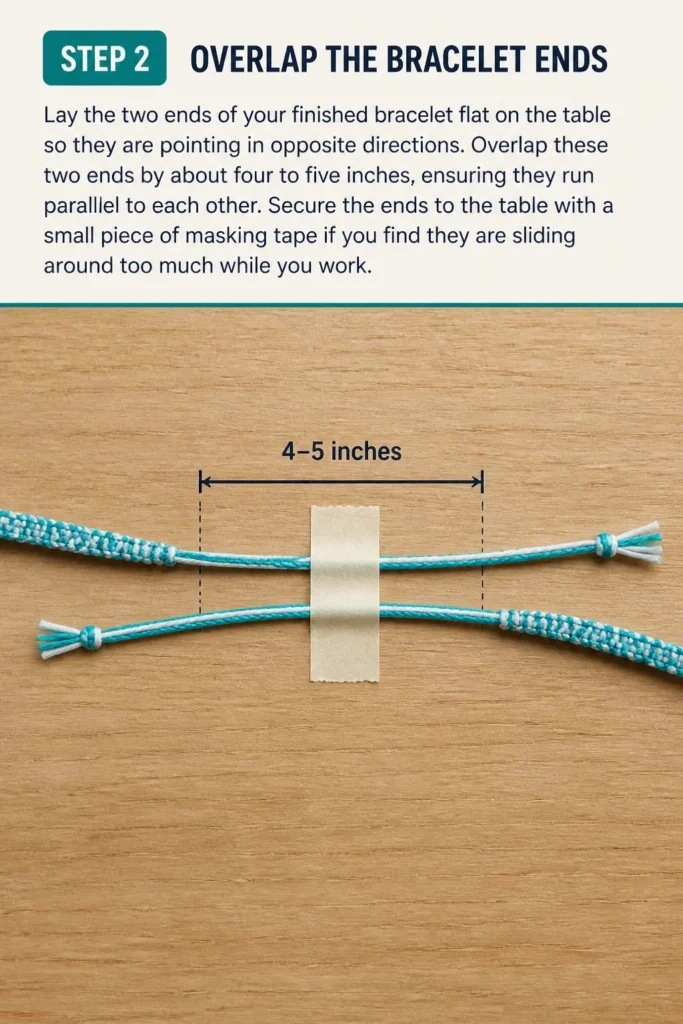
Overlap these two ends by about four to five inches, ensuring they run parallel to each other.
Secure the ends to the table with a small piece of masking tape if you find they are sliding around too much while you work.
Step 3: Position the Sliding Cord
Slide your 12-inch piece of cord underneath the two overlapped bracelet ends.
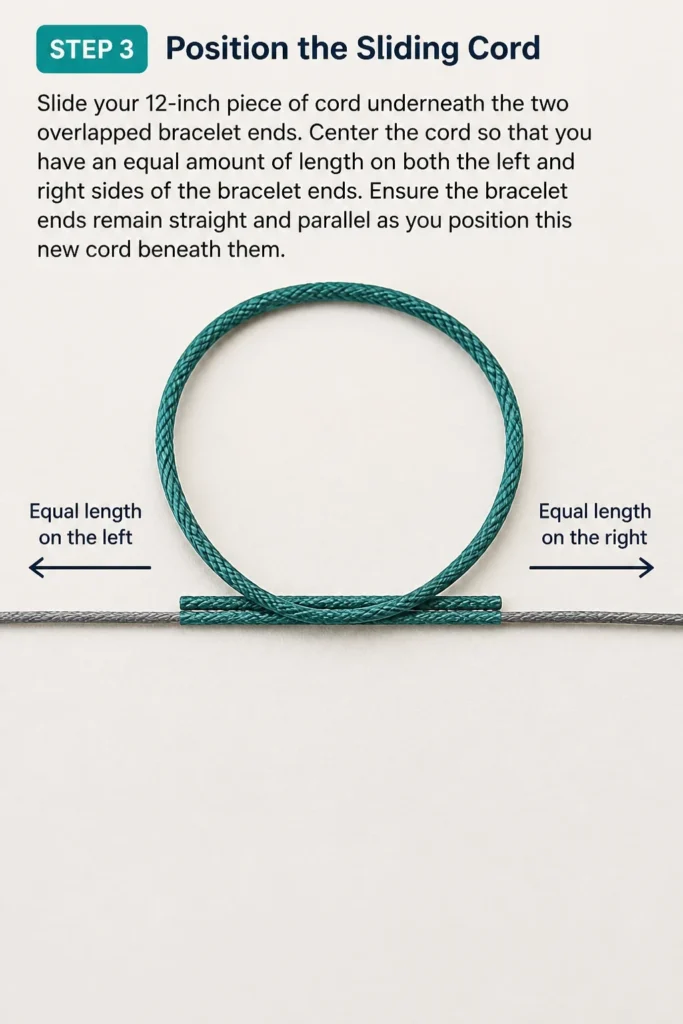
Center the cord so that you have an equal amount of length on both the left and right sides of the bracelet ends.
Ensure the bracelet ends remain straight and parallel as you position this new cord beneath them.
Step 4: Create the First Loop
Take the left-hand side of your 12-inch cord and cross it over the top of the two parallel bracelet ends.
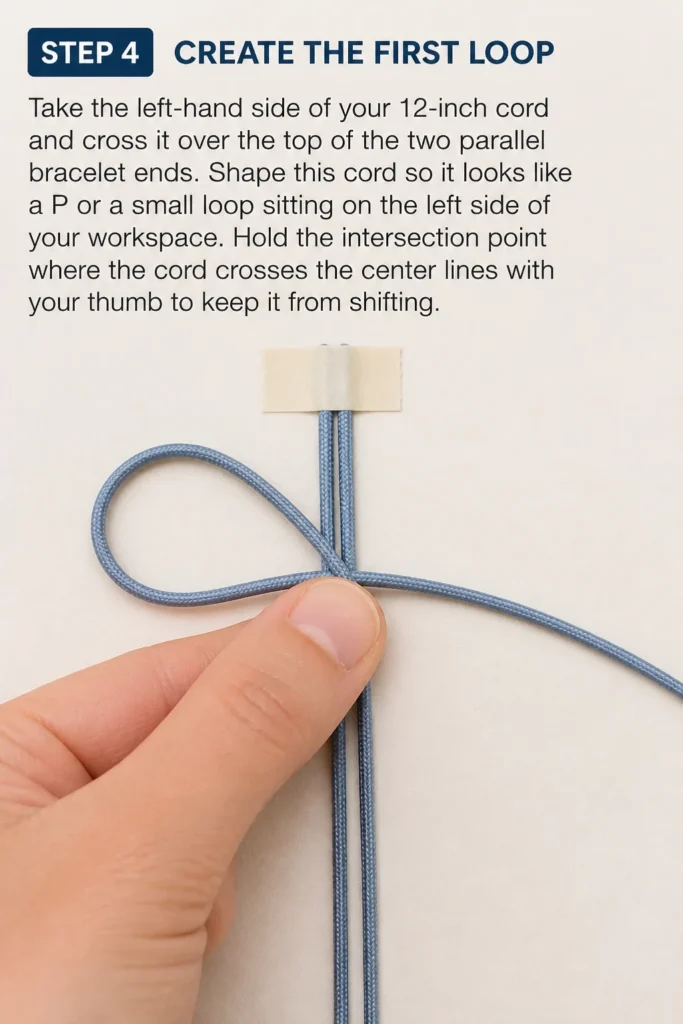
Shape this cord so it looks like a “P” or a small loop sitting on the left side of your workspace.
Hold the intersection point where the cord crosses the center lines with your thumb to keep it from shifting.
Step 5: Pass the Right Cord Over and Under
Pick up the right-hand side of your 12-inch cord and place it over the tail of the left-hand cord you just moved.
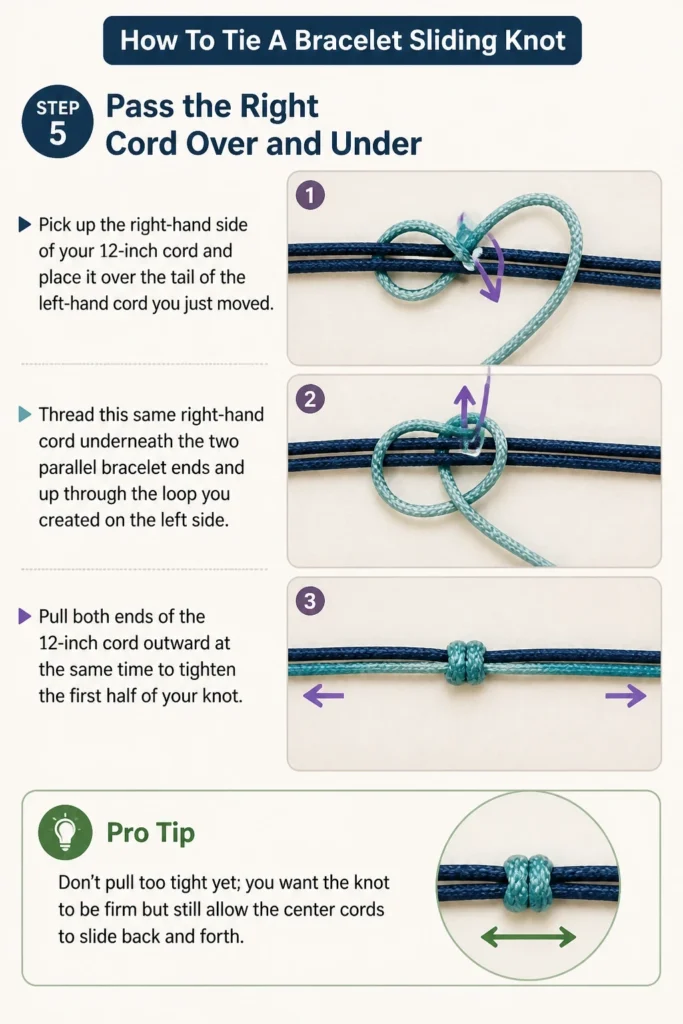
Thread this same right-hand cord underneath the two parallel bracelet ends and up through the loop you created on the left side.
Pull both ends of the 12-inch cord outward at the same time to tighten the first half of your knot.
Pro Tip: Don’t pull too tight yet; you want the knot to be firm but still allow the center cords to slide back and forth.
Step 6: Reverse the Process
Take the right-hand side of the cord and cross it over the top of the two parallel bracelet ends.
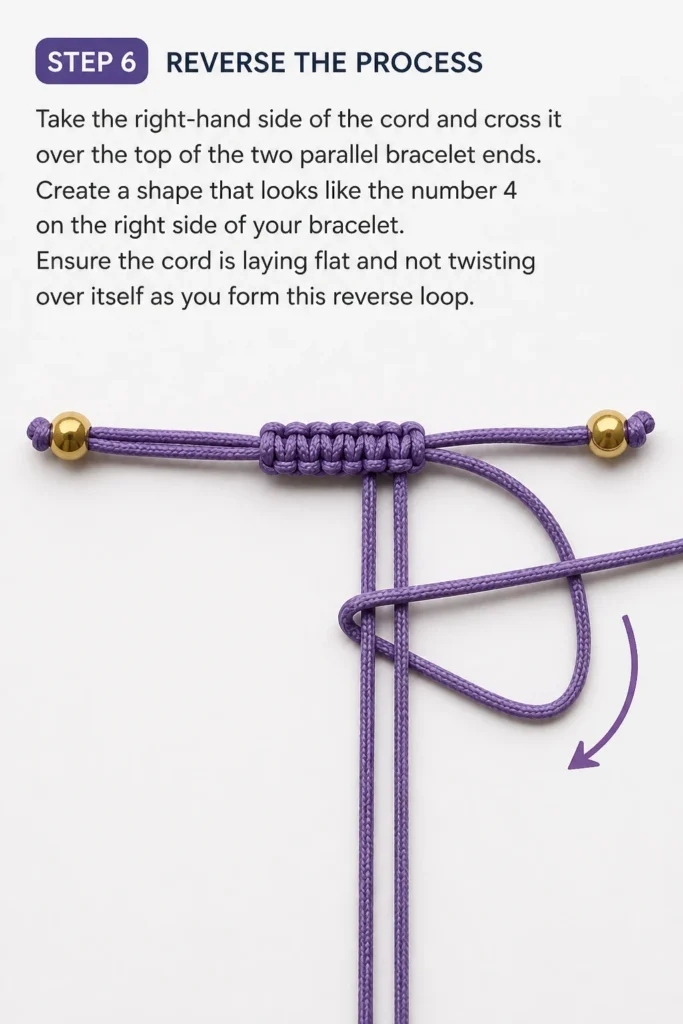
Create a shape that looks like the number “4” on the right side of your bracelet.
Ensure the cord is laying flat and not twisting over itself as you form this reverse loop.
Step 7: Complete the Second Half of the Knot
Grab the left-hand cord and place it over the tail of the right-hand cord you just positioned.
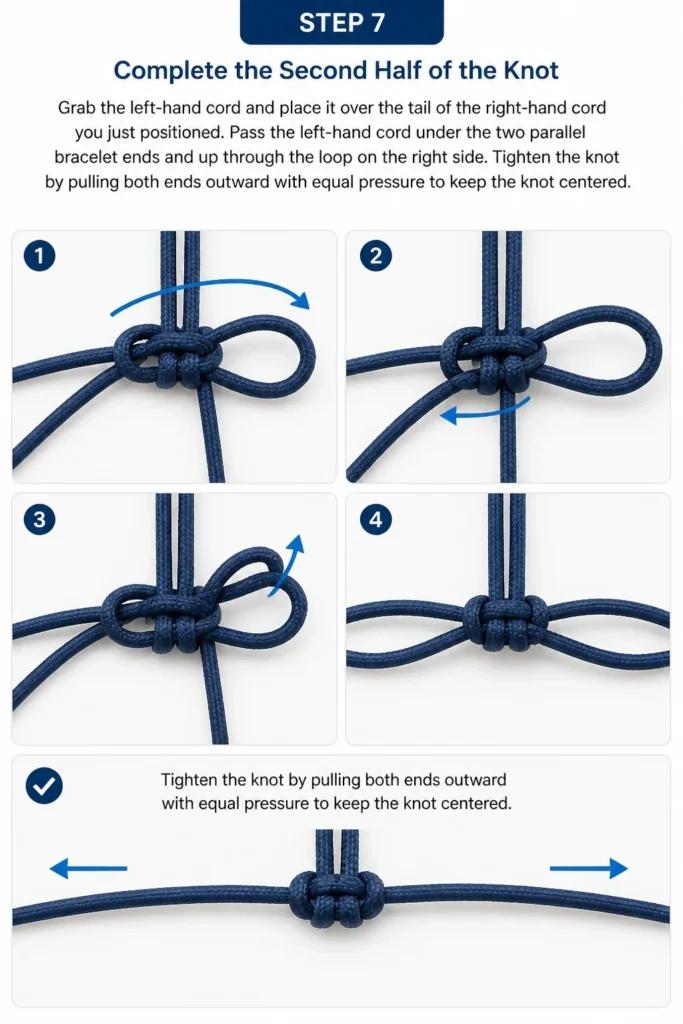
Pass the left-hand cord under the two parallel bracelet ends and up through the loop on the right side.
Tighten the knot by pulling both ends outward with equal pressure to keep the knot centered.
Step 8: Repeat the Knot Sequence
Continue alternating sides, starting with the left, then the right, until you have a series of 4 to 6 knots.
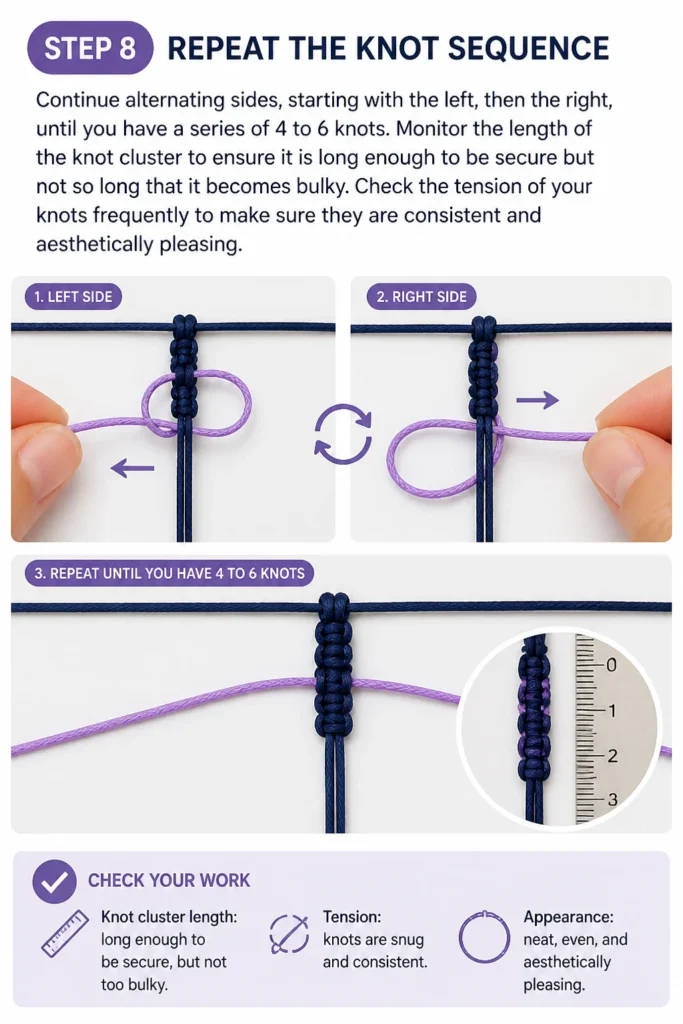
Monitor the length of the knot cluster to ensure it is long enough to be secure but not so long that it becomes bulky.
Check the tension of your knots frequently to make sure they are consistent and aesthetically pleasing.
Step 9: Test the Sliding Mechanism
Grip the bracelet ends and pull them gently to see if they slide through the knot cluster you just created.
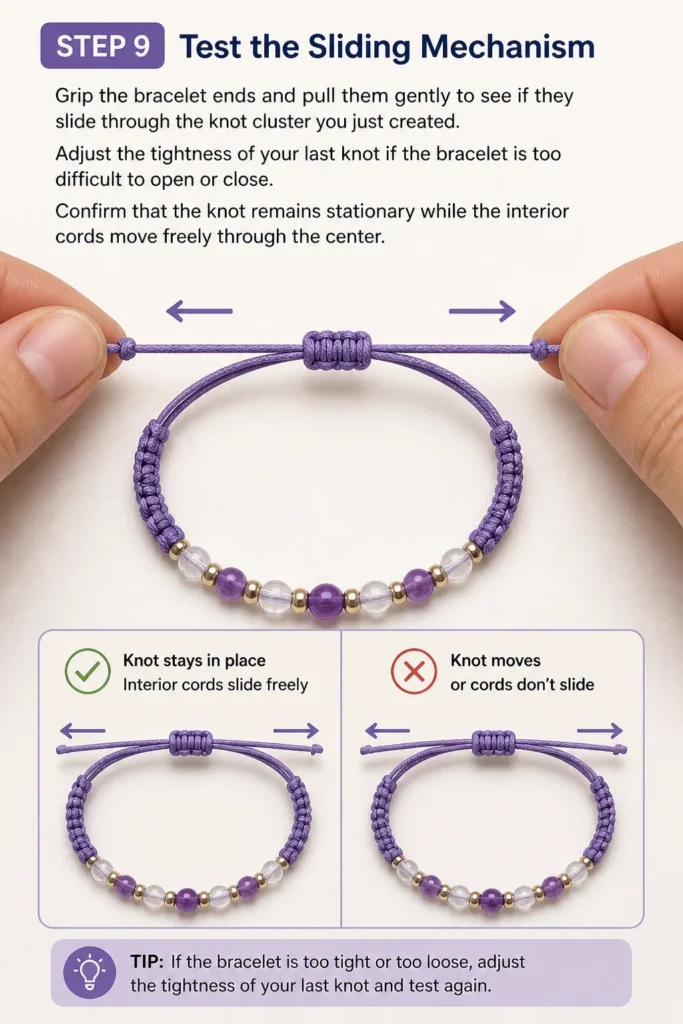
Adjust the tightness of your last knot if the bracelet is too difficult to open or close.
Confirm that the knot remains stationary while the interior cords move freely through the center.
Step 10: Trim and Seal the Ends
Cut the excess tails of the sliding knot cord, leaving about one or two millimeters of length.
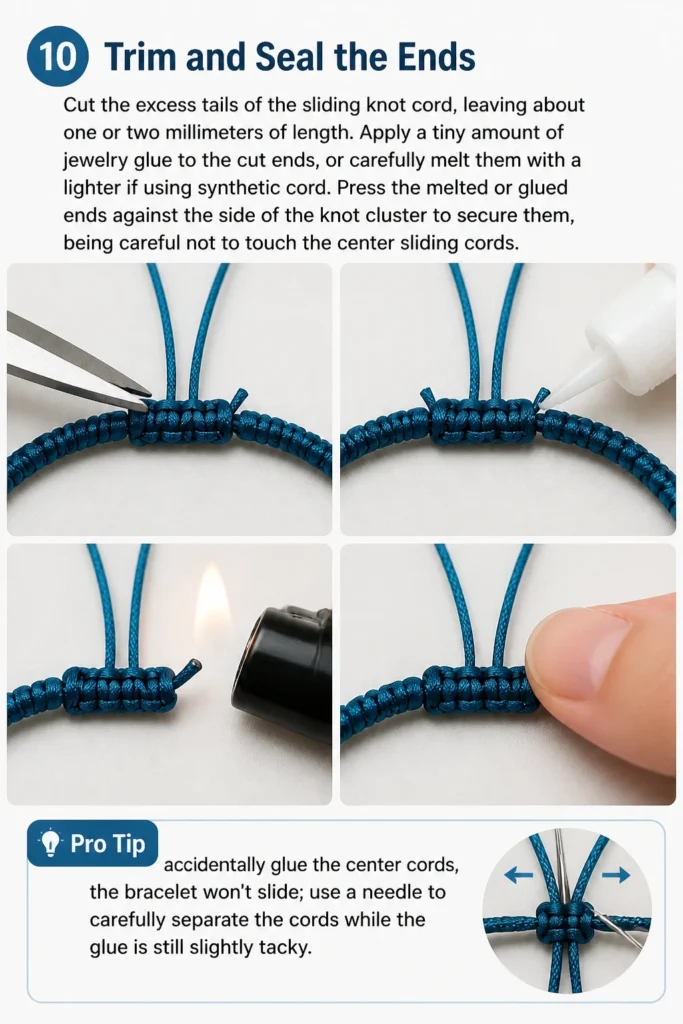
Apply a tiny amount of jewelry glue to the cut ends, or carefully melt them with a lighter if using synthetic cord.
Press the melted or glued ends against the side of the knot cluster to secure them, being careful not to touch the center sliding cords.
Pro Tip: If you accidentally glue the center cords, the bracelet won’t slide; use a needle to carefully separate the cords while the glue is still slightly tacky.
Common Mistakes to Avoid
Inconsistent Tension
One of the biggest issues beginners face is pulling one side of the knot tighter than the other. This results in a lopsided or twisted knot that looks messy and may not slide correctly. Focus on using even, gentle pressure for every single stitch you make.
If you notice the knot starting to spiral, it means you have forgotten to alternate sides. A square sliding knot requires you to switch from left-start to right-start every time to stay flat.
Cutting the Tails Too Short
It is tempting to cut the excess cord as close to the knot as possible for a clean look. However, if you cut it too close before sealing it, the knot can easily unravel when the bracelet is under tension. Always leave a tiny “nub” that can be melted or glued down to create a physical stopper.
If you are using cotton cord, this is especially important as cotton does not melt. You will need enough surface area for the glue to bond the tail to the outer part of the knot.
Sealing the Sliding Cords
This is the most frustrating mistake because it ruins the entire functionality of the piece. When you use a lighter or glue to finish the knot, it is very easy for the heat or the liquid to reach the center cords. If the center cords get fused to the knot, the bracelet will no longer adjust.
To avoid this, pull the center cords slightly as you seal the ends to ensure they are moving. If you feel any resistance, stop immediately and separate the fibers before they set permanently.
Troubleshooting
The Knot is Too Tight to Move
If you have finished your knot and find that you cannot pull the bracelet ends through it, the tension was likely too high. You can often fix this by taking a thick sewing needle and wiggling it inside the knot to stretch the loops slightly. If that doesn’t work, it is better to untie the knot and start over with a lighter touch.
Remember that some cords, like waxed polyester, will naturally “settle” and become slightly tighter over time. Always leave a tiny bit of breathing room during the initial construction phase.
The Knot Keeps Unraveling
Unraveling usually happens when the cord material is too slippery, such as with silk or certain types of satin cord. If your knot isn’t holding, try adding two or three extra square knots to increase the surface area and friction. You can also use a tiny drop of clear nail polish on the final knot ends if you don’t have jewelry glue.
Check your sealing method as well. If you are melting synthetic cord, ensure the melted plastic has actually fused to the body of the knot and hasn’t just formed a loose bead on the end of the string.
The Bracelet Ends Are Different Lengths
If one side of your bracelet is much longer than the other after you finish the knot, it can make the piece hang awkwardly on the wrist. Before you trim and seal your sliding knot, center the bracelet within the closure. Pull both ends until the decorative part of the bracelet is perfectly aligned with the sliding knot.
Once centered, you can add small beads to the ends of the tails and tie simple overhand knots. This prevents the ends from slipping back through the sliding knot and keeps everything symmetrical.
Key Takeaways
- Overlap the ends: Always ensure your bracelet ends are parallel and pointing in opposite directions before starting.
- Alternate sides: To keep the knot flat and professional, you must switch between starting on the left and the right for every stitch.
- Check movement: Test the sliding function after every two knots to ensure you haven’t tied them too tightly.
- Seal with care: Use heat or glue only on the outer tails of the knot, never on the center cords that need to move.
- Leave a tail: When trimming, leave a small amount of cord to melt or glue down for a secure finish.
- Practice with scrap: Use leftover cord to practice the “P” and “4” shapes until the muscle memory is established.
Frequently Asked Questions
What is the best type of cord for a sliding knot?
Waxed polyester cord is widely considered the best choice for sliding knots. The wax coating provides just enough friction to hold the knot in place while allowing the cords to glide smoothly when pulled. It is also very easy to seal because the synthetic fibers melt and fuse together permanently with a small flame.
How many knots should I tie for the closure?
For most bracelets, four to six square knots are sufficient to create a secure and attractive closure. If you are using very thin cord, you might want to go up to eight or ten knots to ensure there is enough grip. If the knot is too short, it may slide open on its own throughout the day.
Can I use this knot for necklaces too?
Yes, the sliding square knot works perfectly for necklaces, especially those with heavy pendants. It allows the wearer to adjust the length to suit different necklines. Just ensure the cord you use is strong enough to support the weight of the pendant without stretching the knots over time.
What if I don’t have a lighter to seal the ends?
If you are working with natural fibers like cotton or hemp, a lighter won’t work anyway because the cord will burn rather than melt. In these cases, a high-quality jewelry glue or even a small dab of clear super glue is the best alternative. Simply apply a tiny amount to the end of the cord and press it firmly against the knot with a pair of pliers.
Our Top Recommended Finds
- Waxed Polyester Cord: This is the gold standard for sliding knots because it is durable, water-resistant, and melts easily for a clean finish.
- Micro-Tip Scissors: Precision is key when trimming the tails of your knot, and small embroidery or jewelry scissors allow you to get close without cutting the wrong cord.
- Butane Torch Lighter: A small, refillable torch provides a more controlled flame than a standard cigarette lighter, which helps prevent charring or burning the cord.
Mastering Your Jewelry Craft
Now that you have mastered the sliding knot, you can turn almost any string of beads or braided cord into a professional-grade bracelet. This technique is a fundamental skill that opens the door to more complex macrame and jewelry designs.
Try experimenting with different cord thicknesses or adding small accent beads to the ends of your adjustment strings. The more you practice, the more consistent your tension will become, leading to pieces that look like they came from a high-end boutique.
Take a moment today to grab some scrap cord and practice the alternating “P” and “4” shapes until they become second nature. Once you have the rhythm down, you’ll be able to finish a bracelet closure in less than two minutes.
Beginner-friendly templates, step-by-step guides,
and weekly project ideas in your inbox.