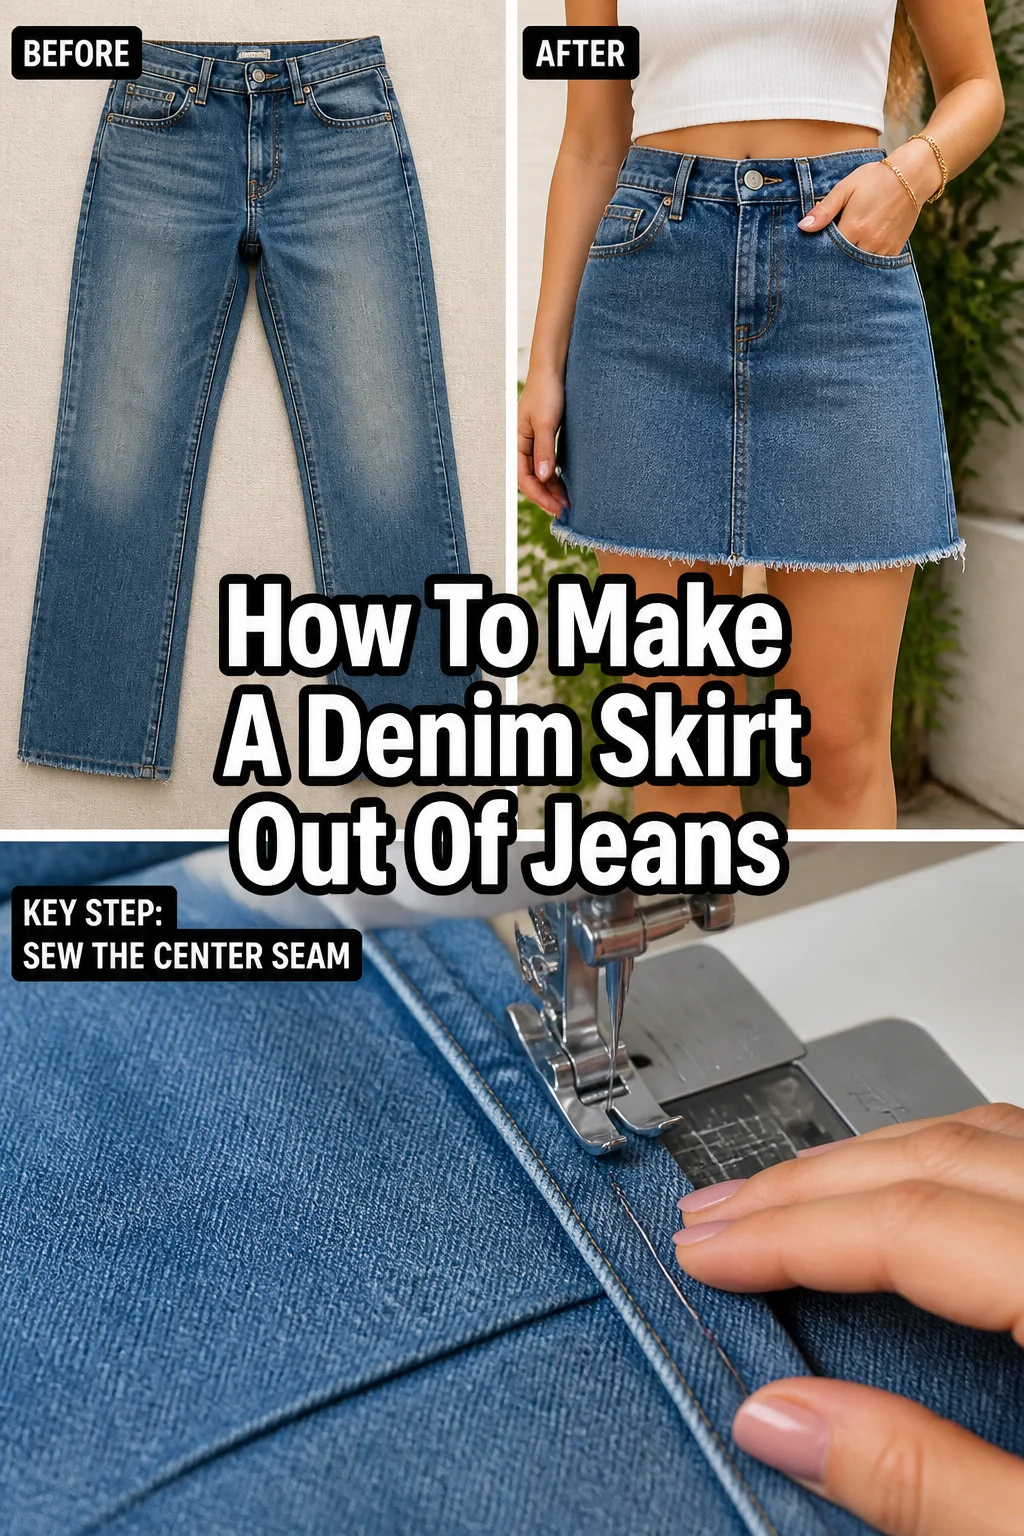
👖 How To Make A Denim Skirt Out Of Jeans

Beginner-friendly templates, step-by-step guides,
and weekly project ideas in your inbox.
I remember staring at a pile of old jeans, too worn for their original purpose but too loved to simply discard. That’s when I first discovered the magic of transforming them into something new. This guide shares the practical steps I learned to give those beloved jeans a stylish second life.
You can absolutely create a unique denim skirt, even if you’re new to sewing. With a few simple tools and a little patience, you’ll craft a garment that’s both fashionable and sustainable. Let’s get started on your upcycling adventure.

Quick Overview
Transforming a pair of jeans into a skirt is a rewarding project that combines creativity with practicality. You’ll learn fundamental sewing skills while creating a custom piece for your wardrobe.
Time needed: 3-6 hours (depending on sewing experience and embellishments)
Difficulty: Beginner to Intermediate
What you’ll need: Old jeans, sewing machine, fabric scissors, seam ripper, pins, measuring tape, thread, iron.
Step-by-Step Instructions
Step 1: Gather Your Materials and Prepare Your Jeans
Before you begin, make sure you have all your tools ready and accessible. A clean, well-lit workspace will make the process much smoother and more enjoyable.
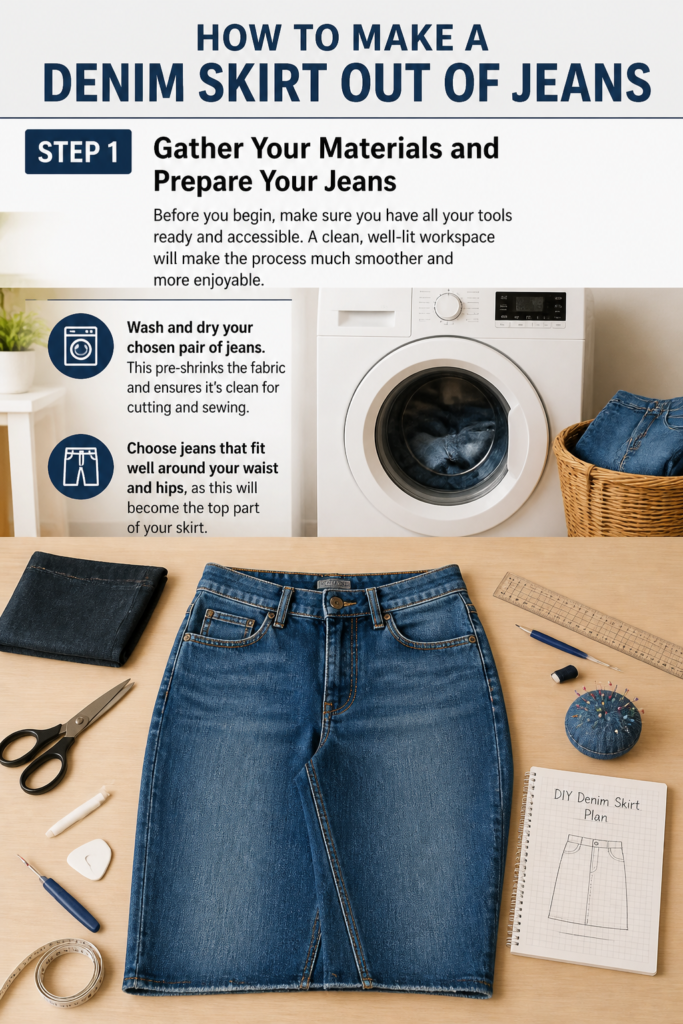
Wash and dry your chosen pair of jeans. This pre-shrinks the fabric and ensures it’s clean for cutting and sewing. Choose jeans that fit well around your waist and hips, as this will become the top part of your skirt.
Step 2: Determine Skirt Length and Cut the Legs
Decide on your desired skirt length. You can go for a mini, knee-length, or even a maxi skirt depending on the jeans and your preference.
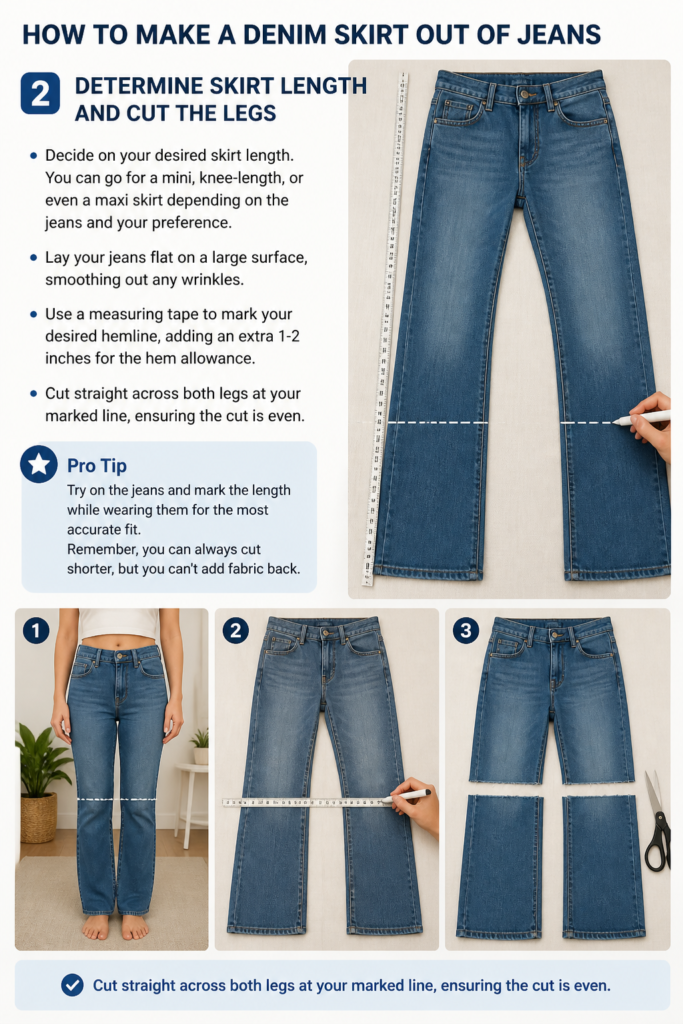
Lay your jeans flat on a large surface, smoothing out any wrinkles. Use a measuring tape to mark your desired hemline, adding an extra 1-2 inches for the hem allowance. Cut straight across both legs at your marked line, ensuring the cut is even.
Pro Tip: Try on the jeans and mark the length while wearing them for the most accurate fit. Remember, you can always cut shorter, but you can’t add fabric back.
Step 3: Deconstruct the Crotch Seams
This is where the magic of transformation truly begins. Carefully open up the inner leg seams to prepare the fabric for reshaping.
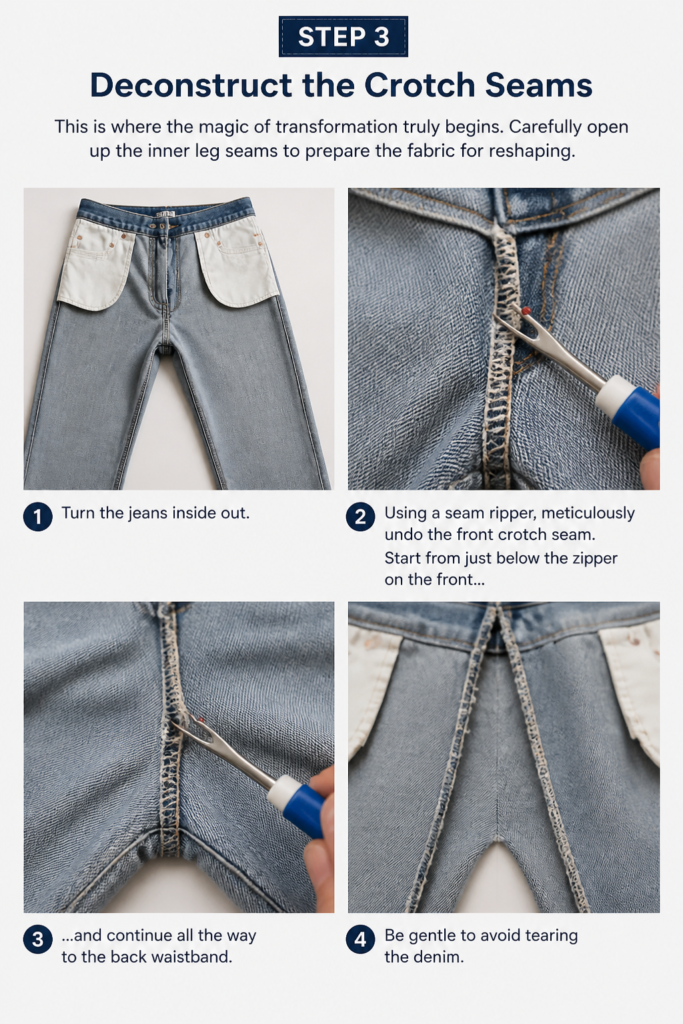
Turn the jeans inside out. Using a seam ripper, meticulously undo the front and back crotch seams. Start from just below the zipper on the front and continue all the way to the back waistband. Be gentle to avoid tearing the denim.
Step 4: Create the Front Panel Insert
The front gap created by ripping the crotch seam needs to be filled. You’ll use the denim you cut from the legs for this purpose.
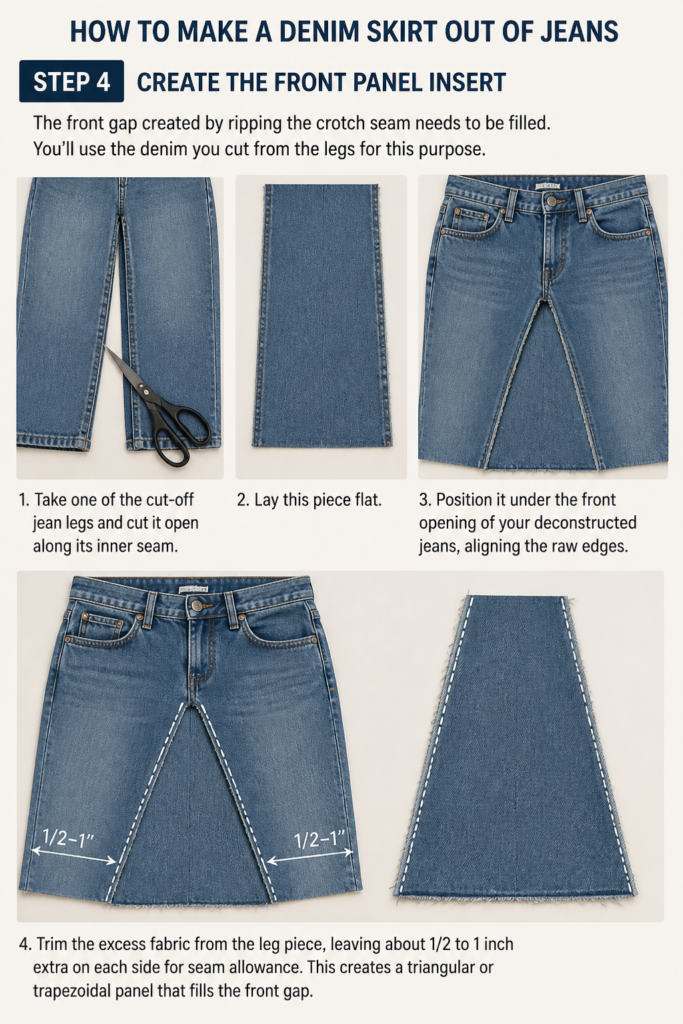
Take one of the cut-off jean legs and cut it open along its inner seam. Lay this piece flat. Position it under the front opening of your deconstructed jeans, aligning the raw edges.
Trim the excess fabric from the leg piece, leaving about 1/2 to 1 inch extra on each side for seam allowance. This creates a triangular or trapezoidal panel that fills the front gap.
Step 5: Form the Back Panel
The back of the skirt often requires a different approach due to the curve of the body and the original jean construction. You might need a more subtle insert.
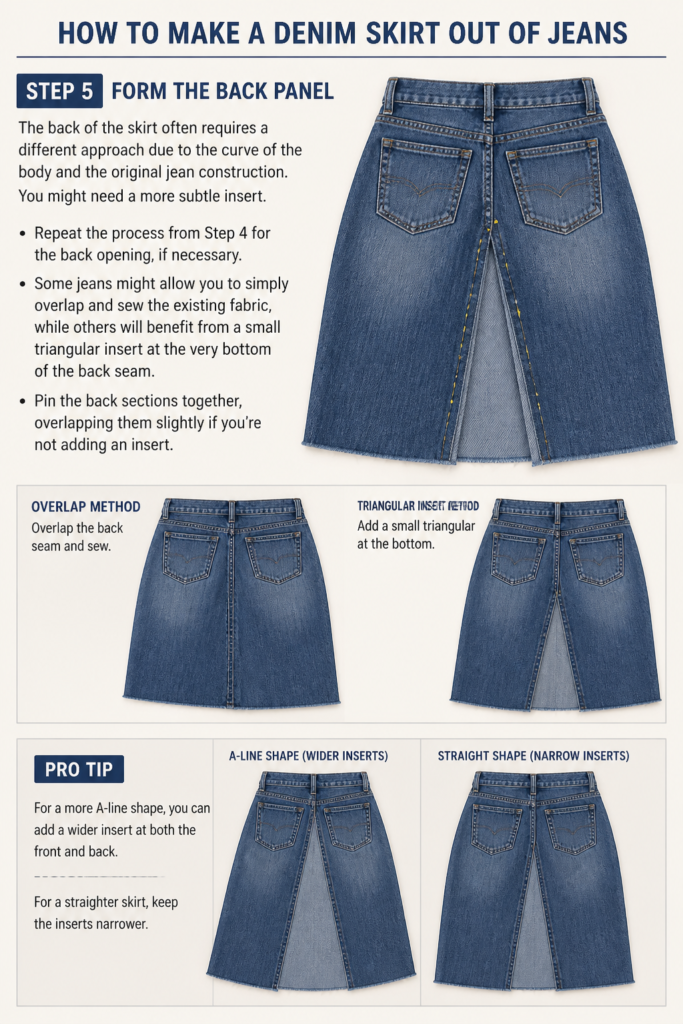
Repeat the process from Step 4 for the back opening, if necessary. Some jeans might allow you to simply overlap and sew the existing fabric, while others will benefit from a small triangular insert at the very bottom of the back seam. Pin the back sections together, overlapping them slightly if you’re not adding an insert.
Pro Tip: For a more A-line shape, you can add a wider insert at both the front and back. For a straighter skirt, keep the inserts narrower.
Step 6: Pin and Sew the New Seams
Now it’s time to bring the skirt together. Take your time with pinning to ensure smooth, strong seams.
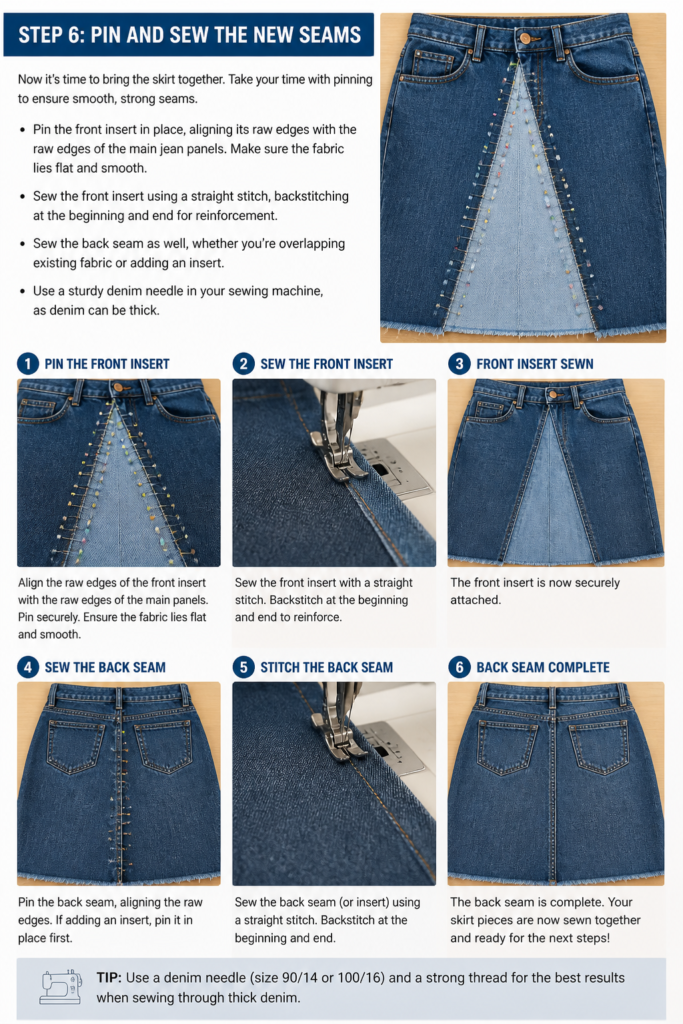
Pin the front insert in place, aligning its raw edges with the raw edges of the main jean panels. Make sure the fabric lies flat and smooth. Sew the front insert using a straight stitch, backstitching at the beginning and end for reinforcement.
Sew the back seam as well, whether you’re overlapping existing fabric or adding an insert. Use a sturdy denim needle in your sewing machine, as denim can be thick.
Step 7: Press and Trim Seams
Properly finishing your seams makes a huge difference in the professional look and durability of your skirt. Don’t skip this important step.
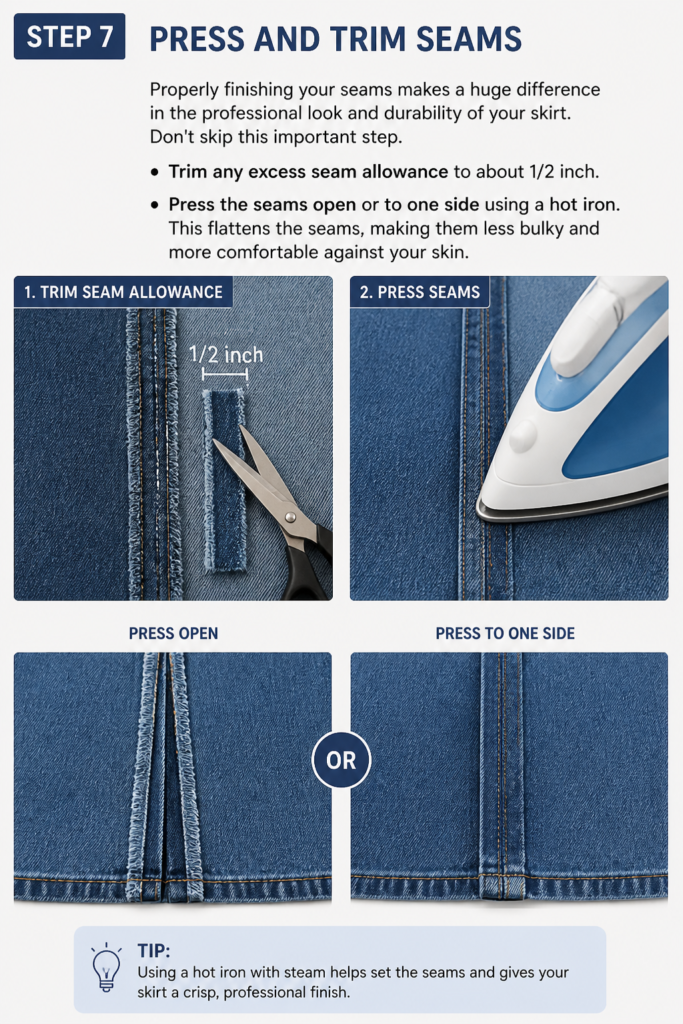
Trim any excess seam allowance to about 1/2 inch. Press the seams open or to one side using a hot iron. This flattens the seams, making them less bulky and more comfortable against your skin.
Step 8: Hem the Skirt
A neat hem gives your skirt a polished finish. You have a few options for how to hem, depending on the look you want.
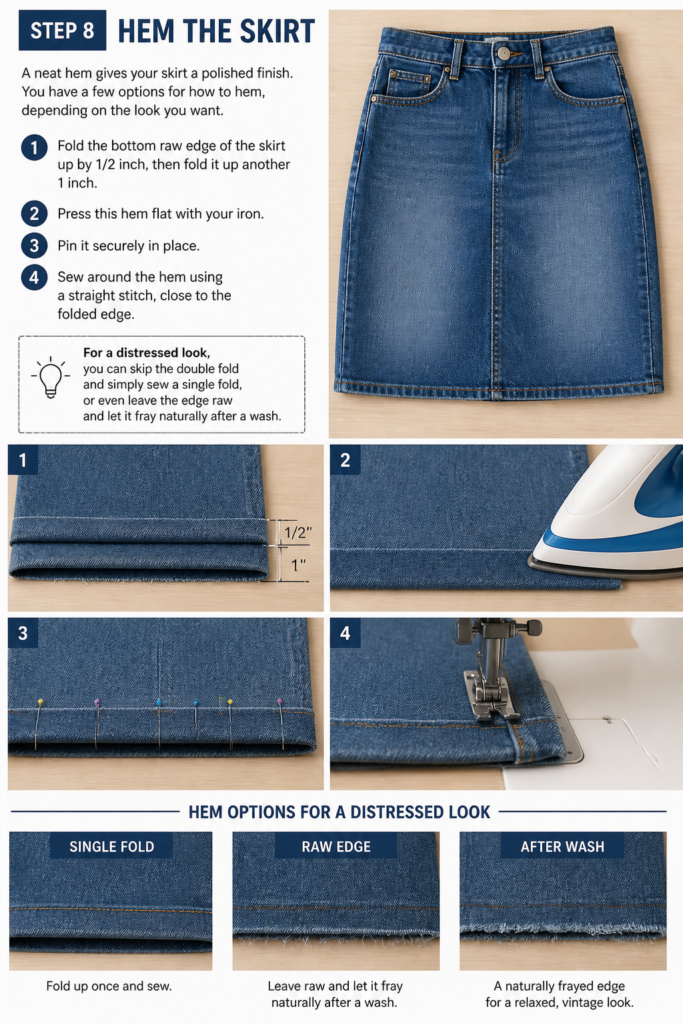
Fold the bottom raw edge of the skirt up by 1/2 inch, then fold it up another 1 inch. Press this hem flat with your iron. Pin it securely in place.
Sew around the hem using a straight stitch, close to the folded edge. For a distressed look, you can skip the double fold and simply sew a single fold, or even leave the edge raw and let it fray naturally after a wash.
Step 9: Add Finishing Touches and Try It On
Once the main construction is done, you can personalize your skirt even further. This is where your creativity can truly shine.
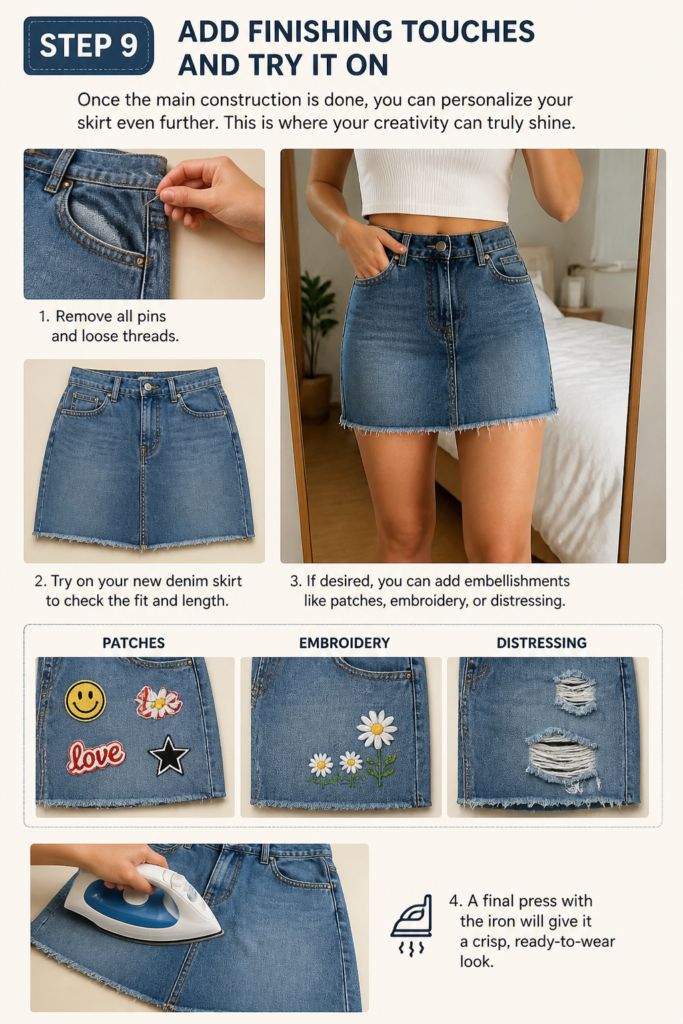
Remove all pins and loose threads. Try on your new denim skirt to check the fit and length. If desired, you can add embellishments like patches, embroidery, or distressing. A final press with the iron will give it a crisp, ready-to-wear look.
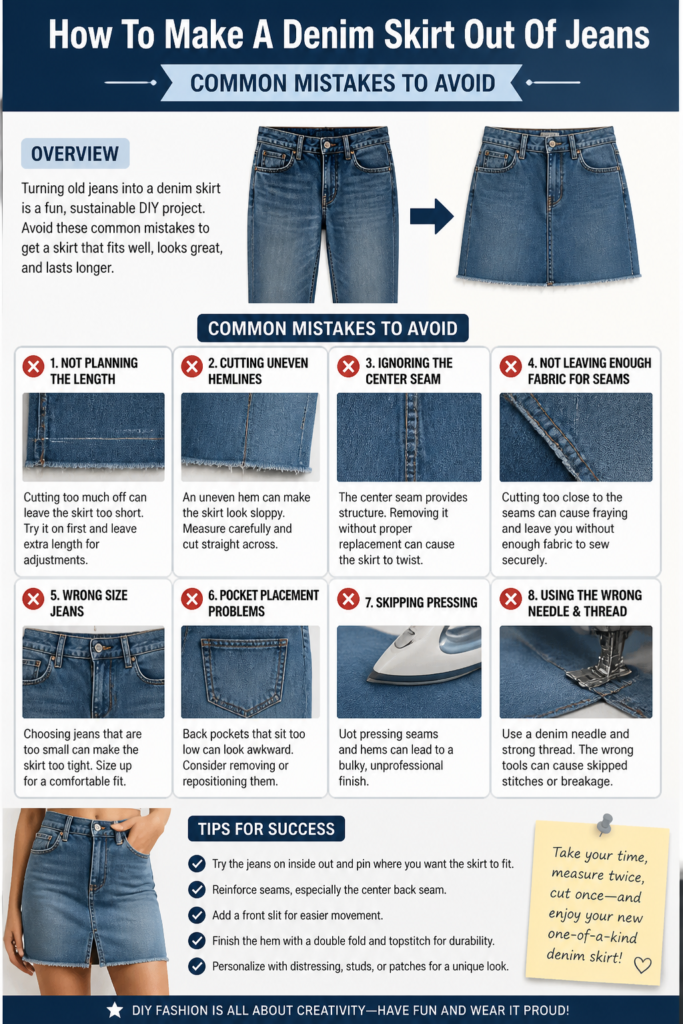
Common Mistakes to Avoid
Ripping Too Much Fabric
It’s easy to get carried away with the seam ripper, especially when tackling thick denim. Ripping beyond the seam line can create holes or weaken the fabric, making your skirt less durable.
Always work slowly and carefully with your seam ripper. Only target the stitches themselves. If you accidentally make a small tear, you might be able to mend it with a patch or a decorative stitch, but it’s best to avoid it from the start.
Not Using a Strong Enough Needle
Denim is a robust fabric, and a standard sewing machine needle can struggle to penetrate it, leading to skipped stitches, broken needles, or damage to your machine. This is a very common beginner oversight.
Always use a denim-specific needle (usually size 16 or 18) in your sewing machine when working with denim. These needles have a sharper, stronger point designed to glide through thick fabric layers without bending or breaking.
Skipping the Pressing Steps
Pressing seams might seem like an extra, unnecessary step, but it significantly impacts the final appearance and quality of your garment. Unpressed seams can look bulky and unprofessional.
Pressing flattens the seams, helping them lie smoothly and making subsequent sewing steps easier and more accurate. It “sets” the stitches and gives your skirt a much more finished and tailored look. Always press after each major seam.
Incorrect Skirt Length Measurement
Cutting the legs too short without accounting for the hem allowance is a frequent mistake. This can result in a skirt that is much shorter than intended or leaves no room for a proper hem.
Always measure twice and cut once. When marking your desired skirt length, remember to add at least 1-2 inches for the hem. You can always trim more later, but you can’t add length back once it’s cut.
Troubleshooting
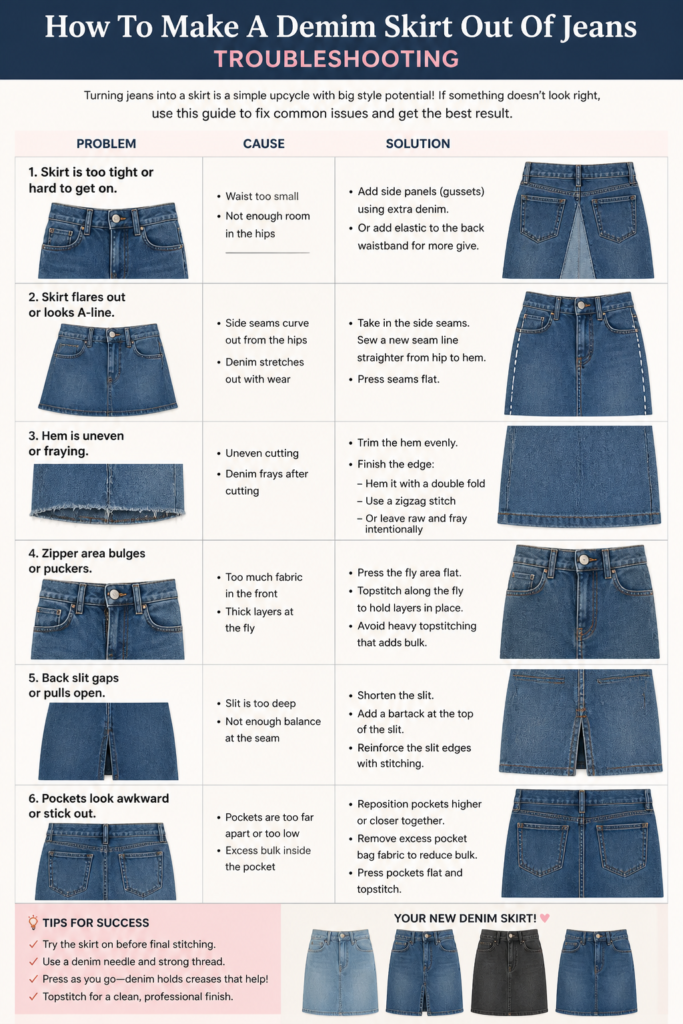
My Sewing Machine is Skipping Stitches
Skipped stitches often indicate that your machine is struggling to handle the thickness of the denim. This can be frustrating but is usually fixable.
First, ensure you’re using a fresh, strong denim needle. Check that your thread is properly tensioned and correctly threaded through the machine. Sometimes, increasing the stitch length slightly can also help the machine handle the fabric better.
The Denim is Bunching Under the Needle
Bunching fabric suggests an issue with fabric feed or needle penetration. This can lead to uneven seams and a messy finish.
Make sure your machine’s presser foot pressure is set appropriately for heavy fabric. Guide the fabric gently without pulling or pushing excessively. Using a walking foot attachment can also be incredibly helpful for feeding multiple layers of thick fabric evenly.
The Seams Look Uneven or Crooked
Uneven seams usually come from inaccurate cutting, pinning, or inconsistent sewing. It’s a common challenge, especially when working with new patterns.
Take your time when cutting your fabric pieces, ensuring straight lines. Pin frequently and precisely along the seam lines before sewing. Practice sewing straight lines on scrap denim to build confidence and control over your machine.
Key Takeaways
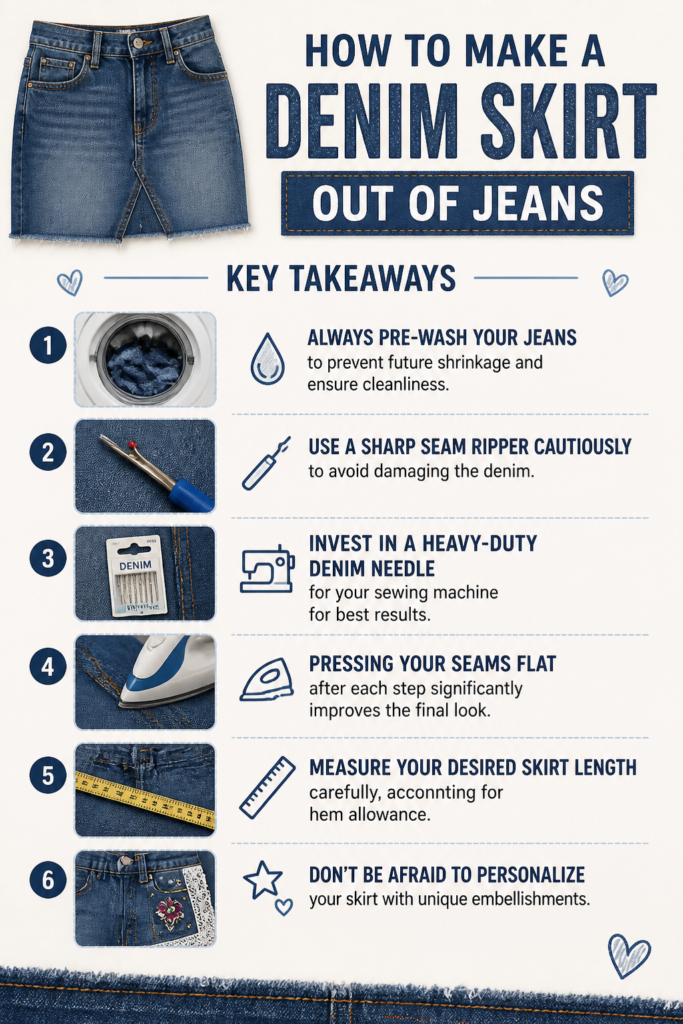
Always pre-wash your jeans to prevent future shrinkage and ensure cleanliness.
Use a sharp seam ripper cautiously to avoid damaging the denim.
Invest in a heavy-duty denim needle for your sewing machine for best results.
Pressing your seams flat after each step significantly improves the final look.
Measure your desired skirt length carefully, accounting for hem allowance.
Don’t be afraid to personalize your skirt with unique embellishments.
Frequently Asked Questions
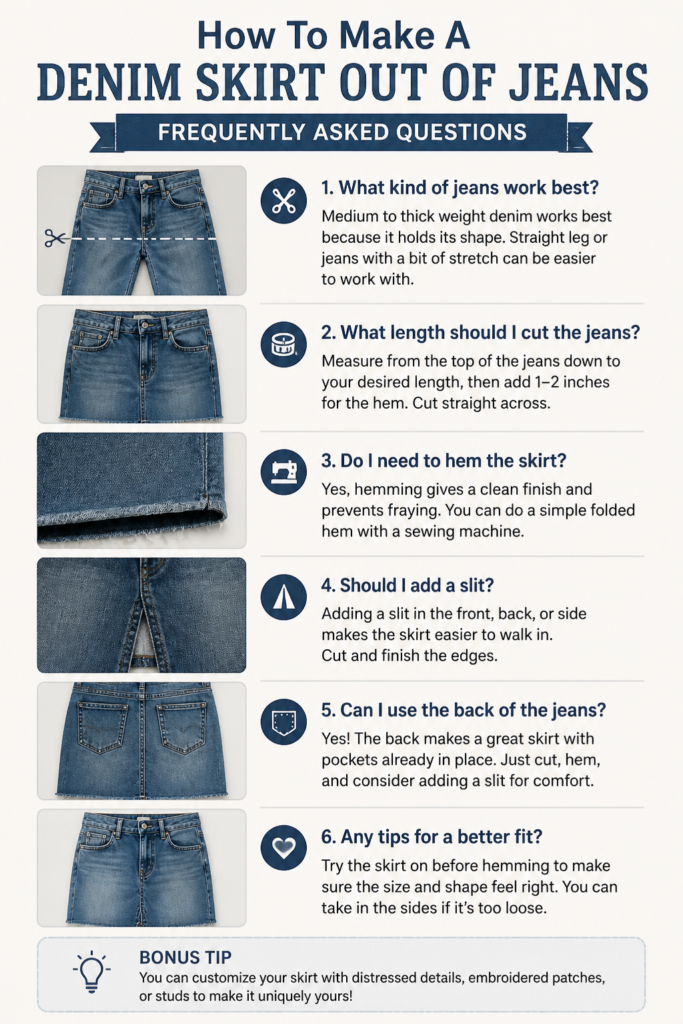
Can I make a denim skirt without a sewing machine?
Yes, it’s possible to hand-sew a denim skirt, but it will take considerably more time and effort. You’ll need a strong needle, thimble, and durable thread. Hand-sewn seams might not be as strong as machine-sewn ones for heavy-wear items like skirts.
What kind of jeans work best for this project?
Straight-leg or bootcut jeans often work best as they provide ample fabric in the legs for inserts. Avoid super skinny jeans, as they might not yield enough usable fabric. Jeans with a comfortable waist fit are ideal.
How do I get a perfectly even hem?
To get a perfectly even hem, try on the skirt and have a friend mark the desired hemline while you’re wearing it. Use a tailor’s chalk or fabric marker. Then, use a measuring tape from the marked line to ensure your hem allowance is consistent all the way around before folding and pressing.
Can I add pockets to my new denim skirt?
Absolutely! You can remove pockets from the cut-off leg pieces of your jeans and reattach them to your skirt. Alternatively, you can create new pockets from contrasting fabric or purchase pre-made patches. This is a great way to add both style and functionality.
Our Top Recommended Finds
Denim Sewing Machine Needles: Essential for smoothly sewing through tough denim without breaking. They prevent skipped stitches and protect your machine.
Sharp Fabric Scissors: A good pair of sharp scissors makes cutting denim much easier and more precise, reducing hand strain.
Seam Ripper with a Comfortable Handle: You’ll be using this tool a lot, so one with an ergonomic grip will make the deconstruction process less tiring.
Your Next Creative Step Awaits
You’ve just transformed a pair of old jeans into a stylish, custom denim skirt. This project is more than just sewing; it’s about sustainable fashion and expressing your unique style. Each stitch tells a story of creativity and resourcefulness.
Don’t let your sewing journey end here. Consider experimenting with different denim washes, adding unique patches, or even trying a different skirt silhouette next time. Embrace the joy of creating something beautiful with your own hands, and wear your new skirt with pride.
Beginner-friendly templates, step-by-step guides,
and weekly project ideas in your inbox.