🎈 How To Make A Balloon Arch Step By Step

Beginner-friendly templates, step-by-step guides,
and weekly project ideas in your inbox.
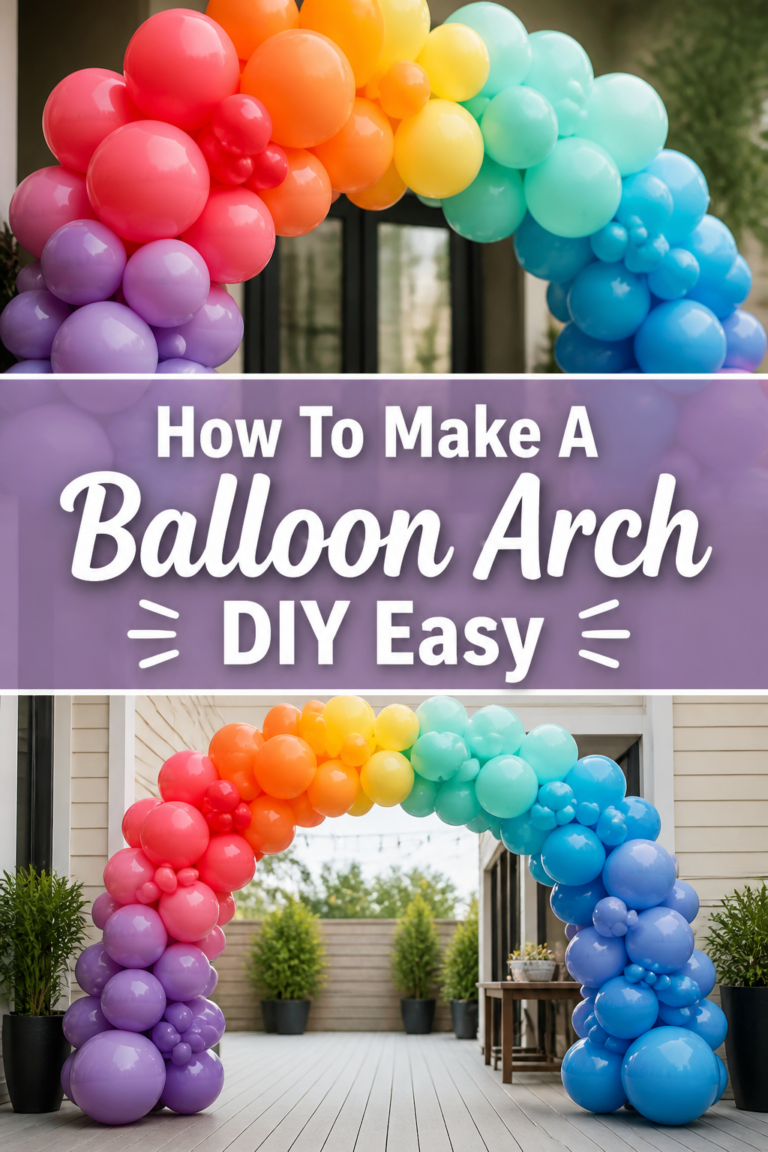
Planning a party or special event often includes a desire for stunning decorations that truly make a statement.
A beautiful balloon arch is a fantastic way to add that ‘wow’ factor, transforming any space into a festive wonderland.
Having crafted numerous arches for various celebrations, I can assure you that creating one yourself is much simpler and more rewarding than you might think.

Quick Overview
By following this guide, you will learn to construct a beautiful, sturdy balloon arch that will impress your guests and elevate your event decor.
You’ll gain confidence in balloon artistry and discover how accessible this seemingly complex project truly is.
- Time needed: 2-4 hours (depending on size and complexity)
- Difficulty: Beginner
- What you’ll need: Balloons, a balloon pump, arch strip/fishing line, command hooks, scissors, and optional decorative elements.
Step-by-Step Instructions
Let’s dive into the practical steps to bring your vision to life. Each stage is designed to be straightforward, ensuring a smooth and enjoyable crafting experience.
Step 1: Gather Your Materials and Plan Your Design
Before inflating a single balloon, it’s crucial to collect all necessary items. This includes your chosen balloons in various sizes and colors, a reliable balloon pump (electric is highly recommended), and your arch-building mechanism.
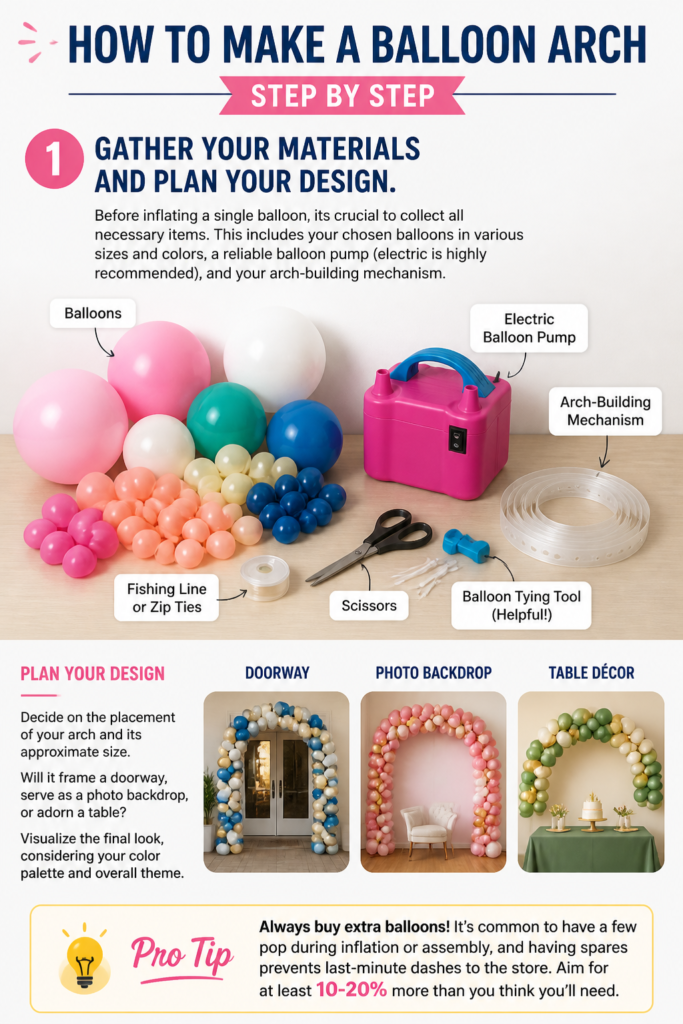
Decide on the placement of your arch and its approximate size. Will it frame a doorway, serve as a photo backdrop, or adorn a table? Visualize the final look, considering your color palette and overall theme.
Pro Tip: Always buy extra balloons! It’s common to have a few pop during inflation or assembly, and having spares prevents last-minute dashes to the store. Aim for at least 10-20% more than you think you’ll need.
Step 2: Inflate Your Balloons
Now it’s time to inflate your balloons. This is where an electric balloon pump truly shines, saving you significant time and effort compared to a hand pump.
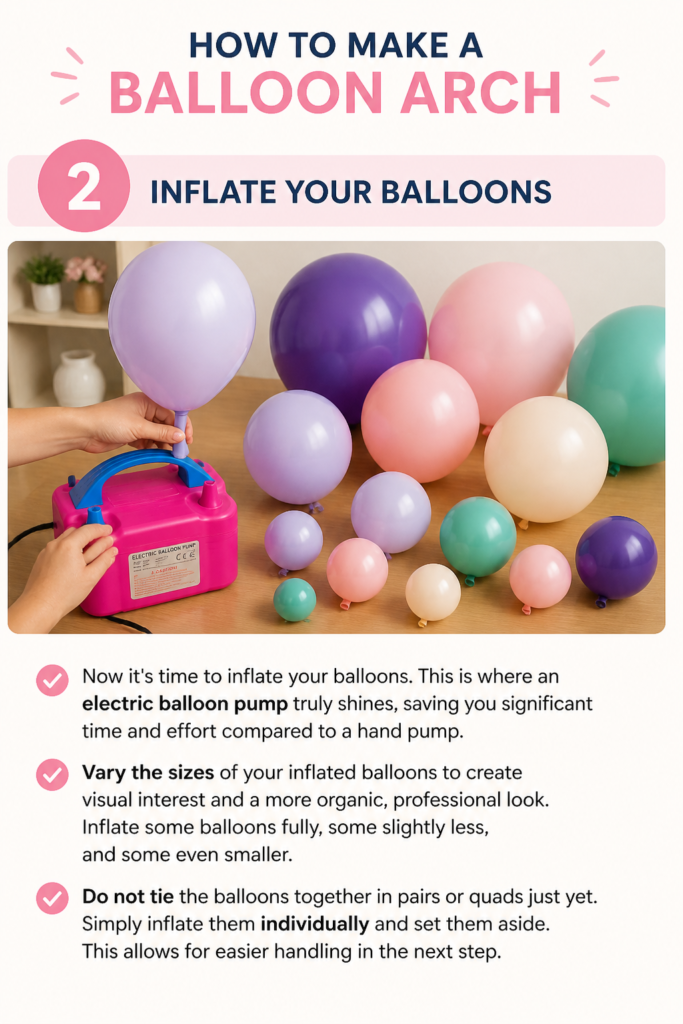
Vary the sizes of your inflated balloons to create visual interest and a more organic, professional look. Inflate some balloons fully, some slightly less, and some even smaller.
Do not tie the balloons together in pairs or quads just yet. Simply inflate them individually and set them aside. This allows for easier handling in the next step.
Step 3: Create Balloon Clusters
To build a full and voluminous arch, you’ll need to create balloon clusters. The most common method involves tying two inflated balloons together at their necks to form a pair.
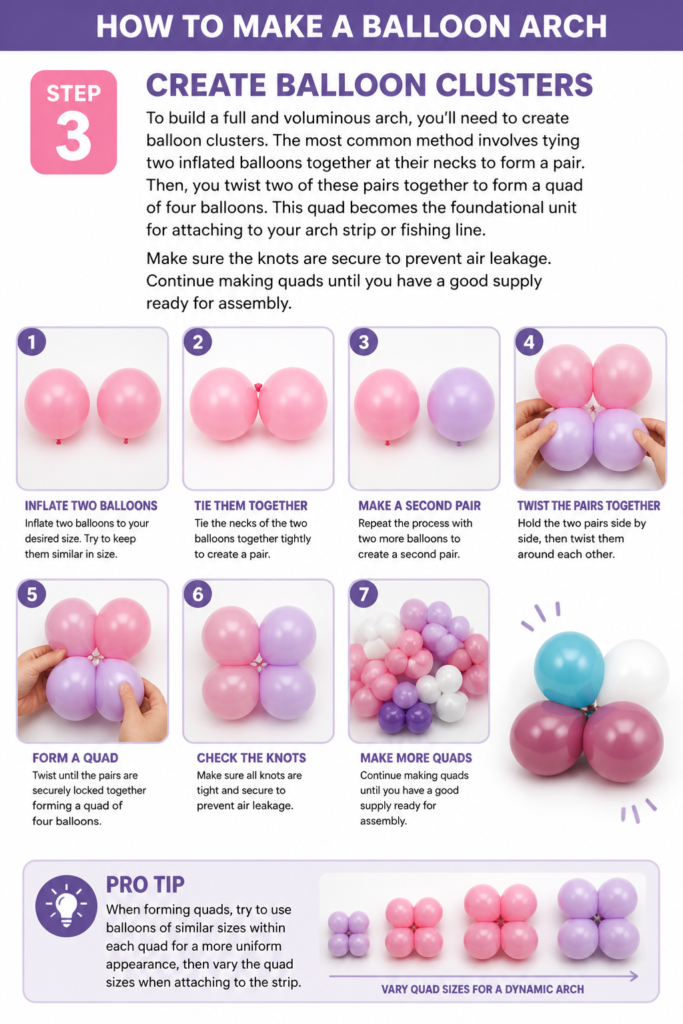
Then, you twist two of these pairs together to form a “quad” of four balloons. This quad becomes the foundational unit for attaching to your arch strip or fishing line.
Make sure the knots are secure to prevent air leakage. Continue making quads until you have a good supply ready for assembly.
Pro Tip: When forming quads, try to use balloons of similar sizes within each quad for a more uniform appearance, then vary the quad sizes when attaching to the strip.
Step 4: Attach Balloons to the Arch Strip or Fishing Line
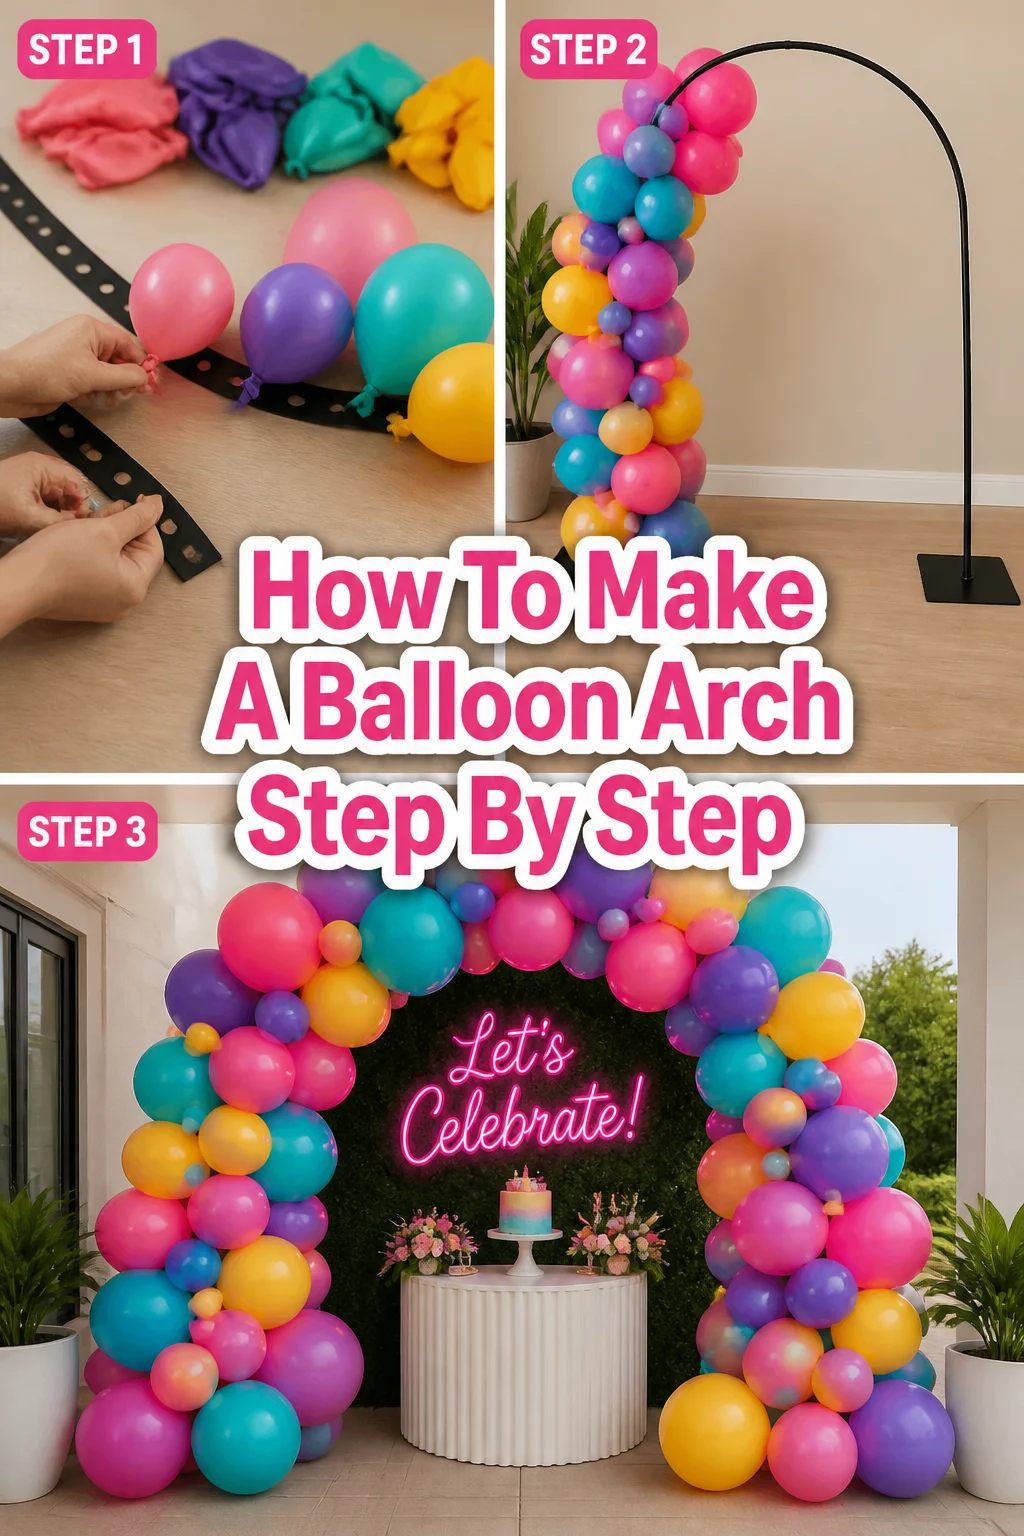
This is where your arch begins to take shape. If using a plastic balloon arch strip, it will have small holes or slots along its length.
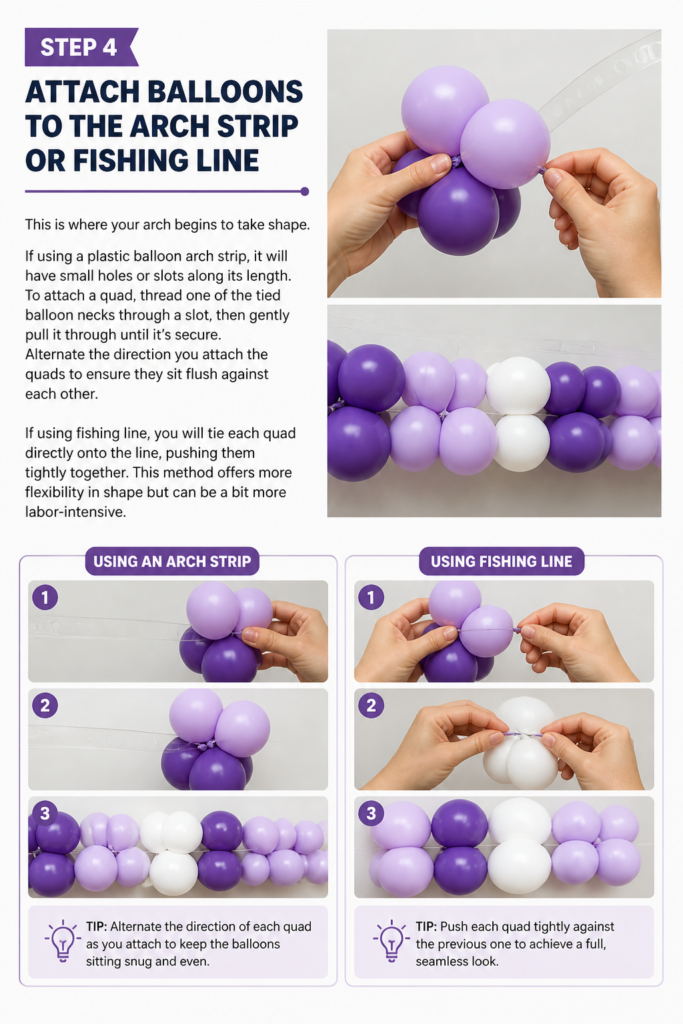
To attach a quad, thread one of the tied balloon necks through a slot, then gently pull it through until it’s secure. Alternate the direction you attach the quads to ensure they sit flush against each other.
If using fishing line, you will tie each quad directly onto the line, pushing them tightly together. This method offers more flexibility in shape but can be a bit more labor-intensive.
Step 5: Build the Arch Gradually
Continue adding quads to your arch strip or fishing line, pushing them together tightly to eliminate gaps. The goal is to create a dense, continuous garland of balloons.
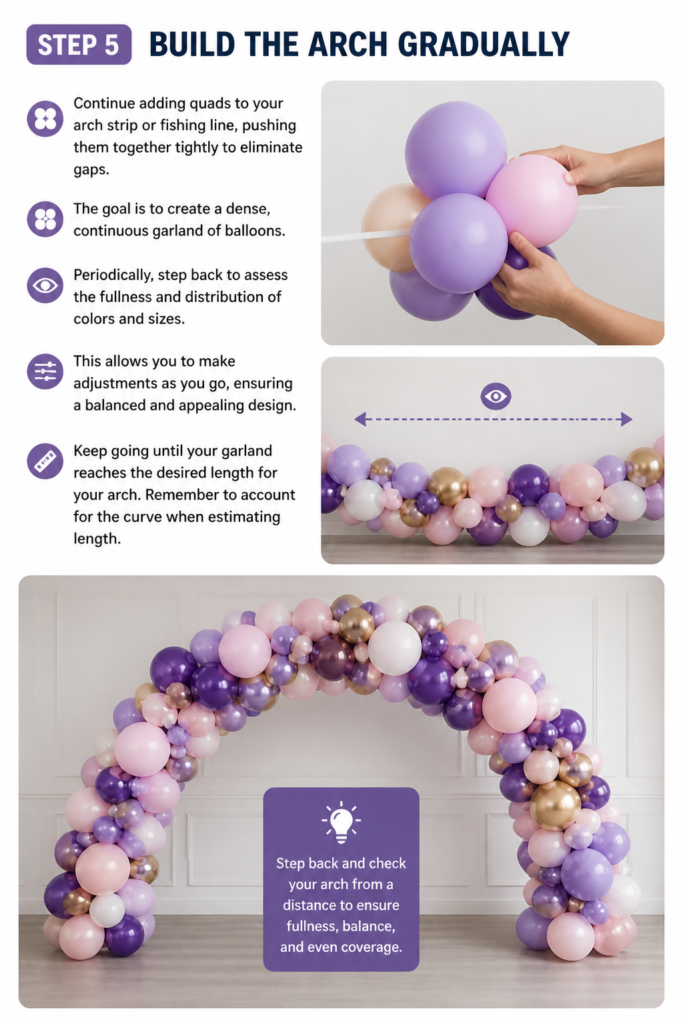
Periodically, step back to assess the fullness and distribution of colors and sizes. This allows you to make adjustments as you go, ensuring a balanced and appealing design.
Keep going until your garland reaches the desired length for your arch. Remember to account for the curve when estimating length.
Step 6: Secure and Shape Your Arch
Once your balloon garland is complete, it’s time to install it. Use strong adhesive hooks (like Command hooks) or sturdy nails placed strategically on your wall or desired surface.
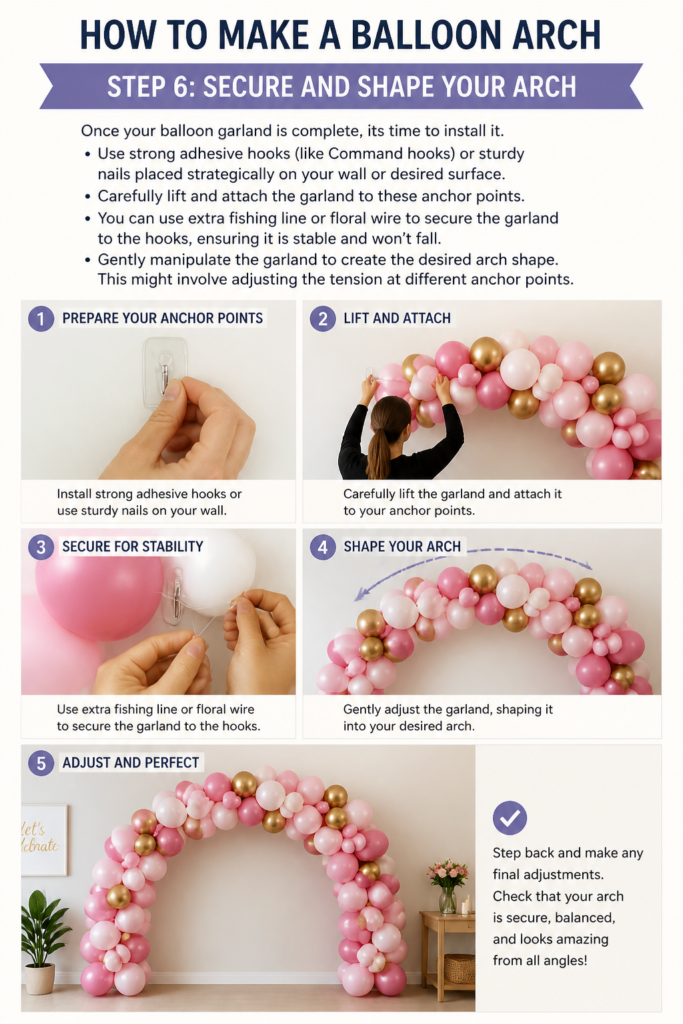
Carefully lift and attach the garland to these anchor points. You can use extra fishing line or floral wire to secure the garland to the hooks, ensuring it is stable and won’t fall.
Gently manipulate the garland to create the desired arch shape. This might involve adjusting the tension at different anchor points.
Step 7: Add Filler Balloons and Details
Now for the fun part: filling in any gaps and adding decorative touches. Inflate smaller balloons (5-inch or even smaller) and use balloon glue dots to attach them into empty spaces within the arch.
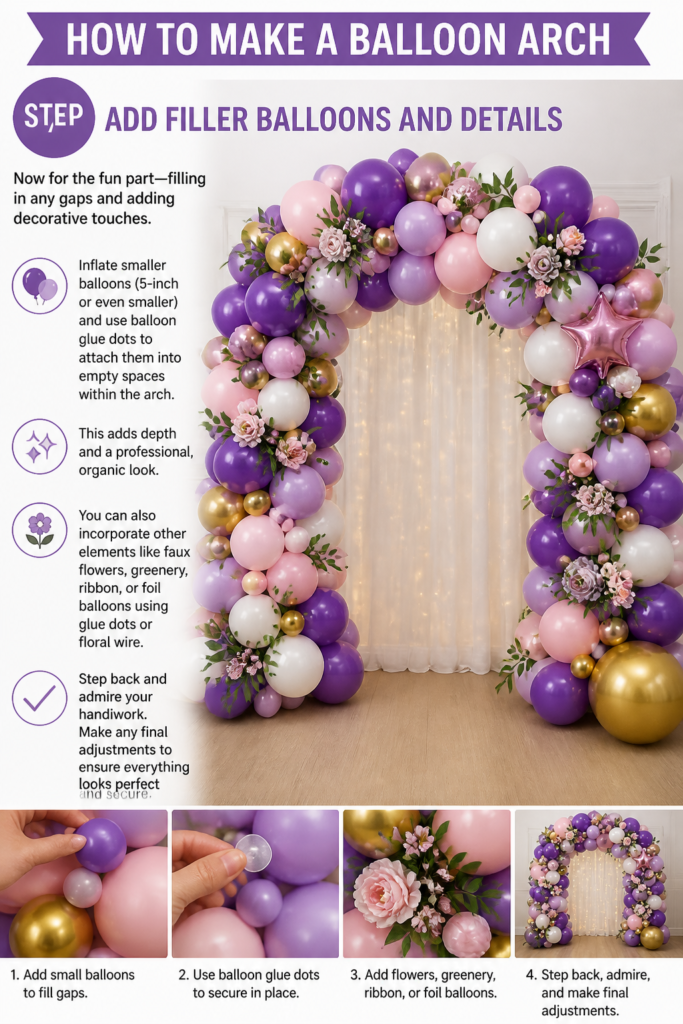
This adds depth and a professional, organic look. You can also incorporate other elements like faux flowers, greenery, ribbon, or foil balloons using glue dots or floral wire.
Step back and admire your handiwork. Make any final adjustments to ensure everything looks perfect and secure.
Common Mistakes to Avoid
Even experienced decorators can make small errors. Being aware of these common pitfalls will help you create a flawless balloon arch on your first try.
Under-inflating or Over-inflating Balloons
Balloons that are too small leave gaps, making your arch look sparse. Over-inflated balloons, on the other hand, are prone to popping and can look stiff. Aim for a soft, round shape that still has a little give when gently squeezed.
This balance ensures a full, organic look and reduces the risk of premature pops, especially when pushing balloons together during assembly.
Not Varying Balloon Sizes
Using only one size of balloon results in a flat, uninteresting arch. The magic of a professional-looking arch comes from the interplay of different sizes.
Always incorporate a mix of large, medium, and small balloons. This variation creates texture, depth, and a more dynamic visual appeal that truly catches the eye.
Failing to Plan Placement and Anchors
Guessing where your arch will go and how it will be supported can lead to frustration. Before you start assembling, visualize the arch’s final location and identify strong anchor points.
Ensure you have appropriate hooks or ties ready. Proper planning prevents your beautiful creation from sagging or falling, guaranteeing it stays picture-perfect throughout your event.
Not Securing Balloons Tightly Enough
Loose balloons within your quads or on the arch strip can cause gaps and instability. It’s crucial to tie knots securely and push quads tightly together.
A firm, compact garland is much more durable and maintains its shape better. Take the extra moment to ensure each connection is robust, preventing your arch from unraveling.
Troubleshooting
Sometimes, despite your best efforts, little issues can arise. Here are solutions to common balloon arch problems.
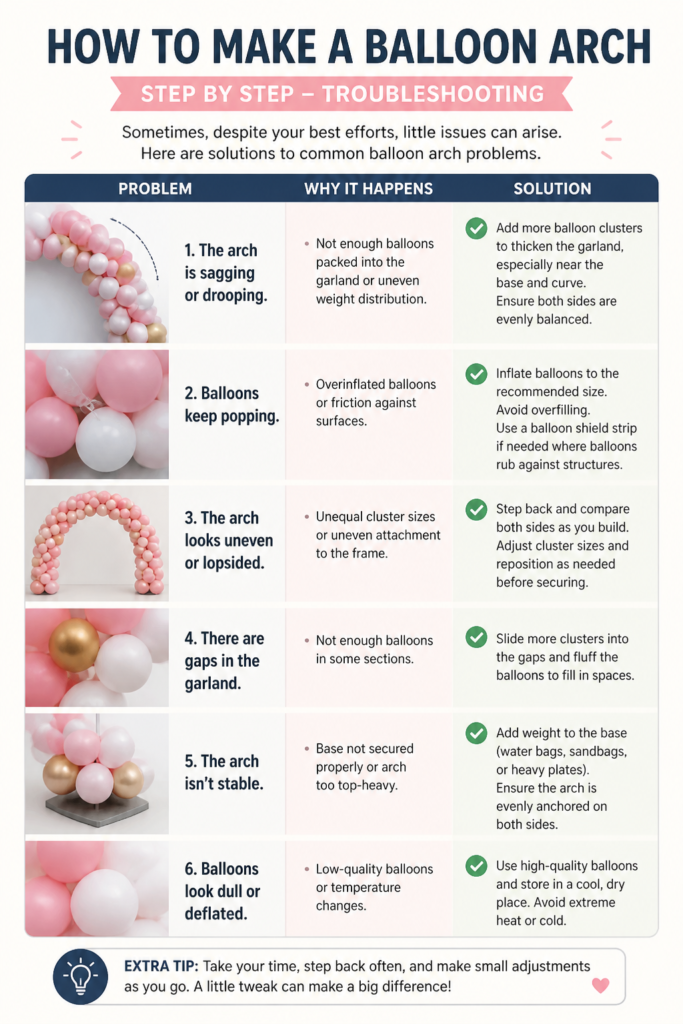
Arch is Sagging or Losing Shape
If your arch isn’t holding its desired curve or appears to be drooping, it likely needs more support. Check your anchor points to ensure they are strong and spaced appropriately.
Add additional command hooks or tie points along the arch, especially at the apex or any particularly heavy sections. You can also reinforce existing connections with extra fishing line or floral wire for added stability.
Gaps Appearing in the Arch
Gaps can occur if balloons deflate slightly, or if they weren’t pushed together tightly enough during assembly. To fix this, inflate some smaller 5-inch balloons.
Use balloon glue dots to attach these smaller balloons directly into the visible gaps. This instantly creates a fuller, more cohesive look, making your arch appear professionally finished.
Balloons Keep Popping
Balloons popping can be due to over-inflation, sharp objects, or extreme temperatures. Ensure you’re not inflating balloons to their absolute maximum capacity; they should have a slight give.
Check the area where the arch is placed for any sharp edges or rough surfaces. If outdoors, avoid direct sunlight on dark-colored balloons, as heat can cause them to expand and pop. Keep a few extra balloons on hand for quick replacements.
Key Takeaways
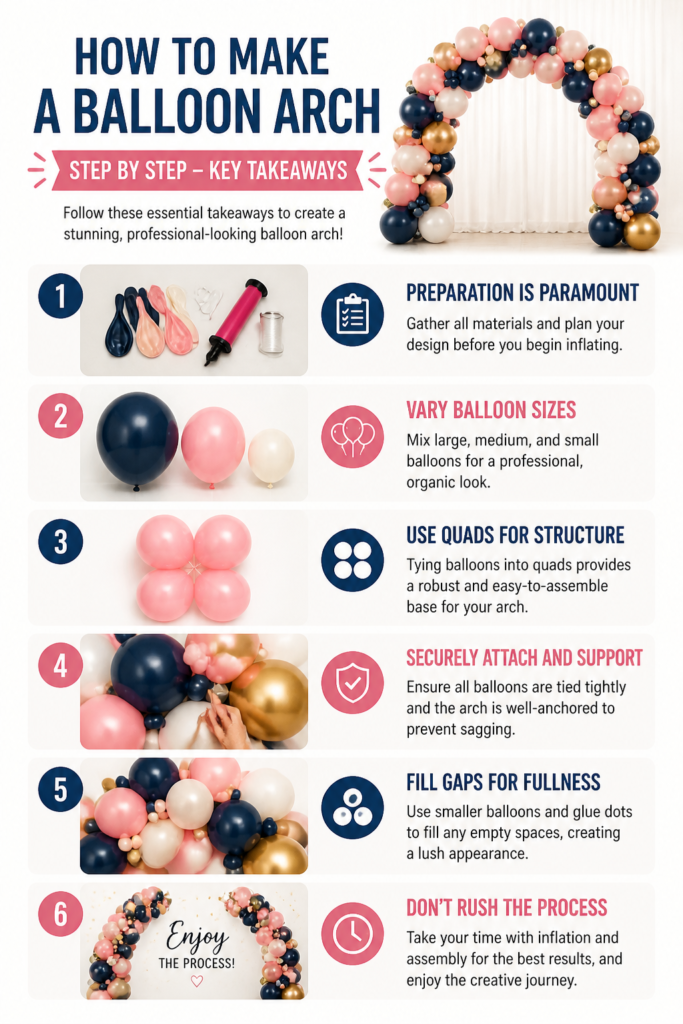
- Preparation is paramount: Gather all materials and plan your design before you begin inflating.
- Vary balloon sizes: Mix large, medium, and small balloons for a professional, organic look.
- Use quads for structure: Tying balloons into quads provides a robust and easy-to-assemble base for your arch.
- Securely attach and support: Ensure all balloons are tied tightly and the arch is well-anchored to prevent sagging.
- Fill gaps for fullness: Use smaller balloons and glue dots to fill any empty spaces, creating a lush appearance.
- Don’t rush the process: Take your time with inflation and assembly for the best results, and enjoy the creative journey.
Frequently Asked Questions
How far in advance can I make a balloon arch?
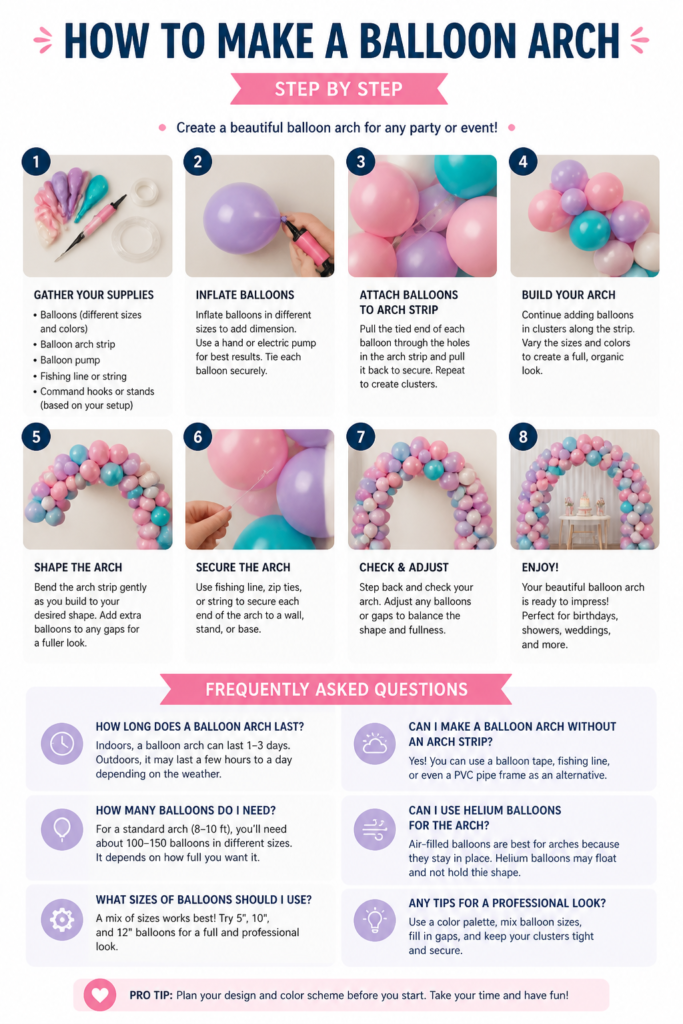
You can typically assemble a balloon arch 1-2 days before your event. Air-filled balloons, especially good quality ones, can last for several days, even up to a week, if kept indoors at a stable temperature.
Avoid direct sunlight or extreme heat, which can cause balloons to pop or deflate quickly. For the freshest look, assembling the day before is ideal.
Can I make an outdoor balloon arch?
Yes, you can! For outdoor arches, consider using double-stuffed balloons (one balloon inside another) for extra durability and opacity, especially in sunlight. Avoid dark-colored balloons in direct sun as they absorb heat and can pop.
Ensure your arch is well-anchored to withstand wind. Humidity and temperature fluctuations can affect balloon longevity, so plan accordingly for outdoor events.
How do I make a freestanding balloon arch without a wall?
To create a freestanding arch, you’ll need a dedicated arch frame or stand. These typically consist of a base, poles, and connectors that you can build your garland onto.
Once your balloon garland is complete, you simply attach it to the frame. The bases often need to be weighted down with water bags or sandbags for stability, especially if outdoors.
What’s the best way to clean up after the party?
Once the party is over, simply snip the knots or pop the balloons to deflate them. Collect all the deflated latex balloons and dispose of them properly. Latex is biodegradable, but it still takes time.
If you used a plastic arch strip, you can often reuse it for future projects by carefully removing the balloons. Recycle any other non-biodegradable materials where possible.
Our Top Recommended Finds
- Electric Balloon Pump: This essential tool saves hours of manual inflation and ensures consistent balloon sizes.
- Balloon Decorating Strip: A plastic strip with holes or slots makes attaching balloon quads incredibly simple and efficient.
- Balloon Glue Dots: Perfect for attaching smaller filler balloons or decorative elements without visible tape or string.
Your Next Creative Adventure Awaits
You now possess the knowledge and practical steps to create a beautiful balloon arch that will be the centerpiece of any celebration.
This skill opens up a world of creative possibilities for birthdays, anniversaries, baby showers, or just because you want to add some joy.
Don’t hesitate to gather your materials and start crafting your very own stunning balloon arch today. Your guests will be amazed, and you’ll love the satisfaction of a DIY triumph!
Beginner-friendly templates, step-by-step guides,
and weekly project ideas in your inbox.