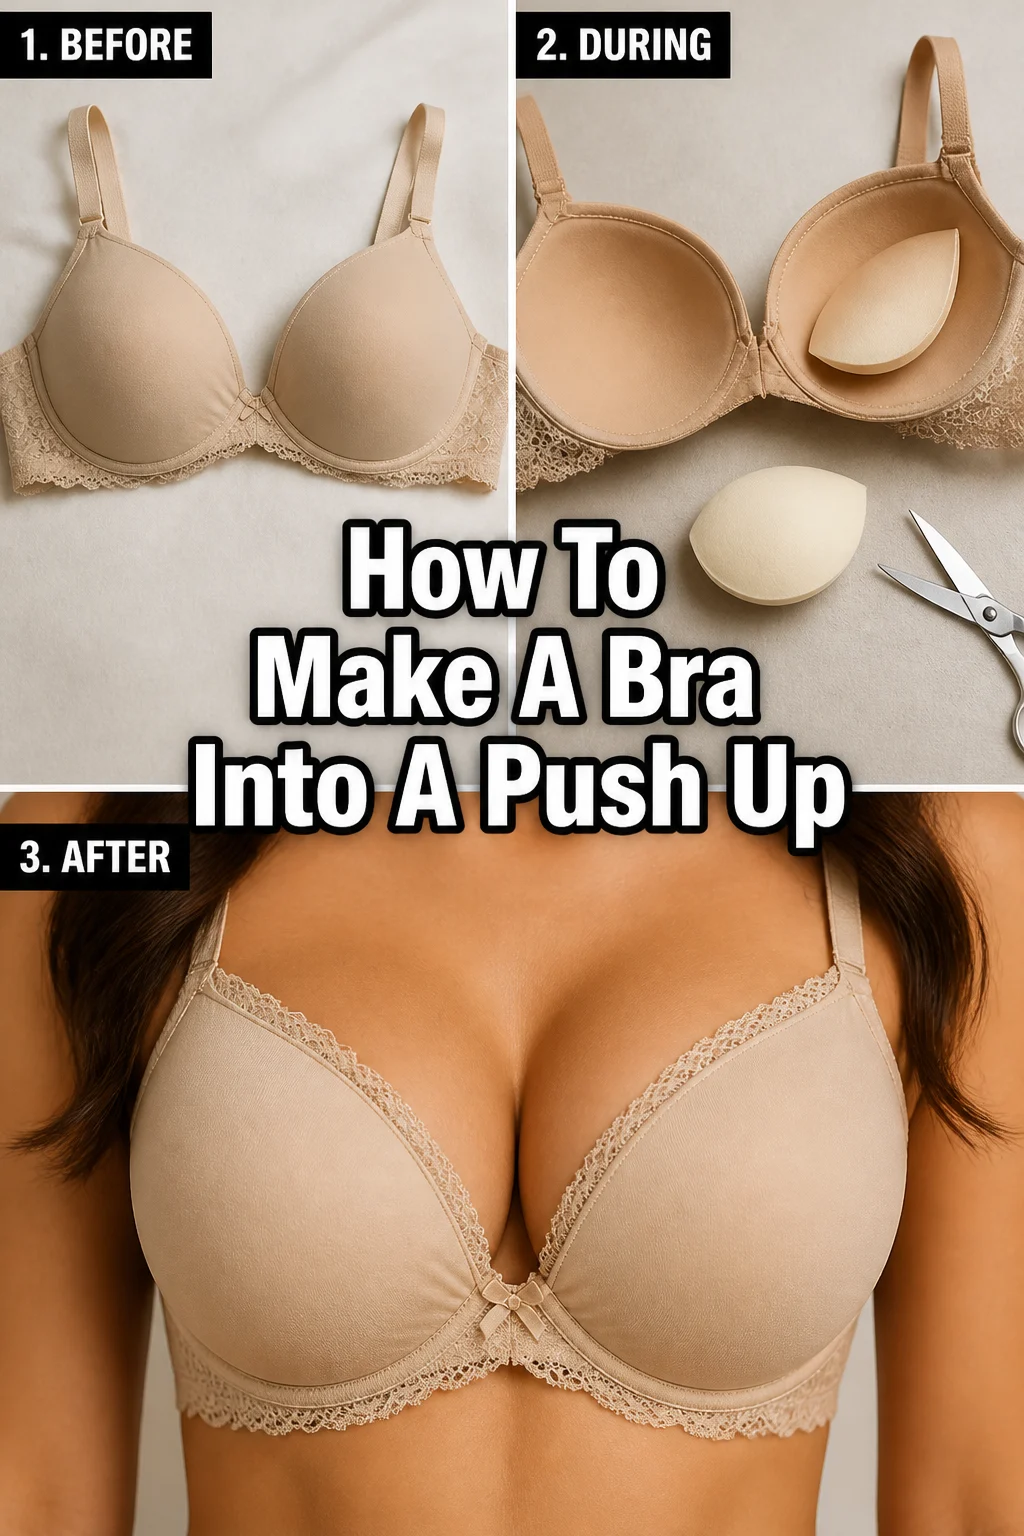
How To Make A Bra Into A Push Up

Beginner-friendly templates, step-by-step guides,
and weekly project ideas in your inbox.
Ever wished your favorite bra offered a little more lift and cleavage?
I’ve been there myself, wanting that extra oomph without buying a whole new, expensive garment.
This guide shares the proven methods I’ve used to transform everyday bras into flattering push-ups, saving both money and time while ensuring a perfect, customized fit.

Quick Overview
Transforming a regular bra into a push-up is a rewarding DIY project. You’ll learn how to add padding discreetly and effectively, achieving a custom lift tailored to your needs.
- Time needed: 30-60 minutes (depending on method and experience)
- Difficulty: Beginner to Intermediate
- What you’ll need: Your chosen bra, padding material (foam, silicone inserts, fabric), sewing kit, fabric scissors, pins.
Step-by-Step Instructions
Step 1: Assess Your Bra and Gather Materials
Begin by carefully examining the bra you wish to modify. Consider its fabric, existing structure, and any current padding.
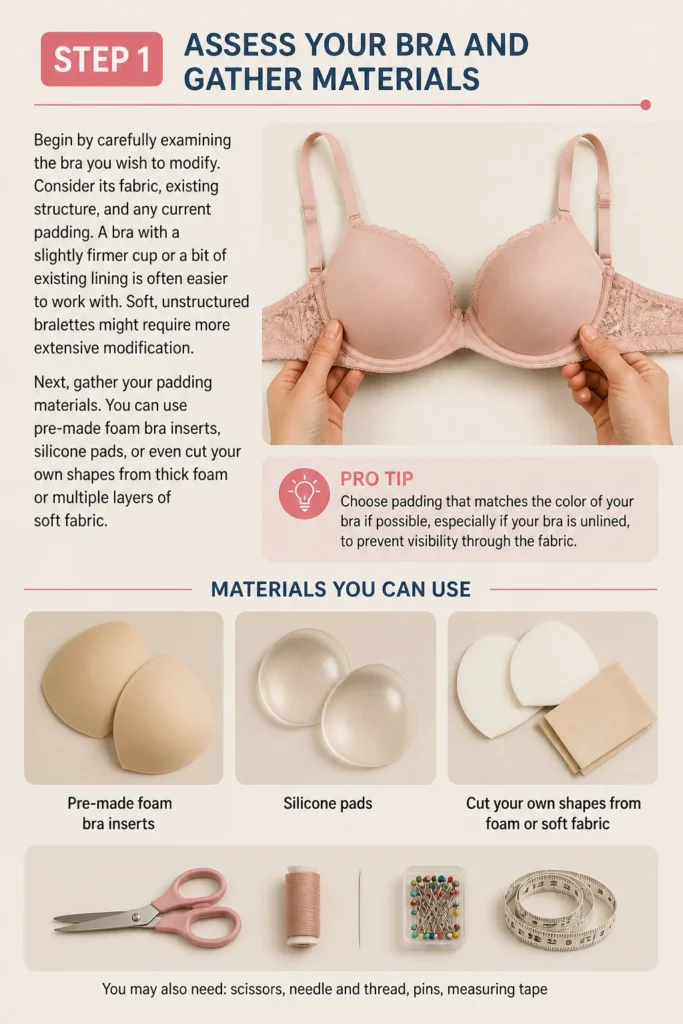
A bra with a slightly firmer cup or a bit of existing lining is often easier to work with. Soft, unstructured bralettes might require more extensive modification.
Next, gather your padding materials. You can use pre-made foam bra inserts, silicone pads, or even cut your own shapes from thick foam or multiple layers of soft fabric.
Pro Tip: Choose padding that matches the color of your bra if possible, especially if your bra is unlined, to prevent visibility through the fabric.
Step 2: Decide on Your Push-Up Method
There are two primary ways to add push-up padding: creating internal pockets or using removable inserts.
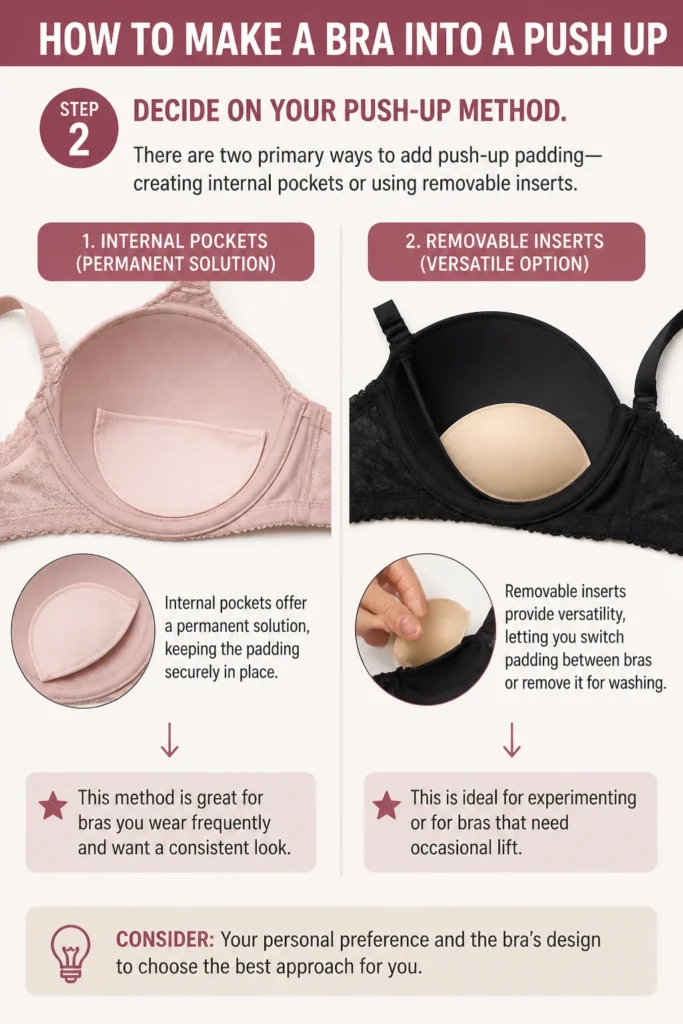
Internal pockets offer a permanent solution, keeping the padding securely in place. This method is great for bras you wear frequently and want a consistent look.
Removable inserts provide versatility, letting you switch padding between bras or remove it for washing. This is ideal for experimenting or for bras that need occasional lift.
Consider your personal preference and the bra’s design to choose the best approach for you.
Step 3: Prepare Your Padding Material
If you’re using pre-made inserts, ensure they are the correct size and shape for your bra cups. You might need to trim them slightly to fit perfectly.
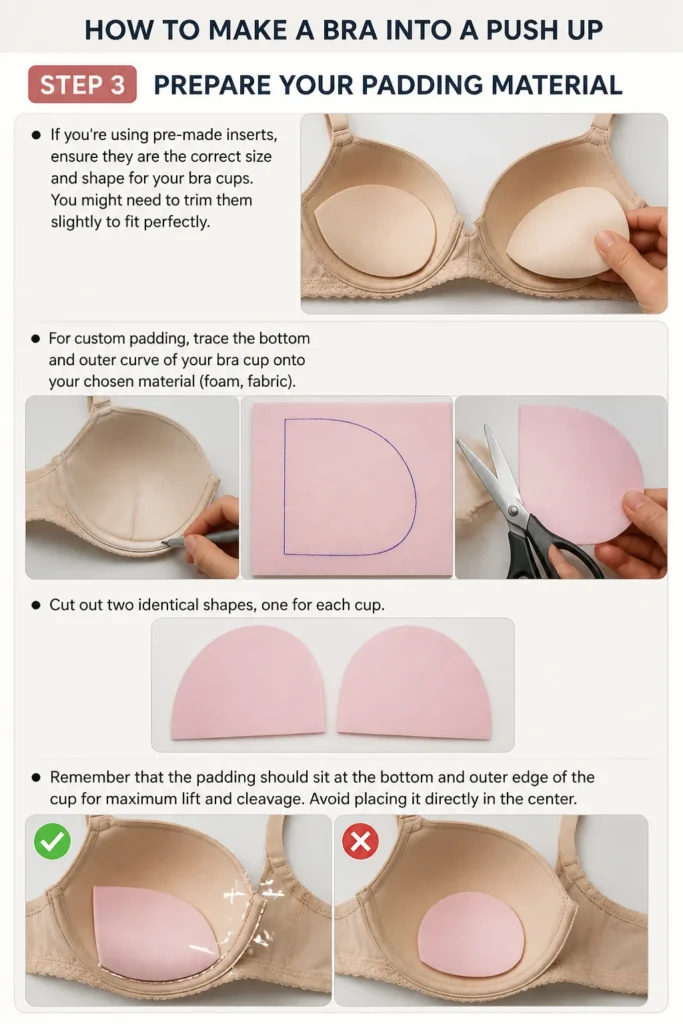
For custom padding, trace the bottom and outer curve of your bra cup onto your chosen material (foam, fabric). Cut out two identical shapes, one for each cup.
Remember that the padding should sit at the bottom and outer edge of the cup for maximum lift and cleavage. Avoid placing it directly in the center.
Step 4: Create Internal Pockets (Permanent Method)
If you’ve chosen the permanent method, you’ll need to sew small fabric pockets inside the bra cups. Select a soft, thin fabric that won’t irritate your skin, like jersey or an old t-shirt.
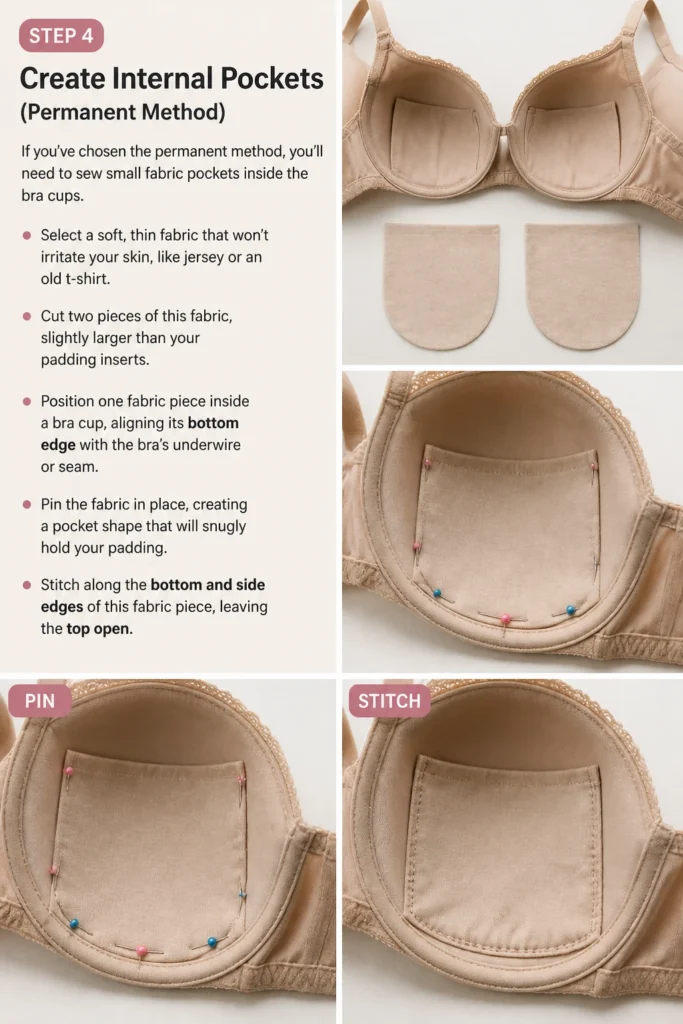
Cut two pieces of this fabric, slightly larger than your padding inserts. Position one fabric piece inside a bra cup, aligning its bottom edge with the bra’s underwire or seam.
Pin the fabric in place, creating a pocket shape that will snugly hold your padding. Stitch along the bottom and side edges of this fabric piece, leaving the top open.
Step 5: Insert and Secure Padding into Pockets
Carefully slide your prepared padding into the newly sewn fabric pockets. Adjust its position until it feels comfortable and provides the desired lift.
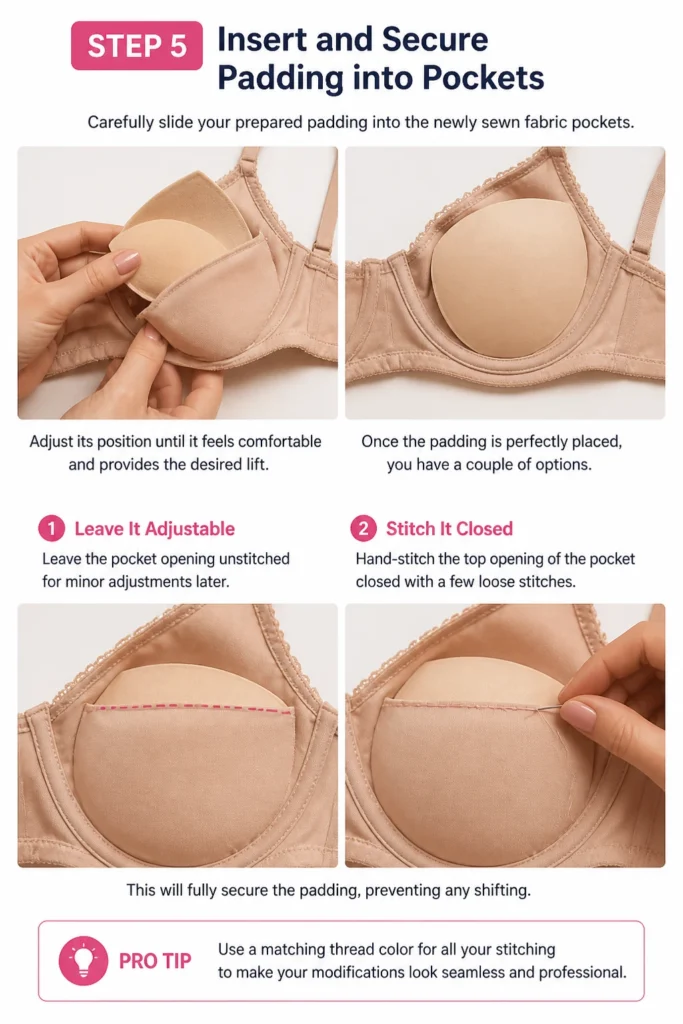
Once the padding is perfectly placed, you have a couple of options. You can leave the pocket opening unstitched for minor adjustments later.
Alternatively, you can hand-stitch the top opening of the pocket closed with a few loose stitches. This will fully secure the padding, preventing any shifting.
Pro Tip: Use a matching thread color for all your stitching to make your modifications look seamless and professional.
Step 6: Adapt for Removable Inserts (Versatile Method)
For the removable insert method, you don’t sew pockets directly into the bra. Instead, you’ll create a subtle way to keep the inserts in place.
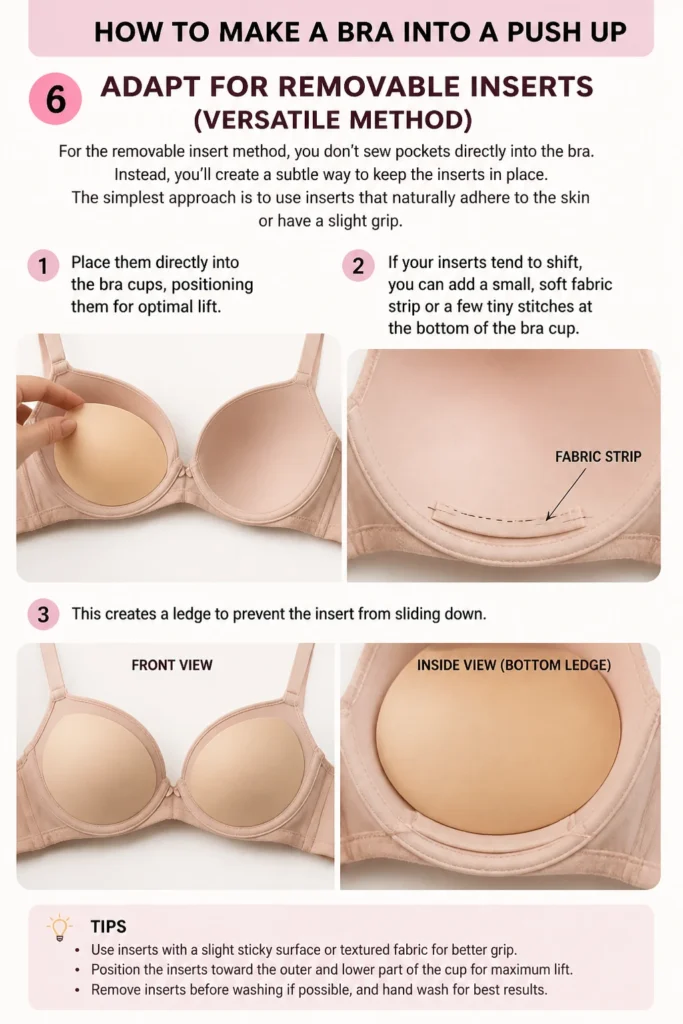
The simplest approach is to use inserts that naturally adhere to the skin or have a slight grip. Place them directly into the bra cups, positioning them for optimal lift.
If your inserts tend to shift, you can add a small, soft fabric strip or a few tiny stitches at the bottom of the bra cup. This creates a “ledge” to prevent the insert from sliding down.
Step 7: Test and Adjust for Comfort and Lift
Once you’ve inserted your padding using either method, try on the bra immediately. This is the most crucial step for achieving the perfect push-up effect.
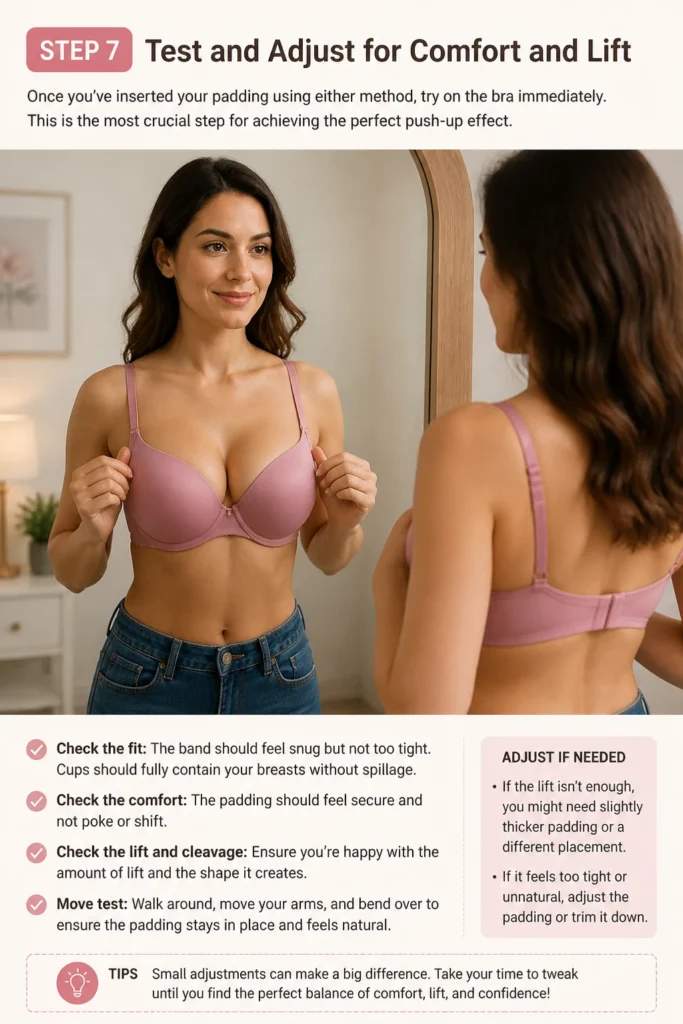
Check the fit, comfort, and the level of lift and cleavage. Walk around, move your arms, and bend over to ensure the padding stays in place and feels natural.
If the lift isn’t enough, you might need slightly thicker padding or a different placement. If it feels too tight or unnatural, adjust the padding or trim it down.
Step 8: Final Touches and Durability
After finding your ideal fit and lift, make any final adjustments to your stitching or padding placement. Trim any loose threads for a clean finish.
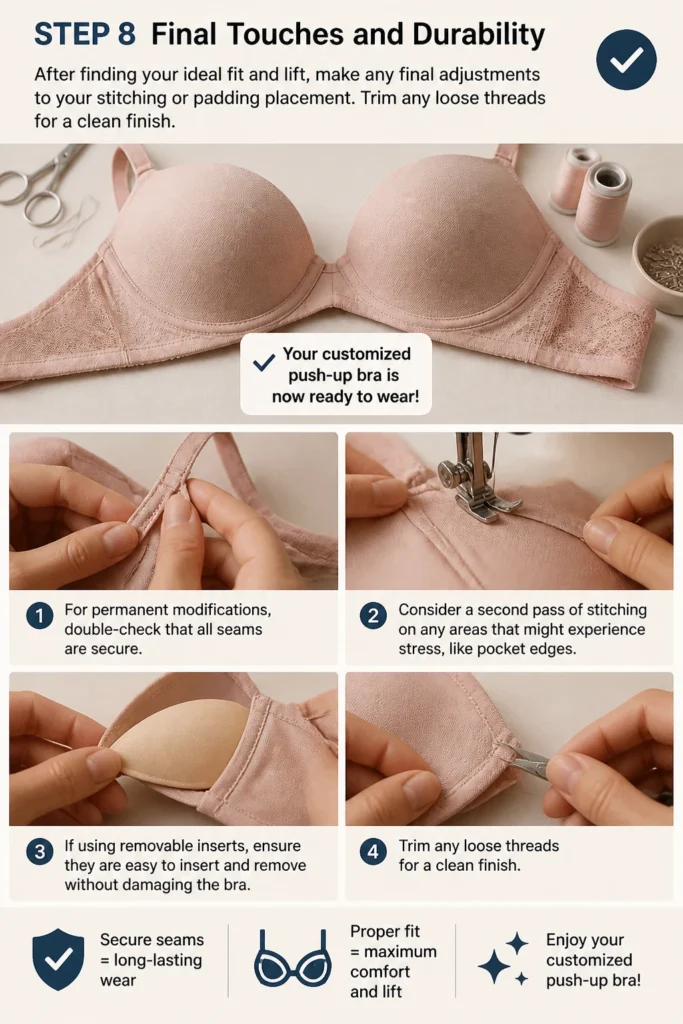
For permanent modifications, double-check that all seams are secure. Consider a second pass of stitching on any areas that might experience stress, like pocket edges.
If using removable inserts, ensure they are easy to insert and remove without damaging the bra. Your customized push-up bra is now ready to wear!
Common Mistakes to Avoid
Over-Padding
Adding too much padding can lead to an unnatural, bulky appearance. It can also make the bra uncomfortable, digging into your chest or armpits.
Always start with a moderate amount of padding and add more gradually if needed. The goal is enhancement, not drastic alteration.
Uneven Padding
One of the most common pitfalls is uneven padding, which results in a lopsided look. This can be very noticeable under clothing.
Ensure both padding inserts are identical in size, shape, and placement within each bra cup. Use pins to hold them steady while marking or stitching.
Wrong Material Choice
Using padding material that is too stiff, too thin, or too visible can ruin the effect. Stiff materials can feel uncomfortable and create harsh lines.
Thin materials might not provide enough lift, while dark padding in a light bra can show through. Opt for soft, pliable, and appropriately colored materials.
Ignoring Bra Structure
Not every bra is a candidate for push-up conversion. Trying to add significant padding to a very soft, unstructured bralette might not yield the desired results and could compromise its original shape.
Choose bras with some inherent structure or a sturdy cup. This provides a better foundation for the added padding and ensures the modification holds up.
Troubleshooting
Padding Shifts or Bunches Up
If your padding isn’t staying in place, it likely needs more secure attachment. For permanent methods, reinforce your pocket stitching, especially at the bottom and outer edges.
For removable inserts, consider adding a small, soft fabric “ledge” inside the cup, just above the underwire. This prevents the insert from sliding down.
Uncomfortable Fit or Digging
Discomfort often comes from padding that is too large, too thick, or incorrectly placed. Remove the padding and re-evaluate its size and shape.
Trim the padding if it’s too wide or tall. Adjust its position so it’s only at the bottom and outer curve of the cup, avoiding sensitive areas like the armpit or center chest.
Visible Lines or Bulk Under Clothing
If the padding creates visible lines or bulk, the material might be too thick, or its edges too blunt. Try using a thinner padding material, or gently bevel the edges of your existing padding with scissors.
Ensure the bra fabric is smooth over the padding. A seamless cup bra often works best for avoiding visible lines.
Key Takeaways
- Customizing your bra for a push-up effect is an achievable and rewarding DIY project.
- Careful selection of padding material and understanding its placement are crucial for natural-looking results.
- You can choose between permanent internal pockets or versatile removable inserts based on your needs.
- Always test the modified bra for comfort and appearance before finalizing any stitches.
- Patience and attention to detail will ensure a professional-looking and comfortable finish.
- Start with a moderate amount of padding and adjust gradually to avoid over-padding or discomfort.
Frequently Asked Questions
Can I do this with any bra?
While most bras can be modified, those with some existing structure or a slightly firmer cup will yield the best results. Very soft, unstructured bralettes might not provide enough support for significant padding.
What kind of padding is best for a natural look?
Soft foam inserts or silicone pads often provide the most natural feel and appearance. Silicone mimics natural breast tissue well, while foam offers lightweight lift. Avoid overly stiff or dense materials.
Will the modified bra look natural under clothes?
Yes, if done correctly. The key is to use appropriately sized and shaped padding, place it strategically, and ensure smooth edges. Test the bra under various outfits to confirm it looks seamless.
How do I wash a bra that I’ve modified?
If you’ve sewn in permanent padding, hand washing is highly recommended to preserve the modification and the bra’s shape. For removable inserts, simply take them out before washing the bra as usual.
Our Top Recommended Finds
- Basic Sewing Kit: Essential for needles, thread, and thimble to make precise modifications.
- Sharp Fabric Scissors: Crucial for clean, accurate cuts on padding materials and fabric, preventing fraying.
- Silicone Bra Inserts: Excellent for a natural feel and easy to use with the removable insert method.
- Foam Bra Cups/Padding Sheets: Perfect for custom shaping and sewing into internal pockets for a permanent lift.
Embrace Your Perfect Lift Today
You now have all the tools and knowledge to transform your favorite bras. Stop settling for less than perfect lift and comfort.
This simple DIY project empowers you to customize your wardrobe, saving money and ensuring every outfit looks its best.
Pick a bra, gather your materials, and start creating your perfectly tailored push-up effect today. You’ll love the confidence it brings.
Beginner-friendly templates, step-by-step guides,
and weekly project ideas in your inbox.