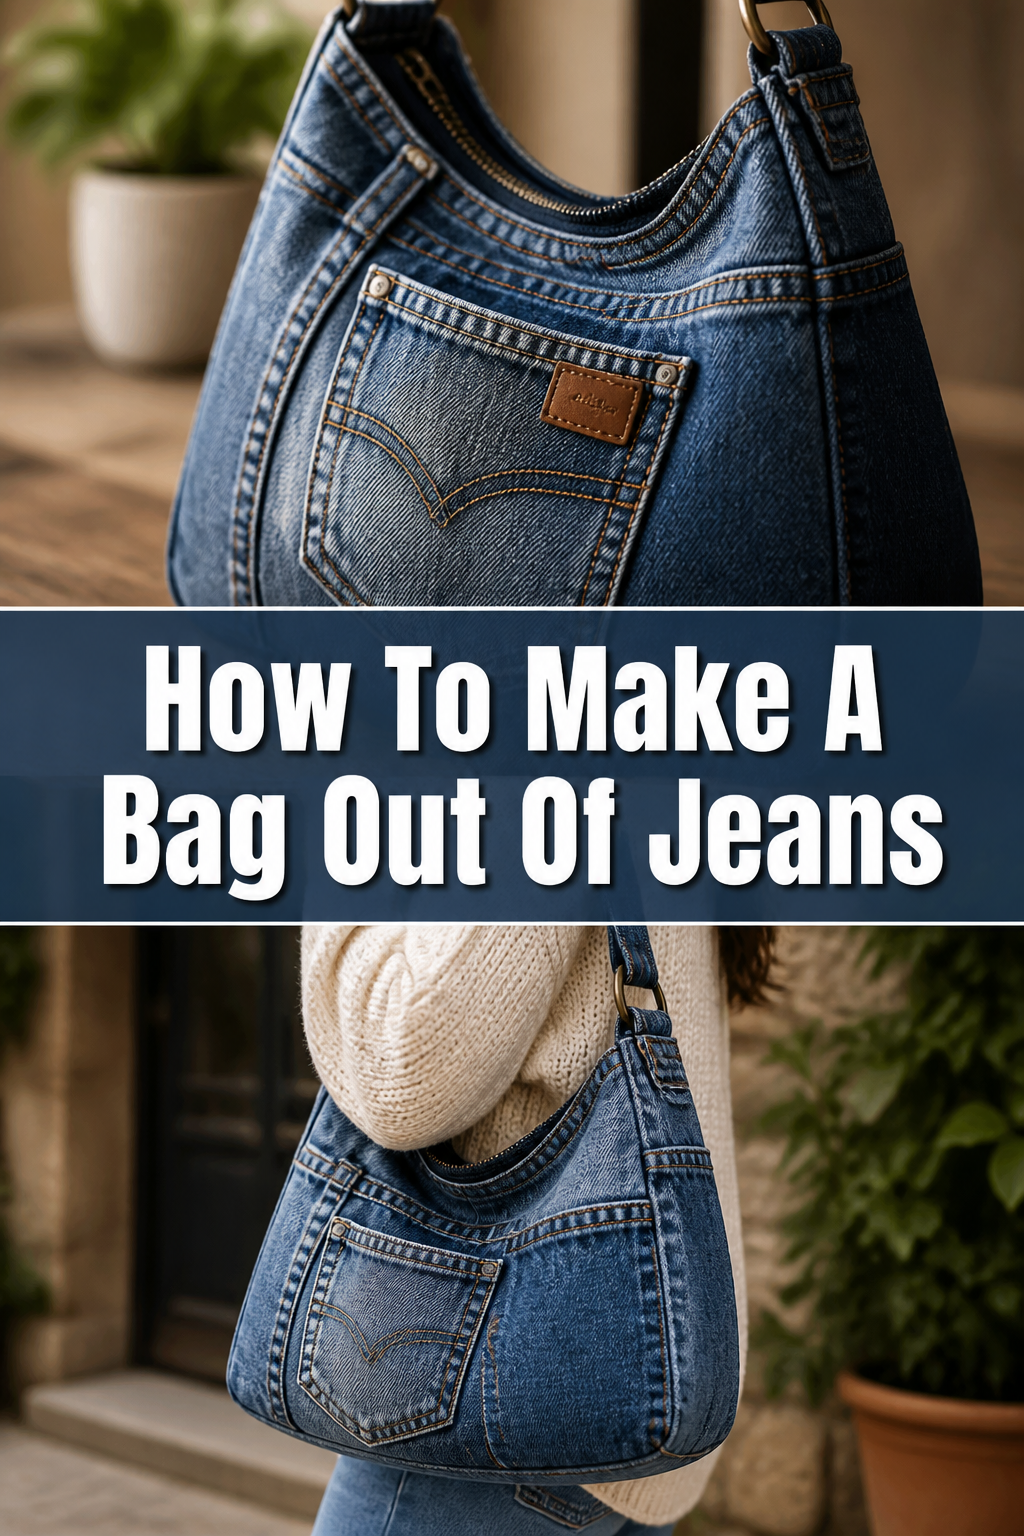
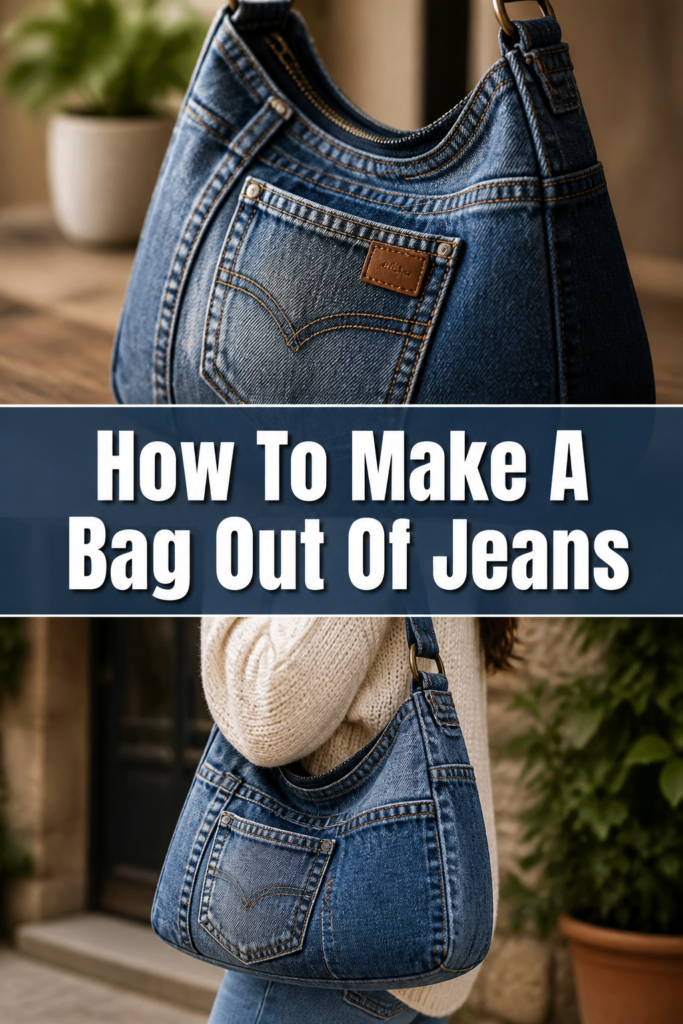
👖 How To Make A Bag Out Of Jeans

Beginner-friendly templates, step-by-step guides,
and weekly project ideas in your inbox.
Your favorite pair of jeans just developed a massive tear in the inner thigh, and they are beyond the point of a simple patch job.
Instead of tossing them into a landfill, you can turn that high-quality denim into a durable, stylish tote bag that will last for years.
I have spent years upcycling old denim into everything from quilts to handbags, and this specific method is the most beginner-friendly way to get professional results with just a basic sewing machine.
Quick Overview
Turning jeans into a bag is a rewarding project that combines sustainability with practical fashion.
You will be using the natural structure of the jeans, specifically the waistband and pockets, to create a functional bag with minimal effort.
- Time needed: 2 to 3 hours
- Difficulty: Beginner
- What you’ll need: Old jeans, fabric scissors, sewing machine, heavy-duty needles, thread, pins, and optional lining fabric.
Step-by-Step Instructions
Step 1: Choose and Prepare Your Denim
Select a pair of jeans that is made of 100% cotton or has very little stretch.
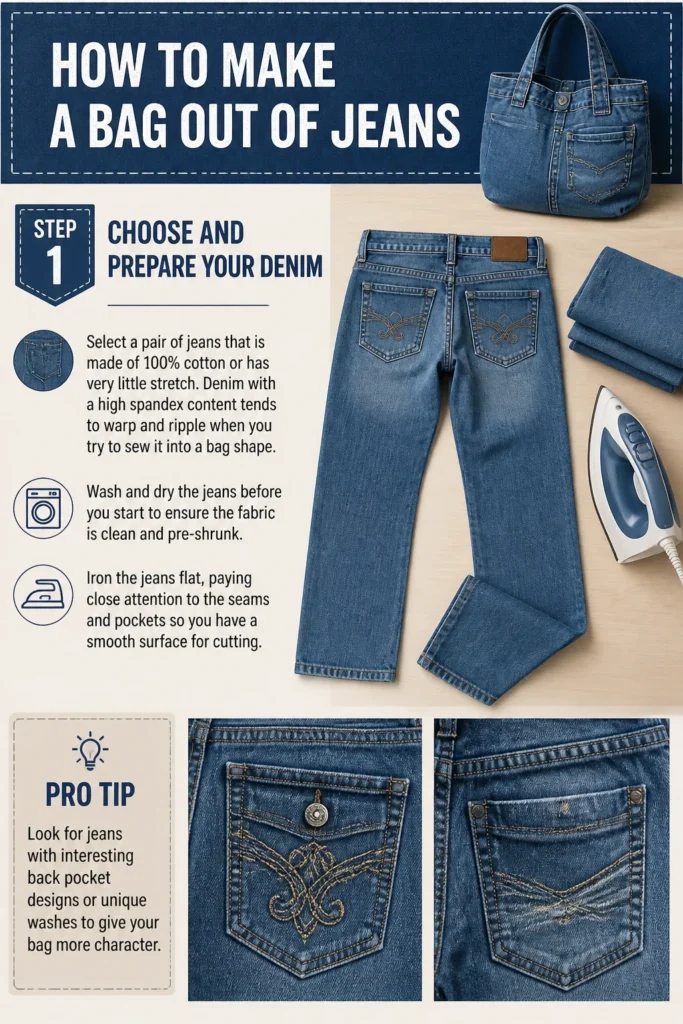
Denim with a high spandex content tends to warp and ripple when you try to sew it into a bag shape.
Wash and dry the jeans before you start to ensure the fabric is clean and pre-shrunk.
Iron the jeans flat, paying close attention to the seams and pockets so you have a smooth surface for cutting.
Pro Tip: Look for jeans with interesting back pocket designs or unique washes to give your bag more character.
Step 2: Cut the Legs Off
Lay the jeans flat on your work surface, making sure the front and back waistbands are aligned.
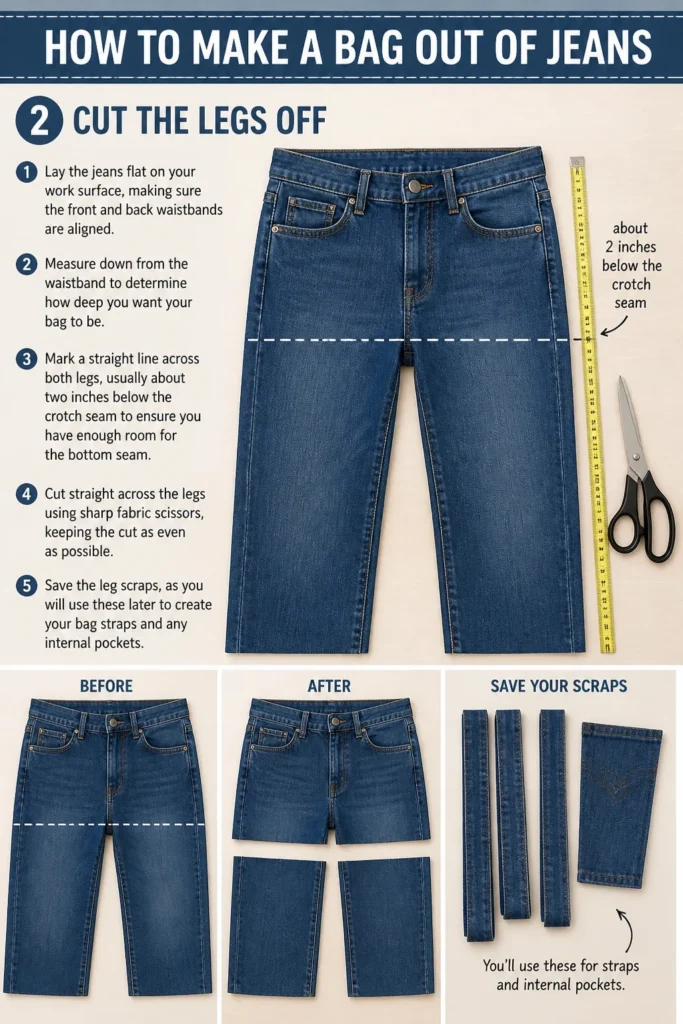
Measure down from the waistband to determine how deep you want your bag to be.
Mark a straight line across both legs, usually about two inches below the crotch seam to ensure you have enough room for the bottom seam.
Cut straight across the legs using sharp fabric scissors, keeping the cut as even as possible.
Save the leg scraps, as you will use these later to create your bag straps and any internal pockets.
Step 3: Open the Crotch Seam
Turn the jeans inside out so you are looking at the inner seams.
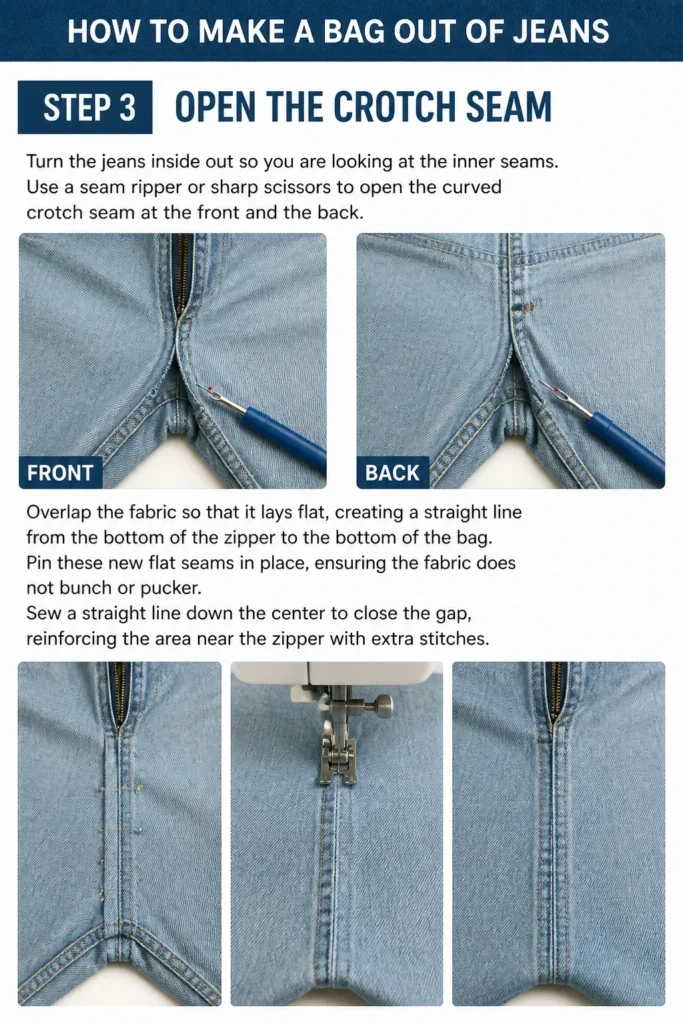
Use a seam ripper or sharp scissors to open the curved crotch seam at the front and the back.
Overlap the fabric so that it lays flat, creating a straight line from the bottom of the zipper to the bottom of the bag.
Pin these new flat seams in place, ensuring the fabric does not bunch or pucker.
Sew a straight line down the center to close the gap, reinforcing the area near the zipper with extra stitches.
Step 4: Sew the Bottom Seam
Keep the jeans inside out and align the bottom raw edges that you cut in Step 2.
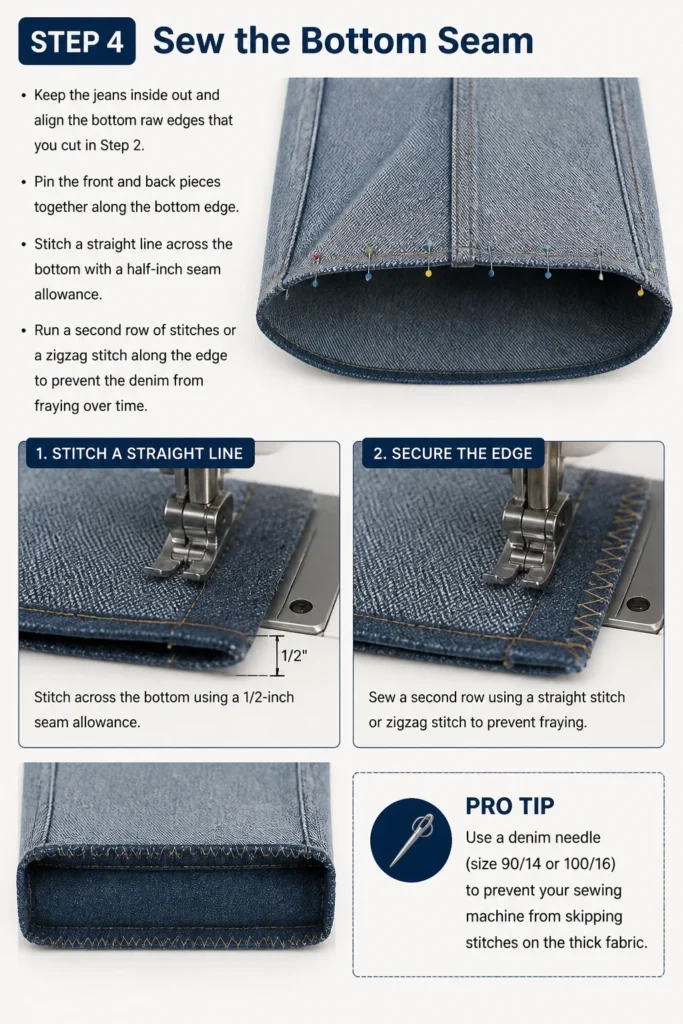
Pin the front and back pieces together along the bottom edge.
Stitch a straight line across the bottom with a half-inch seam allowance.
Run a second row of stitches or a zigzag stitch along the edge to prevent the denim from fraying over time.
Pro Tip: Use a denim needle (size 90/14 or 100/16) to prevent your sewing machine from skipping stitches on the thick fabric.
Step 5: Create Boxed Corners for Volume
Pull the front and back fabric apart at the bottom corners while the bag is still inside out.
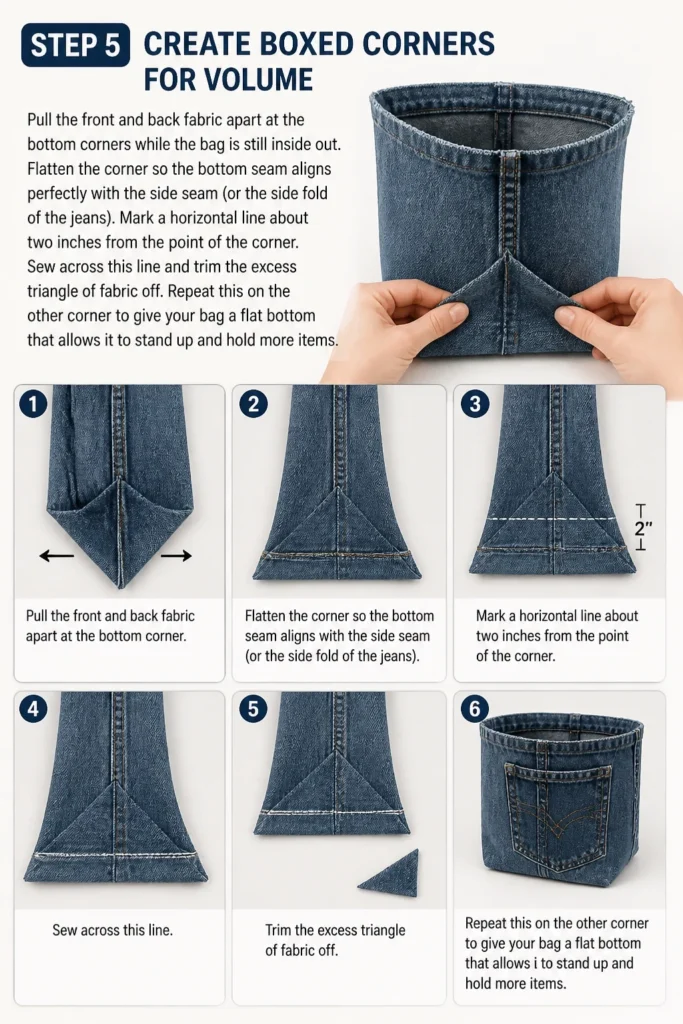
Flatten the corner so the bottom seam aligns perfectly with the side seam (or the side fold of the jeans).
Mark a horizontal line about two inches from the point of the corner.
Sew across this line and trim the excess triangle of fabric off.
Repeat this on the other corner to give your bag a flat bottom that allows it to stand up and hold more items.
Step 6: Construct the Straps
Take the leg scraps you set aside earlier and cut two long strips of fabric.
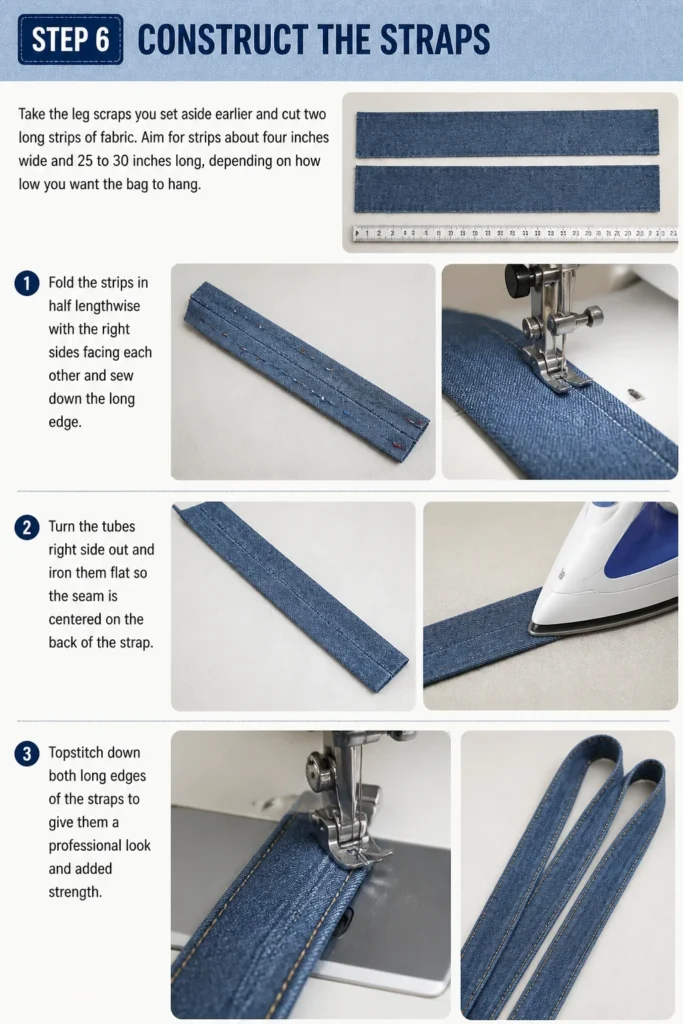
Aim for strips about four inches wide and 25 to 30 inches long, depending on how low you want the bag to hang.
Fold the strips in half lengthwise with the right sides facing each other and sew down the long edge.
Turn the tubes right side out and iron them flat so the seam is centered on the back of the strap.
Topstitch down both long edges of the straps to give them a professional look and added strength.
Step 7: Attach the Straps to the Waistband
Decide where you want the straps to sit, usually about three to four inches from the side seams.
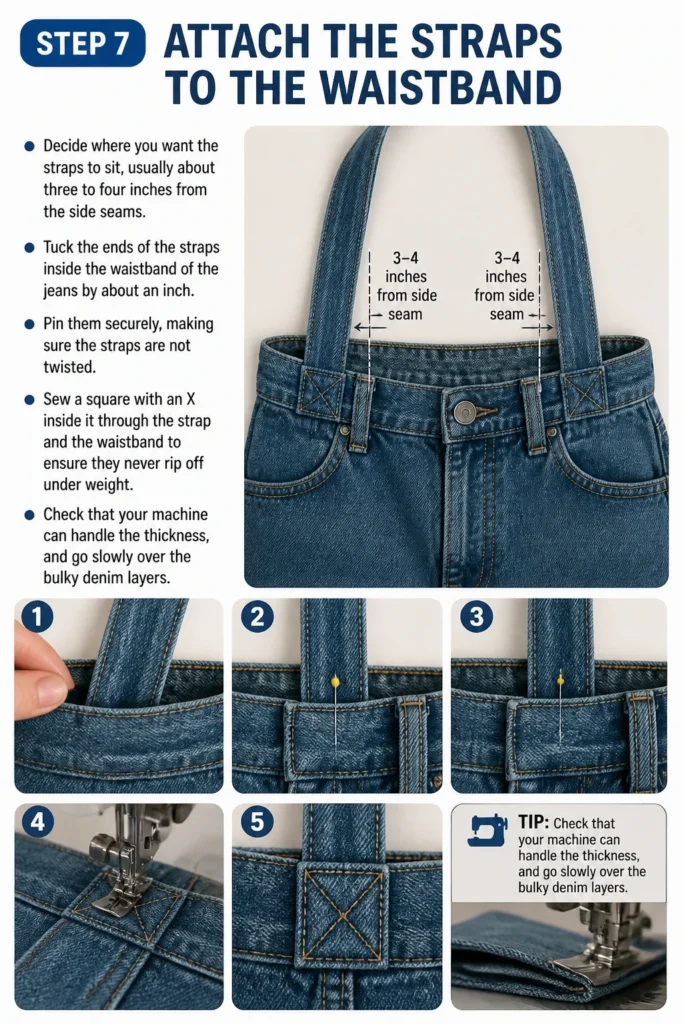
Tuck the ends of the straps inside the waistband of the jeans by about an inch.
Pin them securely, making sure the straps are not twisted.
Sew a square with an “X” inside it through the strap and the waistband to ensure they never rip off under weight.
Check that your machine can handle the thickness, and go slowly over the bulky denim layers.
Step 8: Add a Lining (Optional)
Measure the interior of your denim bag to determine the size of the lining.
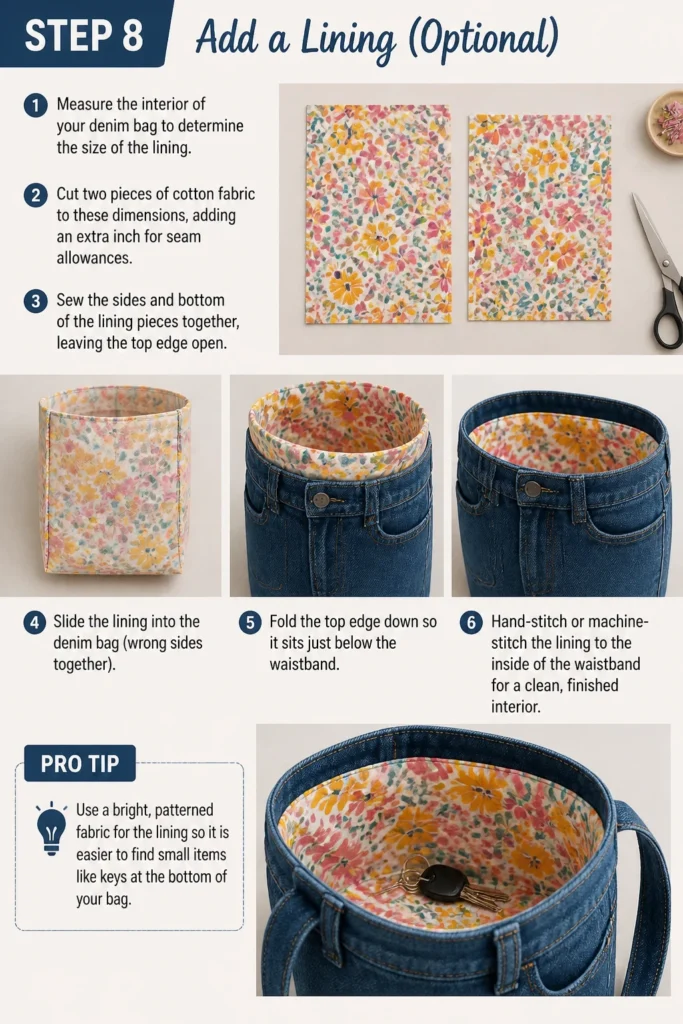
Cut two pieces of cotton fabric to these dimensions, adding an extra inch for seam allowances.
Sew the sides and bottom of the lining pieces together, leaving the top edge open.
Slide the lining into the denim bag (wrong sides together) and fold the top edge down so it sits just below the waistband.
Hand-stitch or machine-stitch the lining to the inside of the waistband for a clean, finished interior.
Pro Tip: Use a bright, patterned fabric for the lining so it is easier to find small items like keys at the bottom of your bag.
Common Mistakes to Avoid
Using a Standard Universal Needle
Denim is a very dense, tightly woven fabric that requires a specialized needle to penetrate multiple layers. A standard needle will often bend or snap when it hits the thick side seams of the jeans. Always switch to a dedicated denim needle before you start sewing to protect your machine and your sanity.
Ignoring the Seam Allowance
When you cut the jeans, it is easy to forget that sewing the bottom will take away about an inch of height. If you cut the jeans too short, your bag will end up looking more like a shallow pouch than a tote. Always leave at least two extra inches of fabric at the bottom to account for the seam and the boxed corners.
Forgetting to Backstitch
A bag carries weight, which puts constant stress on the seams, especially at the bottom and where the straps are attached. If you do not backstitch at the beginning and end of every seam, the bag will eventually pull apart. Double-backstitch over the areas where the straps meet the waistband to provide maximum durability.
Troubleshooting
The Sewing Machine is Skipping Stitches
This usually happens because the needle cannot pierce the fabric fast enough or the thread tension is wrong. Try slowing down your sewing speed and using a longer stitch length, which is better suited for heavy fabrics. You can also try using a “hump jumper” or a folded piece of cardboard to keep the presser foot level when sewing over thick seams.
The Straps Feel Flimsy
If your denim scraps were thin or had a lot of stretch, the straps might feel like they are going to snap. You can solve this by inserting a piece of heavy-duty cotton webbing or interfacing inside the strap tubes before you topstitch them. This adds structural integrity without changing the look of the denim.
The Bag Bottom is Uneven
If your boxed corners are not identical, the bag will lean to one side when you set it down. Measure from the corner point to the stitch line on both sides to ensure they are exactly the same distance. If they are off, rip out the stitches on the shorter side and re-sew it to match the longer one.
Key Takeaways
- Always use a heavy-duty denim needle to prevent machine damage and skipped stitches.
- Wash and iron your jeans before cutting to ensure a professional and clean finish.
- Reinforce the strap attachments with a square and “X” stitch pattern for extra strength.
- Use the existing waistband and pockets of the jeans to save time and add functionality.
- Box the corners of the bag to create a flat bottom and increase carrying capacity.
- Consider adding a colorful lining to make the bag more durable and aesthetically pleasing.
Frequently Asked Questions
Can I make this bag without a sewing machine?
Yes, you can hand-sew a denim bag using a backstitch and a very strong upholstery thread. It will take significantly longer, and you will likely need a thimble to help push the needle through the thick layers of fabric. Make sure your stitches are small and tight to ensure the bag can hold weight.
What should I do if the jeans have holes in the pockets?
You can turn this into a design feature by patching the holes with contrasting fabric from the inside. This creates a “distressed” look that is very popular in upcycled fashion. Alternatively, you can sew the pocket shut entirely if it is no longer functional.
How do I clean my finished denim bag?
Since the bag is made of denim and cotton lining, it should be machine washable. Turn the bag inside out before washing to protect any decorative elements or the straps. Air dry the bag to prevent the denim from shrinking unevenly or the straps from twisting.
What is the best way to cut through thick denim seams?
Use heavy-duty tailor shears rather than standard craft scissors, as they are designed to handle multiple layers of fabric. If you hit a particularly thick spot, try cutting with the very back of the blades where you have the most leverage. Never force the scissors, as this can lead to jagged edges or hand strain.
Our Top Recommended Finds
- Schmetz Denim Sewing Machine Needles: These are the gold standard for sewing through heavy fabric and will prevent your machine from jamming.
- Heavy-Duty Polyester Thread: Regular cotton thread might snap under the tension of denim seams, so a strong polyester thread is a better choice for longevity.
- Fabric Chalk or Marking Pens: These are essential for marking your cut lines and boxed corners accurately without leaving permanent marks on your bag.
Take Your Upcycling To The Next Level
Now that you have mastered the basic denim tote, the possibilities for customization are endless.
You might consider adding a zipper closure to the top or experimenting with embroidery on the back pockets.
If you have more scraps left over, you could even create matching coin purses or phone sleeves to go inside your new bag.
Grab those old jeans from the back of your closet today and start cutting; you are only a few seams away from your new favorite accessory.
Beginner-friendly templates, step-by-step guides,
and weekly project ideas in your inbox.