✂️ How To Cut The Neck Of A Tshirt

Beginner-friendly templates, step-by-step guides,
and weekly project ideas in your inbox.
It’s amazing how a simple snip can transform an old tee.
I’ve given countless forgotten shirts a new lease on life with just a few cuts.
This guide will show you exactly how to achieve that perfect custom look, turning a basic garment into something uniquely yours.

Quick Overview
Transforming your t-shirt’s neckline is a fantastic way to refresh your wardrobe without buying new clothes. You’ll learn how to create various necklines, from a simple wider scoop to a stylish off-shoulder.
Time needed: 15-30 minutes
Difficulty: Beginner
What you’ll need: T-shirt, sharp fabric scissors, tailor’s chalk or fabric marker, ruler or measuring tape, pins (optional), ironing board and iron (optional).
Step-by-Step Instructions
Step 1: Gather Your Tools
Before you begin, make sure you have all your supplies ready. Having the right tools makes the process smoother and ensures a cleaner finish.
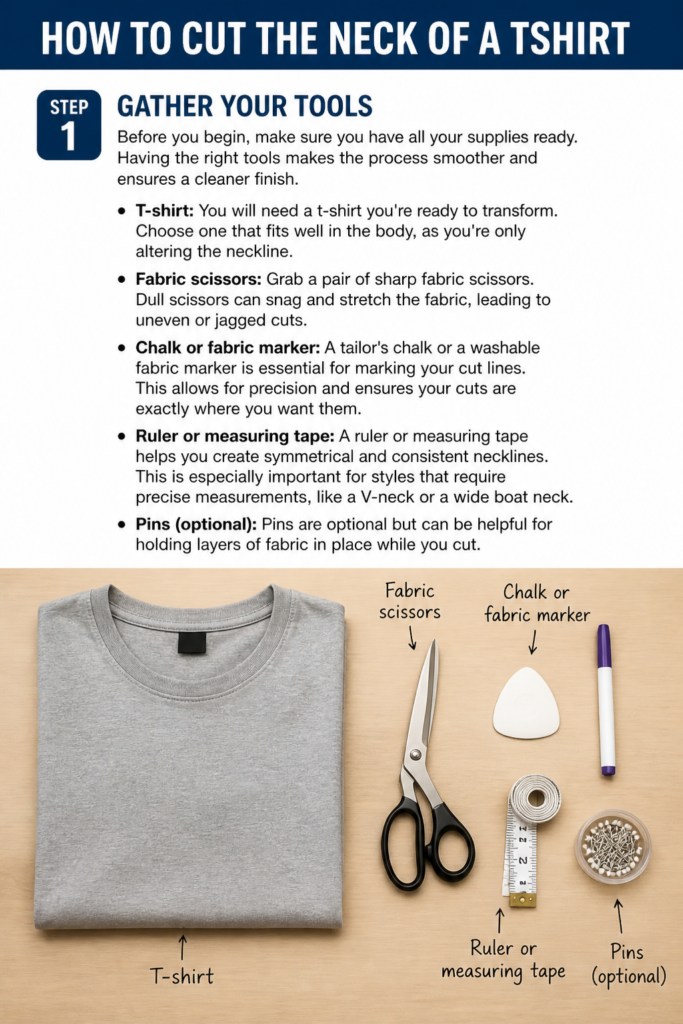
You will need a t-shirt you’re ready to transform. Choose one that fits well in the body, as you’re only altering the neckline.
Grab a pair of sharp fabric scissors. Dull scissors can snag and stretch the fabric, leading to uneven or jagged cuts.
A tailor’s chalk or a washable fabric marker is essential for marking your cut lines. This allows for precision and ensures your cuts are exactly where you want them.
A ruler or measuring tape helps you create symmetrical and consistent necklines. This is especially important for styles that require precise measurements, like a V-neck or a wide boat neck.
Pins are optional but can be helpful for holding layers of fabric together or marking specific points. An iron and ironing board are useful for pressing your t-shirt flat before cutting, which helps achieve accurate lines.
Step 2: Prepare Your T-Shirt
Proper preparation is key to a successful cut. Lay your t-shirt flat on a clean, hard surface.
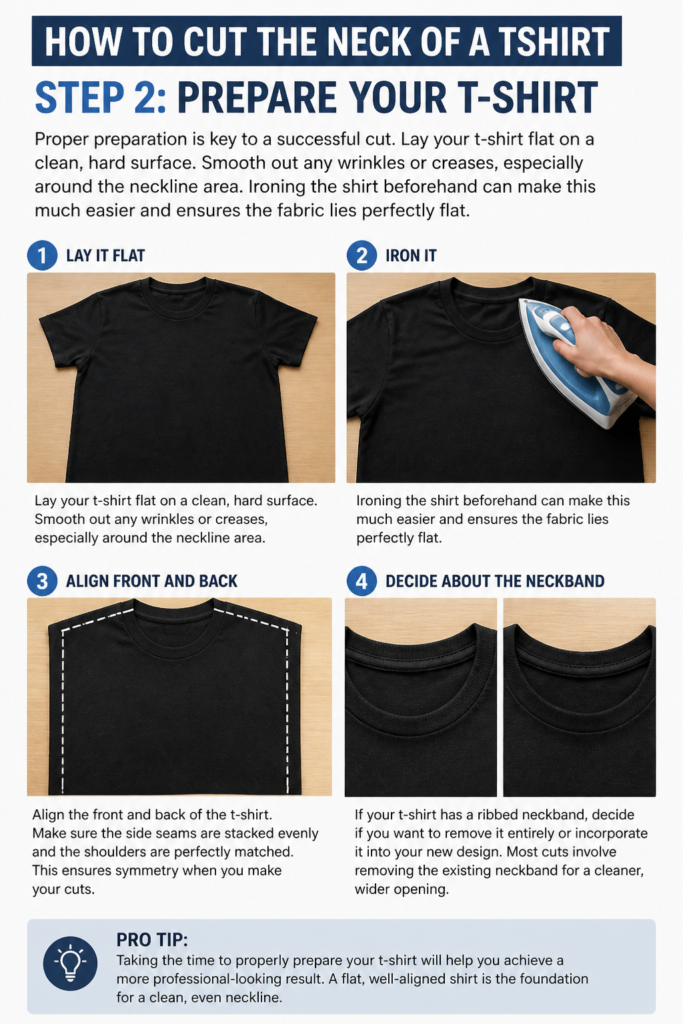
Smooth out any wrinkles or creases, especially around the neckline area. Ironing the shirt beforehand can make this much easier and ensures the fabric lies perfectly flat.
Align the front and back of the t-shirt. Make sure the side seams are stacked evenly and the shoulders are perfectly matched. This ensures symmetry when you make your cuts.
If your t-shirt has a ribbed neckband, decide if you want to remove it entirely or incorporate it into your new design. Most cuts involve removing the existing neckband for a cleaner, wider opening.
Step 3: Decide Your Style
This is where your creativity comes in. Consider what kind of neckline you want to achieve.
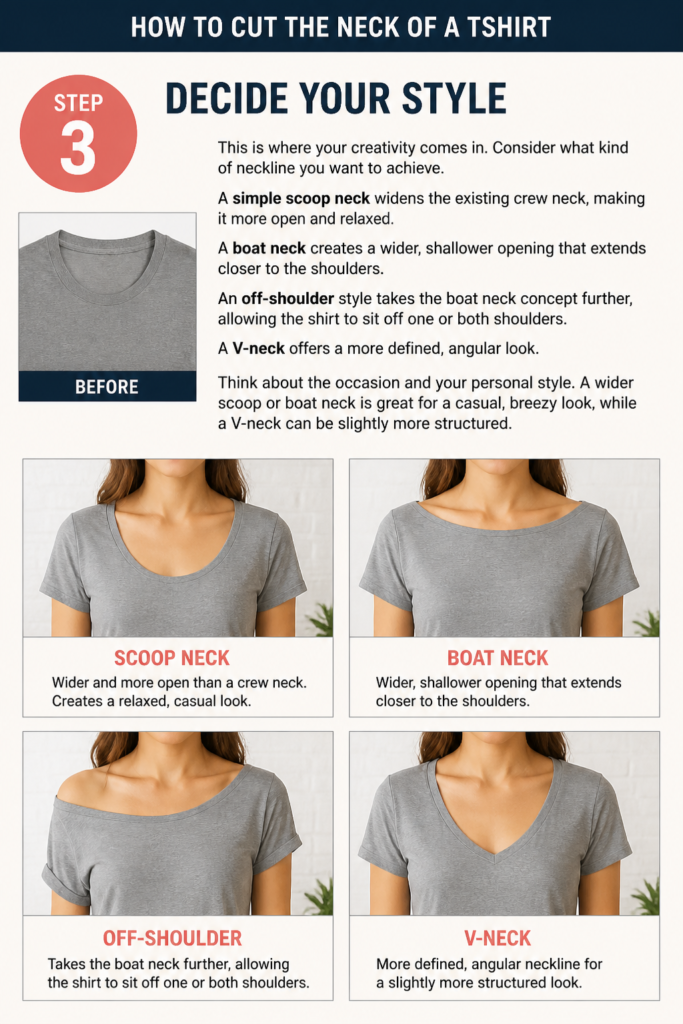
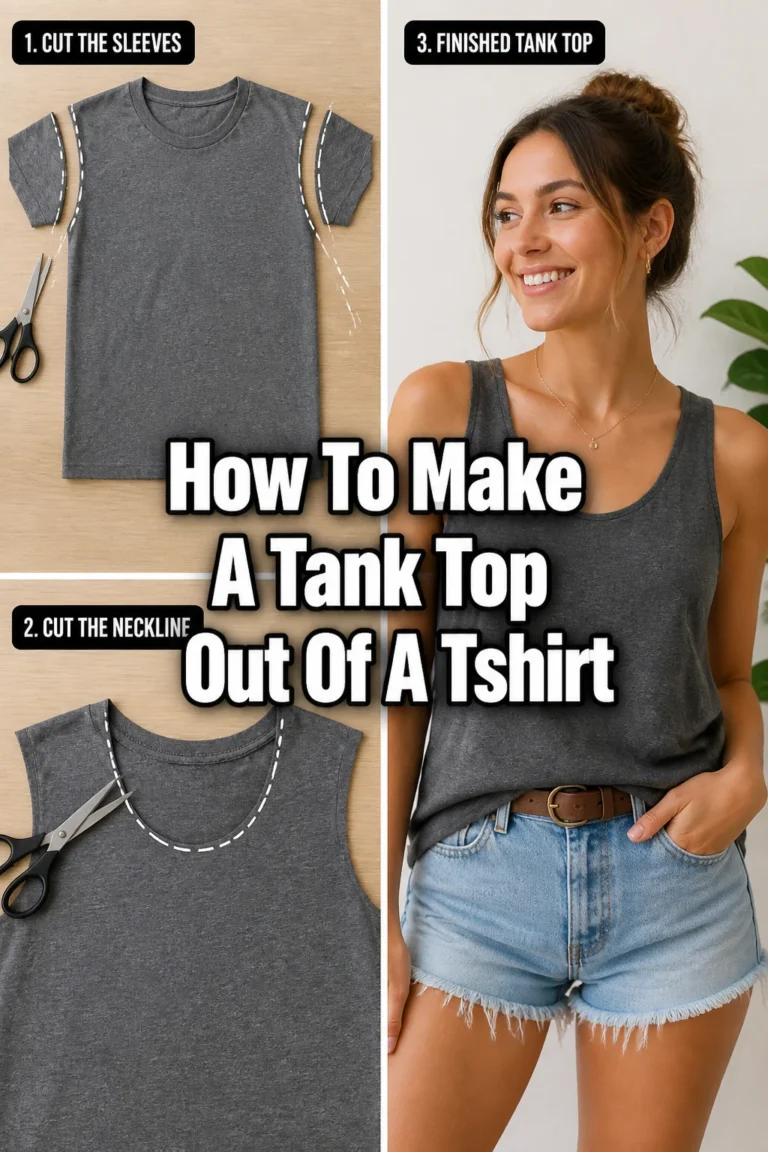
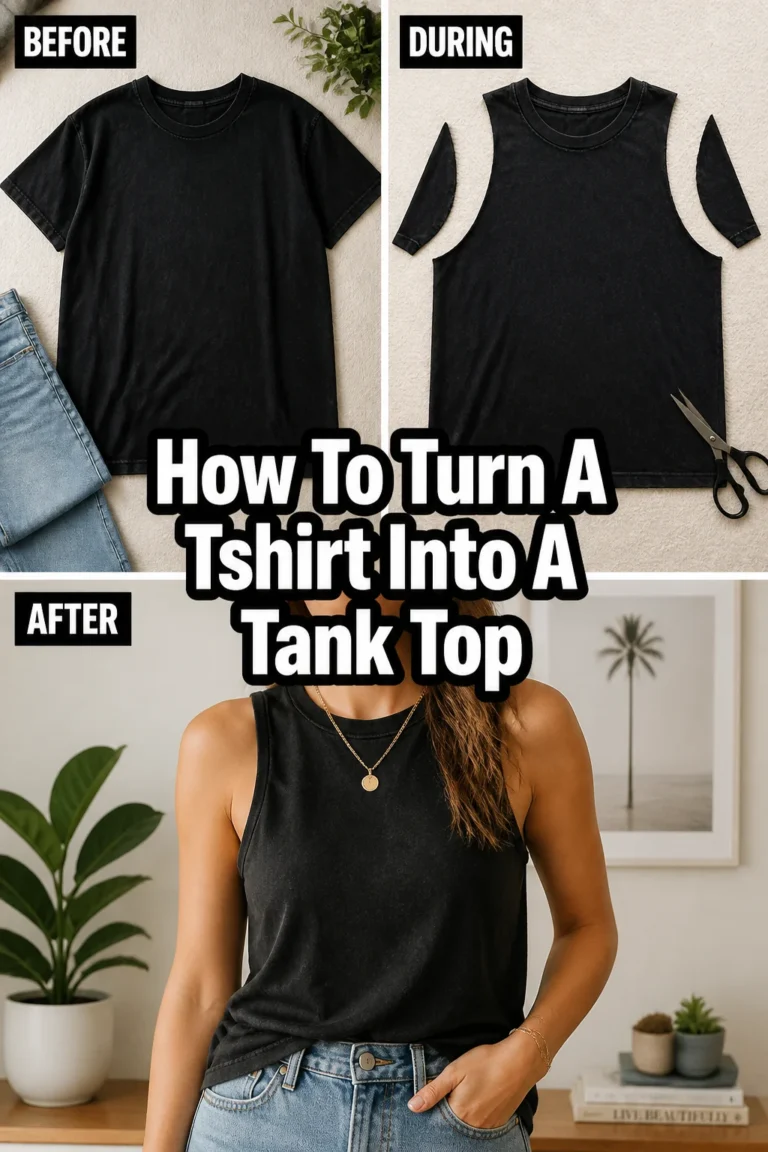
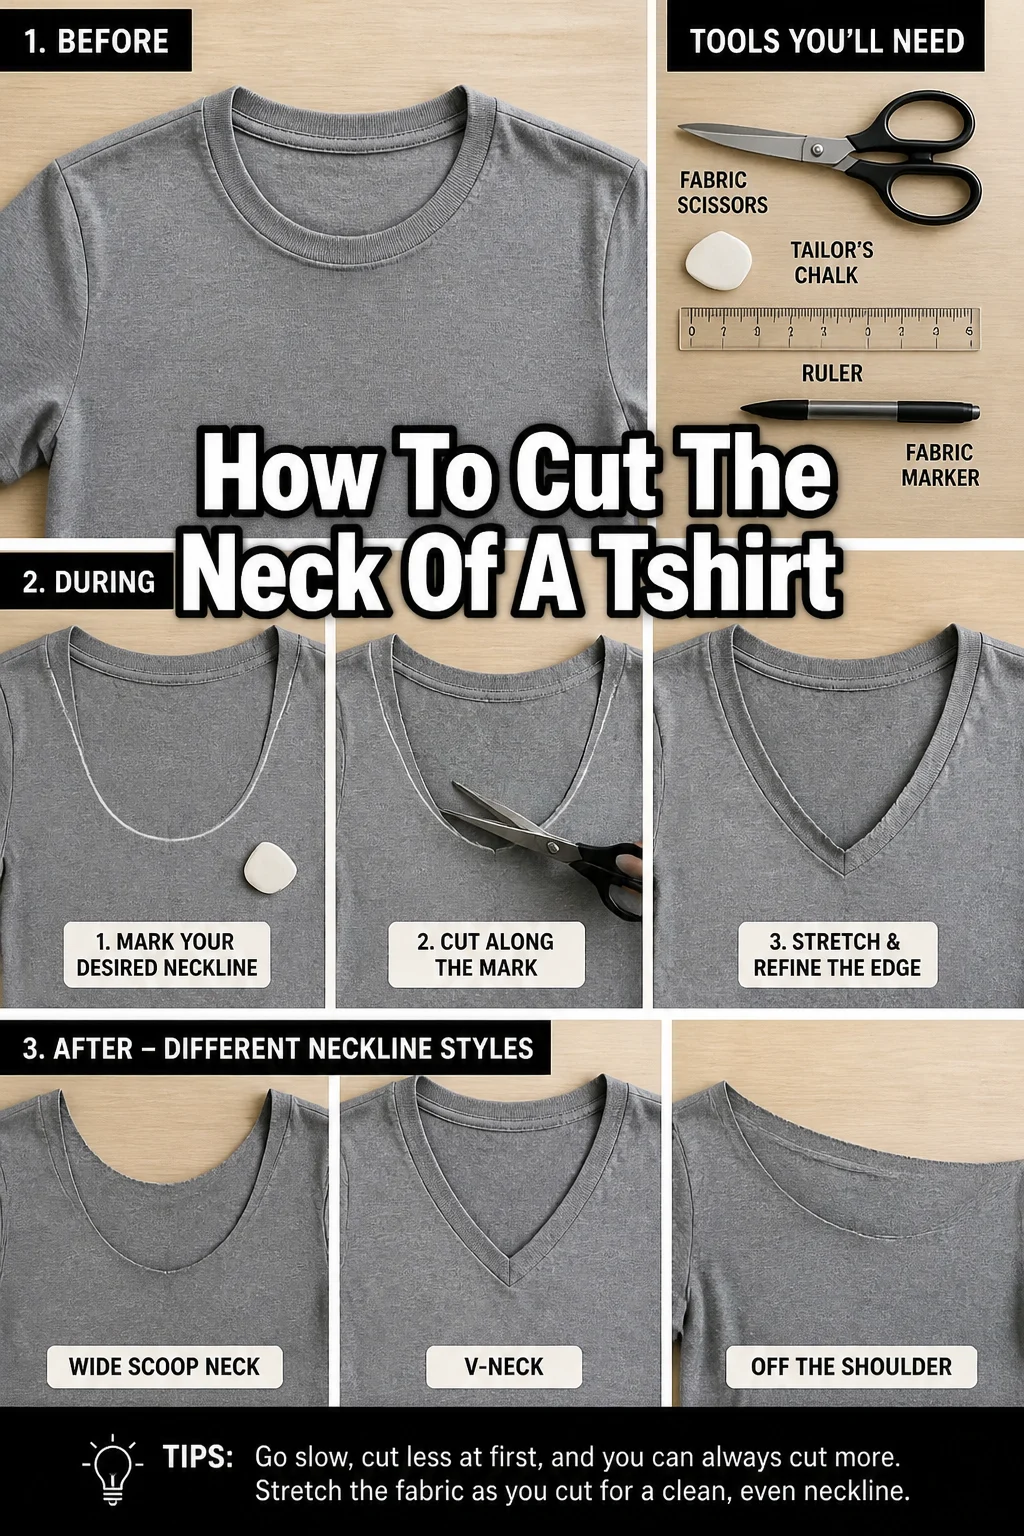
A simple scoop neck widens the existing crew neck, making it more open and relaxed. A boat neck creates a wider, shallower opening that extends closer to the shoulders.
An off-shoulder style takes the boat neck concept further, allowing the shirt to sit off one or both shoulders. A V-neck offers a more defined, angular look.
Think about the occasion and your personal style. A wider scoop or boat neck is great for a casual, breezy look, while a V-neck can be slightly more structured.
Step 4: Mark Your Cut Lines (The Scoop/Boat Neck)
Let’s start with a common and forgiving style: the scoop or boat neck. Fold your t-shirt in half lengthwise, perfectly aligning the shoulder seams and side seams.
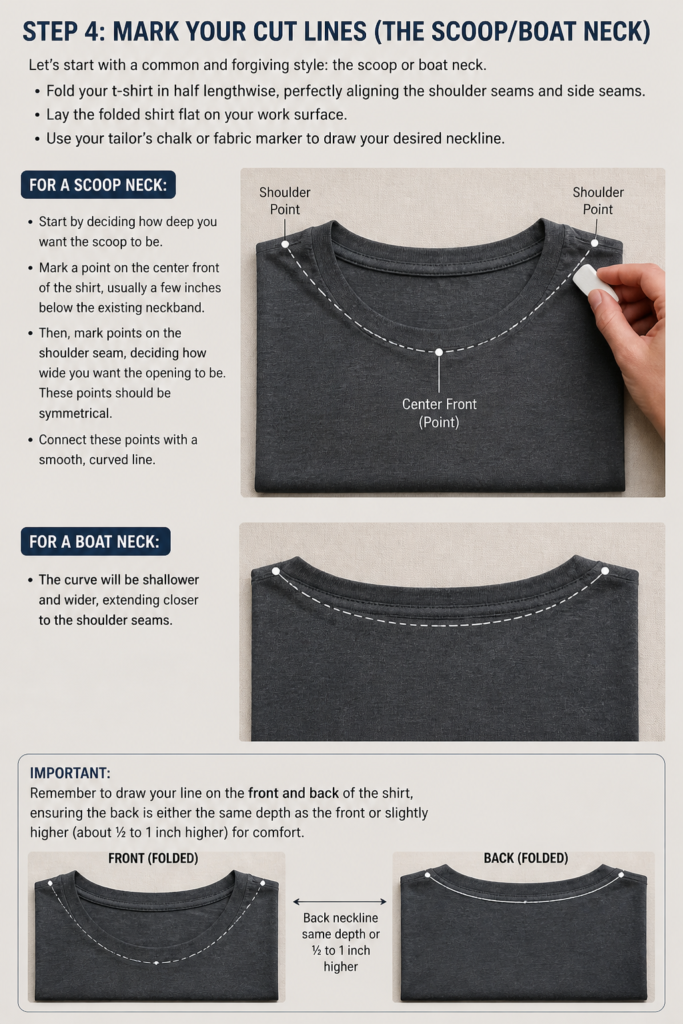
Lay the folded shirt flat on your work surface. Use your tailor’s chalk or fabric marker to draw your desired neckline.
For a scoop neck, start by deciding how deep you want the scoop to be. Mark a point on the center front of the shirt, usually a few inches below the existing neckband.
Then, mark points on the shoulder seam, deciding how wide you want the opening to be. These points should be symmetrical.
Connect these points with a smooth, curved line. For a boat neck, the curve will be shallower and wider, extending closer to the shoulder seams.
Remember to draw your line on the front and back of the shirt, ensuring the back is slightly higher than the front for most styles. This prevents the shirt from slipping off your shoulders too easily.
Pro Tip: Start small. You can always cut more, but you can’t add fabric back. Begin with a conservative line, then try the shirt on to see if you want to go deeper or wider.
Step 5: Make Your First Cuts
With your lines clearly marked, it’s time to cut. Keep your t-shirt folded in half as you cut.
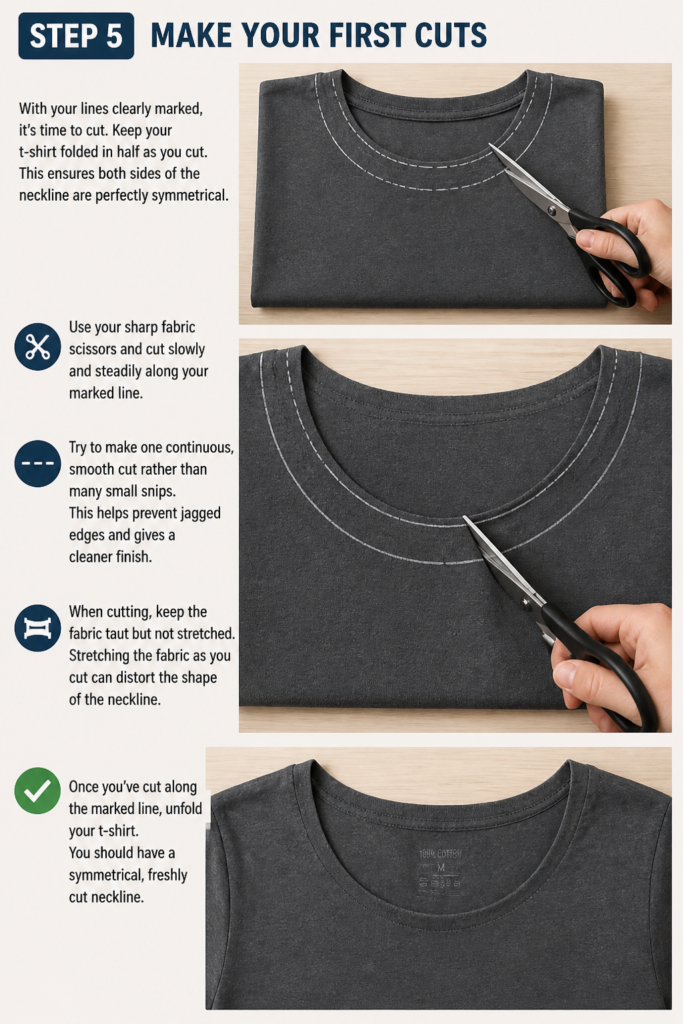
This ensures both sides of the neckline are perfectly symmetrical. Use your sharp fabric scissors and cut slowly and steadily along your marked line.
Try to make one continuous, smooth cut rather than many small snips. This helps prevent jagged edges and gives a cleaner finish.
When cutting, keep the fabric taut but not stretched. Stretching the fabric as you cut can distort the shape of the neckline.
Once you’ve cut along the marked line, unfold your t-shirt. You should have a symmetrical, freshly cut neckline.
Step 6: Refine and Adjust
After your initial cut, it’s crucial to check your work and make any necessary adjustments. Try the t-shirt on.
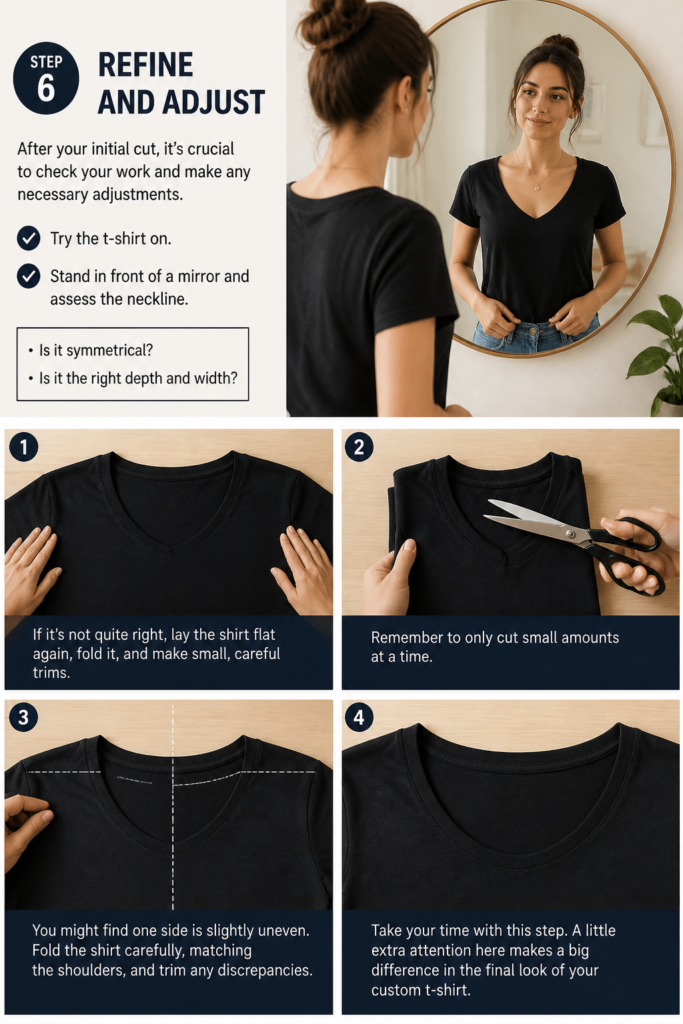
Stand in front of a mirror and assess the neckline. Is it symmetrical? Is it the right depth and width?
If it’s not quite right, lay the shirt flat again, fold it, and make small, careful trims. Remember to only cut small amounts at a time.
You might find one side is slightly uneven. Fold the shirt carefully, matching the shoulders, and trim any discrepancies.
Take your time with this step. A little extra attention here makes a big difference in the final look of your custom t-shirt.
Step 7: Finish the Edge (Optional)
Depending on the fabric and your desired look, you might want to finish the cut edge. Many t-shirt fabrics, especially cotton jerseys, will naturally roll inwards when stretched.
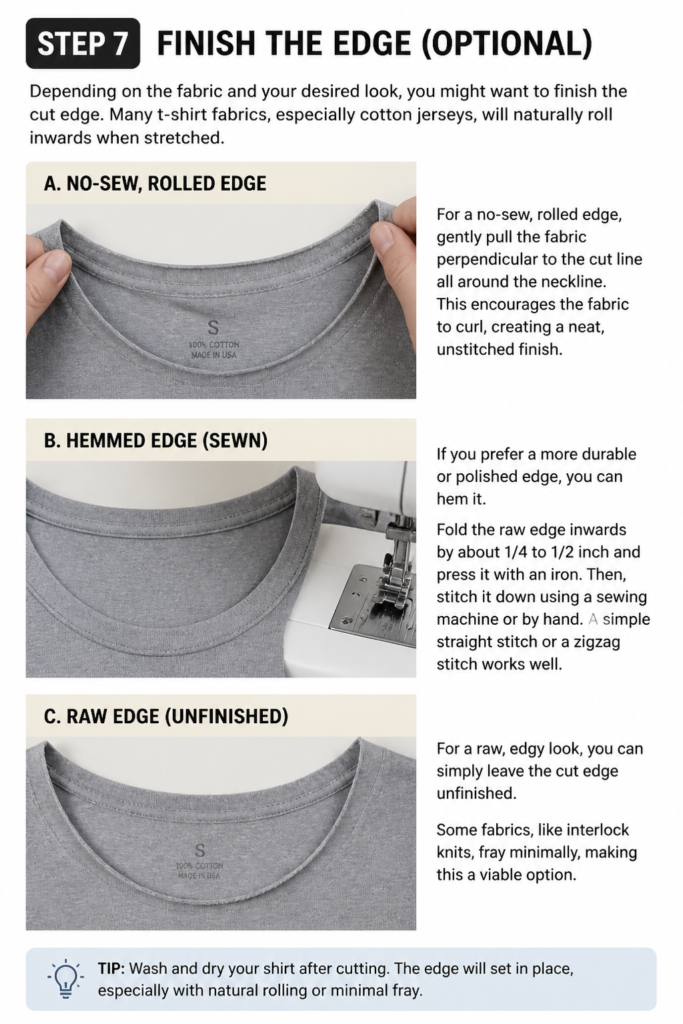
For a no-sew, rolled edge, gently pull the fabric perpendicular to the cut line all around the neckline. This encourages the fabric to curl, creating a neat, unstitched finish.
If you prefer a more durable or polished edge, you can hem it. Fold the raw edge inwards by about 1/4 to 1/2 inch and press it with an iron.
Then, stitch it down using a sewing machine or by hand. A simple straight stitch or a zigzag stitch works well.
For a raw, edgy look, you can simply leave the cut edge unfinished. Some fabrics, like interlock knits, fray minimally, making this a viable option.
Step 8: Consider a V-Neck
To create a V-neck, start with your t-shirt folded in half lengthwise, as before. Mark a central point on the front of the shirt where you want the bottom of your V to be.
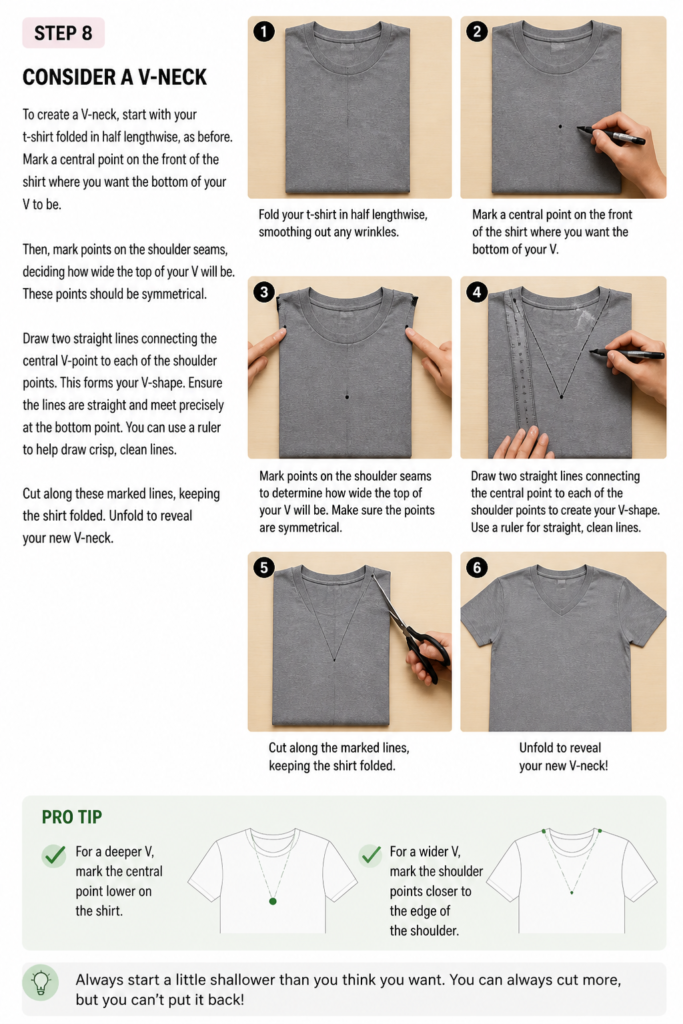
Then, mark points on the shoulder seams, deciding how wide the top of your V will be. These points should be symmetrical.
Draw two straight lines connecting the central V-point to each of the shoulder points. This forms your V-shape.
Ensure the lines are straight and meet precisely at the bottom point. You can use a ruler to help draw crisp, clean lines.
Cut along these marked lines, keeping the shirt folded. Unfold to reveal your new V-neck.
Pro Tip: For a deeper V, mark the central point lower on the shirt. For a wider V, mark the shoulder points closer to the edge of the shoulder. Always start a little shallower than you think you want, as you can always cut more.
Step 9: Try an Off-Shoulder Look
An off-shoulder neckline is perfect for a relaxed, bohemian vibe. Lay your t-shirt flat and smooth, but this time, you don’t need to fold it perfectly in half initially.
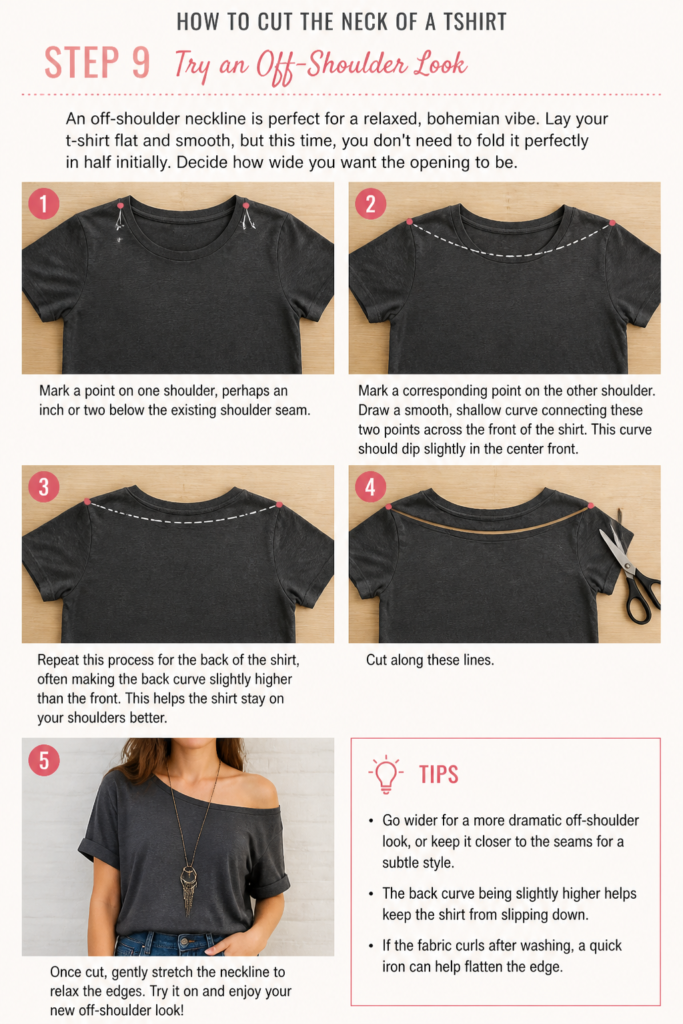
Decide how wide you want the opening to be. This style typically goes from shoulder to shoulder, potentially extending past the existing shoulder seams.
Mark a point on one shoulder, perhaps an inch or two below the existing shoulder seam. Then, mark a corresponding point on the other shoulder.
Draw a smooth, shallow curve connecting these two points across the front of the shirt. This curve should dip slightly in the center front.
Repeat this process for the back of the shirt, often making the back curve slightly higher than the front. This helps the shirt stay on your shoulders better.
Cut along these lines. Once cut, gently stretch the neckline to encourage the fabric to roll. This helps create that characteristic relaxed, off-shoulder look.
Common Mistakes to Avoid
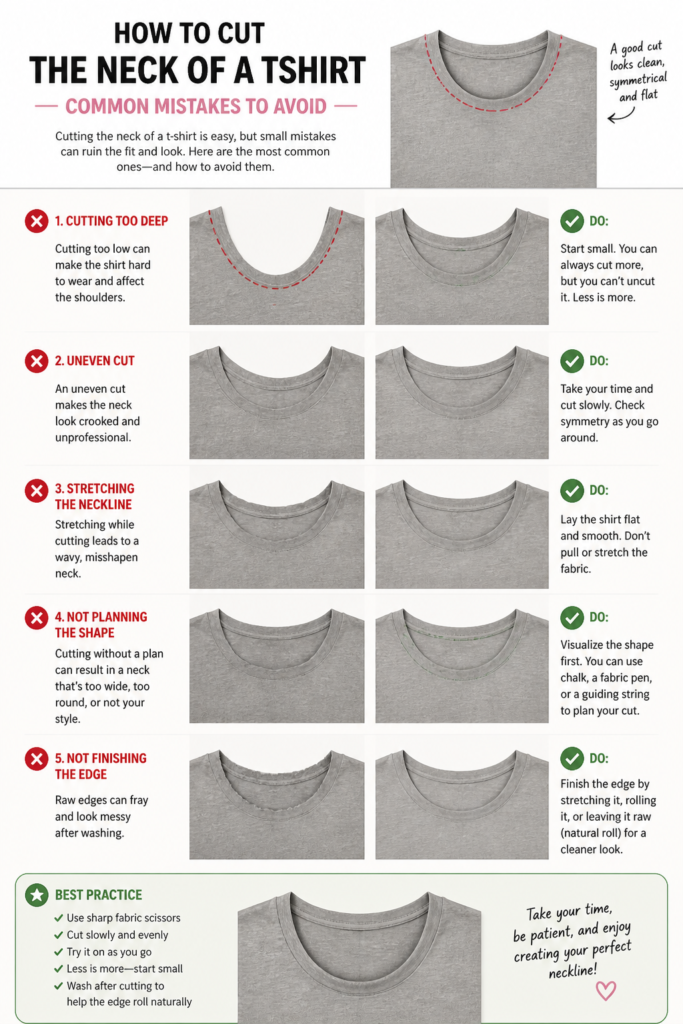
Cutting Too Much Too Soon
This is the most frequent mistake. Once fabric is cut, it cannot be put back. Always mark your lines conservatively and start with a smaller cut than you think you need. Try the shirt on after the initial cut and make smaller, incremental trims until you reach your desired look. Patience here saves your shirt.
Using Dull Scissors
Dull scissors will chew through fabric, leaving frayed, uneven, and jagged edges. This makes the cut look messy and unprofessional, and can also make the fabric prone to further fraying. Always use sharp fabric scissors, reserved only for fabric, to ensure clean, crisp cuts.
Ignoring Fabric Stretch
Different fabrics behave differently. A stretchy cotton jersey will roll and relax beautifully, while a stiffer cotton blend might fray more or not drape as desired. Consider the fabric’s natural stretch and recovery before you cut. Gently stretching the fabric after cutting can help encourage rolling edges in knits.
Not Planning Your Cut
Impulsively cutting without marking first often leads to asymmetrical or uneven necklines. Always take the time to lay your shirt flat, smooth it out, and clearly mark your cut lines with tailor’s chalk or a fabric marker. Folding the shirt in half and marking ensures symmetry from the start.
Troubleshooting
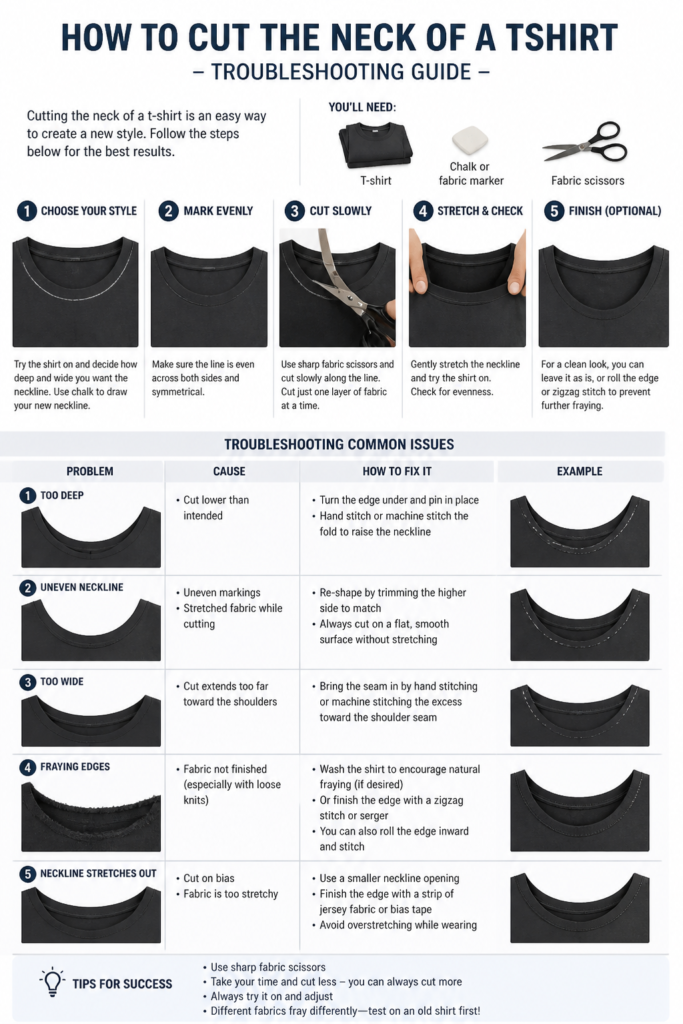
Uneven Neckline
If your neckline turns out uneven, don’t panic. Lay the t-shirt flat, fold it in half carefully, aligning the shoulder seams and the center of the neckline. Identify the longer or deeper side. Use your tailor’s chalk to draw a new, symmetrical line that matches the shorter or shallower side. Carefully trim the excess fabric from the uneven side.
Fraying Edges
If your fabric is fraying more than desired, especially if it’s not a knit fabric, you have a few options. For a quick fix, you can apply a small amount of fabric glue or “Fray Check” along the raw edge. For a more permanent solution, you’ll need to hem the edge, either by hand or with a sewing machine. A narrow zigzag stitch can also help contain fraying.
Neckline Too Wide/Loose
If you’ve cut your neckline too wide or too loose, there are creative ways to salvage it. You can gather the fabric at the shoulders and stitch it down, creating a ruched effect. Another option is to thread a drawstring or a piece of elastic through a small casing sewn along the edge of the neckline, allowing you to cinch it tighter. You could also add decorative ties at the shoulders.
Key Takeaways
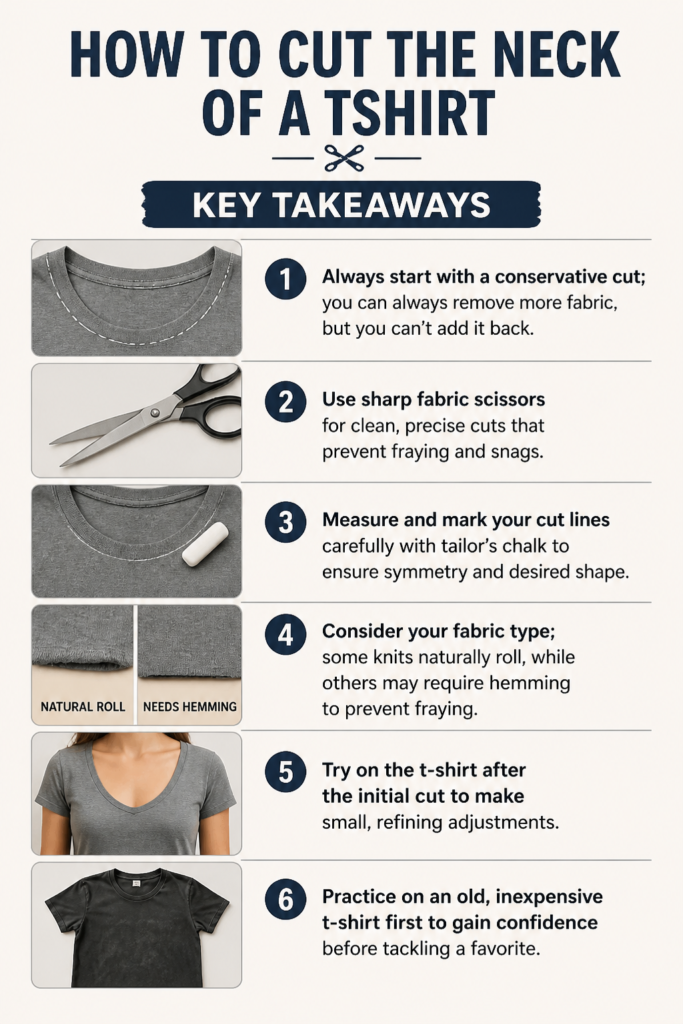
Always start with a conservative cut; you can always remove more fabric, but you can’t add it back.
Use sharp fabric scissors for clean, precise cuts that prevent fraying and snags.
Measure and mark your cut lines carefully with tailor’s chalk to ensure symmetry and desired shape.
Consider your fabric type; some knits naturally roll, while others may require hemming to prevent fraying.
Try on the t-shirt after the initial cut to make small, refining adjustments.
Practice on an old, inexpensive t-shirt first to gain confidence before tackling a favorite.
Frequently Asked Questions
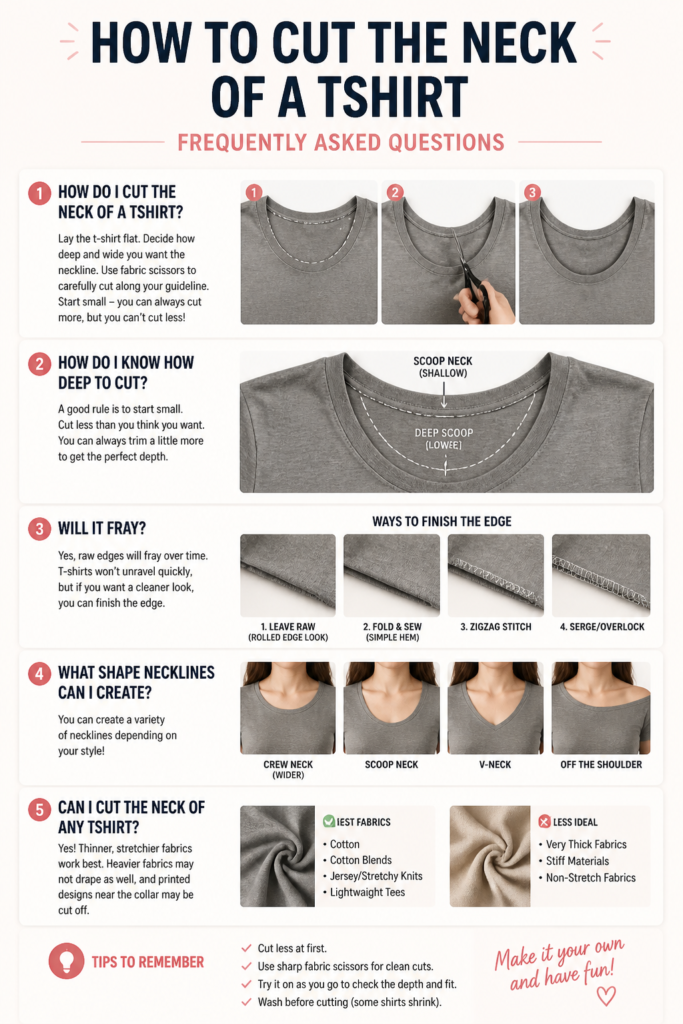
Can I cut any t-shirt fabric?
Most t-shirt fabrics, especially cotton or cotton blends, are suitable for cutting. Knit fabrics (like jersey) are generally easier to work with as they tend to roll rather than fray excessively. Woven fabrics, however, will fray significantly and will almost always require hemming or a fabric sealant to prevent unraveling.
Will the cut edge fray?
Whether the cut edge frays depends largely on the fabric type. Knit fabrics, which are common for t-shirts, are made of interlocking loops and tend to roll rather than fray much. Woven fabrics, on the other hand, will fray along the cut edge. For non-fraying fabric or a clean finish, you can either hem the edge or use a product like “Fray Check.”
How do I make a V-neck from a crew neck?
To create a V-neck, fold your t-shirt in half lengthwise. Mark a point at the center front for the bottom of your ‘V’ and two points on the shoulder seams for the top edges. Draw straight lines connecting the center point to each shoulder point. Cut along these lines while the shirt is folded to ensure symmetry.
Do I need to hem the cut edge?
Hemming the cut edge is often optional, especially for knit t-shirts. Many knit fabrics will naturally roll inwards when gently stretched, creating a neat, unstitched finish. However, if you prefer a more polished look, are working with a fabric that frays, or want added durability, hemming the edge by hand or machine is a good idea.
Our Top Recommended Finds
High-Quality Fabric Shears: Essential for clean, precise cuts without damaging your fabric.
Washable Fabric Marker Set: Allows you to clearly mark your cut lines without leaving permanent traces.
Soft Retractable Measuring Tape: Flexible and easy to use for accurate measurements on curved surfaces.
Your T-Shirt’s New Beginning Awaits
Cutting the neck of a t-shirt is a simple yet impactful way to refresh your wardrobe and express your personal style. It’s an accessible project that doesn’t require advanced sewing skills, just a keen eye and a steady hand.
Once you’ve mastered the basic neckline cuts, you might consider other t-shirt customizations like distressing, adding patches, or even tie-dyeing. The possibilities for creative expression are endless. Grab an old tee today and get cutting – you’ll be amazed at the transformation!
Beginner-friendly templates, step-by-step guides,
and weekly project ideas in your inbox.