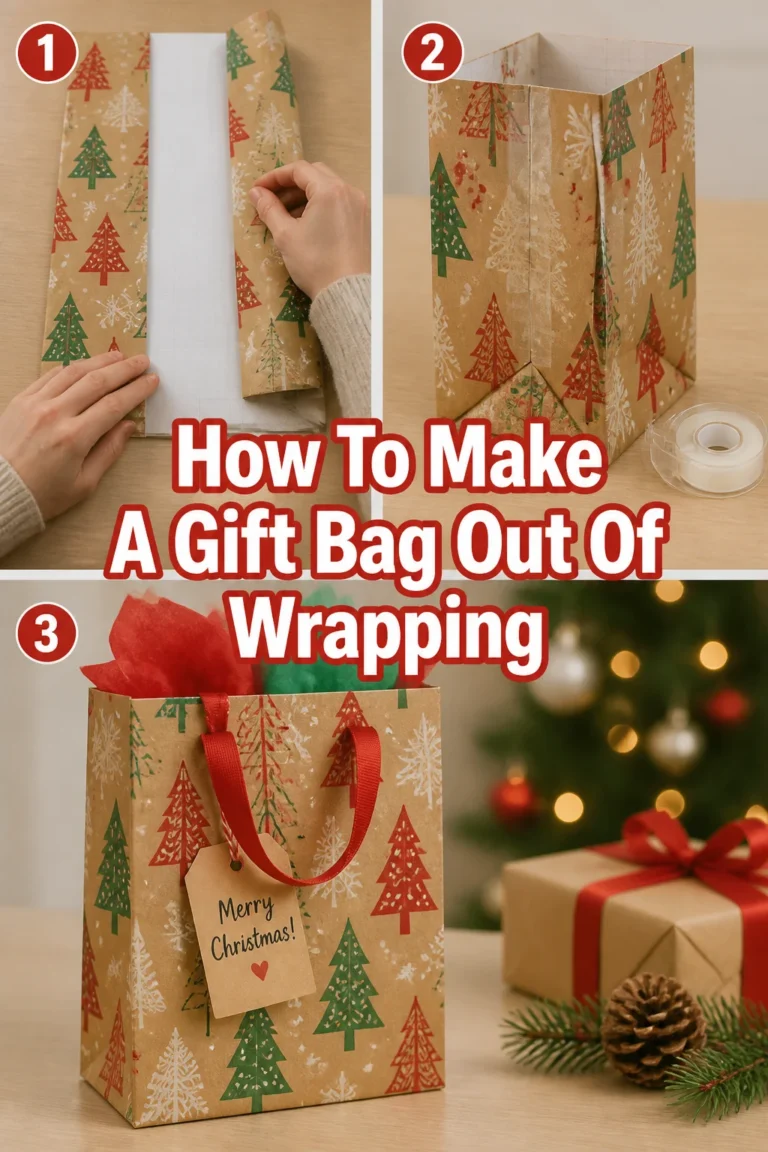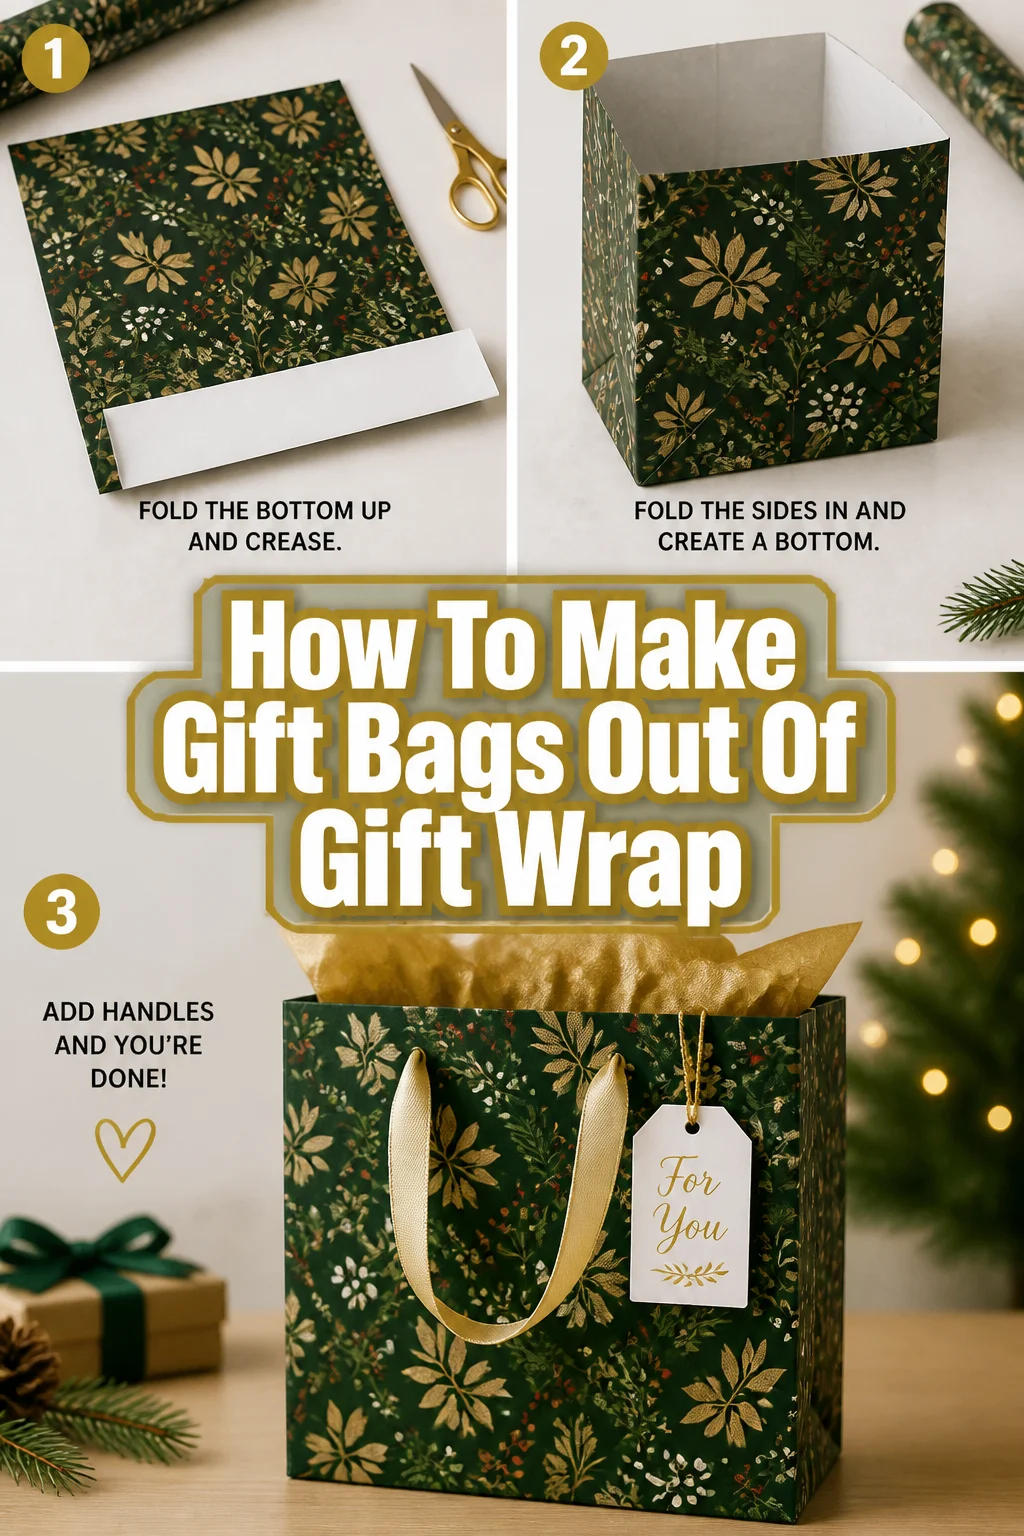
🎁 How To Make Gift Bags Out Of Gift Wrap
Have you ever found yourself with a beautifully wrapped gift, only to realize you’re missing a suitable gift bag? It happens to the best of us.
I remember once, with only minutes to spare before a birthday party, staring at a pile of leftover wrapping paper and a present that absolutely needed a bag. That moment of panic turned into a creative solution.
Transforming gift wrap into a custom bag is not just a last-minute savior; it’s a wonderfully personal touch. This guide will walk you through creating sturdy, stylish gift bags, one simple step at a time. You’ll learn the secrets to making bags that look professionally crafted, all from materials you likely already have.
Quick Overview
Making a gift bag from wrapping paper is a rewarding craft that adds a personal touch to any present. You’ll be creating a custom container, perfect for uniquely shaped items or simply for a more elegant presentation.
This project is a fantastic way to use up leftover paper and reduce waste. It also allows for complete customization to match your gift or occasion.
- Time needed: 30-60 minutes (depending on size and embellishments)
- Difficulty: Beginner
- What you’ll need: Gift wrap, scissors, ruler, pencil, tape or glue, hole punch, ribbon
Step-by-Step Instructions
Step 1: Gather Your Materials
Before you begin, ensure you have all the necessary items within reach. A clear workspace will make the process much smoother.
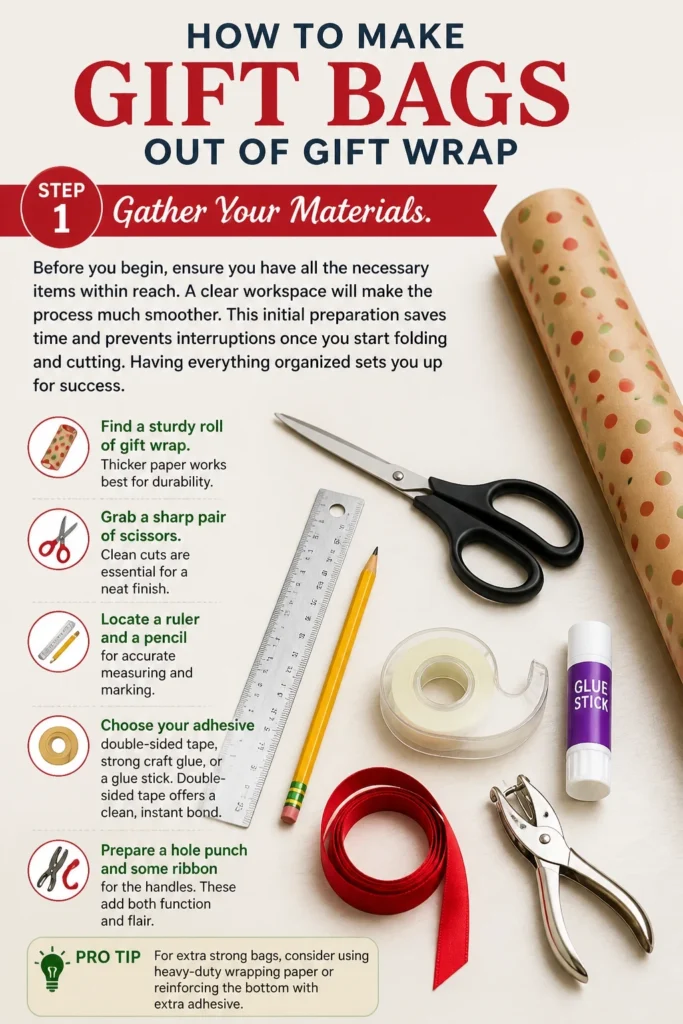
This initial preparation saves time and prevents interruptions once you start folding and cutting. Having everything organized sets you up for success.
- Find a sturdy roll of gift wrap. Thicker paper works best for durability.
- Grab a sharp pair of scissors. Clean cuts are essential for a neat finish.
- Locate a ruler and a pencil for accurate measuring and marking. Precision is key.
- Choose your adhesive: double-sided tape, strong craft glue, or a glue stick. Double-sided tape offers a clean, instant bond.
- Prepare a hole punch and some ribbon for the handles. These add both function and flair.
Pro Tip: For extra strong bags, consider using heavy-duty wrapping paper or even wallpaper samples. The thicker the paper, the more robust your finished bag will be.
Step 2: Measure and Cut Your Wrap
Accurate measurements are the foundation of a well-proportioned gift bag. Take your time with this step to avoid lopsided results.
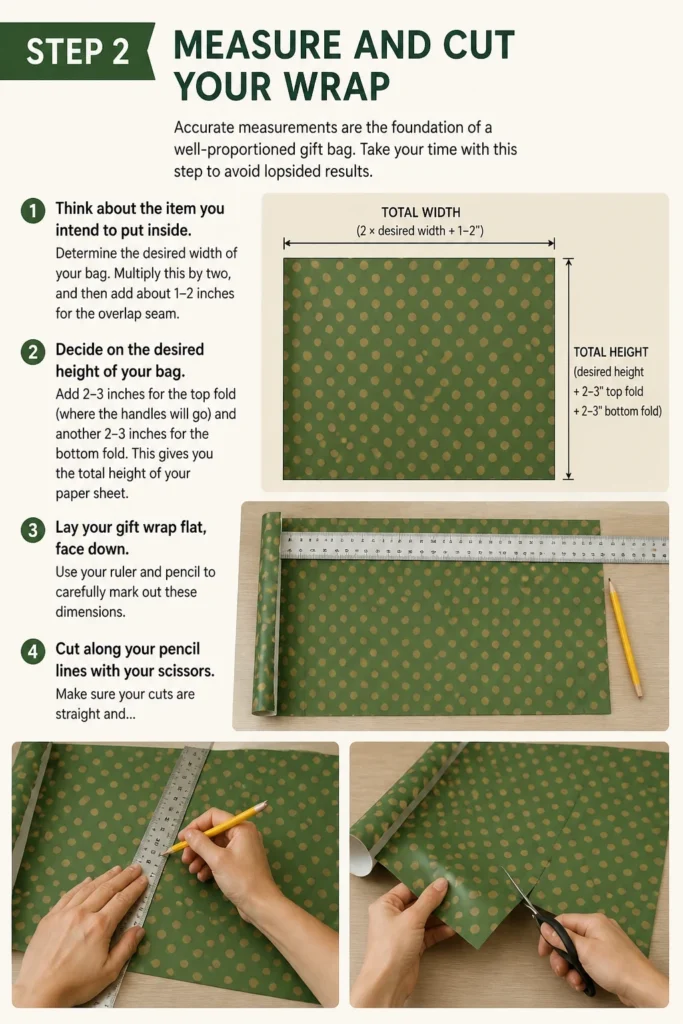
The dimensions of your paper will dictate the final size of your bag. Think about the item you intend to put inside.
- Determine the desired width of your bag. Multiply this by two, and then add about 1-2 inches for the overlap seam. This gives you the total width of your paper sheet.
- Decide on the desired height of your bag. Add 2-3 inches for the top fold (where the handles will go) and another 2-3 inches for the bottom fold. This gives you the total height of your paper sheet.
- Lay your gift wrap flat, face down. Use your ruler and pencil to carefully mark out these dimensions.
- Cut along your pencil lines with your scissors. Make sure your cuts are straight and clean.
Step 3: Form the Main Body
Now you will begin to shape the core of your gift bag. This involves creating the main cylindrical or rectangular form.
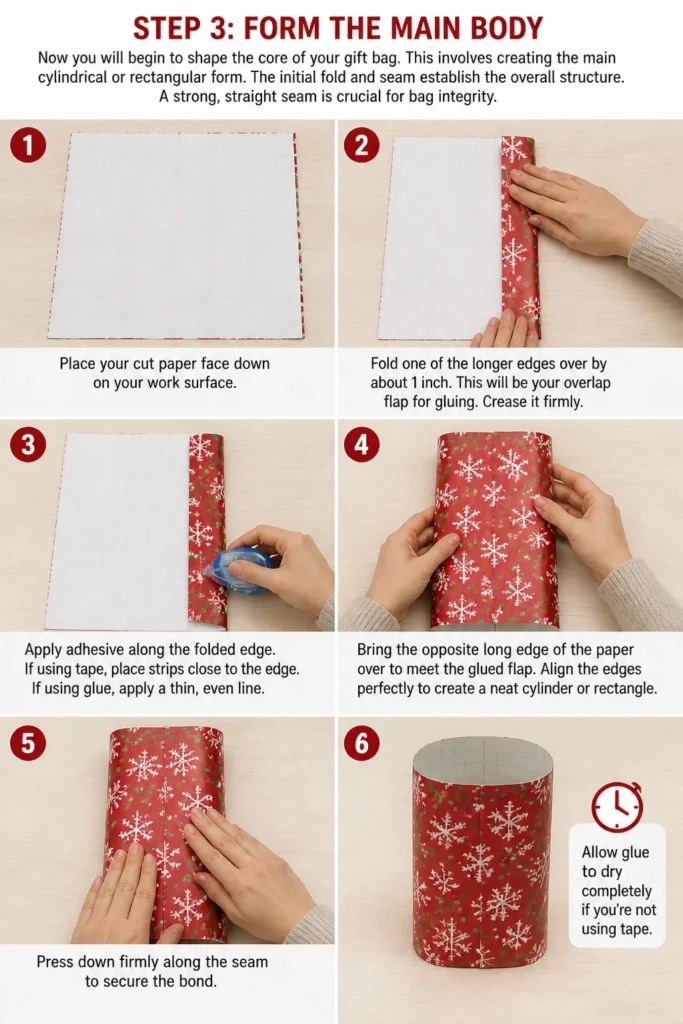
The initial fold and seam establish the overall structure. A strong, straight seam is crucial for bag integrity.
- Place your cut paper face down on your work surface.
- Fold one of the longer edges over by about 1 inch. This will be your overlap flap for gluing. Crease it firmly.
- Apply adhesive along the folded edge. If using tape, place strips close to the edge. If using glue, apply a thin, even line.
- Bring the opposite long edge of the paper over to meet the glued flap. Align the edges perfectly to create a neat cylinder or rectangle.
- Press down firmly along the seam to secure the bond. Allow glue to dry completely if you’re not using tape.
Step 4: Create the Bottom Fold
The bottom of your bag needs to be strong and stable to hold the gift. This step involves a series of precise folds.
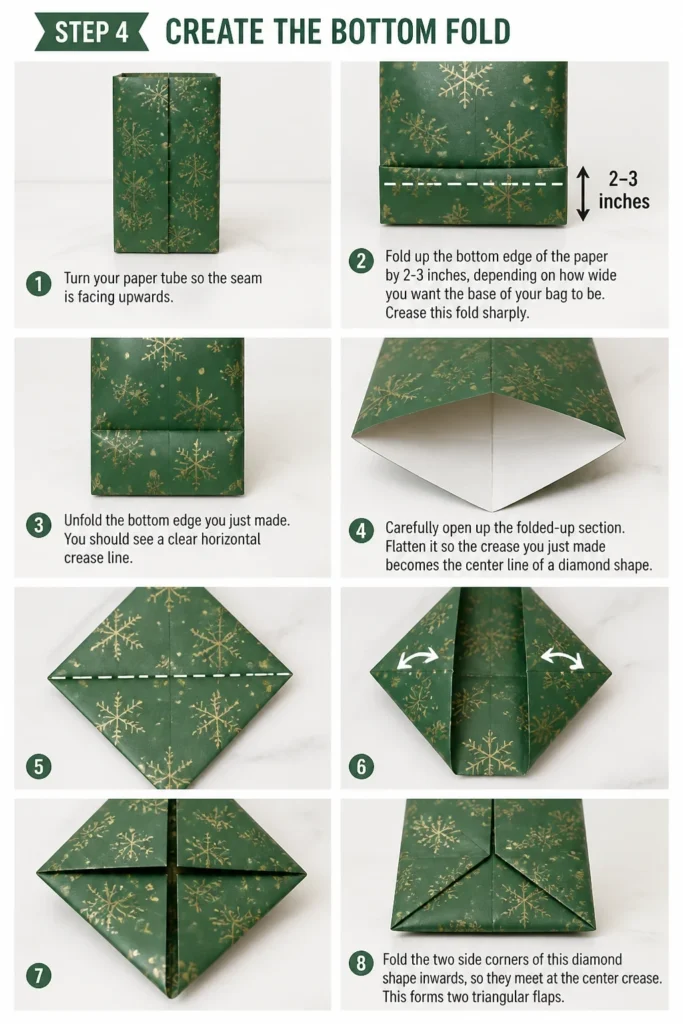
A well-constructed bottom ensures your bag can stand upright and support its contents. This is where the bag gains its load-bearing strength.
- Turn your paper tube so the seam is facing upwards.
- Fold up the bottom edge of the paper by 2-3 inches, depending on how wide you want the base of your bag to be. Crease this fold sharply.
- Unfold the bottom edge you just made. You should see a clear horizontal crease line.
- Carefully open up the folded-up section. Flatten it so the crease you just made becomes the center line of a diamond shape.
- Fold the two side corners of this diamond shape inwards, so they meet at the center crease. This forms two triangular flaps.
Step 5: Reinforce the Bottom
Adding reinforcement to the bottom ensures the bag won’t easily tear or sag under the weight of a gift. This step is optional but highly recommended for durability.
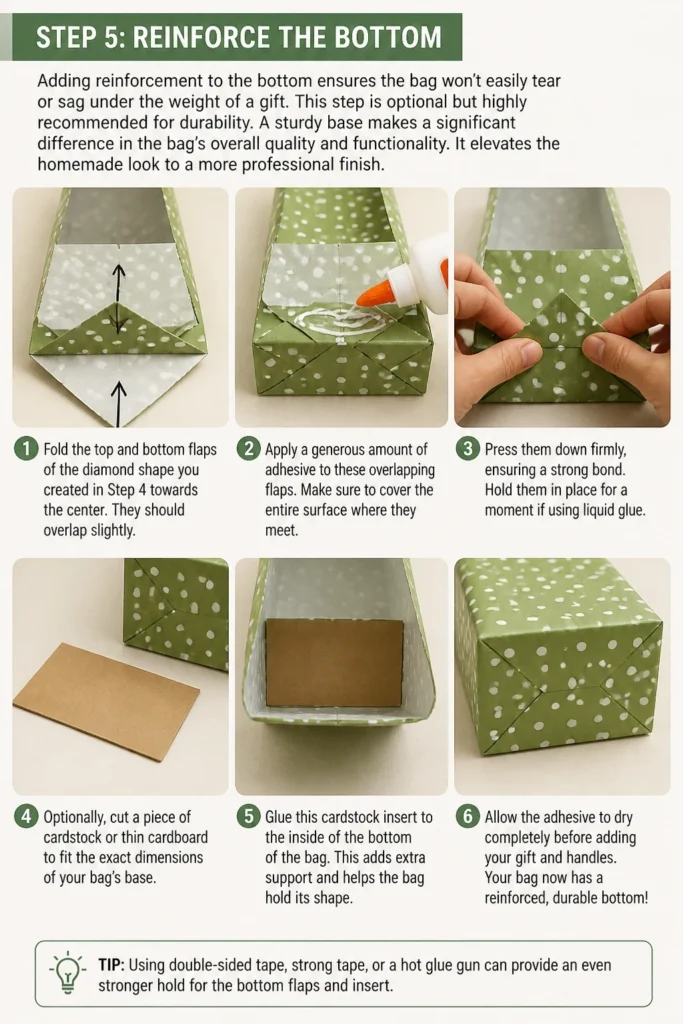
A sturdy base makes a significant difference in the bag’s overall quality and functionality. It elevates the homemade look to a more professional finish.
- Fold the top and bottom flaps of the diamond shape you created in Step 4 towards the center. They should overlap slightly.
- Apply a generous amount of adhesive to these overlapping flaps. Make sure to cover the entire surface where they meet.
- Press them down firmly, ensuring a strong bond. Hold them in place for a moment if using liquid glue.
- Optionally, cut a piece of cardstock or thin cardboard to fit the exact dimensions of your bag’s base.
- Glue this cardstock insert to the inside bottom of your bag for extra rigidity. This provides a flat, stable platform for your gift.
Pro Tip: For gifts that are heavy or have sharp edges, always add a cardstock insert to the bottom. This prevents the gift from tearing through the paper.
Step 6: Fold the Sides (Gussets)
The side gussets are what give your bag depth and allow it to expand. This crucial step transforms a flat shape into a functional bag.
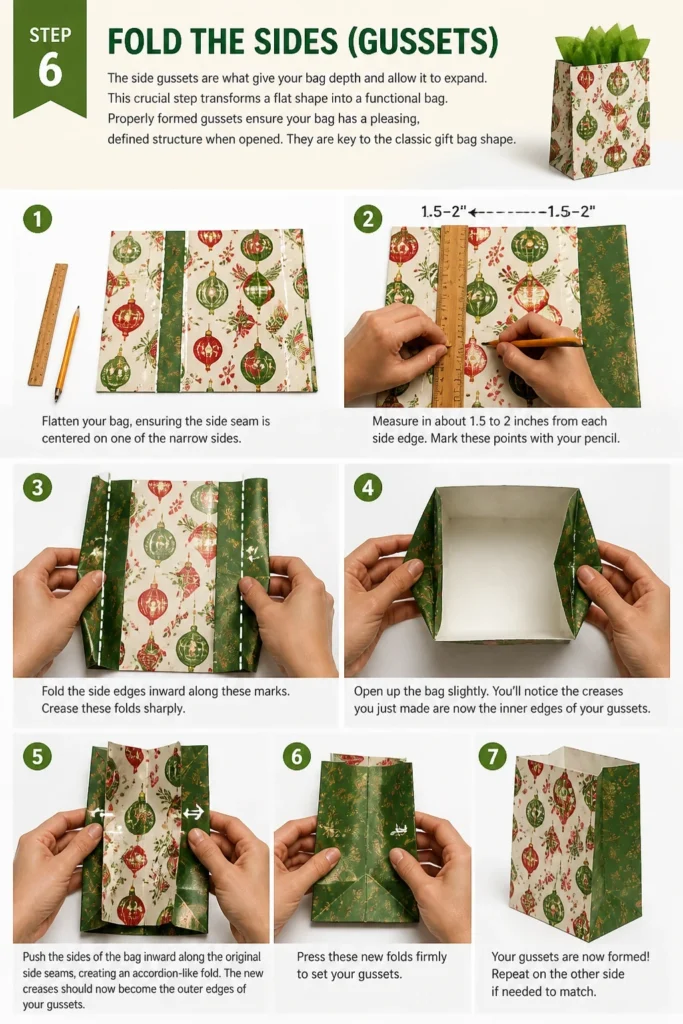
Properly formed gussets ensure your bag has a pleasing, defined structure when opened. They are key to the classic gift bag shape.
- Flatten your bag, ensuring the side seam is centered on one of the narrow sides.
- Measure in about 1.5 to 2 inches from each side edge. Mark these points with your pencil.
- Fold the side edges inward along these marks. Crease these folds sharply.
- Open up the bag slightly. You’ll notice the creases you just made are now the inner edges of your gussets.
- Push the sides of the bag inward along the original side seams, creating an accordion-like fold. The new creases should now become the outer edges of your gussets.
- Press these new folds down firmly. When the bag is flat, the gussets will be folded inward, creating a neat, compact shape.
Step 7: Prepare the Top Edge
A clean, finished top edge not only looks better but also reinforces the area where the handles will be attached. This step adds polish to your bag.
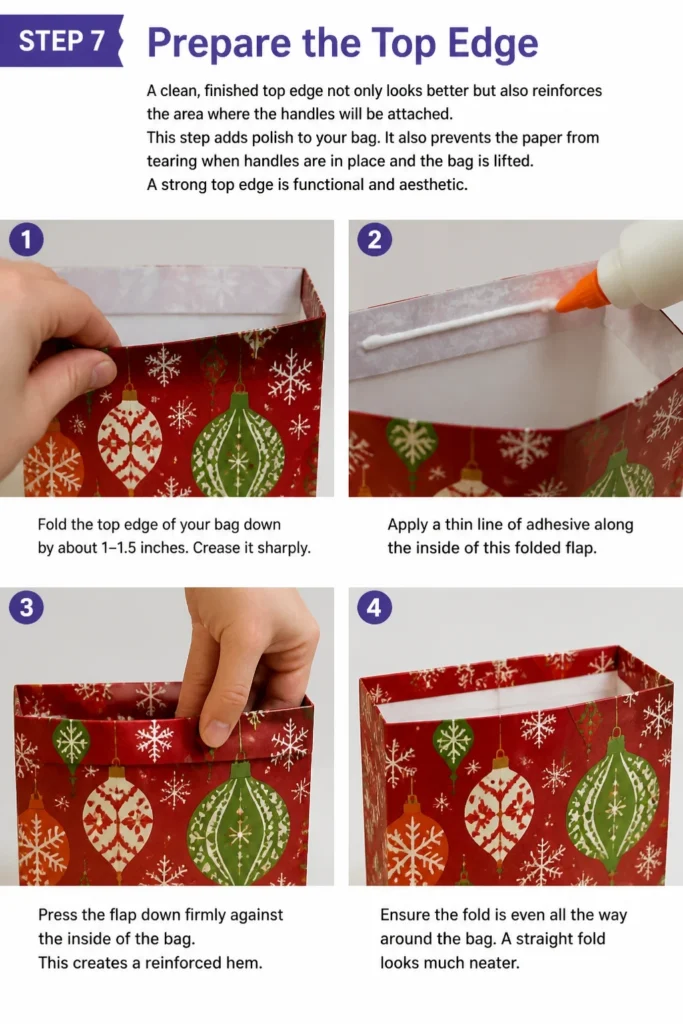
It also prevents the paper from tearing when handles are in place and the bag is lifted. A strong top edge is functional and aesthetic.
- Fold the top edge of your bag down by about 1-1.5 inches. Crease it sharply.
- Apply a thin line of adhesive along the inside of this folded flap.
- Press the flap down firmly against the inside of the bag. This creates a reinforced hem.
- Ensure the fold is even all the way around the bag. A straight fold looks much neater.
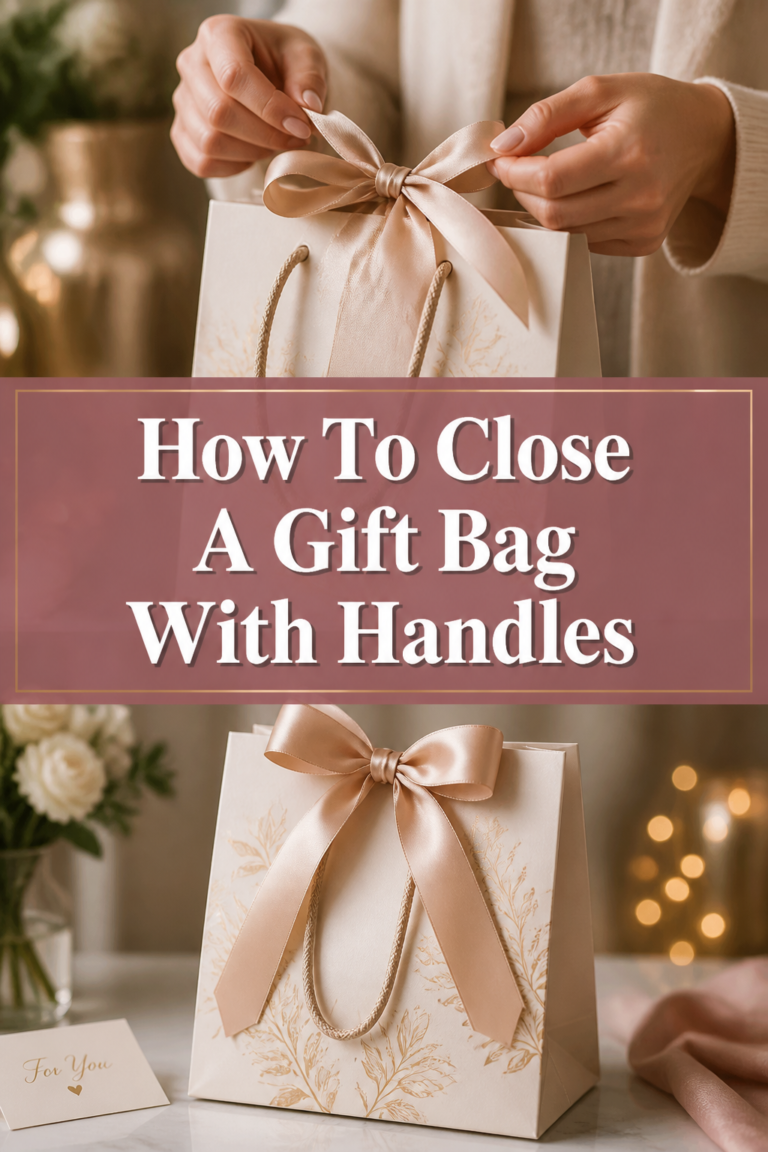
Step 8: Add Handles
Handles transform your paper creation into a functional gift bag. There are several ways to add them, but a classic ribbon loop is popular.
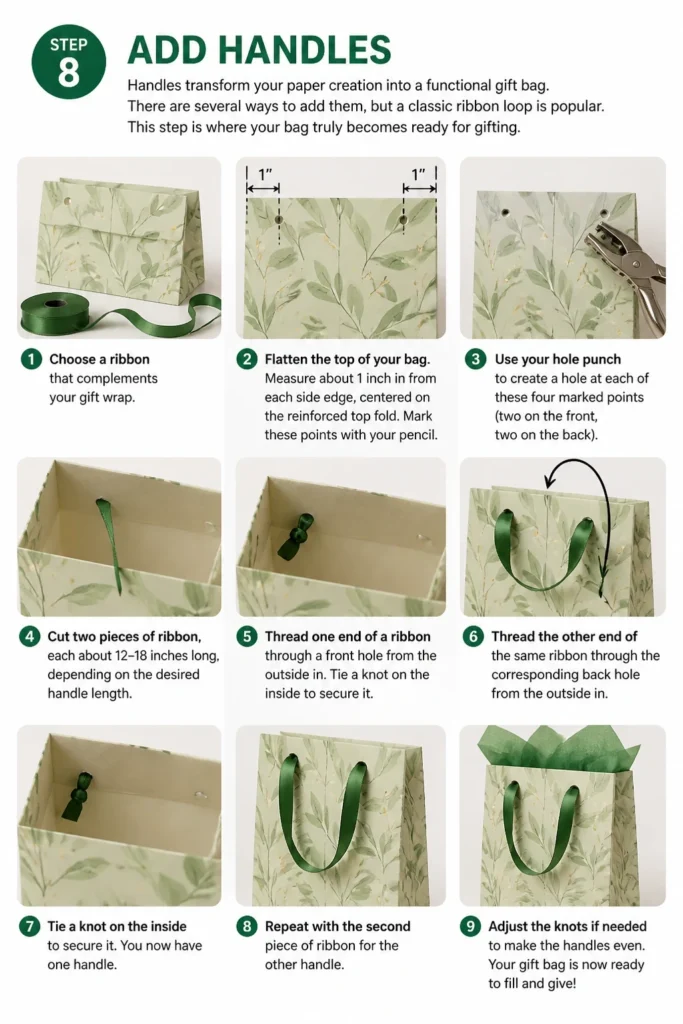
This step is where your bag truly becomes ready for gifting. Choose a ribbon that complements your gift wrap.
- Flatten the top of your bag again.
- Measure about 1 inch in from each side edge, centered on the reinforced top fold. Mark these points with your pencil.
- Use your hole punch to create a hole at each of these four marked points (two on the front, two on the back).
- Cut two pieces of ribbon, each about 12-18 inches long, depending on the desired handle length.
- Thread one end of a ribbon through a front hole from the outside in. Tie a knot on the inside to secure it.
- Thread the other end of the same ribbon through the corresponding back hole from the outside in. Tie another knot on the inside.
- Repeat for the second handle on the other side of the bag.
Pro Tip: For heavier gifts, reinforce the handle holes with metal eyelets before adding the ribbon. This prevents tearing around the holes.
Step 9: Decorate and Personalize
The final step is where you can truly make the gift bag your own. Personalization adds a thoughtful touch that elevates your gift.
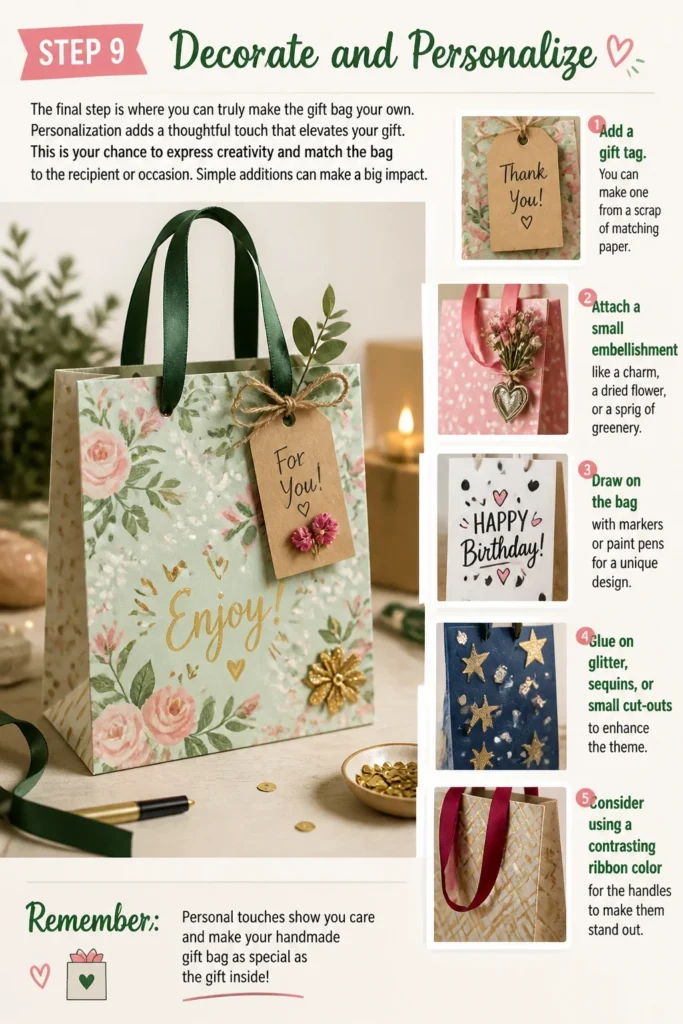
This is your chance to express creativity and match the bag to the recipient or occasion. Simple additions can make a big impact.
- Add a gift tag. You can make one from a scrap of matching paper.
- Attach a small embellishment like a charm, a dried flower, or a sprig of greenery.
- Draw on the bag with markers or paint pens for a unique design.
- Glue on glitter, sequins, or small cut-outs to enhance the theme.
- Consider using a contrasting ribbon color for the handles to make them stand out.
Common Mistakes to Avoid
Incorrect Measurements
Many people rush the initial measuring step, leading to lopsided or incorrectly sized bags. This can result in a bag that’s too small for the gift or one that looks unprofessional. Always double-check your measurements before cutting. Use a ruler consistently and mark lightly with a pencil, allowing for adjustments.
Weak Seams
Using too little adhesive or not allowing glue enough drying time is a common pitfall. A weak seam will fail, causing the bag to fall apart when lifted or filled. Apply a generous, even amount of strong adhesive, especially along the main body seam and the bottom flaps. If using glue, give it ample time to cure before handling the bag extensively.
Ignoring Gussets
Some skip the step of folding the side gussets properly, thinking it’s less important. However, without well-defined gussets, the bag won’t open up correctly and will lack its characteristic depth. Take the time to create sharp, even folds for the gussets. This ensures your bag has a professional, functional shape.
Rushing the Drying Time
Impatience can lead to frustrating accidents. Trying to fill or handle a bag before the adhesive is fully dry will cause seams to separate. Always allow sufficient drying time for all glued sections. Depending on the glue, this could range from a few minutes to several hours. Plan ahead to avoid last-minute mishaps.
Troubleshooting
Bag Tearing
If your gift bag tears easily, especially at the seams or around the handles, it’s often due to using thin paper or insufficient adhesive. To fix this, you can reinforce the inside of the bag with additional strips of tape or a second layer of paper. For future bags, opt for thicker wrapping paper or add a cardstock insert to the bottom for extra strength.
Handles Pulling Out
When handles detach from the bag, it usually means the holes weren’t reinforced or the knots weren’t secure enough. To remedy this, re-thread the ribbon and tie larger, tighter knots on the inside. For better durability, consider adding small pieces of tape or paper reinforcement around the holes on the inside before tying the knots. Metal eyelets are an excellent long-term solution.
Bag Won’t Stand Upright
If your finished bag collapses or won’t stand on its own, the bottom fold might not be flat enough, or the gussets are uneven. First, gently press the bottom of the bag flat against a table to ensure all creases are sharp. Then, check the gusset folds and re-crease them if they seem rounded. Adding a piece of cardstock or thin cardboard to the inside bottom of the bag will significantly improve its stability and allow it to stand proudly.
Key Takeaways
- Accurate measuring is the foundation for a well-proportioned and professional-looking gift bag.
- Strong adhesive and proper drying time are crucial for durable seams that won’t fail.
- Creating well-defined side gussets gives your bag its essential depth and classic shape.
- Reinforcing the bottom and handle areas significantly increases the bag’s strength and longevity.
- Personalizing your handmade gift bag adds a unique touch that shows extra thought and care.
- This craft is an excellent way to use leftover gift wrap, promoting creativity and reducing waste.
Frequently Asked Questions
What kind of gift wrap works best?
Thicker, sturdier gift wrap is ideal for making bags. Think about paper with a bit of gloss or a heavier weight. Avoid very thin or flimsy paper, as it tends to tear easily and won’t hold its shape well. Craft paper, old maps, or even wallpaper samples can also be excellent alternatives.
Can I make different sizes?
Absolutely! The beauty of this DIY project is its complete scalability. Simply adjust your initial measurements (width and height) to suit the size of your gift. Remember to proportionally increase the bottom and top fold allowances for larger bags to maintain stability and strength.
How do I make it stronger?
To increase the strength of your gift bag, there are several tricks. Use double-sided tape or strong craft glue for all seams. Incorporate a cardstock or thin cardboard insert for the bottom. For heavy items, you can even line the entire inside of the bag with a second layer of gift wrap or craft paper, gluing it securely.
What if I don’t have a hole punch?
No hole punch? No problem! You can use a sharp pair of scissors to carefully snip two small slits instead of holes for each handle. Alternatively, you can create a reinforced flap by folding the top edge down twice, then stapling your ribbon handles directly to the inside of this reinforced flap.
Our Top Recommended Finds
- High-Quality Double-Sided Tape: Offers a clean, instant, and strong bond without the drying time of liquid glue. Perfect for quick and neat seams.
- Precision Craft Scissors: A sharp, comfortable pair of scissors makes cutting straight lines and intricate details much easier, resulting in a cleaner finish.
- A Good Metal Ruler: Essential for accurate measuring and creating crisp, straight folds. A non-slip backing is a bonus for stability.
Embrace Your Creative Gifting Journey
Making gift bags from wrapping paper is more than just a craft; it’s an act of thoughtful creativity. Each bag you create carries a piece of your effort and care, making the gift inside even more special. You’re not just presenting a present; you’re presenting an experience.
Now that you have the steps, gather your materials and let your imagination take over. You might discover a new favorite way to personalize your gifts. Why not start today and transform those leftover rolls into something beautiful and functional?