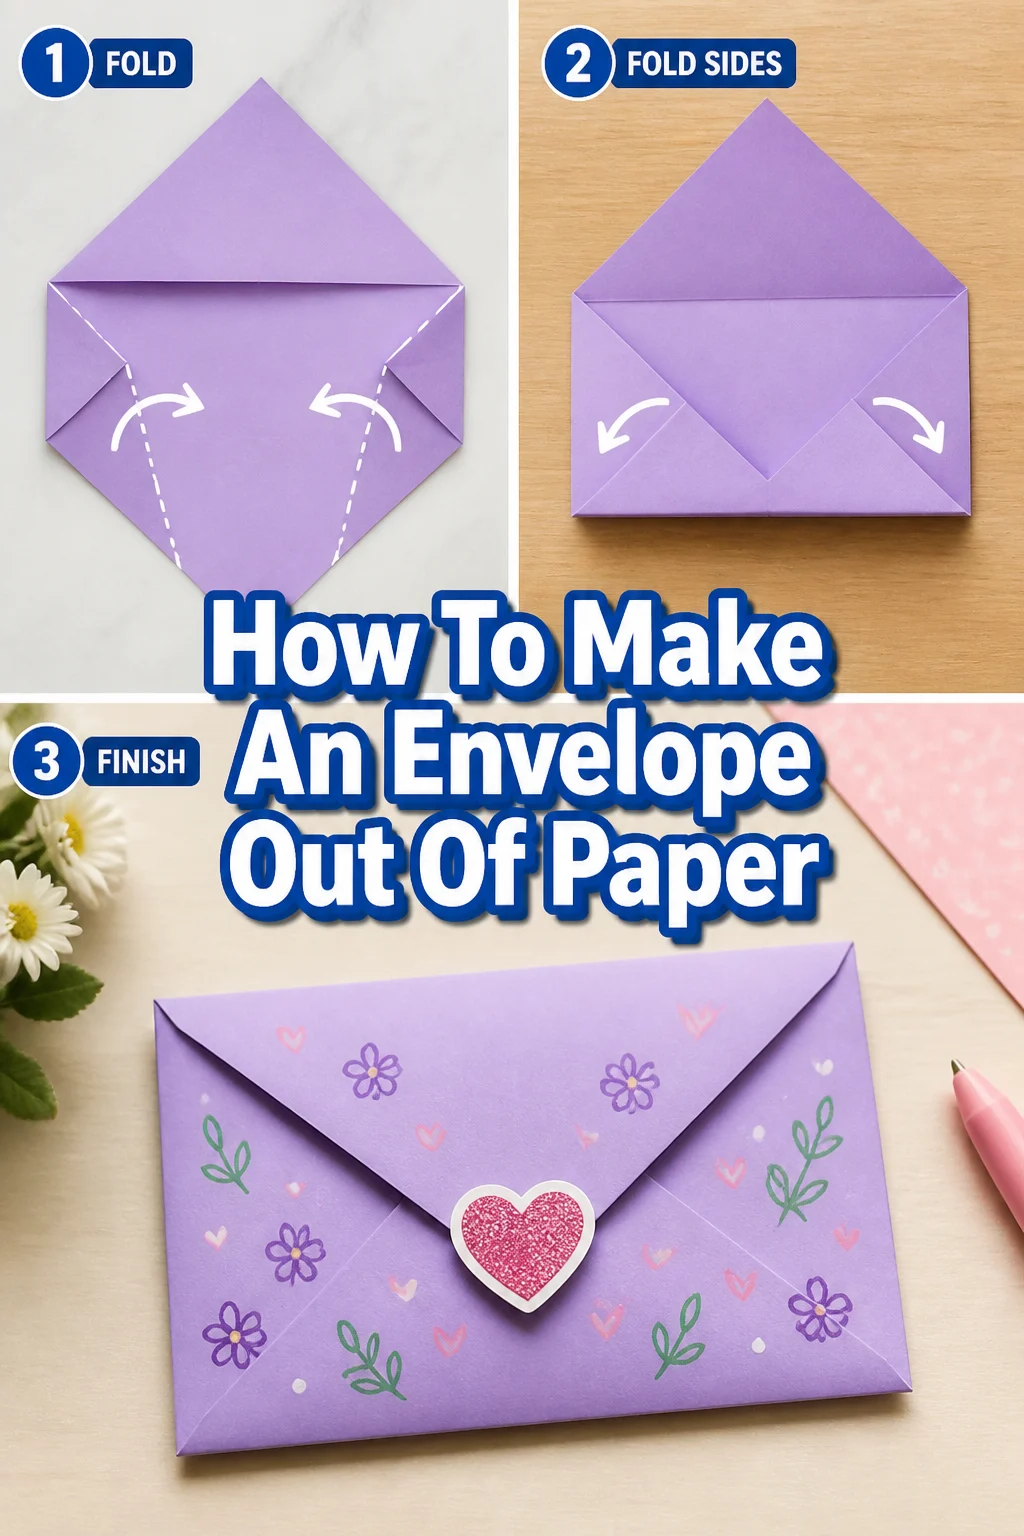
✉️ How To Make An Envelope Out Of Paper

Beginner-friendly templates, step-by-step guides,
and weekly project ideas in your inbox.
There’s a special charm to a handmade envelope.
It adds a personal touch to any letter, card, or small gift.
Having crafted countless envelopes for everything from birthday cards to secret notes, I know how satisfying it is to create something beautiful and functional with just a few basic supplies.

Quick Overview
This guide will walk you through creating a custom paper envelope from scratch.
You’ll learn how to measure, cut, and fold your way to a perfectly formed enclosure.
- Time needed: 15-30 minutes (depending on complexity and decoration)
- Difficulty: Beginner
- What you’ll need: Paper, scissors, ruler, pencil, adhesive (glue stick or tape)
Step-by-Step Instructions
Step 1: Gather Your Materials
Before you begin, lay out all your necessary tools and supplies.
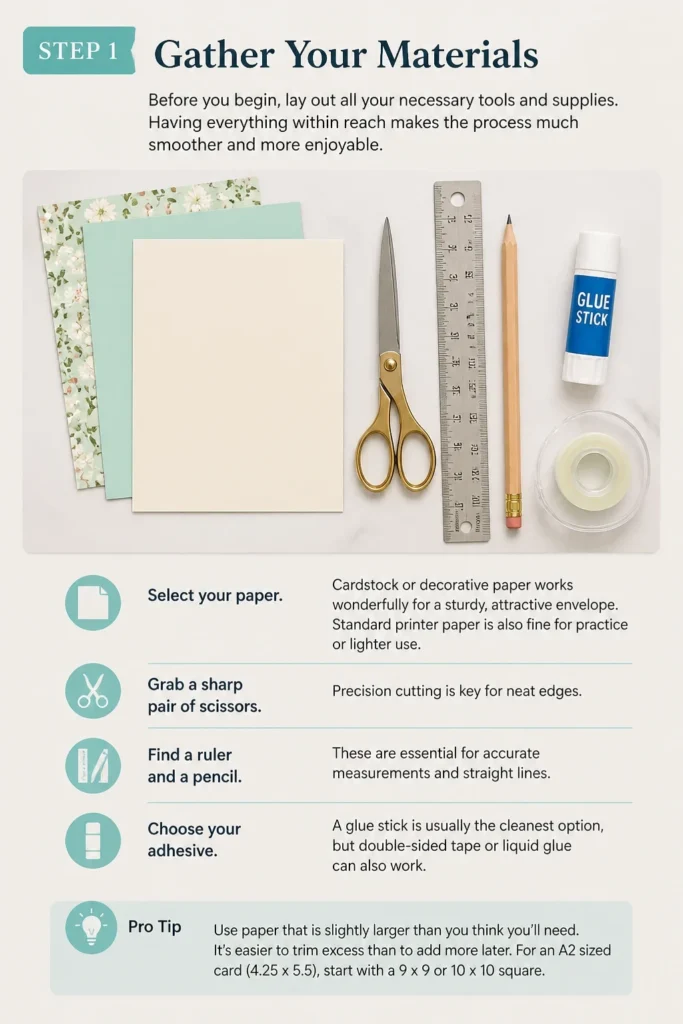
Having everything within reach makes the process much smoother and more enjoyable.
Select your paper. Cardstock or decorative paper works wonderfully for a sturdy, attractive envelope. Standard printer paper is also fine for practice or lighter use.
Grab a sharp pair of scissors. Precision cutting is key for neat edges.
Find a ruler and a pencil. These are essential for accurate measurements and straight lines.
Choose your adhesive. A glue stick is usually the cleanest option, but double-sided tape or liquid glue can also work.
Pro Tip: Use paper that is slightly larger than you think you’ll need. It’s easier to trim excess than to add more later. For an A2 sized card (4.25″ x 5.5″), start with a 9″ x 9″ or 10″ x 10″ square of paper.
Step 2: Prepare Your Paper Base
The foundation of your envelope starts with a carefully prepared sheet of paper.
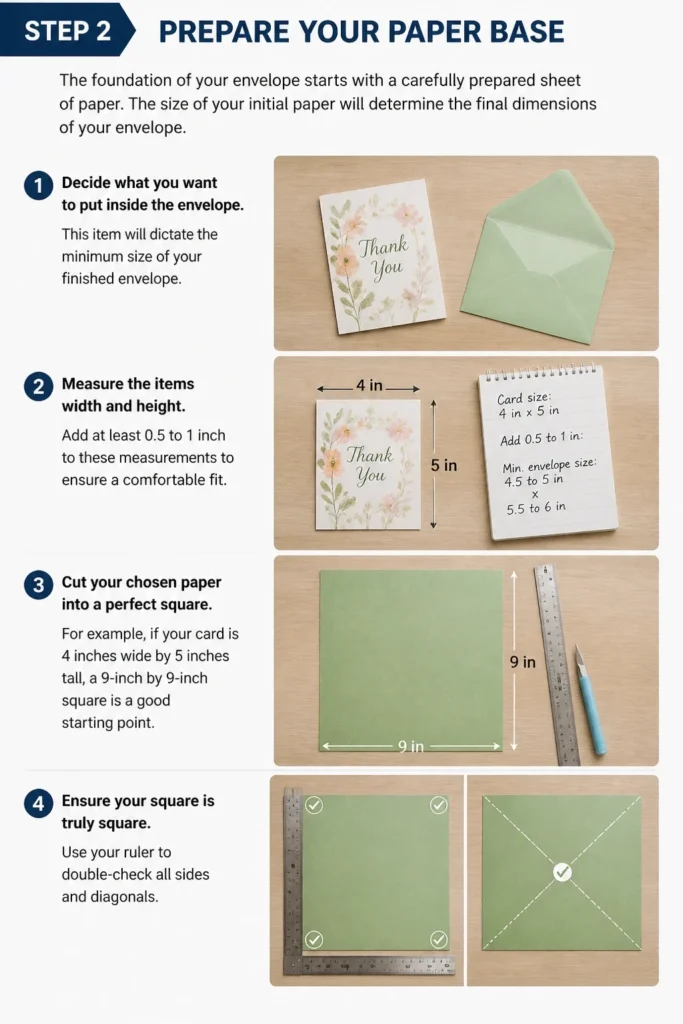
The size of your initial paper will determine the final dimensions of your envelope.
Decide what you want to put inside the envelope. This item will dictate the minimum size of your finished envelope.
Measure the item’s width and height. Add at least 0.5 to 1 inch to these measurements to ensure a comfortable fit.
Cut your chosen paper into a perfect square. For example, if your card is 4 inches wide by 5 inches tall, a 9-inch by 9-inch square is a good starting point.
Ensure your square is truly square. Use your ruler to double-check all sides and diagonals.
Step 3: Mark the Center and Flap Guidelines
Accurate marking is crucial for creating symmetrical and well-sealed envelopes.
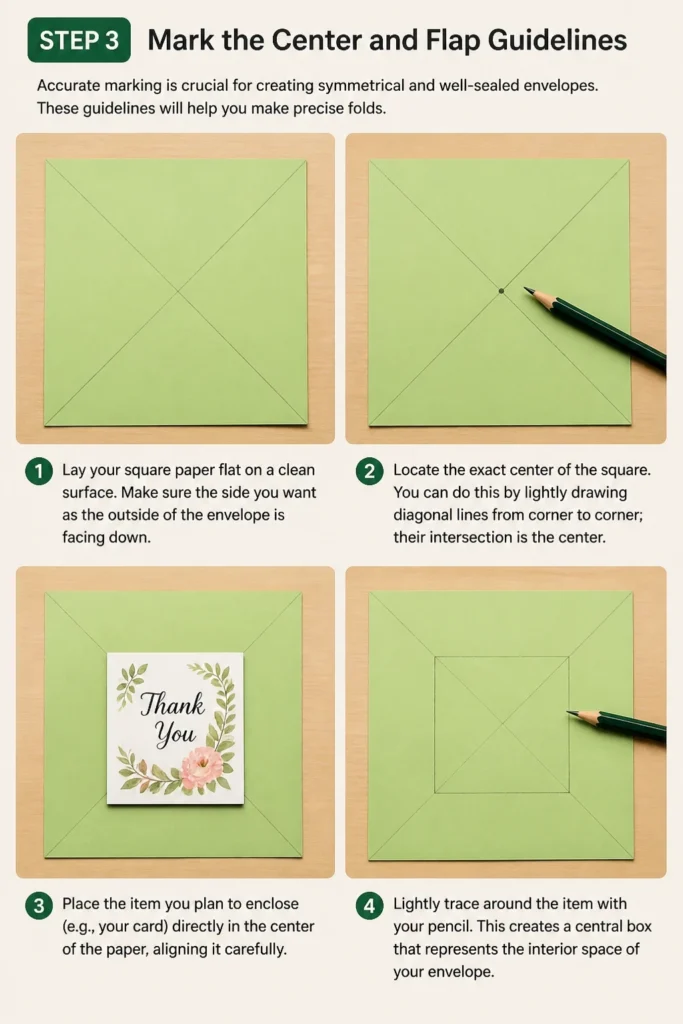
These guidelines will help you make precise folds.
Lay your square paper flat on a clean surface. Make sure the side you want as the outside of the envelope is facing down.
Locate the exact center of the square. You can do this by lightly drawing diagonal lines from corner to corner; their intersection is the center.
Place the item you plan to enclose (e.g., your card) directly in the center of the paper, aligning it carefully.
Lightly trace around the item with your pencil. This creates a central box that represents the interior space of your envelope.
Step 4: Create the Side Flaps
These flaps will form the sides of your envelope, holding the contents in place.
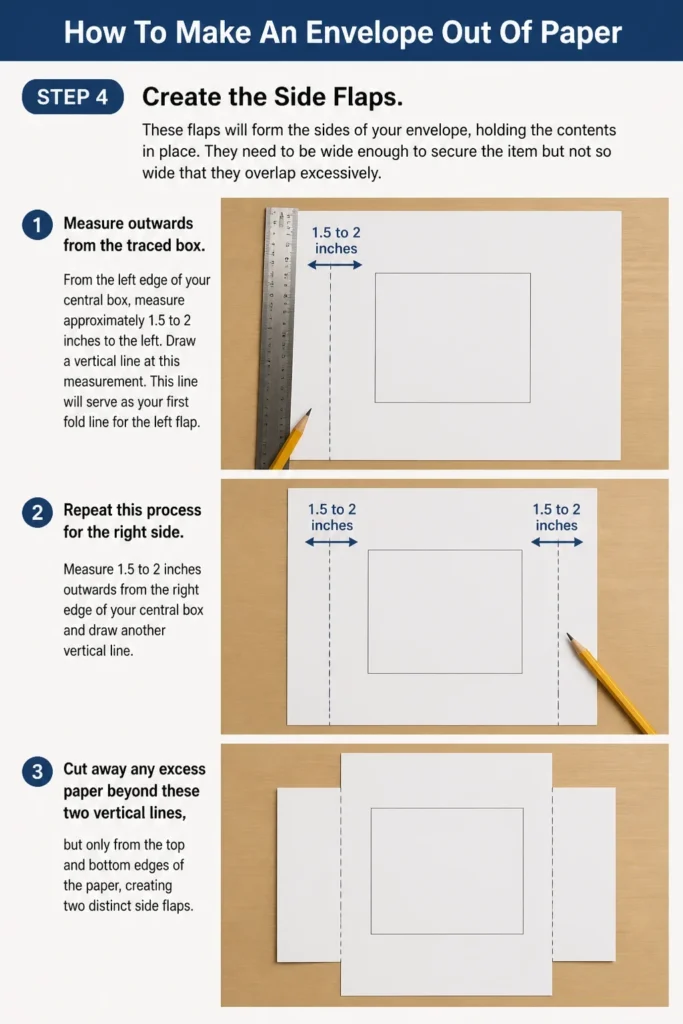
They need to be wide enough to secure the item but not so wide that they overlap excessively.
Measure outwards from the traced box. From the left edge of your central box, measure approximately 1.5 to 2 inches to the left.
Draw a vertical line at this measurement. This line will serve as your first fold line for the left flap.
Repeat this process for the right side. Measure 1.5 to 2 inches outwards from the right edge of your central box and draw another vertical line.
Cut away any excess paper beyond these two vertical lines, but only from the top and bottom edges of the paper, creating two distinct side flaps.
Step 5: Fold the Side Flaps
Folding these flaps carefully will establish the main structure of your envelope.
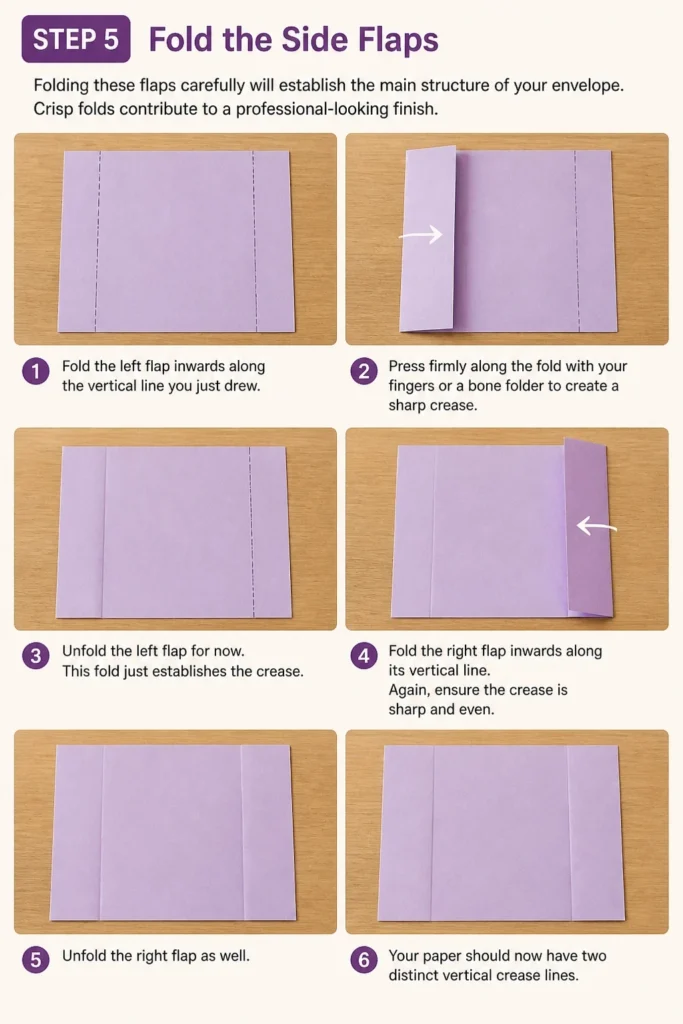
Crisp folds contribute to a professional-looking finish.
Fold the left flap inwards along the vertical line you just drew. Press firmly along the fold with your fingers or a bone folder to create a sharp crease.
Unfold the left flap for now. This fold just establishes the crease.
Fold the right flap inwards along its vertical line. Again, ensure the crease is sharp and even.
Unfold the right flap as well. Your paper should now have two distinct vertical crease lines.
Step 6: Form the Bottom Flap
The bottom flap is crucial as it will secure the contents and provide the main adhesive surface.
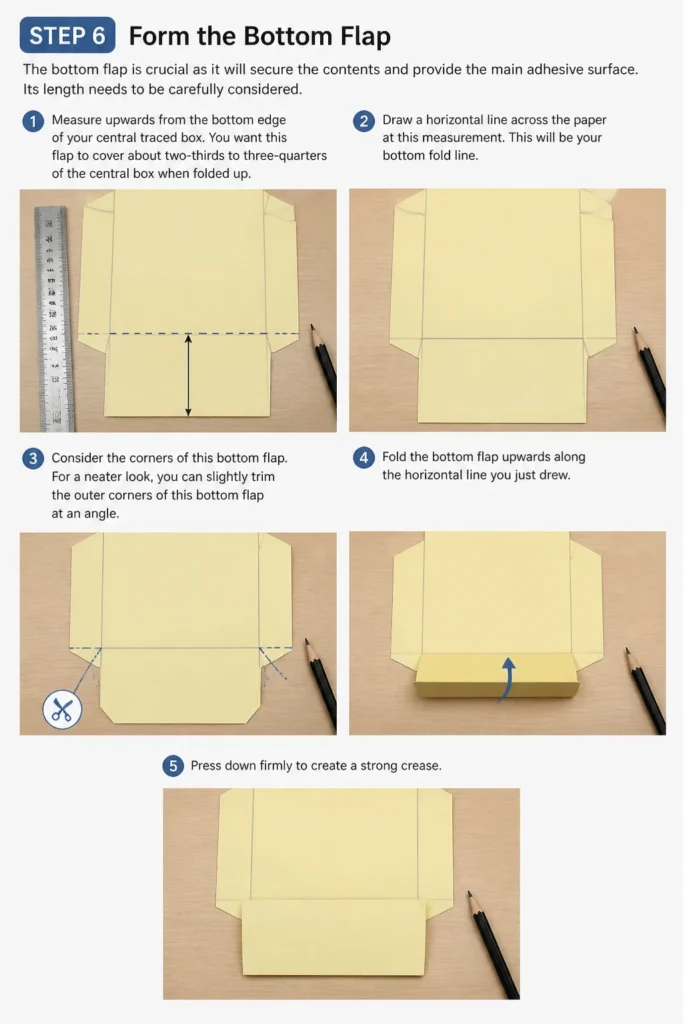
Its length needs to be carefully considered.
Measure upwards from the bottom edge of your central traced box. You want this flap to cover about two-thirds to three-quarters of the central box when folded up.
Draw a horizontal line across the paper at this measurement. This will be your bottom fold line.
Consider the corners of this bottom flap. For a neater look, you can slightly trim the outer corners of this bottom flap at an angle.
Fold the bottom flap upwards along the horizontal line you just drew. Press down firmly to create a strong crease.
Step 7: Secure the Envelope Base
Now it’s time to bring the side and bottom flaps together to form the pouch of your envelope.
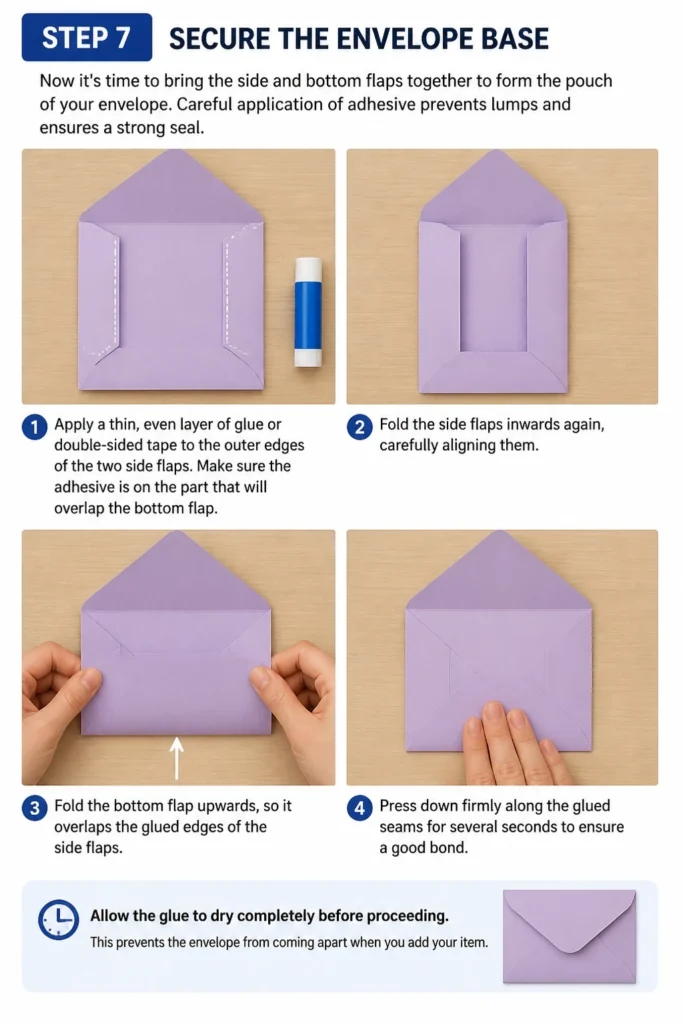
Careful application of adhesive prevents lumps and ensures a strong seal.
Apply a thin, even layer of glue or double-sided tape to the outer edges of the two side flaps. Make sure the adhesive is on the part that will overlap the bottom flap.
Fold the side flaps inwards again, carefully aligning them.
Fold the bottom flap upwards, so it overlaps the glued edges of the side flaps. Press down firmly along the glued seams for several seconds to ensure a good bond.
Allow the glue to dry completely before proceeding. This prevents the envelope from coming apart when you add your item.
Step 8: Create the Top Flap
The top flap is what you’ll use to seal your envelope after placing your item inside.
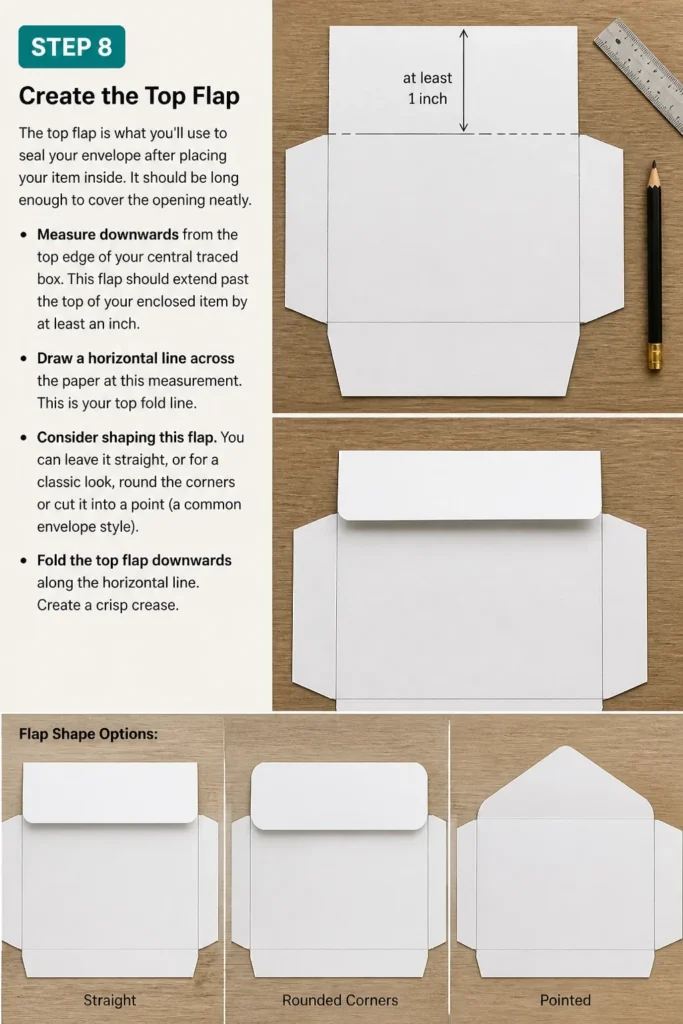
It should be long enough to cover the opening neatly.
Measure downwards from the top edge of your central traced box. This flap should extend past the top of your enclosed item by at least an inch.
Draw a horizontal line across the paper at this measurement. This is your top fold line.
Consider shaping this flap. You can leave it straight, or for a classic look, round the corners or cut it into a point (a common envelope style).
Fold the top flap downwards along the horizontal line. Create a crisp crease.
Step 9: Test and Refine
Before sealing, it’s always wise to do a quick check and make any necessary adjustments.
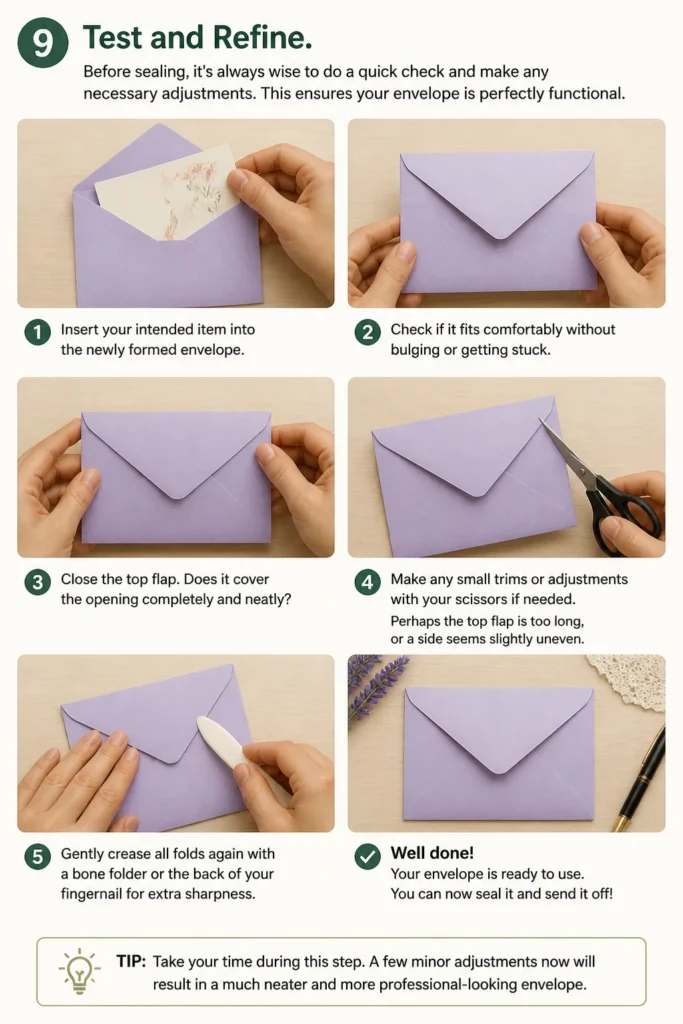
This ensures your envelope is perfectly functional.
Insert your intended item into the newly formed envelope. Check if it fits comfortably without bulging or getting stuck.
Close the top flap. Does it cover the opening completely and neatly?
Make any small trims or adjustments with your scissors if needed. Perhaps the top flap is too long, or a side seems slightly uneven.
Gently crease all folds again with a bone folder or the back of your fingernail for extra sharpness.
Step 10: Decorate Your Envelope (Optional)
This is where you can truly personalize your creation and make it unique.
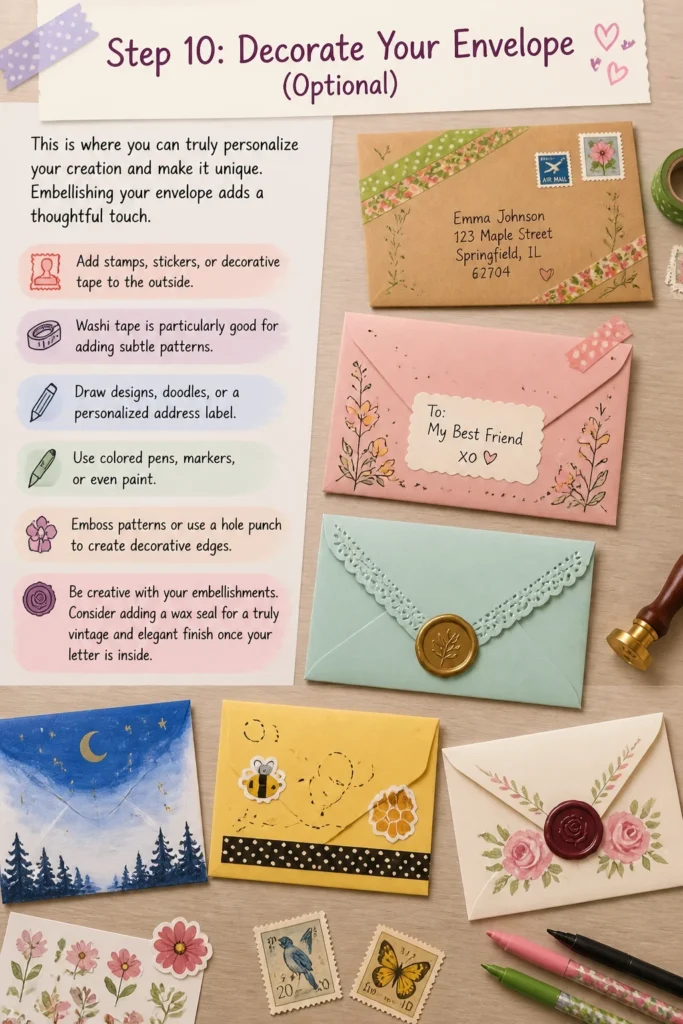
Embellishing your envelope adds a thoughtful touch.
Add stamps, stickers, or decorative tape to the outside. Washi tape is particularly good for adding subtle patterns.
Draw designs, doodles, or a personalized address label. Use colored pens, markers, or even paint.
Emboss patterns or use a hole punch to create decorative edges. Be creative with your embellishments.
Consider adding a wax seal for a truly vintage and elegant finish once your letter is inside.
Common Mistakes to Avoid
Uneven Cuts and Folds
One of the most common issues is cutting or folding inaccurately. This can lead to a crooked envelope that doesn’t seal properly or looks unprofessional.
Always use a ruler and a sharp pencil for marking, and take your time when cutting. Press firmly along fold lines to ensure crisp, straight creases.
Insufficient Adhesive
Using too little glue or tape, or applying it unevenly, can result in the envelope flaps detaching. This leaves your contents vulnerable or creates an unsightly gap.
Apply a consistent, thin layer of adhesive along all edges that need to bond. Press firmly for a few seconds to ensure a secure hold.
Incorrect Sizing
Making an envelope that’s too small for its contents is frustrating. Conversely, an overly large envelope can make items rattle around or look awkward.
Always measure your intended contents first and add sufficient buffer space (at least 0.5 to 1 inch) to all dimensions when planning your paper size.
Rushing the Process
Trying to make an envelope quickly often leads to mistakes like misaligned folds, ripped paper, or smudged glue. Patience is key for a polished result.
Take your time with each step, especially measuring, marking, and folding. Enjoy the crafting process rather than rushing to the finish line.
Troubleshooting
My Envelope Looks Crooked
If your envelope appears lopsided or the opening isn’t straight, it’s usually due to inaccurate initial cuts or uneven folding.
Double-check that your initial paper square was perfectly symmetrical. When folding, always align edges carefully and use a ruler to guide your creases. Practice improves precision.
The Flaps Don’t Seal Properly
This issue often stems from either insufficient adhesive or misaligned flaps that don’t overlap correctly.
Ensure you apply enough glue or tape to cover the entire sealing surface. If the flaps are misaligned, gently adjust them before the adhesive fully dries. For future envelopes, be more precise with your initial measurements and folds.
The Paper Tears When Folding
Thicker paper or cardstock can sometimes tear at the fold line if it’s too thick or if you press too hard without scoring.
For heavier papers, lightly score the fold lines with a scoring tool or the back of a dull knife before folding. This creates a channel for the fold, preventing tears. Fold gradually and gently.
Key Takeaways
- Precision in measuring and cutting is vital for a professional-looking envelope.
- Always start with paper slightly larger than your final desired envelope size.
- A bone folder or the back of your fingernail helps create crisp, clean creases.
- Allow adequate drying time for adhesives to ensure a strong, lasting bond.
- Don’t be afraid to personalize your envelope with decorations and unique shapes.
- Practice makes perfect; your first envelope might not be flawless, but each one will improve.
Frequently Asked Questions
Can I use any type of paper?
Yes, you can use almost any paper type! Standard printer paper is great for practice. Cardstock, scrapbook paper, or even magazine pages work well for sturdier or decorative envelopes. Just be mindful that very thin paper might tear easily, and very thick paper might require scoring before folding.
How do I make an envelope for an unusually shaped item?
The principle remains the same: measure your item carefully. Place the item in the center of your paper and build the flaps around it, ensuring enough overlap for sealing. For very irregular shapes, you might need to create a custom template by tracing the item and adding an even border around it.
What if I don’t have glue? How can I seal it?
If you don’t have glue, you can use double-sided tape, regular clear tape (applied neatly), or even staples for a more rustic look. For a temporary seal, you can fold the top flap under itself, or use a decorative sticker or wax seal to hold it closed.
Can I make different sized envelopes with this method?
Absolutely! This method is highly adaptable. The key is to adjust the initial size of your square paper and the measurements for your flaps based on the size of the item you want to enclose. Always measure your item first and add a comfortable margin.
Our Top Recommended Finds
- Quality Craft Paper Pack: Provides a variety of colors and patterns, perfect for different occasions and moods.
- Precision Craft Scissors: Sharp, comfortable scissors make cutting straight lines and intricate shapes much easier and cleaner.
- Glue Stick (Acid-Free): A reliable glue stick offers a clean, mess-free way to bond paper without warping or leaving residue.
Unleash Your Inner Paper Artist
Creating your own envelopes is more than just a craft; it’s an opportunity to add a touch of personal flair to your correspondence.
Imagine the delight of someone receiving a beautifully handmade envelope, tailored specifically for them.
Don’t wait to add that unique touch to your next letter or gift. Gather your materials and start crafting your first custom envelope today.
Explore different papers, experiment with various decorations, and discover the joy of this simple yet rewarding paper art.
Beginner-friendly templates, step-by-step guides,
and weekly project ideas in your inbox.