⭐ How To Make A Guitar Out Of Cardboard

Beginner-friendly templates, step-by-step guides,
and weekly project ideas in your inbox.
Building your own musical instrument is one of the most rewarding creative projects you can tackle at home.
I remember the first time I turned an old refrigerator box into a functional six-string; the sound wasn’t perfect, but the feeling of accomplishment was incredible.
This guide draws on years of trial and error to help you build a cardboard guitar that actually plays a tune.

Quick Overview
This project transforms everyday recyclables into a musical tool. It is perfect for science projects, home-schooling activities, or just a fun weekend craft.
- Time needed: 3 to 4 hours (plus drying time)
- Difficulty: Intermediate
- What you’ll need: Heavy-duty cardboard, craft knife, hot glue, rubber bands or fishing line, a cardboard tube, and a ruler.
Step-by-Step Instructions
Step 1: Design Your Template
Sketch the outline of your guitar body onto a large piece of flat cardboard. You can go for a classic acoustic shape or something more modern like an electric guitar style.
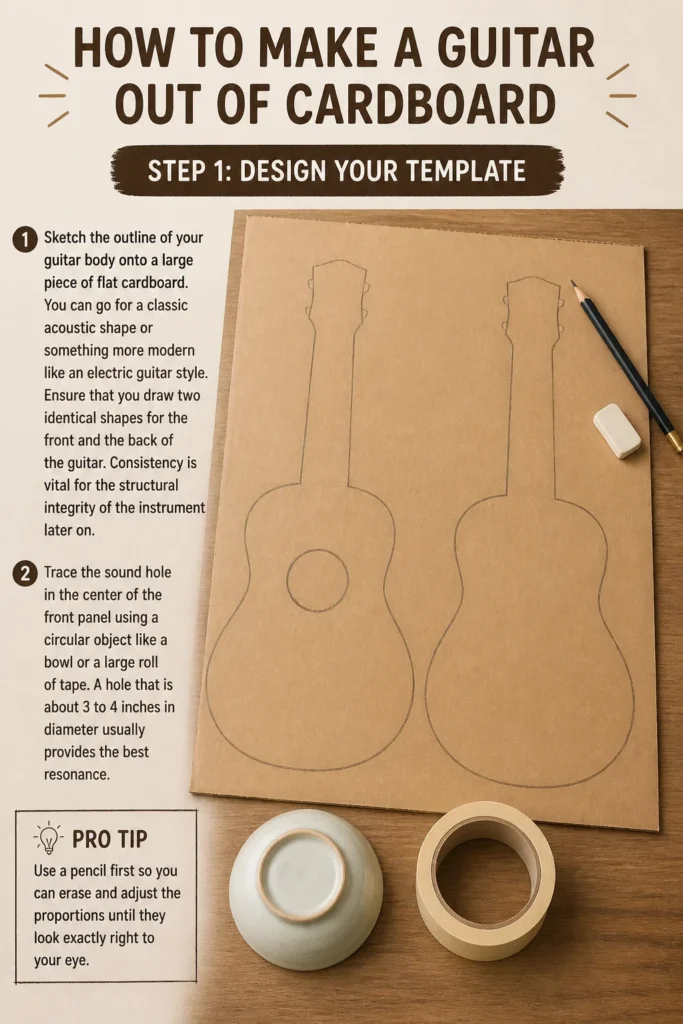
Ensure that you draw two identical shapes for the front and the back of the guitar. Consistency is vital for the structural integrity of the instrument later on.
Trace the sound hole in the center of the front panel using a circular object like a bowl or a large roll of tape. A hole that is about 3 to 4 inches in diameter usually provides the best resonance.
Pro Tip: Use a pencil first so you can erase and adjust the proportions until they look exactly right to your eye.
Step 2: Select and Prep Your Cardboard
Choose corrugated cardboard that has two flat layers with a wavy layer in between. This type of material offers the best strength-to-weight ratio for holding string tension.
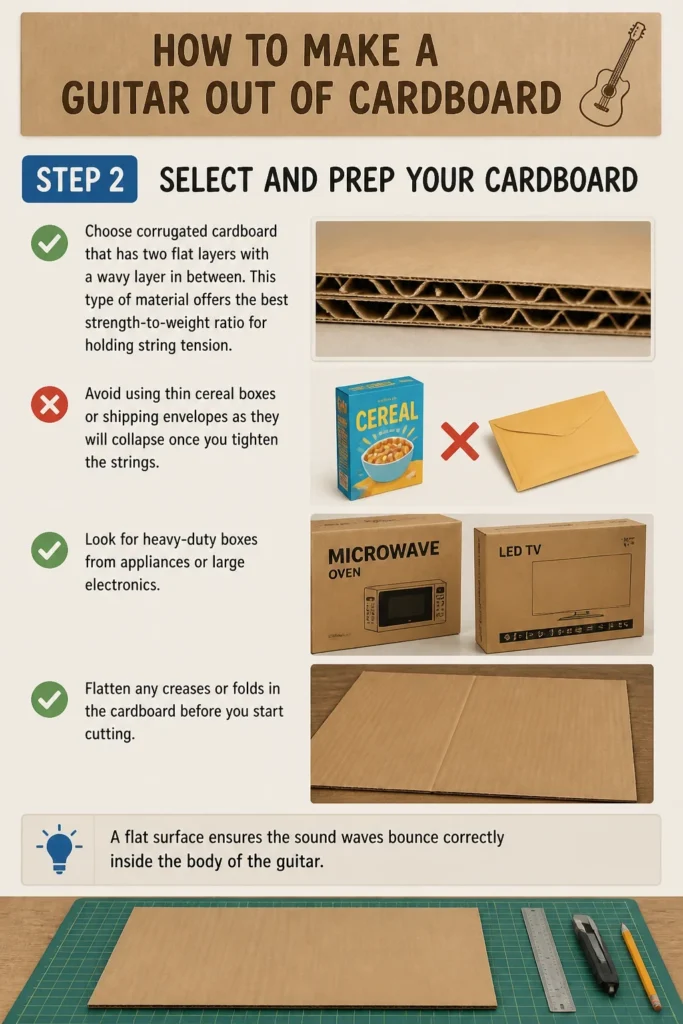
Avoid using thin cereal boxes or shipping envelopes as they will collapse once you tighten the strings. Look for heavy-duty boxes from appliances or large electronics.
Flatten any creases or folds in the cardboard before you start cutting. A flat surface ensures the sound waves bounce correctly inside the body of the guitar.
Step 3: Cut the Body Pieces
Cut out the front and back panels using a sharp craft knife or a box cutter. Always cut away from your body and keep your fingers clear of the blade’s path.
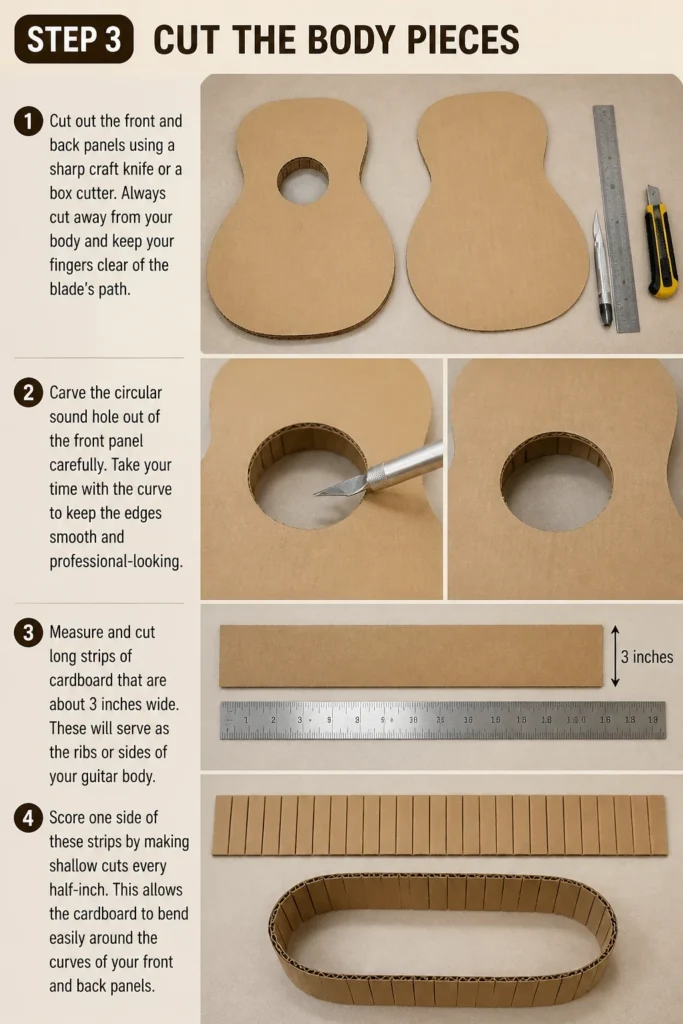
Carve the circular sound hole out of the front panel carefully. Take your time with the curve to keep the edges smooth and professional-looking.
Measure and cut long strips of cardboard that are about 3 inches wide. These will serve as the “ribs” or sides of your guitar body.
Score one side of these strips by making shallow cuts every half-inch. This allows the cardboard to bend easily around the curves of your front and back panels.
Step 4: Assemble the Soundbox
Apply a thick bead of hot glue along the edge of the back panel. Work in small sections so the glue doesn’t dry before you can attach the side strips.
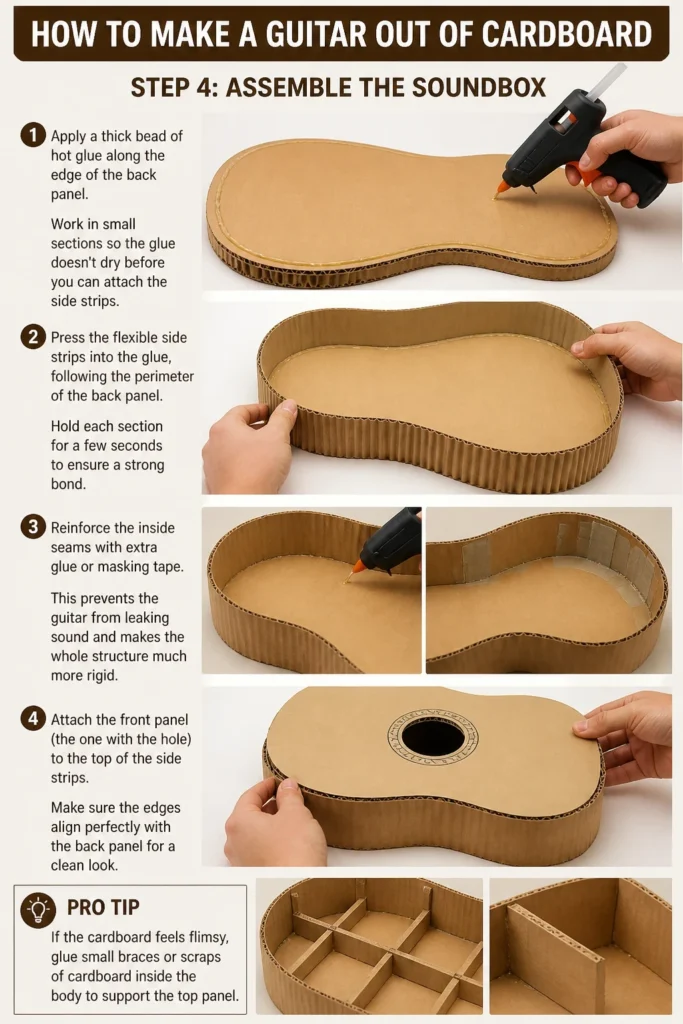
Press the flexible side strips into the glue, following the perimeter of the back panel. Hold each section for a few seconds to ensure a strong bond.
Reinforce the inside seams with extra glue or masking tape. This prevents the guitar from “leaking” sound and makes the whole structure much more rigid.
Attach the front panel (the one with the hole) to the top of the side strips. Make sure the edges align perfectly with the back panel for a clean look.
Pro Tip: If the cardboard feels flimsy, glue small “braces” or scraps of cardboard inside the body to support the top panel.
Step 5: Construct the Neck
Find a sturdy cardboard tube, like one from a roll of wrapping paper or a heavy postal tube. If you don’t have one, you can roll several layers of flat cardboard into a tight cylinder.
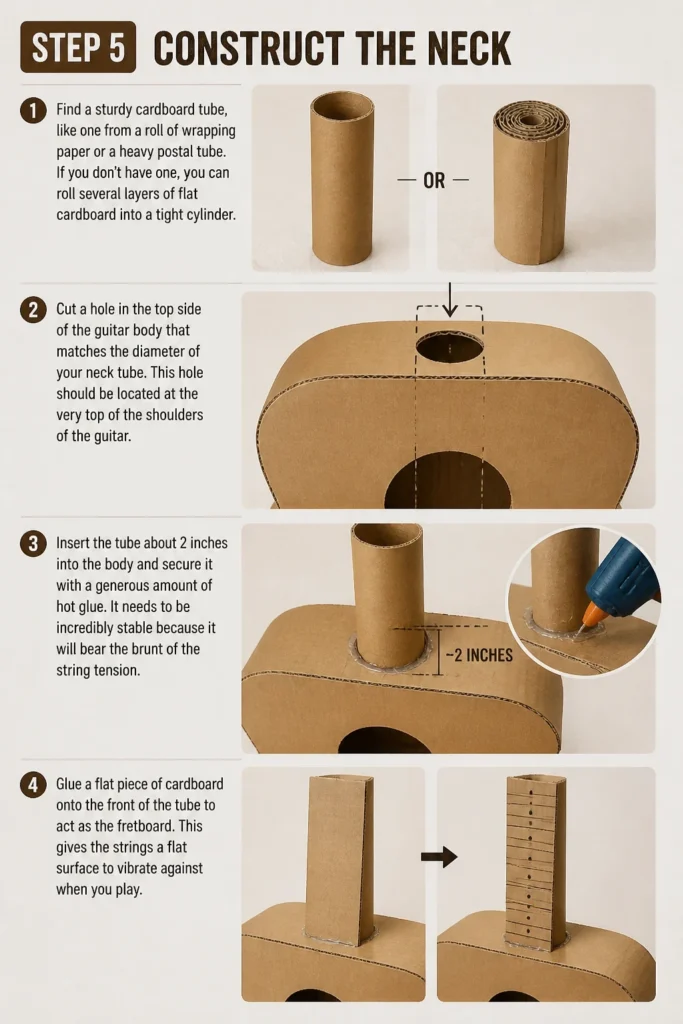
Cut a hole in the top side of the guitar body that matches the diameter of your neck tube. This hole should be located at the very top of the “shoulders” of the guitar.
Insert the tube about 2 inches into the body and secure it with a generous amount of hot glue. It needs to be incredibly stable because it will bear the brunt of the string tension.
Glue a flat piece of cardboard onto the front of the tube to act as the fretboard. This gives the strings a flat surface to vibrate against when you play.
Step 6: Create the Bridge and Nut
Cut two small, rectangular blocks of thick cardboard or wood scraps. One will be the “nut” at the top of the neck, and the other will be the “bridge” on the body.
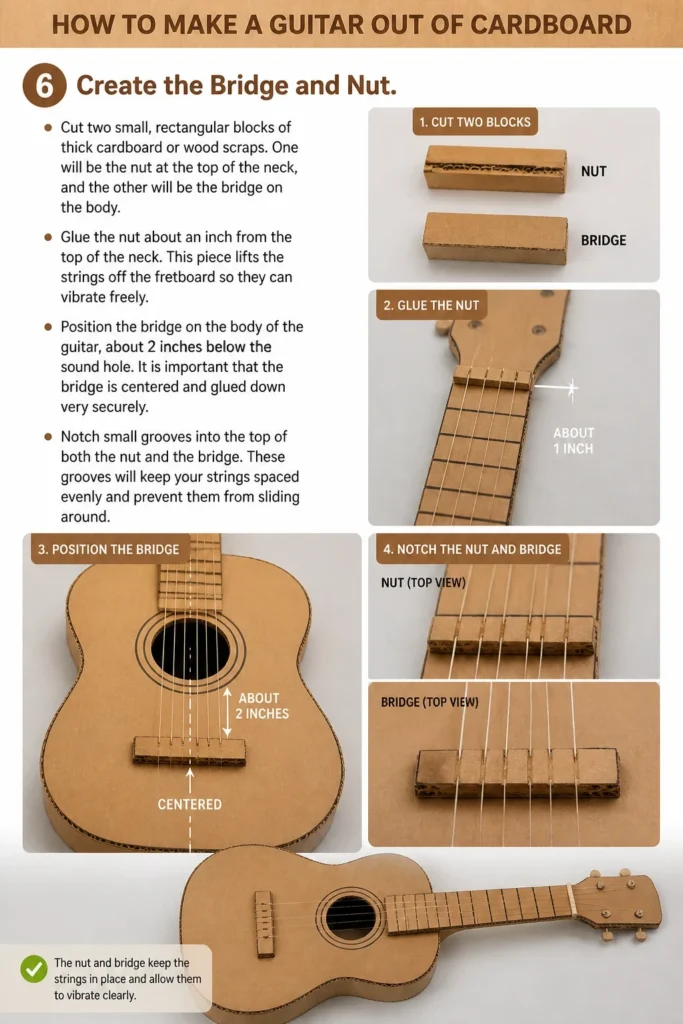
Glue the nut about an inch from the top of the neck. This piece lifts the strings off the fretboard so they can vibrate freely.
Position the bridge on the body of the guitar, about 2 inches below the sound hole. It is important that the bridge is centered and glued down very securely.
Notch small grooves into the top of both the nut and the bridge. These grooves will keep your strings spaced evenly and prevent them from sliding around.
Step 7: Install the Strings
Select your string material, such as thick rubber bands, nylon fishing line, or even thin craft wire. Rubber bands are easiest for beginners because they are already under tension.
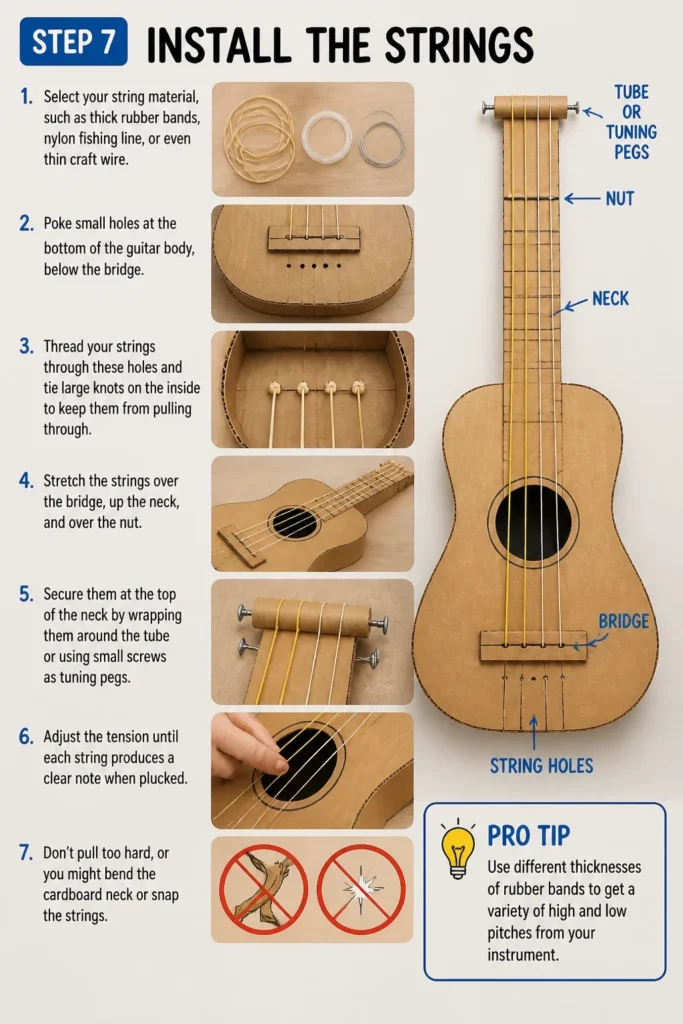
Poke small holes at the bottom of the guitar body, below the bridge. Thread your strings through these holes and tie large knots on the inside to keep them from pulling through.
Stretch the strings over the bridge, up the neck, and over the nut. Secure them at the top of the neck by wrapping them around the tube or using small screws as tuning pegs.
Adjust the tension until each string produces a clear note when plucked. Don’t pull too hard, or you might bend the cardboard neck or snap the strings.
Pro Tip: Use different thicknesses of rubber bands to get a variety of high and low pitches from your instrument.
Common Mistakes to Avoid
Using Weak Glue
Many people try to use standard school glue or glue sticks for this project. These adhesives are not strong enough to hold the cardboard together once the strings are tightened. The tension will pull the guitar apart within minutes. Always use a high-temp hot glue gun or a dedicated wood glue for the best results.
Ignoring Grain Direction
Cardboard has a “grain” created by the internal fluting. If you cut the neck so the grain runs horizontally, it will fold and collapse almost immediately. Ensure the grain of the cardboard runs vertically along the length of the neck. This provides the maximum amount of resistance against the pulling force of the strings.
Skipping the Bridge Reinforcement
The bridge is where the strings exert the most pressure on the body of the guitar. If you glue it directly to a thin layer of cardboard, it might cave in or rip off. Glue a small scrap of wood or a double layer of cardboard directly underneath the bridge area inside the body. This distributes the pressure and keeps the top of your guitar flat.
Troubleshooting
The Strings Are Buzzing
Buzzing usually happens when the strings are too close to the fretboard. This causes them to hit the cardboard as they vibrate. To fix this, you can glue a small shim or an extra layer of cardboard to the top of the nut or the bridge. Raising the height of the strings even by a millimeter can clear up the sound instantly.
The Neck Is Bending Inward
If the neck of your guitar is curving toward the body, the string tension is too high for the material. You can solve this by inserting a wooden dowel or a sturdy stick inside the cardboard tube neck. This “truss rod” provides the internal support needed to keep the neck straight. Alternatively, try using thinner rubber bands that require less tension to reach a pitch.
The Sound Is Too Quiet
A quiet guitar usually means the soundbox isn’t vibrating enough or the sound hole is too small. Check to see if your cardboard is too thick or if you used too much tape on the outside. You can also try making the sound hole slightly larger. Ensure the bridge is making solid contact with the top panel, as this is how vibrations travel into the body.
Key Takeaways
- Material Choice: Use double-walled corrugated cardboard for the best structural strength and sound quality.
- Grain Alignment: Always align the cardboard grain vertically on the neck to prevent it from snapping under tension.
- Secure Bonding: Use hot glue for a fast, permanent bond that can withstand the pressure of the strings.
- The Nut and Bridge: These two components are essential for lifting the strings and allowing them to vibrate clearly.
- Internal Bracing: Adding extra scraps of cardboard inside the body will prevent the instrument from collapsing over time.
- Patience is Key: Allow all glue to dry completely before you attempt to tune or play your new guitar.
Frequently Asked Questions
Can I use real guitar strings on a cardboard guitar?
You can use real strings, but you must be very careful with the tension. Real steel strings exert much more force than rubber bands or nylon line. If you want to use them, you will likely need to reinforce the entire neck with a wooden spine. Nylon classical guitar strings are a safer middle ground for cardboard builds.
How do I make the guitar look more realistic?
Once the structure is complete, you can paint the cardboard with acrylic paints. Many people like to use a wood-grain effect or bright, vibrant colors. You can also use metallic markers to draw on “frets” and “tuning pegs.” Just be sure not to use too much watery paint, as it can soften the cardboard and cause it to warp.
How long will a cardboard guitar last?
With gentle use, a well-constructed cardboard guitar can last for several months. The main enemy of these instruments is humidity, which can soften the fibers and cause the glue to fail. Store your guitar in a dry place and avoid placing heavy objects on top of it. If a string snaps or a joint loosens, it is usually very easy to repair with a little more glue.
Is it possible to actually tune a cardboard guitar?
Yes, you can tune it, though it may not hold its tune as long as a wooden instrument. By tightening or loosening the strings at the top of the neck, you can change the pitch. Using a digital tuner or a piano can help you get the strings to specific notes. It is a great way to learn the basics of how string tension affects musical scales.
Our Top Recommended Finds
- High-Temp Hot Glue Gun: A reliable glue gun is the most important tool for ensuring your guitar stays together under pressure.
- Heavy-Duty Utility Knife: A sharp blade makes clean cuts through thick corrugated cardboard, which improves the look and sound of the instrument.
- Nylon Fishing Line: This makes for excellent “pro” strings that provide a much brighter and louder sound than standard rubber bands.
Bringing Your Cardboard Creation To Life
Now that you have the blueprint for success, it is time to start scavenging for the perfect boxes.
Building an instrument is a journey of discovery that teaches you about physics, engineering, and art all at once.
Once you master the basic acoustic design, you might even try building a cardboard amplifier or a ukulele.
Grab your craft knife and some cardboard today to see what kind of music you can make from scratch.
Beginner-friendly templates, step-by-step guides,
and weekly project ideas in your inbox.