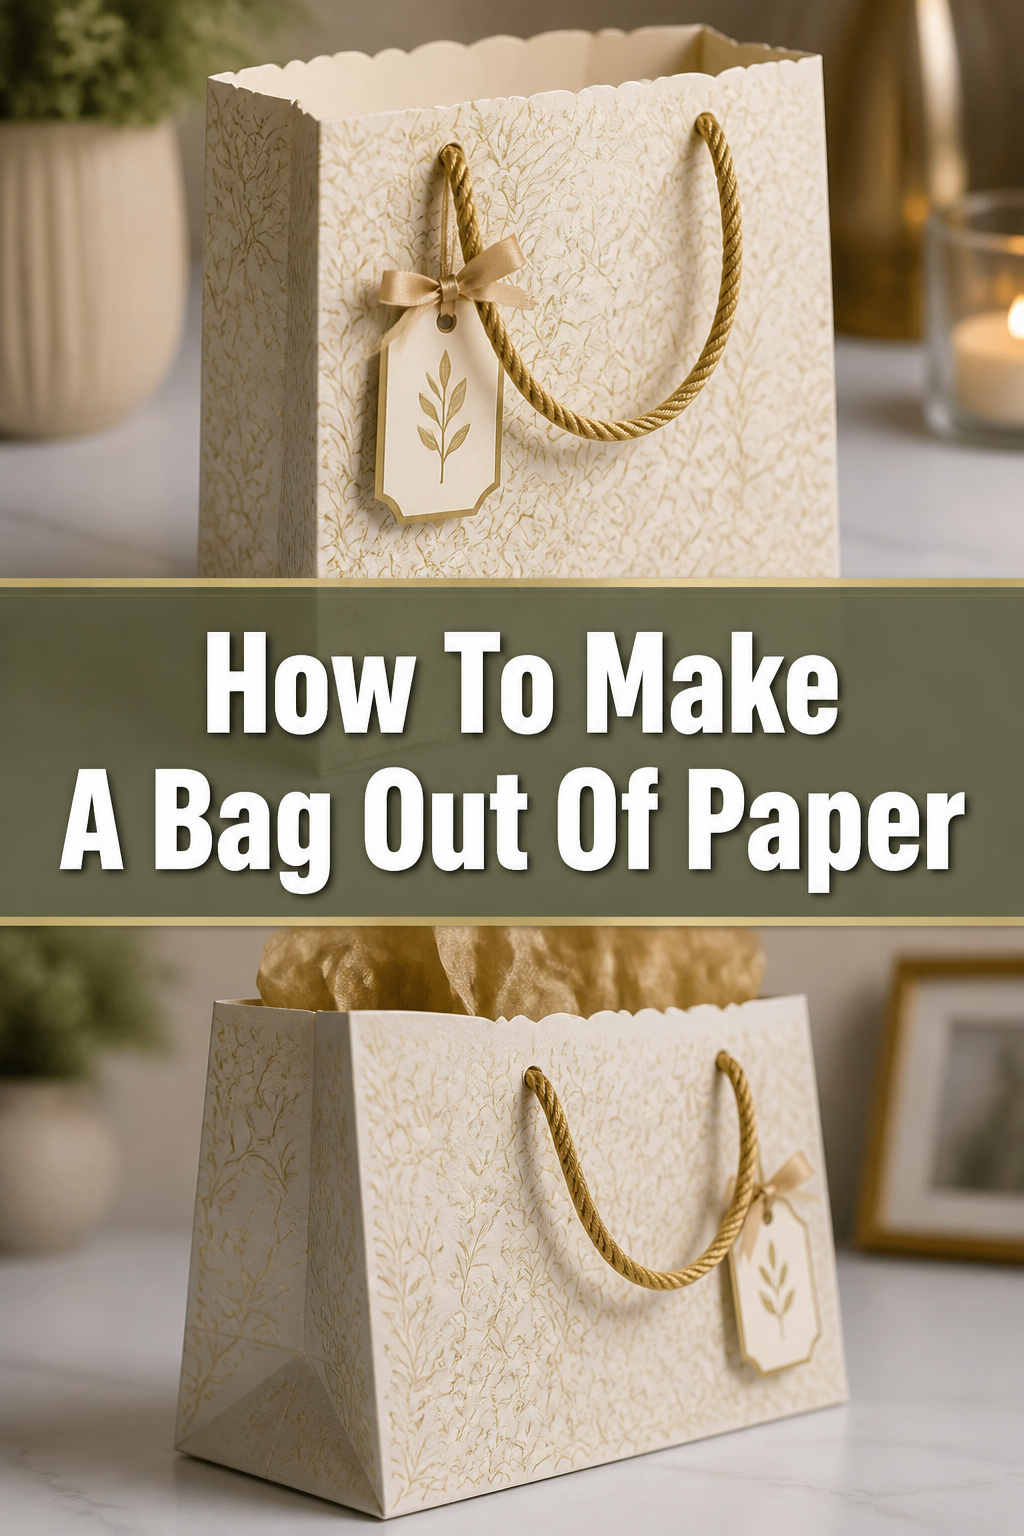
🛍️ How To Make A Bag Out Of Paper

Beginner-friendly templates, step-by-step guides,
and weekly project ideas in your inbox.
There’s a unique satisfaction in crafting something useful with your own hands.
I remember needing a quick, charming way to present a small gift, and store-bought options just didn’t feel right.
That’s when I rediscovered the simple joy and practicality of making a paper bag from scratch.
Quick Overview
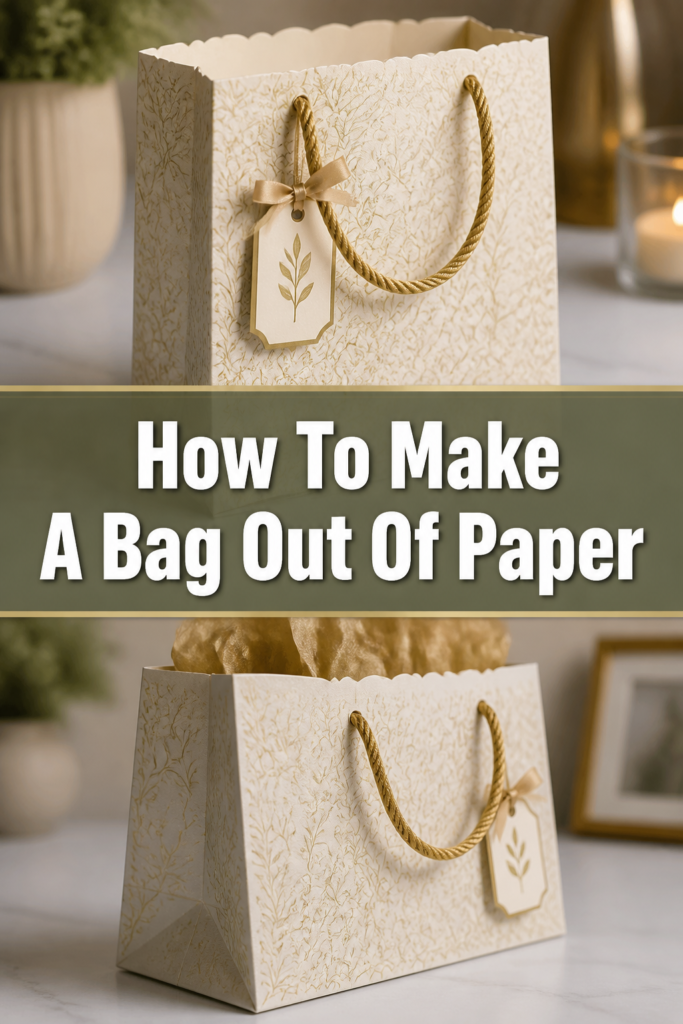
This guide will walk you through creating a sturdy, custom-sized paper bag, perfect for gifts, party favors, or organizing small items. You’ll gain a valuable crafting skill and a beautiful handmade product.
- Time needed: Approximately 45-60 minutes
- Difficulty: Beginner
- What you’ll need: Paper, scissors, ruler, pencil, glue stick or liquid craft glue, optional hole punch and string for handles.
Step-by-Step Instructions
Step 1: Gather Your Materials
Before you begin, ensure you have all your supplies ready and organized. A clear workspace helps immensely.
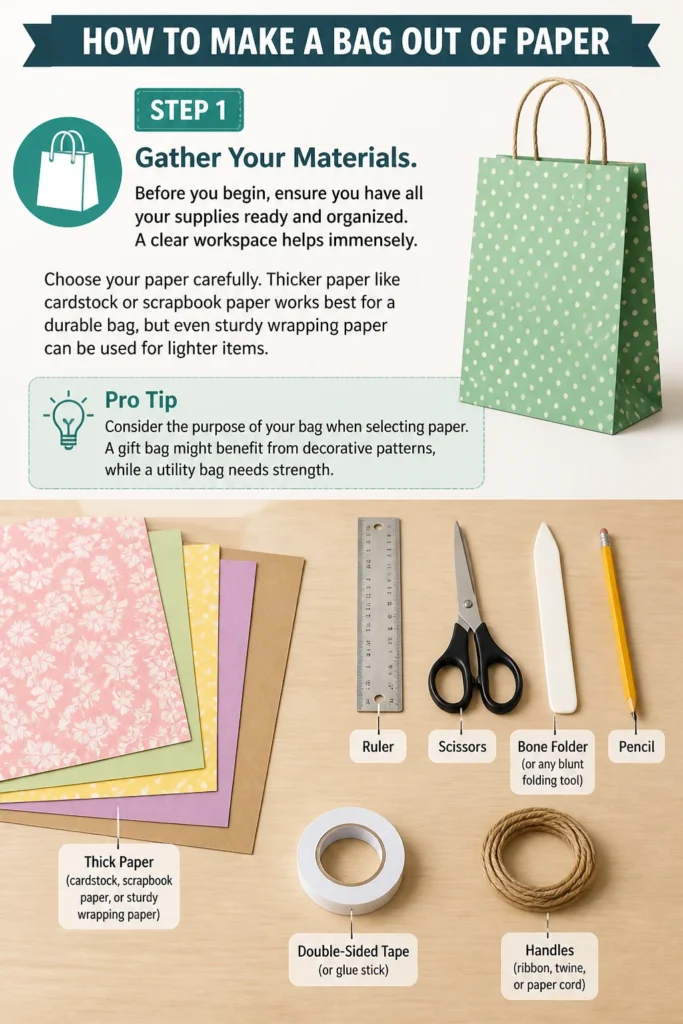
Choose your paper carefully. Thicker paper like cardstock or scrapbook paper works best for a durable bag, but even sturdy wrapping paper can be used for lighter items.
Pro Tip: Consider the purpose of your bag when selecting paper. A gift bag might benefit from decorative patterns, while a utility bag needs strength.
Step 2: Prepare Your Paper
Lay your chosen paper flat on your work surface. The size of your paper will determine the size of your finished bag.
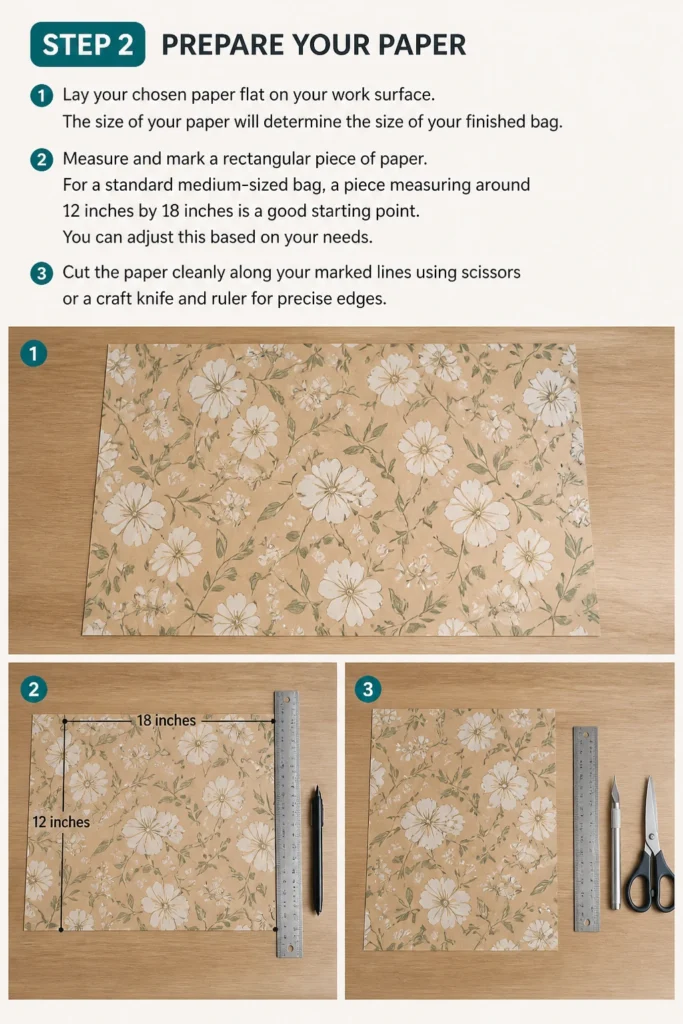
Measure and mark a rectangular piece of paper. For a standard medium-sized bag, a piece measuring around 12 inches by 18 inches is a good starting point. You can adjust this based on your needs.
Cut the paper cleanly along your marked lines using scissors or a craft knife and ruler for precise edges.
Step 3: Fold the Base Seam
Place your paper horizontally. Measure 1 inch in from one of the short edges.
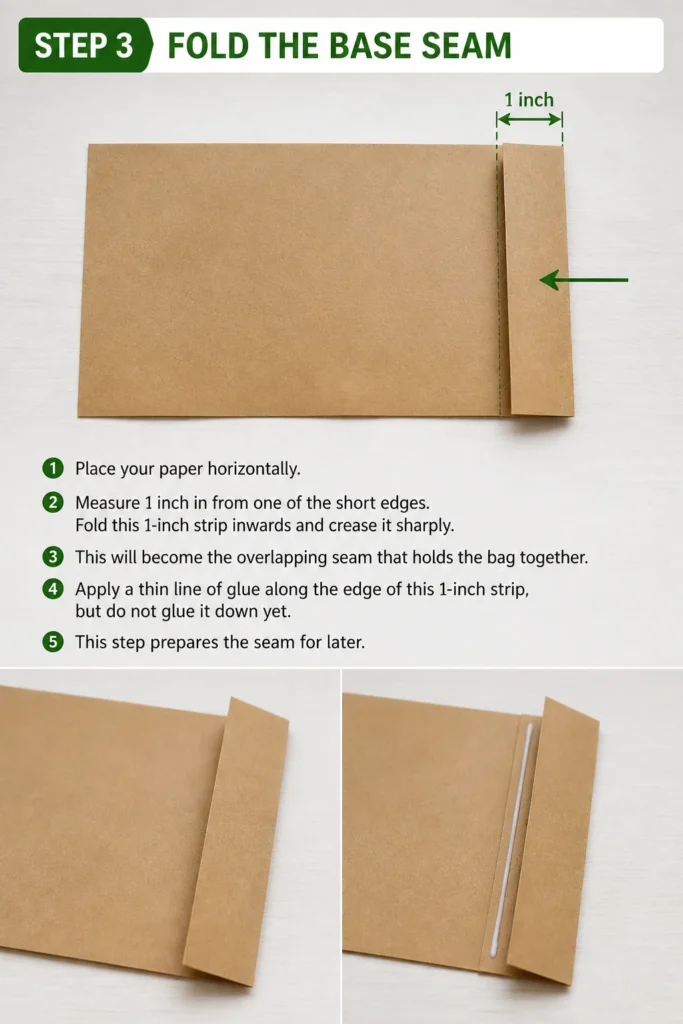
Fold this 1-inch strip inwards and crease it sharply. This will become the overlapping seam that holds the bag together.
Apply a thin line of glue along the edge of this 1-inch strip, but do not glue it down yet. This step prepares the seam for later.
Step 4: Create the Side Folds
With the 1-inch glued strip facing up, bring the opposite short edge of the paper over to meet the edge of the glued strip.
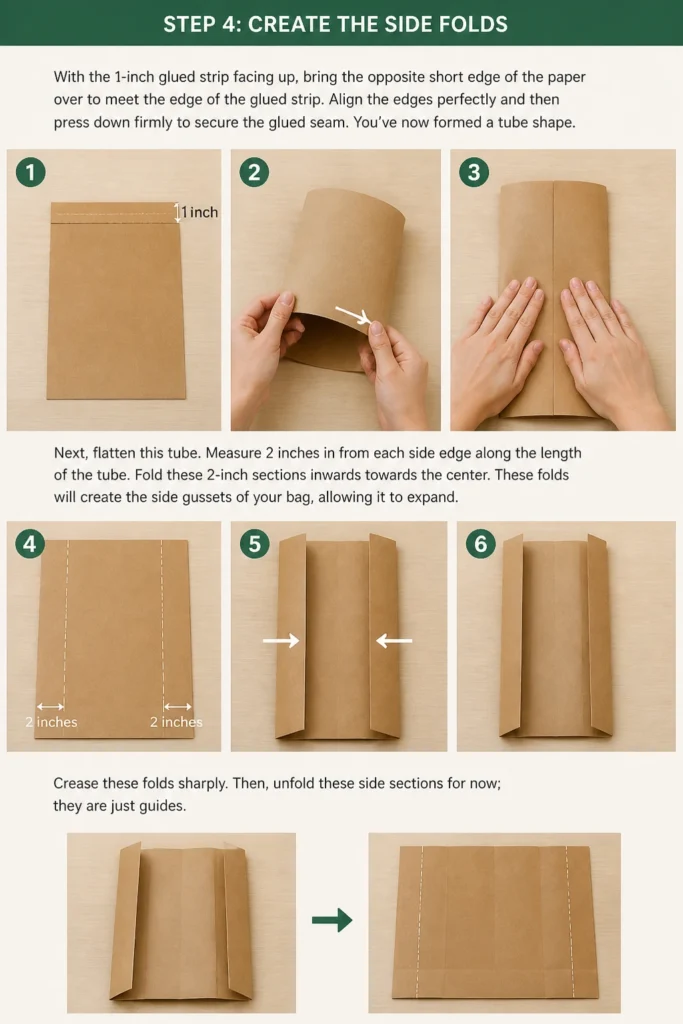
Align the edges perfectly and then press down firmly to secure the glued seam. You’ve now formed a tube shape.
Next, flatten this tube. Measure 2 inches in from each side edge along the length of the tube.
Fold these 2-inch sections inwards towards the center. These folds will create the side gussets of your bag, allowing it to expand.
Crease these folds sharply. Then, unfold these side sections for now; they are just guides.
Step 5: Form the Bottom Creases
Now, let’s create the bottom of the bag. With your paper tube still flattened, decide how deep you want the bag’s bottom to be.
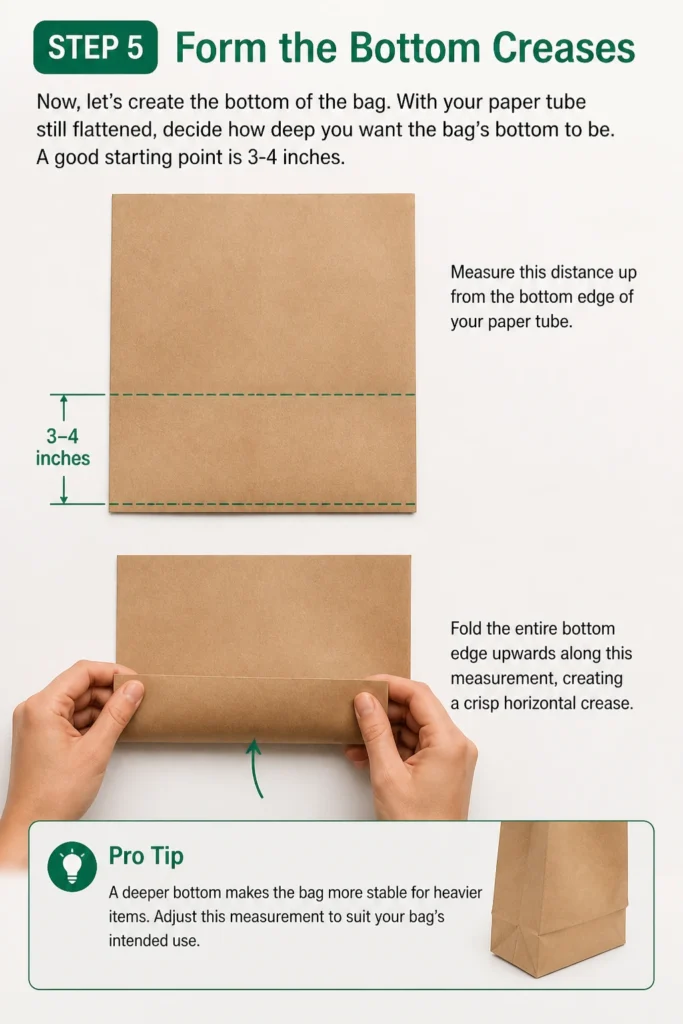
A good starting point is 3-4 inches. Measure this distance up from the bottom edge of your paper tube.
Fold the entire bottom edge upwards along this measurement, creating a crisp horizontal crease.
Pro Tip: A deeper bottom makes the bag more stable for heavier items. Adjust this measurement to suit your bag’s intended use.
Step 6: Fold and Secure the Bag Bottom
Unfold the bottom flap you just made. Now, open up the bottom section of the bag, pushing the side gussets inwards.
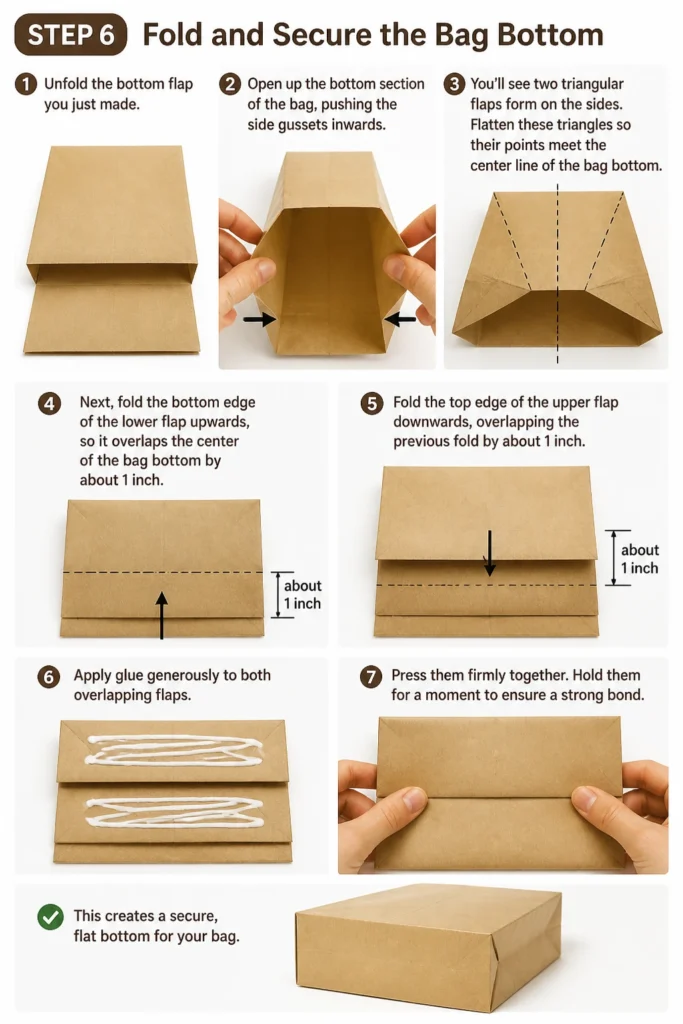
You’ll see two triangular flaps form on the sides. Flatten these triangles so their points meet the center line of the bag bottom.
Next, fold the bottom edge of the lower flap upwards, so it overlaps the center of the bag bottom by about 1 inch.
Fold the top edge of the upper flap downwards, overlapping the previous fold by about 1 inch.
Apply glue generously to both overlapping flaps and press them firmly together. Hold them for a moment to ensure a strong bond. This creates a secure, flat bottom for your bag.
Step 7: Reinforce the Top Edge
With the bottom sealed, it’s time to finish the top. Fold the top edge of your bag inwards by about 1.5 to 2 inches.
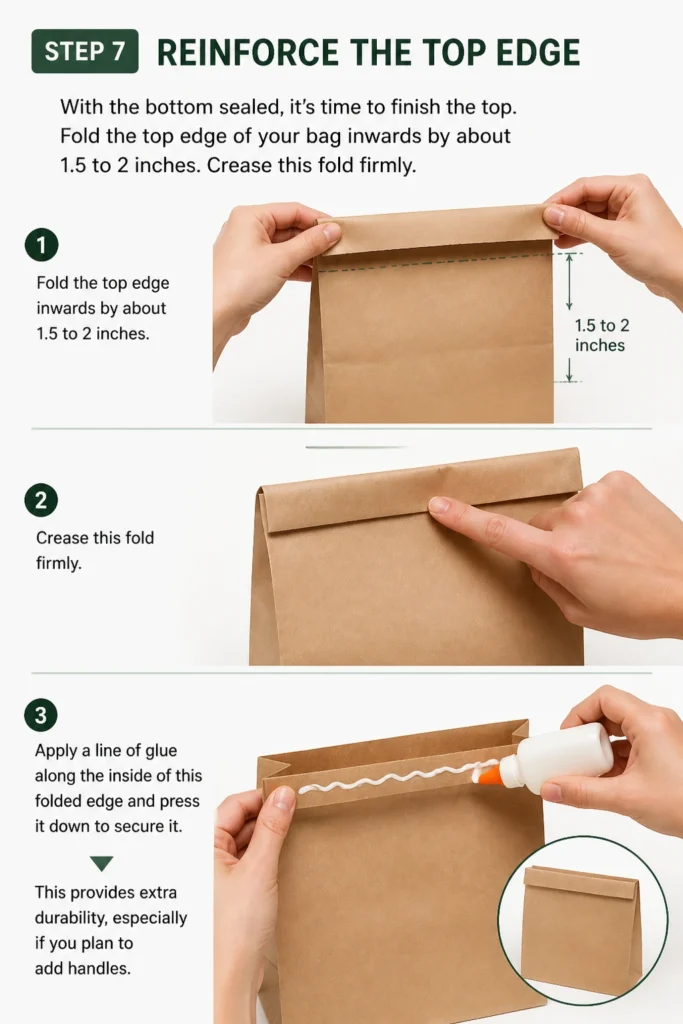
Crease this fold firmly. This reinforces the top edge, making it stronger and giving it a cleaner look.
Apply a line of glue along the inside of this folded edge and press it down to secure it. This provides extra durability, especially if you plan to add handles.
Step 8: Add Handles (Optional)
If you want handles, this is the time to add them. Measure about 1 inch in from each side of the top opening on both the front and back of the bag.
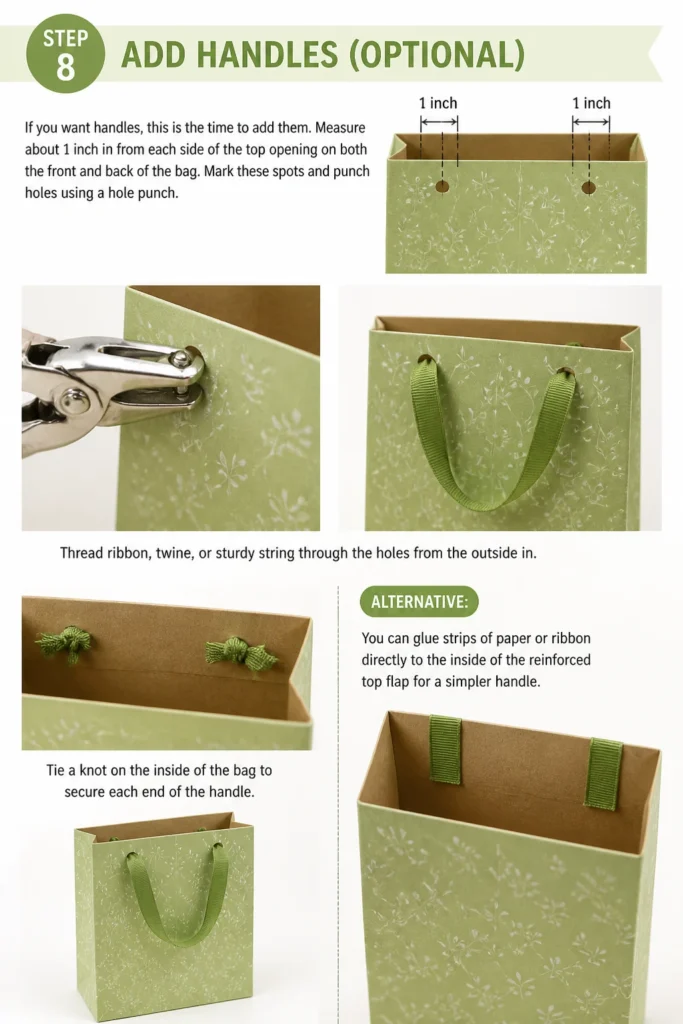
Mark these spots and punch holes using a hole punch.
Thread ribbon, twine, or sturdy string through the holes from the outside in. Tie a knot on the inside of the bag to secure each end of the handle.
Alternatively, you can glue strips of paper or ribbon directly to the inside of the reinforced top flap for a simpler handle.
Common Mistakes to Avoid
Uneven Folds
One of the most common issues is not making sharp, even folds. This can lead to a crooked bag that won’t stand up straight or looks lopsided.
Always use a ruler and a pencil to mark your fold lines before creasing. Take your time and press firmly along the entire length of each fold to ensure it’s crisp and straight.
Insufficient Glue
Using too little glue, or not letting it dry properly, can cause your bag to fall apart. The seams are crucial for structural integrity.
Apply a continuous, thin line of glue along all seams, especially the side seam and the bottom flaps. Press firmly and hold for a few moments, or use clips, to allow the glue to set properly before moving on.
Rushing the Process
Paper bag making requires patience. Rushing through steps often results in misalignments, weak seams, or accidental tears.
Work methodically through each step. Allow glue to dry, double-check your measurements, and smooth out each fold before proceeding. Enjoy the process rather than focusing solely on the end product.
Using the Wrong Paper Type
While almost any paper can be used, thin paper like printer paper will result in a flimsy bag that tears easily. Conversely, overly thick paper might be difficult to fold precisely.
Opt for paper that offers a good balance of strength and flexibility. Cardstock, scrapbook paper (65-80 lb), or sturdy craft paper are ideal choices that provide durability without being too challenging to work with.
Troubleshooting
Bag Tearing
If your bag tears, especially at the folds or where handles are attached, it’s usually due to thin paper or too much stress on a weak point.
For thin paper, reinforce key areas by gluing an extra strip of paper on the inside of the fold or handle attachment points. If a tear occurs during folding, try to patch it with a small piece of matching paper and glue, then allow it to dry completely.
Bag Won’t Stand Upright
A wobbly or collapsing bag often indicates uneven bottom folds or insufficient creasing of the side gussets. The bottom needs to be perfectly flat and square.
Go back and re-crease all the bottom folds, ensuring the triangular flaps are completely flattened and the overlapping sections are securely glued. Make sure the side gussets are also sharply creased, as they help the bag maintain its structure.
Handles Pulling Out
If your handles detach, the attachment method might not be strong enough for the weight. Knots might be too small, or glue might not have held.
For string handles, ensure the knots are substantial and positioned securely against the inside of the reinforced top. If gluing, use a strong craft adhesive and allow ample drying time. You can also reinforce the handle attachment points with small squares of cardstock glued over the knots or glued handle ends.
Key Takeaways
- Accurate measurements and crisp folds are essential for a professional-looking and functional paper bag.
- A strong adhesive, applied correctly and allowed to dry, is crucial for the bag’s durability.
- Choosing the right paper type directly impacts the strength and appearance of your finished bag.
- Reinforcing the top edge and handle attachment points adds significant longevity to your creation.
- Patience and attention to detail during each step will yield the best results.
- Customization with decorations or unique handles makes your paper bag truly special.
Frequently Asked Questions
Can I make this bag waterproof?
While paper itself isn’t waterproof, you can add a degree of water resistance. You could line the inside with clear contact paper or spray the finished bag with a clear acrylic sealant. Keep in mind these methods offer protection against splashes, not full submersion.
What’s the best paper for a strong bag?
Heavy cardstock (65-80 lb), sturdy scrapbook paper, or specialized kraft paper are excellent choices. These papers offer good rigidity and hold up well to folding and carrying moderate weight. Avoid standard printer paper for anything but the lightest items.
How can I decorate my paper bag?
The possibilities are endless! You can use stamps, stickers, markers, paint, glitter, or even glued-on fabric scraps. Consider adding a personalized tag or a charming bow. Decorate your paper flat before assembly for easier application, or add embellishments to the finished bag.
Can I reuse old gift wrap for this?
Absolutely, as long as the gift wrap is relatively thick and not too flimsy. Thicker, good-quality gift wrap can make beautiful and unique bags. Be mindful of any existing creases or tears in the wrap, and try to cut around them for the cleanest result.
Our Top Recommended Finds
- Craft Paper Assortment: A pack with various colors and thicknesses allows for versatile projects and experimentation.
- Strong Craft Glue: A reliable glue stick or a quick-drying liquid craft glue ensures lasting bonds for all your seams.
- Rotary Cutter & Mat: For perfectly straight cuts and crisp edges, a rotary cutter with a self-healing mat is an invaluable tool.
Your Paper Crafting Journey Continues
You’ve just created a fantastic paper bag, a testament to your creativity and attention to detail. This simple craft opens up a world of possibilities.
Think about scaling up or down, experimenting with different paper textures, or adding unique embellishments.
Why not try making a series of bags in various sizes for an upcoming event, or use them as charming, personalized gift wrap? Pick up some paper and start crafting today!
Beginner-friendly templates, step-by-step guides,
and weekly project ideas in your inbox.