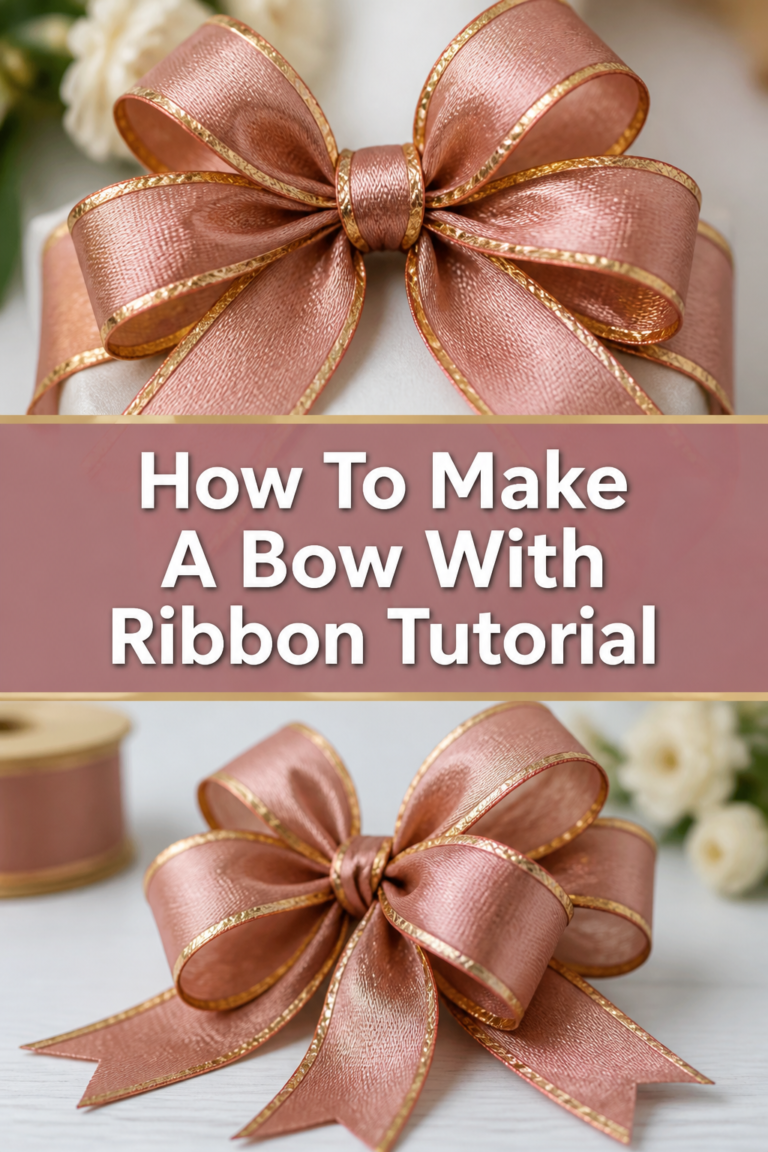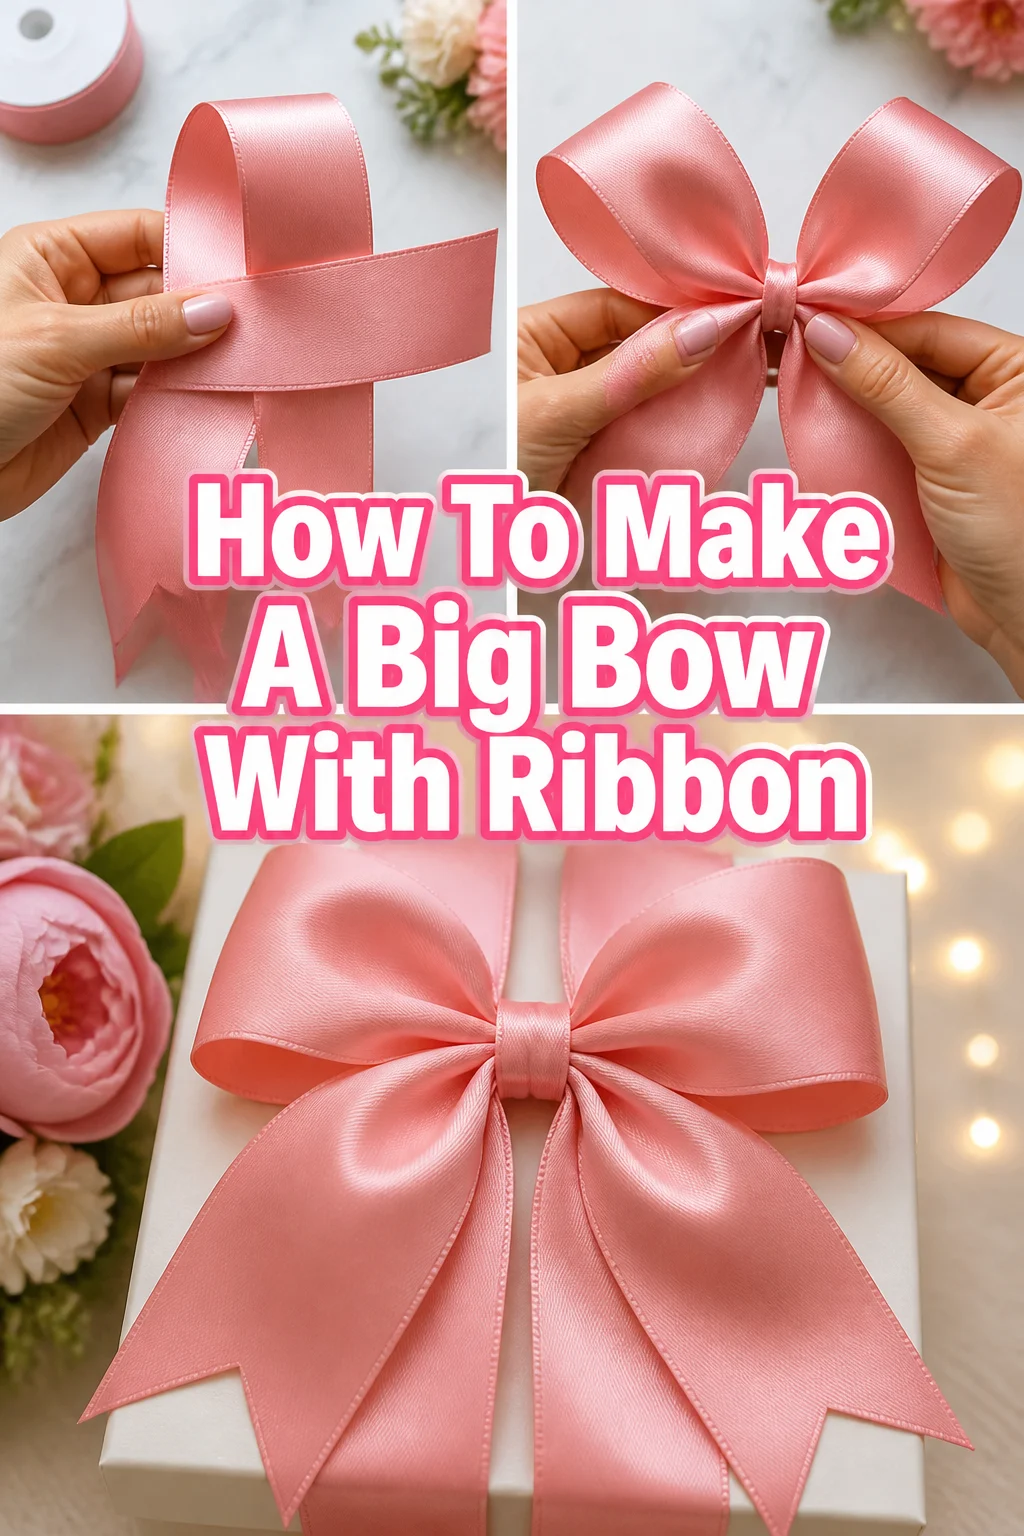
🎀 How To Make A Big Bow With Ribbon

Beginner-friendly templates, step-by-step guides,
and weekly project ideas in your inbox.
Learning to make a big, beautiful bow can transform any gift or decoration. I remember struggling with flimsy bows that never quite held their shape, feeling frustrated with my crafting attempts. This guide distills years of personal experience and countless ribbon experiments into a simple, reliable method. You can trust these steps to help you create stunning bows every time.

Quick Overview
Get ready to craft an impressive ribbon bow that will elevate any present, wreath, or decor item. This guide will walk you through creating a full, professional-looking bow from start to finish.
- Time needed: 20-45 minutes (depending on complexity and experience)
- Difficulty: Beginner to Intermediate
- What you’ll need: Ribbon, floral wire or thin string, sharp scissors, measuring tape
Step-by-Step Instructions
Step 1: Gather Your Materials
Before you begin, make sure all your supplies are within reach. Having everything organized prevents interruptions and keeps your crafting smooth.
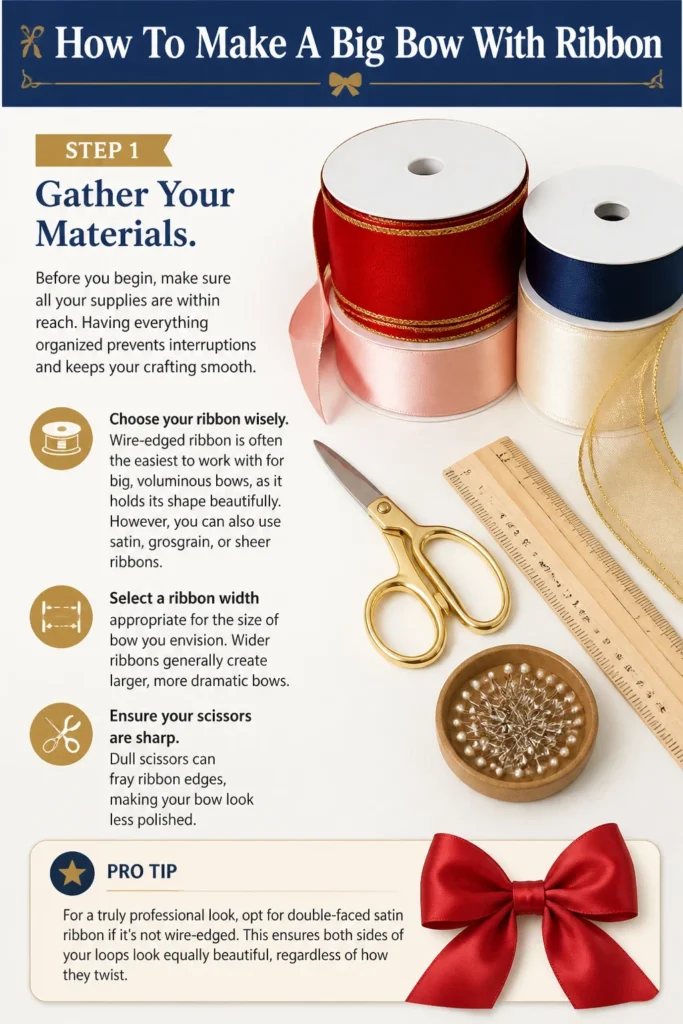
Choose your ribbon wisely. Wire-edged ribbon is often the easiest to work with for big, voluminous bows, as it holds its shape beautifully. However, you can also use satin, grosgrain, or sheer ribbons.
Select a ribbon width appropriate for the size of bow you envision. Wider ribbons generally create larger, more dramatic bows.
Ensure your scissors are sharp. Dull scissors can fray ribbon edges, making your bow look less polished.
Pro Tip: For a truly professional look, opt for double-faced satin ribbon if it’s not wire-edged. This ensures both sides of your loops look equally beautiful, regardless of how they twist.
Step 2: Determine Your Bow Size and Ribbon Length
Visualizing the final bow helps you cut the right amount of ribbon. Consider where the bow will be used to guide its dimensions.
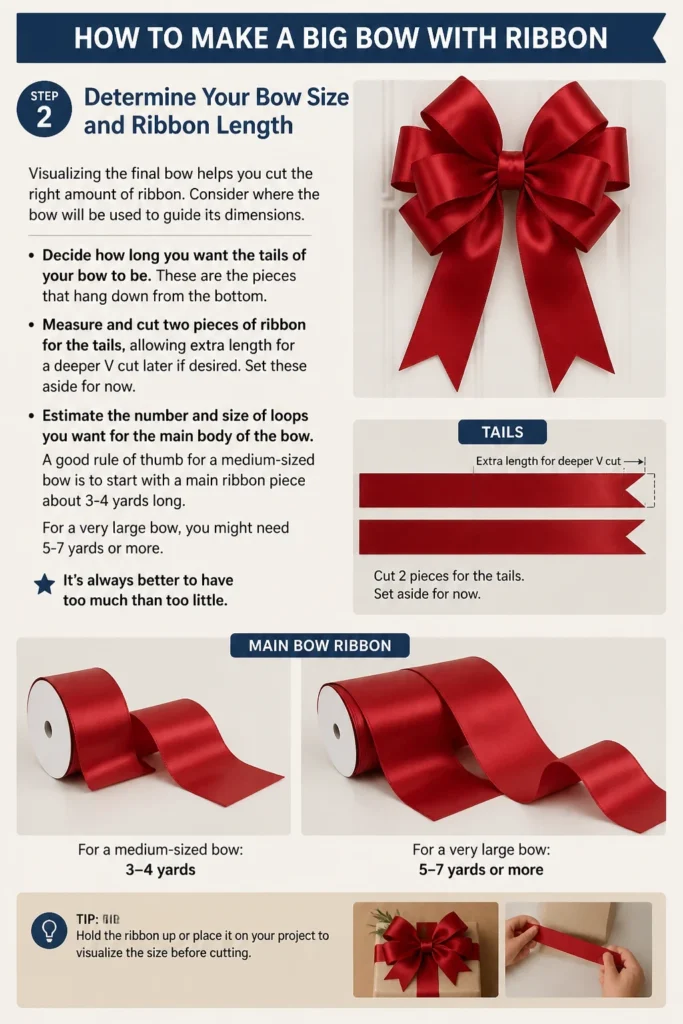
Decide how long you want the “tails” of your bow to be. These are the pieces that hang down from the bottom.
Measure and cut two pieces of ribbon for the tails, allowing extra length for a deeper “V” cut later if desired. Set these aside for now.
Estimate the number and size of loops you want for the main body of the bow. A good rule of thumb for a medium-sized bow is to start with a main ribbon piece about 3-4 yards long. For a very large bow, you might need 5-7 yards or more. It’s always better to have too much than too little.
Step 3: Create the First Loops
This is where the magic begins, forming the foundational structure of your bow. Starting with a manageable length helps maintain control.
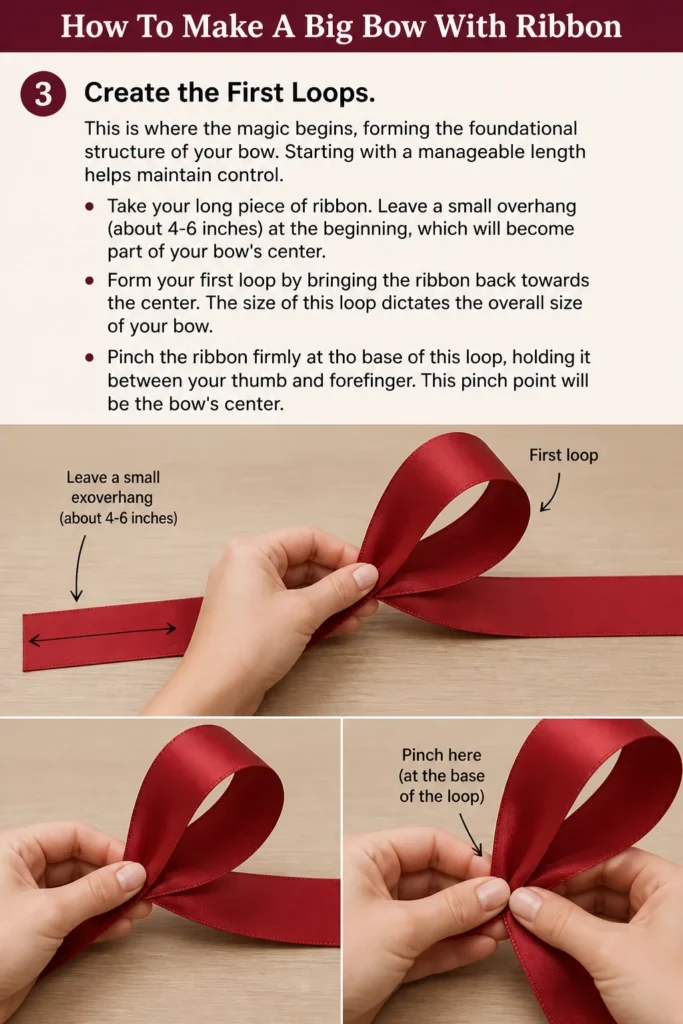
Take your long piece of ribbon. Leave a small overhang (about 4-6 inches) at the beginning, which will become part of your bow’s center.
Form your first loop by bringing the ribbon back towards the center. The size of this loop dictates the overall size of your bow.
Pinch the ribbon firmly at the base of this loop, holding it between your thumb and forefinger. This pinch point will be the bow’s center.
Step 4: Build Subsequent Loops (The Figure-Eight Method)
The figure-eight method is excellent for creating a full, symmetrical bow with distinct layers. Practice maintaining consistent loop sizes.
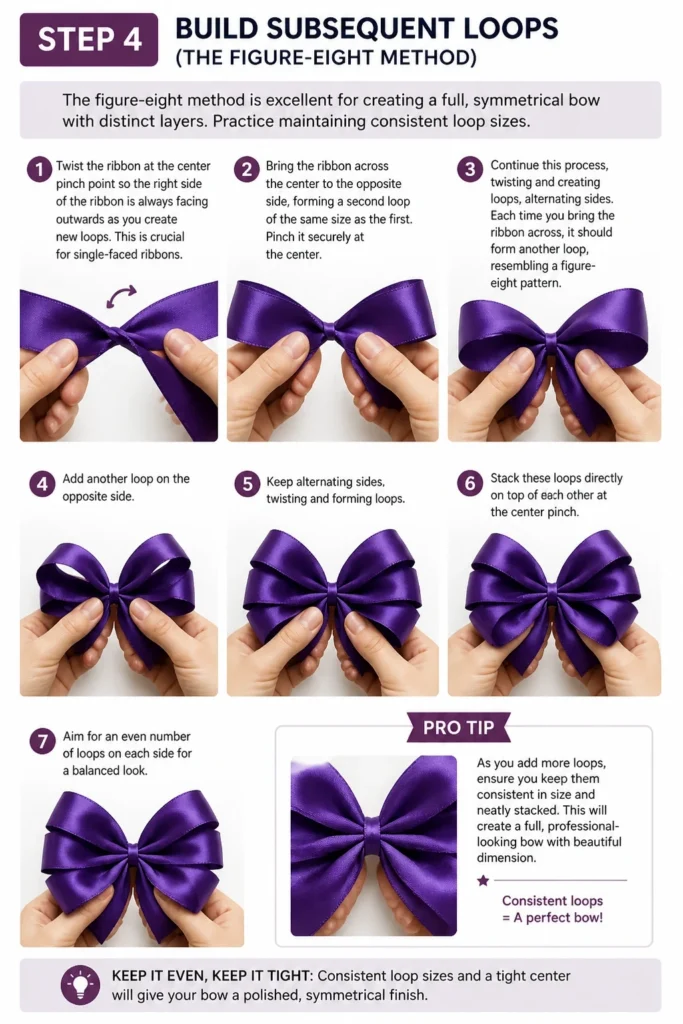
Twist the ribbon at the center pinch point so the “right” side of the ribbon is always facing outwards as you create new loops. This is crucial for single-faced ribbons.
Bring the ribbon across the center to the opposite side, forming a second loop of the same size as the first. Pinch it securely at the center.
Continue this process, twisting and creating loops, alternating sides. Each time you bring the ribbon across, it should form another loop, resembling a figure-eight pattern.
Stack these loops directly on top of each other at the center pinch. Aim for an even number of loops on each side for a balanced look.
Pro Tip: As you add more loops, ensure you’re twisting the ribbon at the center to keep the “good” side facing out. This prevents the underside of your ribbon from showing in the finished bow.
Step 5: Add More Layers and Adjust Fullness
The more loops you add, the fuller and more luxurious your bow will appear. Don’t be afraid to experiment with different layer counts.
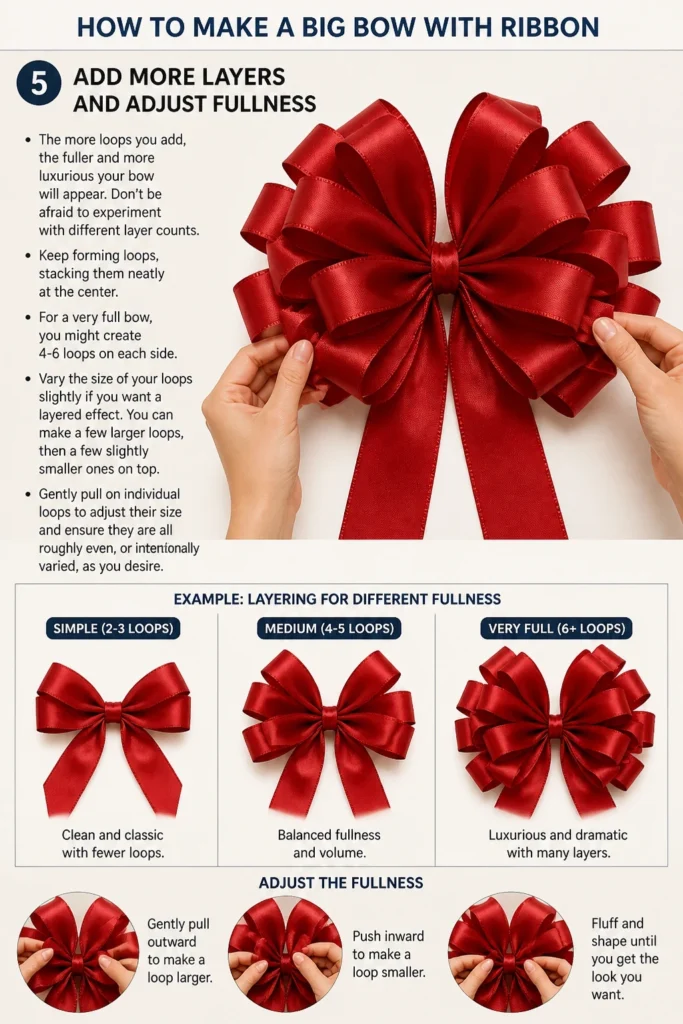
Keep forming loops, stacking them neatly at the center. For a very full bow, you might create 4-6 loops on each side.
Vary the size of your loops slightly if you want a layered effect. You can make a few larger loops, then a few slightly smaller ones on top.
Gently pull on individual loops to adjust their size and ensure they are all roughly even, or intentionally varied, as you desire.
Step 6: Secure the Bow’s Center
This is the most critical step for ensuring your bow holds its shape and doesn’t unravel. A tight cinch is key.
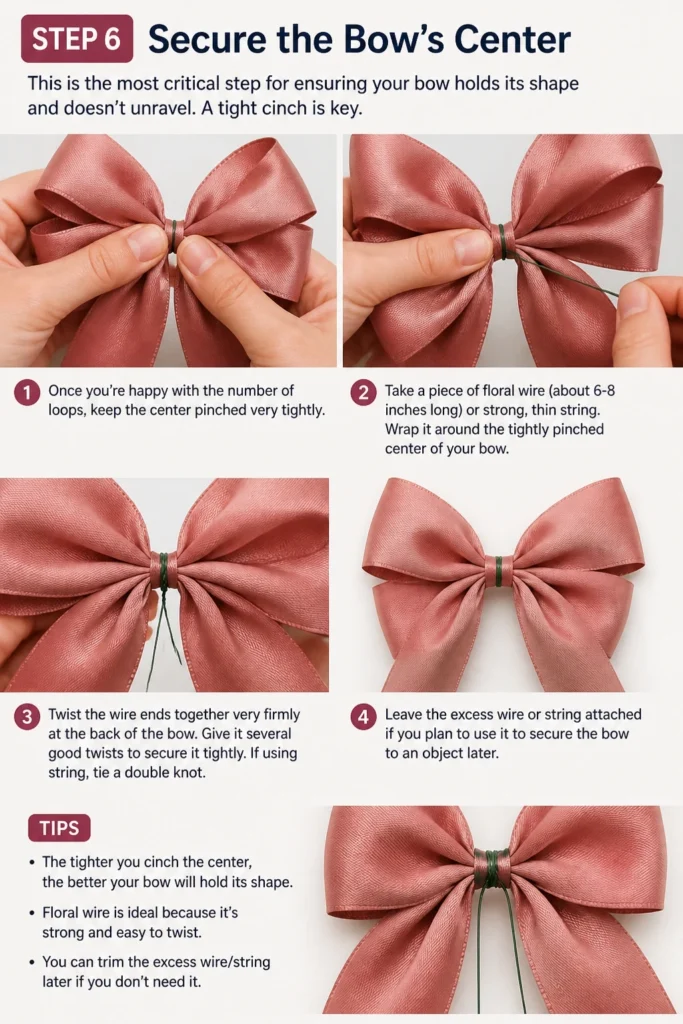
Once you’re happy with the number of loops, keep the center pinched very tightly.
Take a piece of floral wire (about 6-8 inches long) or strong, thin string. Wrap it around the tightly pinched center of your bow.
Twist the wire ends together very firmly at the back of the bow. Give it several good twists to secure it tightly. If using string, tie a double knot.
Leave the excess wire or string attached if you plan to use it to secure the bow to an object later.
Step 7: Attach the Tails
Now it’s time to add those elegant hanging pieces to complete the bow’s silhouette.
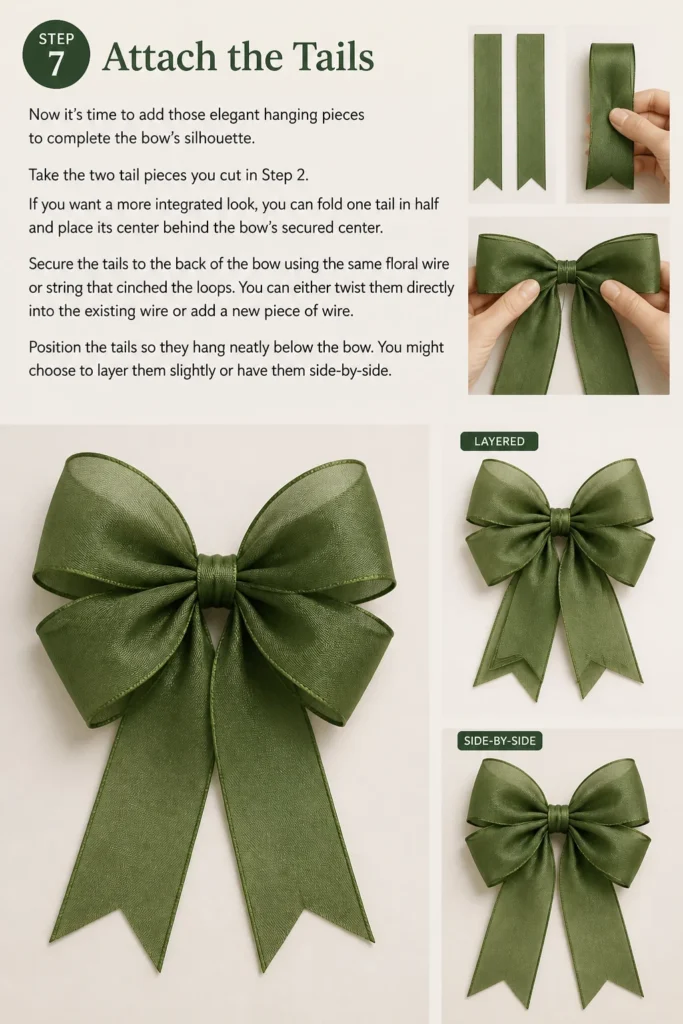
Take the two tail pieces you cut in Step 2. If you want a more integrated look, you can fold one tail in half and place its center behind the bow’s secured center.
Secure the tails to the back of the bow using the same floral wire or string that cinched the loops. You can either twist them directly into the existing wire or add a new piece of wire.
Position the tails so they hang neatly below the bow. You might choose to layer them slightly or have them side-by-side.
Step 8: Trim the Tails and Finish
The final cuts add a touch of professional polish to your creation. These small details make a big difference.
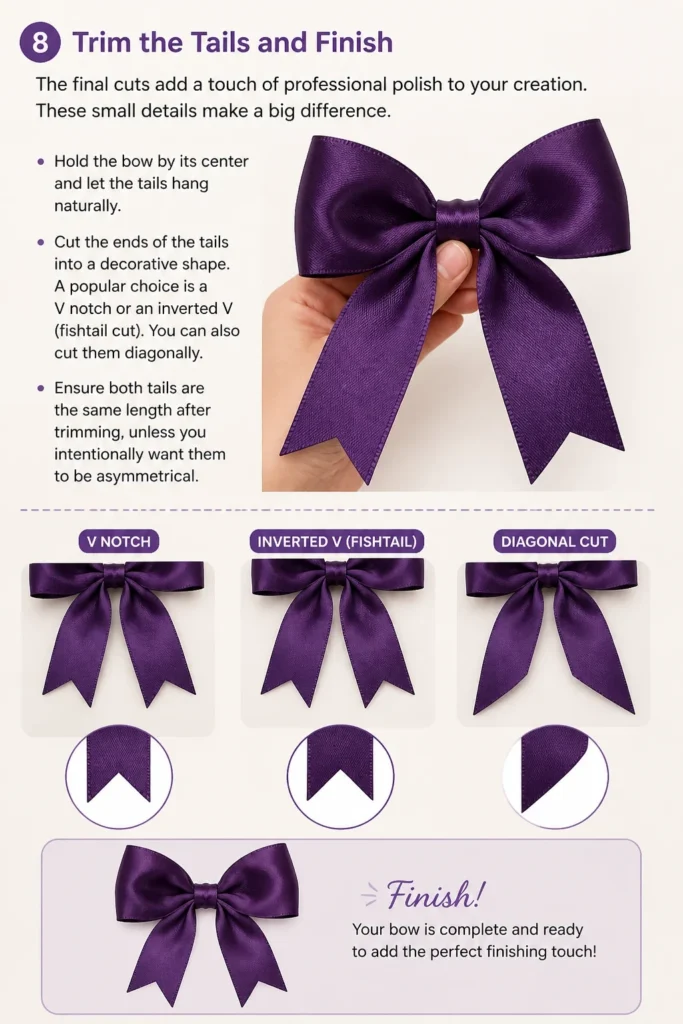
Hold the bow by its center and let the tails hang naturally.
Cut the ends of the tails into a decorative shape. A popular choice is a “V” notch or an inverted “V” (fishtail cut). You can also cut them diagonally.
Ensure both tails are the same length after trimming, unless you intentionally want them to be asymmetrical.
Step 9: Fluff and Shape Your Bow
This is the most satisfying part, bringing your flat loops to life and giving your bow its full, beautiful form. Don’t rush this step.
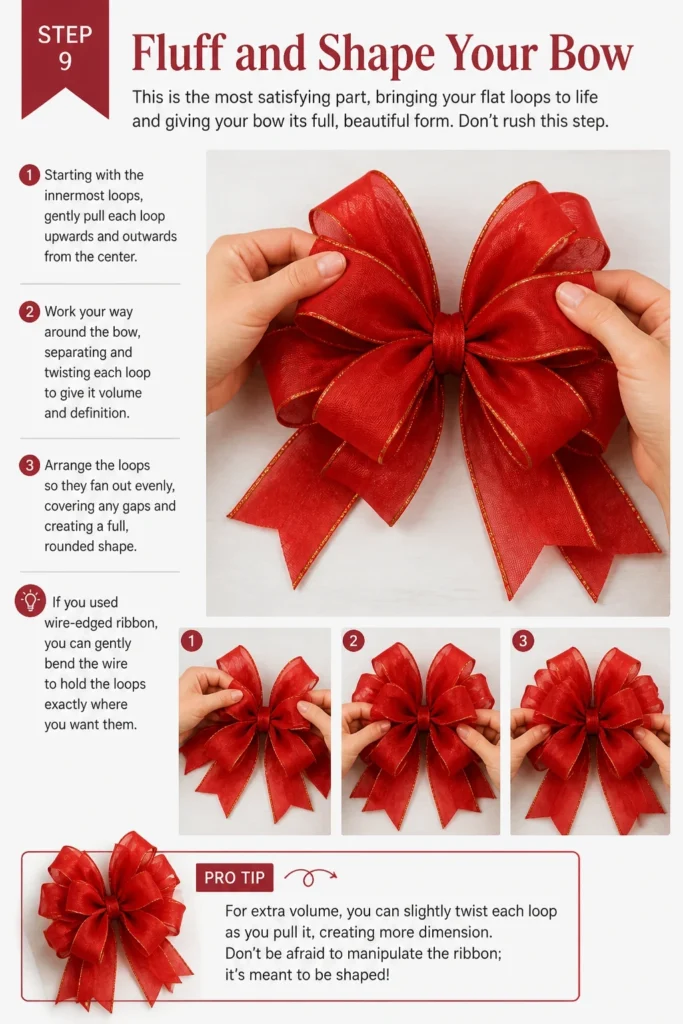
Starting with the innermost loops, gently pull each loop upwards and outwards from the center.
Work your way around the bow, separating and twisting each loop to give it volume and definition.
Arrange the loops so they fan out evenly, covering any gaps and creating a full, rounded shape. If you used wire-edged ribbon, you can gently bend the wire to hold the loops exactly where you want them.
Pro Tip: For extra volume, you can slightly twist each loop as you pull it, creating more dimension. Don’t be afraid to manipulate the ribbon; it’s meant to be shaped!
Common Mistakes to Avoid
Using Single-Faced Ribbon Incorrectly
Many crafters start with single-faced ribbon, where only one side is shiny or patterned. If you don’t twist the ribbon at the center with each loop, the dull or plain side will show, detracting from your bow’s appearance. Always remember to twist the ribbon at the center pinch point before bringing it around to form the next loop, ensuring the “good” side is always facing outwards.
Not Securing the Center Tightly Enough
A loose center means a floppy bow. If the floral wire or string isn’t pulled as tight as possible, your loops will slip, and the bow won’t hold its shape. When twisting the wire, pull it taut with one hand while twisting with the other until it feels very firm. For string, pull the first half of your knot extremely tight before completing the second half.
Uneven Loop Sizes
While some designs might call for varied loop sizes, generally, an inconsistent main bow will look messy. When forming your loops, try to keep them the same length on each side. Hold the bow up and visually compare loops as you go, making small adjustments before securing the center. If using wire-edged ribbon, you have more flexibility to adjust later, but consistency from the start is best.
Trimming Tails Before Shaping
It’s tempting to trim the tails early, but wait until the bow is fully fluffed and shaped. The act of fluffing can sometimes pull ribbon, slightly changing the effective length of your tails. Trim them last, after you’ve manipulated all the loops, to ensure they hang perfectly and are evenly cut.
Troubleshooting
My Bow Looks Flat and Lifeless
If your bow lacks volume, it’s likely due to insufficient fluffing or not enough loops. The solution is to go back and separate each individual loop, gently pulling it away from the center and twisting it slightly to give it dimension. If it still looks sparse, consider adding more layers of loops in your next attempt or using a wider ribbon. Wire-edged ribbon is especially forgiving for shaping.
The Loops Keep Slipping Out of Place
This issue almost always stems from the center not being secured tightly enough. The floral wire or string needs to be cinched as tightly as possible around the gathered ribbon. If your bow is already made, you might need to carefully untwist the wire, re-gather the center even more firmly, and then re-secure it with a fresh, tight twist. Sometimes, a thicker gauge of floral wire can offer more stability.
The Center of My Bow Looks Messy
A cluttered center can detract from an otherwise beautiful bow. This often happens if the ribbon isn’t twisted neatly at the pinch point or if too much ribbon is gathered in one spot. To fix this, try to arrange the ribbon at the center so it lies as flat as possible before securing. You can also cover a messy center with an additional small loop of ribbon, a decorative knot, or even a craft embellishment like a jewel or button, attached with hot glue.
Key Takeaways
- Choose wire-edged ribbon for the easiest and most forgiving bow-making experience, especially for beginners.
- Always twist single-faced ribbon at the center to ensure the “good” side faces outward on all loops.
- Secure the bow’s center with floral wire or strong string, pulling it as tightly as possible to maintain shape.
- Build your bow with enough loops to achieve the desired fullness, typically 4-6 loops per side for a substantial look.
- Fluff and shape each individual loop meticulously after securing the center to bring the bow to life.
- Trim tails last, after all fluffing and shaping, for a polished and even finish.
Frequently Asked Questions
What type of ribbon is best for making a big bow?
Wire-edged ribbon is highly recommended for big bows because the wire allows you to easily shape and hold the loops in place, creating a full and structured look. Satin, grosgrain, and sheer ribbons can also work, but they require more careful handling and may not hold their shape as rigidly without the wire.
How much ribbon do I need for a large bow?
The amount of ribbon needed varies greatly depending on the desired size and fullness of your bow. For a substantial large bow, you’ll typically need anywhere from 3 to 7 yards (or meters) of ribbon. It’s always best to have more than you think you’ll need, as you can always trim off excess.
Can I make a big bow without floral wire?
Yes, you can make a big bow without floral wire by using strong, thin string, fishing line, or even a pipe cleaner to secure the center. The key is to cinch the center as tightly as possible with whatever material you choose to ensure the loops hold firmly. However, floral wire is often preferred for its strength and ease of twisting.
How do I attach the finished bow to a wreath or gift?
If you left the excess floral wire attached from securing the center, simply use those ends to twist around the wreath frame or tie to your gift. If you used string or trimmed the wire, you can attach a new piece of floral wire or hot glue a clip or pin to the back of the bow for easy attachment.
Our Top Recommended Finds
- Wire-Edged Ribbon: Essential for effortlessly shaping large, voluminous bows that hold their form beautifully. Look for widths from 1.5 inches to 4 inches.
- 26-Gauge Floral Wire: This thin yet strong wire is perfect for cinching the bow’s center securely without adding bulk.
- Sharp Fabric Scissors: Clean, crisp cuts prevent fraying and give your bow a professional, polished appearance.
Unleash Your Inner Bow-Maker
Creating a magnificent bow with ribbon is a rewarding skill that adds a touch of handmade charm to anything. Don’t be intimidated by the process; with a little practice, you’ll be crafting impressive bows that become the focal point of gifts, decorations, and celebrations.
Now that you have all the tools and knowledge, why not gather your supplies and start making your first big bow today? Experiment with different ribbon types and colors to truly make each creation unique. You might even find yourself inspired to explore other ribbon crafts, like making smaller decorative bows or even elegant ribbon flowers. The possibilities are endless!
Beginner-friendly templates, step-by-step guides,
and weekly project ideas in your inbox.