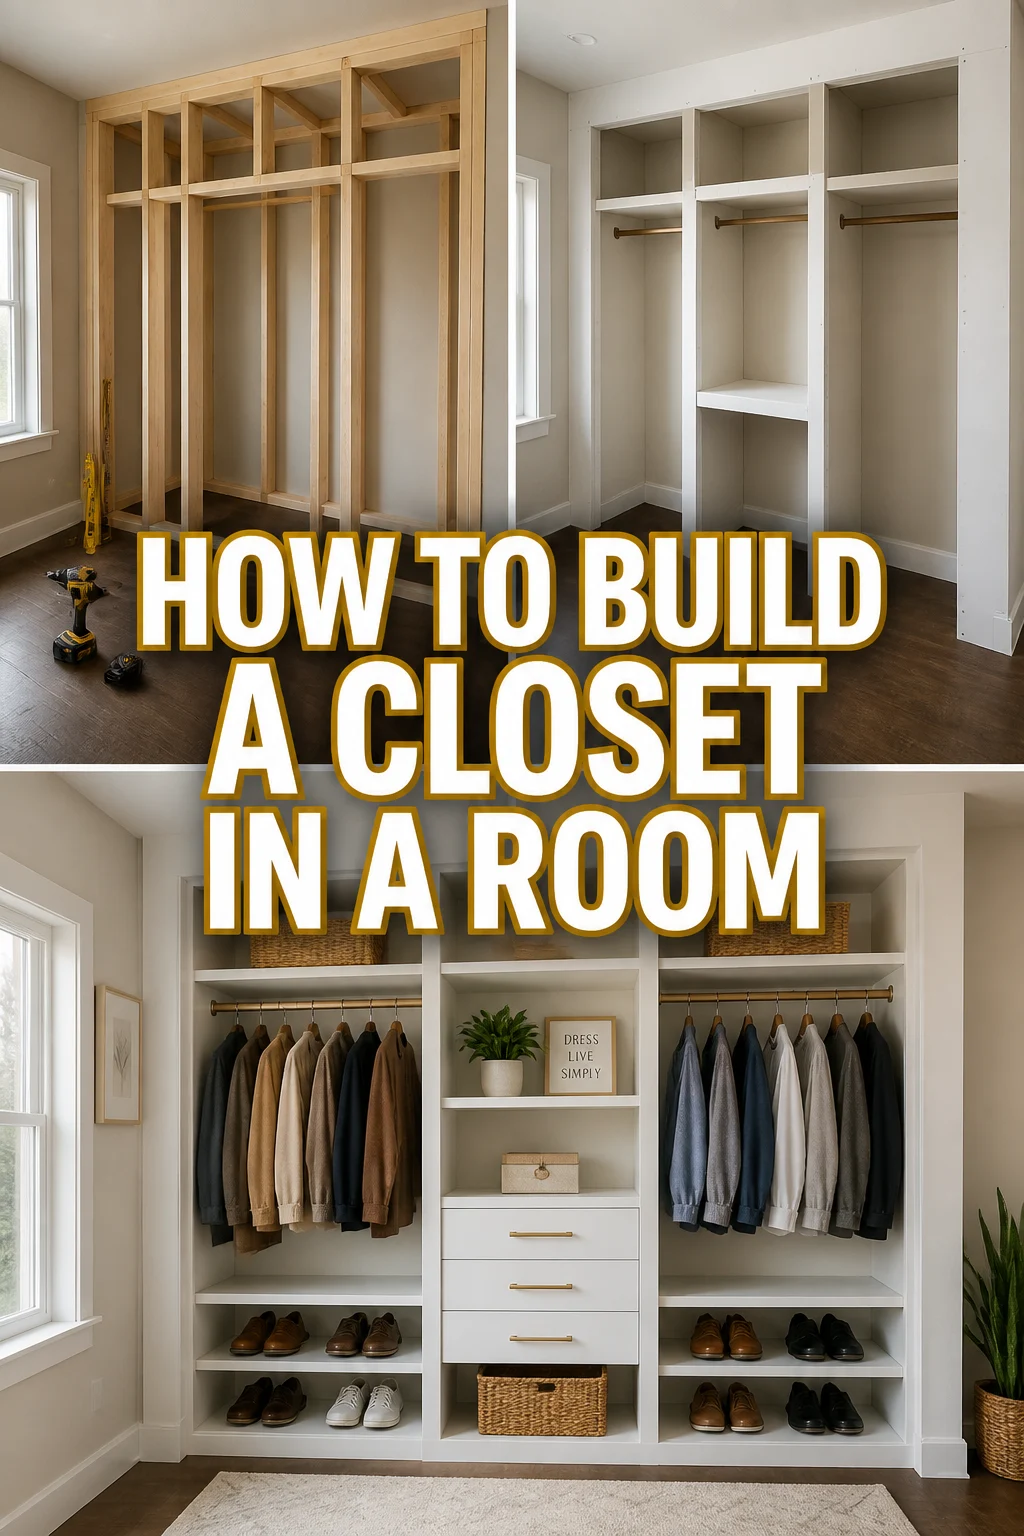
How To Build A Closet In A Room

Beginner-friendly templates, step-by-step guides,
and weekly project ideas in your inbox.
🛠️ How To Build A Closet In A Room
Adding a closet to an existing room can transform its functionality and aesthetic. I’ve tackled this project myself, turning a spare corner into much-needed storage. It’s a rewarding DIY endeavor that adds significant value.
This guide will walk you through each stage, from initial planning to the final touches. You’ll gain the confidence to create a beautiful, practical closet space.

Quick Overview
This project empowers you to construct a custom closet, enhancing storage and organization in any room. You’ll build a sturdy frame, finish it with drywall, and add essential elements like a door and shelving.
The result will be a built-in closet that looks professional and serves your needs perfectly.
- Time needed: 2-4 days (spread across a week for drying times)
- Difficulty: Intermediate
- What you’ll need: Lumber, drywall, fasteners, basic carpentry tools, drywall tools, paint, closet hardware.
Step-by-Step Instructions
Step 1: Plan Your Closet Design and Location
Careful planning prevents many headaches down the line. Visualize the closet’s size and how it will integrate with the room.
Measure the available space accurately. Consider the depth needed for hangers, typically at least 24 inches.
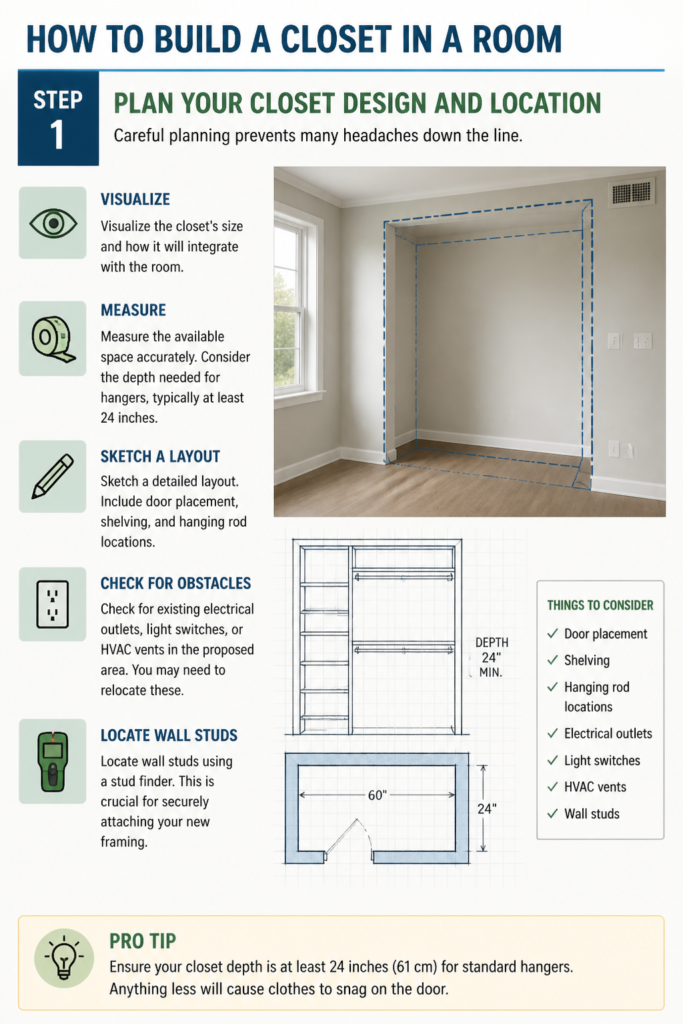
Sketch a detailed layout. Include door placement, shelving, and hanging rod locations.
Check for existing electrical outlets, light switches, or HVAC vents in the proposed area. You may need to relocate these.
Locate wall studs using a stud finder. This is crucial for securely attaching your new framing.
Pro Tip: Ensure your closet depth is at least 24 inches (61 cm) for standard hangers. Anything less will cause clothes to snag on the door.
Step 2: Gather Your Materials and Tools
Having everything on hand before you start saves time and frustration. A well-stocked workspace makes the process smoother.
Purchase framing lumber (2x4s are standard). Get enough for top plates, bottom plates, and vertical studs.
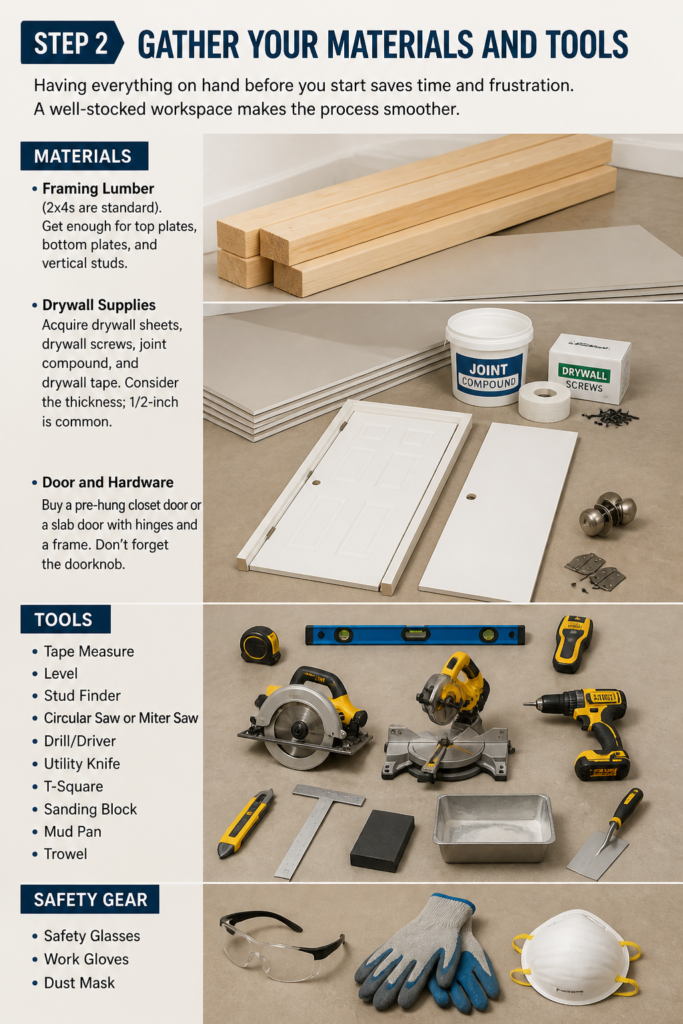
Acquire drywall sheets, drywall screws, joint compound, and drywall tape. Consider the thickness; 1/2-inch is common.
Buy a pre-hung closet door or a slab door with hinges and a frame. Don’t forget the doorknob.
Collect essential tools: a tape measure, level, stud finder, circular saw or miter saw, drill/driver, utility knife, T-square, sanding block, mud pan, and trowel.
Obtain safety gear: safety glasses, work gloves, and a dust mask.
Step 3: Frame the Closet Walls
The framing provides the structural backbone of your new closet. Accuracy here is paramount for straight walls and a properly fitting door.
Mark the layout on the floor and ceiling. Use your tape measure and a chalk line or a long straightedge.
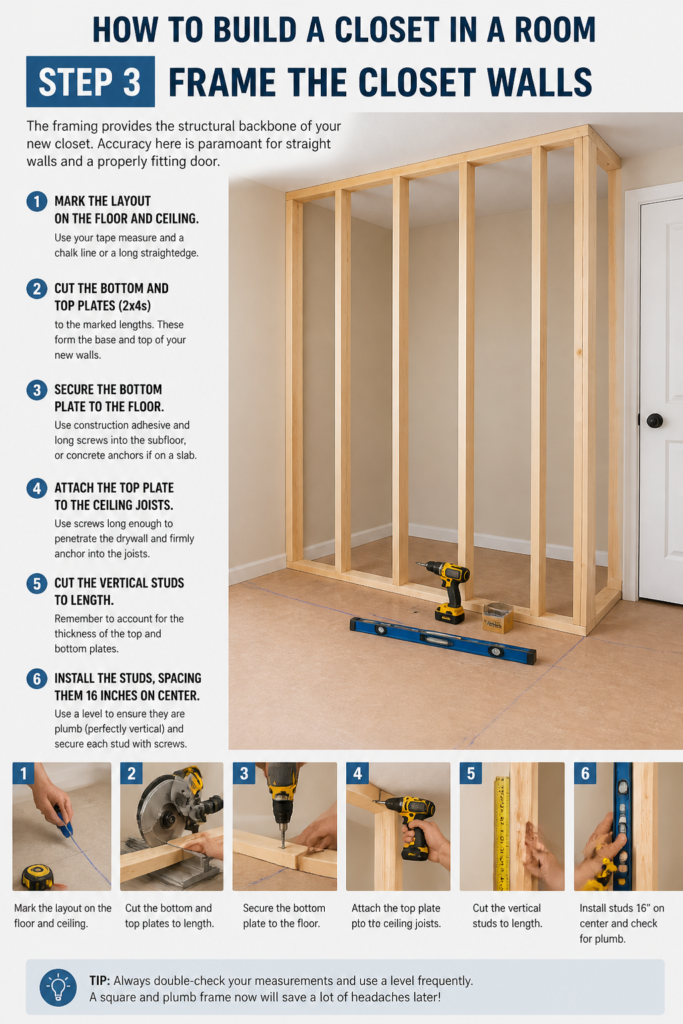
Cut the bottom and top plates (2x4s) to the marked lengths. These form the base and top of your new walls.
Secure the bottom plate to the floor. Use construction adhesive and long screws into the subfloor, or concrete anchors if on a slab.
Attach the top plate to the ceiling joists. Use screws long enough to penetrate the drywall and firmly anchor into the joists.
Cut the vertical studs to length. Remember to account for the thickness of the top and bottom plates.
Install the studs, spacing them 16 inches on center. Use a level to ensure they are plumb (perfectly vertical) before screwing them into both plates.
Build the door opening frame. Install king studs, jack studs, and a header according to your door’s rough opening dimensions. This creates a sturdy opening for the door.
Pro Tip: Always double-check your measurements, especially for the door opening. A rough opening that’s too small or too large will make door installation extremely difficult.
Step 4: Install Electrical (If Needed) and Drywall
Addressing electrical needs now is much easier than later. Drywall installation is messy but straightforward with the right technique.
Run any necessary electrical wiring for a light or outlet inside the closet. Consult an electrician if you’re unsure or uncomfortable with this step.
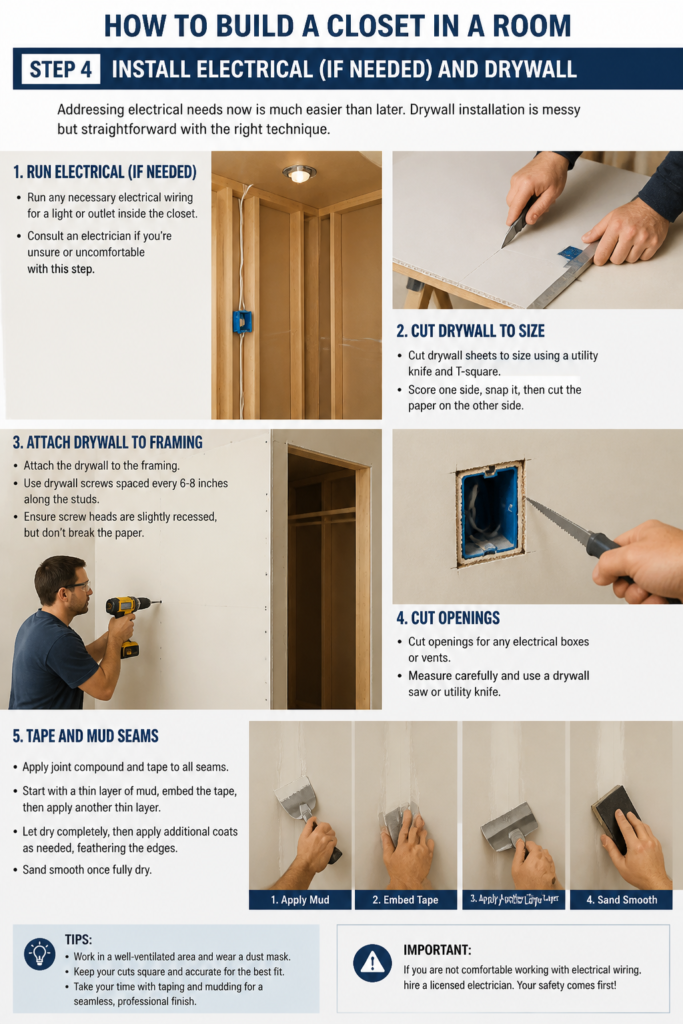
Cut drywall sheets to size using a utility knife and T-square. Score one side, snap it, then cut the paper on the other side.
Attach the drywall to the framing. Use drywall screws spaced every 6-8 inches along the studs. Ensure screw heads are slightly recessed, but don’t break the paper.
Cut openings for any electrical boxes or vents. Measure carefully and use a drywall saw or utility knife.
Apply joint compound and tape to all seams. Start with a thin layer of mud, embed the tape, then apply another thin layer over the tape.
Cover all screw heads with joint compound. Allow each coat to dry completely before applying the next.
Sand the dried compound smooth. Use a sanding block or pole sander with fine-grit sandpaper. Apply additional thin coats of mud and sand until the walls are perfectly smooth.
Pro Tip: When sanding drywall, wear a high-quality dust mask and open windows. Drywall dust gets everywhere and can be irritating.
Step 5: Install the Closet Door
A properly hung door is essential for the closet’s functionality and appearance. Take your time to get it right.
Unpack your pre-hung door unit. Remove any temporary bracing.
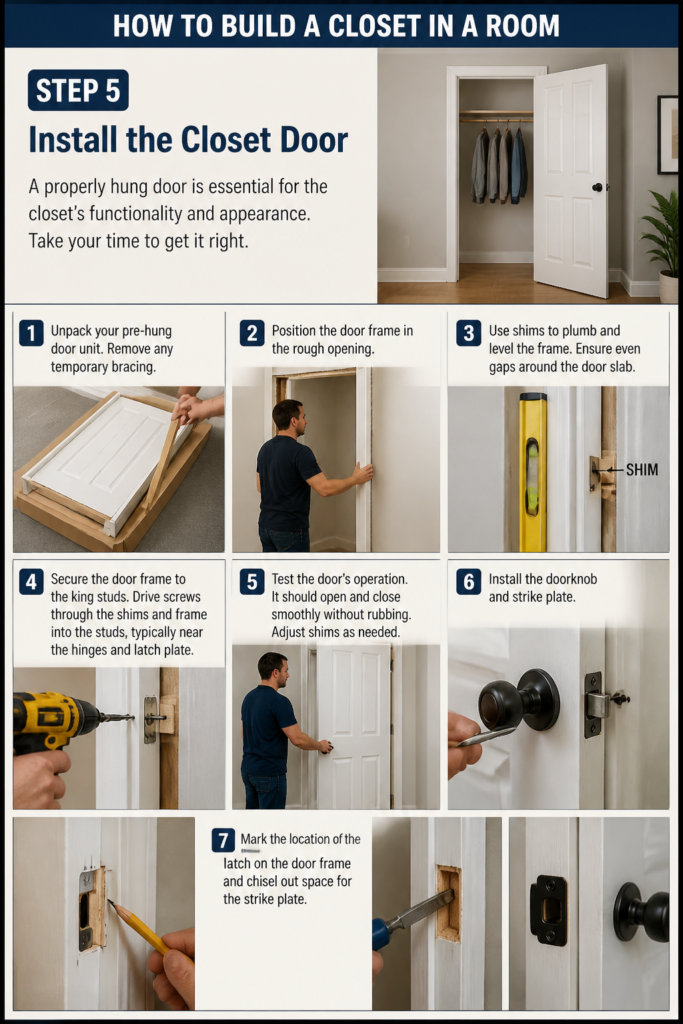
Position the door frame in the rough opening. Use shims to plumb and level the frame. Ensure even gaps around the door slab.
Secure the door frame to the king studs. Drive screws through the shims and frame into the studs, typically near the hinges and latch plate.
Test the door’s operation. It should open and close smoothly without rubbing. Adjust shims as needed.
Install the doorknob and strike plate. Mark the location of the latch on the door frame and chisel out space for the strike plate.
Step 6: Paint and Finish the Interior and Exterior
Painting gives your closet a polished, finished look. Proper preparation ensures a durable and attractive finish.
Clean all drywall surfaces thoroughly. Remove any dust from sanding.
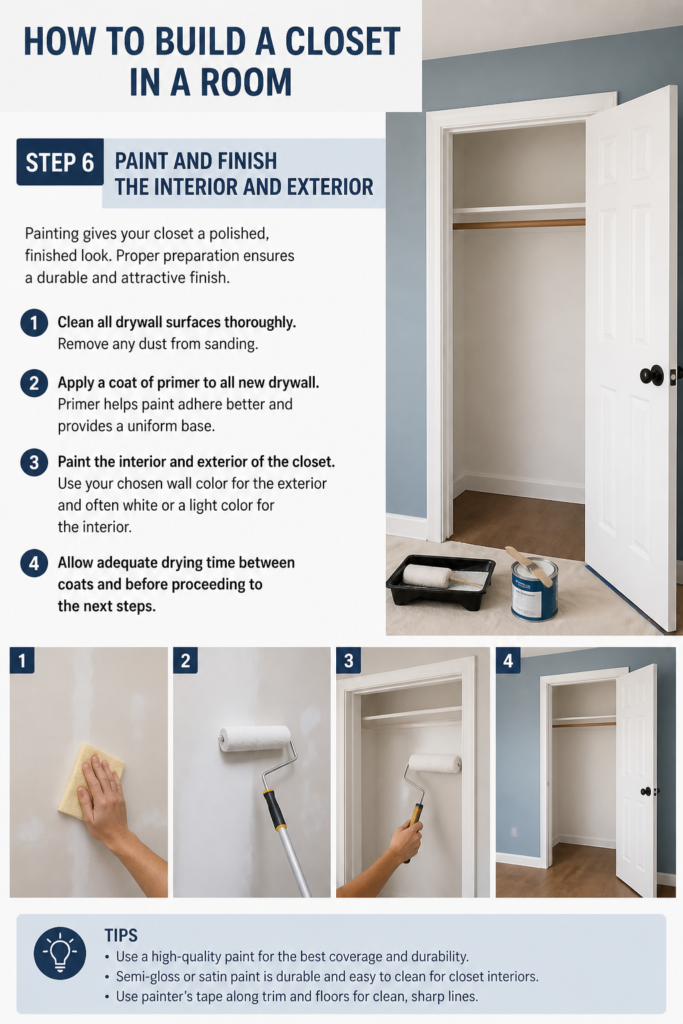
Apply a coat of primer to all new drywall. Primer helps paint adhere better and provides a uniform base.
Paint the interior and exterior of the closet. Use your chosen wall color for the exterior and often white or a light color for the interior.
Allow adequate drying time between coats and before proceeding to the next steps.
Step 7: Install Shelving and Hanging Rods
This is where your closet truly becomes functional. Customize the interior to suit your storage needs.
Mark the desired heights for shelves and hanging rods. Use a level to ensure straight lines.
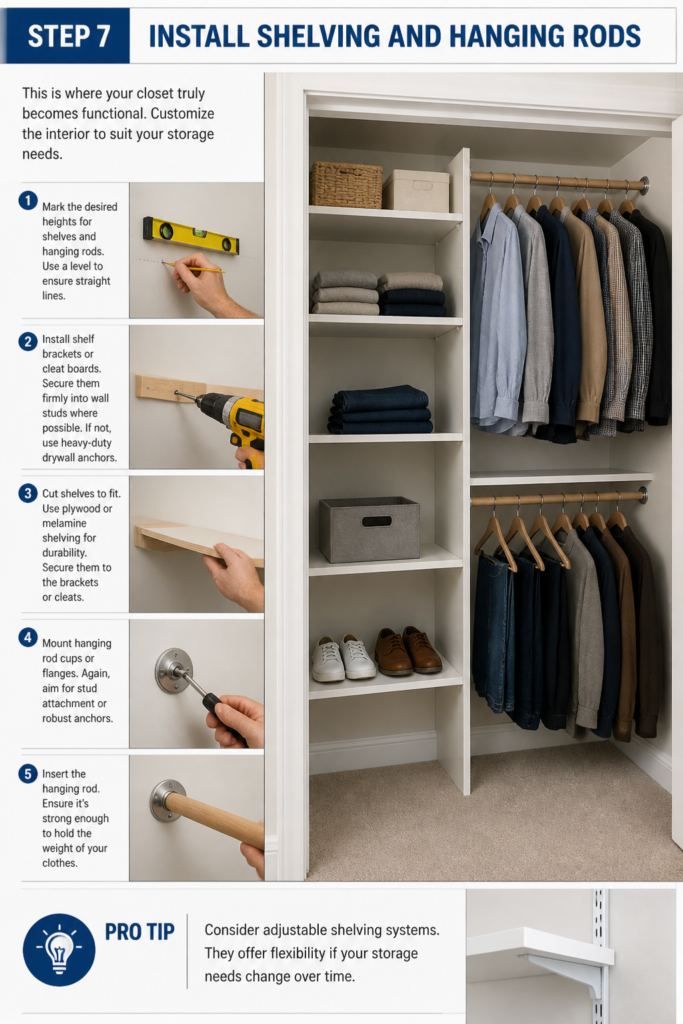
Install shelf brackets or cleat boards. Secure them firmly into wall studs where possible. If not, use heavy-duty drywall anchors.
Cut shelves to fit. Use plywood or melamine shelving for durability. Secure them to the brackets or cleats.
Mount hanging rod cups or flanges. Again, aim for stud attachment or robust anchors.
Insert the hanging rod. Ensure it’s strong enough to hold the weight of your clothes.
Pro Tip: Consider adjustable shelving systems. They offer flexibility if your storage needs change over time.
Step 8: Add Trim and Final Touches
Trim work adds a professional, custom look to your new closet. It hides imperfections and integrates the closet seamlessly with the room.
Install door casing around the door frame. Miter the corners at 45 degrees for a clean joint.
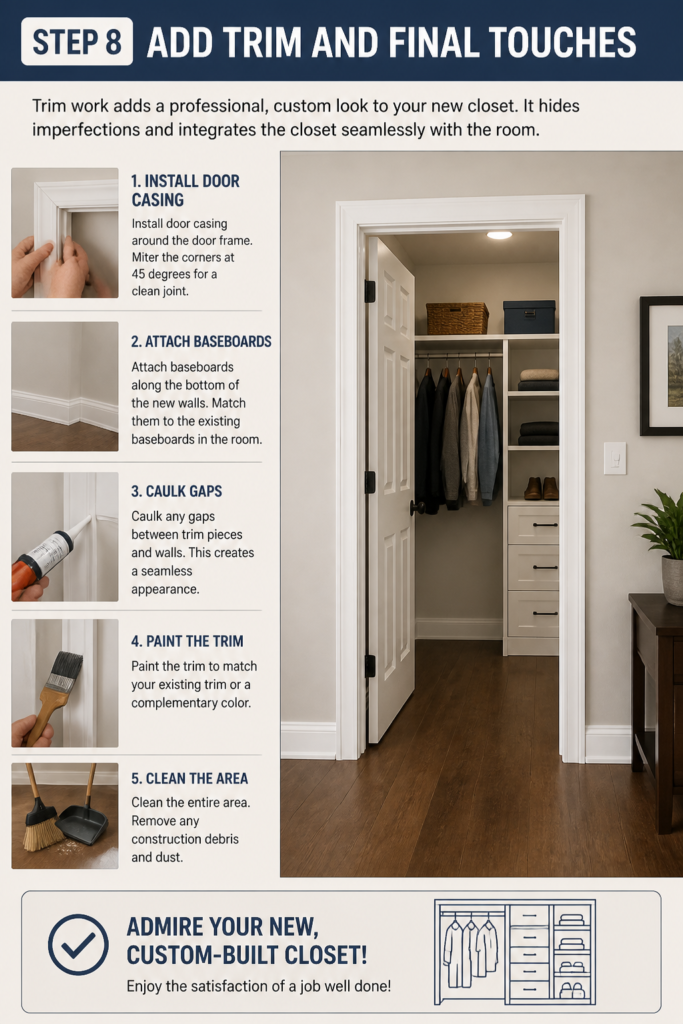
Attach baseboards along the bottom of the new walls. Match them to the existing baseboards in the room.
Caulk any gaps between trim pieces and walls. This creates a seamless appearance.
Paint the trim to match your existing trim or a complementary color.
Clean the entire area. Remove any construction debris and dust.
Admire your new, custom-built closet!
Common Mistakes to Avoid
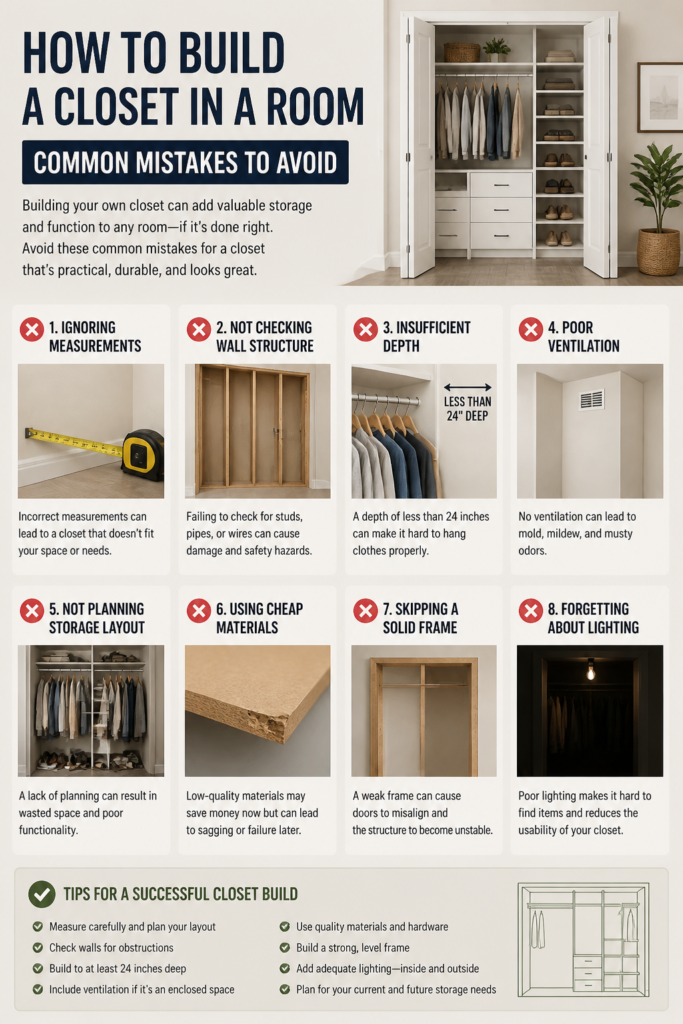
Ignoring Electrical and Plumbing
Many homeowners start framing without checking what’s behind the walls. Cutting into a live electrical wire or a water pipe can be dangerous and costly. Always use a stud finder with electrical detection, and investigate any unusual readings. Reroute utilities before framing begins.
Poor Framing Accuracy
A crooked frame leads to a crooked closet. Walls won’t be plumb, and the door won’t hang correctly. Use a level and tape measure constantly during framing. Ensure studs are exactly 16 inches on center (or 24 if preferred) and perfectly vertical. Square your corners carefully.
Insufficient Drywall Finishing
Rushing the drywall mudding and sanding process results in visible seams and screw heads. This is often the most noticeable flaw in DIY projects. Take your time, apply thin coats, sand thoroughly between coats, and use a bright light to check for imperfections before painting.
Overloading Shelves
Installing shelves without proper support or into weak drywall anchors can lead to sagging or collapse. Always secure shelf supports into wall studs whenever possible. If studs aren’t available, use toggle bolts or heavy-duty screw-in anchors designed for significant weight. Distribute weight evenly on shelves.
Troubleshooting
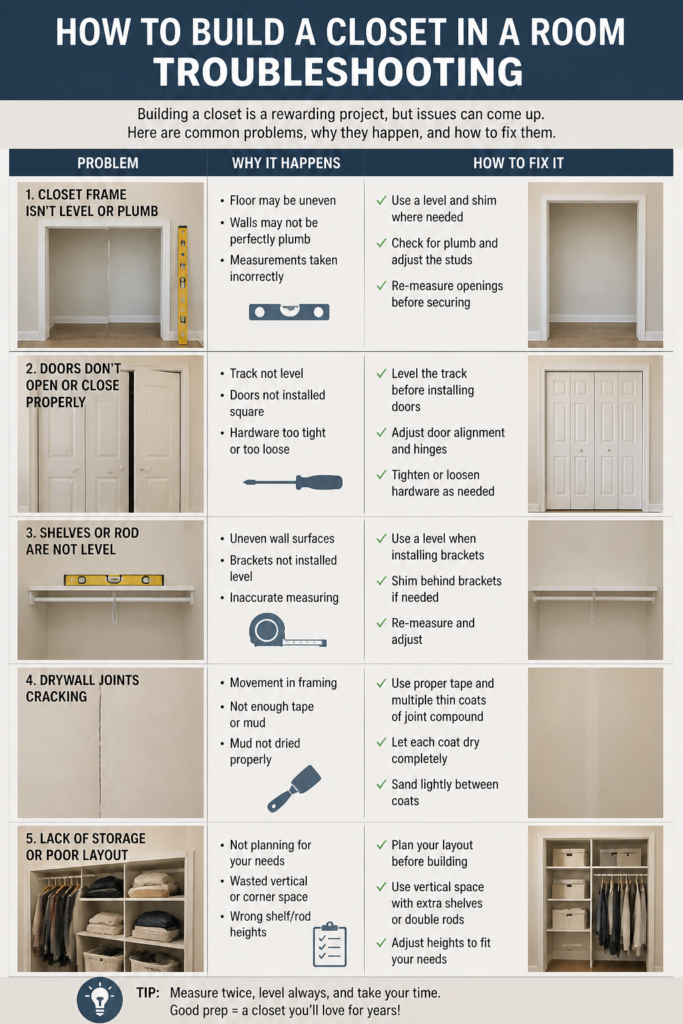
Door Rubs or Doesn’t Close Properly
This usually indicates the door frame isn’t perfectly plumb or square. Re-examine the shims around the door frame. Loosen screws, adjust shims to fine-tune the frame’s position, and then re-tighten. Check that the hinges aren’t bent or loose. Sometimes, a slight adjustment to the strike plate location can resolve minor latching issues.
Drywall Cracks Appearing at Seams
Cracks often signal insufficient joint compound, improper tape application, or movement in the framing. Ensure you used enough mud to embed the tape fully and applied subsequent coats smoothly. If framing movement is suspected, reinforce the area. For existing cracks, re-tape and re-mud the area, ensuring strong adhesion.
Shelves Sagging or Pulling Away
This is a sign of inadequate support for the weight. If the shelves are sagging, they might be too long for their thickness, or the supports are too far apart. Add additional brackets or switch to a thicker, sturdier shelving material. If pulling away, the fasteners or anchors aren’t strong enough. Replace them with longer screws into studs or heavier-duty anchors.
Key Takeaways
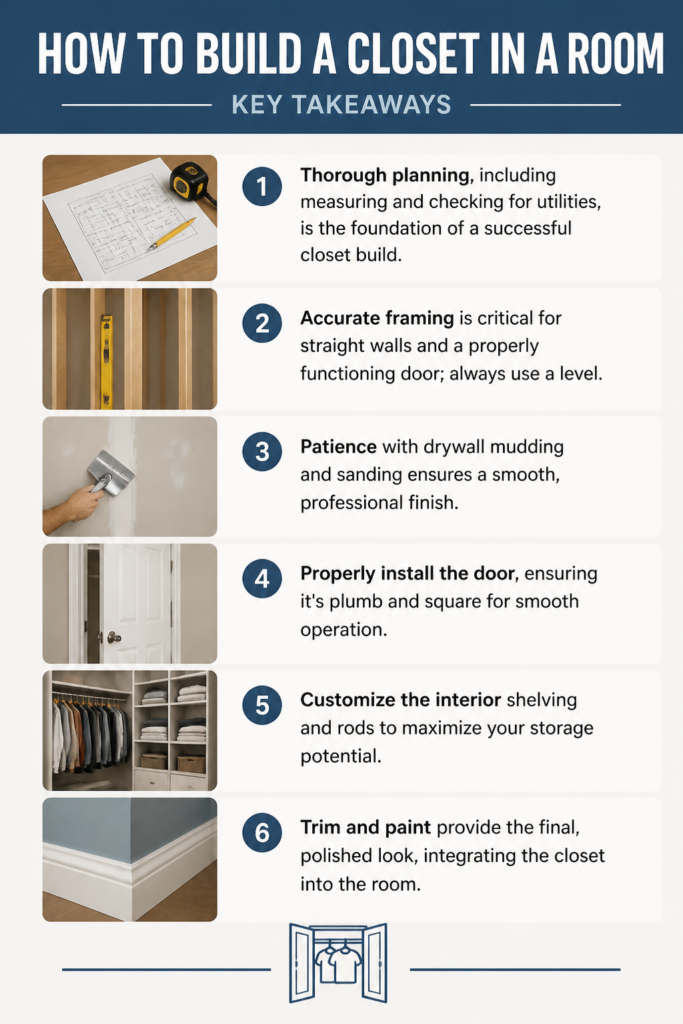
- Thorough planning, including measuring and checking for utilities, is the foundation of a successful closet build.
- Accurate framing is critical for straight walls and a properly functioning door; always use a level.
- Patience with drywall mudding and sanding ensures a smooth, professional finish.
- Properly install the door, ensuring it’s plumb and square for smooth operation.
- Customize the interior shelving and rods to maximize your storage potential.
- Trim and paint provide the final, polished look, integrating the closet into the room.
Frequently Asked Questions
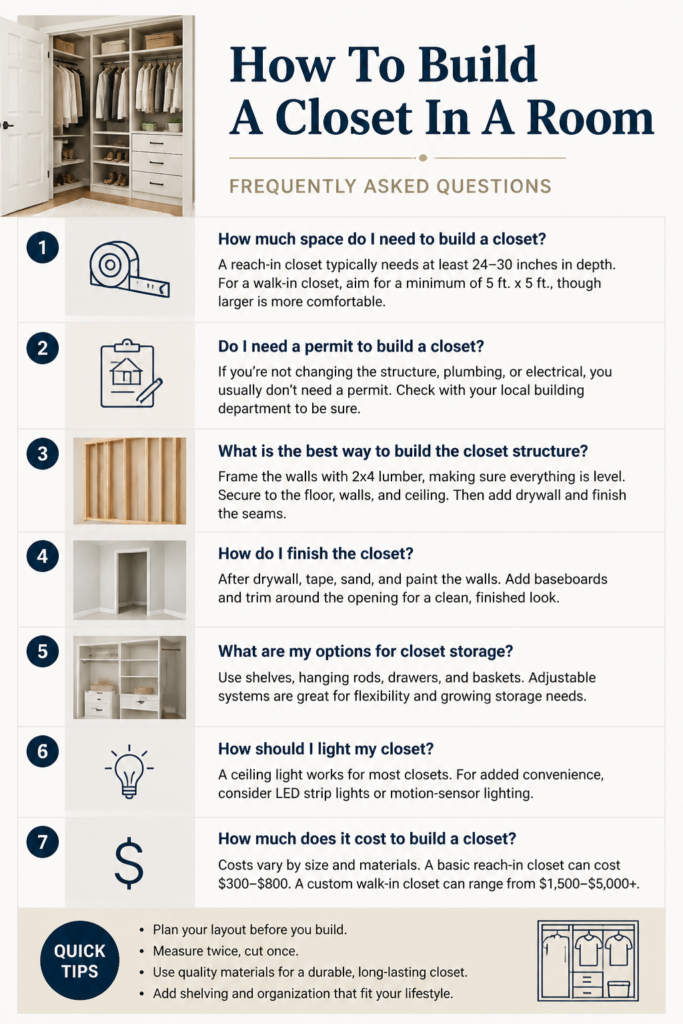
Do I need a building permit to build a closet?
In many areas, minor interior structural changes like adding a non-load-bearing closet do not require a permit. However, if you’re altering load-bearing walls, adding electrical wiring, or changing the footprint of the room significantly, a permit is likely required. Always check with your local building department before starting any project.
How much does it cost to build a closet?
The cost varies widely based on size, materials, and finishes. Basic framing and drywall can be a few hundred dollars. Adding a pre-hung door, shelving, and trim will increase the cost. Expect to spend anywhere from $500 to $1500+ for materials for a standard-sized closet, not including labor if you hire help.
Can I build a closet without attaching it to the ceiling?
While possible, it’s generally not recommended for a sturdy, permanent structure. Attaching the top plate to the ceiling joists provides crucial stability and prevents the walls from swaying. If ceiling attachment isn’t feasible (e.g., in a rental), you might consider freestanding closet systems or a very robustly braced frame, but this is less common for built-in closets.
What type of wood should I use for framing?
Standard construction-grade 2×4 lumber is ideal for framing interior walls. Look for straight boards without excessive knots or warps. Kiln-dried lumber is preferred as it’s less likely to twist or shrink after installation, ensuring a more stable and straight wall.
Our Top Recommended Finds
- DEWALT 20V MAX Cordless Drill/Driver Kit: An essential for drilling pilot holes and driving countless screws quickly and efficiently.
- Stud Finder with AC Wire Detection: Crucial for locating studs accurately and avoiding electrical hazards before cutting or drilling into walls.
- 4-Foot Box Beam Level: Ensures your framing is perfectly plumb and level, which is fundamental for a professional-looking closet.
Transform Your Space Today
Building a closet is a substantial project, but one that offers immense satisfaction and practical benefits. You’ve now got the detailed steps to make it happen. Imagine the organized space, the uncluttered room, and the added value to your home.
Don’t let the thought of a big project intimidate you. Break it down, follow these steps, and you’ll be amazed at what you can achieve. Grab your tools, start planning, and give your room the upgrade it deserves.
Beginner-friendly templates, step-by-step guides,
and weekly project ideas in your inbox.