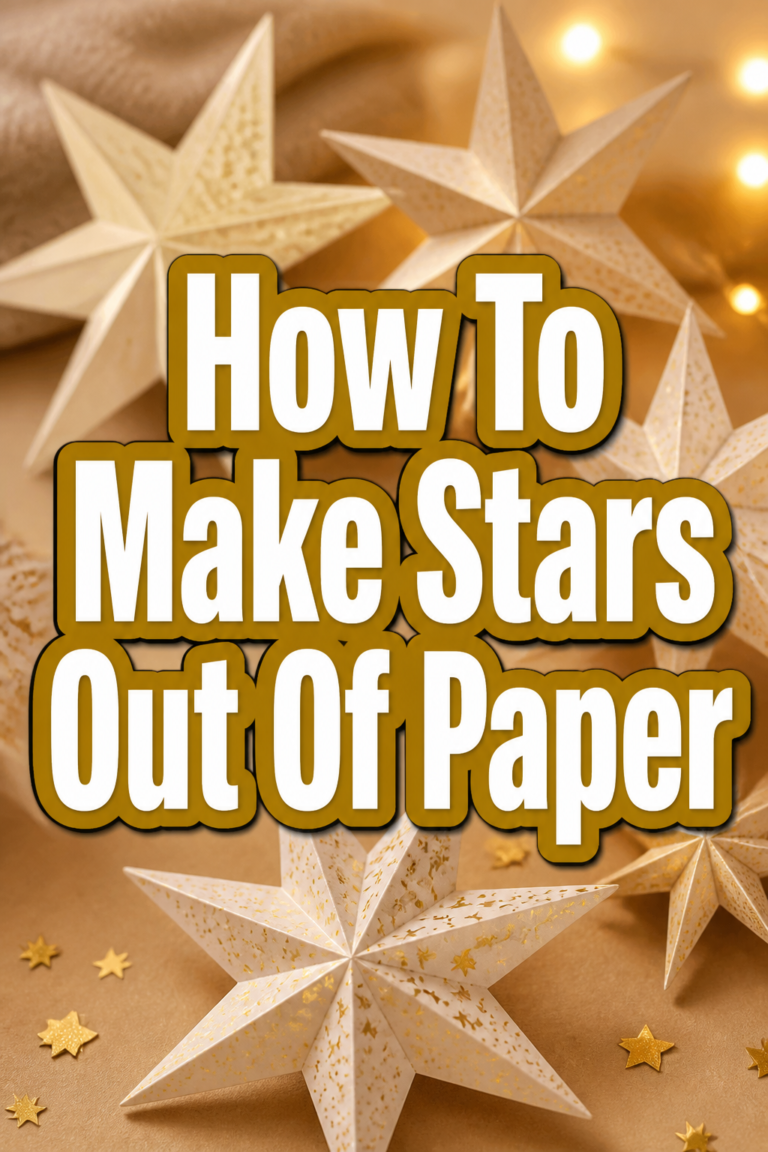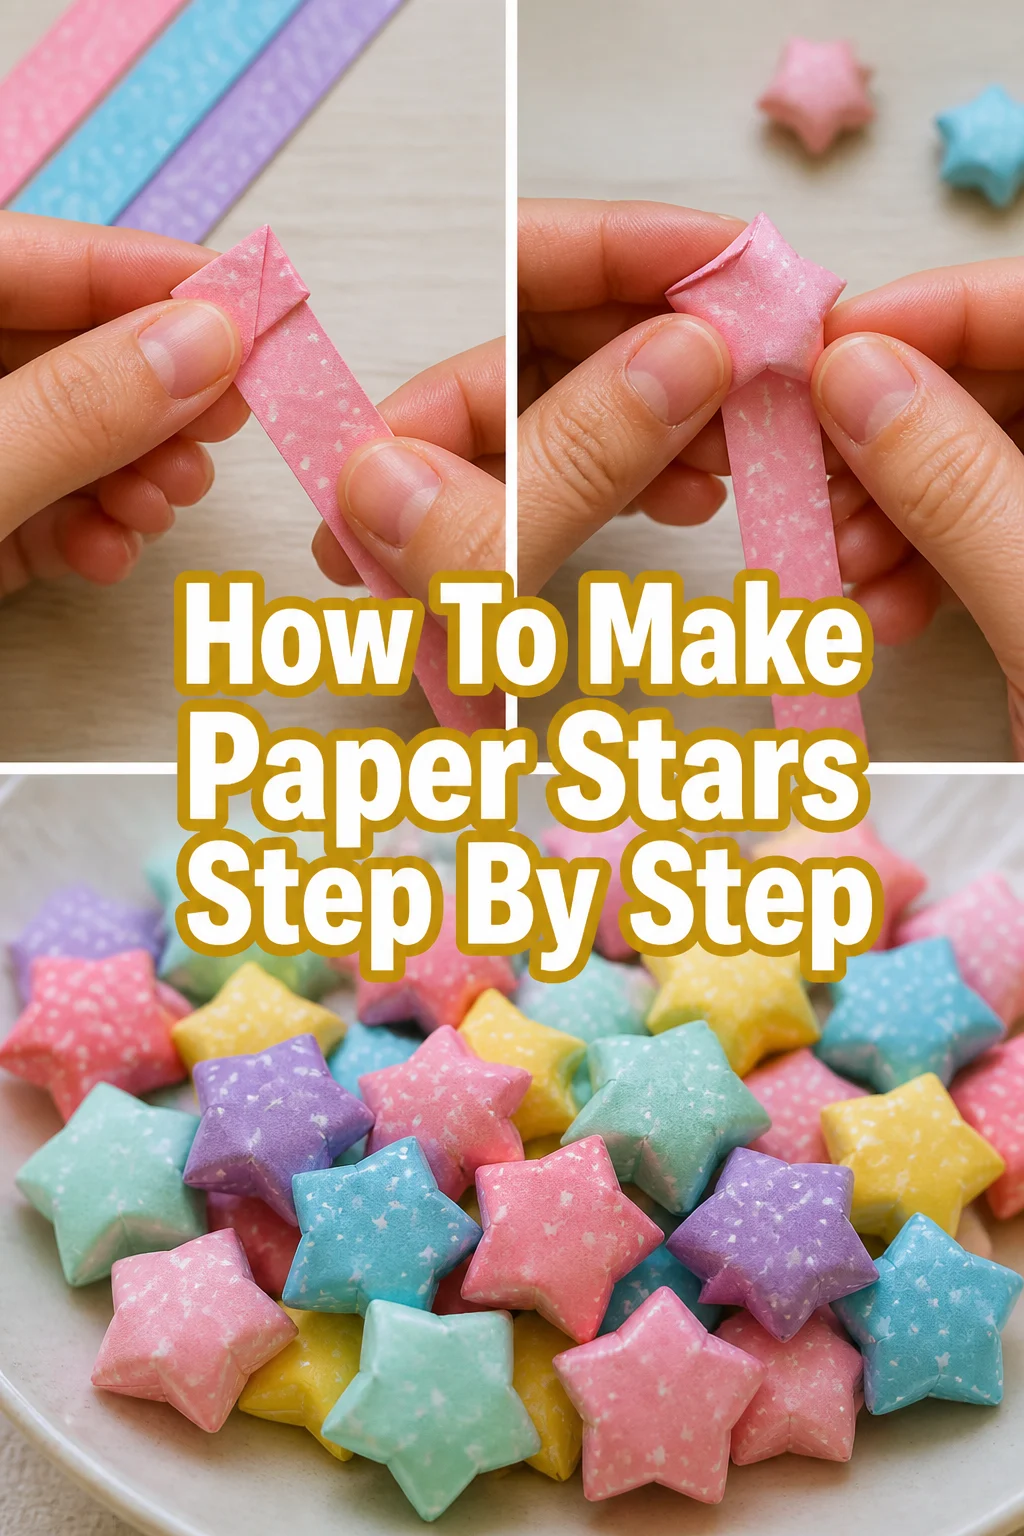
⭐ How To Make Paper Stars Step By Step

Beginner-friendly templates, step-by-step guides,
and weekly project ideas in your inbox.
Transforming simple strips of paper into charming little stars is a delightful craft.
I’ve personally folded hundreds of these over the years, discovering all the subtle tricks to make them perfect every time.
This guide shares everything I’ve learned, so you can create your own twinkling collection with ease and confidence.

Quick Overview
You’re about to embark on a wonderfully satisfying journey into the world of paper folding. By the end of this guide, you’ll have mastered the art of creating beautiful, puffy paper stars, perfect for decoration, gifts, or just for fun.
- Time needed: 3-7 minutes per star (once you get the hang of it)
- Difficulty: Beginner
- What you’ll need: Paper strips (pre-cut or cut yourself), optional: ruler, pencil, scissors
Step-by-Step Instructions
Step 1: Prepare Your Paper Strips
The foundation of a perfect paper star begins with the right strip of paper. You’ll need long, thin strips to achieve the iconic five-point shape.
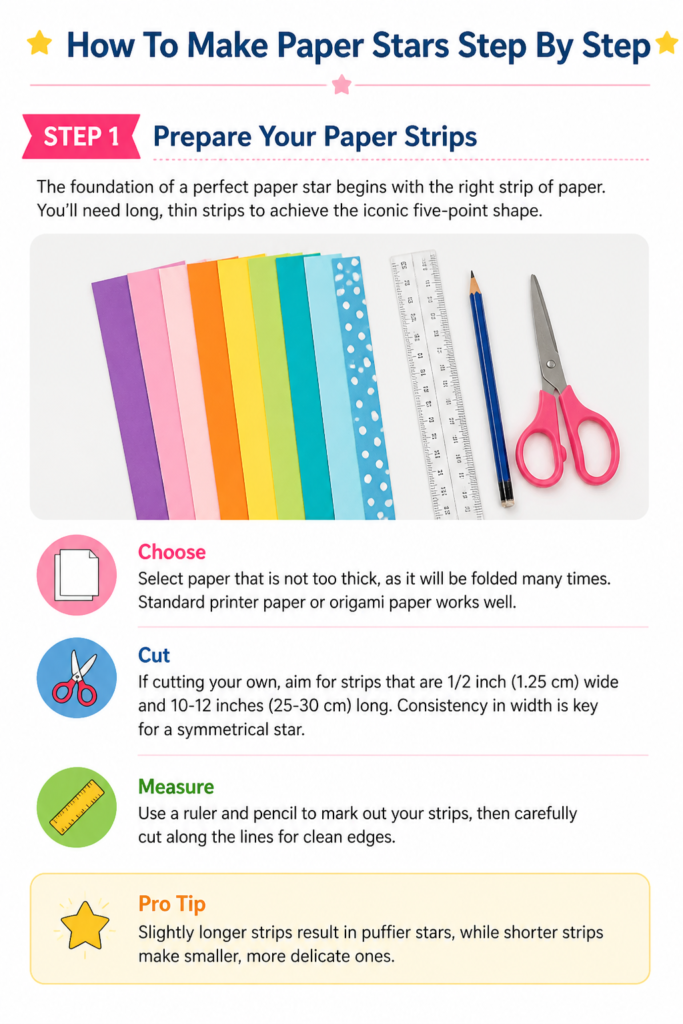
Consider using specialty paper star strips, which are often pre-cut to ideal dimensions and come in a dazzling array of colors and patterns.
- Choose: Select paper that is not too thick, as it will be folded many times. Standard printer paper or origami paper works well.
- Cut: If cutting your own, aim for strips that are 1/2 inch (1.25 cm) wide and 10-12 inches (25-30 cm) long. Consistency in width is key for a symmetrical star.
- Measure: Use a ruler and pencil to mark out your strips, then carefully cut along the lines for clean edges.
Pro Tip: Slightly longer strips result in puffier stars, while shorter strips make smaller, more delicate ones. Experiment with different lengths to find your preferred size.
Step 2: Form the Pentagon Knot
This is the magical first fold that sets the stage for your star. It’s often called the “knot” because you’ll be tying the paper into a loose five-sided shape.
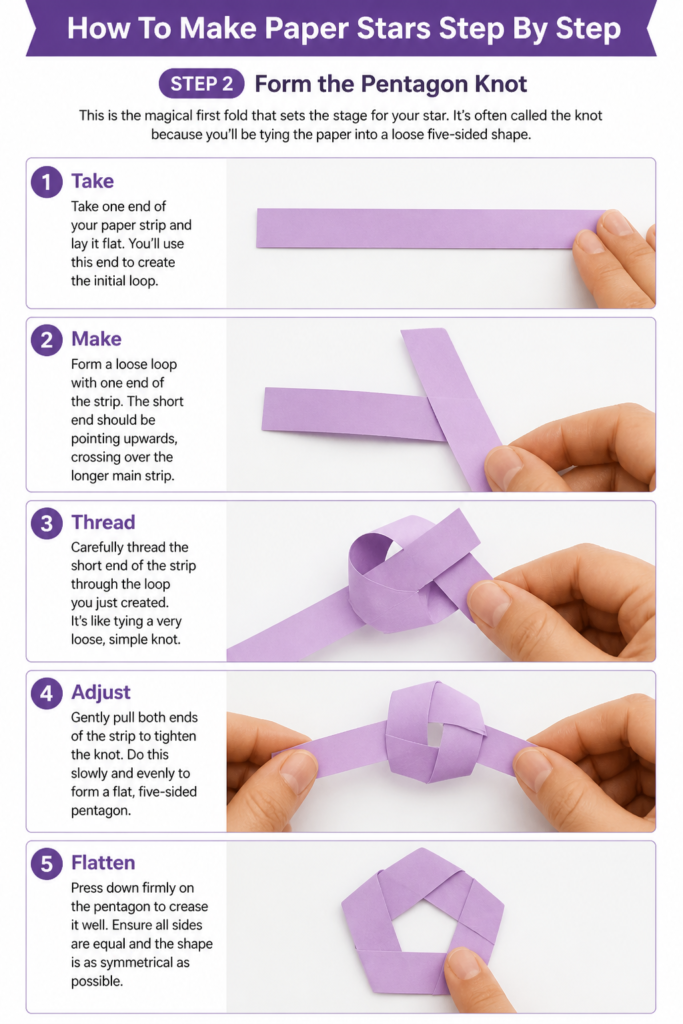
Take one end of your paper strip and lay it flat. You’ll use this end to create the initial loop.
- Make: Form a loose loop with one end of the strip. The short end should be pointing upwards, crossing over the longer main strip.
- Thread: Carefully thread the short end of the strip through the loop you just created. It’s like tying a very loose, simple knot.
- Adjust: Gently pull both ends of the strip to tighten the knot. Do this slowly and evenly to form a flat, five-sided pentagon.
- Flatten: Press down firmly on the pentagon to crease it well. Ensure all sides are equal and the shape is as symmetrical as possible.
Step 3: Trim the Short End
After forming your perfect pentagon, you’ll notice a small excess piece of paper sticking out. This needs to be dealt with to keep your star neat.
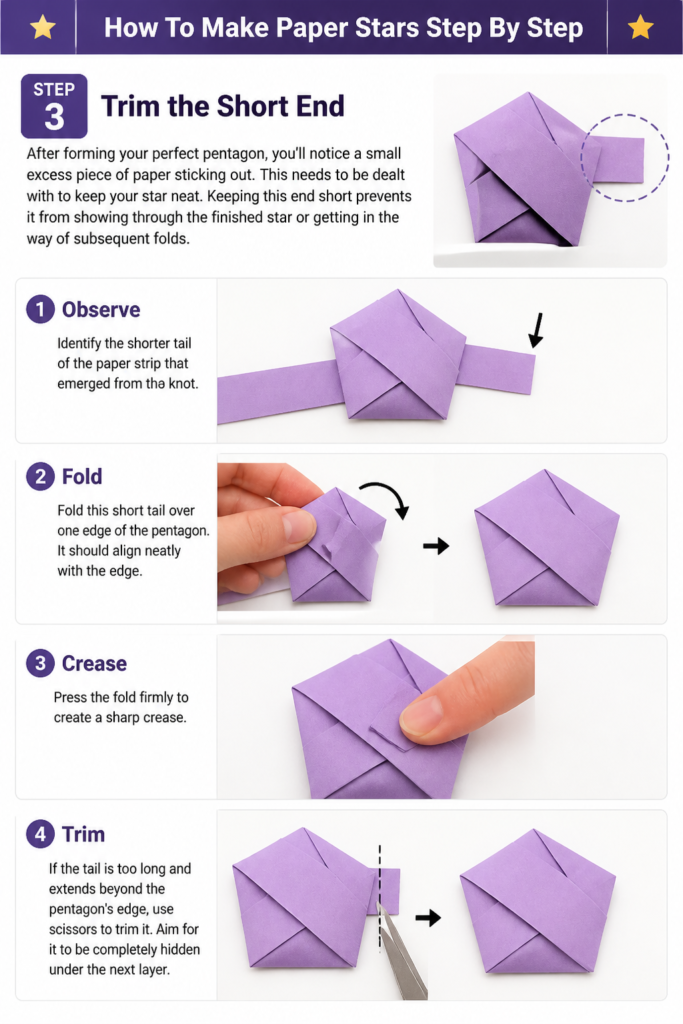
Keeping this end short prevents it from showing through the finished star or getting in the way of subsequent folds.
- Observe: Identify the shorter tail of the paper strip that emerged from the knot.
- Fold: Fold this short tail over one edge of the pentagon. It should align neatly with the edge.
- Crease: Press the fold firmly to create a sharp crease.
- Trim: If the tail is too long and extends beyond the pentagon’s edge, use scissors to trim it. Aim for it to be completely hidden under the next layer.
Step 4: Wrap the Long End
Now, you’ll use the long end of your paper strip to begin wrapping around the pentagon. This is where the star shape truly starts to emerge.
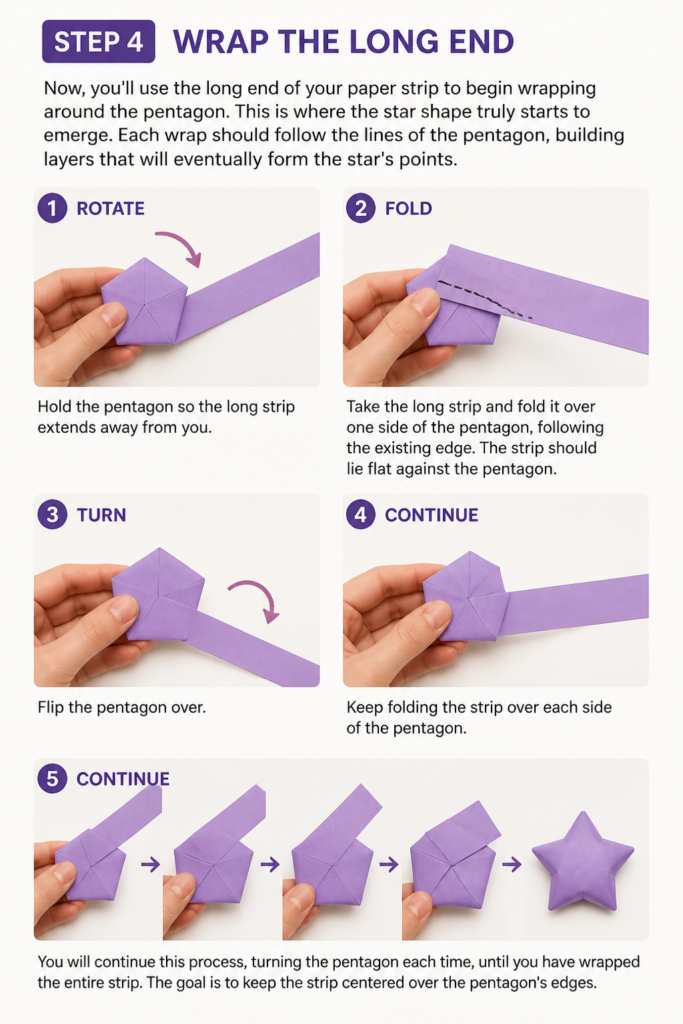
Each wrap should follow the lines of the pentagon, building layers that will eventually form the star’s points.
- Rotate: Hold the pentagon so the long strip extends away from you.
- Fold: Take the long strip and fold it over one side of the pentagon, following the existing edge. The strip should lie flat against the pentagon.
- Turn: Flip the pentagon over.
- Continue: Keep folding the strip over each side of the pentagon. You will continue this process, turning the pentagon each time, until you have wrapped the entire strip. The goal is to keep the strip centered over the pentagon’s edges.
Step 5: Tuck in the Final Tail
As you continue wrapping, your paper strip will get shorter and shorter. Eventually, you’ll have just a small tail left, and you need to secure it.
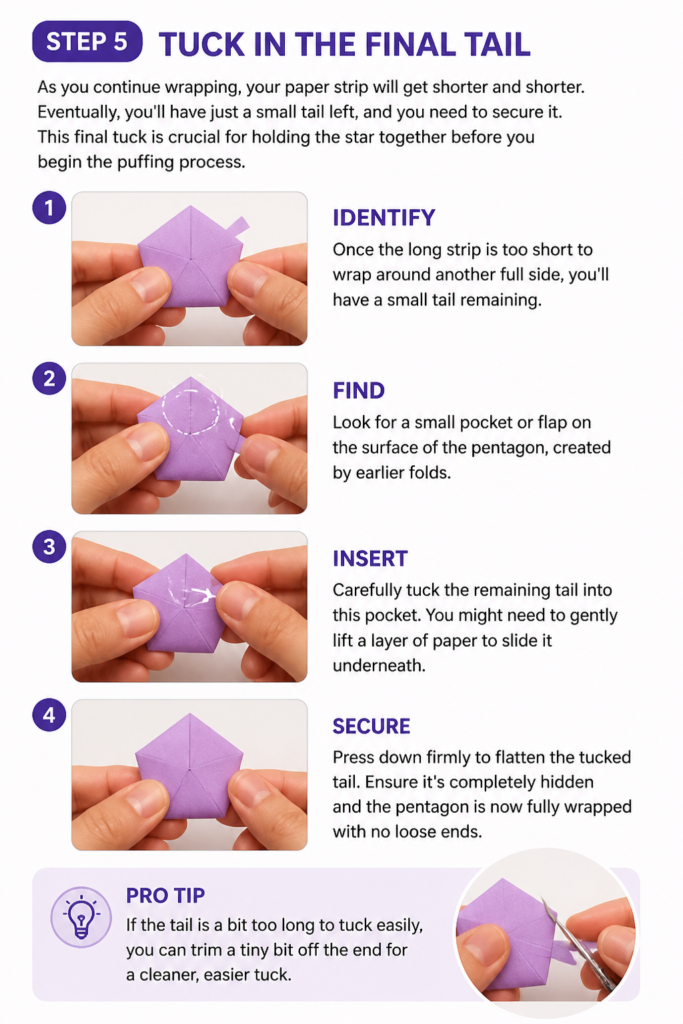
This final tuck is crucial for holding the star together before you begin the puffing process.
- Identify: Once the long strip is too short to wrap around another full side, you’ll have a small tail remaining.
- Find: Look for a small pocket or flap on the surface of the pentagon, created by earlier folds.
- Insert: Carefully tuck the remaining tail into this pocket. You might need to gently lift a layer of paper to slide it underneath.
- Secure: Press down firmly to flatten the tucked tail. Ensure it’s completely hidden and the pentagon is now fully wrapped with no loose ends.
Pro Tip: If the tail is a bit too long to tuck easily, you can trim a tiny bit off with scissors. Just be careful not to cut too much.
Step 6: Begin Puffing the Star
This is the most exciting part, transforming your flat pentagon into a three-dimensional star. It requires a delicate touch and patience.
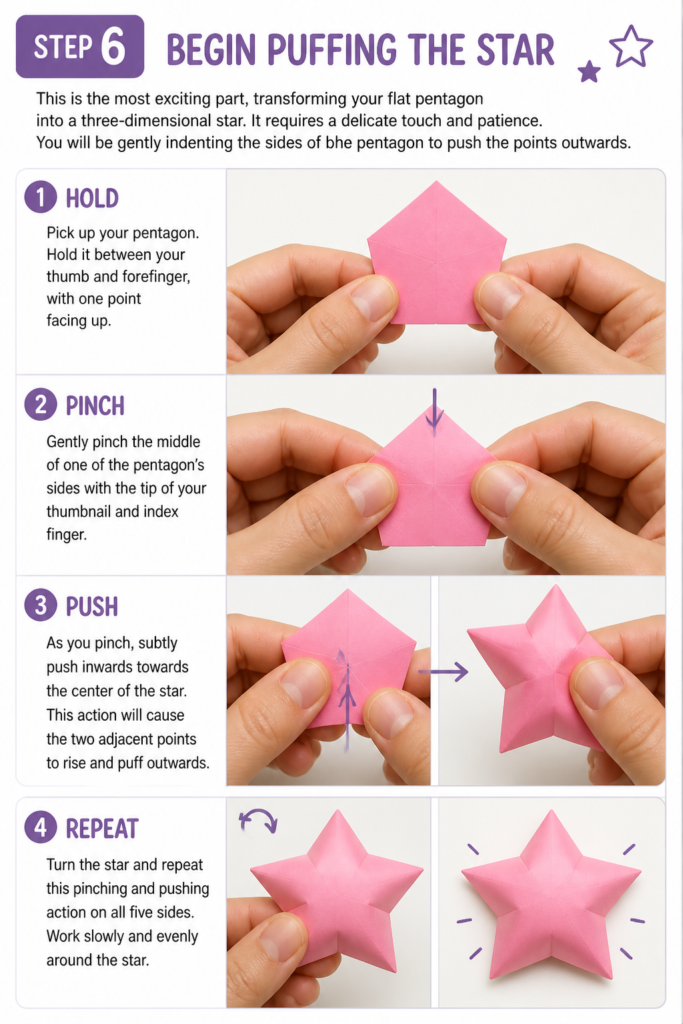
You will be gently indenting the sides of the pentagon to push the points outwards.
- Hold: Pick up your pentagon. Hold it between your thumb and forefinger, with one point facing up.
- Pinch: Gently pinch the middle of one of the pentagon’s sides with the tip of your thumbnail and index finger.
- Push: As you pinch, subtly push inwards towards the center of the star. This action will cause the two adjacent points to rise and puff outwards.
- Repeat: Turn the star and repeat this pinching and pushing action on all five sides. Work slowly and evenly around the star.
Step 7: Refine Each Point
The first round of puffing will give you a basic star shape, but it often needs a little refinement to look truly perfect and symmetrical.
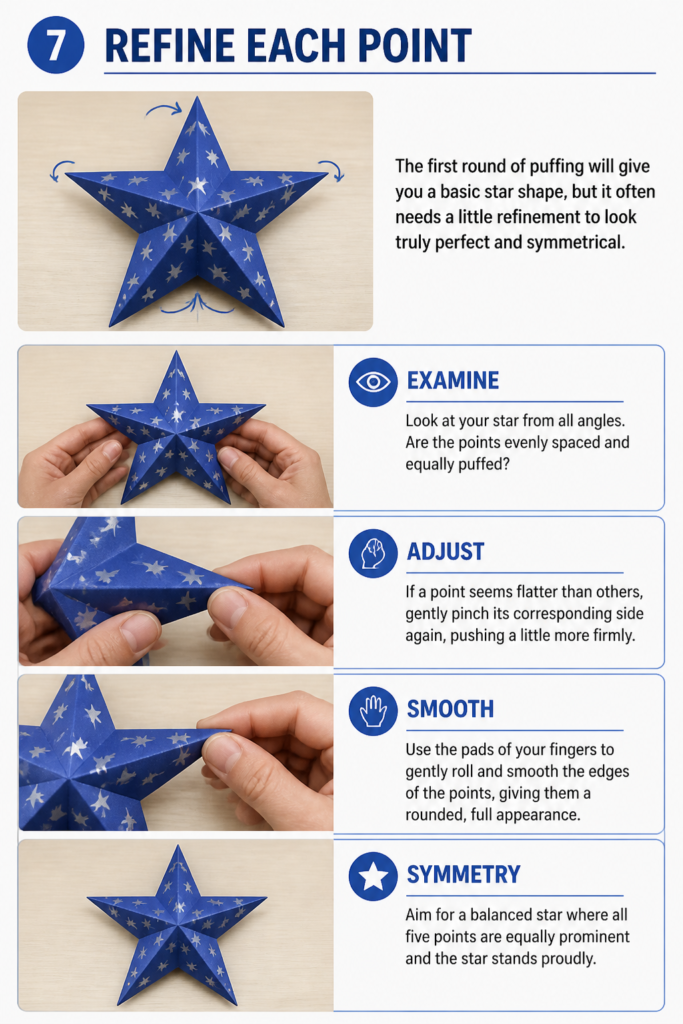
Each point can be individually shaped to enhance the star’s overall appearance.
- Examine: Look at your star from all angles. Are the points evenly spaced and equally puffed?
- Adjust: If a point seems flatter than others, gently pinch its corresponding side again, pushing a little more firmly.
- Smooth: Use the pads of your fingers to gently roll and smooth the edges of the points, giving them a rounded, full appearance.
- Symmetry: Aim for a balanced star where all five points are equally prominent and the star stands proudly.
Step 8: Admire Your Creation
You’ve done it! Your paper star is now complete and ready to bring a touch of charm wherever it goes. Take a moment to appreciate your handiwork.
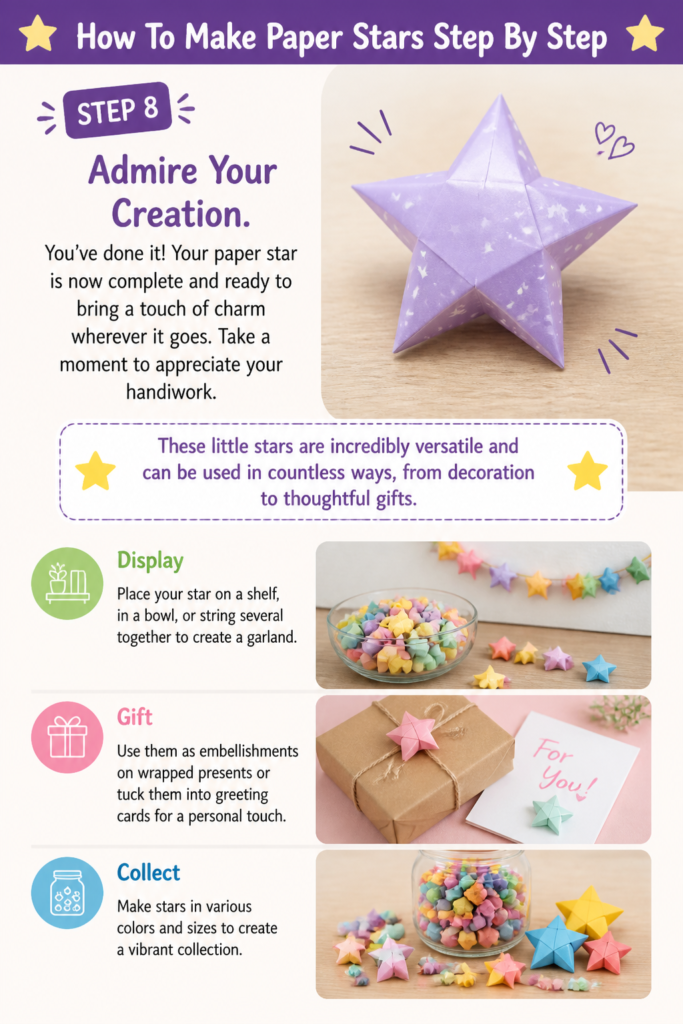
These little stars are incredibly versatile and can be used in countless ways, from decoration to thoughtful gifts.
- Display: Place your star on a shelf, in a bowl, or string several together to create a garland.
- Gift: Use them as embellishments on wrapped presents or tuck them into greeting cards for a personal touch.
- Collect: Make stars in various colors and sizes to create a vibrant collection.
Common Mistakes to Avoid
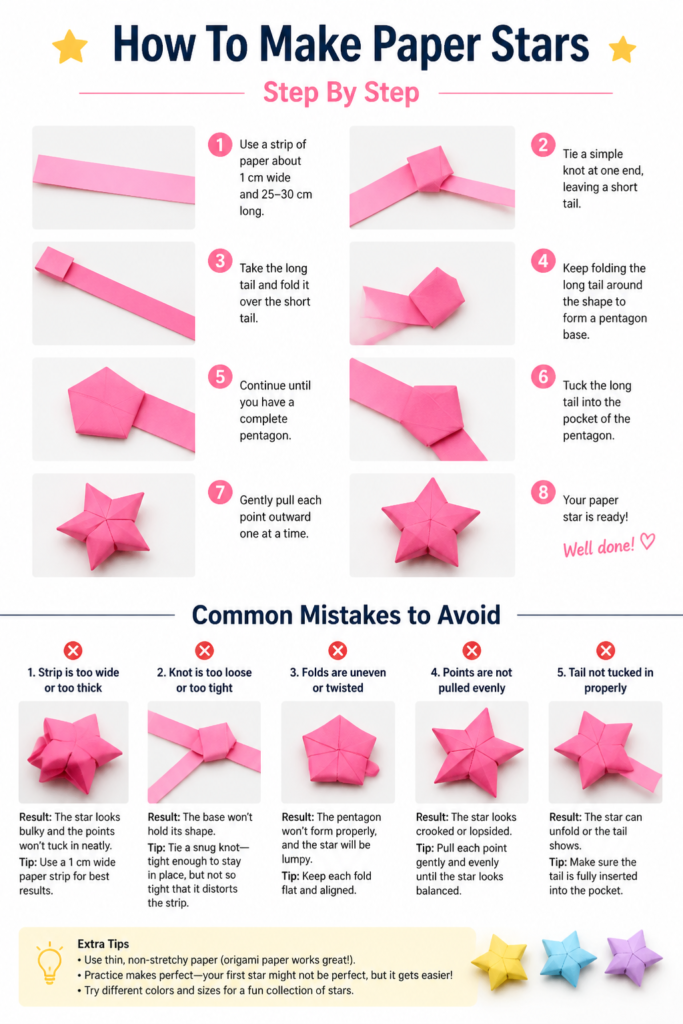
Using Paper That’s Too Thick
Many beginners reach for cardstock or very heavy paper, thinking it will make a sturdier star. However, thick paper is incredibly difficult to fold precisely.
It resists sharp creases, making it hard to form a tight pentagon and nearly impossible to puff out the points evenly without tearing. Stick to standard printer paper weight or lighter for best results.
Uneven Pentagon Knot
The initial pentagon knot is the foundation of your star. If it’s lopsided or not tightly formed, your entire star will be asymmetrical.
Take your time in Step 2, gently pulling both ends of the strip to ensure the pentagon is flat, tight, and has five equal sides before moving on.
Wrapping Too Loosely or Too Tightly
When wrapping the long end around the pentagon, finding the right tension is key. Wrapping too loosely results in a flimsy star that won’t hold its shape.
Wrapping too tightly can cause the paper to buckle or tear, making it difficult to tuck the end and puff the star. Aim for firm but gentle wraps that lie flat against the previous layer.
Aggressive Puffing
The puffing stage requires a delicate touch. Trying to force the points out too quickly or too hard can tear the paper or flatten the star instead of puffing it.
Use gentle, controlled pinches and pushes on each side, working your way around the pentagon multiple times if needed, to gradually coax the points into shape.
Troubleshooting
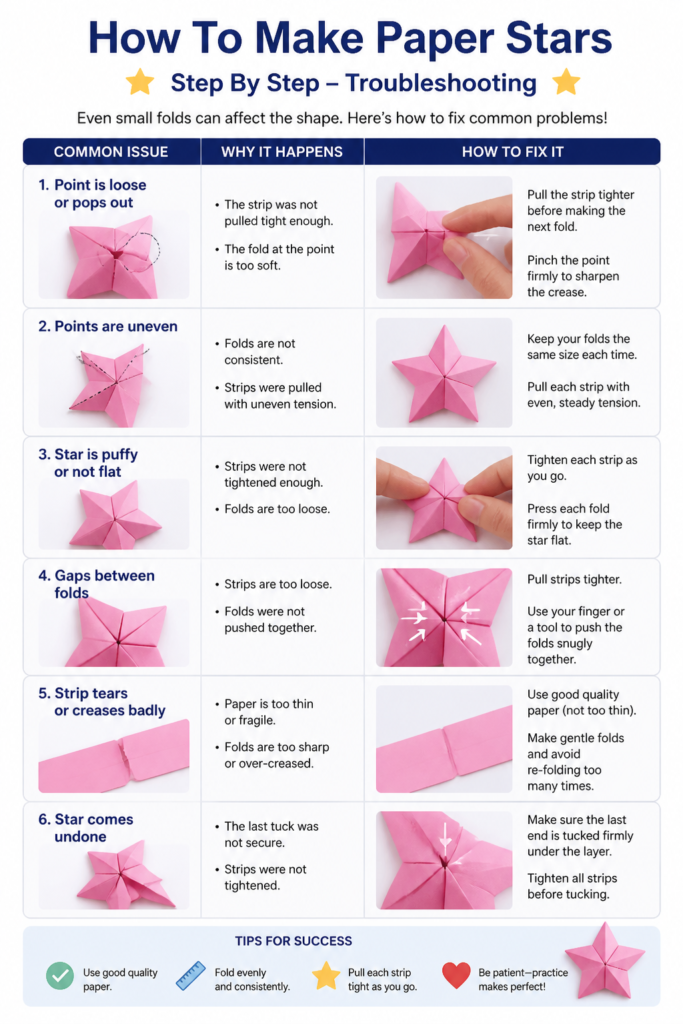
My Pentagon Knot Isn’t Flat
If your initial pentagon knot looks lumpy or isn’t lying flat, it usually means the paper wasn’t pulled evenly when tightening the knot.
Gently undo the knot and try again, ensuring you pull both ends of the strip simultaneously and slowly to distribute the tension evenly, then press it firmly flat.
The Star Won’t Puff Out
A star that resists puffing often indicates the paper was wrapped too tightly or the creases are too sharp from the wrapping stage.
Try gently loosening the wraps by flexing the pentagon slightly. Then, use very light, repeated pinches on each side, gradually increasing pressure until the points begin to emerge.
My Star Points Are Uneven
Uneven points typically stem from an asymmetrical pentagon knot or inconsistent wrapping tension.
Examine the star closely. You can gently re-pinch and push specific sides to try and balance the points. Sometimes, a slightly longer strip allows more room for error and adjustment during the puffing phase.
Key Takeaways
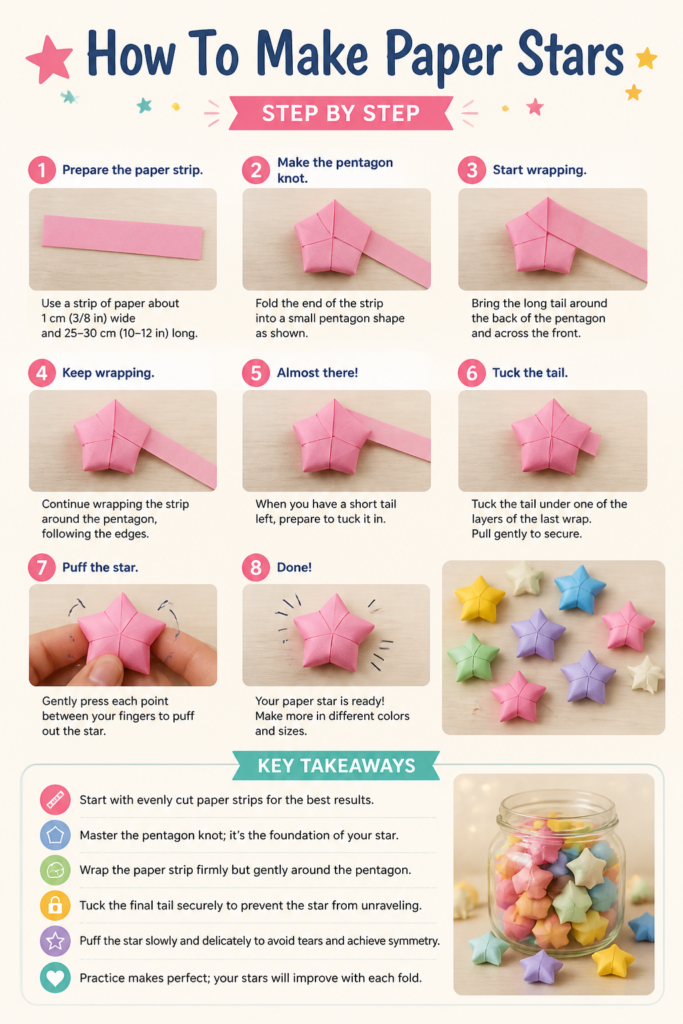
- Start with evenly cut paper strips for the best results.
- Master the pentagon knot; it’s the foundation of your star.
- Wrap the paper strip firmly but gently around the pentagon.
- Tuck the final tail securely to prevent the star from unraveling.
- Puff the star slowly and delicately to avoid tears and achieve symmetry.
- Practice makes perfect; your stars will improve with each fold.
Frequently Asked Questions
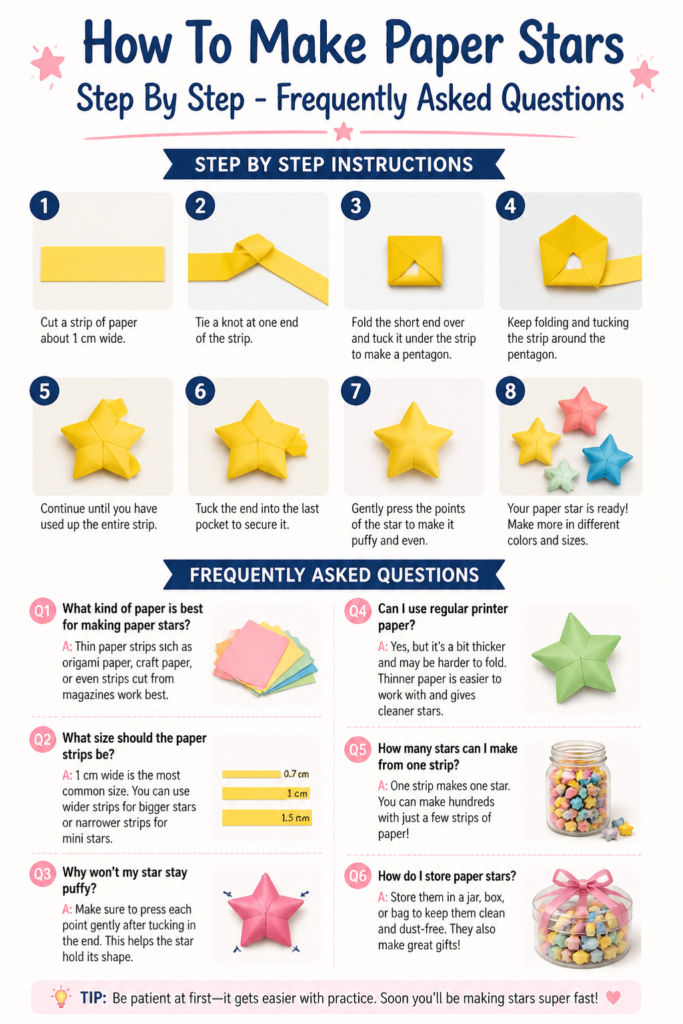
Can I use any type of paper?
While you can theoretically use various papers, thinner paper like standard printer paper, origami paper, or specialty paper star strips works best. Thick paper, such as cardstock, is too stiff for the intricate folds and delicate puffing required.
How do I make bigger or smaller stars?
The size of your star is determined by the dimensions of your paper strip. For bigger stars, use wider and longer strips. For smaller stars, use narrower and shorter strips. Maintain the width-to-length ratio for best results; typically, length should be about 20-25 times the width.
My star keeps unraveling. What am I doing wrong?
If your star unravels, the most common culprit is an improperly tucked final tail. Ensure the end of the strip is fully inserted into one of the small pockets on the pentagon’s surface and pressed down firmly. Sometimes, a tiny bit of glue can secure a stubborn end.
Are these stars durable?
Paper stars are relatively delicate, especially if made from thinner paper. They can be crushed or torn if handled roughly. However, if kept away from moisture and excessive pressure, they can last for a very long time, making beautiful, lasting decorations.
Our Top Recommended Finds
- Pre-cut Origami Paper Strips: Perfect for beginners, these strips save time and ensure consistent sizing.
- Precision Craft Scissors: Essential for clean, straight cuts if you’re making your own strips from larger sheets.
- Decorative Display Jars: Ideal for showcasing your collection of finished paper stars beautifully.
Your Next Creative Adventure Awaits
You’ve just transformed a simple strip of paper into a tiny piece of art. This skill opens up a world of creative possibilities, from personalized gifts to enchanting home decor.
Why stop at one? Experiment with different paper colors, patterns, and even glittered strips to create a dazzling array of stars.
Gather your materials today and start folding; a galaxy of beautiful paper stars is just waiting to be made by your hands.
Beginner-friendly templates, step-by-step guides,
and weekly project ideas in your inbox.