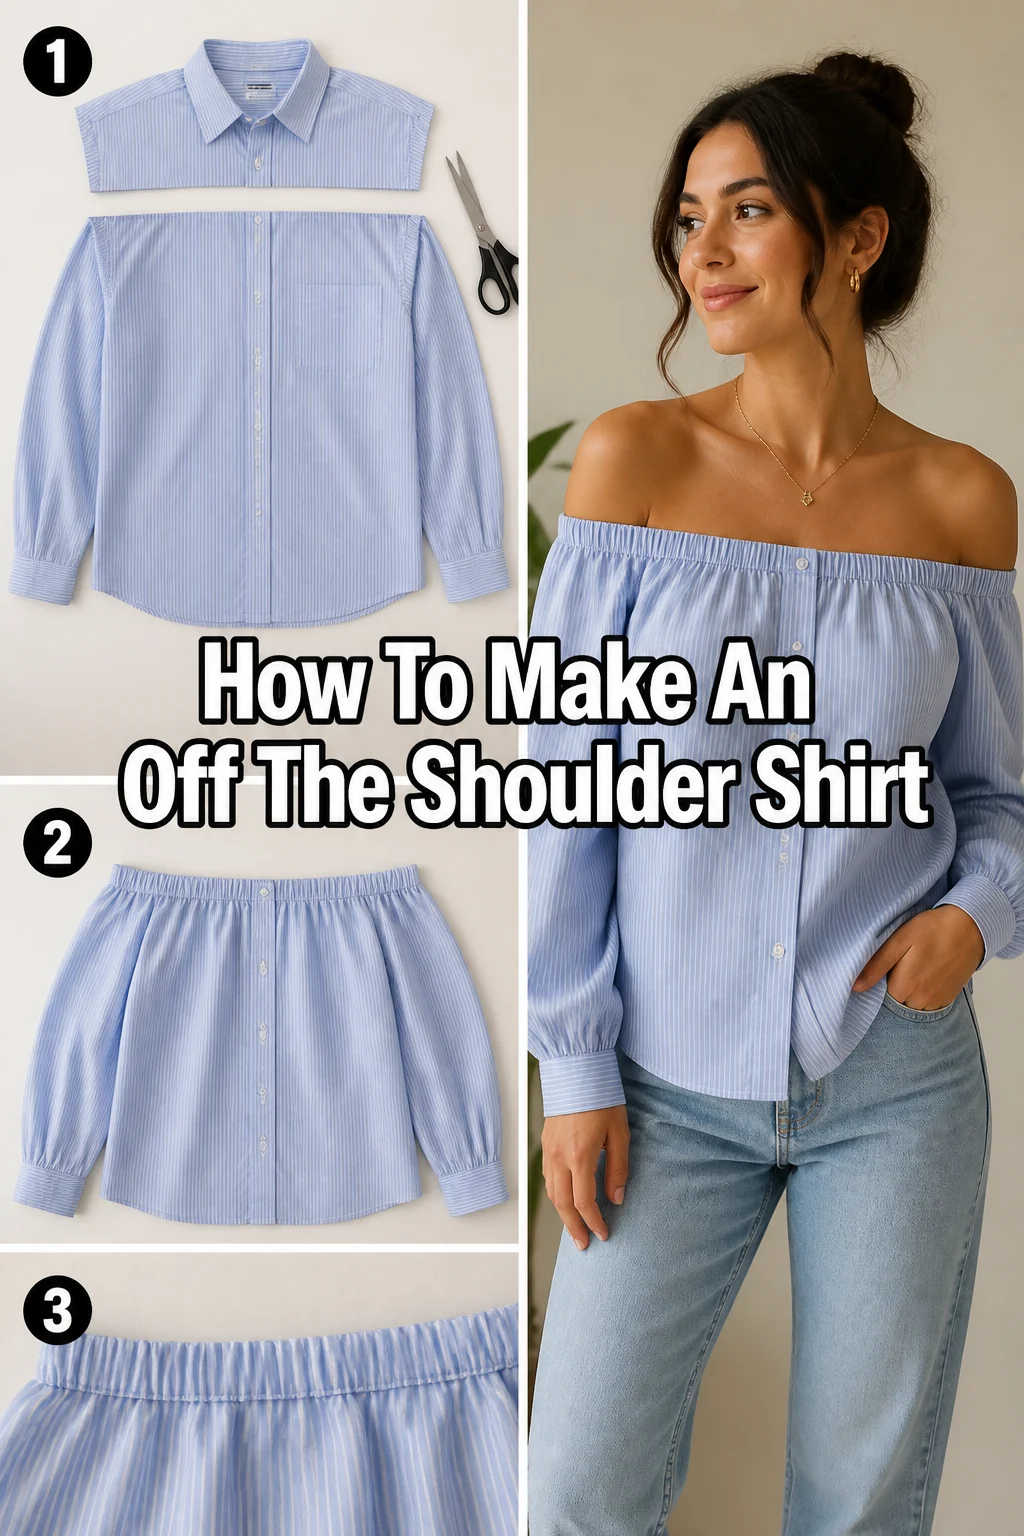
👚 How To Make An Off The Shoulder Shirt

Beginner-friendly templates, step-by-step guides,
and weekly project ideas in your inbox.
Remember that beloved t-shirt you rarely wear anymore? Or perhaps you found the perfect fabric but aren’t sure what to make. I’ve spent countless hours at my sewing machine, transforming simple materials into stylish, wearable pieces.
This guide will walk you through creating a chic off-the-shoulder shirt, perfect for any season. You’ll gain practical skills and a beautiful new garment.

Quick Overview
This project lets you transform an existing shirt or new fabric into a trendy, comfortable off-the-shoulder top. It’s a fantastic way to refresh your wardrobe with a custom piece.
You’ll learn essential sewing techniques, from measuring and cutting to creating an elastic casing. The result is a flattering, versatile shirt you’ll love.
- Time needed: 2-4 hours (depending on experience)
- Difficulty: Beginner to Intermediate
- What you’ll need: Fabric, elastic, sewing machine, basic sewing supplies
Step-by-Step Instructions
Step 1: Gather Your Materials
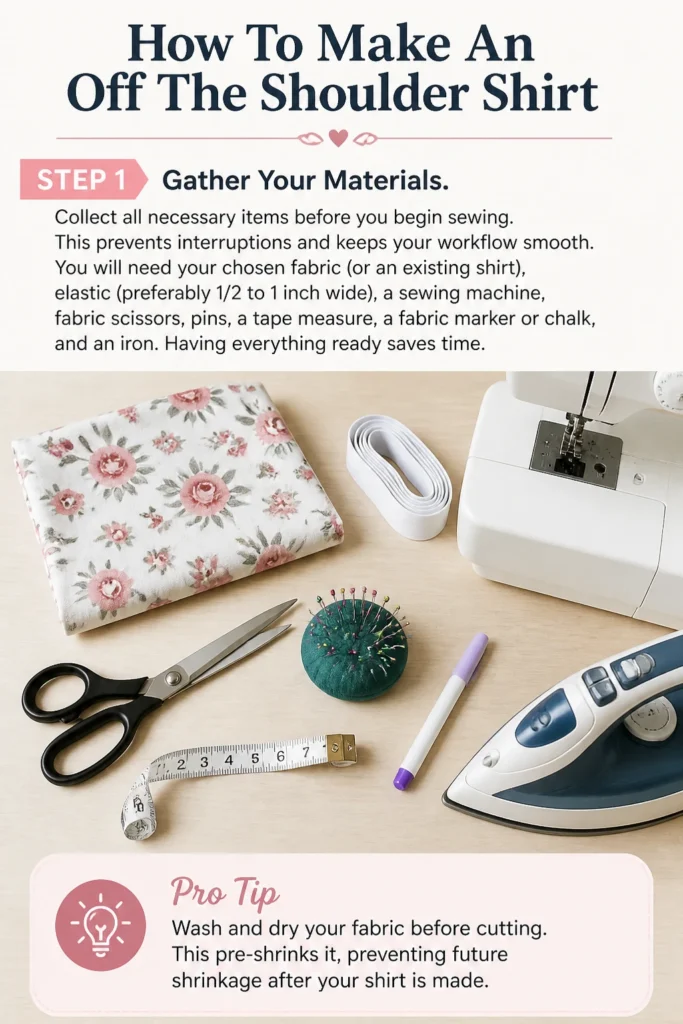
Collect all necessary items before you begin sewing. This prevents interruptions and keeps your workflow smooth.
You will need your chosen fabric (or an existing shirt), elastic (preferably 1/2 to 1 inch wide), a sewing machine, fabric scissors, pins, a tape measure, a fabric marker or chalk, and an iron. Having everything ready saves time.
Pro Tip: Wash and dry your fabric before cutting. This pre-shrinks it, preventing future shrinkage after your shirt is made.
Step 2: Prepare Your Fabric or Existing Shirt
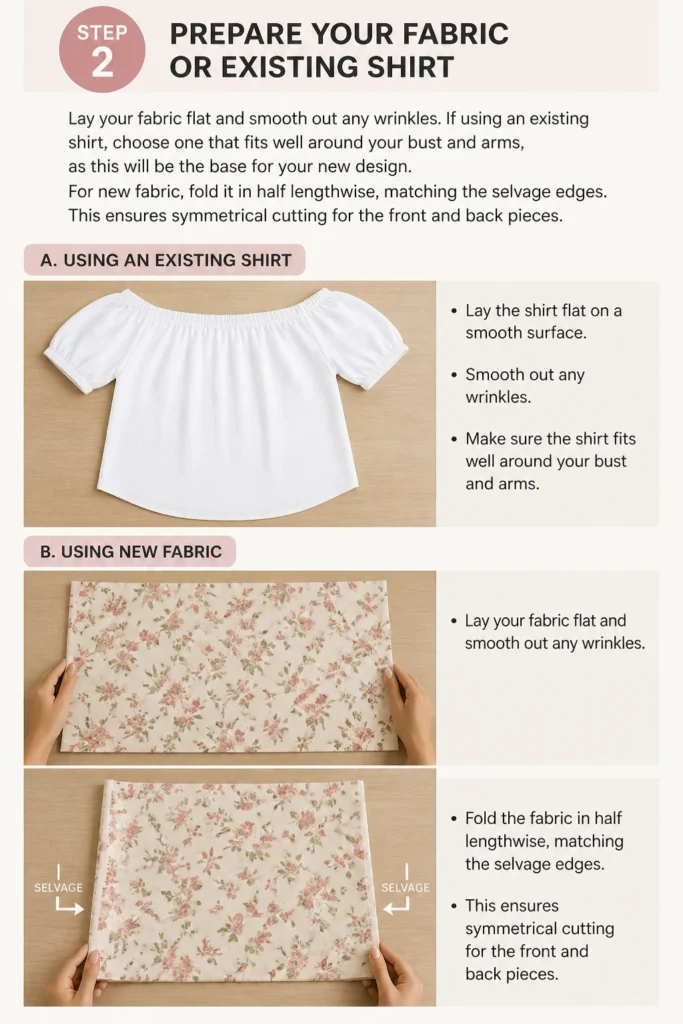
Lay your fabric flat and smooth out any wrinkles. If using an existing shirt, choose one that fits well around your bust and arms, as this will be the base for your new design.
For new fabric, fold it in half lengthwise, matching the selvage edges. This ensures symmetrical cutting for the front and back pieces.
Step 3: Measure and Mark for the Neckline
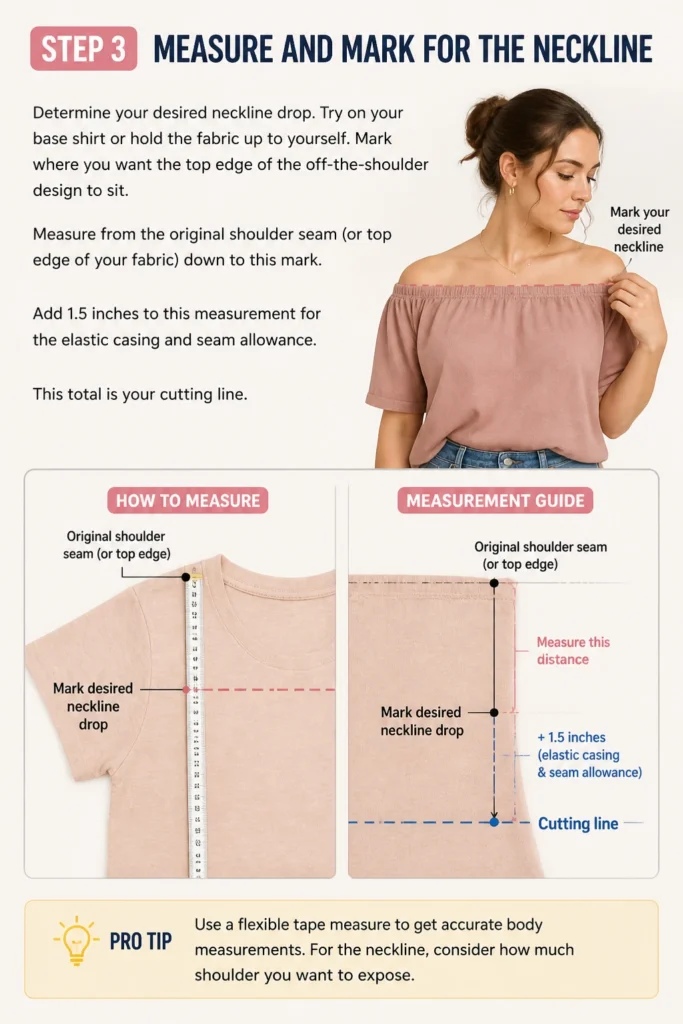
Determine your desired neckline drop. Try on your base shirt or hold the fabric up to yourself. Mark where you want the top edge of the off-the-shoulder design to sit.
Measure from the original shoulder seam (or top edge of your fabric) down to this mark. Add 1.5 inches to this measurement for the elastic casing and seam allowance. This total is your cutting line.
Pro Tip: Use a flexible tape measure to get accurate body measurements. For the neckline, consider how much shoulder you want to expose.
Step 4: Cut the Neckline and Sleeves
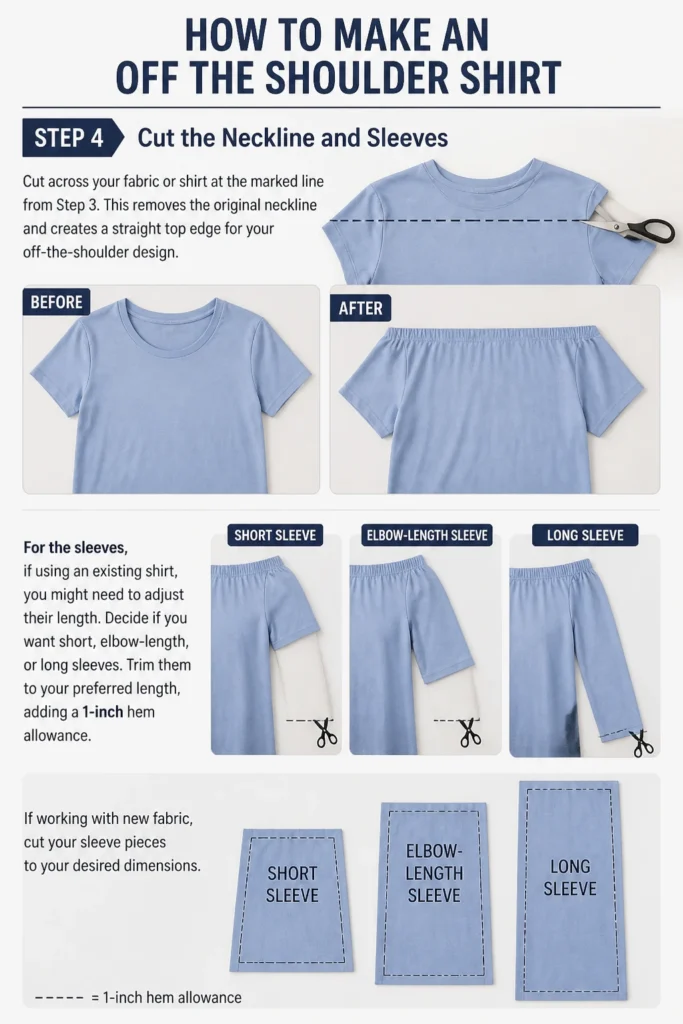
Cut across your fabric or shirt at the marked line from Step 3. This removes the original neckline and creates a straight top edge for your off-the-shoulder design.
For the sleeves, if using an existing shirt, you might need to adjust their length. Decide if you want short, elbow-length, or long sleeves. Trim them to your preferred length, adding a 1-inch hem allowance. If working with new fabric, cut your sleeve pieces to your desired dimensions.
Step 5: Sew the Side Seams and Sleeve Seams (if applicable)
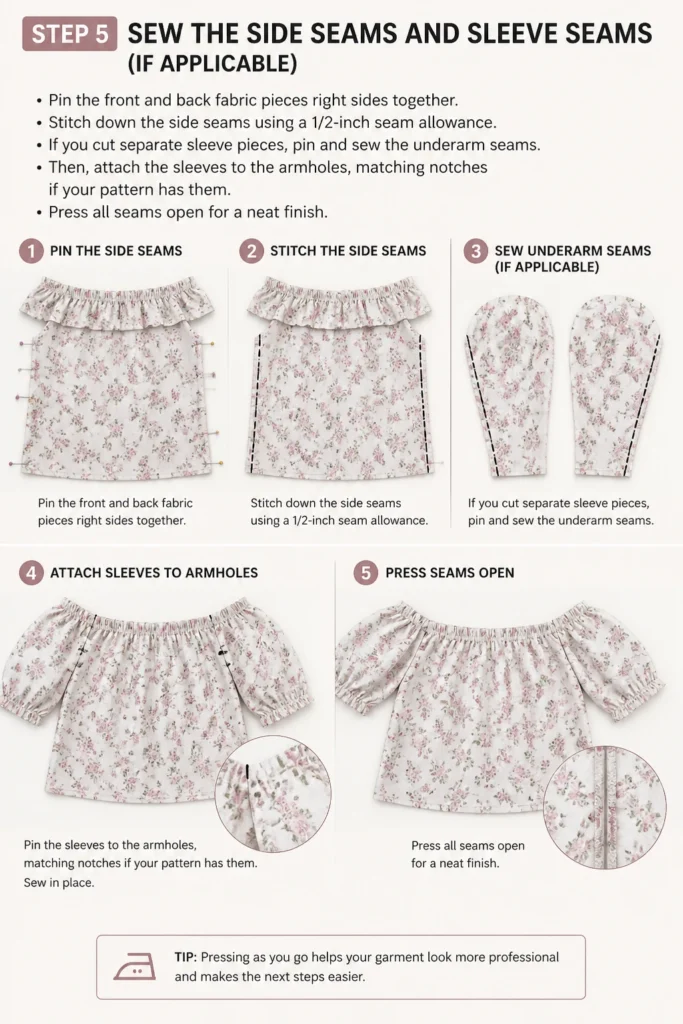
Pin the front and back fabric pieces right sides together. Stitch down the side seams using a 1/2-inch seam allowance. If you cut separate sleeve pieces, pin and sew the underarm seams.
Then, attach the sleeves to the armholes, matching notches if your pattern has them. Press all seams open for a neat finish.
Step 6: Create the Elastic Casing
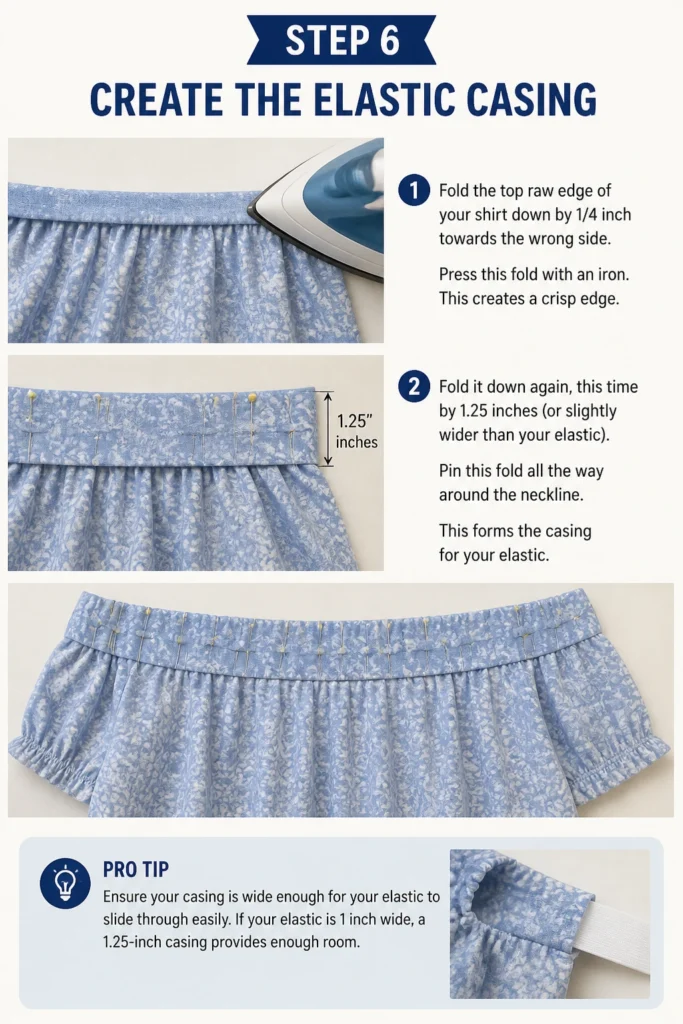
Fold the top raw edge of your shirt down by 1/4 inch towards the wrong side. Press this fold with an iron. This creates a crisp edge.
Fold it down again, this time by 1.25 inches (or slightly wider than your elastic). Pin this fold all the way around the neckline. This forms the casing for your elastic.
Pro Tip: Ensure your casing is wide enough for your elastic to slide through easily. If your elastic is 1 inch wide, a 1.25-inch casing provides enough room.
Step 7: Stitch the Elastic Casing
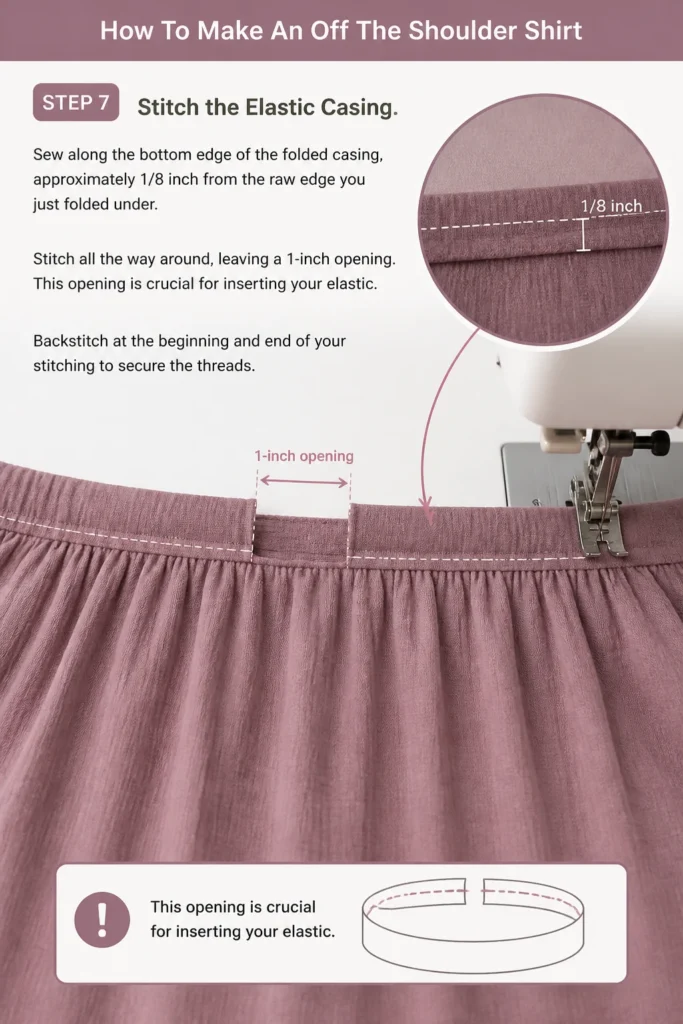
Sew along the bottom edge of the folded casing, approximately 1/8 inch from the raw edge you just folded under. Stitch all the way around, leaving a 1-inch opening.
This opening is crucial for inserting your elastic. Backstitch at the beginning and end of your stitching to secure the threads.
Step 8: Measure and Insert the Elastic
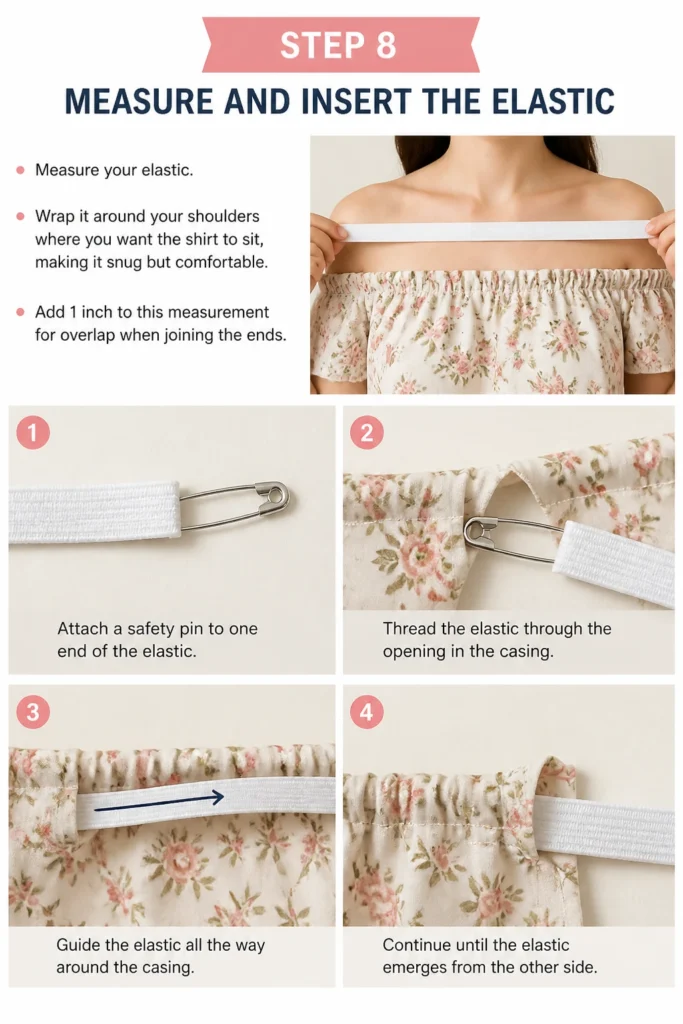
Measure your elastic. Wrap it around your shoulders where you want the shirt to sit, making it snug but comfortable. Add 1 inch to this measurement for overlap when joining the ends.
Attach a safety pin to one end of the elastic. Thread the elastic through the opening in the casing, guiding it all the way around until it emerges from the other side.
Step 9: Join the Elastic and Finish the Casing
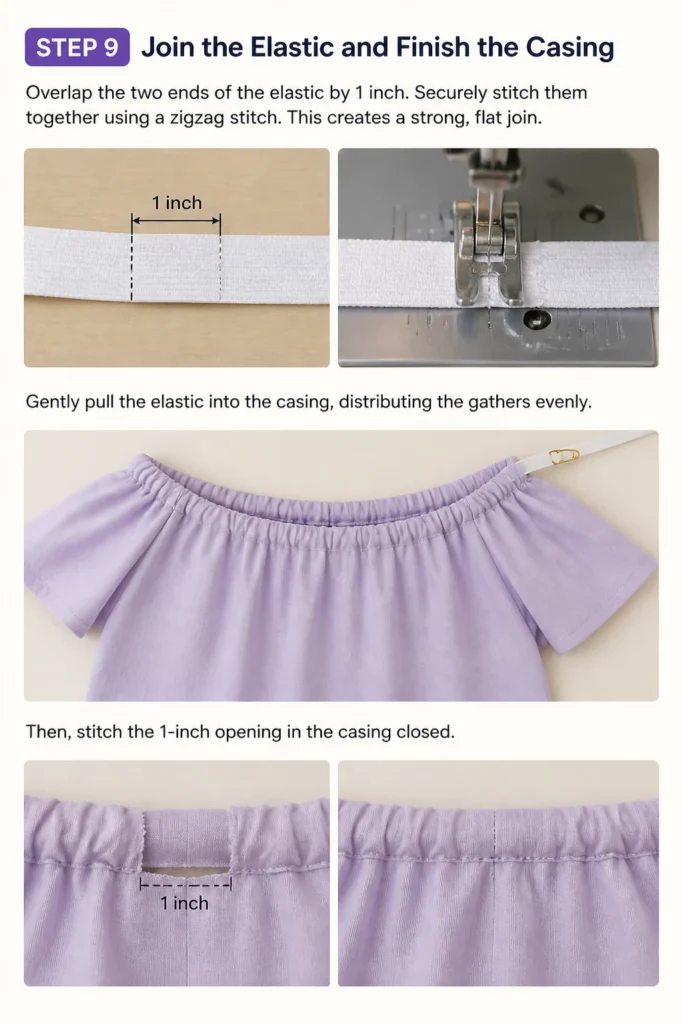
Overlap the two ends of the elastic by 1 inch. Securely stitch them together using a zigzag stitch. This creates a strong, flat join.
Gently pull the elastic into the casing, distributing the gathers evenly. Then, stitch the 1-inch opening in the casing closed.
Step 10: Hem the Sleeves and Bottom Edge
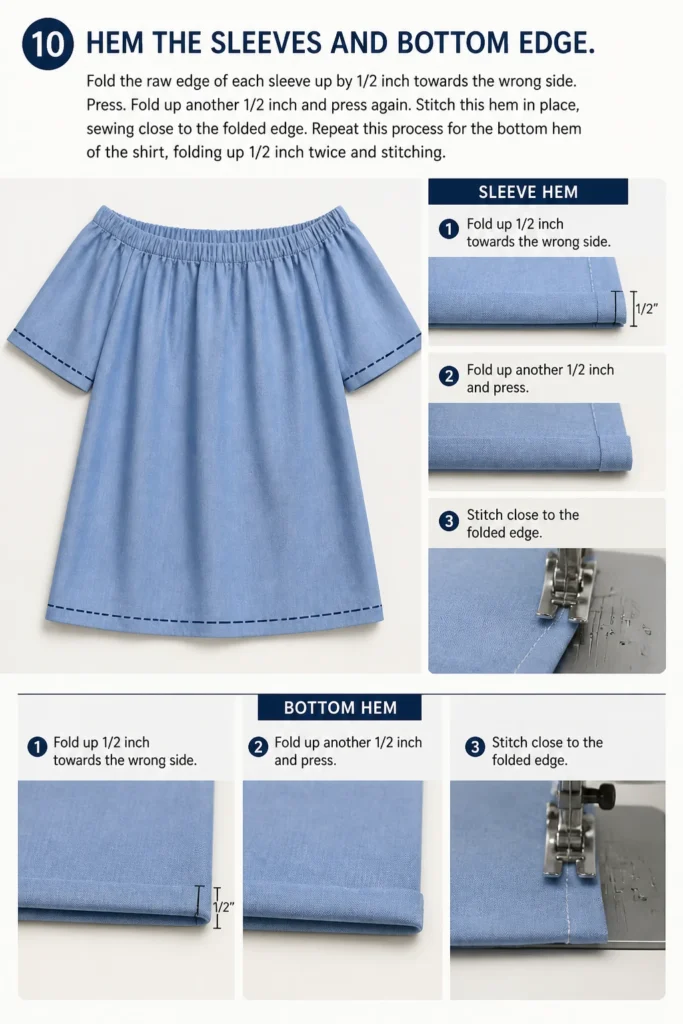
Fold the raw edge of each sleeve up by 1/2 inch towards the wrong side. Press. Fold up another 1/2 inch and press again.
Stitch this hem in place, sewing close to the folded edge. Repeat this process for the bottom hem of the shirt, folding up 1/2 inch twice and stitching.
Common Mistakes to Avoid
Not Pre-Washing Fabric
Forgetting to pre-wash your fabric before cutting can lead to disappointment. Fabric often shrinks when first washed. If you don’t pre-wash, your finished shirt might shrink unevenly or become too small after its first laundry cycle. Always wash and dry your fabric as you intend to wash the finished garment.
Incorrect Elastic Measurement
Cutting your elastic too short will result in a shirt that feels uncomfortably tight and restricts movement. Conversely, elastic that is too long will cause the shirt to slip down your shoulders. Measure the elastic directly on your body for the most accurate fit, ensuring it’s snug but not constricting.
Uneven Casing Stitching
If your elastic casing is sewn unevenly, the elastic might twist or gather awkwardly, creating an unprofessional look. Take your time to press the folds precisely and stitch slowly and straight. A consistent casing width ensures the elastic lays flat and creates even gathers.
Skipping Seam Finishes
Leaving raw edges exposed can lead to fraying, especially after multiple washes. This weakens the seams and reduces the garment’s lifespan. Always finish your seams with a zigzag stitch, serger, or pinking shears to prevent fraying and give your shirt a professional, durable finish.
Troubleshooting
Shirt Slips Off Shoulders
If your off-the-shoulder shirt keeps sliding up or down, the elastic might be too loose. Carefully open a small section of your elastic casing. Pull the elastic out and cut off a small amount (1/2 to 1 inch). Re-stitch the elastic ends and close the casing, then try on the shirt again.
Elastic Feels Too Tight
A common issue is the elastic feeling too restrictive around your shoulders. The solution is similar to a loose elastic. Open the casing, cut the elastic, and insert a new piece that is slightly longer. Measure it against your body for comfort before stitching it in place.
Gathers Are Uneven
If the fabric gathers around the elastic are not evenly distributed, the shirt might look lopsided. Gently pull and adjust the fabric along the elastic casing. Work the gathers around until they are spread out smoothly. You can use pins to temporarily hold them in place before closing the casing if needed.
Key Takeaways
- Always pre-wash your fabric to prevent shrinkage after construction.
- Accurate measurements for both fabric and elastic are crucial for a comfortable fit.
- Pressing seams and folds meticulously creates a professional, crisp finish.
- Leaving a small opening in the casing is essential for threading your elastic.
- Finishing raw edges improves durability and the overall appearance of your shirt.
- Take your time with each step; patience leads to better results.
Frequently Asked Questions
Can I make this shirt without a sewing machine?
Yes, you can hand-sew this shirt. It will take significantly longer, but it’s entirely possible. Use a strong backstitch for all seams and a whipstitch or slip stitch for the hems and casing closure.
What kind of fabric is best for an off-the-shoulder shirt?
Lightweight, drapey fabrics work best. Think cotton blends, rayon, challis, jersey knits, or even a soft linen. Avoid stiff fabrics as they won’t flow well and may not sit comfortably off the shoulder.
How do I choose the right elastic width?
For off-the-shoulder tops, 1/2-inch to 1-inch wide elastic is generally good. Thinner elastic can roll, while much wider elastic might feel too bulky. The width also depends on the fabric weight; heavier fabrics might benefit from slightly wider elastic.
Can I add ruffles or other embellishments?
Absolutely! This guide provides a basic pattern, but you can customize it. Add a ruffle to the top edge before creating the casing, or embellish with lace, embroidery, or fabric paint. Get creative with your design.
Our Top Recommended Finds
- Good Quality Fabric Scissors: Sharp scissors make precise cuts, which are vital for a neat finish. They prevent fabric from fraying during cutting.
- All-Purpose Polyester Thread: This thread is strong, durable, and suitable for most fabrics, ensuring your seams hold up well. It’s a versatile choice for any sewing project.
- Fabric Marking Pen or Chalk: These tools allow you to make clear, temporary marks on your fabric for cutting and stitching lines, ensuring accuracy without permanent stains.
Your Next Stylish Creation Awaits
You’ve now got the blueprint to craft a beautiful off-the-shoulder shirt, a versatile addition to any wardrobe. This project is more than just sewing; it’s about making something uniquely yours.
Don’t let your new skills gather dust. Grab that fabric, fire up your machine, and start creating today. You’ll be amazed at what you can achieve with a little patience and creativity.
Beginner-friendly templates, step-by-step guides,
and weekly project ideas in your inbox.