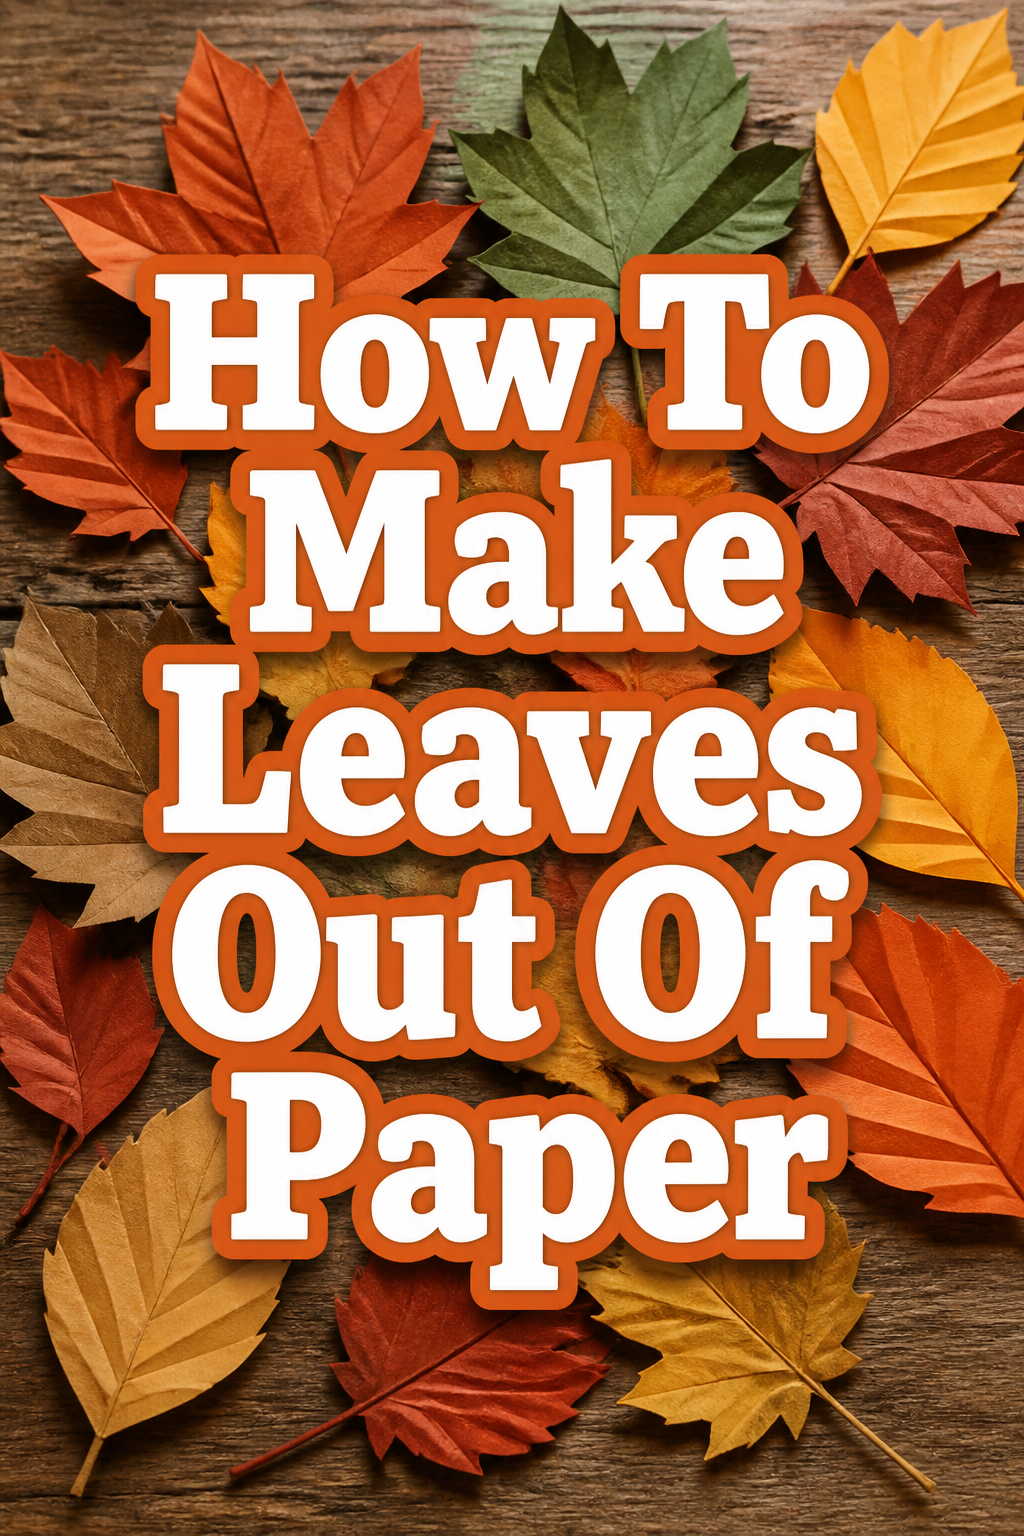
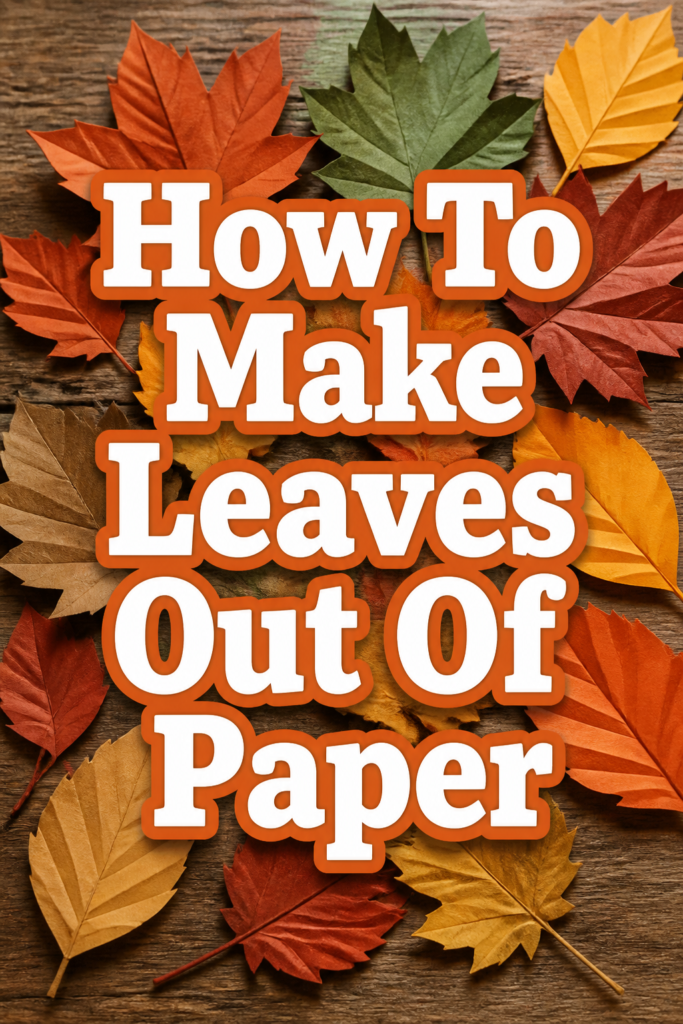
🍂 How To Make Leaves Out Of Paper

Beginner-friendly templates, step-by-step guides,
and weekly project ideas in your inbox.
Remember the simple joy of collecting fallen leaves as a child? Their unique shapes and vibrant colors always held a special charm. That same magic can be recreated indoors, any time of year, with just a few sheets of paper.
As someone who’s crafted countless paper botanicals for events and home decor, I’ve refined techniques to make these creations look incredibly lifelike. This guide will walk you through each step, ensuring your paper leaves are not just pretty, but truly captivating. Let’s transform ordinary paper into a stunning natural display.
Quick Overview
This guide will empower you to craft beautiful, realistic paper leaves from everyday materials. You’ll learn the secrets to adding dimension, texture, and natural color variations. By the end, you’ll have a collection of impressive paper botanicals ready for any project.
- Time needed: 30-60 minutes per leaf (depending on complexity and detail)
- Difficulty: Beginner to Intermediate (techniques can be scaled for all skill levels)
- What you’ll need: Paper, scissors, glue, pencil, optional wire, paints, or markers
Step-by-Step Instructions
Step 1: Gather Your Materials
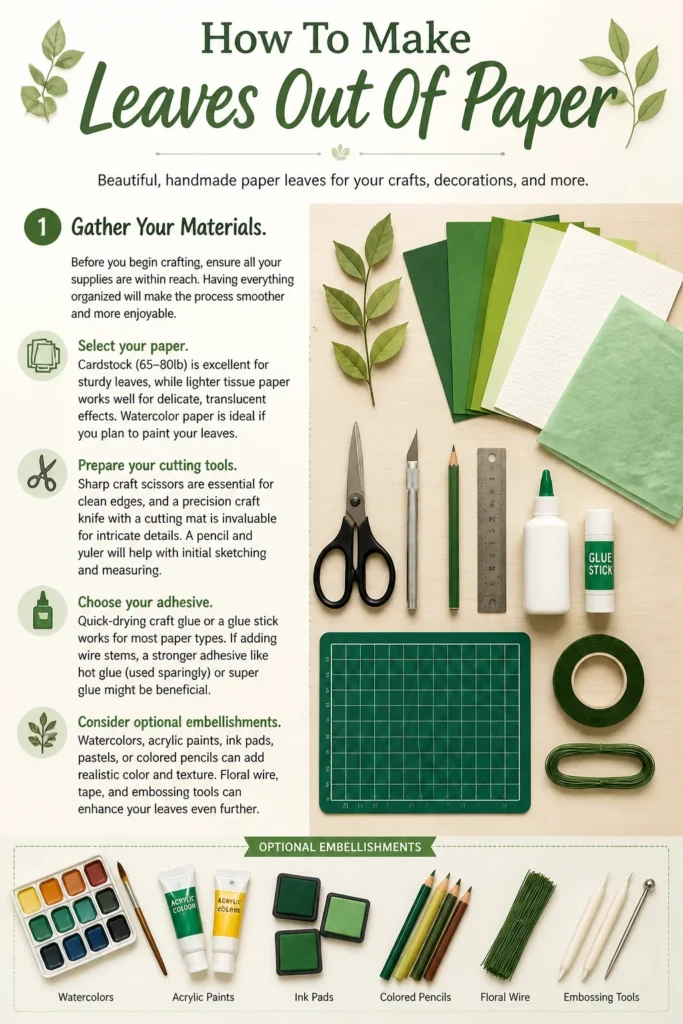
Before you begin crafting, ensure all your supplies are within reach. Having everything organized will make the process smoother and more enjoyable.
- Select your paper. Cardstock (65-80lb) is excellent for sturdy leaves, while lighter tissue paper works well for delicate, translucent effects. Watercolor paper is ideal if you plan to paint your leaves.
- Prepare your cutting tools. Sharp craft scissors are essential for clean edges, and a precision craft knife with a cutting mat is invaluable for intricate details. A pencil and ruler will help with initial sketching and measuring.
- Choose your adhesive. Quick-drying craft glue or a glue stick works for most paper types. If adding wire stems, a stronger adhesive like hot glue (used sparingly) or super glue might be beneficial.
- Consider optional embellishments. Floral wire provides a flexible stem, while watercolors, acrylics, pastels, or markers can add realistic color and shading. A bone folder or blunt tool is useful for scoring.
Pro Tip: Invest in good quality, sharp scissors and a fresh craft knife blade. Dull tools lead to jagged edges and frustration, making your leaves look less professional.
Step 2: Choose Your Leaf Design
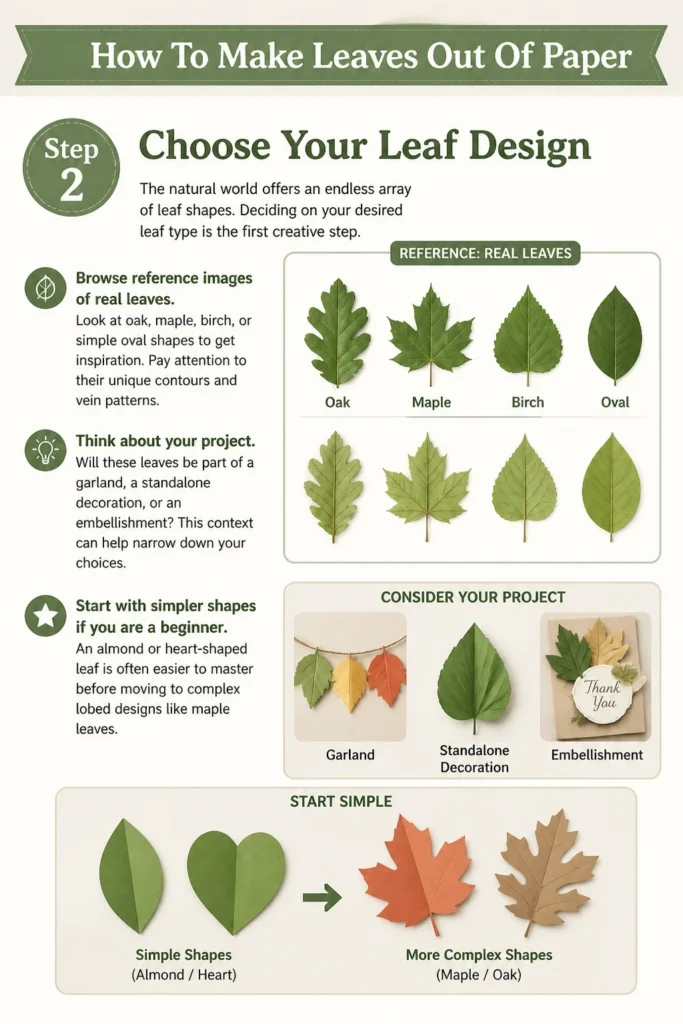
The natural world offers an endless array of leaf shapes. Deciding on your desired leaf type is the first creative step.
- Browse reference images of real leaves. Look at oak, maple, birch, or simple oval shapes to get inspiration. Pay attention to their unique contours and vein patterns.
- Think about your project. Will these leaves be part of a garland, a standalone decoration, or an embellishment? This context can help narrow down your choices.
- Start with simpler shapes if you are a beginner. An almond or heart-shaped leaf is often easier to master before moving to complex lobed designs like maple leaves.
Step 3: Sketch or Print Your Template
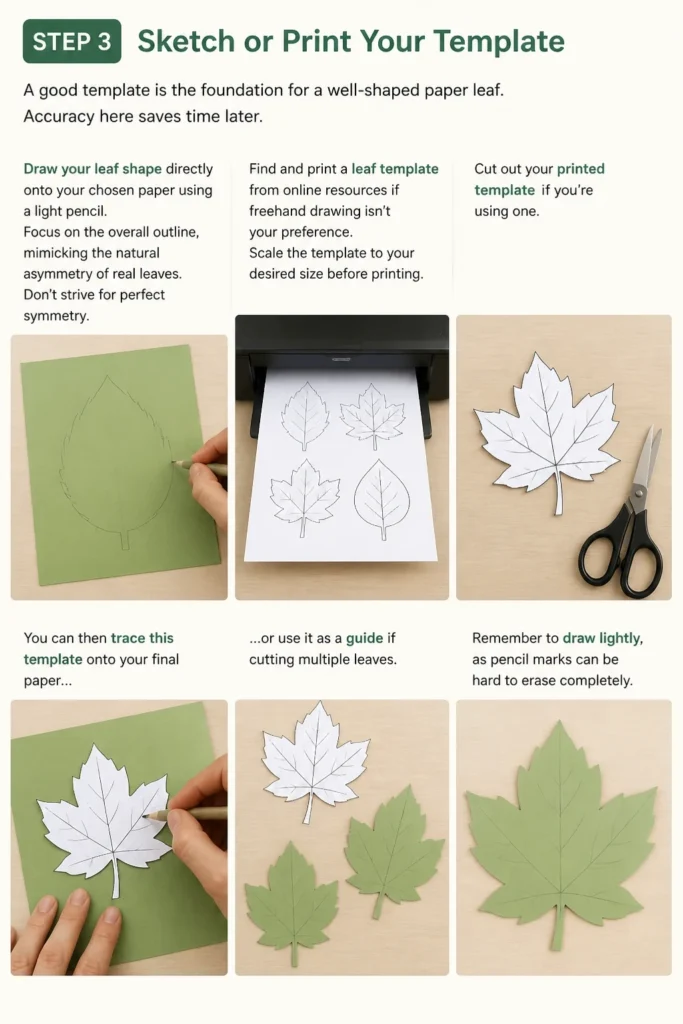
A good template is the foundation for a well-shaped paper leaf. Accuracy here saves time later.
- Draw your leaf shape directly onto your chosen paper using a light pencil. Focus on the overall outline, mimicking the natural asymmetry of real leaves. Don’t strive for perfect symmetry.
- Find and print a leaf template from online resources if freehand drawing isn’t your preference. Scale the template to your desired size before printing.
- Cut out your printed template if you’re using one. You can then trace this template onto your final paper, or use it as a guide if cutting multiple leaves. Remember to draw lightly, as pencil marks can be hard to erase completely.
Step 4: Cut Out Your Basic Leaf Shape
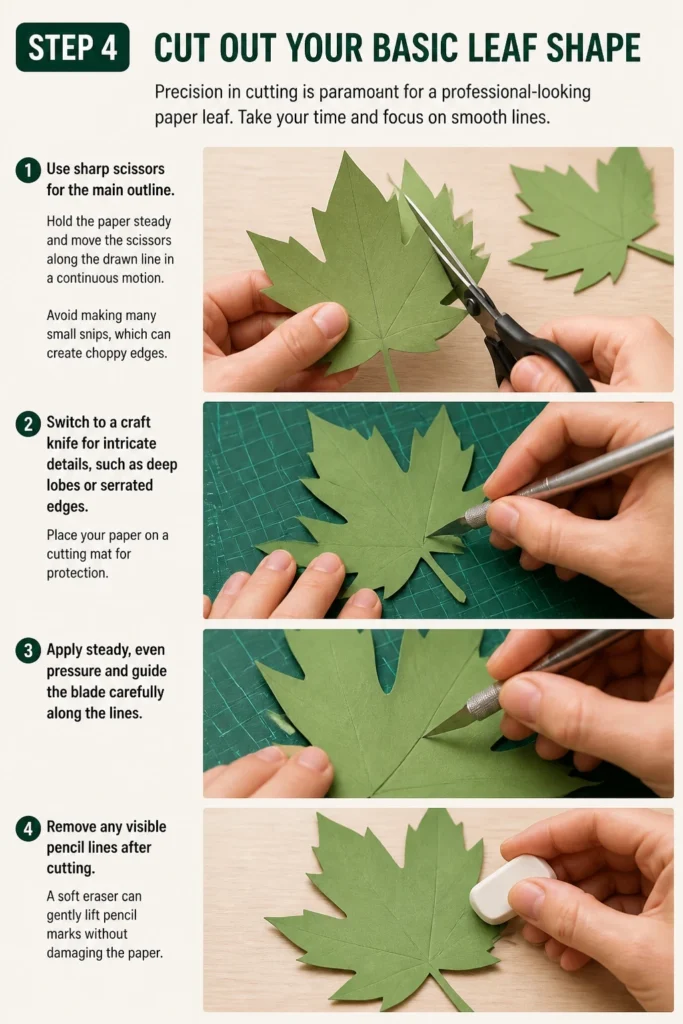
Precision in cutting is paramount for a professional-looking paper leaf. Take your time and focus on smooth lines.
- Use sharp scissors for the main outline. Hold the paper steady and move the scissors along the drawn line in a continuous motion. Avoid making many small snips, which can create choppy edges.
- Switch to a craft knife for intricate details, such as deep lobes or serrated edges. Place your paper on a cutting mat for protection. Apply steady, even pressure and guide the blade carefully along the lines.
- Remove any visible pencil lines after cutting. A soft eraser can gently lift pencil marks without damaging the paper.
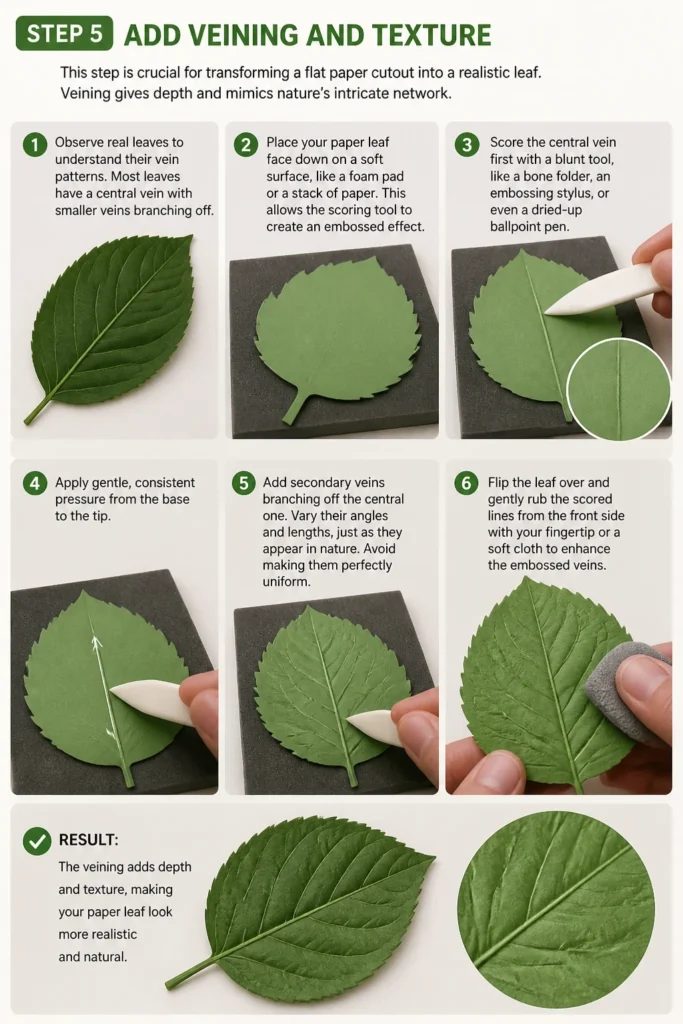
Step 5: Add Veining and Texture
This step is crucial for transforming a flat paper cutout into a realistic leaf. Veining gives depth and mimics nature’s intricate network.
- Observe real leaves to understand their vein patterns. Most leaves have a central vein with smaller veins branching off.
- Place your paper leaf face down on a soft surface, like a foam pad or a stack of paper. This allows the scoring tool to create an embossed effect.
- Score the central vein first with a blunt tool, like a bone folder, an embossing stylus, or even a dried-up ballpoint pen. Apply gentle, consistent pressure from the base to the tip.
- Add secondary veins branching off the central one. Vary their angles and lengths, just as they appear in nature. Avoid making them perfectly uniform.
- Flip the leaf over and gently rub the scored lines from the front side. This helps to subtly lift the veins, making them more prominent and realistic.
Pro Tip: For very delicate leaves, you can gently fold the leaf in half along where the central vein would be, then unfold it. This creates a subtle crease that acts as a guide for scoring the main vein.
Step 6: Shape and Curl the Edges
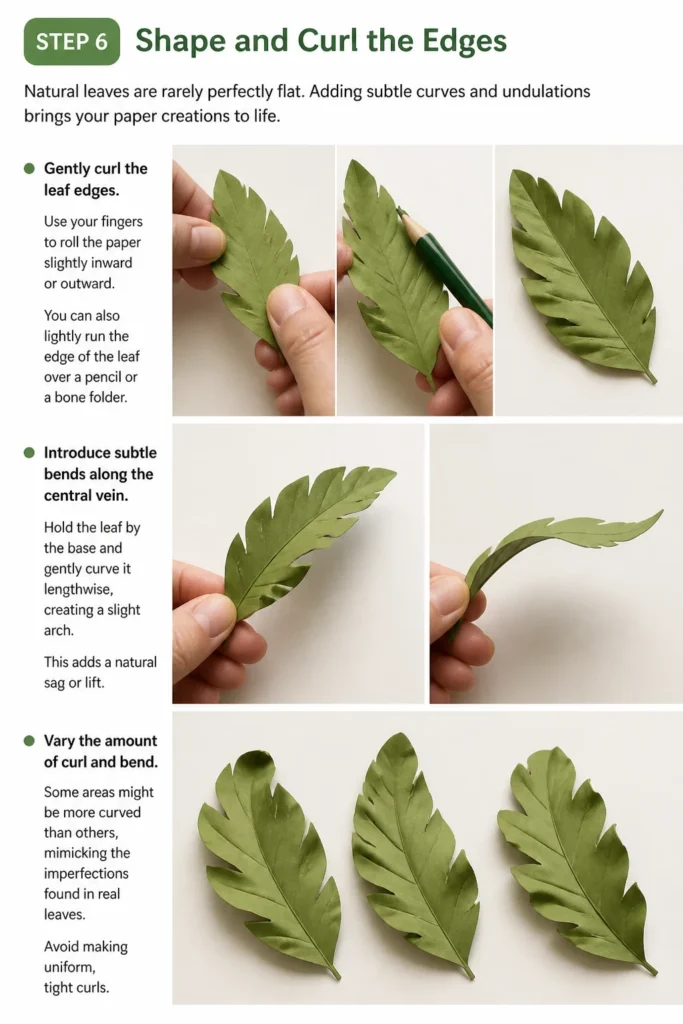
Natural leaves are rarely perfectly flat. Adding subtle curves and undulations brings your paper creations to life.
- Gently curl the leaf edges. Use your fingers to roll the paper slightly inward or outward. You can also lightly run the edge of the leaf over a pencil or a bone folder.
- Introduce subtle bends along the central vein. Hold the leaf by the base and gently curve it lengthwise, creating a slight arch. This adds a natural sag or lift.
- Vary the amount of curl and bend. Some areas might be more curved than others, mimicking the imperfections found in real leaves. Avoid making uniform, tight curls.
Step 7: Introduce Color (Optional but Recommended)
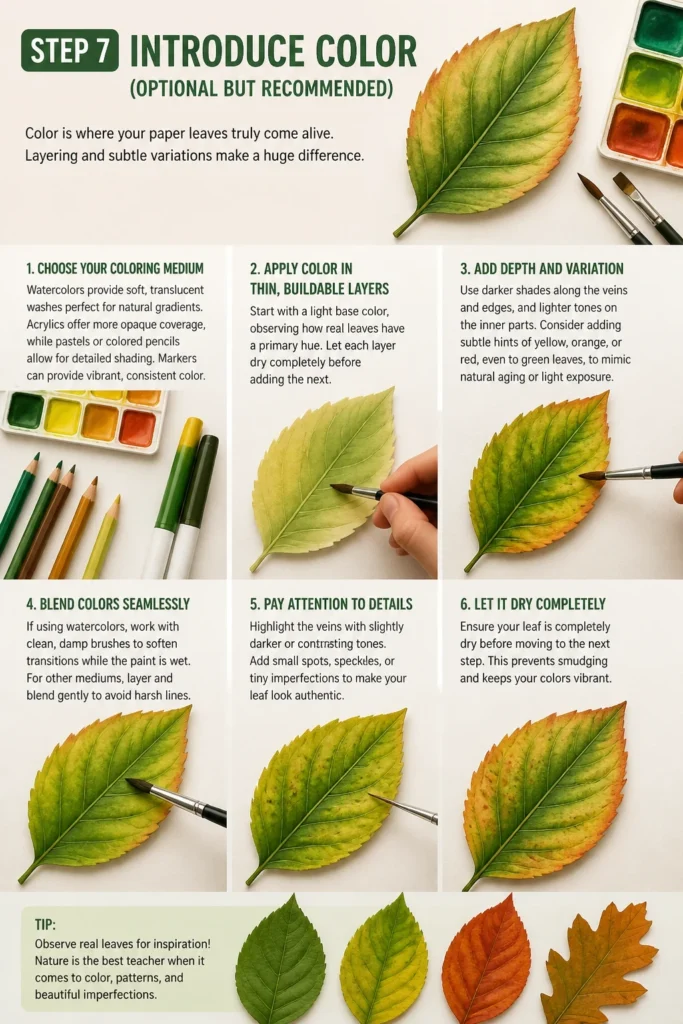
Color is where your paper leaves truly come alive. Layering and subtle variations make a huge difference.
- Choose your coloring medium. Watercolors provide soft, translucent washes perfect for natural gradients. Acrylics offer more opaque coverage, while pastels or colored pencils allow for detailed shading. Markers can provide vibrant, consistent color.
- Apply color in thin, buildable layers. Start with a light base color, observing how real leaves have a primary hue. Let each layer dry completely before adding the next.
- Add depth and variation. Use darker shades along the veins and edges, and lighter tones on the inner parts. Consider adding subtle hints of yellow, orange, or red, even to green leaves, to mimic natural aging or light exposure.
- Blend colors seamlessly. If using watercolors, work while the paper is slightly damp for smooth transitions. For pastels, use a cotton swab or your finger to gently smudge and blend.
Step 8: Attach a Stem (Optional)
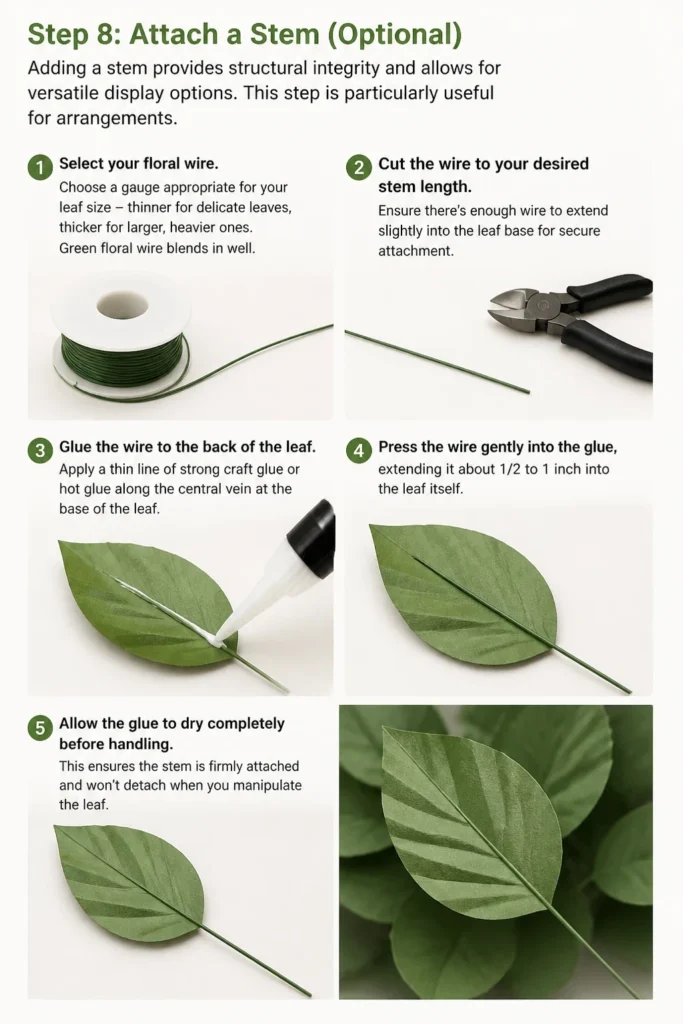
Adding a stem provides structural integrity and allows for versatile display options. This step is particularly useful for arrangements.
- Select your floral wire. Choose a gauge appropriate for your leaf size – thinner for delicate leaves, thicker for larger, heavier ones. Green floral wire blends in well.
- Cut the wire to your desired stem length. Ensure there’s enough wire to extend slightly into the leaf base for secure attachment.
- Glue the wire to the back of the leaf. Apply a thin line of strong craft glue or hot glue along the central vein at the base of the leaf. Press the wire gently into the glue, extending it about 1/2 to 1 inch into the leaf itself.
- Allow the glue to dry completely before handling. This ensures the stem is firmly attached and won’t detach when you manipulate the leaf. You can also cover the wire with a small strip of paper for a cleaner finish.
Step 9: Assemble and Arrange
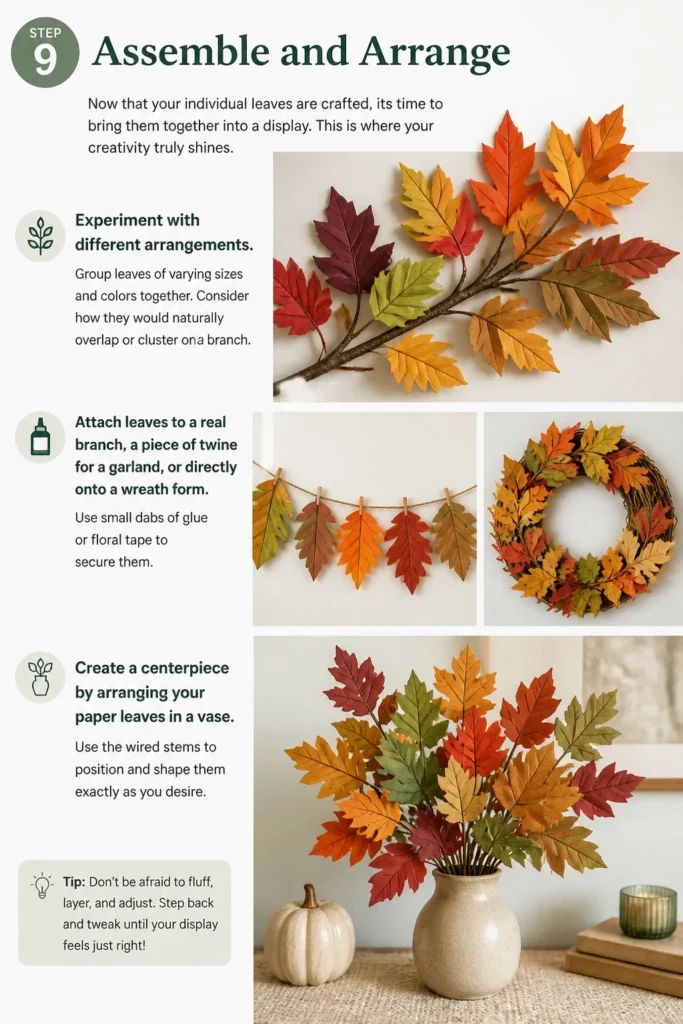
Now that your individual leaves are crafted, it’s time to bring them together into a display. This is where your creativity truly shines.
- Experiment with different arrangements. Group leaves of varying sizes and colors together. Consider how they would naturally overlap or cluster on a branch.
- Attach leaves to a real branch, a piece of twine for a garland, or directly onto a wreath form. Use small dabs of glue or floral tape to secure them.
- Create a centerpiece by arranging your paper leaves in a vase. Use the wired stems to position and shape them exactly as you desire.
Step 10: Seal and Protect (Optional)
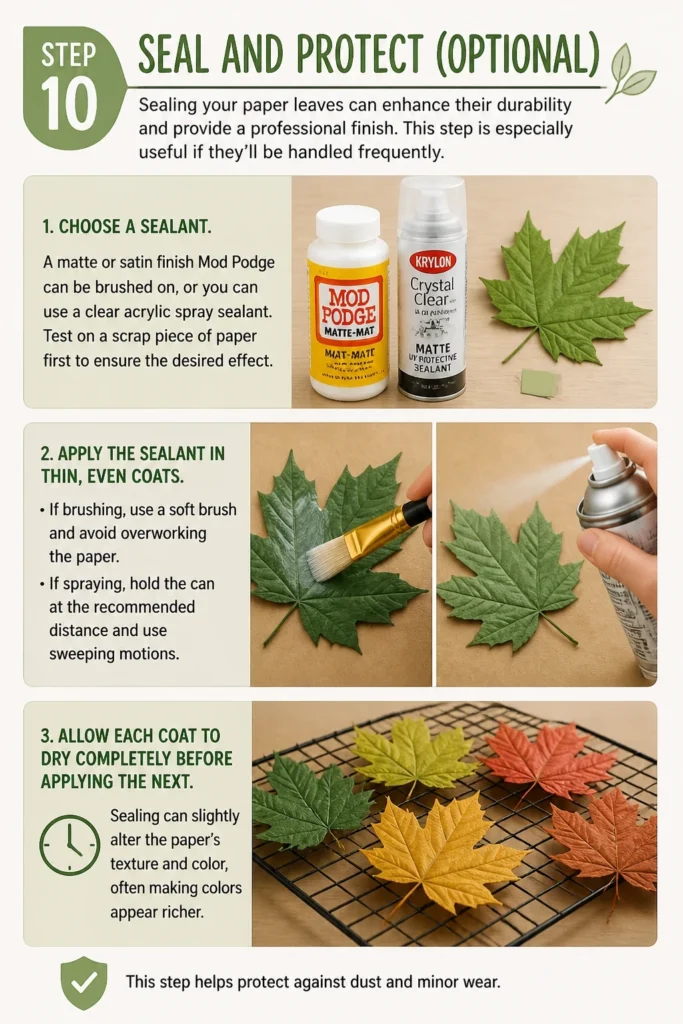
Sealing your paper leaves can enhance their durability and provide a professional finish. This step is especially useful if they’ll be handled frequently.
- Choose a sealant. A matte or satin finish Mod Podge can be brushed on, or you can use a clear acrylic spray sealant. Test on a scrap piece of paper first to ensure the desired effect.
- Apply the sealant in thin, even coats. If brushing, use a soft brush and avoid overworking the paper. If spraying, hold the can at the recommended distance and use sweeping motions.
- Allow each coat to dry completely before applying the next. Sealing can slightly alter the paper’s texture and color, often making colors appear richer. This step helps protect against dust and minor wear.
Common Mistakes to Avoid
Rushing the Cut
Cutting too quickly often results in jagged, uneven edges that detract from realism. Paper leaves look best with smooth, clean lines. Instead of hurrying, take your time and make slow, deliberate cuts. Use sharp tools and let the blade do the work, guiding it steadily along your drawn lines.
Ignoring Veining
A flat paper cutout, without any veining, will always look artificial. Natural leaves possess intricate networks of veins that provide structure and texture. Always take the time to score central and secondary veins. This simple step adds crucial dimension and makes your leaf appear much more lifelike.
Over-Curling
While shaping is essential for realism, over-curling or rolling the leaf edges too tightly can make it look unnatural. Leaves have subtle, organic curves, not tight, uniform rolls. Aim for gentle undulations and slight bends rather than pronounced, artificial-looking curls. Observe real leaves for inspiration on natural curvature.
Using Too Much Glue
Excessive glue can warp paper, create unsightly shiny spots, or even bleed through lighter papers. It can also make your finished leaf stiff and unnatural. Always apply glue sparingly, using just enough to secure the components. A thin, even layer is usually sufficient, and pressing gently helps spread it without overdoing it.
Troubleshooting
Leaf Looks Flat and Unrealistic
If your finished paper leaf lacks dimension and appears lifeless, it likely needs more shaping and veining. Go back to Step 5 and Step 6. Ensure you have scored prominent central and secondary veins, and gently shape the leaf with your fingers or a bone folder. Adding subtle curves and twists along the edges and body of the leaf will drastically improve its realism.
Edges Are Frayed or Uneven
Choppy or frayed edges usually indicate dull cutting tools or improper technique. First, replace your craft knife blade or sharpen your scissors. Then, when cutting, apply steady pressure and try to make long, continuous cuts rather than many small snips. Practice on scrap paper to refine your cutting motion before working on your final leaf.
Color Bleeds or Looks Splotchy
Issues with color often stem from using too much water with watercolors or applying paint too thickly. To fix this, use less water when mixing watercolors, aiming for a more concentrated pigment. Apply thin, even layers of color, allowing each layer to dry completely before adding the next. This prevents bleeding and ensures a smooth, consistent finish.
Key Takeaways
- Precision cutting with sharp tools is fundamental for clean, professional-looking paper leaves.
- Scoring and shaping are crucial steps that add essential realism, transforming flat paper into dimensional botanicals.
- Layering and blending colors, even subtly, create depth and mimic the natural variations found in real leaves.
- Don’t be afraid to experiment with different paper types, coloring mediums, and shaping techniques to find your unique style.
- Patience and attention to detail throughout each step will yield the most beautiful and convincing paper leaf creations.
- Reference real leaves for inspiration on shapes, textures, and color gradients to enhance authenticity.
Frequently Asked Questions
What type of paper is best for paper leaves?
The best paper depends on your desired effect. Cardstock (65-80lb) is excellent for sturdy, durable leaves that hold their shape well. Lighter tissue paper creates delicate, translucent leaves, while watercolor paper is ideal if you plan to paint intricate details and gradients. Experiment with different types to see what you prefer.
How can I make my leaves look more realistic?
Realism comes from observing nature closely. Focus on creating irregular, organic edges rather than perfect symmetry. Introduce varied veining patterns, and most importantly, add subtle shaping and curves to break up the flatness. Layering colors with slight imperfections and gradients also greatly enhances realism.
Can I use a cutting machine like a Cricut?
Yes, a cutting machine like a Cricut or Silhouette can precisely cut out your leaf shapes, saving a lot of time, especially for multiple leaves. However, for true realism, you will still need to manually add the crucial steps of scoring veins, shaping the paper, and applying color variations. The machine handles the initial cut, but your artistic touch completes the leaf.
How do I store my paper leaves?
To prevent damage, store your paper leaves carefully. If they are relatively flat, you can place them between sheets of tissue paper in a sturdy box. For shaped leaves or those with wire stems, arrange them loosely in a box or display them in a way that prevents crushing. Avoid stacking heavy items on top of them.
Our Top Recommended Finds
- Precision Craft Knife Set: Essential for intricate cuts and sharp details, offering various blade types.
- Fine-Tip Scoring Tool with Embossing Stylus: Perfect for creating realistic veins without tearing the paper, adding crucial texture.
- Artist’s Watercolor Paint Set: Provides a wide range of colors for natural-looking gradients and subtle shading, bringing your leaves to life.
Your Paper Botanical Journey Begins Now
Crafting paper leaves is a wonderfully rewarding hobby that blends artistry with simple materials. Each leaf you create is a tiny testament to your patience and creativity. Remember, practice makes perfect, and every leaf you make will teach you something new.
Don’t hesitate to experiment with different leaf shapes, paper textures, and coloring techniques. These skills can translate into countless other paper craft projects, from intricate flowers to charming embellishments. Pick up your materials today and transform simple paper into a vibrant forest of your own creation.
Beginner-friendly templates, step-by-step guides,
and weekly project ideas in your inbox.