👗 How To Make A Dress Into A Skirt

Beginner-friendly templates, step-by-step guides,
and weekly project ideas in your inbox.
I remember staring at a beautiful dress in my closet, rarely worn because the top no longer fit quite right. Instead of letting it gather dust, I decided to give it a new life. Transforming a dress into a skirt is a wonderfully rewarding project, perfect for breathing new style into old favorites.
This guide comes from my own experience of giving cherished garments a second chance. You can absolutely achieve a fantastic, wearable skirt with just a few simple steps.
Quick Overview
This guide will walk you through the process of repurposing an old dress into a stylish, custom-fit skirt. You’ll learn how to measure, cut, and sew a new waistband, resulting in a unique addition to your wardrobe.
- Time needed: 1-3 hours (depending on sewing experience)
- Difficulty: Beginner to Intermediate
- What you’ll need: Sewing machine, fabric scissors, measuring tape, tailor’s chalk or pins, elastic, thread, seam ripper, iron.
Step-by-Step Instructions
Step 1: Gather Your Tools & Prep the Dress
Before you begin, make sure you have all your tools laid out and ready. A little preparation goes a long way in ensuring a smooth sewing process. This includes setting up your sewing machine and having a clear workspace.
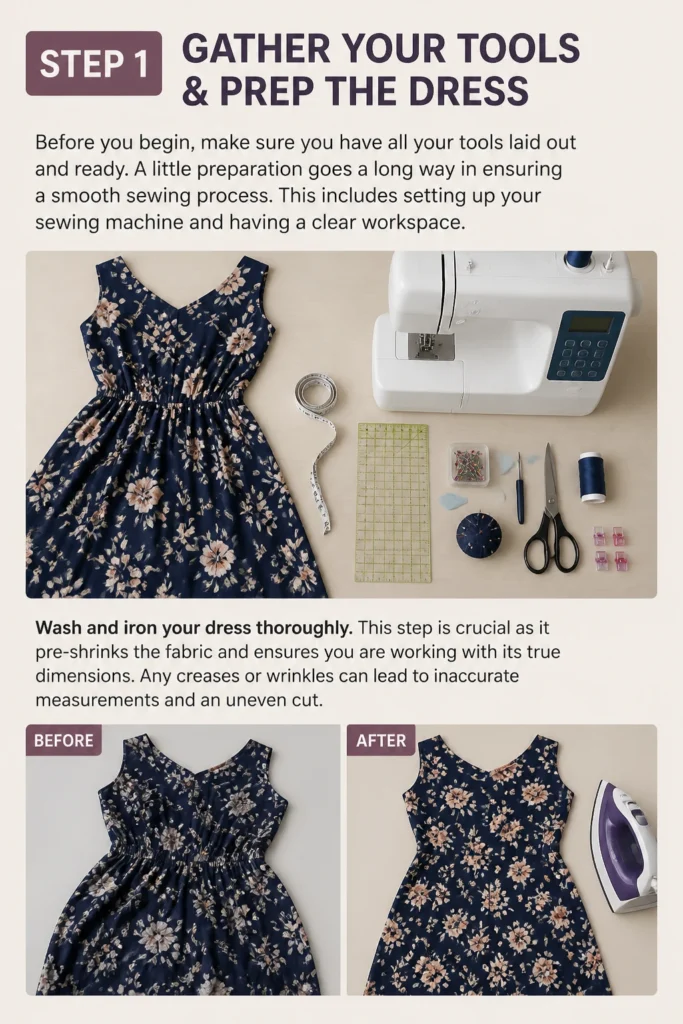
Wash and iron your dress thoroughly. This step is crucial as it pre-shrinks the fabric and ensures you are working with its true dimensions. Any creases or wrinkles can lead to inaccurate measurements and an uneven cut.
Step 2: Determine Your Skirt’s Waistline
Try on the dress and stand in front of a mirror. Decide exactly where you want the skirt’s waistline to sit on your body. This could be at your natural waist, a high waist, or even lower on your hips.
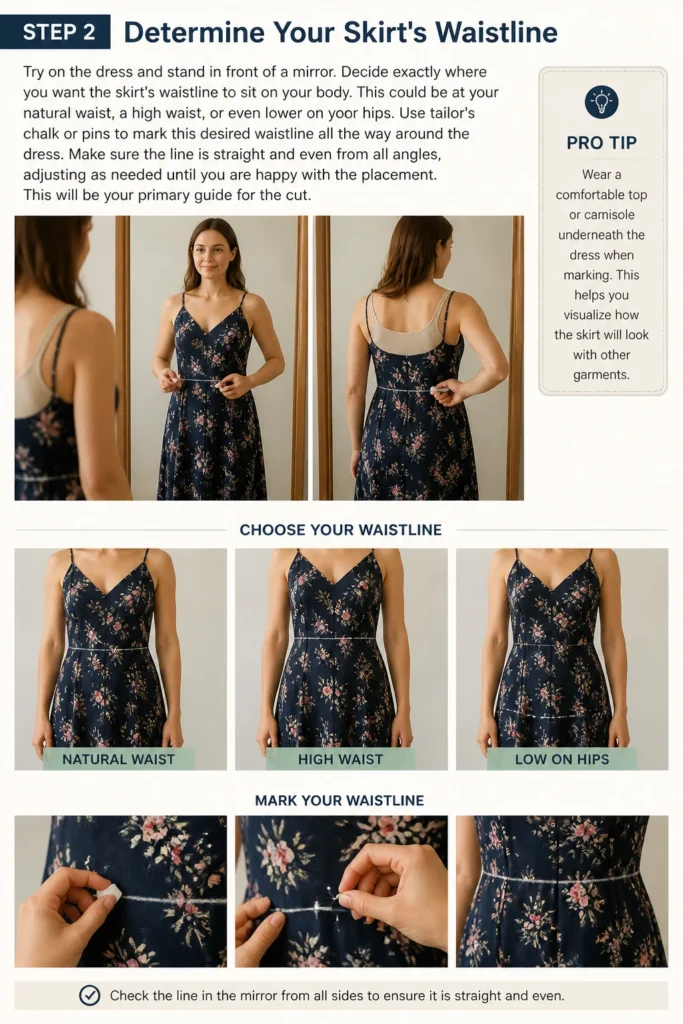
Use tailor’s chalk or pins to mark this desired waistline all the way around the dress. Make sure the line is straight and even from all angles, adjusting as needed until you are happy with the placement. This will be your primary guide for the cut.
Pro Tip: Wear a comfortable top or camisole underneath the dress when marking. This helps you visualize how the skirt will look with other garments.
Step 3: Measure and Mark the Cutting Line
Take off the dress and lay it flat on a large, clean surface. Using your measuring tape, measure 1.5 to 2 inches (4-5 cm) above the chalk line you just made. This extra fabric is for creating the elastic waistband casing.
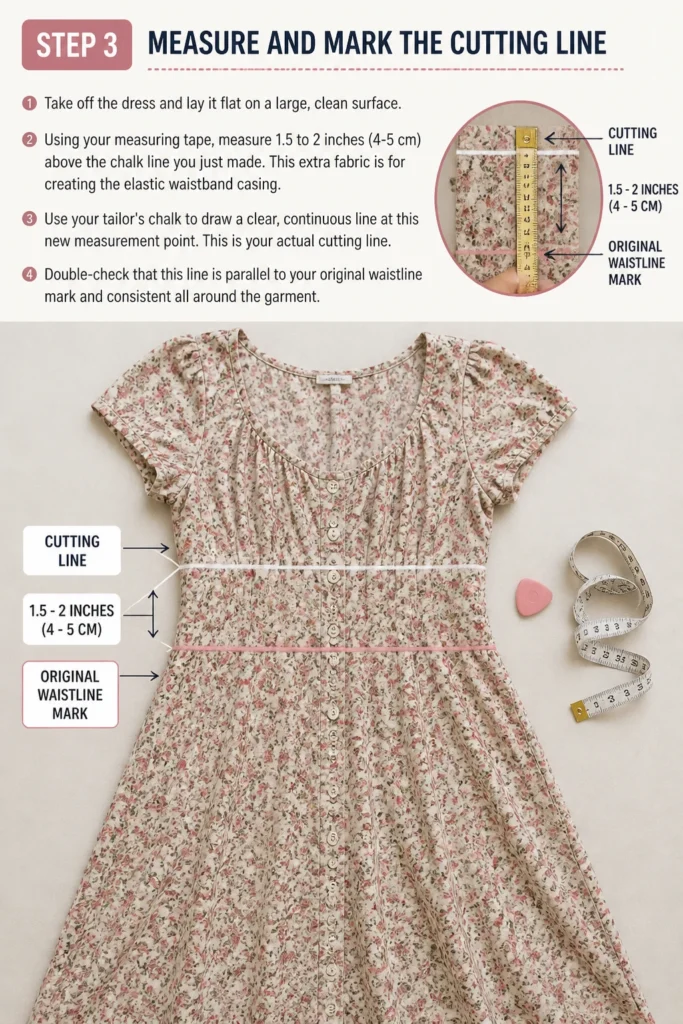
Use your tailor’s chalk to draw a clear, continuous line at this new measurement point. This is your actual cutting line. Double-check that this line is parallel to your original waistline mark and consistent all around the garment.
Step 4: Carefully Cut the Dress
With sharp fabric scissors, carefully cut along the marked cutting line. Take your time and make a steady, even cut. This ensures a clean edge that will be easier to work with when forming the waistband.
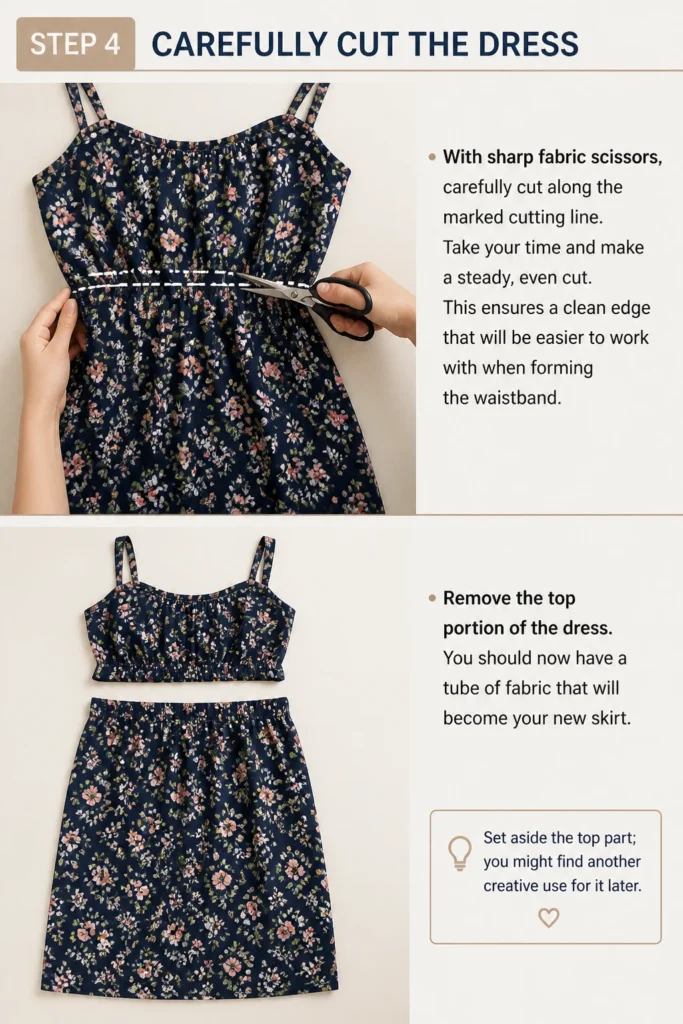
Remove the top portion of the dress. You should now have a tube of fabric that will become your new skirt. Set aside the top part; you might find another creative use for it later.
Step 5: Prepare the Waistband Casing
Lay the newly cut skirt flat, with the raw edge facing up. Fold the raw edge down towards the inside of the skirt by about ¼ inch (0.6 cm) and press it firmly with an iron. This small fold helps to create a neat, durable edge.
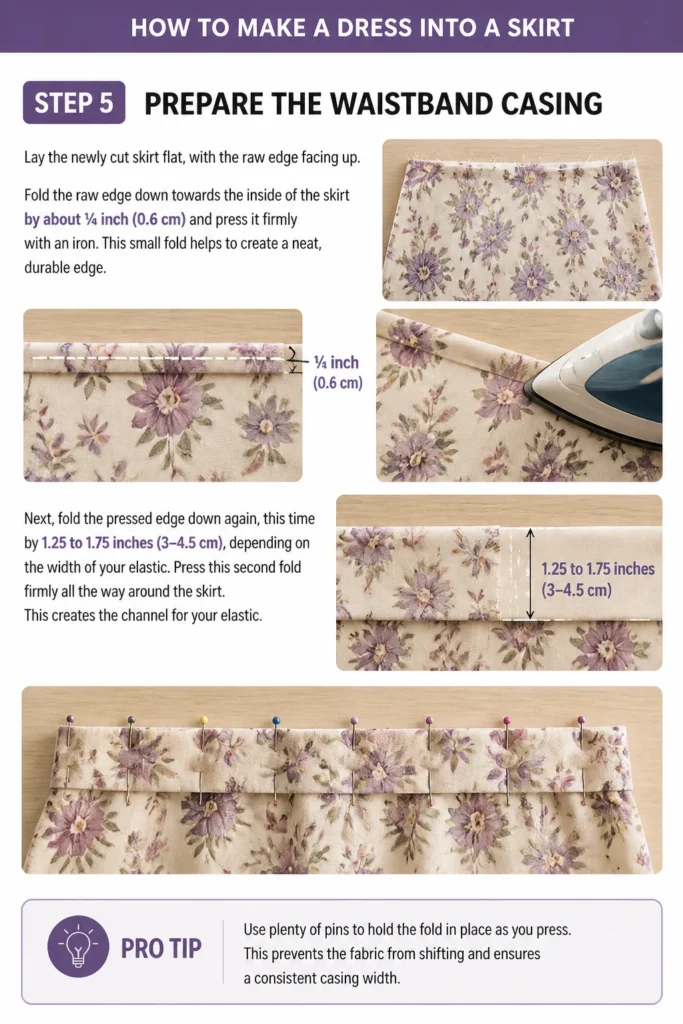
Next, fold the pressed edge down again, this time by 1.25 to 1.75 inches (3-4.5 cm), depending on the width of your elastic. Press this second fold firmly all the way around the skirt. This creates the channel for your elastic.
Pro Tip: Use plenty of pins to hold the fold in place as you press. This prevents the fabric from shifting and ensures a consistent casing width.
Step 6: Stitch the Casing
Thread your sewing machine with a color that matches your skirt fabric. Select a straight stitch. Begin sewing close to the bottom folded edge of the casing, about 1/8 inch (0.3 cm) from the edge.
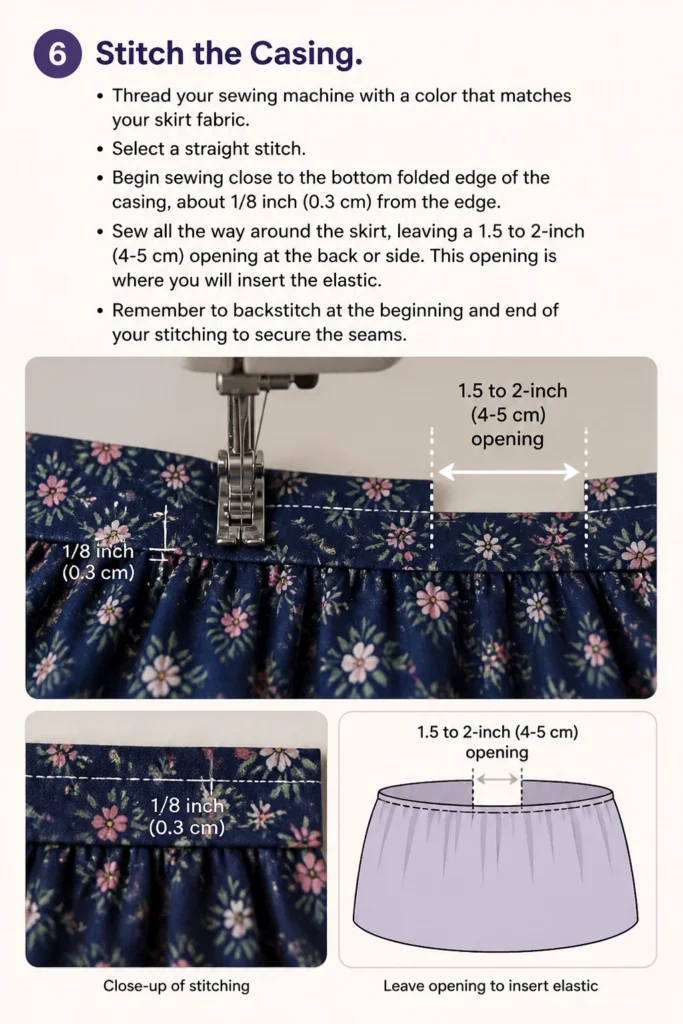
Sew all the way around the skirt, leaving a 1.5 to 2-inch (4-5 cm) opening at the back or side. This opening is where you will insert the elastic. Remember to backstitch at the beginning and end of your stitching to secure the seams.
Step 7: Measure and Insert the Elastic
To determine the correct elastic length, wrap the elastic around your natural waist (or wherever you want the skirt to sit). Pull it comfortably snug, but not too tight. Add 1 inch (2.5 cm) to this measurement for overlap, then cut the elastic.
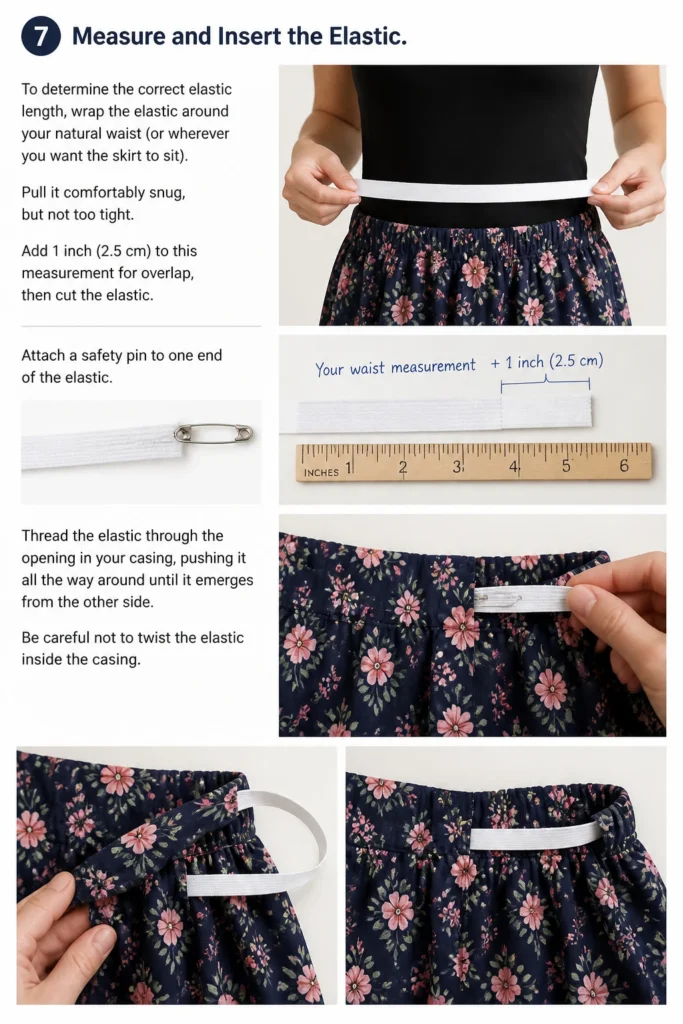
Attach a safety pin to one end of the elastic. Thread the elastic through the opening in your casing, pushing it all the way around until it emerges from the other side. Be careful not to twist the elastic inside the casing.
Step 8: Secure and Finish the Waistband
Once the elastic is fully threaded, overlap the two ends by 1 inch (2.5 cm). Stitch them together securely using a zigzag stitch on your sewing machine. Reinforce this seam with several passes to ensure it holds up to wear.
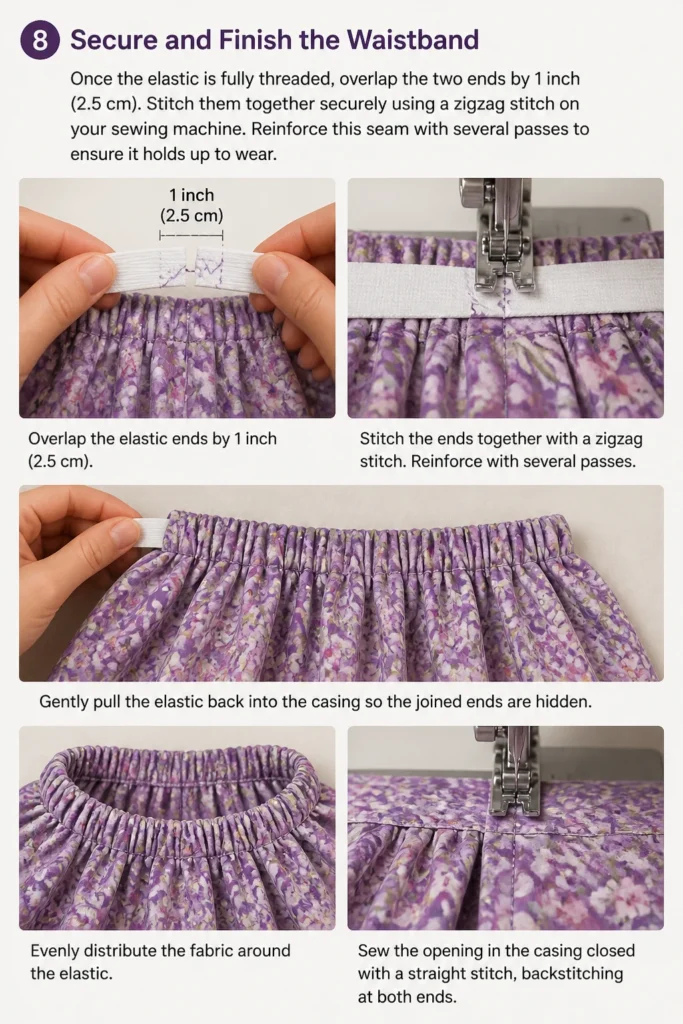
Gently pull the elastic back into the casing so the joined ends are hidden. Evenly distribute the fabric around the elastic. Finally, sew the opening in the casing closed with a straight stitch, backstitching at both ends.
Step 9: Final Touches and Try-On
Trim any loose threads from your new skirt. Give the waistband a final press with your iron to smooth out any wrinkles and set the stitches. Take a moment to admire your handiwork.
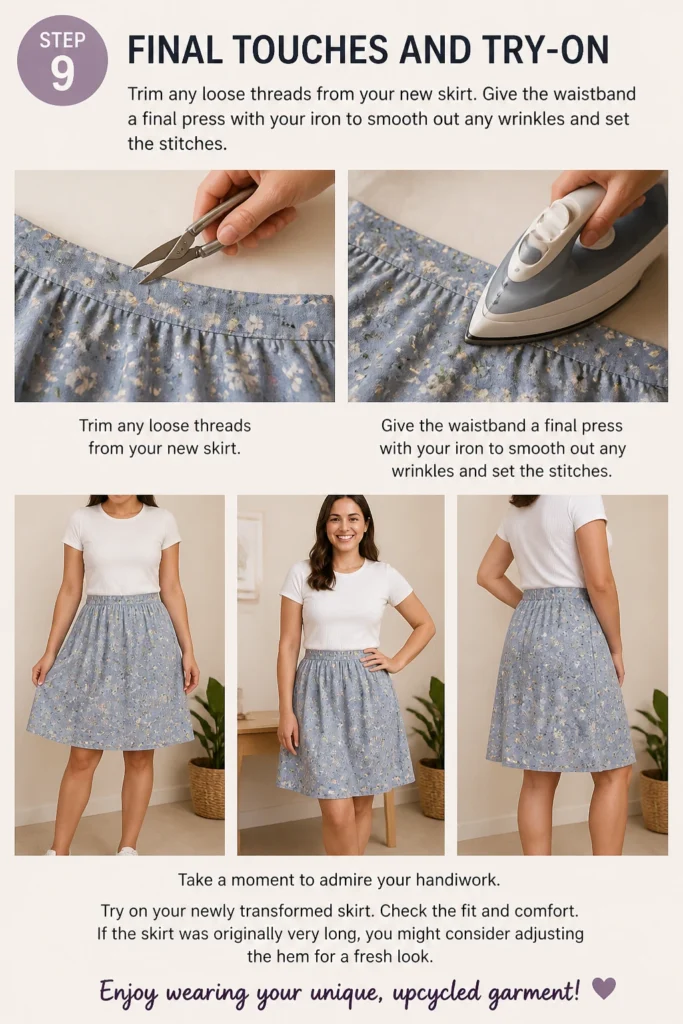
Try on your newly transformed skirt. Check the fit and comfort. If the skirt was originally very long, you might consider adjusting the hem for a fresh look. Enjoy wearing your unique, upcycled garment!
Common Mistakes to Avoid
Cutting Without Enough Seam Allowance
Many beginners cut the dress directly at their desired waistline. This leaves no fabric to create the waistband casing, making it impossible to insert elastic. The result is a skirt that cannot be comfortably worn or properly finished.
Always remember to add at least 1.5 to 2 inches (4-5 cm) above your intended waistline when marking your cutting line. This provides ample fabric for a sturdy and functional elastic casing. Measure twice, cut once is a good rule here.
Using the Wrong Elastic Length
Cutting elastic too short will result in a waistband that is uncomfortably tight, digging into your skin. Conversely, elastic that is too long will make the skirt fall down, rendering it unwearable. The fit needs to be just right.
Always measure the elastic against your body, pulling it snug but not restrictive. Add a small overlap for sewing. Test the elastic’s comfort before stitching the ends together permanently.
Uneven Cutting or Stitching
A crooked cutting line will lead to a lopsided waistband, making the skirt hang unevenly. Similarly, inconsistent stitching for the casing can create a lumpy or twisted waistband once the elastic is inserted. Precision is key in these steps.
Take your time when marking and cutting. Use plenty of pins to hold fabric folds in place before stitching. Practice straight lines on scrap fabric if you’re new to machine sewing.
Troubleshooting
Waistband Feels Too Tight or Too Loose
If your finished skirt’s waistband is uncomfortable, the elastic length is likely the culprit. Too tight means the elastic was cut too short; too loose means it was too long. This is a common issue for first-timers.
Carefully use a seam ripper to open a small section of the waistband casing. Locate the joined ends of the elastic. Adjust the length by either cutting off a bit more elastic (if too loose) or stitching on a small extension piece (if too tight). Re-stitch the ends and close the casing.
Fabric Gathers Unevenly Around the Waist
This usually happens if the elastic was inserted or distributed poorly within the casing. One side of the skirt might have more gathers than the other, making it look off-balance. It can also happen if your casing width isn’t uniform.
Open a small part of the casing and gently pull the elastic out slightly. Manually push and pull the fabric along the elastic to redistribute the gathers evenly. Once satisfied, re-secure the elastic and close the casing. Ensure your casing stitching is consistent next time.
Stitching is Skipped or Uneven
Skipped stitches or very uneven lines can indicate an issue with your sewing machine settings or needle. It might also mean the fabric was not fed smoothly through the machine. This can weaken the casing seam.
Check your machine’s tension settings and ensure you are using the correct needle for your fabric type. A dull or bent needle can cause skipped stitches. Guide the fabric gently without pulling or pushing excessively. If the seam is weak, carefully unpick it and re-sew.
Key Takeaways
- Always wash and iron your dress before starting to avoid shrinkage surprises.
- Measure carefully and add seam allowance for the waistband casing above your desired waistline.
- Use a safety pin to easily thread elastic through the casing without twisting.
- Overlap elastic ends by 1 inch (2.5 cm) and secure with a strong zigzag stitch.
- Leave a small opening in the casing stitching for elastic insertion, then close it neatly.
- Practice patience and precision; small adjustments make a big difference in the final look.
Frequently Asked Questions
Can I make a skirt from any dress fabric?
Most woven fabrics, like cotton, linen, rayon, or even lighter denim, work wonderfully. Stretchy knit fabrics can also work, but they require a slightly different approach for the waistband, often using a stretch stitch or a different type of elastic. Start with a non-stretch woven for your first project.
Do I need a sewing machine for this project?
While possible to hand-sew, a sewing machine will make the process much faster, stronger, and give a more professional finish. The waistband casing involves multiple layers of fabric and consistent stitching, which is easier with a machine. If you’re new to sewing, this is a great project to practice on.
What if my dress has a zipper?
If the dress has a zipper in the skirt portion, you can usually leave it as is. It will simply become a functional zipper on your new skirt. If the zipper is high up and would interfere with your new waistband, you might need to carefully remove it and sew the seam closed before creating the casing.
Can I add pockets to my new skirt?
Absolutely! Adding pockets is a fantastic way to customize your skirt. This would typically be done before you sew the waistband casing. You would cut out pocket pieces and attach them to the side seams of the skirt, following a separate pocket tutorial, before proceeding with the waistband steps.
Our Top Recommended Finds
- Good Quality Fabric Scissors: Sharp scissors make precise cuts, which are essential for a professional finish.
- Tailor’s Chalk Wheel: Provides clear, fine lines that are easy to see and brush away, much better than traditional chalk.
- Assorted Elastic Pack: Having a variety of widths on hand ensures you have the right elastic for any waistband project.
Your Next Creative Project Awaits
You’ve successfully transformed a dress into a stylish, wearable skirt. This project not only saves a garment from oblivion but also builds your confidence in basic sewing skills. Now that you’ve mastered the art of upcycling, think about other ways to refresh your wardrobe.
Consider experimenting with different hem lengths, adding decorative trim, or even combining fabrics from other old garments. The possibilities for creative expression are endless. Grab another dress and start your next transformation today!
Beginner-friendly templates, step-by-step guides,
and weekly project ideas in your inbox.