❤️ How To Make A Heart Out Of Money

Beginner-friendly templates, step-by-step guides,
and weekly project ideas in your inbox.
Have you ever wanted to give a gift that truly stands out? A money heart adds a unique, personal touch to a common present. I’ve folded countless bills into these charming shapes, seeing the delight they bring.
This guide shares the exact method I use, ensuring your creation is perfect. You’ll soon craft beautiful money hearts with confidence and ease.

Quick Overview
Creating a money heart is a simple yet impressive way to present currency. It transforms a regular bill into a thoughtful keepsake. This guide will walk you through each fold, making the process straightforward for anyone.
- Time needed: 10-15 minutes per bill
- Difficulty: Beginner
- What you’ll need: A crisp dollar bill (or any currency note), a flat surface, and your fingers.
Step-by-Step Instructions
Step 1: Choose Your Bill and Prepare
The foundation of a great money heart begins with the right bill. Select a new or gently used bill that is as crisp as possible. Avoid bills with significant creases or tears.
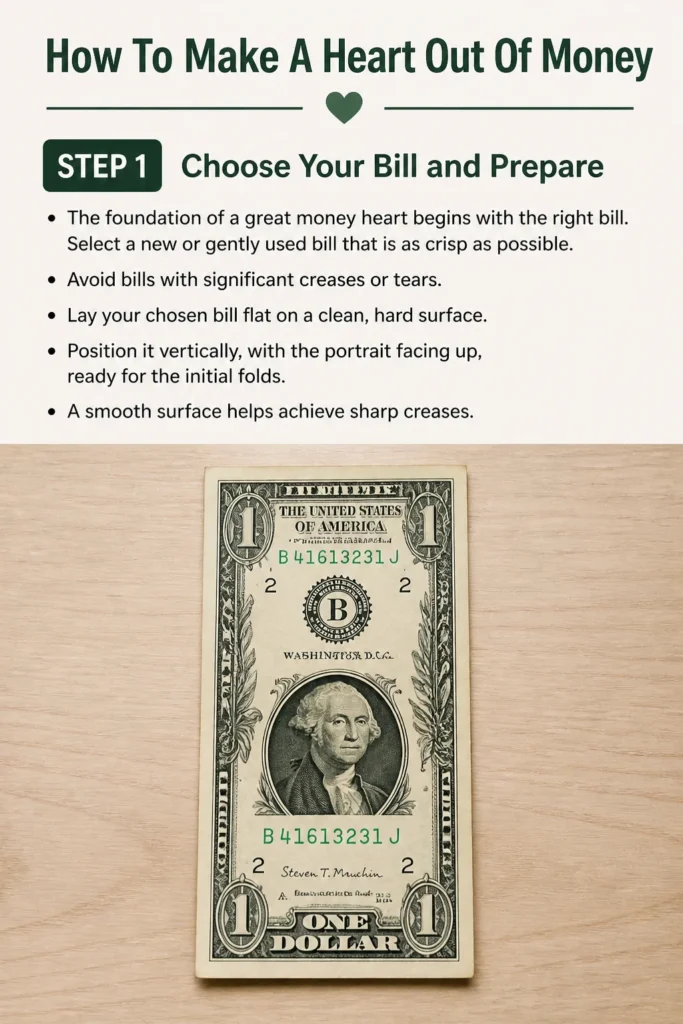
Lay your chosen bill flat on a clean, hard surface. Position it vertically, with the portrait facing up, ready for the initial folds. A smooth surface helps achieve sharp creases.
Step 2: Fold in Half Lengthwise
Take your bill and fold it in half lengthwise. Bring the bottom edge up to meet the top edge precisely. Press firmly along the crease to ensure it’s sharp and defined.
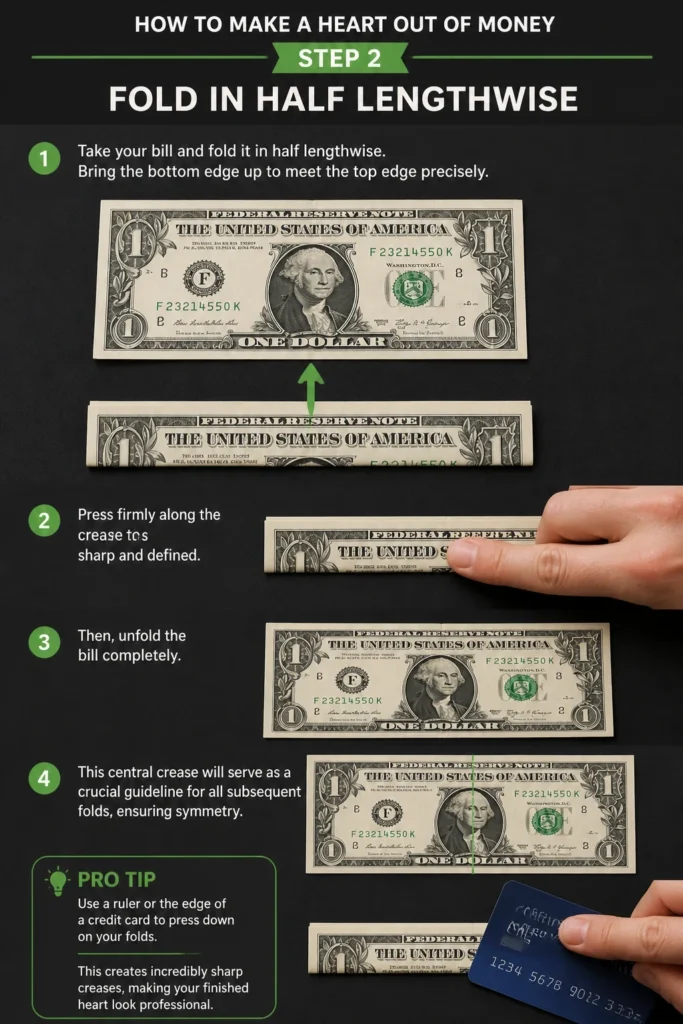
Then, unfold the bill completely. This central crease will serve as a crucial guideline for all subsequent folds, ensuring symmetry.
Pro Tip: Use a ruler or the edge of a credit card to press down on your folds. This creates incredibly sharp creases, making your finished heart look professional.
Step 3: Fold Corners to the Center Line
With the bill still vertical and unfolded, fold the top right corner down towards the center crease you just made. The corner point should align perfectly with the center line.
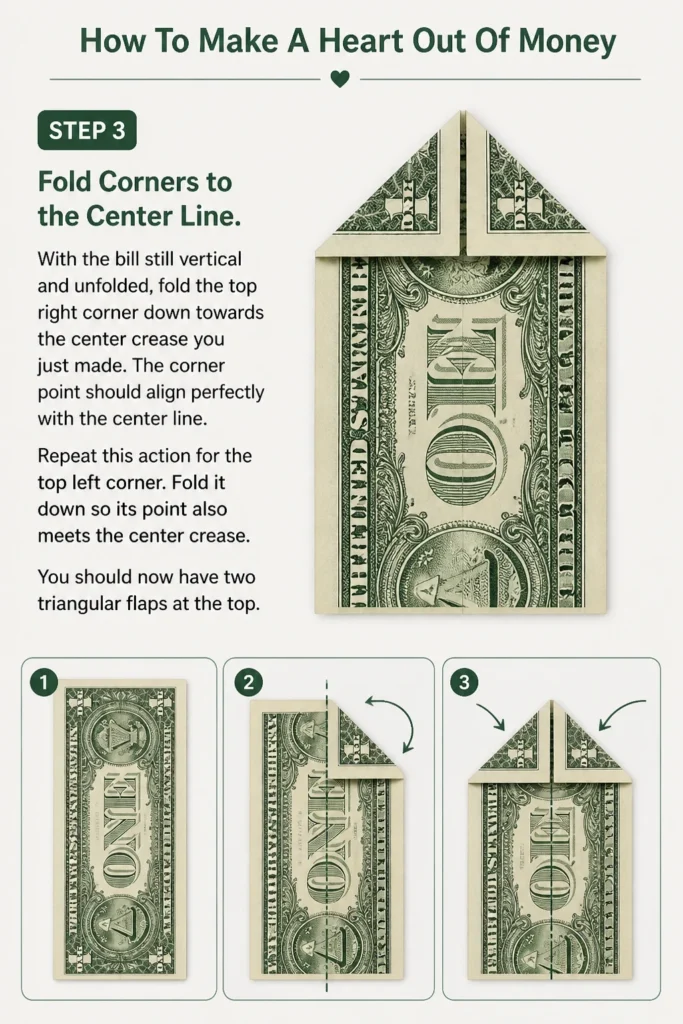
Repeat this action for the top left corner. Fold it down so its point also meets the center crease. You should now have two triangular flaps at the top.
Step 4: Create the Top Edge
Now, fold the entire top edge, which now consists of the base of those two triangles, downwards. This fold should align with the bottom edge of the triangular flaps.
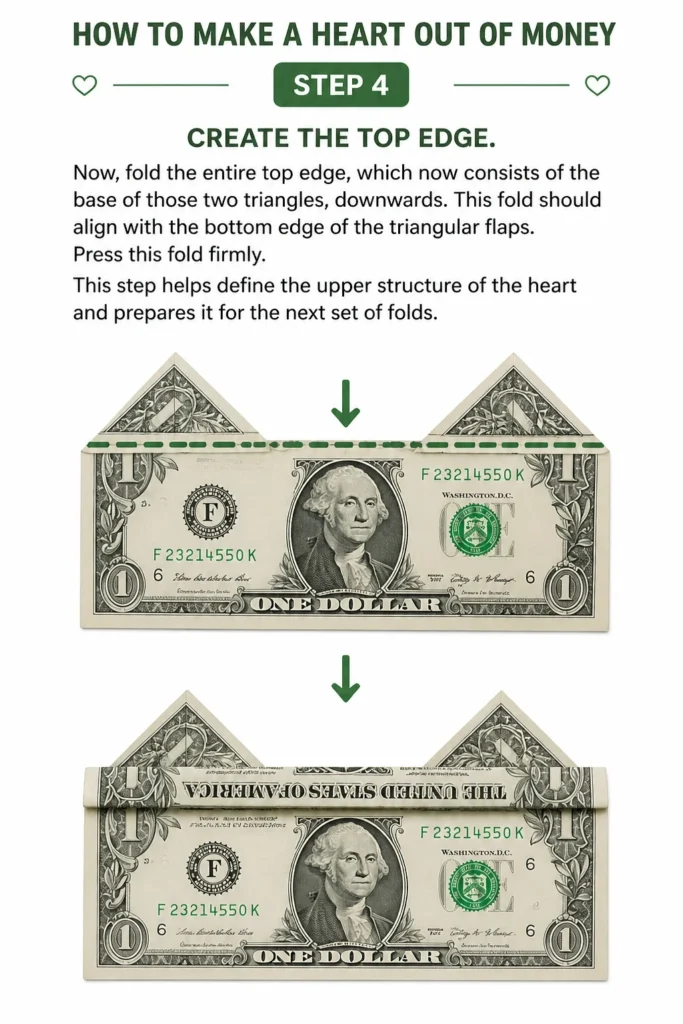
Press this fold firmly. This step helps define the upper structure of the heart and prepares it for the next set of folds.
Step 5: Fold Sides to the Center
With the bill still flat, fold the right side of the bill inwards, towards the central vertical crease. The edge should meet the center line exactly.
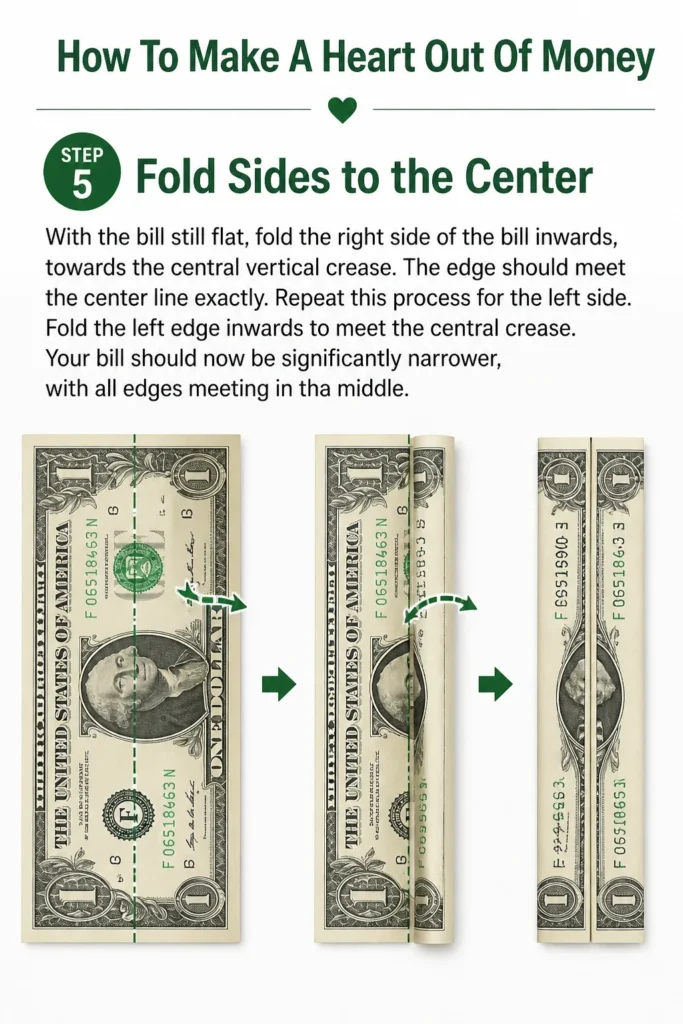
Repeat this process for the left side. Fold the left edge inwards to meet the central crease. Your bill should now be significantly narrower, with all edges meeting in the middle.
Step 6: Form the Pointed Bottom
Turn the bill over so the folded sides are now facing down. Fold the bottom right corner upwards and outwards. The goal is to align this corner with the adjacent vertical edge of the bill.
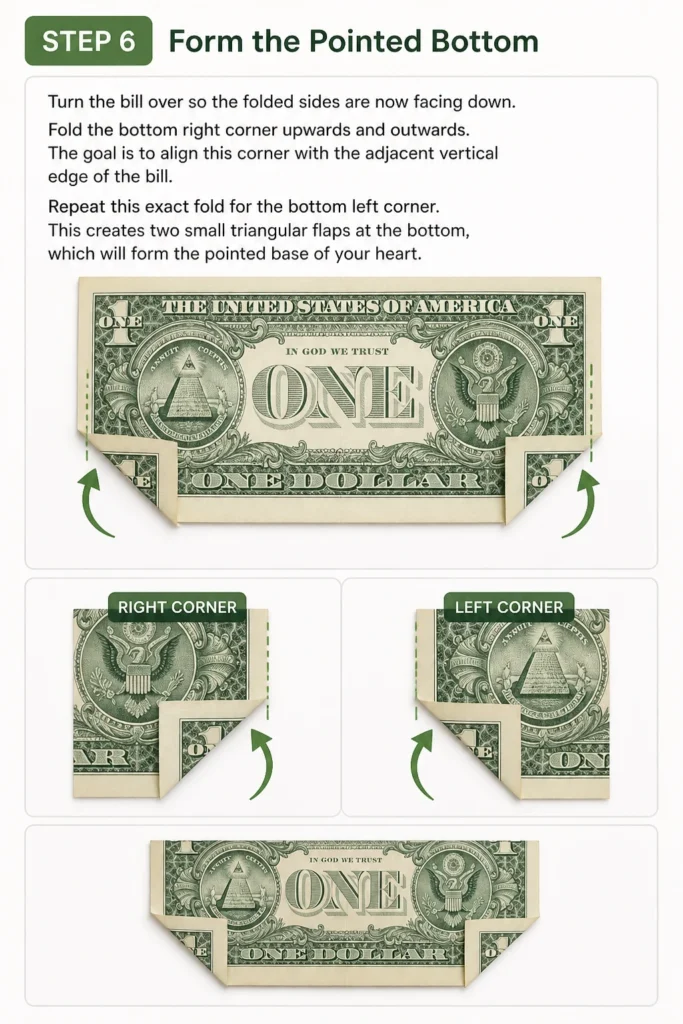
Repeat this exact fold for the bottom left corner. This creates two small triangular flaps at the bottom, which will form the pointed base of your heart.
Step 7: Angle the Top Corners
Flip the bill back over to the side where you first folded the top corners (the side with the “pointy” top). Now, focus on the top two corners created by the initial diagonal folds.
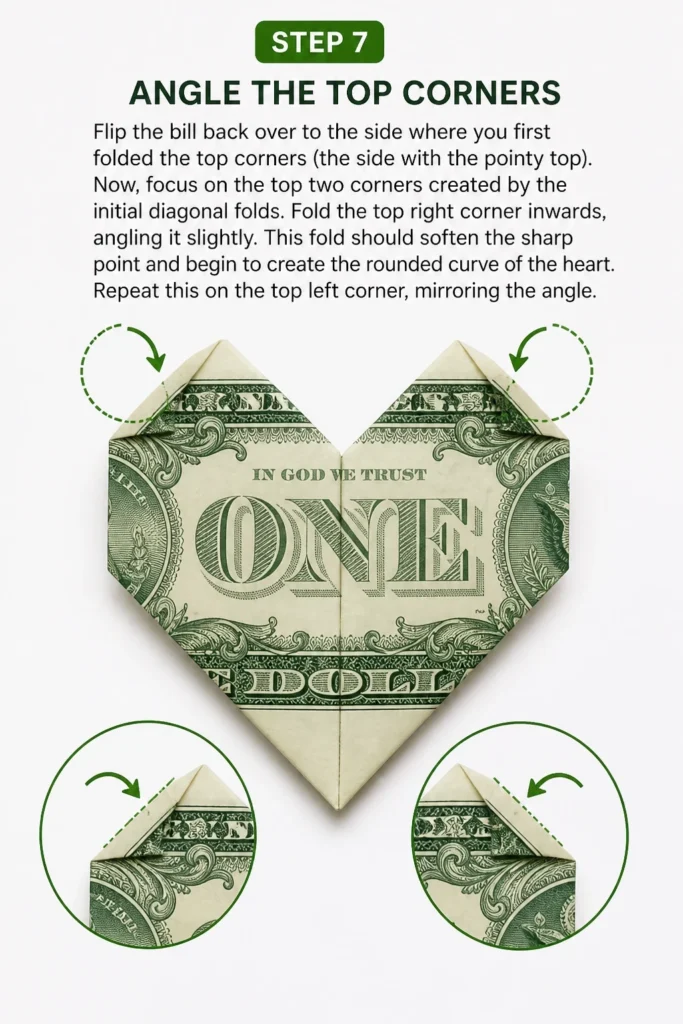
Fold the top right corner inwards, angling it slightly. This fold should soften the sharp point and begin to create the rounded curve of the heart. Repeat this on the top left corner, mirroring the angle.
Step 8: Refine the Top Curves
This step is about shaping the top of the heart. You’ll notice small, sharp points where the top angled folds meet the sides.
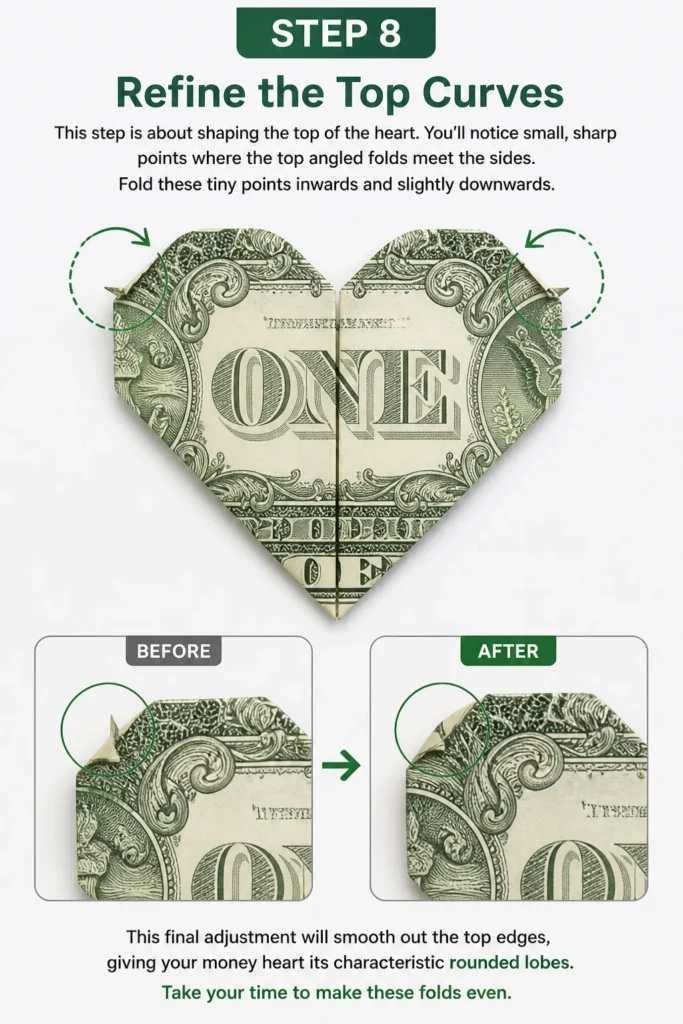
Fold these tiny points inwards and slightly downwards. This final adjustment will smooth out the top edges, giving your money heart its characteristic rounded lobes. Take your time to make these folds even.
Step 9: Secure and Display
Once you are satisfied with the shape, gently press down on the entire heart to reinforce all the creases. This helps the heart maintain its form.
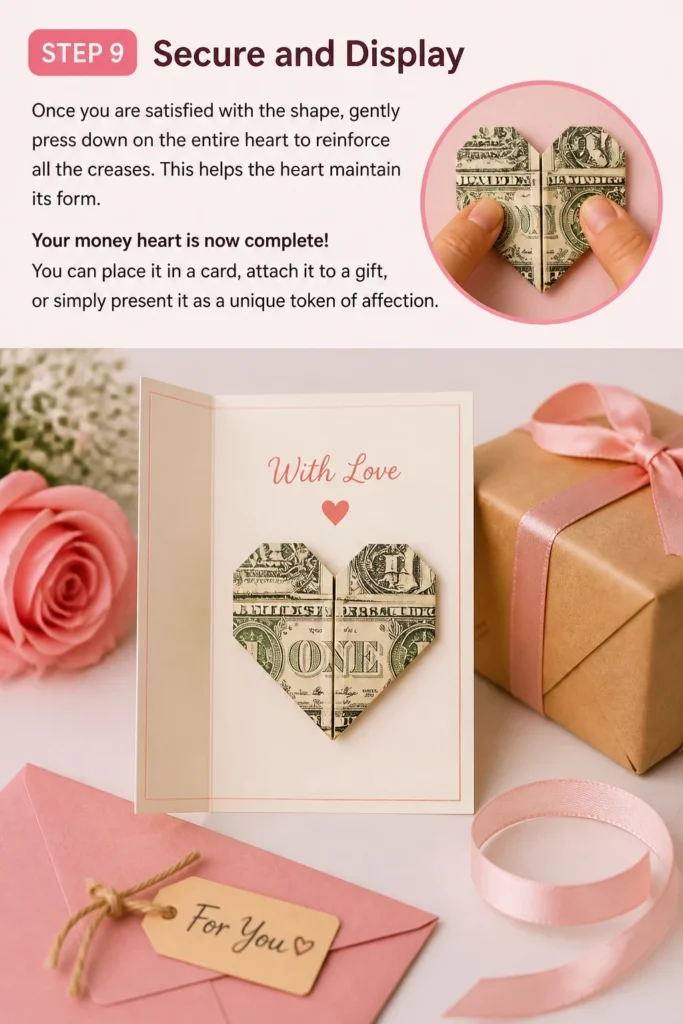
Your money heart is now complete! You can place it in a card, attach it to a gift, or simply present it as a unique token of affection.
Common Mistakes to Avoid
Using a Wrinkled Bill
Trying to fold a bill that is already heavily creased or wrinkled is a recipe for frustration. The existing lines will fight against your new folds, making it difficult to achieve sharp, clean edges. Always start with the crispest bill you can find, as this significantly impacts the final appearance.
Uneven Folds
Many beginners rush through the steps, leading to folds that aren’t perfectly aligned. This results in a lopsided or asymmetrical heart. Take your time with each fold, ensuring edges meet precisely and creases are straight before pressing firmly. Precision is key to a beautiful outcome.
Not Creasing Firmly Enough
Folds that are not pressed down firmly enough will not hold their shape. The heart might unravel or appear soft and undefined. After each fold, use your fingernail or a flat object to press along the crease with good pressure. This locks the shape into place.
Rushing the Process
Origami, even simple forms like a money heart, requires patience. Rushing can lead to mistakes, frustration, and a less-than-perfect result. Enjoy the process of creation, focusing on one step at a time. The satisfaction of a well-made heart is worth the deliberate effort.
Troubleshooting
My Heart Won’t Lie Flat
If your money heart tends to spring open or doesn’t lie flat, it’s likely due to insufficient creasing. Go back through each major fold and re-press them firmly. Pay special attention to the central vertical crease and the folds that create the top and bottom points. Sometimes, gently placing a heavy book on the finished heart for a few minutes can help it settle.
The Corners Aren’t Sharp
Sharp corners and points are essential for a defined heart shape. If your corners look soft or rounded prematurely, you might not have folded precisely to the guidelines. Ensure that when you bring a corner or edge to meet a line, it aligns perfectly. Using a ruler to guide your creases can also help achieve sharper angles.
Difficulty with Small Folds
Some of the final shaping folds, especially those that round out the top lobes, can be quite small. If you find these challenging, try using a pair of tweezers or a toothpick to help manipulate the tiny sections of the bill. This gives you more control and allows for greater precision without damaging the paper. Practice with a regular piece of paper first to get a feel for the small movements.
Key Takeaways
- Always begin with a crisp, undamaged bill for the best results.
- Precision in each fold is crucial for a symmetrical and appealing money heart.
- Firmly crease every fold to ensure the heart maintains its shape and structure.
- Patience is your best tool; take your time and enjoy the creative process.
- Practice makes perfect, so don’t be discouraged if your first attempt isn’t flawless.
- This unique gift adds a personal and memorable touch to giving money.
Frequently Asked Questions
Can I use any currency for this heart?
Yes, this folding technique works with most rectangular paper currency notes. The key is that the bill is relatively crisp and not too thick. Different sizes of bills will yield different sized hearts, but the method remains the same.
What if my bill has a slight crease already?
A slight, singular crease might be manageable, especially if it’s not in a critical folding area. However, multiple or deep creases will make the heart look messy and struggle to hold its shape. If possible, exchange the bill for a newer one.
How can I make the heart more durable?
Once folded, you can carefully place the money heart inside a small clear plastic sleeve or laminate it (if you don’t intend for the money to be spent). For temporary display, securing it gently with a small piece of tape to a card or gift box will prevent it from unfolding.
Is this difficult for children to make?
While the steps are simple, the need for precision and firm creasing might be challenging for very young children. Older children (around 8+) with good fine motor skills can certainly enjoy this craft with some adult guidance. It’s a great way to introduce them to origami.
Our Top Recommended Finds
- Bone Folder: This simple tool helps you achieve incredibly sharp, clean creases without damaging the paper. Essential for precise origami.
- Craft Tweezers: For those tiny, delicate folds, a good pair of craft tweezers provides the precision needed to perfect the curves of the heart.
- Practice Paper: Before using a real bill, practice with similarly sized paper (like construction paper or printer paper cut to size). This builds confidence.
Share a Little Love, One Fold at a Time
You now have all the steps to create a beautiful money heart. This isn’t just about folding paper; it’s about transforming a simple object into a gesture of care. Imagine the smiles and surprise when someone receives this thoughtful gift.
Why wait? Gather a crisp bill and start folding today. You’ll quickly master this charming craft, ready to brighten someone’s day with a handmade token of affection. Consider trying it with different denominations or even foreign currency for unique variations.
Beginner-friendly templates, step-by-step guides,
and weekly project ideas in your inbox.