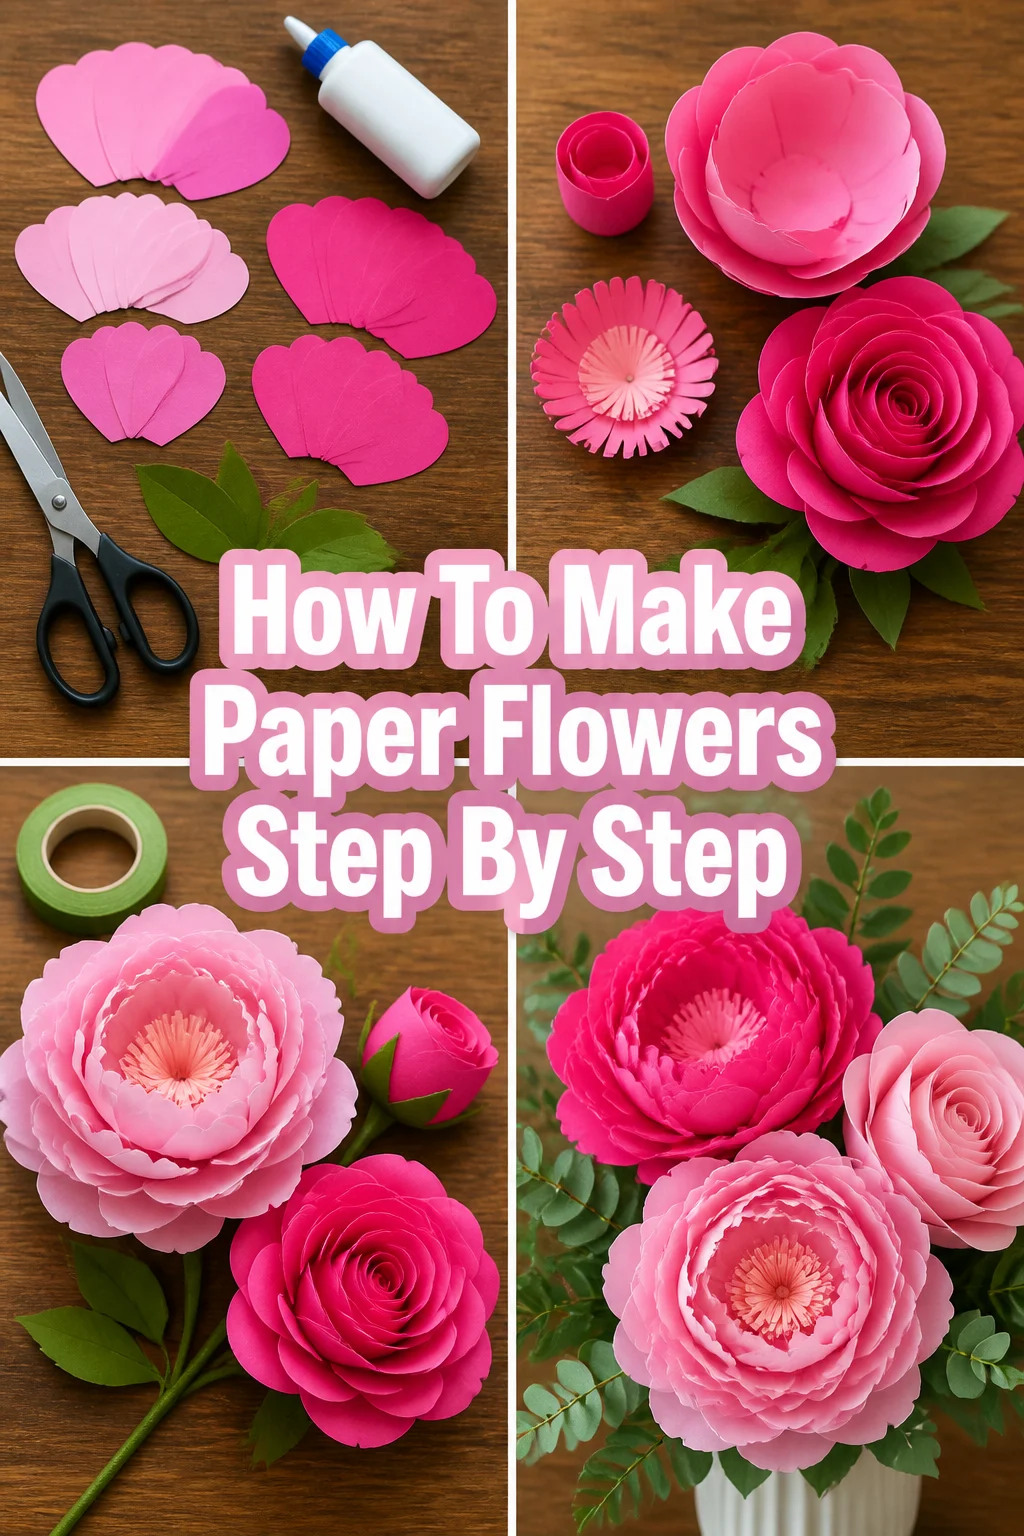
🌸 How To Make Paper Flowers Step By Step

Beginner-friendly templates, step-by-step guides,
and weekly project ideas in your inbox.
There’s a special joy in creating something beautiful with your own hands.
I still remember the first time I transformed flat paper into a vibrant bloom, a simple rose for my grandmother.
This guide shares that accessible magic, helping you craft stunning paper flowers with confidence.

Quick Overview
This guide will walk you through creating a charming, layered paper flower, perfect for gifts, decor, or personal projects.
You’ll learn the techniques to cut, shape, and assemble paper into a realistic-looking blossom.
- Time needed: 1-2 hours (depending on complexity and number of flowers)
- Difficulty: Beginner
- What you’ll need: Cardstock, scissors, glue, pencil, ruler, optional shaping tools
Step-by-Step Instructions
Step 1: Gather Your Materials
Before you begin, ensure you have all your tools and supplies ready and organized.
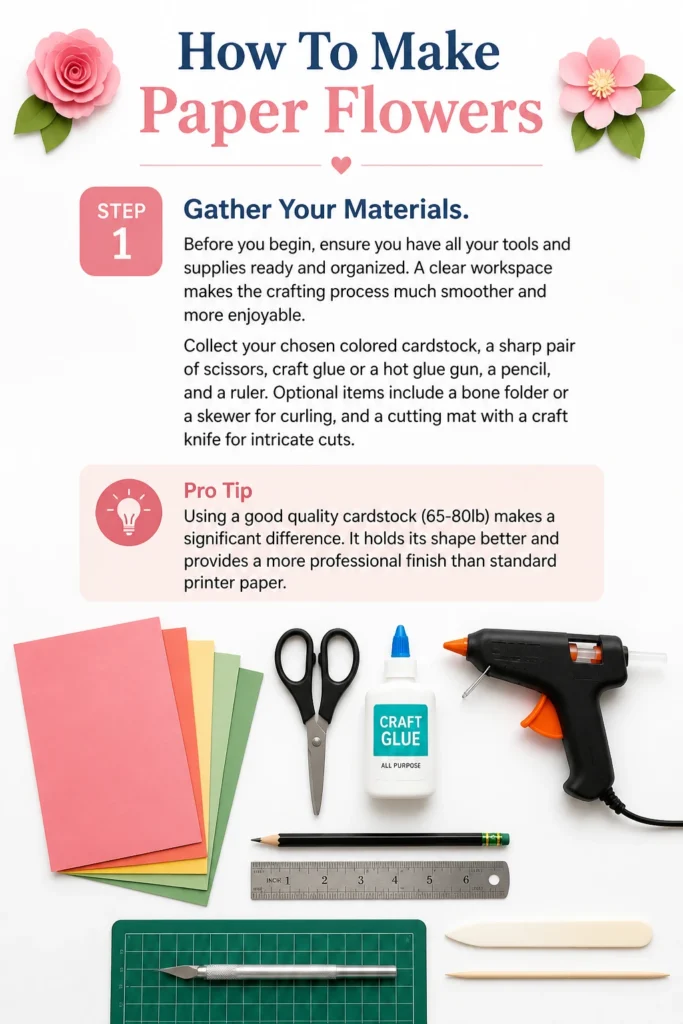
A clear workspace makes the crafting process much smoother and more enjoyable.
Collect your chosen colored cardstock, a sharp pair of scissors, craft glue or a hot glue gun, a pencil, and a ruler.
Optional items include a bone folder or a skewer for curling, and a cutting mat with a craft knife for intricate cuts.
Pro Tip: Using a good quality cardstock (65-80lb) makes a significant difference. It holds its shape better and provides a more professional finish than standard printer paper.
Step 2: Design Your Petal Templates
For a basic layered flower, you’ll need petals in at least three different sizes.
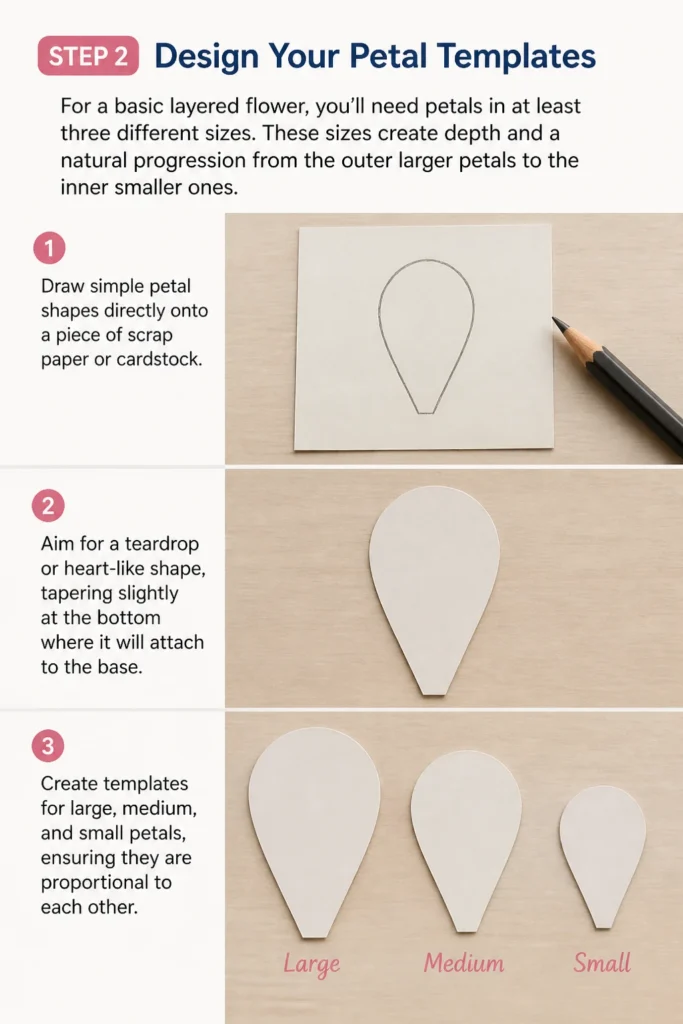
These sizes create depth and a natural progression from the outer larger petals to the inner smaller ones.
Draw simple petal shapes directly onto a piece of scrap paper or cardstock.
Aim for a teardrop or heart-like shape, tapering slightly at the bottom where it will attach to the base.
Create templates for large, medium, and small petals, ensuring they are proportional to each other.
Step 3: Cut Out Your Petals
Now it’s time to bring your petal designs to life by cutting them from your chosen paper.
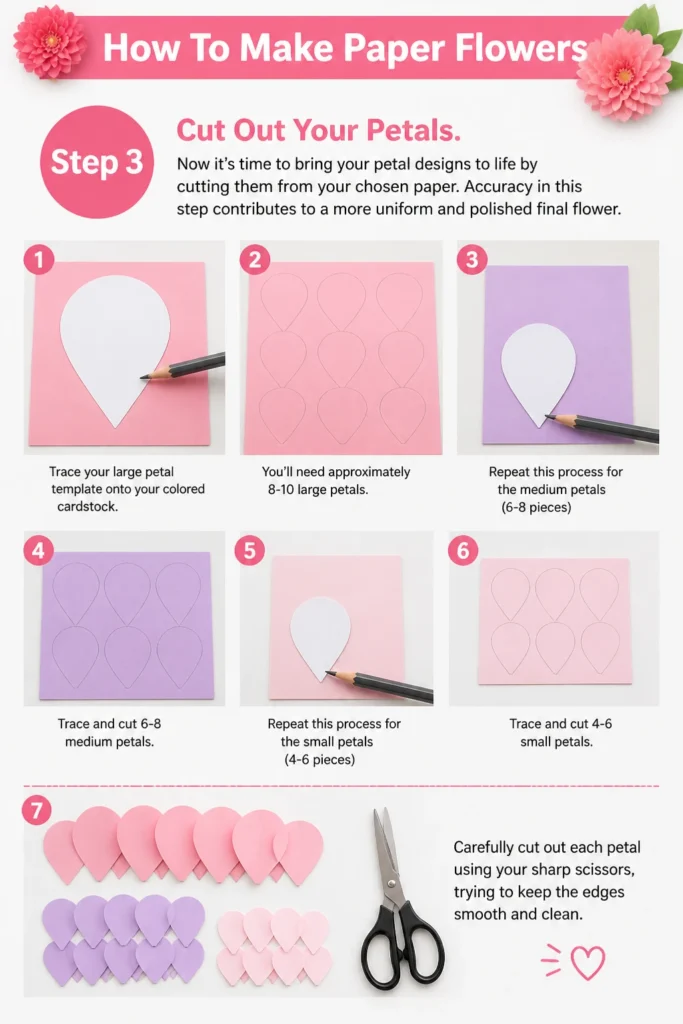
Accuracy in this step contributes to a more uniform and polished final flower.
Trace your large petal template onto your colored cardstock. You’ll need approximately 8-10 large petals.
Repeat this process for the medium petals (6-8 pieces) and the small petals (4-6 pieces).
Carefully cut out each petal using your sharp scissors, trying to keep the edges smooth and clean.
Step 4: Shape the Petals for Dimension
Flat petals won’t create a realistic flower; shaping them adds crucial dimension and softness.
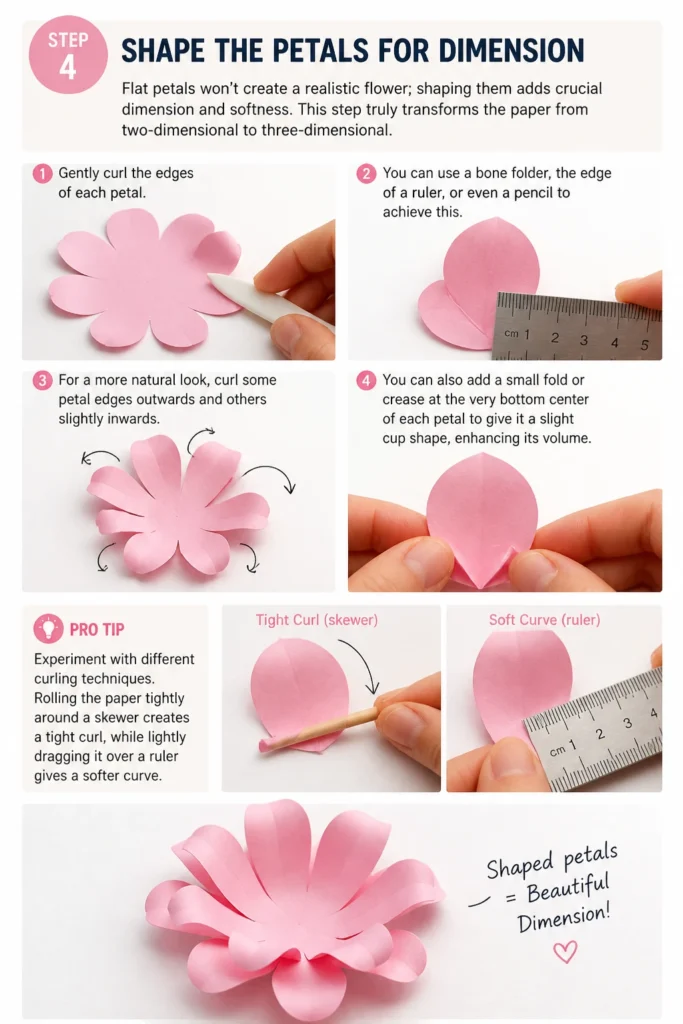
This step truly transforms the paper from two-dimensional to three-dimensional.
Gently curl the edges of each petal. You can use a bone folder, the edge of a ruler, or even a pencil to achieve this.
For a more natural look, curl some petal edges outwards and others slightly inwards.
You can also add a small fold or crease at the very bottom center of each petal to give it a slight cup shape, enhancing its volume.
Pro Tip: Experiment with different curling techniques. Rolling the paper tightly around a skewer creates a tight curl, while lightly dragging it over a ruler gives a softer curve.
Step 5: Create the Flower Base
A sturdy base provides the foundation for your petals and helps maintain the flower’s structure.
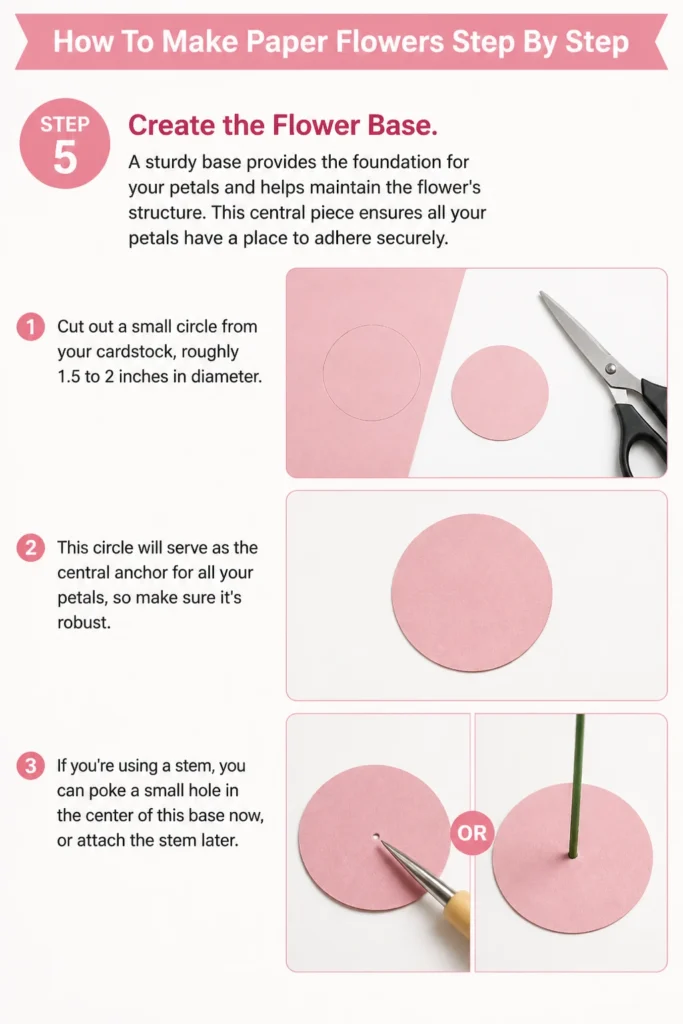
This central piece ensures all your petals have a place to adhere securely.
Cut out a small circle from your cardstock, roughly 1.5 to 2 inches in diameter.
This circle will serve as the central anchor for all your petals, so make sure it’s robust.
If you’re using a stem, you can poke a small hole in the center of this base now, or attach the stem later.
Step 6: Assemble the Outer Petal Layer
Begin building your flower from the outside in, starting with the largest petals.
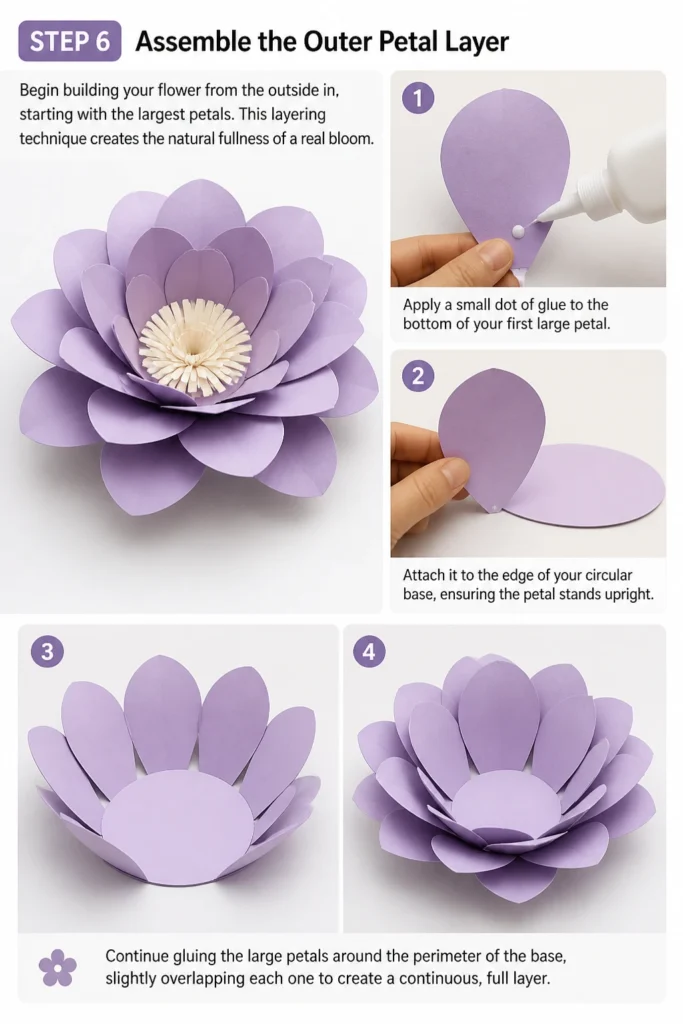
This layering technique creates the natural fullness of a real bloom.
Apply a small dot of glue to the bottom of your first large petal.
Attach it to the edge of your circular base, ensuring the petal stands upright.
Continue gluing the large petals around the perimeter of the base, slightly overlapping each one to create a continuous, full layer.
Step 7: Add the Medium Petal Layer
Once the first layer is complete, move on to the medium-sized petals.
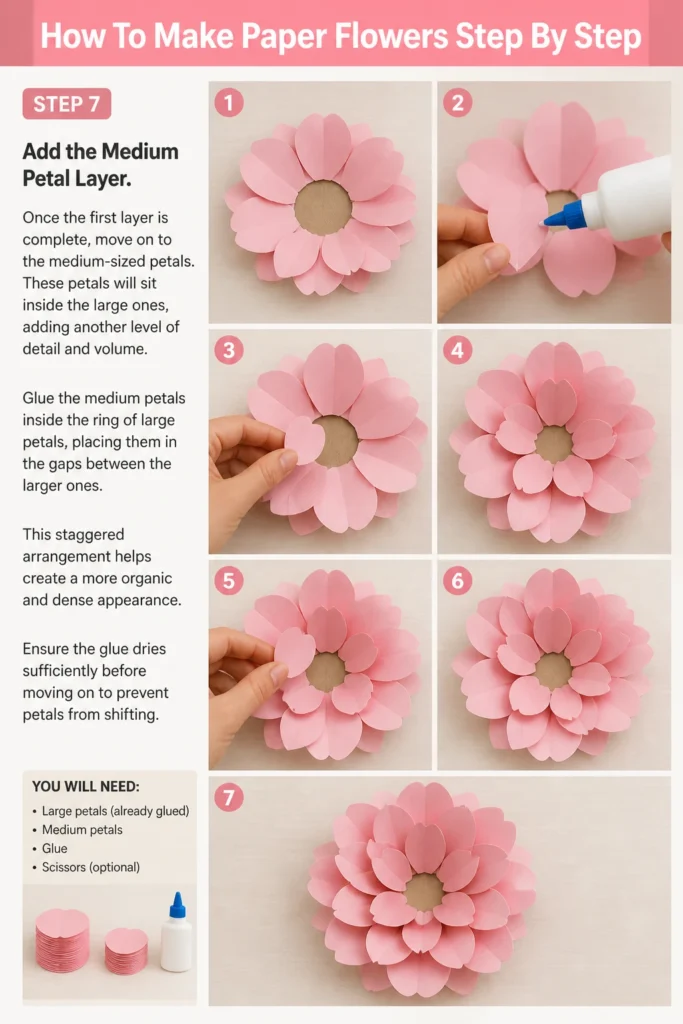
These petals will sit inside the large ones, adding another level of detail and volume.
Glue the medium petals inside the ring of large petals, placing them in the gaps between the larger ones.
This staggered arrangement helps create a more organic and dense appearance.
Ensure the glue dries sufficiently before moving on to prevent petals from shifting.
Step 8: Form the Inner Petals and Center
The smallest petals form the tightly closed center of the flower, often the most delicate part.
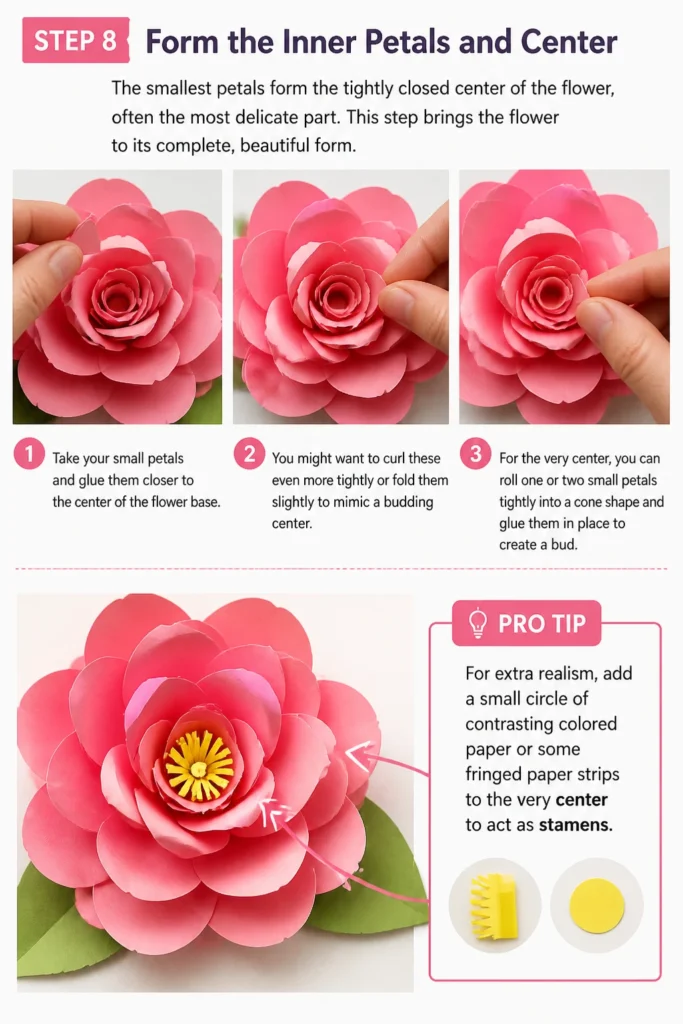
This step brings the flower to its complete, beautiful form.
Take your small petals and glue them closer to the center of the flower base.
You might want to curl these even more tightly or fold them slightly to mimic a budding center.
For the very center, you can roll one or two small petals tightly into a cone shape and glue them in place to create a bud.
Pro Tip: For extra realism, add a small circle of contrasting colored paper or some fringed paper strips to the very center to act as stamens.
Step 9: Final Touches and Drying
With all the petals in place, take a moment to refine your creation.
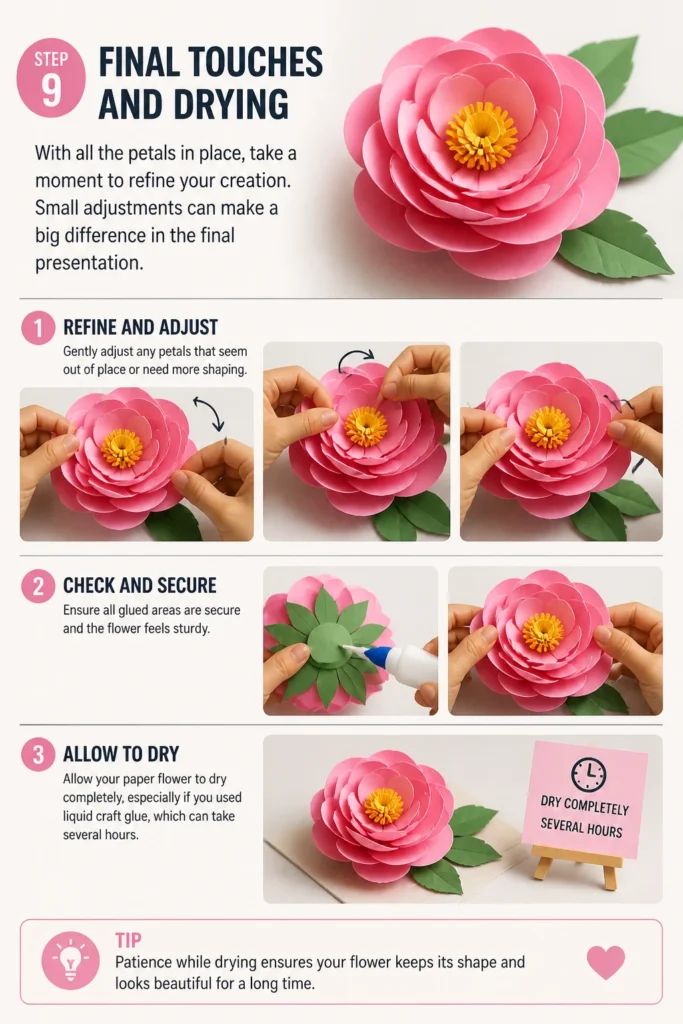
Small adjustments can make a big difference in the final presentation.
Gently adjust any petals that seem out of place or need more shaping.
Ensure all glued areas are secure and the flower feels sturdy.
Allow your paper flower to dry completely, especially if you used liquid craft glue, which can take several hours.
Common Mistakes to Avoid
Using Dull Scissors
Working with dull scissors can lead to frayed, uneven edges on your petals.
These rough cuts detract from the overall clean and professional look of your paper flower.
Always use sharp scissors specifically designated for paper crafts to ensure crisp, smooth cuts every time.
Applying Too Much Glue
Excessive glue can seep out from under the petals, creating visible, shiny spots or causing the paper to warp.
It can also make the flower stiff and difficult to adjust, and significantly increase drying time.
Use small, controlled dots or thin lines of glue, just enough to secure the petals firmly without overflow.
Skipping the Petal Shaping Step
Leaving petals flat is a common mistake that results in a two-dimensional, artificial-looking flower.
The lack of dimension makes the flower appear less realistic and less dynamic.
Always take the time to gently curl, crease, or shape your petals; this step is crucial for adding natural volume and movement.
Inconsistent Petal Sizes
If your petals within the same layer are not roughly the same size, your flower can look lopsided or uneven.
This inconsistency can make the finished bloom appear less cohesive and less aesthetically pleasing.
Use templates for consistent sizing, or if freehand cutting, try to keep an eye on uniformity within each size group.
Troubleshooting
Petals Won’t Hold Their Curl
Sometimes, paper can be stubborn and resist holding its shaped form, especially thinner varieties.
This often happens if the paper is too light or if the curling technique isn’t firm enough.
Try using a slightly heavier cardstock. Also, apply more pressure when dragging the petal over your shaping tool, or try rolling it more tightly around a skewer for a longer duration.
Flower Looks Flat or Sparse
If your finished flower lacks fullness, it might be due to too few petals or insufficient layering.
A sparse look usually means there aren’t enough elements to create a dense, natural appearance.
Add more petals to each layer, ensuring they overlap generously. You can also add an extra layer of medium or small petals to increase density.
Petals Keep Falling Off
This issue typically points to insufficient glue or not allowing enough drying time before handling.
Weak adhesion can cause your carefully placed petals to detach, ruining the flower’s structure.
Ensure you’re using enough glue to create a strong bond, but not too much. Press firmly for a few seconds after applying each petal, and allow the flower to dry undisturbed for several hours.
Key Takeaways
- Always use sharp scissors for clean cuts and a professional finish.
- Petal shaping is essential for creating realistic, three-dimensional flowers.
- Layer petals from largest to smallest, overlapping them for fullness.
- Use small amounts of glue to avoid warping and messy results.
- Allow ample drying time for the glue to set completely.
- Experiment with different paper weights and shaping techniques to find what works best.
Frequently Asked Questions
What kind of paper is best for making paper flowers?
Cardstock is generally the best choice, specifically in the 65-80lb range. It’s sturdy enough to hold its shape after curling and shaping, but still pliable enough to work with easily. Lighter paper like printer paper tends to be too flimsy, while heavier cardstock can be difficult to cut and curl.
Can I use a cutting machine like a Cricut or Silhouette?
Absolutely! Electronic cutting machines are fantastic for paper flowers. They allow for precise, intricate cuts and can quickly produce many petals from your digital designs. Many free and paid templates are available online that are compatible with these machines, saving you a lot of time on cutting.
How can I make my paper flowers last longer?
Paper flowers are quite durable as long as they are kept away from moisture and direct sunlight. To protect them further, you can lightly spray them with a clear acrylic sealant (matte or gloss, depending on your preference). This adds a protective layer against dust and fading, but test it on a scrap piece of paper first to ensure it doesn’t change the paper’s color.
How do I attach a stem to my paper flower?
For a basic stem, you can use floral wire. Create a small loop at one end of the wire, then thread it through a small hole in the center of your flower base. Secure the loop with glue to the underside of the base before adding your petals. Alternatively, hot glue the straight end of the floral wire directly to the back of the finished flower, reinforcing it with a small circle of cardstock glued over the joint.
Our Top Recommended Finds
- Craft Cardstock Pack: A multi-color pack provides a variety of options for different flower types and projects.
- Precision Craft Scissors: Sharp, comfortable scissors are a game-changer for clean, effortless cutting.
- Craft Glue with Fine Tip: A good quality craft glue that dries clear and has a fine applicator tip allows for precise application.
Unleash Your Inner Florist
You now have the steps and insights to create beautiful paper flowers.
This craft is not just about the end product; it’s about the peaceful, creative process.
Consider making a bouquet, decorating a gift, or simply adding a touch of handmade beauty to your home.
Pick up some paper and start crafting your first bloom today!
Beginner-friendly templates, step-by-step guides,
and weekly project ideas in your inbox.