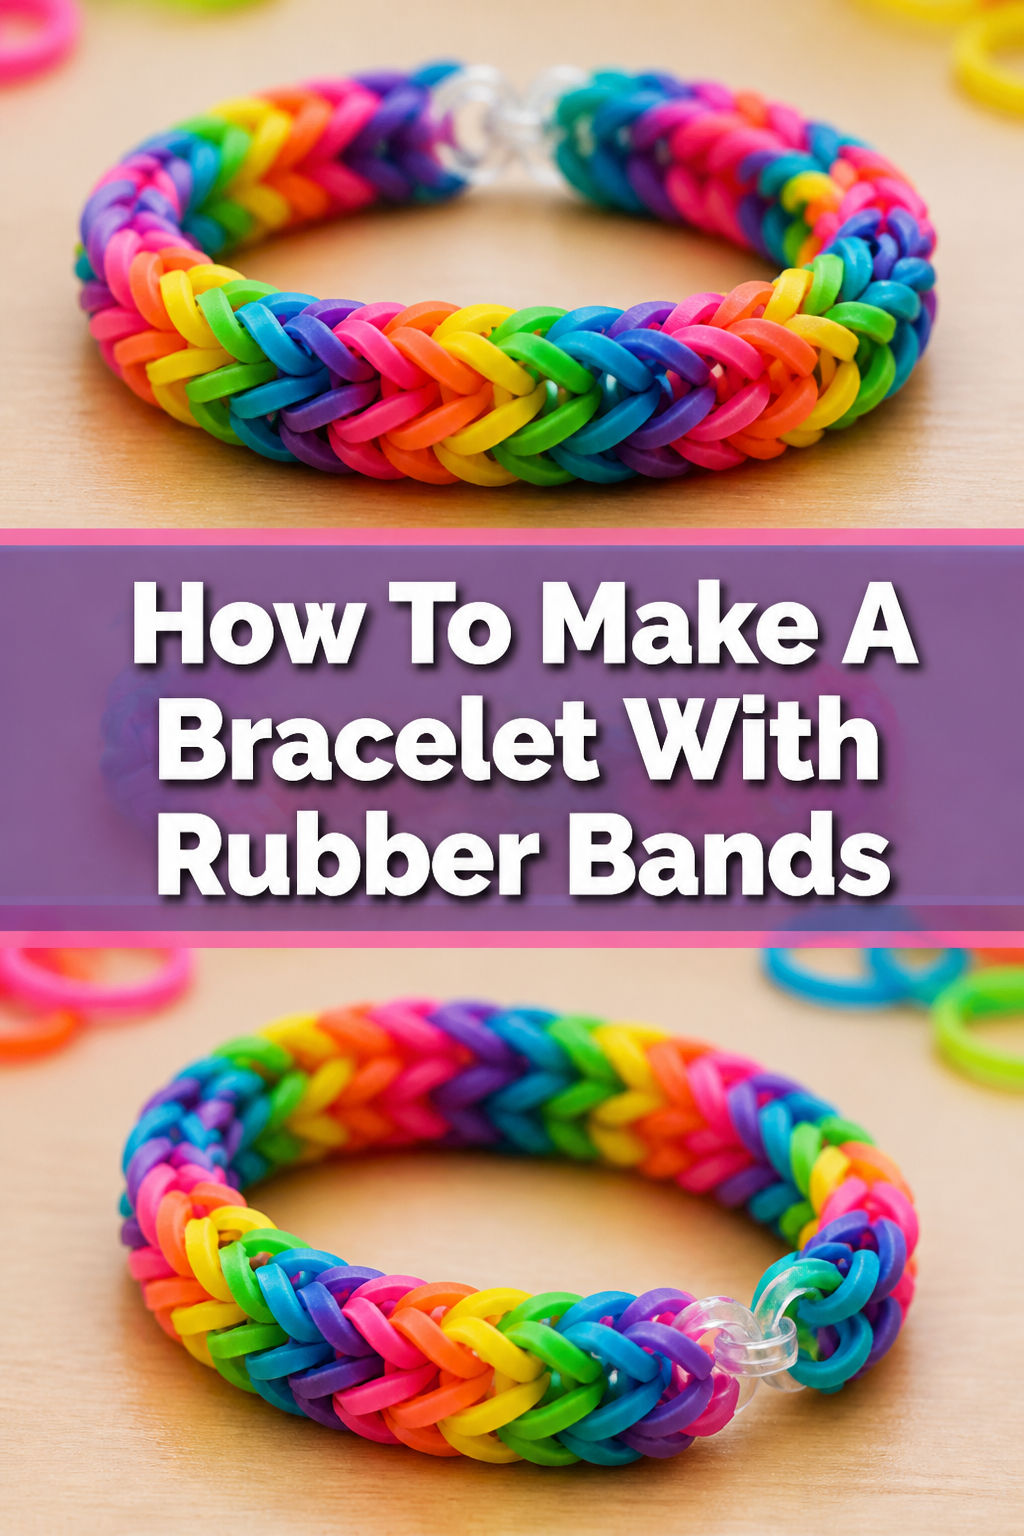
🌈 How To Make A Bracelet With Rubber Bands

Beginner-friendly templates, step-by-step guides,
and weekly project ideas in your inbox.
Remember the joy of creating something with your own hands? Making rubber band bracelets brings back that simple, creative fun. I’ve spent countless hours crafting these colorful accessories, and I’m excited to share all my tips and tricks with you. This guide will walk you through every step, ensuring your first (or fiftieth) bracelet is a dazzling success.
Quick Overview
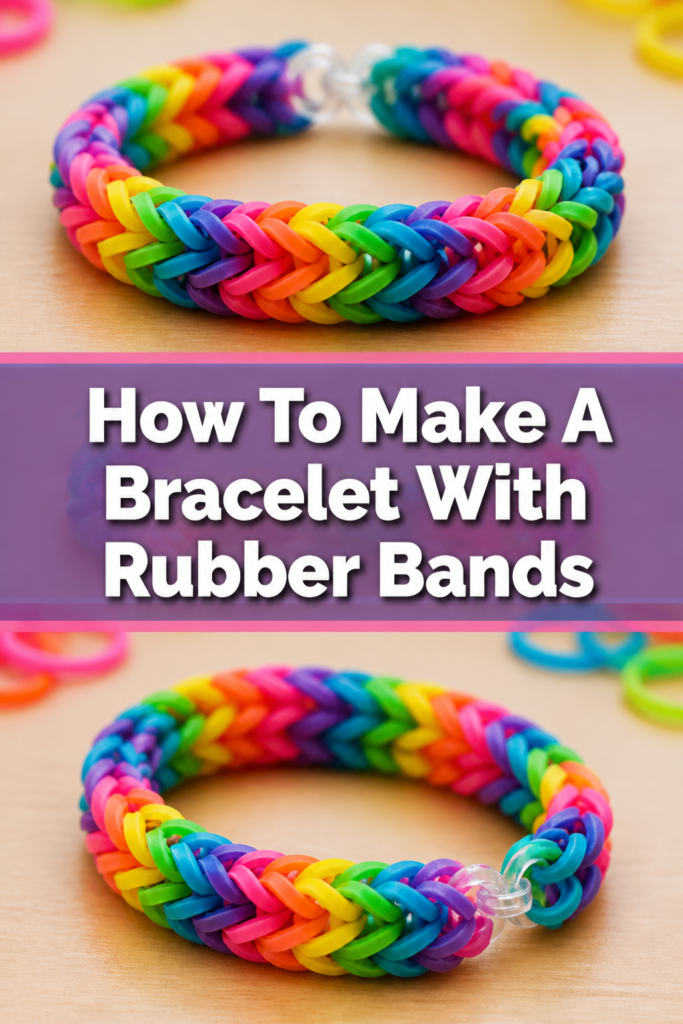
This guide will empower you to create a vibrant and durable rubber band bracelet, specifically focusing on the popular Fishtail design. You’ll learn the core techniques that can be adapted for many other styles. Get ready to unleash your creativity!
- Time needed: 15-30 minutes
- Difficulty: Beginner
- What you’ll need: Rubber bands, a hook tool (optional), and a C-clip or S-clip
Step-by-Step Instructions
Step 1: Gather Your Essential Supplies
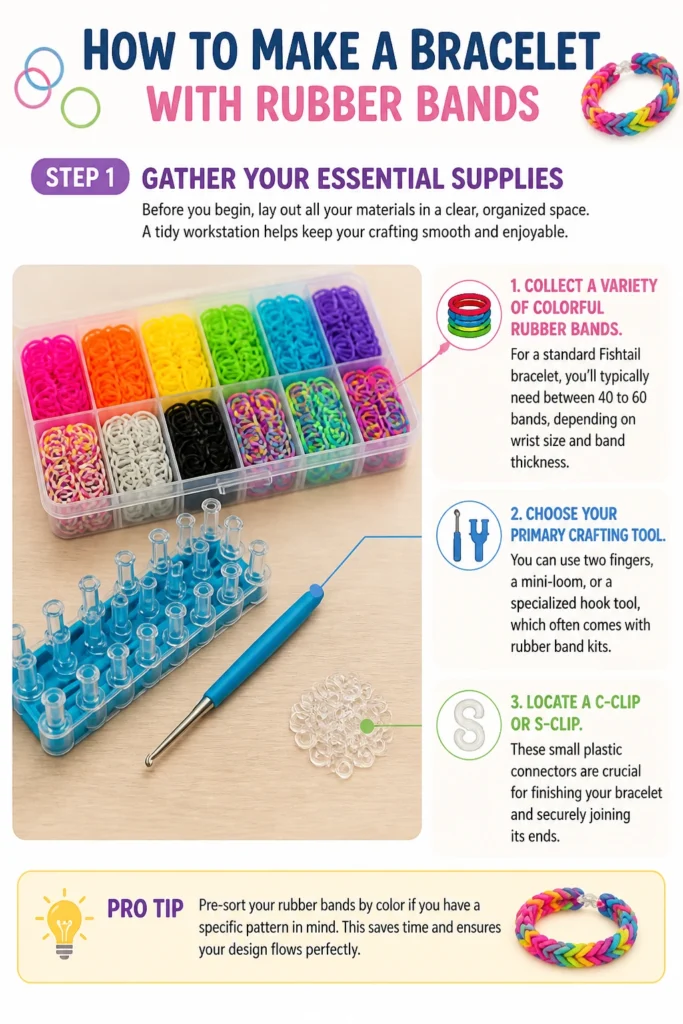
Before you begin, lay out all your materials in a clear, organized space. A tidy workstation helps keep your crafting smooth and enjoyable.
Collect a variety of colorful rubber bands. For a standard Fishtail bracelet, you’ll typically need between 40 to 60 bands, depending on wrist size and band thickness.
Choose your primary crafting tool. You can use two fingers, a mini-loom, or a specialized hook tool, which often comes with rubber band kits.
Locate a C-clip or S-clip. These small plastic connectors are crucial for finishing your bracelet and securely joining its ends.
Pro Tip: Pre-sort your rubber bands by color if you have a specific pattern in mind. This saves time and ensures your design flows perfectly.
Step 2: Start Your First Loop (The Infinity Twist)
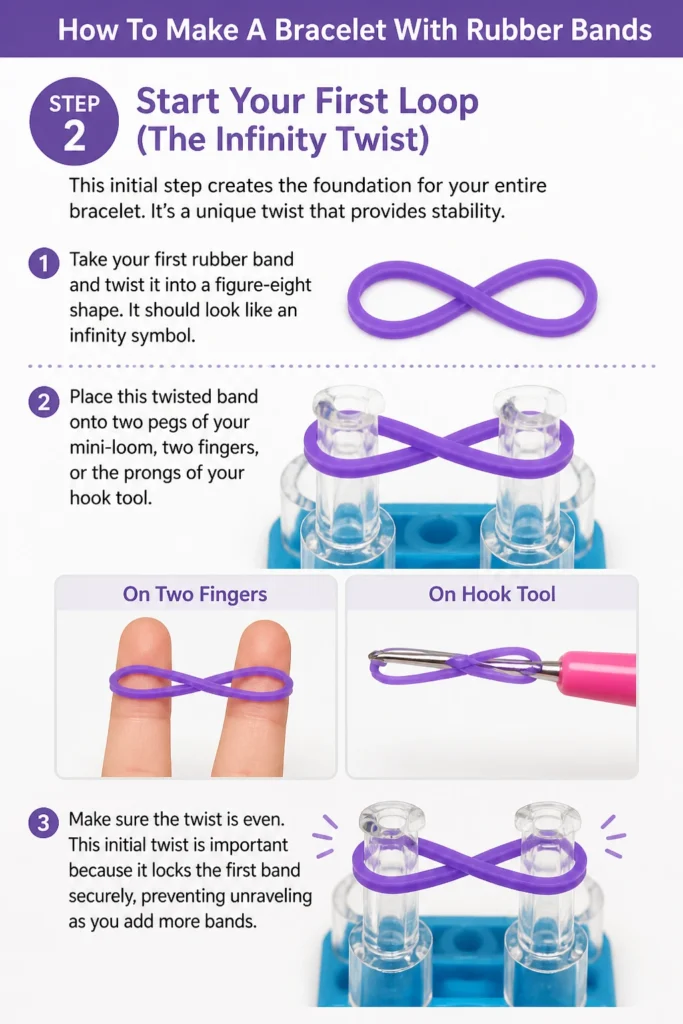
This initial step creates the foundation for your entire bracelet. It’s a unique twist that provides stability.
Take your first rubber band and twist it into a figure-eight shape. It should look like an infinity symbol.
Place this twisted band onto two pegs of your mini-loom, two fingers, or the prongs of your hook tool. Make sure the twist is even.
This initial twist is important because it locks the first band securely, preventing unraveling as you add more bands.
Step 3: Add Your Next Two Bands
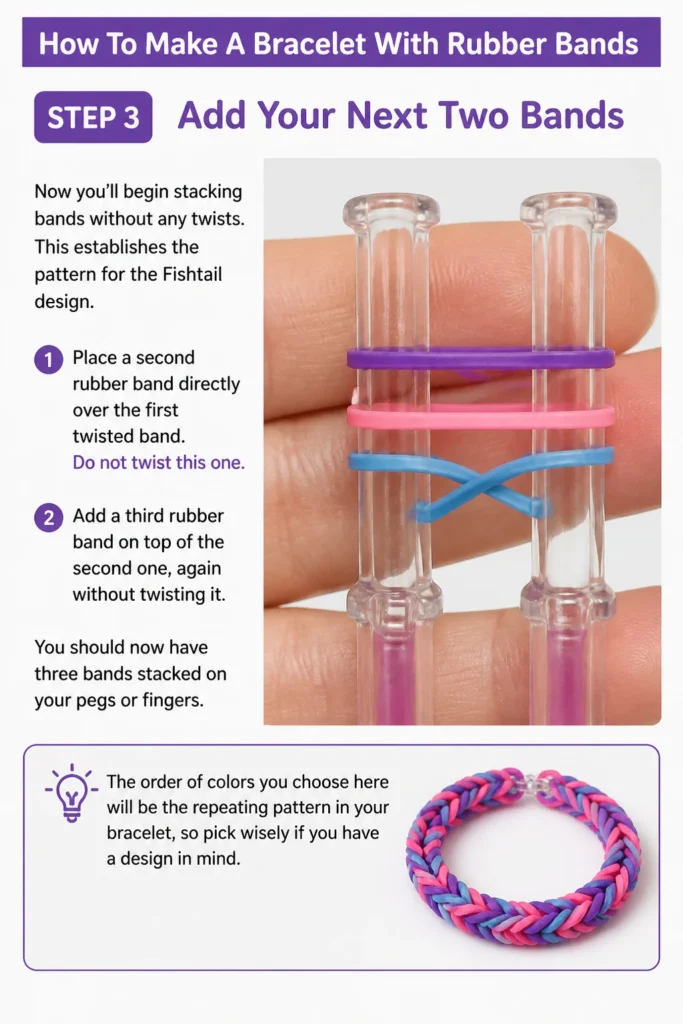
Now you’ll begin stacking bands without any twists. This establishes the pattern for the Fishtail design.
Place a second rubber band directly over the first twisted band. Do not twist this one.
Add a third rubber band on top of the second one, again without twisting it. You should now have three bands stacked on your pegs or fingers.
The order of colors you choose here will be the repeating pattern in your bracelet, so pick wisely if you have a design in mind.
Step 4: Hook and Loop the Bottom Band
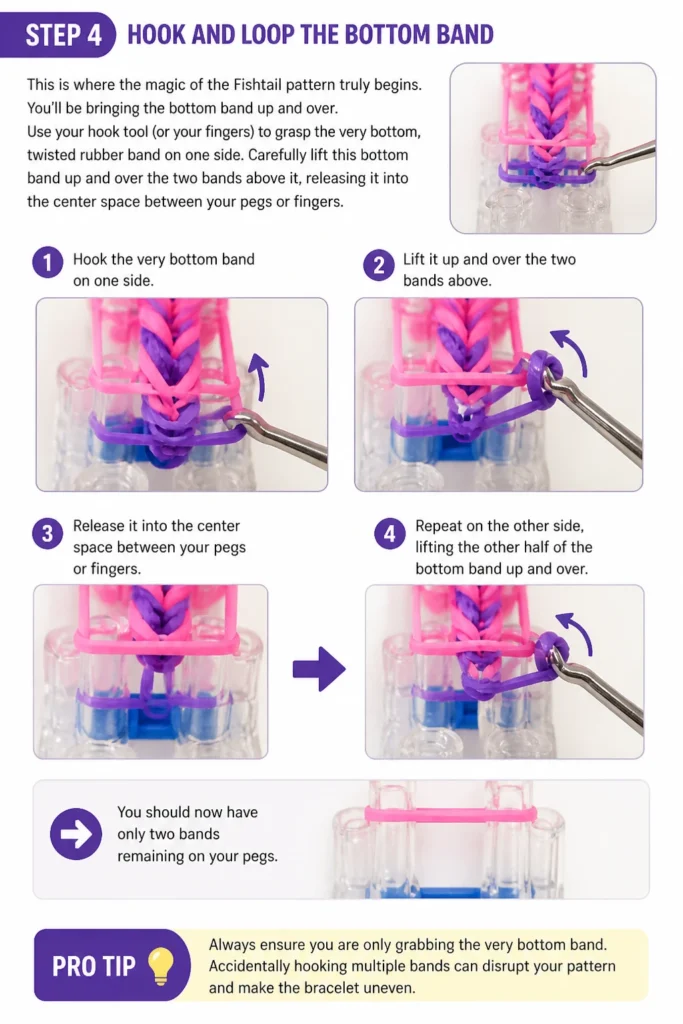
This is where the magic of the Fishtail pattern truly begins. You’ll be bringing the bottom band up and over.
Use your hook tool (or your fingers) to grasp the very bottom, twisted rubber band on one side.
Carefully lift this bottom band up and over the two bands above it, releasing it into the center space between your pegs or fingers.
Repeat this action on the other side, lifting the other half of the bottom twisted band up and over. You should now have only two bands remaining on your pegs.
Pro Tip: Always ensure you are only grabbing the very bottom band. Accidentally hooking multiple bands can disrupt your pattern and make the bracelet uneven.
Step 5: Continue Adding and Looping
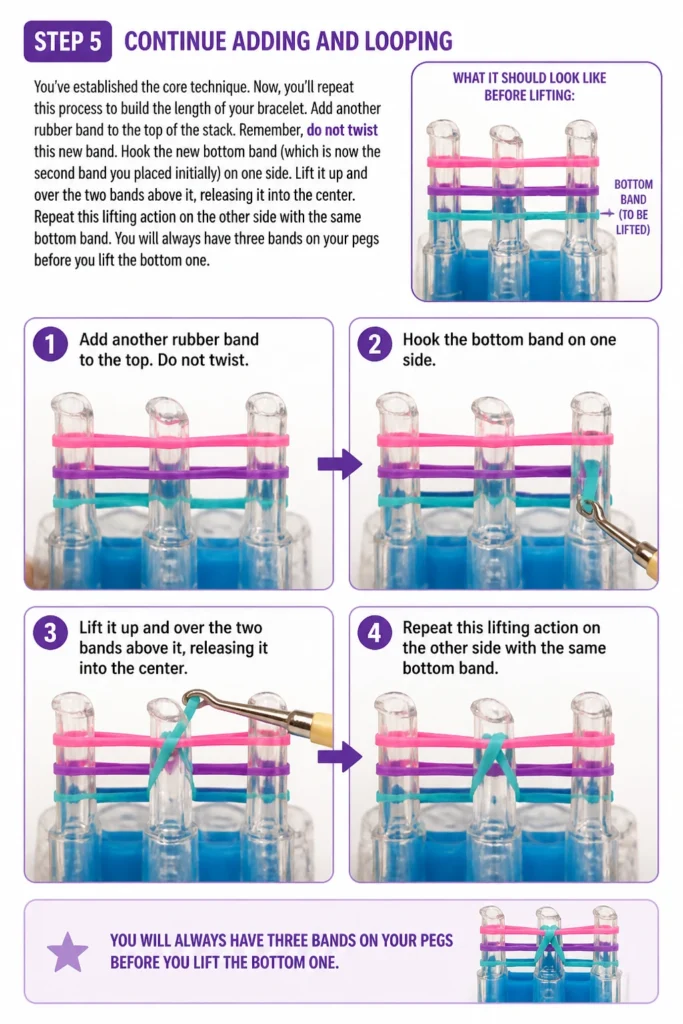
You’ve established the core technique. Now, you’ll repeat this process to build the length of your bracelet.
Add another rubber band to the top of the stack. Remember, do not twist this new band.
Hook the new bottom band (which is now the second band you placed initially) on one side.
Lift it up and over the two bands above it, releasing it into the center.
Repeat this lifting action on the other side with the same bottom band. You will always have three bands on your pegs before you lift the bottom one.
Step 6: Maintain Your Pattern and Length
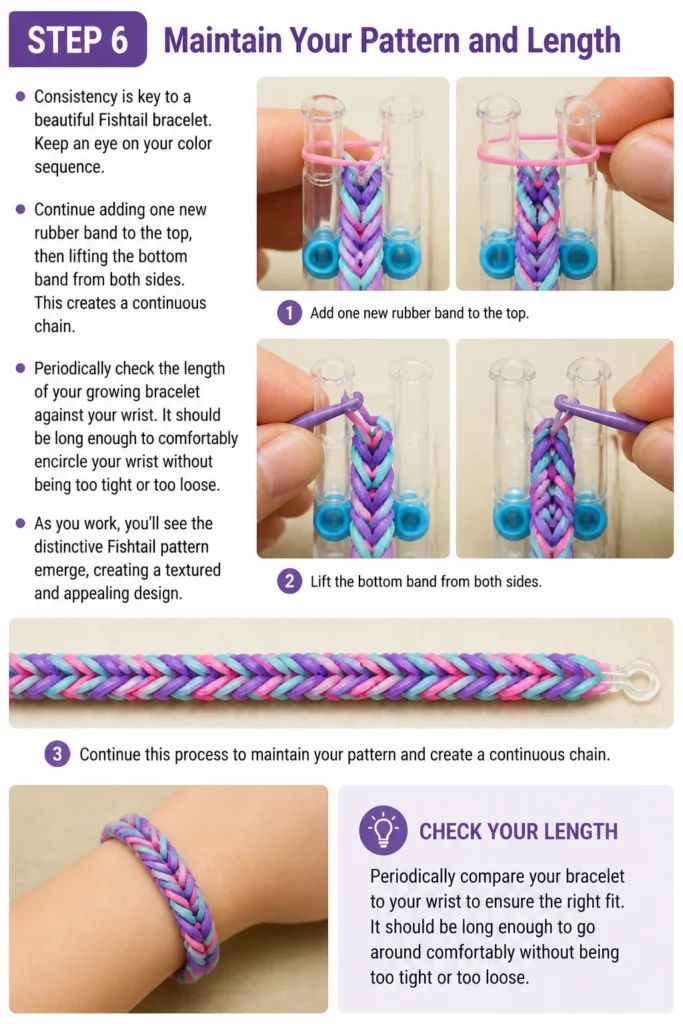
Consistency is key to a beautiful Fishtail bracelet. Keep an eye on your color sequence.
Continue adding one new rubber band to the top, then lifting the bottom band from both sides. This creates a continuous chain.
Periodically check the length of your growing bracelet against your wrist. It should be long enough to comfortably encircle your wrist without being too tight or too loose.
As you work, you’ll see the distinctive Fishtail pattern emerge, creating a textured and appealing design.
Step 7: Finish Your Bracelet with a Clip
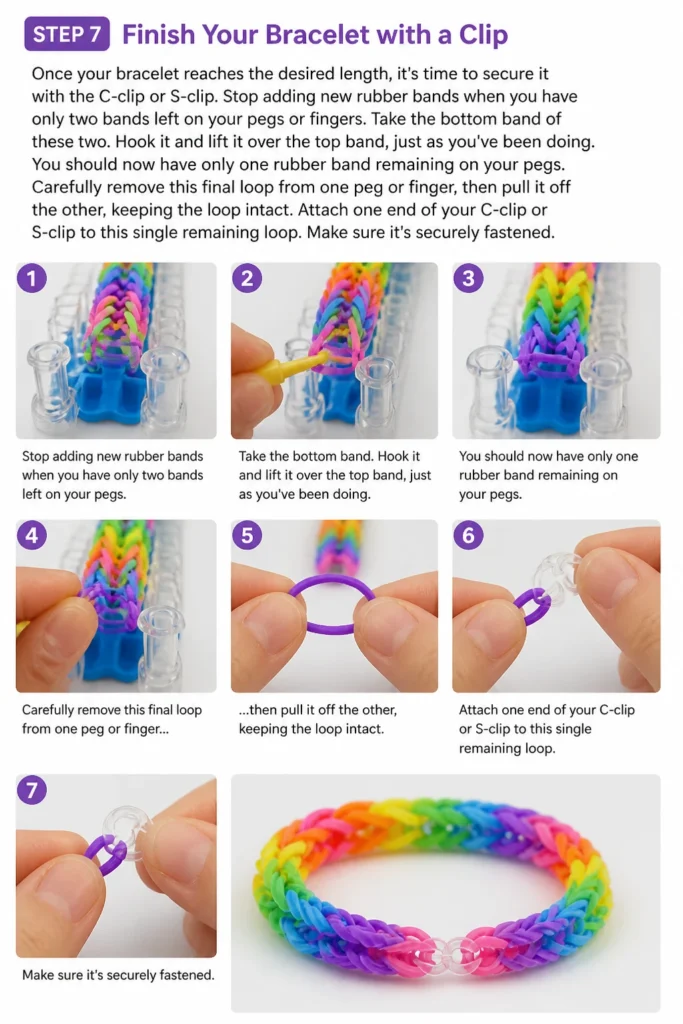
Once your bracelet reaches the desired length, it’s time to secure it with the C-clip or S-clip.
Stop adding new rubber bands when you have only two bands left on your pegs or fingers.
Take the bottom band of these two. Hook it and lift it over the top band, just as you’ve been doing. You should now have only one rubber band remaining on your pegs.
Carefully remove this final loop from one peg or finger, then pull it off the other, keeping the loop intact.
Attach one end of your C-clip or S-clip to this single remaining loop. Make sure it’s securely fastened.
Step 8: Connect the Ends
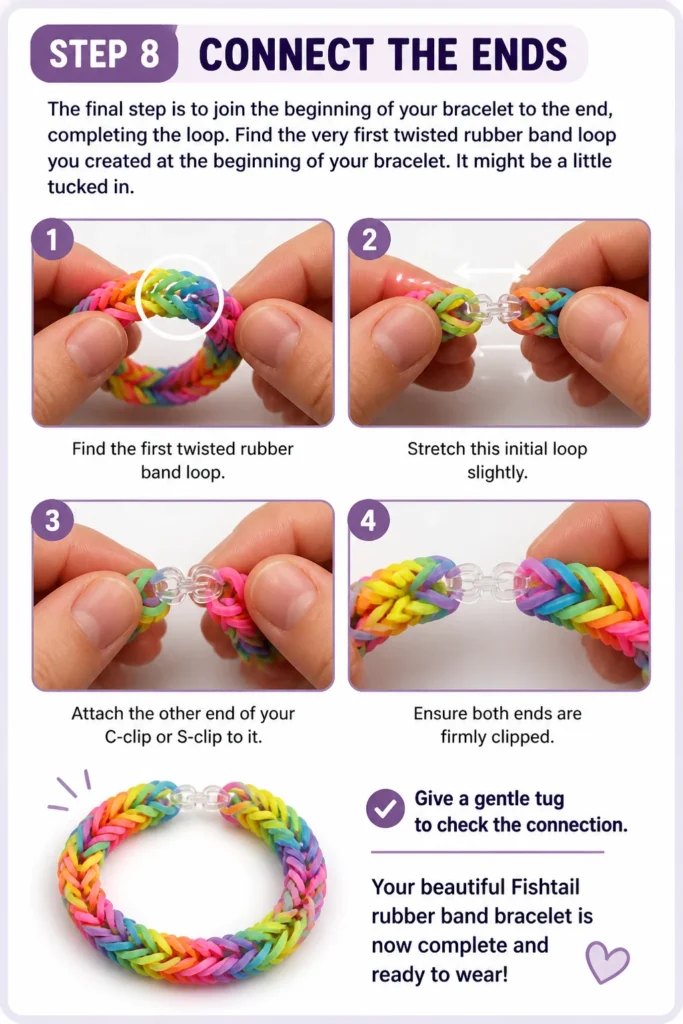
The final step is to join the beginning of your bracelet to the end, completing the loop.
Find the very first twisted rubber band loop you created at the beginning of your bracelet. It might be a little tucked in.
Stretch this initial loop slightly and attach the other end of your C-clip or S-clip to it.
Ensure both ends are firmly clipped. Give a gentle tug to check the connection. Your beautiful Fishtail rubber band bracelet is now complete and ready to wear!
Common Mistakes to Avoid
Twisting Every Band
A common beginner error is twisting every single rubber band before placing it. The Fishtail design specifically requires only the very first band to be twisted into a figure-eight. Twisting subsequent bands will result in a different, often lumpy, pattern or make the bracelet unstable. Always remember to only twist the initial anchor band.
Grabbing Multiple Bands
When you’re hooking the bottom band and lifting it over, it’s easy to accidentally catch the band above it as well. This will disrupt your pattern, make the bracelet look uneven, and can sometimes cause it to unravel. Always double-check that you are only lifting the single, bottom-most rubber band from each side. Take your time and use your hook tool carefully.
Not Pulling Bands Tightly Enough
If your bracelet looks loose or has gaps, you might not be pulling the loops tightly enough as you lift them over. While you don’t want to stretch the bands to their breaking point, a gentle tension helps the Fishtail pattern interlock neatly. Each time you lift a band, give a slight tug on the working bands to ensure they sit snugly.
Making it Too Short or Too Long
It’s easy to misjudge the length. A bracelet that’s too short will be uncomfortable and might snap, while one that’s too long will fall off. Periodically wrap the unfinished bracelet around your wrist to check the fit. Remember to account for the C-clip, which adds a tiny bit of length. Stop when it’s just a little bit shorter than your desired final length, as the clip will bridge the gap.
Troubleshooting
My Bracelet is Uneven or Looks Lumpy
This usually happens when you accidentally hook more than one band at a time, or if you’re not consistently lifting the bottom band. To fix this, carefully unhook the last few bands you added until you reach the point where it started looking uneven. Then, re-do those steps, ensuring you only lift one band at a time. Pay close attention to the order of your bands.
The Bands Keep Snapping
Rubber bands can snap for a few reasons. They might be old or low quality, or you might be stretching them too much. Try using fresh, good-quality bands. Also, try to avoid overstretching them when placing them on your fingers or pegs, and be gentle when lifting. If a band snaps mid-process, you’ll need to carefully remove the broken band and replace it, then re-secure the loops it was holding.
I Can’t Find the Starting Loop for the Clip
The very first twisted loop can sometimes get hidden among the other bands, especially if you’ve made a long bracelet. Gently stretch and examine the beginning of your bracelet. The initial twisted band will likely be thicker or slightly more compressed than the other loops. You can also try to unfold the starting few “fishtail” sections until you expose the original twisted band.
Key Takeaways
- The initial figure-eight twist is crucial for anchoring your bracelet.
- Always add a new band to the top, then lift the bottom band from both sides.
- Consistency in technique prevents lumps and ensures an even pattern.
- Regularly check the bracelet’s length against your wrist for a perfect fit.
- The C-clip or S-clip securely fastens the ends, completing your creation.
- Practice makes perfect; don’t be discouraged by initial imperfections.
Frequently Asked Questions
Can I make this bracelet without a hook tool or loom?
Absolutely! The Fishtail bracelet can be made using just your two fingers. Simply place the bands on your index and middle fingers, using your other hand to lift and loop. It might be a little trickier at first, but it’s completely doable and a great way to start if you don’t have tools.
What kind of rubber bands should I use?
It’s best to use dedicated “loom bands” or “craft bands” designed for bracelet making. These are usually more durable and come in a wider range of colors than standard office rubber bands. Avoid very thin or old bands, as they are more prone to snapping during the process.
How do I make a bigger or smaller bracelet?
The size of your bracelet is determined by the number of bands you use. For a larger bracelet, simply continue the “add one, loop bottom two” process until it reaches the desired length. For a smaller bracelet (like for a child), stop sooner. Always measure against the wearer’s wrist periodically.
Can I add charms or beads to my rubber band bracelet?
Yes, you can! To add a charm, simply slide the charm onto a rubber band before you add that band to your bracelet. Then, continue the looping process as usual. For beads, you might need a small needle or thin wire to thread the rubber band through the bead hole before incorporating it into your design.
Our Top Recommended Finds
- Large Rubber Band Kit: A comprehensive kit offers a wide array of colors and often includes a loom, hook tools, and plenty of C-clips to get you started.
- Metal Hook Tool: While plastic hooks are common, a sturdy metal hook can be more comfortable to hold and less prone to bending or breaking during use.
- Organizer Box with Dividers: Keep your bands neat and sorted by color with a clear plastic organizer. This makes finding specific colors much easier and speeds up your crafting.
Craft Your Creativity into Wearable Art Today!
You’ve learned the fundamental steps to creating your very own rubber band bracelet. This simple craft is not only fun but also a fantastic way to express your personal style. Imagine all the color combinations and patterns you can create!
Don’t stop here; this Fishtail design is just the beginning. Once you’ve mastered it, explore other patterns like the single chain, triple single, or even more intricate designs. The world of rubber band crafting is vast and full of possibilities. So, grab some bands, pick your favorite colors, and start weaving your next masterpiece right now!
Beginner-friendly templates, step-by-step guides,
and weekly project ideas in your inbox.