
🎐 How To Make Wind Chimes Homemade Easy DIY

Beginner-friendly templates, step-by-step guides,
and weekly project ideas in your inbox.
Making your own wind chimes is a wonderfully rewarding project.
It brings a unique, melodic touch to your outdoor space, crafted by your own hands.
I’ve spent countless hours experimenting with different materials and designs, and I’m excited to share the simplest, most effective methods I’ve discovered.

Quick Overview
This guide will walk you through creating beautiful, resonant wind chimes from everyday materials.
You’ll learn how to select components, assemble them, and even personalize your creation for a truly unique sound and aesthetic.
- Time needed: 2-4 hours (depending on material collection and complexity)
- Difficulty: Beginner
- What you’ll need: A sturdy top piece, chime elements, string, scissors, and basic tools.
Step-by-Step Instructions
Step 1: Gather Your Materials
Start by collecting a variety of items that can produce pleasant sounds. Look around your home or local craft store for inspiration.
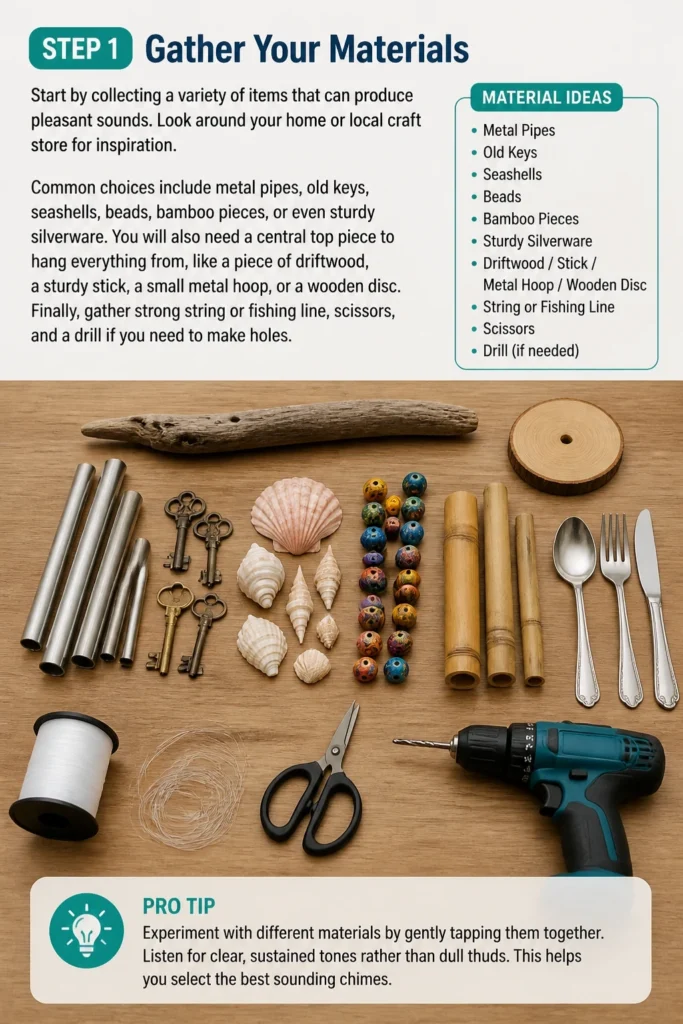
Common choices include metal pipes, old keys, seashells, beads, bamboo pieces, or even sturdy silverware.
You will also need a central top piece to hang everything from, like a piece of driftwood, a sturdy stick, a small metal hoop, or a wooden disc.
Finally, gather strong string or fishing line, scissors, and a drill if you need to make holes.
Pro Tip: Experiment with different materials by gently tapping them together. Listen for clear, sustained tones rather than dull thuds. This helps you select the best sounding chimes.
Step 2: Prepare Your Chime Elements
Each chime element needs a way to be attached. If you’re using metal pipes or bamboo, you’ll need to drill a small hole near one end of each piece.
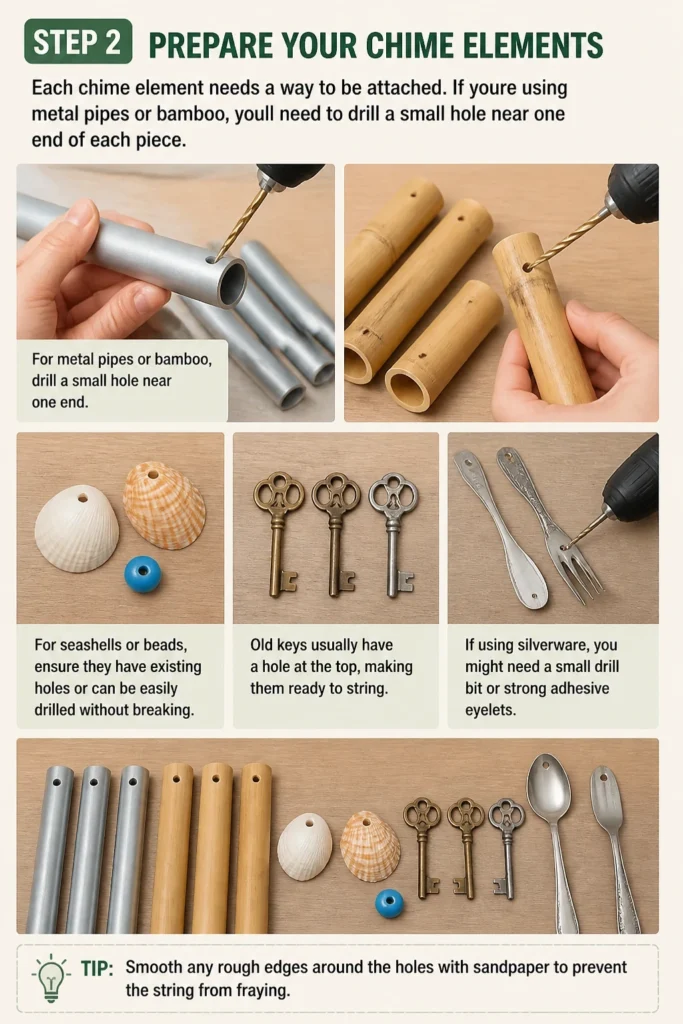
For seashells or beads, ensure they have existing holes or can be easily drilled without breaking.
Old keys usually have a hole at the top, making them ready to string. If using silverware, you might need a small drill bit or strong adhesive eyelets.
Step 3: Prepare Your Top Piece
Your top piece will be the anchor for all your chimes. If using driftwood or a stick, decide which side will face up.
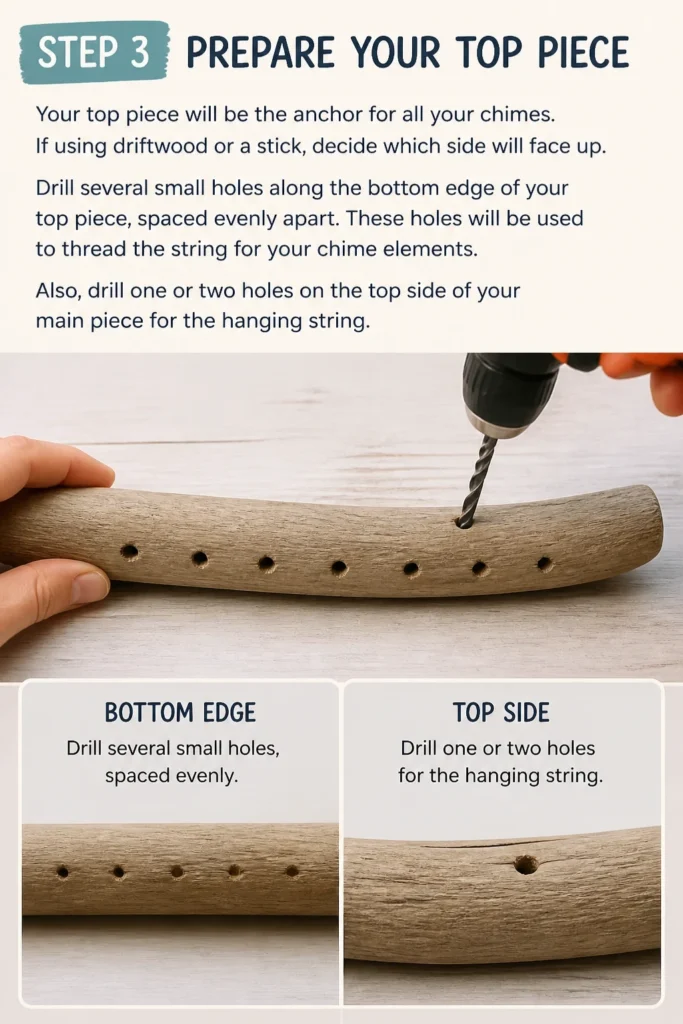
Drill several small holes along the bottom edge of your top piece, spaced evenly apart.
These holes will be used to thread the string for your chime elements.
Also, drill one or two holes on the top side of your main piece for the hanging string.
Step 4: Cut and Thread Your Strings
Measure and cut several lengths of string or fishing line. Each length should be generous enough to accommodate the chime element and reach the top piece with extra for knotting.
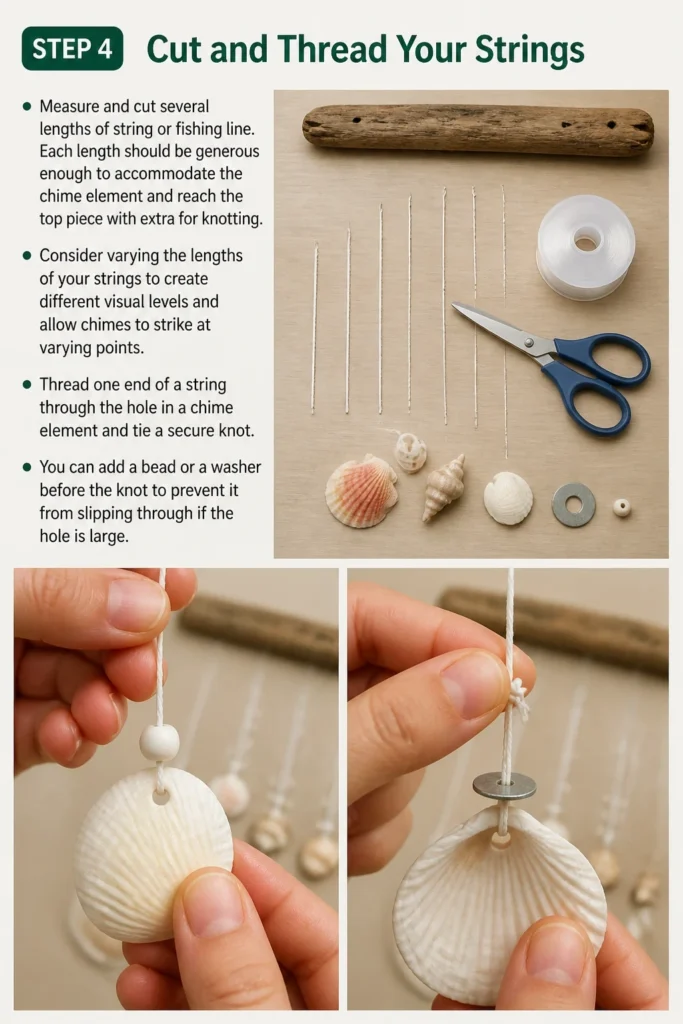
Consider varying the lengths of your strings to create different visual levels and allow chimes to strike at varying points.
Thread one end of a string through the hole in a chime element and tie a secure knot.
You can add a bead or a washer before the knot to prevent it from slipping through if the hole is large.
Step 5: Attach Chimes to the Top Piece
Take the other end of the string from your chime element and thread it up through one of the holes on the underside of your top piece.
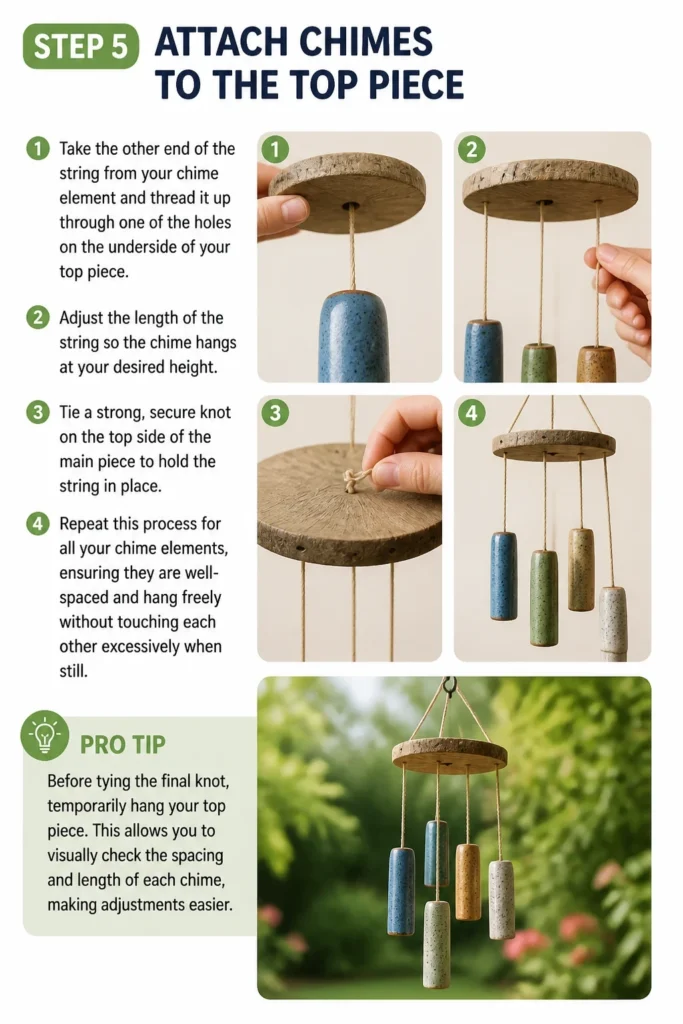
Adjust the length of the string so the chime hangs at your desired height.
Tie a strong, secure knot on the top side of the main piece to hold the string in place.
Repeat this process for all your chime elements, ensuring they are well-spaced and hang freely without touching each other excessively when still.
Pro Tip: Before tying the final knot, temporarily hang your top piece. This allows you to visually check the spacing and length of each chime, making adjustments easier.
Step 6: Create the Clapper (Optional but Recommended)
A clapper is a central piece that strikes the chimes to make sound. It’s often suspended slightly below the chime elements.
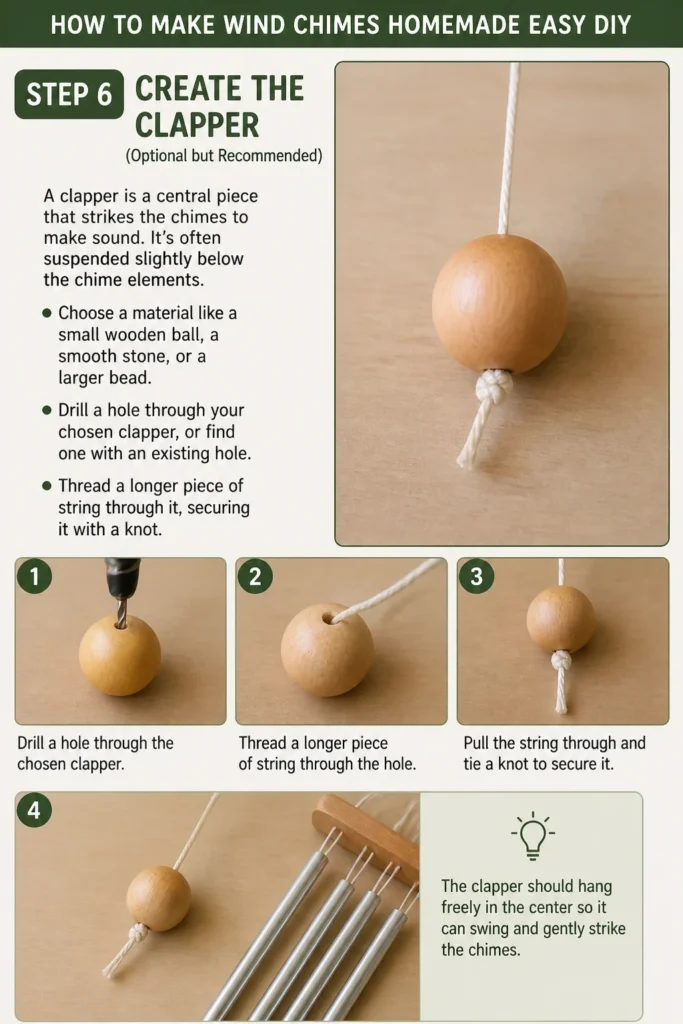
Choose a material like a small wooden ball, a smooth stone, or a larger bead.
Drill a hole through your chosen clapper, or find one with an existing hole.
Thread a longer piece of string through it, securing it with a knot.
Step 7: Attach the Clapper and Wind Catcher
Thread the clapper string through the center hole of your top piece, if you made one, or tie it to the main hanging string.
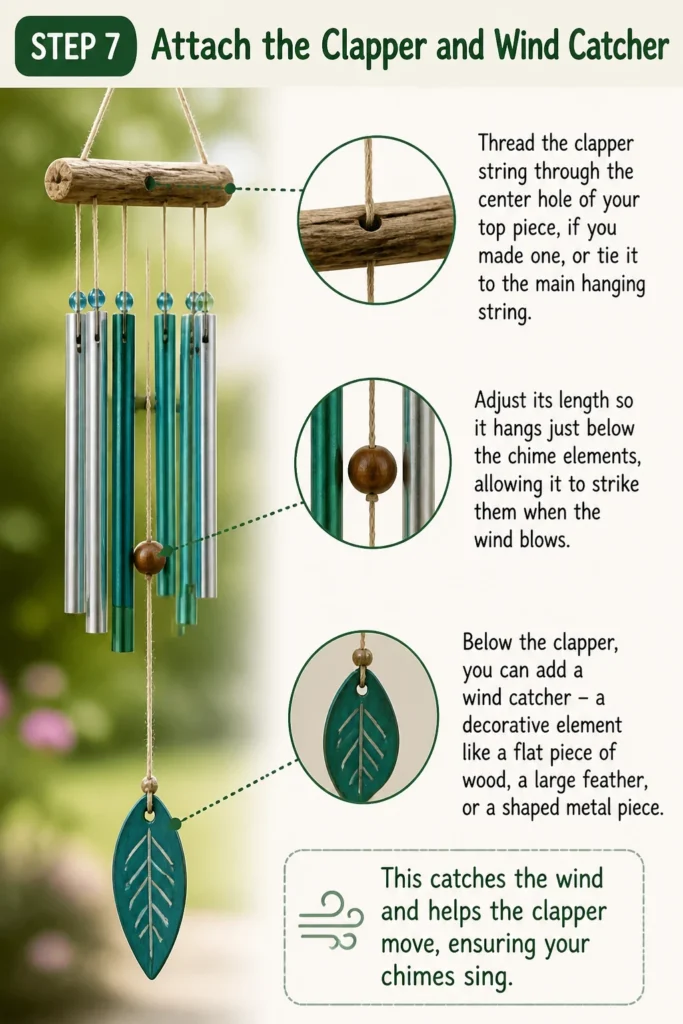
Adjust its length so it hangs just below the chime elements, allowing it to strike them when the wind blows.
Below the clapper, you can add a “wind catcher” – a decorative element like a flat piece of wood, a large feather, or a shaped metal piece.
This catches the wind and helps the clapper move, ensuring your chimes sing.
Step 8: Add the Hanging Mechanism
Finally, attach a sturdy string or chain to the top of your main piece.
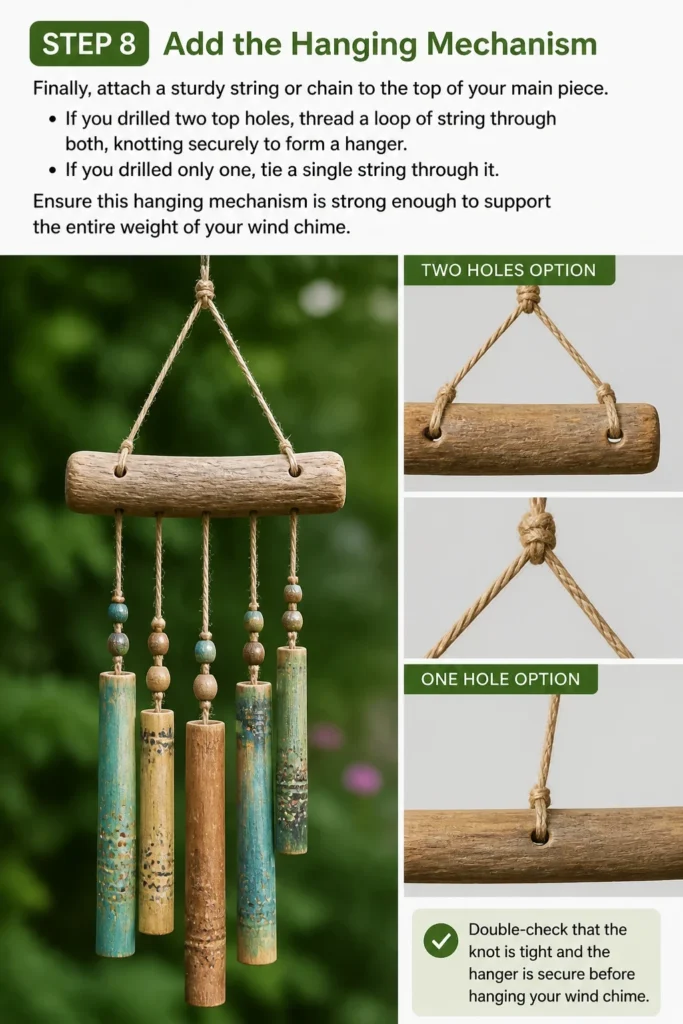
If you drilled two top holes, thread a loop of string through both, knotting securely to form a hanger.
If you drilled only one, tie a single string through it.
Ensure this hanging mechanism is strong enough to support the entire weight of your wind chime.
Step 9: Test and Adjust
Hang your completed wind chime in a breezy location. Listen to its sounds.
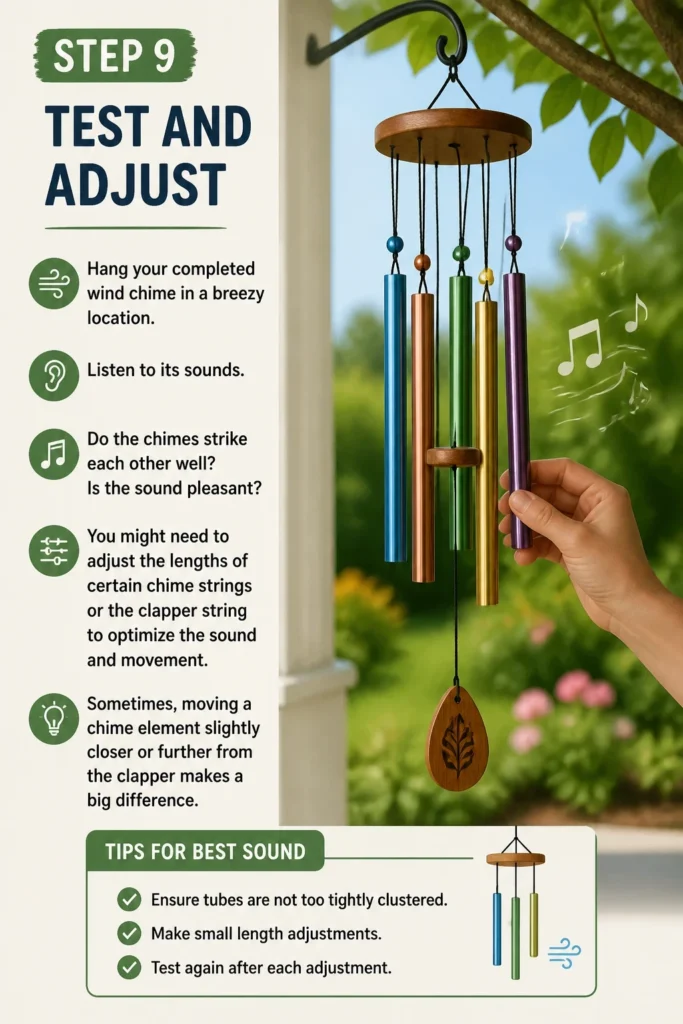
Do the chimes strike each other well? Is the sound pleasant?
You might need to adjust the lengths of certain chime strings or the clapper string to optimize the sound and movement.
Sometimes, moving a chime element slightly closer or further from the clapper makes a big difference.
Common Mistakes to Avoid
Using Weak String
Many beginners use regular sewing thread or thin craft string for their chimes. These materials can easily fray, break, or degrade when exposed to outdoor elements like sun and rain.
Always opt for strong, weather-resistant materials like fishing line (monofilament or braided), waxed polyester string, or thin wire. This ensures your chimes last for years.
Improper Spacing of Chimes
If chimes are hung too close together, they can tangle or clash too aggressively, producing a jarring sound rather than a melodic one. If they are too far apart, the clapper might not strike them effectively.
Aim for enough space so each chime can swing freely without constant contact, but close enough for the clapper to gently tap them in a breeze. Test and adjust before final knotting.
Ignoring Material Resonance
Not all materials make good chimes. Soft plastics, thick wood without a hollow core, or very small, dense objects might produce dull thuds or no sound at all.
Before committing, tap your potential chime materials to gauge their sound quality. Select items that offer a clear, sustained, and pleasing tone when struck.
Forgetting Weatherproofing
Unless your chimes will be strictly indoors, they need to withstand the elements. Untreated wood can rot, and some metals can rust.
Consider sealing wooden components with exterior varnish or paint. Use rust-resistant metals or apply a protective clear coat to prevent corrosion, especially for elements like old keys or silverware.
Troubleshooting
Chimes Aren’t Making Enough Noise
If your wind chimes are too quiet, the clapper might not be striking the chimes effectively, or the chime elements themselves might not be resonant enough.
Check the length of your clapper string; it might need to be adjusted slightly longer or shorter to hit the chimes more consistently. Also, ensure your chime elements are made from materials known for good sound production.
Chimes Tangle Easily
Tangling usually happens when chimes are hung too close together or their strings are too long and flexible, allowing them to swing wildly into each other.
Increase the spacing between your chime elements on the top piece. You can also try using slightly stiffer string or adding small weights at the bottom of longer chimes to reduce excessive movement.
Chimes Sound Dull or Unpleasant
The quality of sound is paramount for wind chimes. A dull sound often indicates the materials chosen are not ideal, or they are striking each other in an undesirable way.
Re-evaluate your chime materials; perhaps some are too soft or heavy. Adjust the hanging lengths so they strike at different points, creating a more harmonious sound rather than a cacophony.
Key Takeaways
- Selecting materials with good natural resonance is crucial for pleasant sounds.
- Careful spacing of chimes prevents tangling and improves musicality.
- Strong, weather-resistant string ensures the longevity of your homemade chimes.
- A well-placed clapper is essential for consistent and melodic sound production.
- Personalizing your wind chime with unique elements makes it truly yours.
- Don’t forget to weatherproof your creation for outdoor display.
Frequently Asked Questions
What are the best materials for a beginner to use?
For beginners, metal keys, bamboo pieces, and sturdy beads are excellent choices. They are often easy to find, simple to prepare with existing holes or easy drilling, and produce satisfying sounds. Seashells are also popular but can be more fragile to drill.
How do I make my wind chimes sound more musical?
To achieve a more musical sound, consider using chime elements of varying lengths and thicknesses. This creates different pitches. Tuning them to specific notes is advanced, but simply varying lengths often yields a pleasing, natural harmony. Also, ensure the clapper hits the chimes effectively but gently.
Can I use natural elements like pinecones or stones?
Absolutely, natural elements add a rustic charm. Pinecones might not produce a strong sound on their own, but they can be beautiful wind catchers or decorative additions. Smooth, flat stones can create a lovely clinking sound if appropriately sized and drilled. Experiment to find what works for your aesthetic and sound preference.
How do I protect my wooden wind chime from the weather?
To protect wooden components, apply multiple coats of an exterior-grade sealant, varnish, or marine-grade polyurethane. This creates a barrier against moisture and UV damage. Reapply periodically, especially if your chimes are exposed to harsh weather conditions year-round, to maintain their integrity.
Our Top Recommended Finds
- Heavy-Duty Fishing Line: Essential for durability and resisting outdoor elements, ensuring your chimes stay put.
- Small Hand Drill Set: Perfect for making clean holes in various materials like wood, plastic, or even thin metal.
- Assorted Craft Beads: Great for adding visual appeal, acting as spacers, or even as clappers.
Crafting Your Outdoor Melody
There’s immense satisfaction in creating something beautiful and functional with your own hands.
Your homemade wind chimes will not only add a personal touch to your garden or patio but also bring a soothing symphony to your outdoor moments.
Why wait? Gather your materials today and start crafting the gentle music of the wind.
Beginner-friendly templates, step-by-step guides,
and weekly project ideas in your inbox.