🔥 How To Make Flowers Out Of Paper Tissue

Beginner-friendly templates, step-by-step guides,
and weekly project ideas in your inbox.
There’s a special joy in transforming simple materials into something beautiful.
I remember my grandmother teaching me this craft, turning plain tissue paper into vibrant blooms for every occasion.
This guide shares those same simple techniques, allowing you to create stunning paper flowers with ease.
Quick Overview
You’re about to create charming, handmade flowers perfect for decorations, gifts, or just a fun craft session. This project is incredibly rewarding.
- Time needed: 15-30 minutes per flower (once you get the hang of it!)
- Difficulty: Beginner
- What you’ll need: Tissue paper, scissors, pipe cleaners or floral wire, and a ruler.
Step-by-Step Instructions
Step 1: Gather Your Materials
Before you begin, make sure all your supplies are within reach. This helps streamline the crafting process significantly.
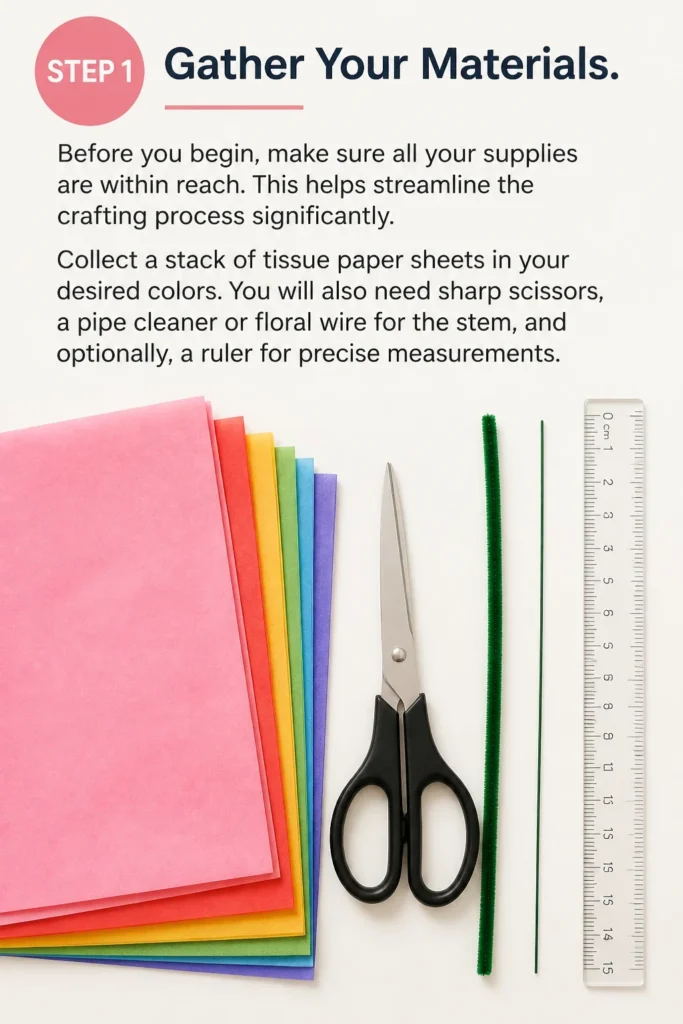
Collect a stack of tissue paper sheets in your desired colors. You will also need sharp scissors, a pipe cleaner or floral wire for the stem, and optionally, a ruler for precise measurements.
Step 2: Prepare Your Tissue Paper
Choose 8 to 10 sheets of tissue paper for one flower. More layers create a fuller, more luxurious bloom.
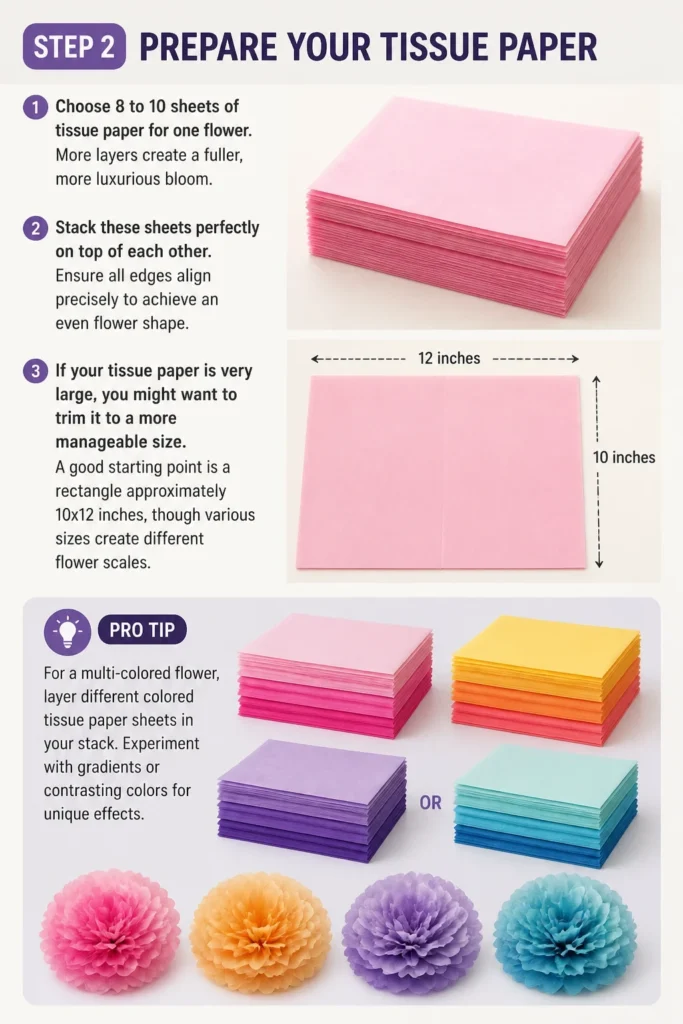
Stack these sheets perfectly on top of each other. Ensure all edges align precisely to achieve an even flower shape.
If your tissue paper is very large, you might want to trim it to a more manageable size. A good starting point is a rectangle approximately 10×12 inches, though various sizes create different flower scales.
Pro Tip: For a multi-colored flower, layer different colored tissue paper sheets in your stack. Experiment with gradients or contrasting colors for unique effects.
Step 3: Create the Accordion Fold
Begin folding your stacked tissue paper like an accordion. Start at one of the shorter ends.
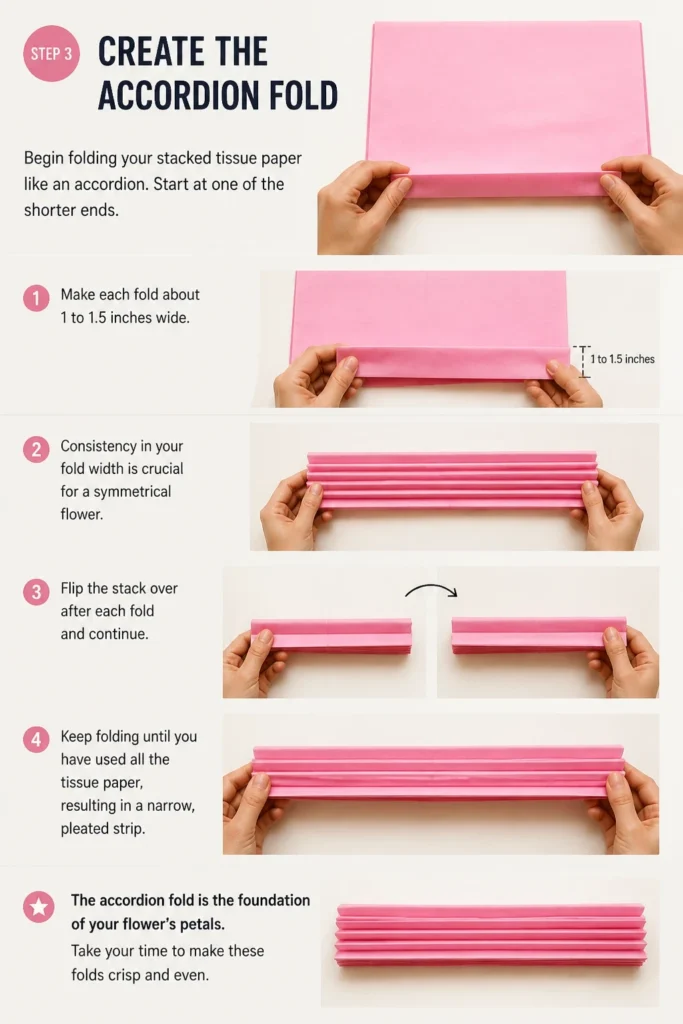
Make each fold about 1 to 1.5 inches wide. Consistency in your fold width is crucial for a symmetrical flower.
Flip the stack over after each fold and continue. Keep folding until you have used all the tissue paper, resulting in a narrow, pleated strip.
The accordion fold is the foundation of your flower’s petals. Take your time to make these folds crisp and even.
Step 4: Shape the Edges
Now, it’s time to give your petals their distinct shape. This step adds character to your flower.
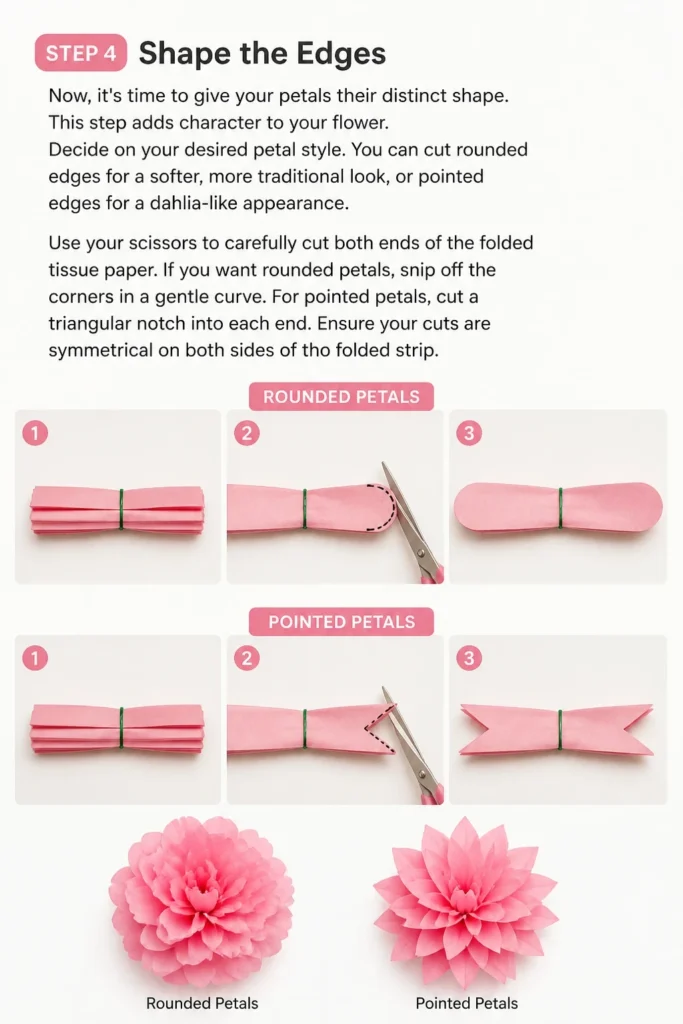
Decide on your desired petal style. You can cut rounded edges for a softer, more traditional look, or pointed edges for a dahlia-like appearance.
Use your scissors to carefully cut both ends of the folded tissue paper. If you want rounded petals, snip off the corners in a gentle curve.
For pointed petals, cut a triangular notch into each end. Ensure your cuts are symmetrical on both sides of the folded strip.
Step 5: Secure the Center
The center of your flower needs to be firmly held together. This is where your pipe cleaner or floral wire comes in.
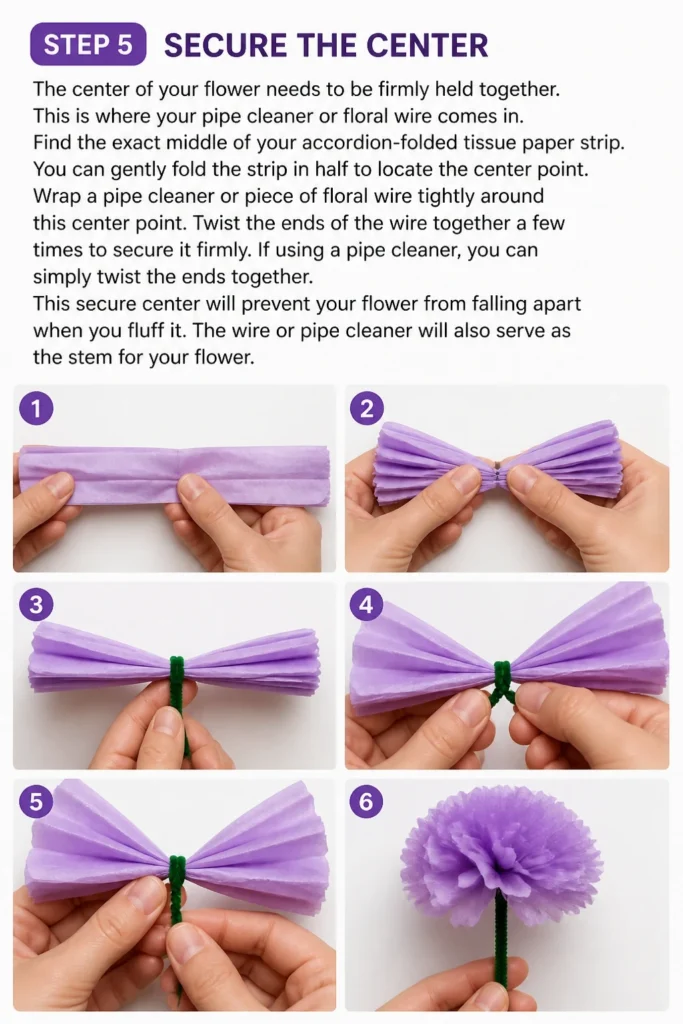
Find the exact middle of your accordion-folded tissue paper strip. You can gently fold the strip in half to locate the center point.
Wrap a pipe cleaner or piece of floral wire tightly around this center point. Twist the ends of the wire together a few times to secure it firmly.
If using a pipe cleaner, you can simply twist the ends together. This secure center will prevent your flower from falling apart when you fluff it.
The wire or pipe cleaner will also serve as the stem for your flower.
Step 6: Fan Out and Separate Layers
This is where your flower truly begins to bloom. It requires a gentle touch.
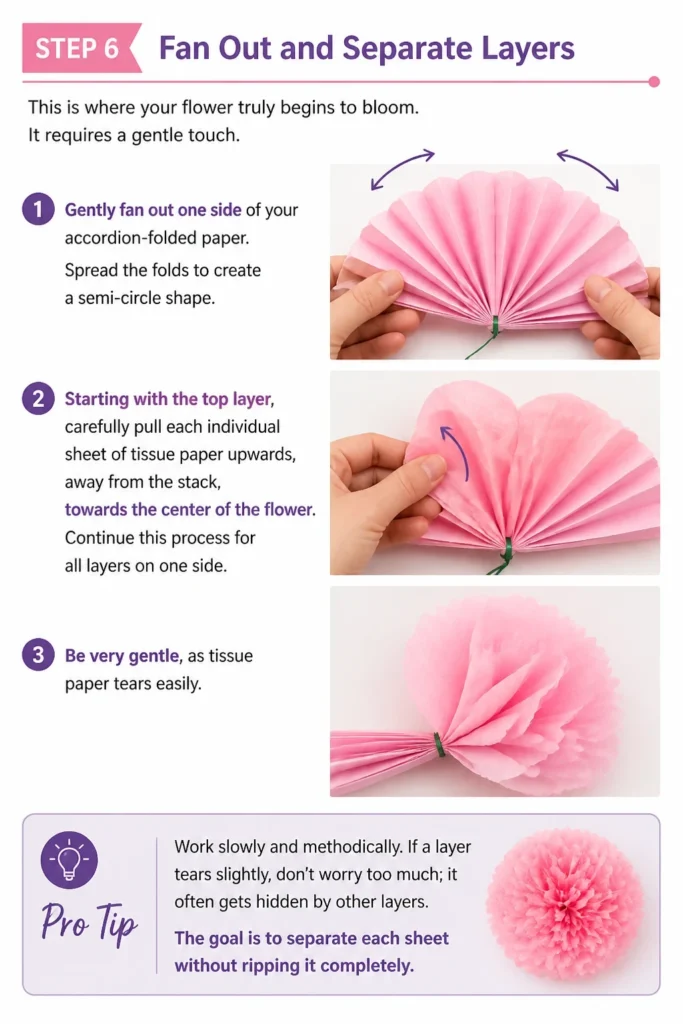
Gently fan out one side of your accordion-folded paper. Spread the folds to create a semi-circle shape.
Starting with the top layer, carefully pull each individual sheet of tissue paper upwards, away from the stack, towards the center of the flower.
Continue this process for all layers on one side. Be very gentle, as tissue paper tears easily.
Pro Tip: Work slowly and methodically. If a layer tears slightly, don’t worry too much; it often gets hidden by other layers. The goal is to separate each sheet without ripping it completely.
Step 7: Fluff and Arrange
Once one side is fluffed, repeat the process for the other side of the flower. Pull each layer upwards and towards the center.
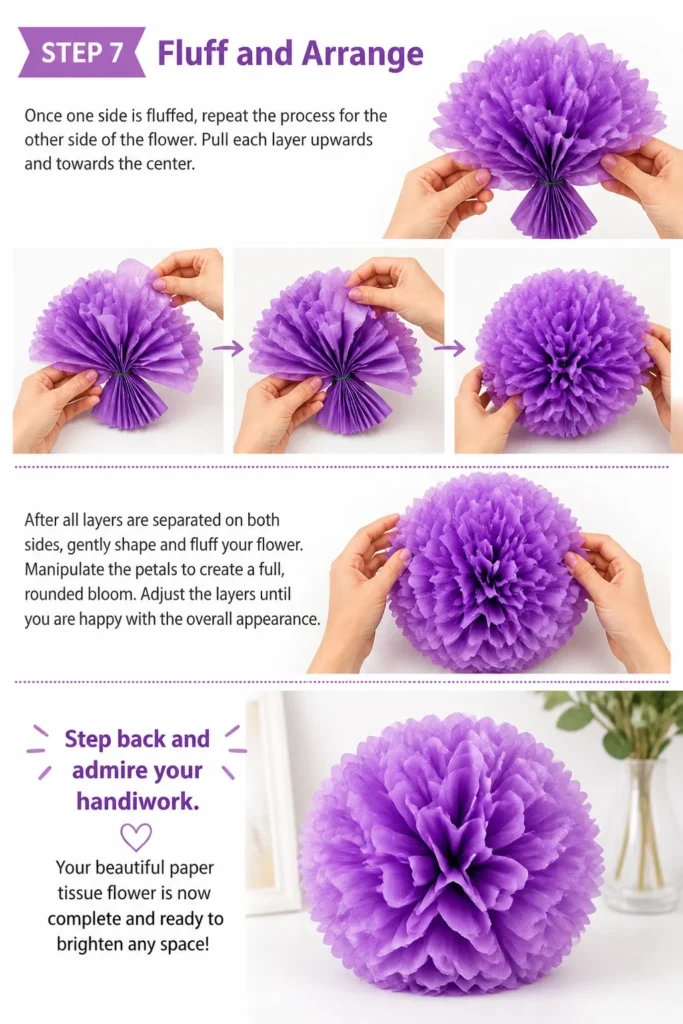
After all layers are separated on both sides, gently shape and fluff your flower. Manipulate the petals to create a full, rounded bloom.
Adjust the layers until you are happy with the overall appearance. Step back and admire your handiwork.
Your beautiful paper tissue flower is now complete and ready to brighten any space!
Common Mistakes to Avoid
Ripping Tissue Paper
Tissue paper is delicate, and it’s easy to tear it during the separation phase. Many beginners apply too much force when pulling the layers apart.
Instead, use a very light touch, almost “peeling” each layer away from the next. Support the base of the flower with one hand while gently lifting a single layer with the other. Patience is key here.
Uneven Folds
Accordion folds that aren’t consistent in width lead to a lopsided or irregular flower. This can make the final bloom look less professional.
Always take your time when folding. Use a ruler to guide your folds if you struggle with consistency. Crisp, even folds create a much more symmetrical and pleasing flower shape.
Center Not Secured Tightly Enough
If the pipe cleaner or wire isn’t twisted tightly enough around the center, your flower might unravel or become floppy. This happens when the core support is weak.
Ensure you twist the wire or pipe cleaner several times, making it snug and secure. The center should feel firm and hold all the tissue paper layers together without slipping.
Not Fluffing Enough
Sometimes, crafters are hesitant to fully fluff their flowers, fearing they might damage them. This results in a flower that looks flat and lacks volume.
Don’t be afraid to really work the layers. Gently pull them up and away from the center, creating air and volume between each sheet. The more you fluff, the fuller and more realistic your flower will appear.
Troubleshooting
Flower Looks Flat and Lifeless
If your flower appears flat even after separating the layers, it usually means the layers haven’t been pulled up sufficiently. Sometimes, they stick together, preventing full expansion.
Go back through each side and gently separate the layers again. Try to introduce more air between each sheet. You can also gently cup the entire flower in your hands and squeeze inwards slightly to help create more volume.
Layers Keep Tearing While Separating
Tearing often occurs when you’re pulling too quickly or at an awkward angle. It’s a common issue with the delicate nature of tissue paper.
Slow down your movements. Instead of pulling straight up, try to gently peel the layer away from the stack, almost rolling it upwards. If a small tear happens, don’t fret; it will likely be hidden once the flower is fully fluffed.
Flower Won’t Hold Its Shape
A flower that won’t maintain its shape typically indicates an issue with the central tie. If the wire or pipe cleaner is too loose, the layers can shift and sag.
Carefully re-tighten the wire or pipe cleaner around the center. Make sure it’s snug enough to hold all the tissue paper layers firmly in place. You might also need to adjust the wire stem to provide better support.
Key Takeaways
- The success of your paper flower relies on consistent accordion folds.
- Gentle handling is paramount when separating delicate tissue paper layers to prevent tears.
- Securely fastening the center with wire or a pipe cleaner provides essential structural integrity.
- Thoroughly fluffing each layer creates a voluminous and realistic bloom.
- Experiment with different paper colors and petal shapes to personalize your creations.
- Don’t be discouraged by initial imperfections; practice leads to beautiful results.
Frequently Asked Questions
What type of tissue paper works best?
Standard craft tissue paper found in most stores is perfect. Thicker, gift-wrap tissue paper can be a bit harder to work with and might not fluff as easily, but it’s still usable. Avoid very flimsy or extremely thin varieties that tear too easily.
Can I make multi-colored flowers?
Absolutely! Simply stack different colored sheets of tissue paper together before you begin folding. This creates stunning, vibrant multi-toned petals that add depth and visual interest to your finished flower.
How can I make larger or smaller flowers?
The size of your flower is directly related to the size of your initial tissue paper stack. For larger flowers, start with bigger sheets of tissue paper. For smaller blooms, use smaller sheets. Remember to adjust your fold width accordingly; smaller folds for smaller flowers, wider folds for larger ones.
How do I store these paper flowers?
Paper flowers are delicate. Store them in a box or container where they won’t be crushed or exposed to moisture. Placing tissue paper between layers of flowers can help protect them. Keep them away from direct sunlight to prevent fading.
Our Top Recommended Finds
- Assorted Tissue Paper Pack: A variety pack offers a rainbow of colors, perfect for experimenting and creating diverse blooms without buying individual packs.
- Floral Wire (22-26 gauge): Provides a sturdy yet flexible stem, ideal for arranging your flowers in vases or bouquets.
- Sharp Craft Scissors: Good quality scissors make clean cuts, which are essential for shaping petal edges neatly and efficiently.
Embrace Your Inner Florist Today!
You now have all the knowledge to create stunning paper tissue flowers. This craft is more than just making decorations; it’s about finding joy in the creative process.
Imagine these vibrant blooms adorning your home, brightening a gift, or becoming a thoughtful handmade present. The possibilities are endless.
Why wait? Gather your materials and start crafting your first beautiful paper flower today. Let your creativity blossom!
Beginner-friendly templates, step-by-step guides,
and weekly project ideas in your inbox.