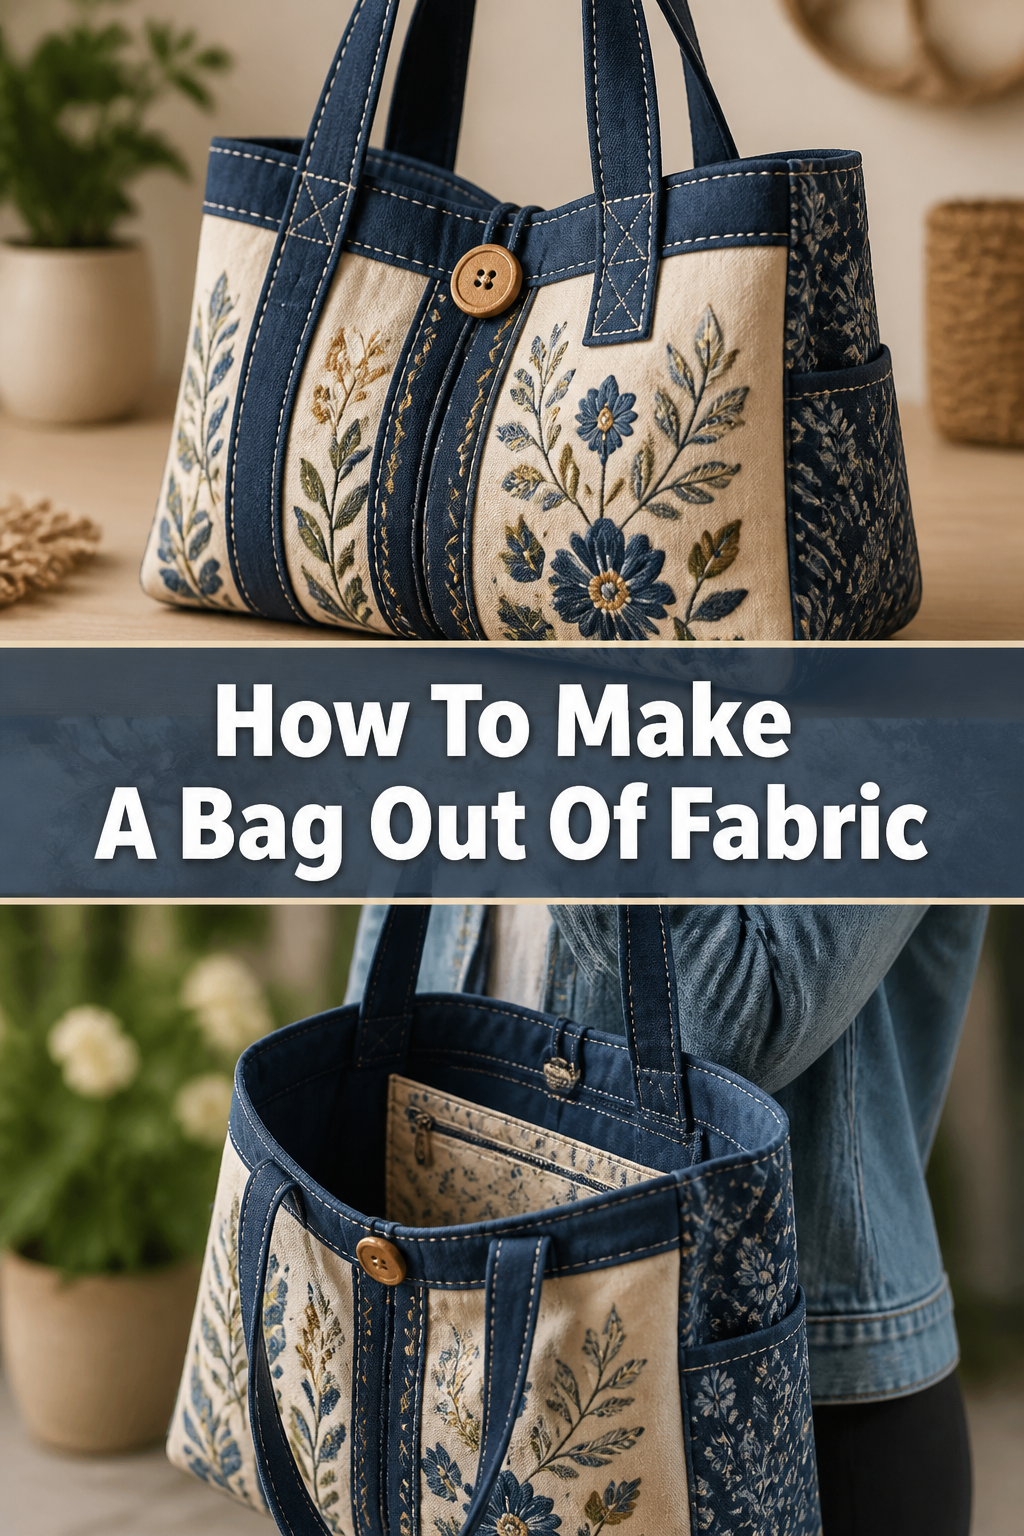
👜 How To Make A Bag Out Of Fabric

Beginner-friendly templates, step-by-step guides,
and weekly project ideas in your inbox.
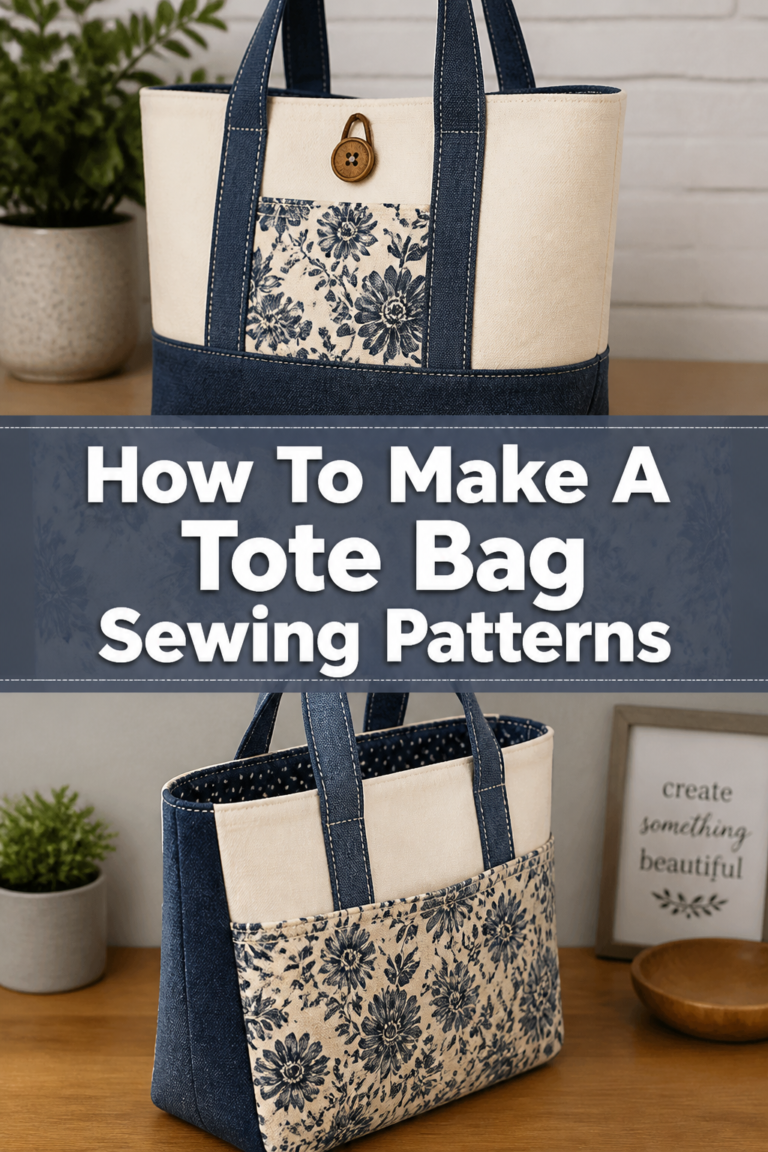
Creating your own fabric bag is a deeply satisfying project.
I remember making my very first one, a simple tote for groceries, and feeling such pride with every use.
This guide shares that hands-on experience, helping you craft a durable and beautiful bag from scratch.
Quick Overview
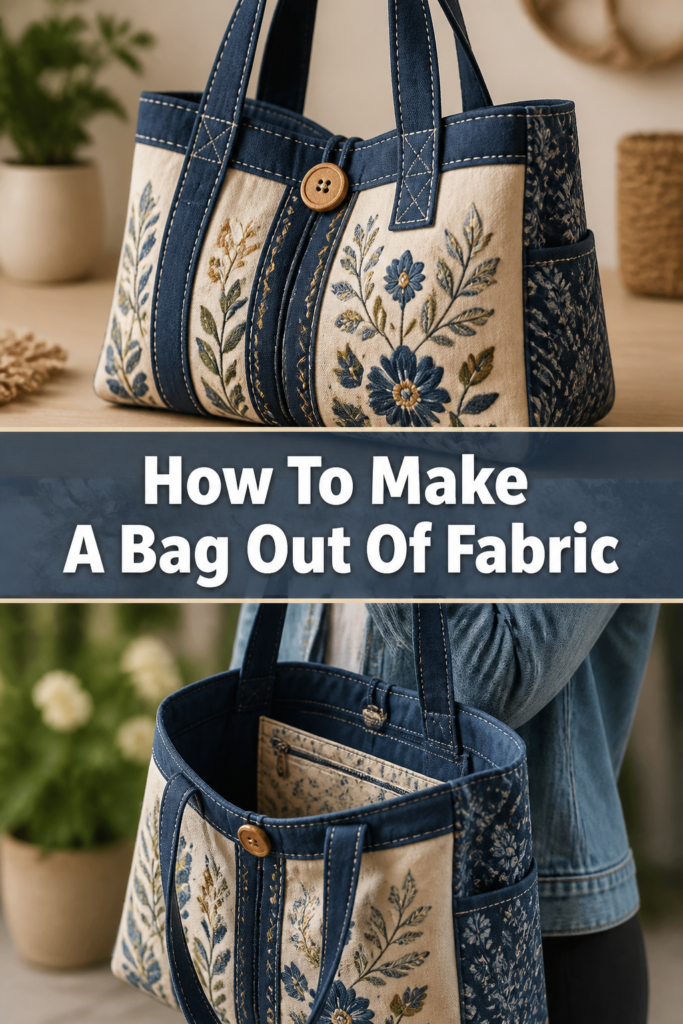
You’ll learn to construct a versatile fabric tote bag, perfect for shopping, carrying books, or as a thoughtful gift.
This project introduces fundamental sewing techniques that build confidence for future creations.
- Time needed: 2-4 hours (depending on sewing experience)
- Difficulty: Beginner to Intermediate
- What you’ll need: Fabric, thread, sewing machine, scissors, pins, iron, ruler/measuring tape
Step-by-Step Instructions
Step 1: Gather Your Materials
Before you begin, collect all necessary tools and supplies.
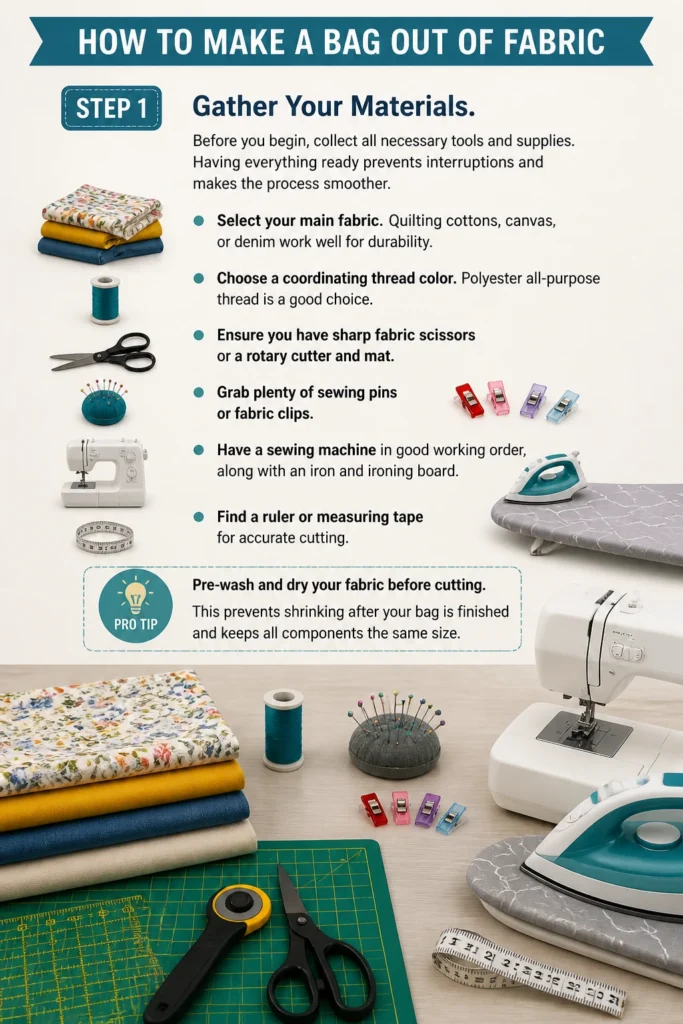
Having everything ready prevents interruptions and makes the process smoother.
- Select your main fabric. Quilting cottons, canvas, or denim work well for durability.
- Choose a coordinating thread color. Polyester all-purpose thread is a good choice.
- Ensure you have sharp fabric scissors or a rotary cutter and mat.
- Grab plenty of sewing pins or fabric clips.
- Have a sewing machine in good working order, along with an iron and ironing board.
- Find a ruler or measuring tape for accurate cutting.
Pro Tip: Pre-wash and dry your fabric before cutting. This prevents shrinking after your bag is finished and keeps all components the same size.
Step 2: Plan Your Design and Cut Fabric Pieces
Decide on your bag’s dimensions, then precisely cut your fabric.
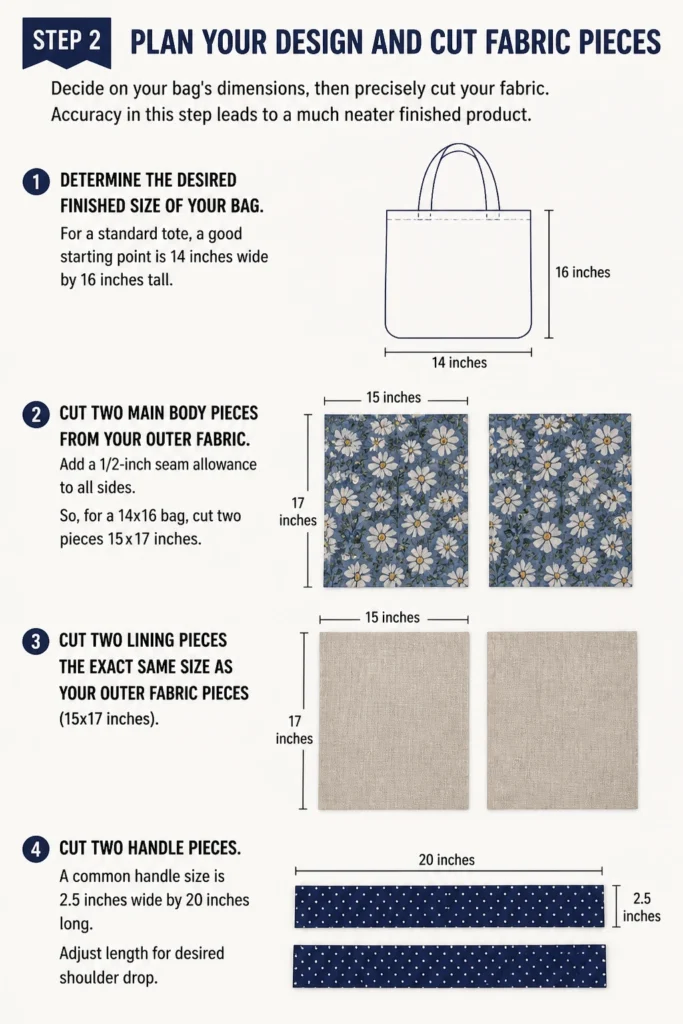
Accuracy in this step leads to a much neater finished product.
- Determine the desired finished size of your bag. For a standard tote, a good starting point is 14 inches wide by 16 inches tall.
- Cut two main body pieces from your outer fabric. Add a 1/2-inch seam allowance to all sides. So, for a 14×16 bag, cut two pieces 15×17 inches.
- Cut two lining pieces the exact same size as your outer fabric pieces (15×17 inches).
- Cut two handle pieces. A common handle size is 2.5 inches wide by 20 inches long. Adjust length for desired shoulder drop.
Step 3: Prepare the Handles
Strong, comfortable handles are essential for any fabric bag.
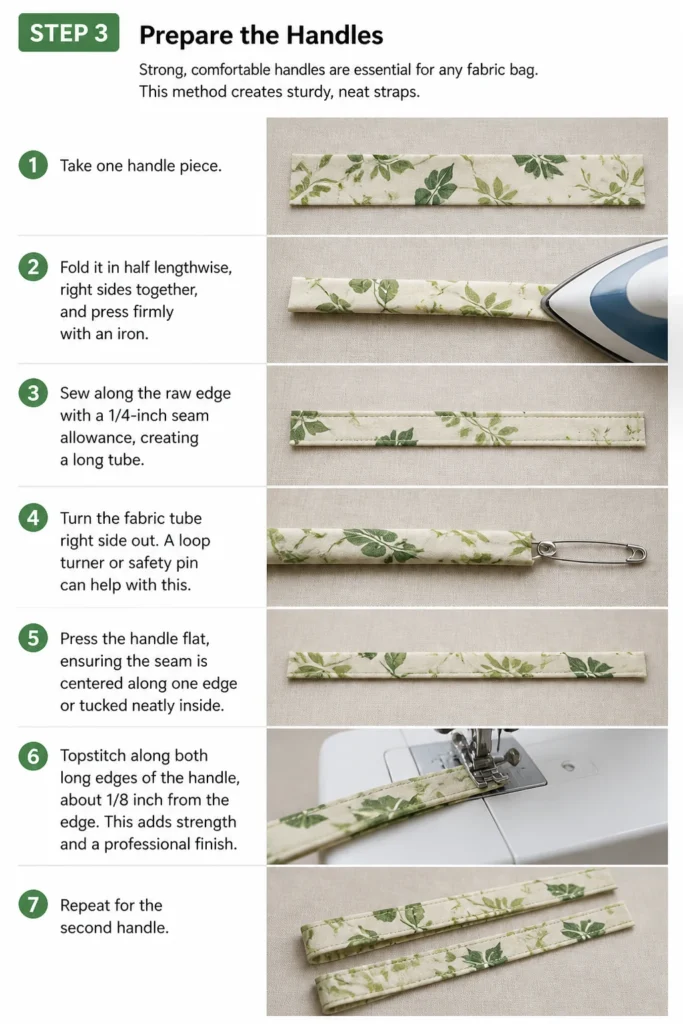
This method creates sturdy, neat straps.
- Take one handle piece. Fold it in half lengthwise, right sides together, and press firmly with an iron.
- Sew along the raw edge with a 1/4-inch seam allowance, creating a long tube.
- Turn the fabric tube right side out. A loop turner or safety pin can help with this.
- Press the handle flat, ensuring the seam is centered along one edge or tucked neatly inside.
- Topstitch along both long edges of the handle, about 1/8 inch from the edge. This adds strength and a professional finish.
- Repeat for the second handle.
Step 4: Assemble the Outer Bag Body
Now, we begin to form the main structure of your bag.
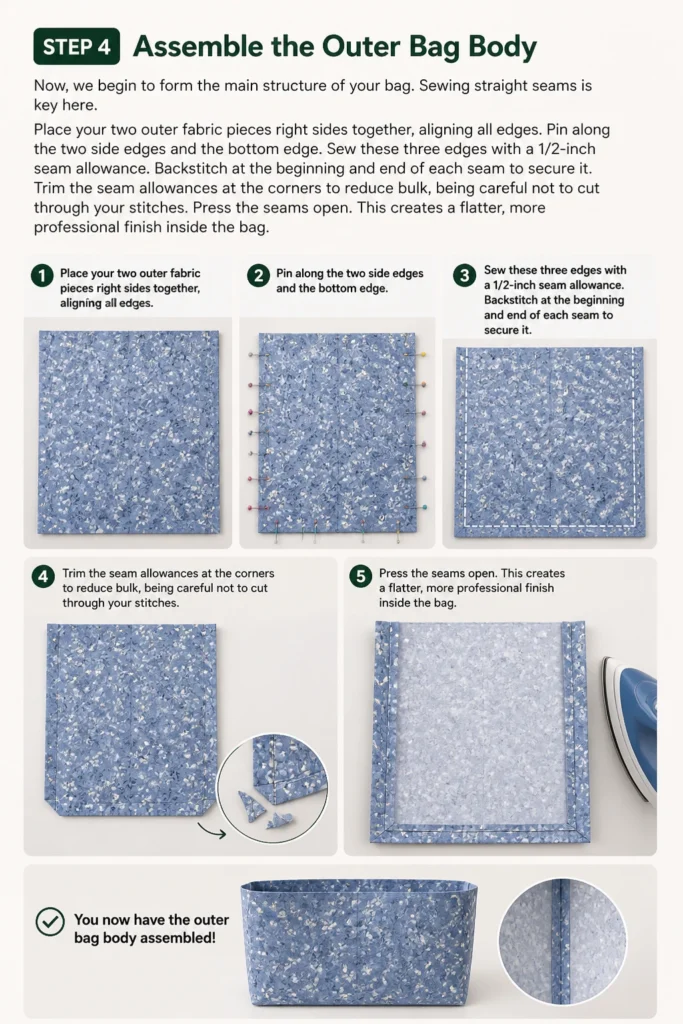
Sewing straight seams is key here.
- Place your two outer fabric pieces right sides together, aligning all edges.
- Pin along the two side edges and the bottom edge.
- Sew these three edges with a 1/2-inch seam allowance. Backstitch at the beginning and end of each seam to secure it.
- Trim the seam allowances at the corners to reduce bulk, being careful not to cut through your stitches.
- Press the seams open. This creates a flatter, more professional finish inside the bag.
Step 5: Create Boxed Corners (Optional but Recommended)
Boxed corners give your bag a flat bottom, adding structure and capacity.
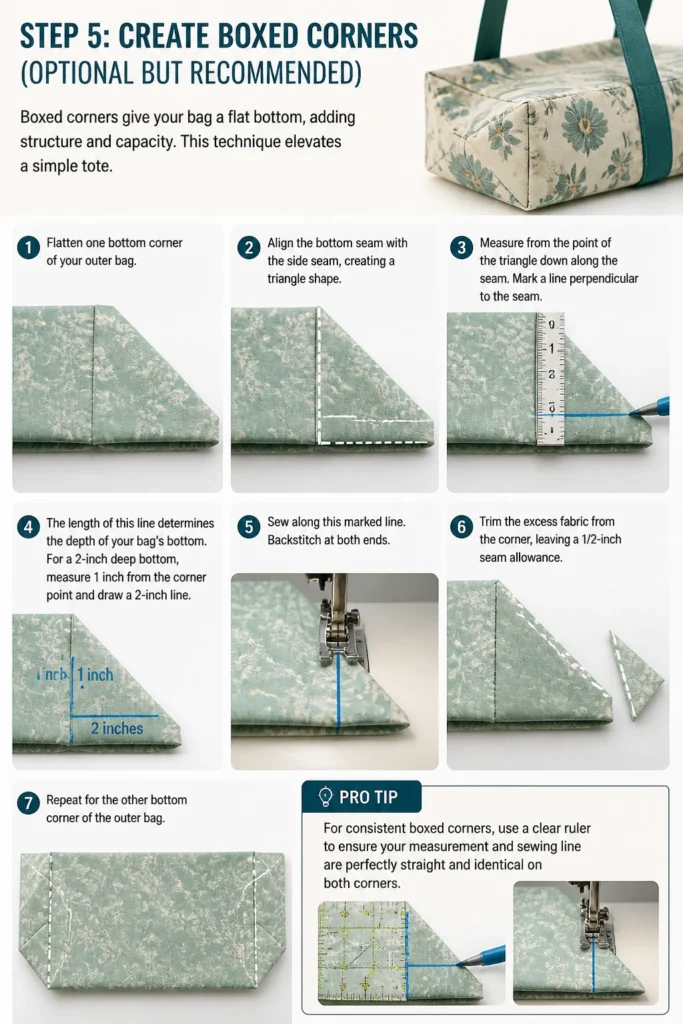
This technique elevates a simple tote.
- Flatten one bottom corner of your outer bag. Align the bottom seam with the side seam, creating a triangle shape.
- Measure from the point of the triangle down along the seam. Mark a line perpendicular to the seam. The length of this line determines the depth of your bag’s bottom. For a 2-inch deep bottom, measure 1 inch from the corner point and draw a 2-inch line.
- Sew along this marked line. Backstitch at both ends.
- Trim the excess fabric from the corner, leaving a 1/2-inch seam allowance.
- Repeat for the other bottom corner of the outer bag.
Pro Tip: For consistent boxed corners, use a clear ruler to ensure your measurement and sewing line are perfectly straight and identical on both sides.
Step 6: Assemble the Lining
The lining gives your bag a clean interior and adds durability.
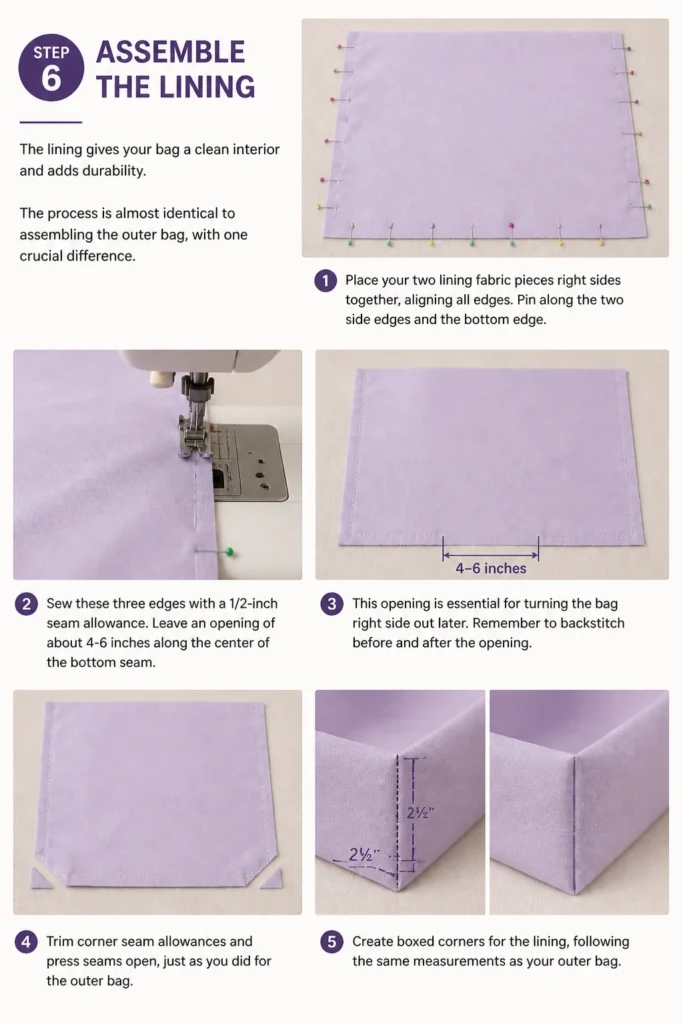
The process is almost identical to assembling the outer bag, with one crucial difference.
- Place your two lining fabric pieces right sides together, aligning all edges.
- Pin along the two side edges and the bottom edge.
- Sew these three edges with a 1/2-inch seam allowance.
- Leave an opening of about 4-6 inches along the center of the bottom seam. This opening is essential for turning the bag right side out later. Remember to backstitch before and after the opening.
- Trim corner seam allowances and press seams open, just as you did for the outer bag.
- Create boxed corners for the lining, following the same measurements as your outer bag.
Step 7: Attach Handles to the Outer Bag
Now it’s time to secure the handles in place before finishing the bag.
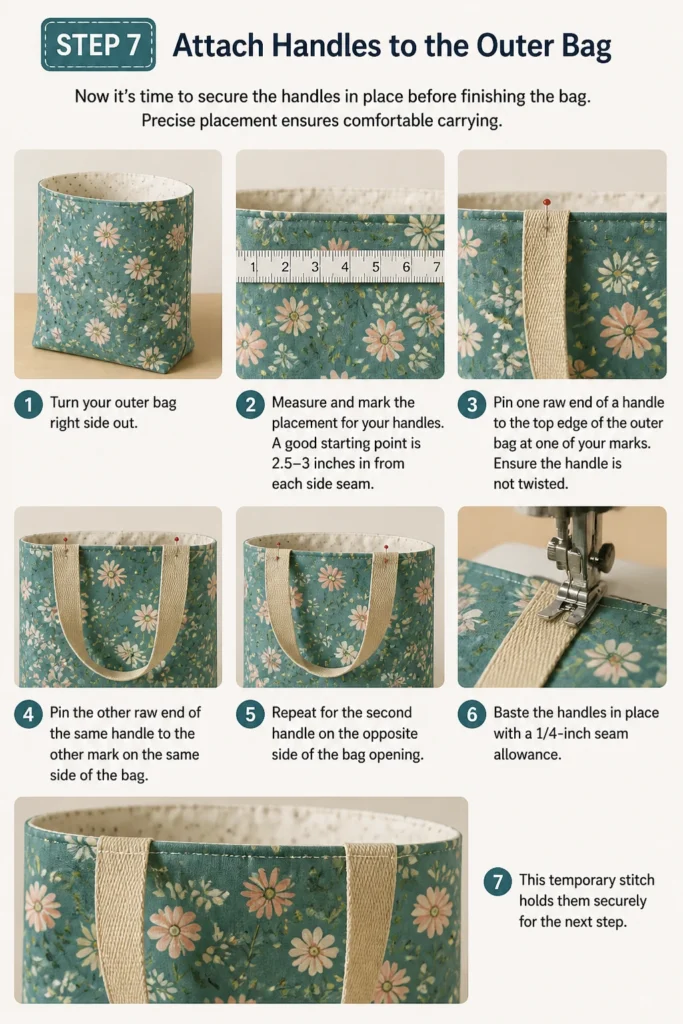
Precise placement ensures comfortable carrying.
- Turn your outer bag right side out.
- Measure and mark the placement for your handles. A good starting point is 2.5-3 inches in from each side seam.
- Pin one raw end of a handle to the top edge of the outer bag at one of your marks. Ensure the handle is not twisted.
- Pin the other raw end of the same handle to the other mark on the same side of the bag.
- Repeat for the second handle on the opposite side of the bag opening.
- Baste the handles in place with a 1/4-inch seam allowance. This temporary stitch holds them securely for the next step.
Step 8: Join Outer Bag and Lining
This step brings all the components together, creating the finished shape.
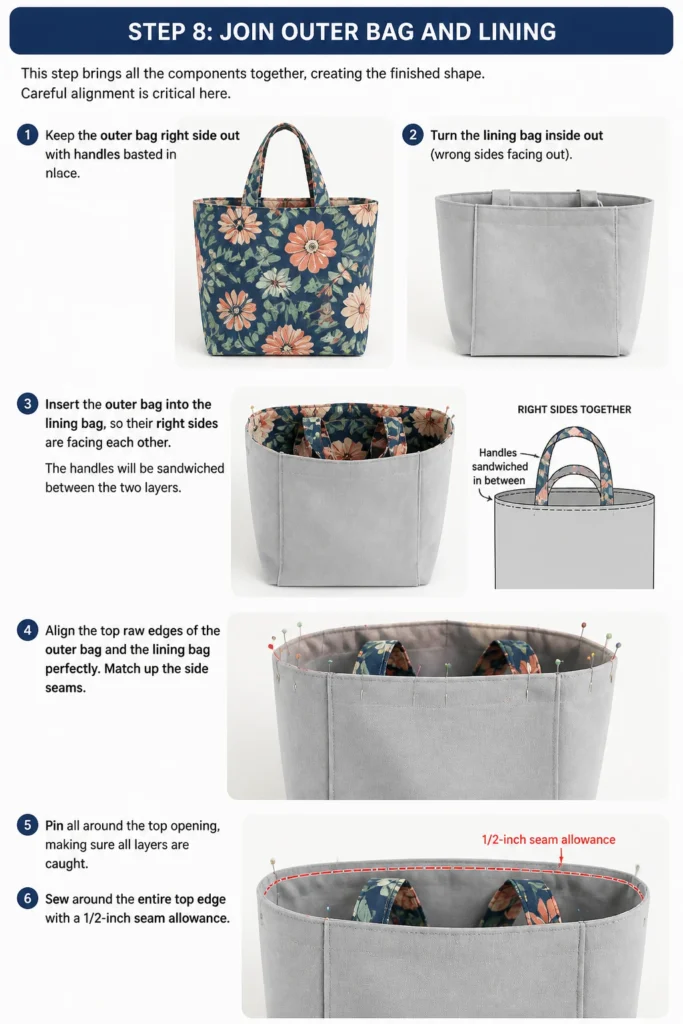
Careful alignment is critical here.
- Keep the outer bag right side out with handles basted in place.
- Turn the lining bag inside out (wrong sides facing out).
- Insert the outer bag into the lining bag, so their right sides are facing each other. The handles will be sandwiched between the two layers.
- Align the top raw edges of the outer bag and the lining bag perfectly. Match up the side seams.
- Pin all around the top opening, making sure all layers are caught.
- Sew around the entire top edge with a 1/2-inch seam allowance.
Step 9: Turn and Finish
Almost done! This is where your bag takes its final form.
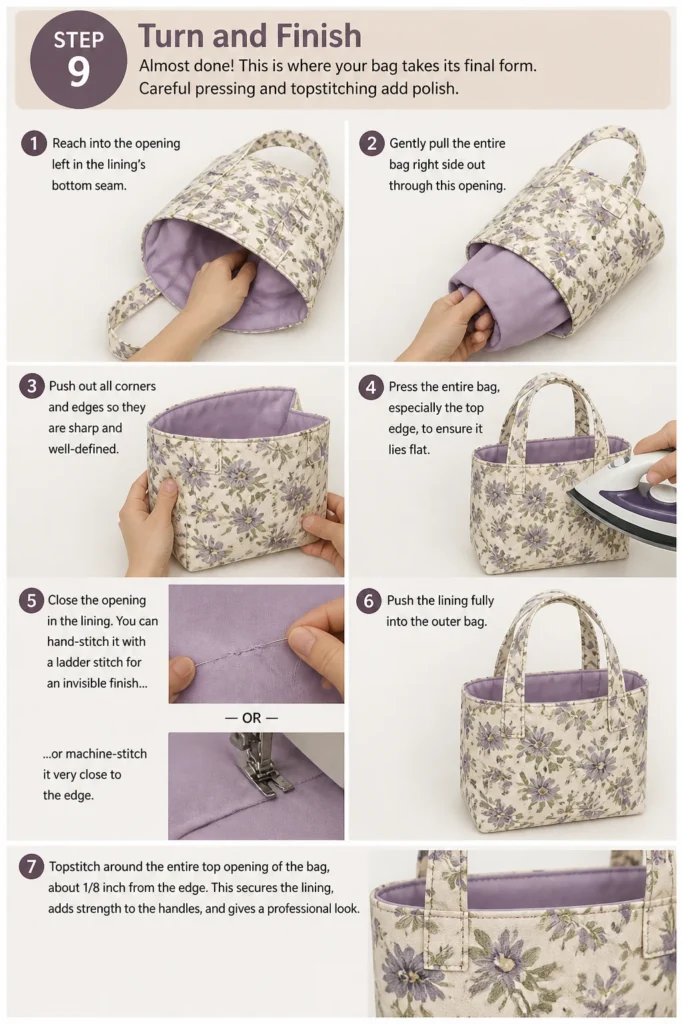
Careful pressing and topstitching add polish.
- Reach into the opening left in the lining’s bottom seam.
- Gently pull the entire bag right side out through this opening.
- Push out all corners and edges so they are sharp and well-defined.
- Press the entire bag, especially the top edge, to ensure it lies flat.
- Close the opening in the lining. You can hand-stitch it with a ladder stitch for an invisible finish or machine-stitch it very close to the edge.
- Push the lining fully into the outer bag.
- Topstitch around the entire top opening of the bag, about 1/8 inch from the edge. This secures the lining, adds strength to the handles, and gives a professional look.
Step 10: Iron and Admire Your Work
A final press makes all the difference in a handmade item.
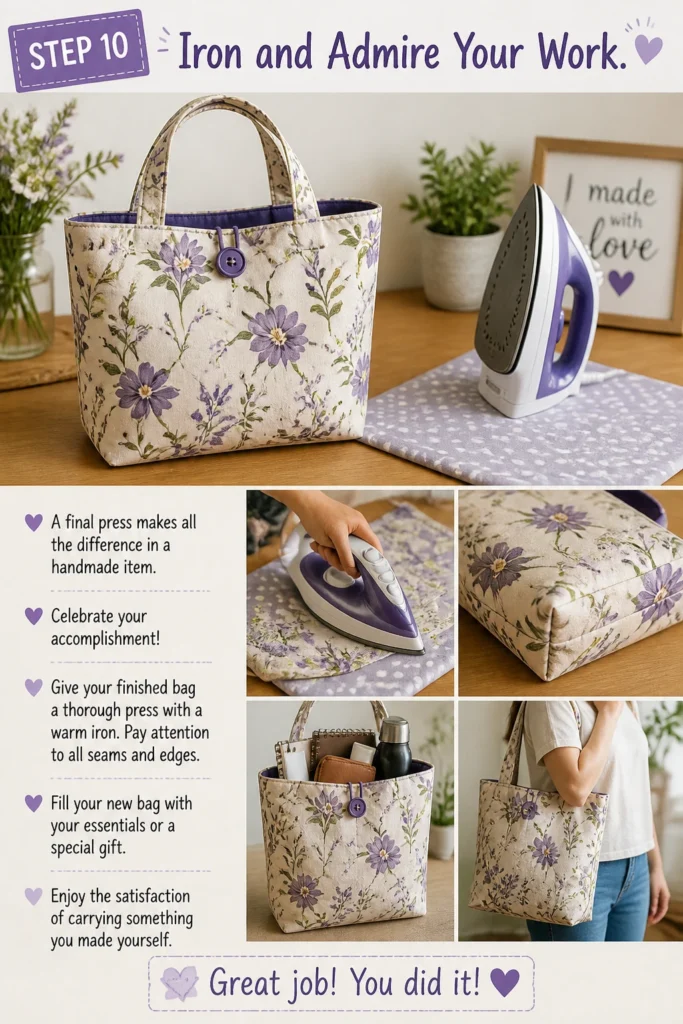
Celebrate your accomplishment!
- Give your finished bag a thorough press with a warm iron. Pay attention to all seams and edges.
- Fill your new bag with your essentials or a special gift.
- Enjoy the satisfaction of carrying something you made yourself.
Common Mistakes to Avoid
Skipping Pre-Washing Fabric
Many beginners skip pre-washing their fabric, eager to start sewing. However, fabric can shrink, especially cotton, when washed for the first time.
If you don’t pre-wash, your finished bag might distort or shrink unevenly after its first wash, ruining your hard work. Always wash and dry your fabric the way you intend to wash the finished item.
Inaccurate Cutting
Precision in cutting is fundamental to good sewing. If your fabric pieces are not cut squarely or to the correct dimensions, your seams won’t align, and your bag will look crooked or lopsided.
Always use a clear ruler, a steady hand, and sharp cutting tools. Double-check your measurements before making any cuts.
Forgetting to Leave a Turning Opening
This is a very common oversight when assembling the lining. If you sew the lining completely shut, you’ll have no way to turn your bag right side out.
Always remember to leave a 4-6 inch gap in the bottom seam of your lining. Backstitch securely at the beginning and end of this opening to prevent the seam from unraveling.
Not Pressing Seams
Pressing seams open or to one side as you go is not just for aesthetics; it’s a crucial part of construction. Unpressed seams create bulk, making your finished bag look lumpy and less professional.
Take the time to press each seam carefully after sewing it. This flattens the fabric, helps seams lie correctly, and makes subsequent steps easier and more accurate.
Troubleshooting
Bag Appears Crooked or Twisted
If your finished bag doesn’t hang straight or looks slightly askew, it’s often due to inconsistent seam allowances or inaccurate cutting.
Ensure you’re using a consistent 1/2-inch seam allowance throughout the project. Use your sewing machine’s guides to keep your stitching lines straight. For future projects, double-check all measurements and fabric cuts before sewing.
Handles Are Uneven or Loose
Uneven handles can be frustrating. This usually happens if they weren’t measured precisely when attaching to the outer bag, or if the basting stitches weren’t secure enough.
When attaching handles, use a ruler to measure the exact distance from the side seams. Pin them very securely, and baste them twice if needed for extra hold before the final seam.
Lining Peeks Out at the Top
If your lining fabric shows above the top edge of your bag, it means the lining might be slightly larger than the outer bag, or the topstitching didn’t effectively secure it.
Carefully press the top edge of the bag again, making sure the lining is tucked fully inside. Ensure your topstitching catches both the outer fabric and the lining. Sometimes, trimming a tiny bit off the top edge of the lining before joining can help.
Key Takeaways
- Pre-washing fabric prevents shrinkage and distortion in your finished bag.
- Accurate cutting and consistent seam allowances are vital for a professional-looking result.
- Pressing seams after each step creates a flatter, neater construction.
- Boxed corners add structure and capacity, elevating a simple tote.
- Always remember to leave a turning opening in the lining’s bottom seam.
- Topstitching adds strength, secures the lining, and provides a polished finish.
Frequently Asked Questions
Can I make this bag without a sewing machine?
Yes, you can hand-stitch this bag. It will take considerably more time and patience, but it’s entirely possible. Use a strong needle and a backstitch for durable seams.
What type of fabric is best for a beginner?
Quilting cotton is an excellent choice for beginners. It’s easy to cut, doesn’t stretch, and holds a press well. Avoid slippery fabrics like satin or stretchy knits until you gain more experience.
How do I make the bag stronger for heavier items?
To make your bag stronger, use heavier weight fabrics like canvas, duck cloth, or denim for both the outer and lining layers. You can also add fusible interfacing to the outer fabric pieces for extra stability and stiffness.
Can I add pockets to this bag?
Absolutely! Pockets are a fantastic addition. Before assembling your outer bag or lining, simply sew a patch pocket onto one of the main body pieces. Remember to finish the pocket’s top edge before attaching it.
Our Top Recommended Finds
- Sharp Fabric Scissors: A good pair of scissors makes cutting effortless and accurate, reducing hand fatigue.
- Clear Acrylic Ruler & Rotary Cutter: This combination allows for quick, precise, and straight cuts, especially useful for squaring up fabric.
- Wonder Clips: These tiny clips hold multiple layers of fabric securely without piercing, great for thick fabrics or when pins distort the fabric.
Your Next Creative Adventure Awaits
You’ve successfully created a functional and stylish fabric bag!
This project builds a solid foundation for countless other sewing endeavors.
Consider adding embellishments, trying different handle styles, or exploring patterns for zippered pouches next.
Embrace the joy of making and let your creativity continue to flourish today.
Beginner-friendly templates, step-by-step guides,
and weekly project ideas in your inbox.