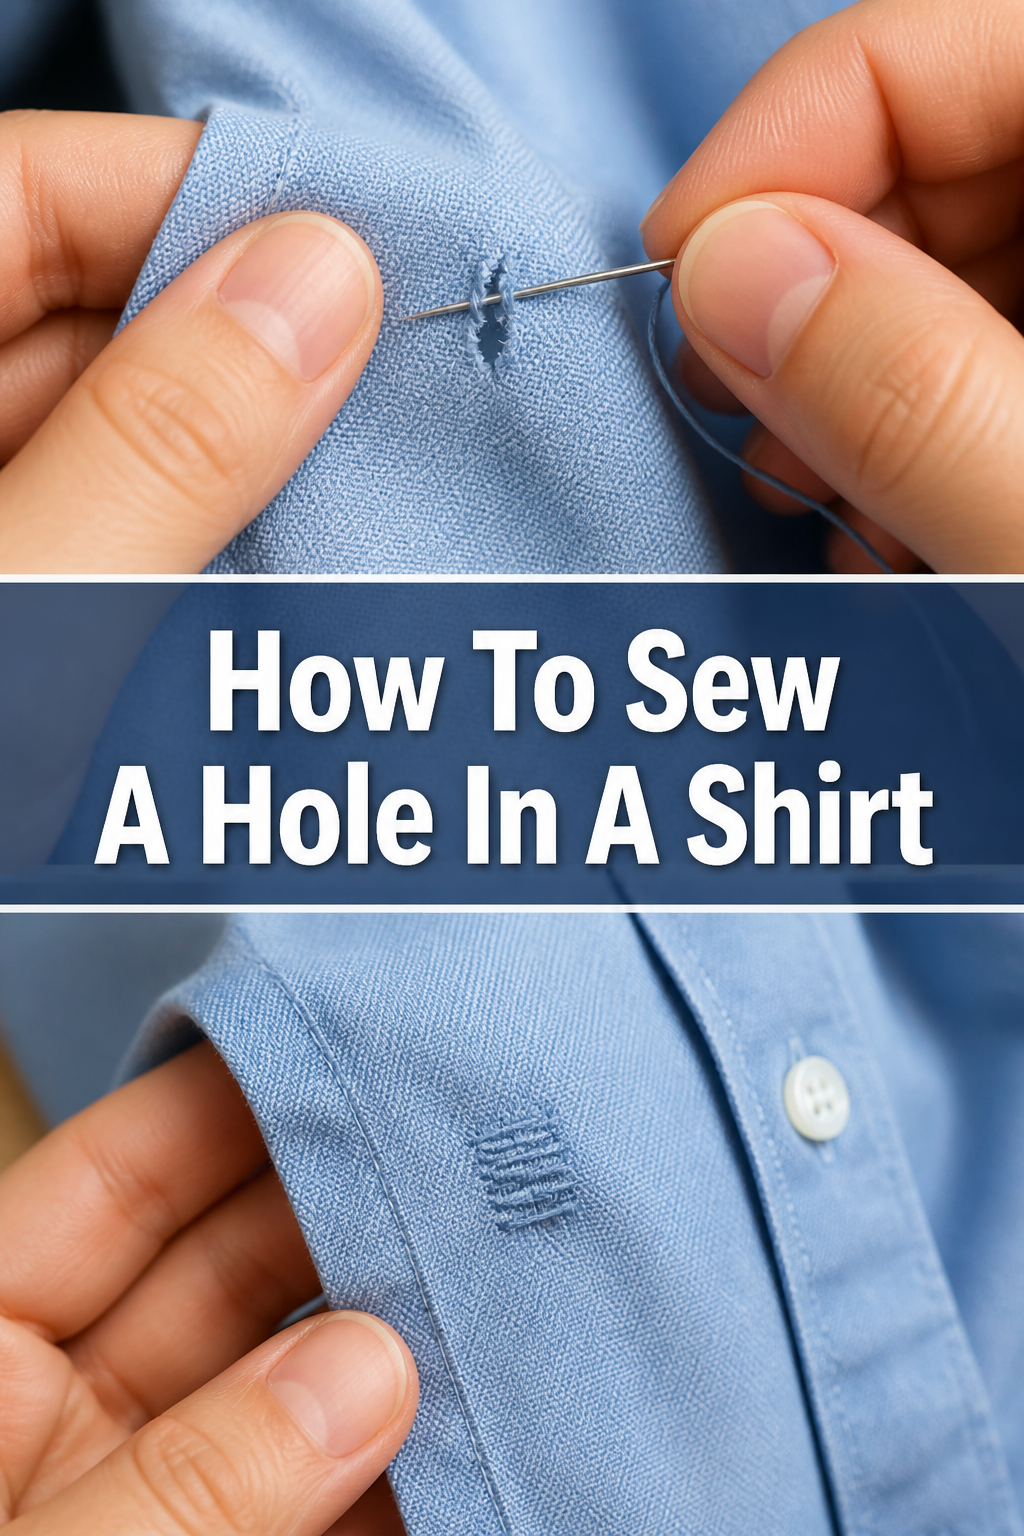
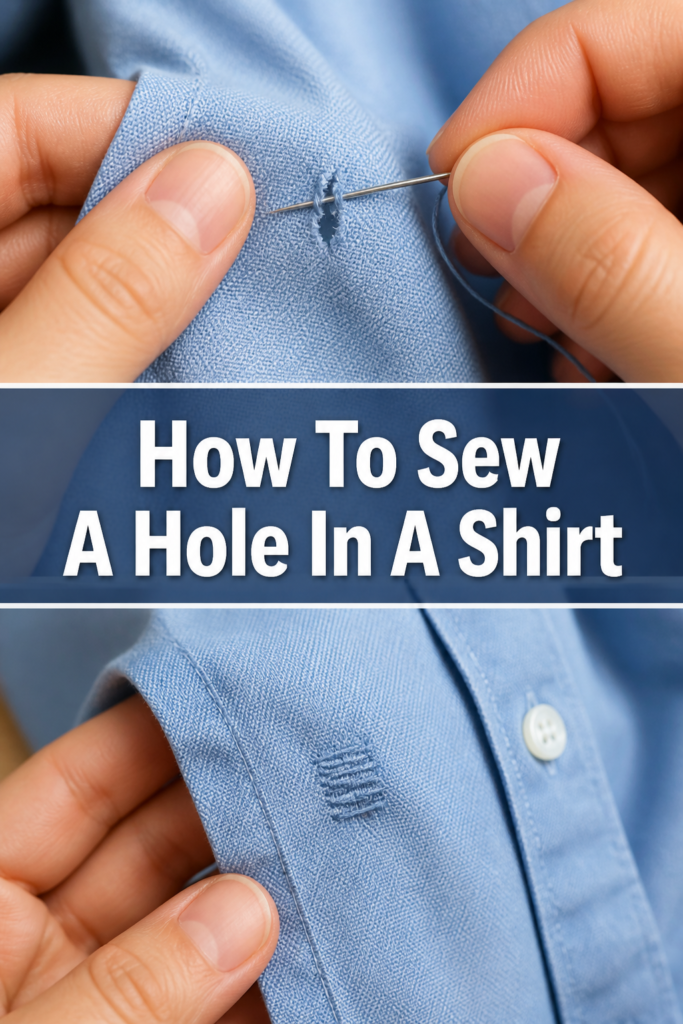
🧵 How To Sew A Hole In A Shirt

Beginner-friendly templates, step-by-step guides,
and weekly project ideas in your inbox.
We all know that sinking feeling when you discover a tiny tear or a pesky hole in your favorite shirt.
Instead of tossing it aside, mending it yourself is a practical skill that saves money and extends the life of your wardrobe.
As someone who’s salvaged countless beloved garments from the brink, I’ll show you exactly how simple and satisfying this process can be.
Quick Overview
This guide will walk you through the straightforward steps to repair a hole in a shirt using basic hand-sewing techniques. You’ll learn how to prepare your garment, select the right tools, and execute a neat, durable mend.
- Time needed: 15-45 minutes (depending on hole size and your experience)
- Difficulty: Beginner
- What you’ll need: Hand sewing needle, thread (matching color), small sharp scissors, fabric pins (optional), thimble (optional), iron, scrap fabric (for practice or patching).
Step-by-Step Instructions
Step 1: Gather Your Essential Tools
Before you begin, collect all the necessary items. Having everything within reach makes the process smooth and enjoyable.
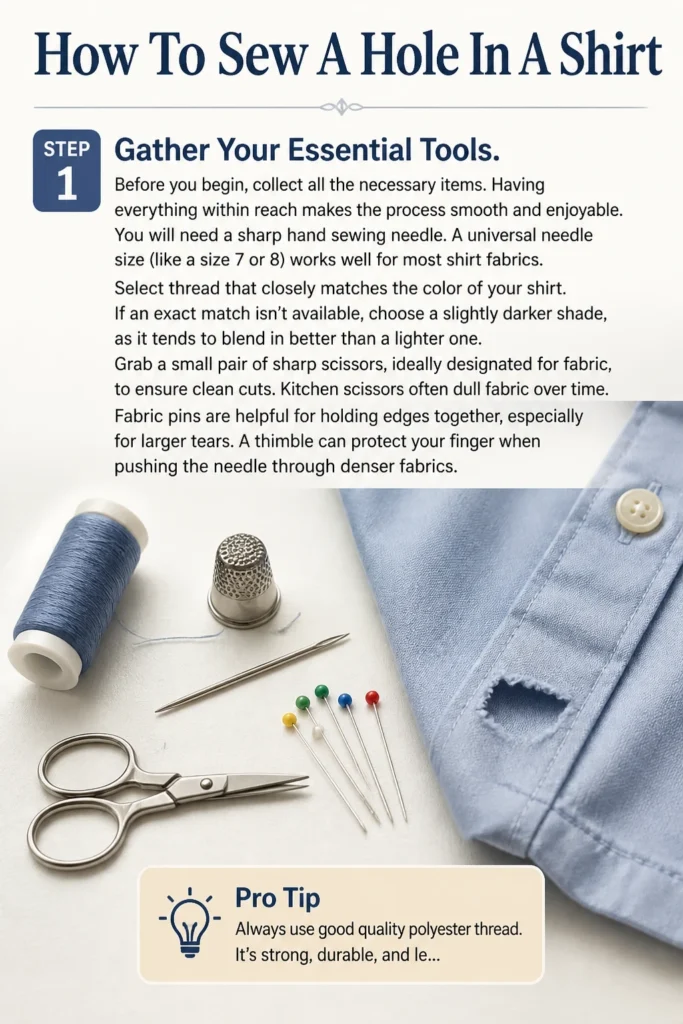
You will need a sharp hand sewing needle. A universal needle size (like a size 7 or 8) works well for most shirt fabrics.
Select thread that closely matches the color of your shirt. If an exact match isn’t available, choose a slightly darker shade, as it tends to blend in better than a lighter one.
Grab a small pair of sharp scissors, ideally designated for fabric, to ensure clean cuts. Kitchen scissors often dull fabric over time.
Fabric pins are helpful for holding edges together, especially for larger tears. A thimble can protect your finger when pushing the needle through denser fabrics.
Pro Tip: Always use good quality polyester thread. It’s strong, durable, and less likely to break than cotton thread, making your repair last longer.
Step 2: Prepare the Shirt and the Hole
Proper preparation is key to a clean and lasting repair. This step ensures your mending efforts are not wasted.
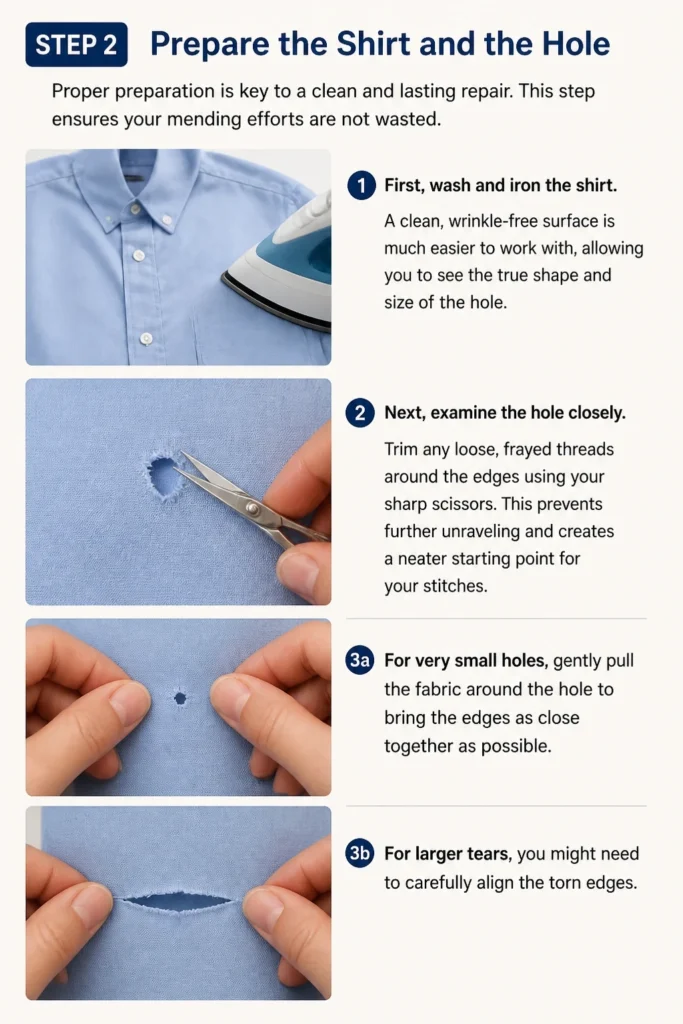
First, wash and iron the shirt. A clean, wrinkle-free surface is much easier to work with, allowing you to see the true shape and size of the hole.
Next, examine the hole closely. Trim any loose, frayed threads around the edges using your sharp scissors. This prevents further unraveling and creates a neater starting point for your stitches.
For very small holes, gently pull the fabric around the hole to bring the edges as close together as possible. For larger tears, you might need to carefully align the torn edges.
Step 3: Thread Your Needle and Knot It
This fundamental step prepares your needle and thread for sewing. A properly knotted thread prevents your stitches from pulling through.
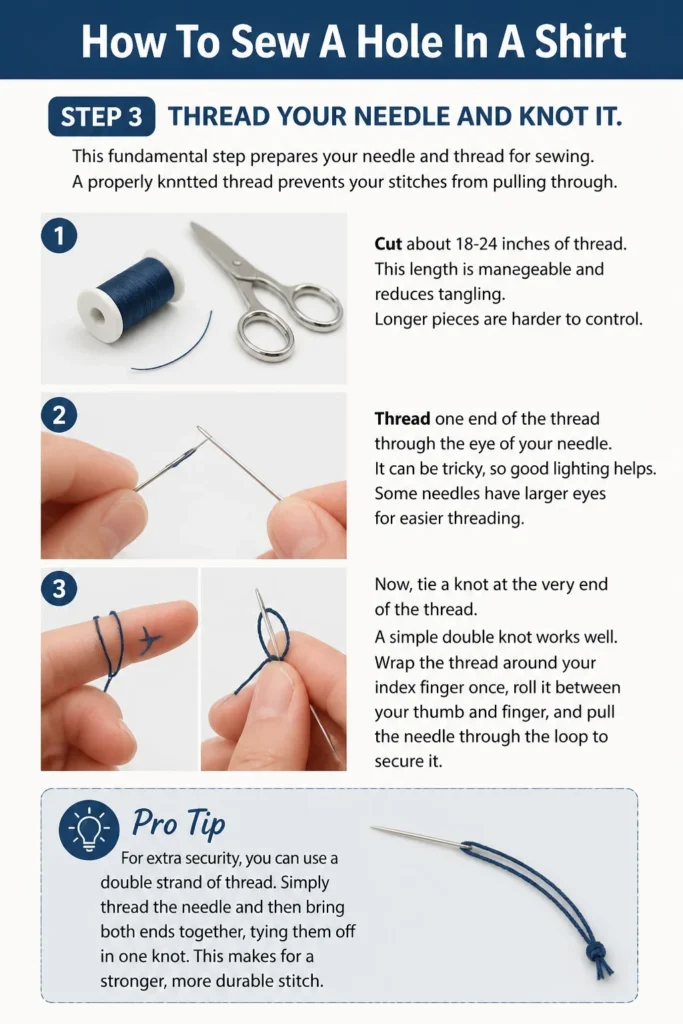
Cut about 18-24 inches of thread. This length is manageable and reduces tangling. Longer pieces are harder to control.
Thread one end of the thread through the eye of your needle. It can be tricky, so good lighting helps. Some needles have larger eyes for easier threading.
Now, tie a knot at the very end of the thread. A simple double knot works well. Wrap the thread around your index finger once, roll it between your thumb and finger, and pull the needle through the loop to secure it.
Pro Tip: For extra security, you can use a double strand of thread. Simply thread the needle and then bring both ends together, tying them off in one knot. This makes for a stronger mend, especially on high-stress areas.
Step 4: Stabilize the Hole’s Edges
Keeping the edges of the hole stable is crucial for even, inconspicuous stitches. This prevents the fabric from shifting as you sew.
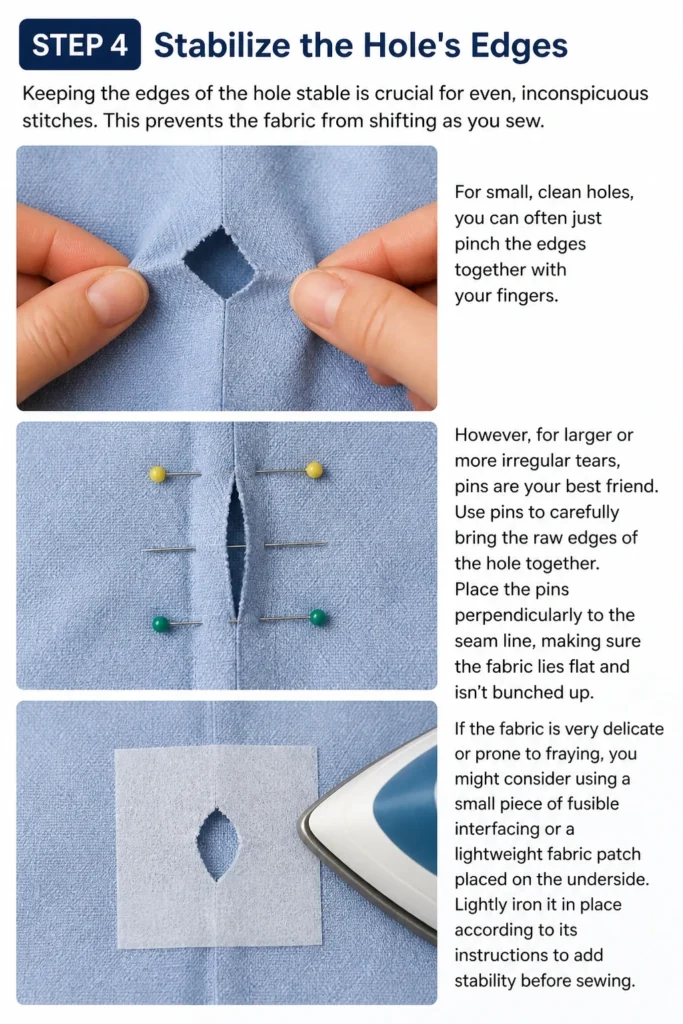
For small, clean holes, you can often just pinch the edges together with your fingers. However, for larger or more irregular tears, pins are your best friend.
Use pins to carefully bring the raw edges of the hole together. Place the pins perpendicularly to the seam line, making sure the fabric lies flat and isn’t bunched up.
If the fabric is very delicate or prone to fraying, you might consider using a small piece of fusible interfacing or a lightweight fabric patch placed on the underside. Lightly iron it in place according to its instructions to add stability before sewing.
Step 5: Begin Sewing with a Running Stitch or Whipstitch
Now it’s time to put needle and thread to fabric. Choose the stitch that best suits the type of hole you’re repairing.
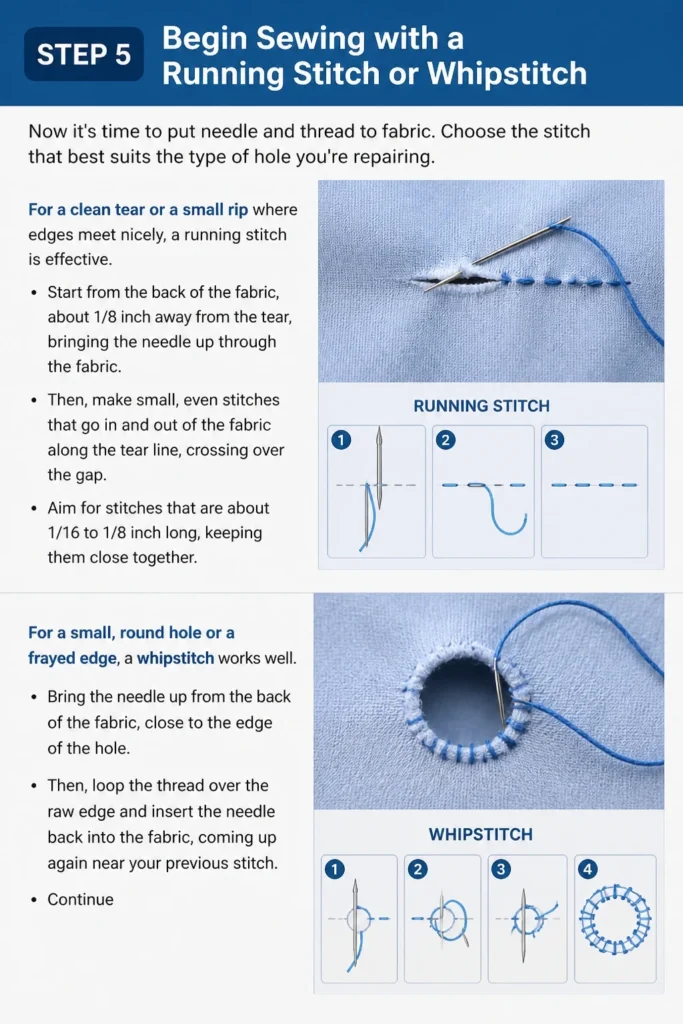
For a clean tear or a small rip where edges meet nicely, a running stitch is effective. Start from the back of the fabric, about 1/8 inch away from the tear, bringing the needle up through the fabric.
Then, make small, even stitches that go in and out of the fabric along the tear line, crossing over the gap. Aim for stitches that are about 1/16 to 1/8 inch long, keeping them close together.
For a small, round hole or a frayed edge, a whipstitch works well. Bring the needle up from the back of the fabric, close to the edge of the hole.
Then, loop the thread over the raw edge and insert the needle back into the fabric, coming up again near your previous stitch. Continue this motion, creating small, diagonal stitches that hug the edge and close the hole.
Step 6: Reinforce Your Stitches
One pass of stitches might not be enough for a durable repair, especially on frequently worn garments or stretchy fabrics.
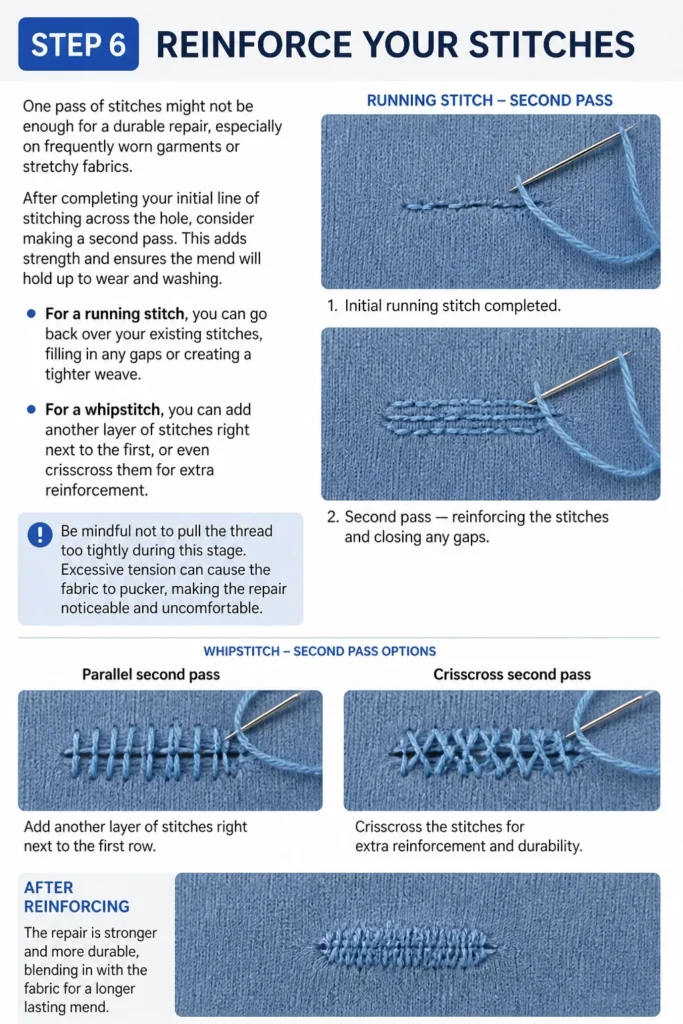
After completing your initial line of stitching across the hole, consider making a second pass. This adds strength and ensures the mend will hold up to wear and washing.
For a running stitch, you can go back over your existing stitches, filling in any gaps or creating a tighter weave. For a whipstitch, you can add another layer of stitches right next to the first, or even crisscross them for extra reinforcement.
Be mindful not to pull the thread too tightly during this stage. Excessive tension can cause the fabric to pucker, making the repair noticeable and uncomfortable.
Step 7: Secure the Thread and Trim
Once you’re satisfied with the repair, it’s time to finish off your thread securely. This prevents your hard work from unraveling.
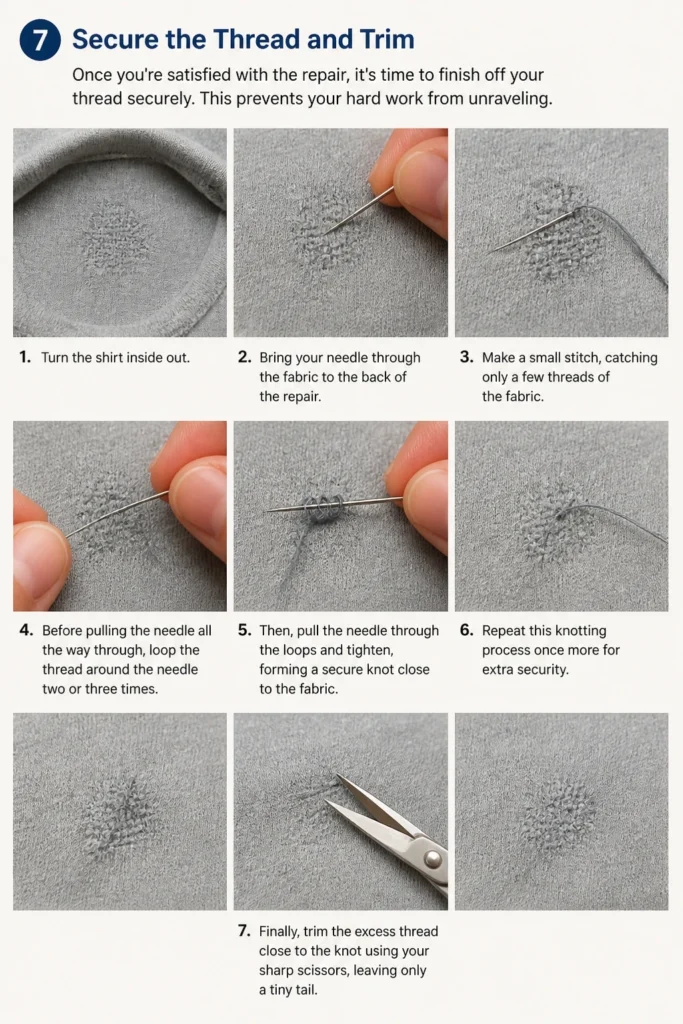
Turn the shirt inside out. Bring your needle through the fabric to the back of the repair. Make a small stitch, catching only a few threads of the fabric.
Before pulling the needle all the way through, loop the thread around the needle two or three times. Then, pull the needle through the loops and tighten, forming a secure knot close to the fabric.
Repeat this knotting process once more for extra security. Finally, trim the excess thread close to the knot using your sharp scissors, leaving only a tiny tail.
Step 8: Final Inspection and Pressing
The last steps ensure your repair looks neat and is ready for wear. A final check can make all the difference.
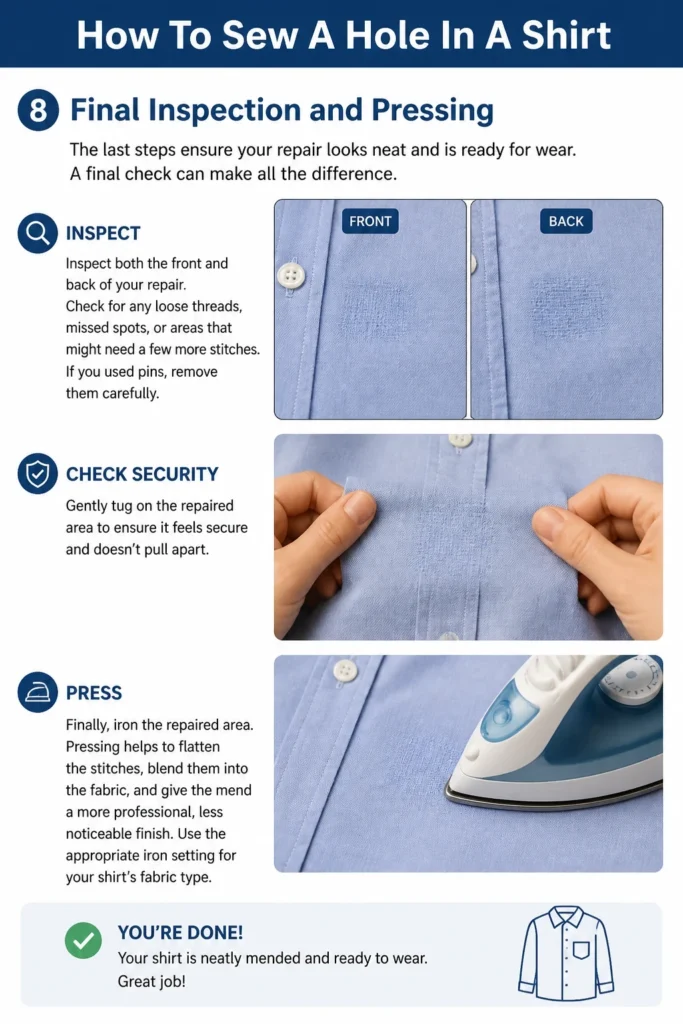
Inspect both the front and back of your repair. Check for any loose threads, missed spots, or areas that might need a few more stitches.
If you used pins, remove them carefully. Gently tug on the repaired area to ensure it feels secure and doesn’t pull apart.
Finally, iron the repaired area. Pressing helps to flatten the stitches, blend them into the fabric, and give the mend a more professional, less noticeable finish. Use the appropriate iron setting for your shirt’s fabric type.
Common Mistakes to Avoid
Using the Wrong Thread Color
Many beginners grab any thread they have on hand, but an ill-matched thread color can make your repair stand out dramatically. A lighter thread on a darker fabric, or vice-versa, draws immediate attention to the mended area.
Always take the time to find thread that is an exact or very close match to your shirt’s fabric. If in doubt, a slightly darker shade will often blend in better than a lighter one, making the repair less conspicuous.
Pulling Stitches Too Tight
It’s tempting to pull your stitches as tight as possible, thinking it will make the mend stronger. However, this common mistake leads to puckering and distortion of the fabric around the hole.
Maintain consistent, gentle tension as you sew. The stitches should be snug enough to hold the fabric together but loose enough to allow the fabric to lie flat and naturally. Pressing the area afterward can sometimes help release minor puckering.
Not Preparing the Fabric Properly
Skipping the initial steps of washing, ironing, and trimming frayed edges can undermine your entire repair. Loose threads can get caught in your stitches, and wrinkles make it difficult to align the fabric accurately.
Always start with a clean, ironed shirt. Take a moment to trim any stray threads around the hole. This creates a smooth, stable foundation for your stitches, ensuring a neater and more durable result.
Ignoring the Back of the Repair
Focusing solely on the visible side of the repair can lead to messy knots and loose ends on the inside of the garment. These can irritate your skin or snag on other items in the wash, potentially unraveling your work.
Always secure your knots on the inside of the garment, making them as flat and unobtrusive as possible. Ensure all thread tails are neatly trimmed close to the knot to prevent them from catching or unraveling.
Troubleshooting
Stitches Look Messy or Uneven
If your stitches appear inconsistent, too large, or generally untidy, it’s a common beginner hurdle. This often happens from inconsistent tension or rushing the process.
Solution: Practice makes perfect. Start by making smaller, more deliberate stitches. Try to keep your stitch length and spacing uniform. Use good lighting to clearly see your work. Consider using a thimble to help push the needle through evenly. Don’t be afraid to unpick and re-sew if you’re not happy with the result.
Hole Keeps Expanding Despite Sewing
Sometimes, despite your best efforts, the fabric around the hole seems to continue fraying or the hole itself appears to grow. This is particularly common with loosely woven or very delicate fabrics.
Solution: For persistent fraying, consider applying a small amount of clear fabric glue or fray check along the raw edges before you begin sewing. For larger or aggressively expanding holes, hand sewing might not be enough. You may need to reinforce the area with a small patch of similar fabric applied to the underside of the hole, then sew around the patch and the hole’s edges.
Fabric Puckering After Sewing
If your shirt fabric gathers or puckers around the mended area, it’s almost always a sign that your stitches were pulled too tightly during the sewing process.
Solution: Gently release some tension in your stitches. If the puckering is severe, you might need to carefully unpick a few stitches and re-sew them with a lighter hand. Always aim for snug but not tight stitches. After completing the mend, a good pressing with an iron (using steam if appropriate for the fabric) can often help relax the fabric and reduce minor puckering.
Key Takeaways
- Preparation is paramount: Always wash, iron, and trim the hole before sewing for the best results.
- Matching your thread color closely to the fabric is crucial for an inconspicuous repair.
- Small, even stitches create a stronger and neater mend that blends into the fabric.
- Avoid pulling your stitches too tightly to prevent fabric puckering and distortion.
- Reinforce your stitches, especially in high-wear areas, to ensure the repair lasts.
- Mending your clothes not only saves money but also extends the life of your favorite garments.
Frequently Asked Questions
Can I machine sew a small hole instead of hand sewing?
Yes, you can machine sew a small hole, especially if it’s a straight tear along a seam or if you’re not concerned about the stitches being highly visible. However, hand sewing offers greater control, particularly for irregular holes or delicate fabrics, allowing for a more subtle and tailored repair that machine sewing often can’t achieve.
What if the hole is very large or in a high-stress area?
For very large holes or those in areas like elbows or knees that experience a lot of stress, a simple hand stitch might not be sufficient. In these cases, a patch repair is usually more durable and effective. You can either sew a patch onto the outside (visible mending) or the inside of the garment, securing it with stitches around its edges and the hole’s perimeter.
How do I prevent new holes from forming in my shirts?
Preventing holes often comes down to proper garment care. Wash your shirts according to their care labels, using gentle cycles for delicate fabrics. Avoid overloading your washing machine, which can cause friction. Store clothes carefully to prevent snagging, and address small snags or loose threads promptly before they turn into larger holes.
What kind of needle should I use for different shirt fabrics?
For most standard cotton or synthetic blend shirts, a universal hand sewing needle (size 7 or 8) is appropriate. For very fine or delicate fabrics like silk or chiffon, opt for a sharper, finer needle (like a sharps or embroidery needle). For thicker fabrics like denim or canvas, a sturdier needle (like a denim or upholstery needle) might be necessary to prevent bending or breaking.
Our Top Recommended Finds
- Assorted Hand Sewing Needles: A multi-pack provides various sizes and types, ensuring you have the right needle for any fabric thickness or task.
- All-Purpose Polyester Thread Kit: A kit with a wide range of colors ensures you always have a matching or near-matching thread for almost any garment.
- Small Fabric Scissors: Dedicated fabric scissors stay sharper longer, preventing snags and ensuring clean cuts for neat repairs.
Embrace the Art of Mending
You now possess the knowledge and confidence to tackle those annoying holes in your shirts. This isn’t just about fixing a garment; it’s about valuing what you own and extending its story.
Mending is a quiet act of sustainability, a small but significant step away from our disposable culture. Each stitch you make is a testament to your resourcefulness and care.
Don’t stop here. Consider exploring other simple mending techniques, like visible mending to add character, or learning how to replace a button. Grab that needle and thread today and give your favorite shirt a new lease on life!
Beginner-friendly templates, step-by-step guides,
and weekly project ideas in your inbox.