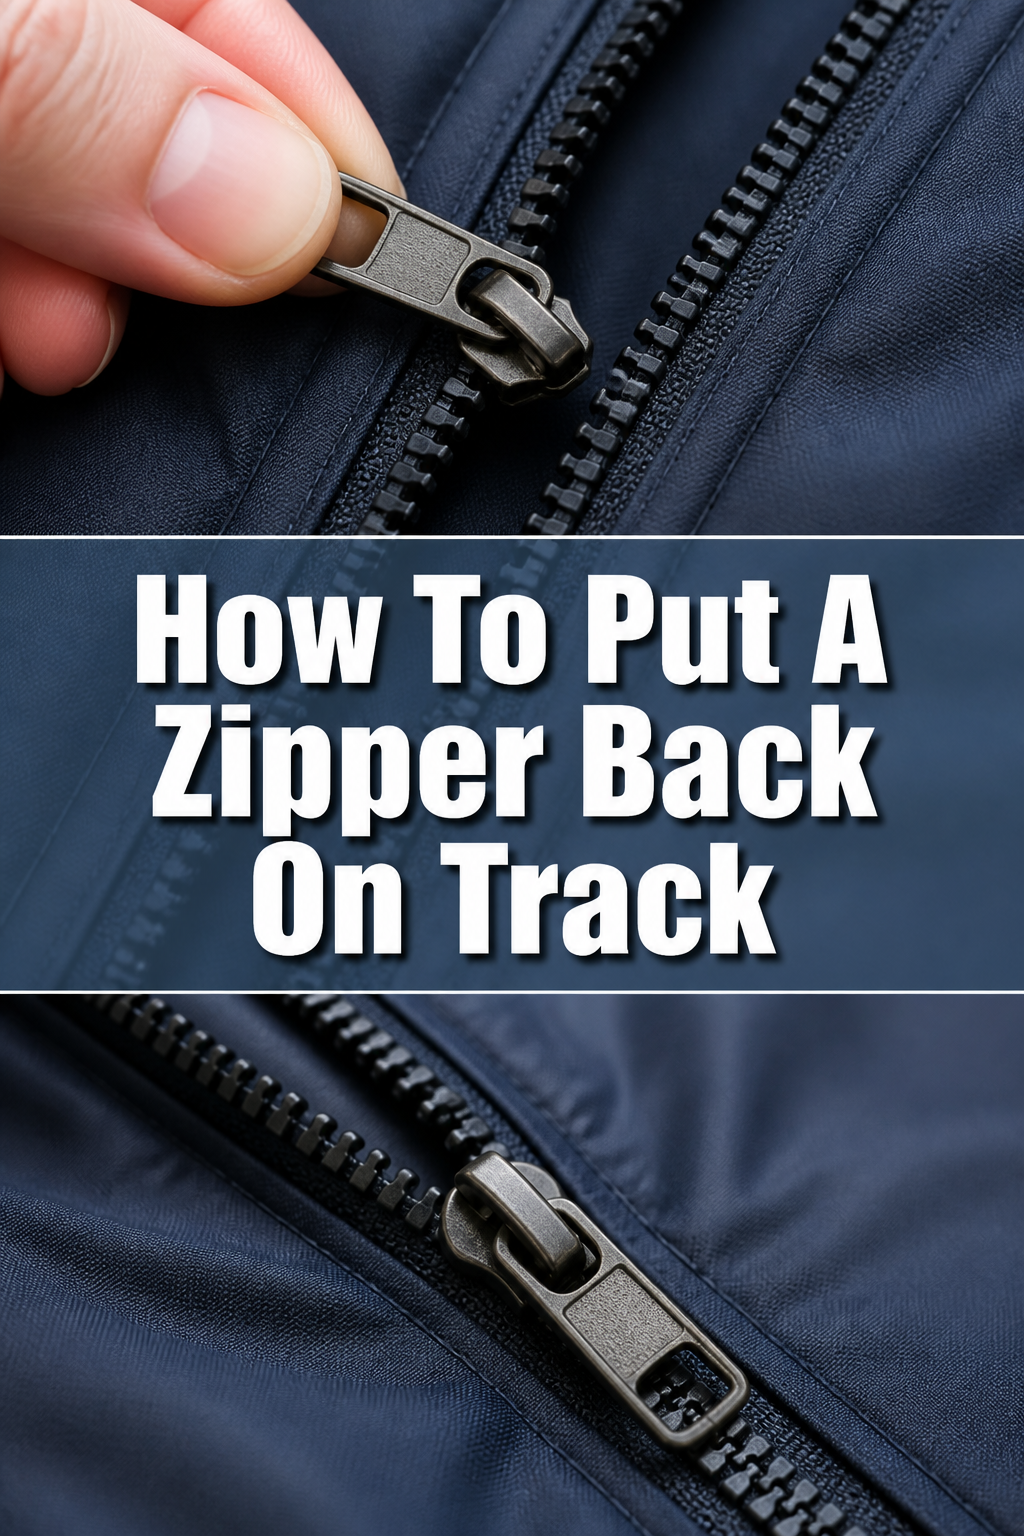
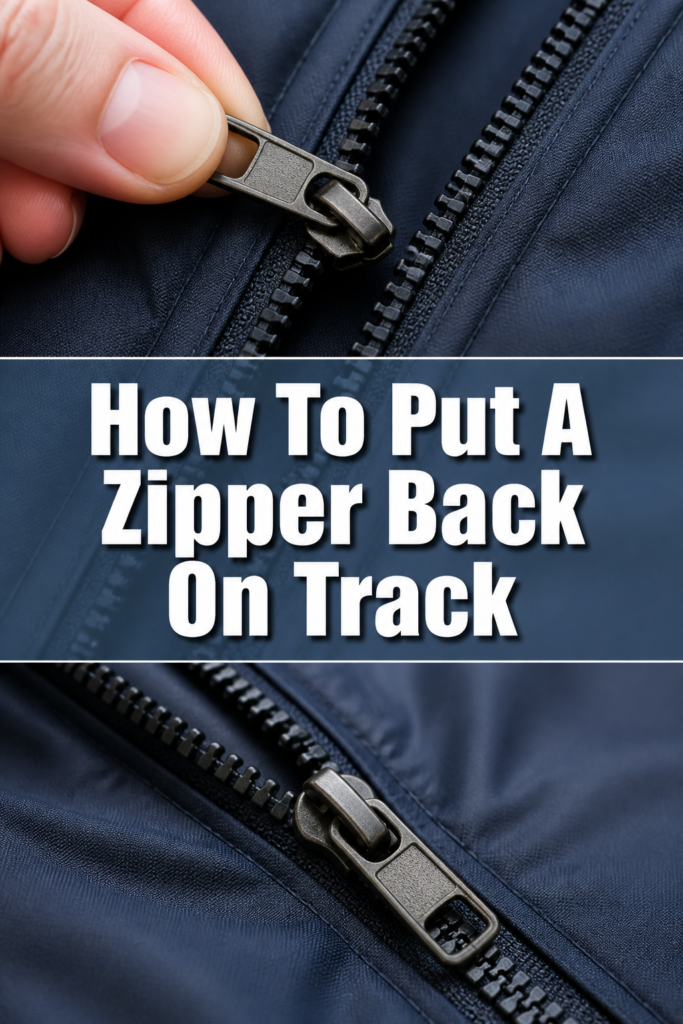
⚙️ How To Put A Zipper Back On Track

Beginner-friendly templates, step-by-step guides,
and weekly project ideas in your inbox.
There’s nothing quite as frustrating as a zipper that refuses to cooperate. One moment it’s working perfectly, the next it’s jammed, separated, or completely off its track. I’ve certainly been there, wrestling with coats, bags, and even tent zippers at the most inconvenient times.
But don’t despair; a misaligned zipper isn’t necessarily a death sentence for your favorite item. With a little patience and the right approach, you can often bring it back to life yourself. This guide will walk you through the practical steps to put a zipper back on track, saving you time and money.
Quick Overview
Getting your zipper back in working order is a rewarding task that prevents perfectly good items from being discarded. Here’s what you can expect from this repair.
- Time needed: 15-45 minutes, depending on the zipper type and damage.
- Difficulty: Beginner to Intermediate. Basic manual dexterity is helpful.
- What you’ll need: Needle-nose pliers, small flathead screwdriver, scissors, seam ripper (optional), graphite pencil, wax (candle wax or crayon), clear nail polish (optional), replacement bottom stopper (optional).
Step-by-Step Instructions
Step 1: Assess the Zipper’s Condition
Before you start any repair, take a moment to understand what went wrong. Look closely at the zipper slider, the teeth, and the fabric tape.
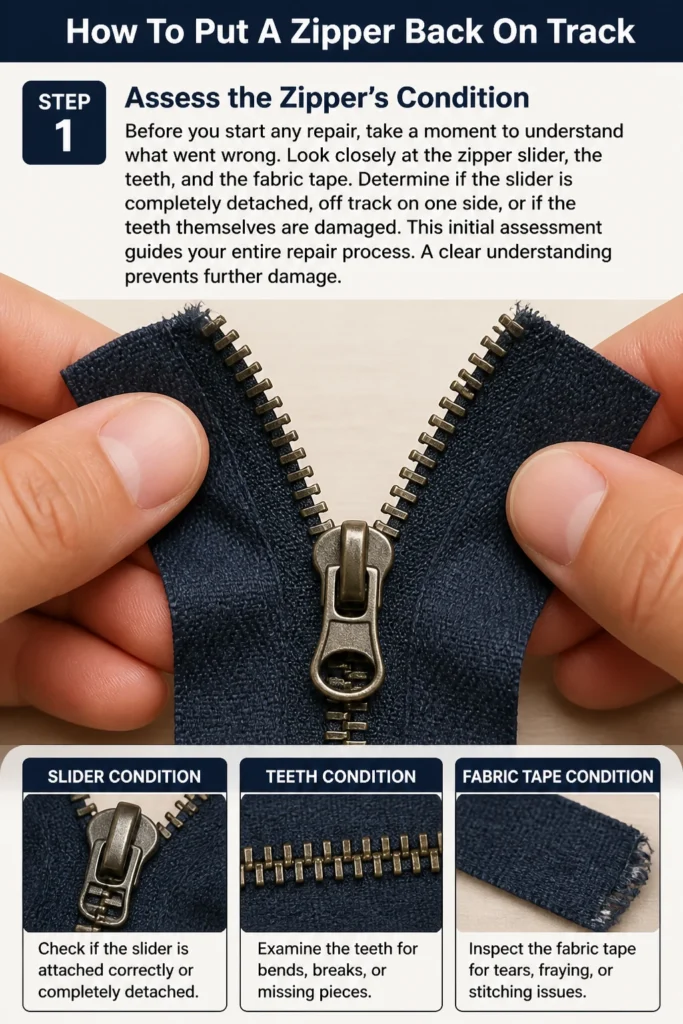
Determine if the slider is completely detached, off track on one side, or if the teeth themselves are damaged. This initial assessment guides your entire repair process. A clear understanding prevents further damage.
Step 2: Gather Your Tools
Having all your tools ready before you begin saves time and frustration. Lay them out on a clean, well-lit surface.
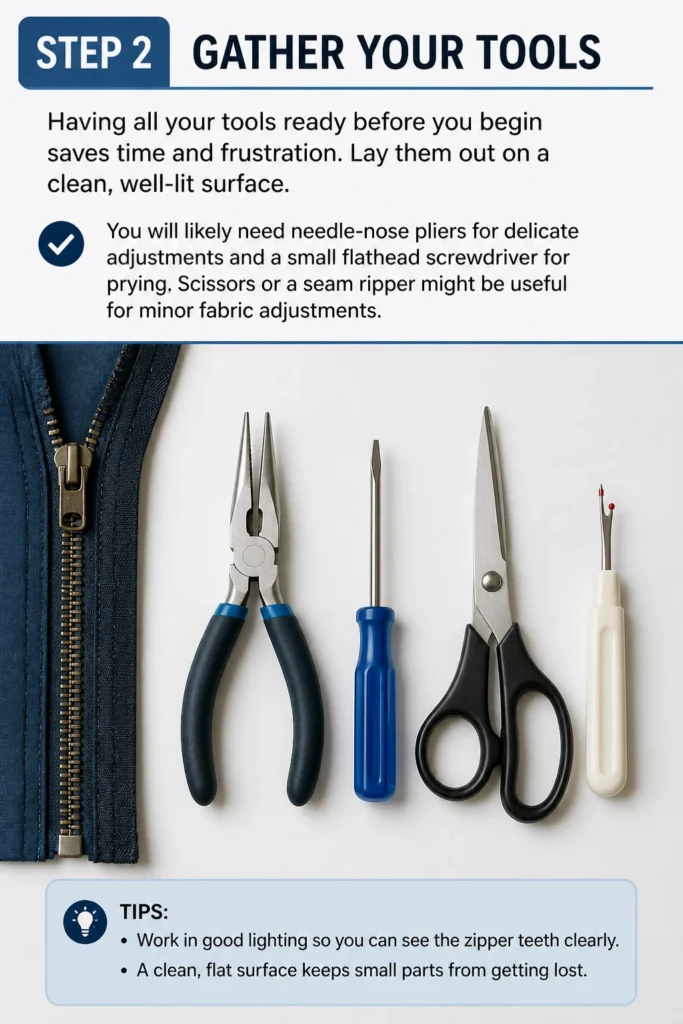
You will likely need needle-nose pliers for delicate adjustments and a small flathead screwdriver for prying. Scissors or a seam ripper might be useful for minor fabric adjustments.
Step 3: Clear the Zipper Path
Often, a zipper comes off track because something is obstructing its path. Look for stray threads, lint, or fabric caught in the teeth.
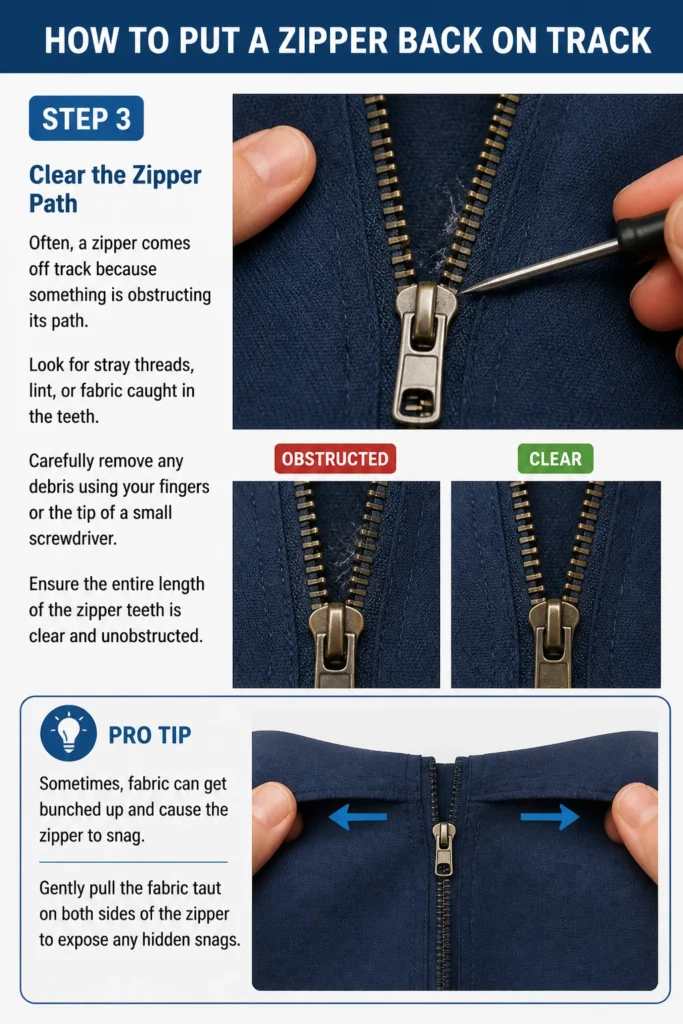
Carefully remove any debris using your fingers or the tip of a small screwdriver. Ensure the entire length of the zipper teeth is clear and unobstructed.
Pro Tip: Sometimes, fabric can get bunched up and cause the zipper to snag. Gently pull the fabric taut on both sides of the zipper to expose any hidden snags.
Step 4: Prepare the Zipper Teeth
For the slider to re-engage properly, the zipper teeth must be perfectly aligned and straight. Examine the teeth for any bends or distortions.
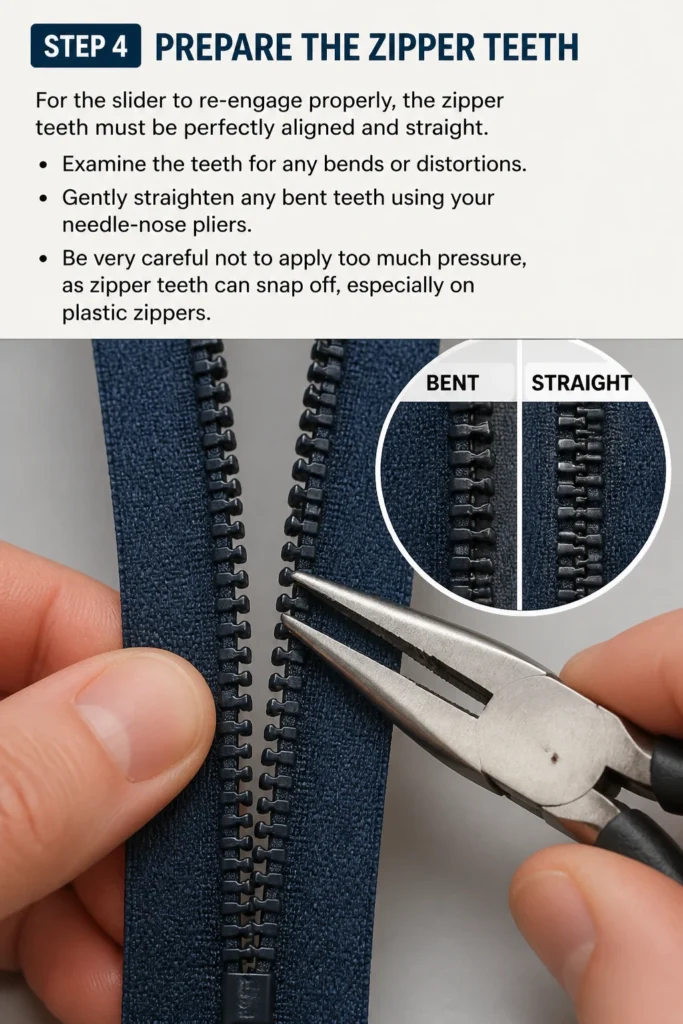
Gently straighten any bent teeth using your needle-nose pliers. Be very careful not to apply too much pressure, as zipper teeth can snap off, especially on plastic zippers.
Step 5: Realign the Slider (If Off One Side)
If the slider is still attached but has come off the track on one side, this step is for you. The goal is to get both sides of the zipper teeth back into the slider’s channel.
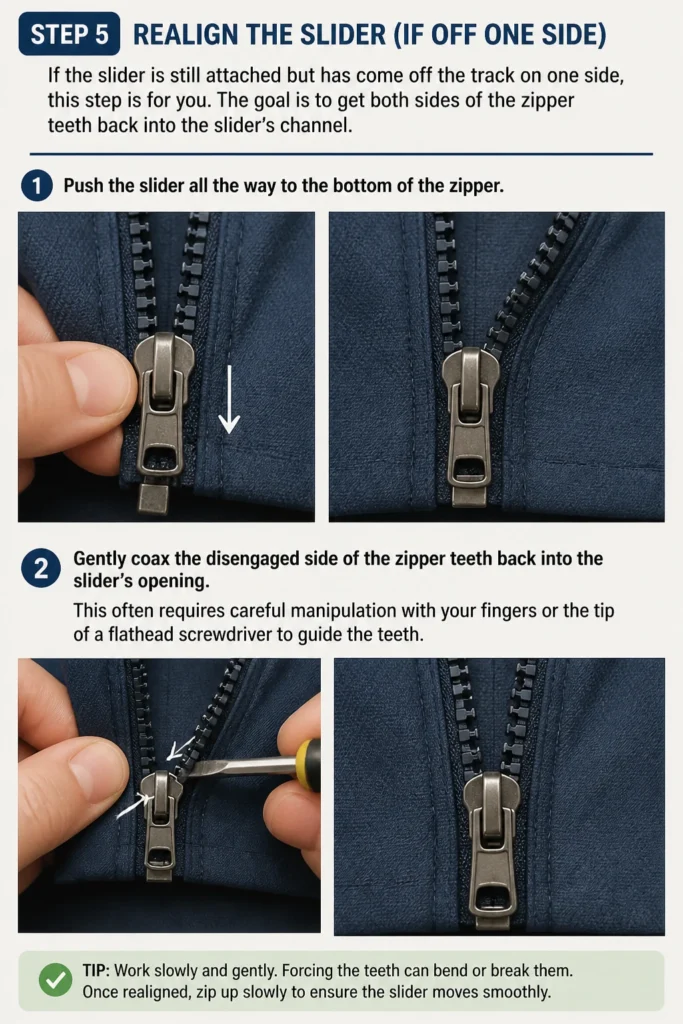
Push the slider all the way to the bottom of the zipper. Gently coax the disengaged side of the zipper teeth back into the slider’s opening. This often requires careful manipulation with your fingers or the tip of a flathead screwdriver to guide the teeth.
Step 6: Reattach the Slider (If Fully Detached)
When the slider has completely come off the zipper, you’ll need to reattach it from the bottom. This is usually done where the zipper tape is weakest.
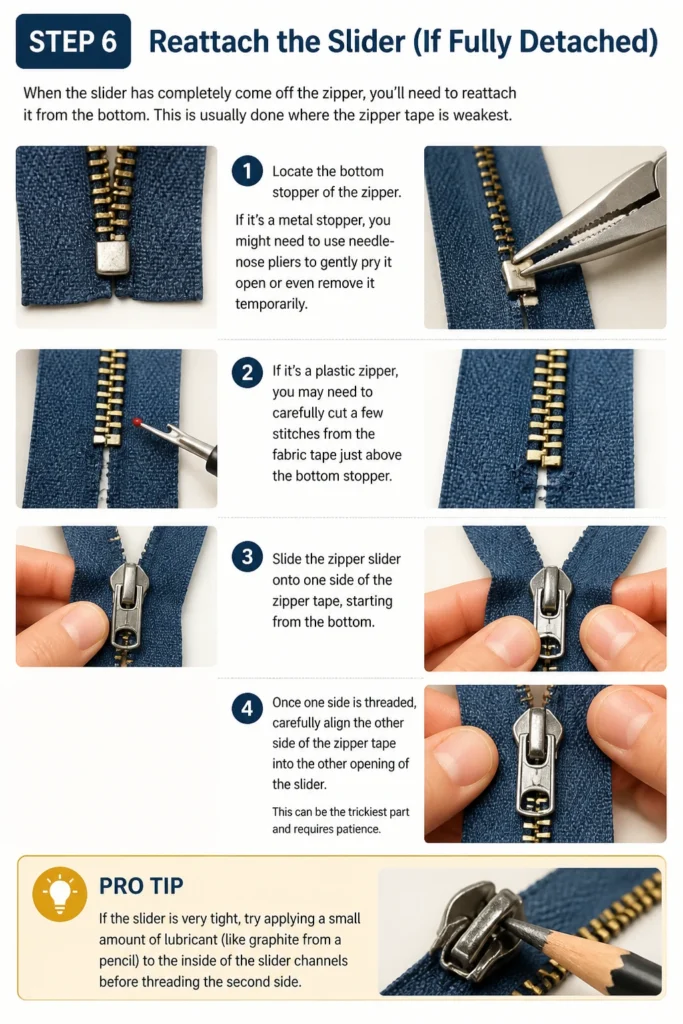
Locate the bottom stopper of the zipper. If it’s a metal stopper, you might need to use needle-nose pliers to gently pry it open or even remove it temporarily. If it’s a plastic zipper, you may need to carefully cut a few stitches from the fabric tape just above the bottom stopper.
Slide the zipper slider onto one side of the zipper tape, starting from the bottom. Once one side is threaded, carefully align the other side of the zipper tape into the other opening of the slider. This can be the trickiest part and requires patience.
Pro Tip: If the slider is very tight, try applying a small amount of lubricant (like graphite from a pencil) to the zipper teeth before attempting to reattach it. This can help the slider glide on more easily.
Step 7: Secure the Bottom Stopper
After reattaching the slider, it’s crucial to secure the bottom of the zipper to prevent the slider from coming off again. This is especially important if you removed or damaged the original stopper.
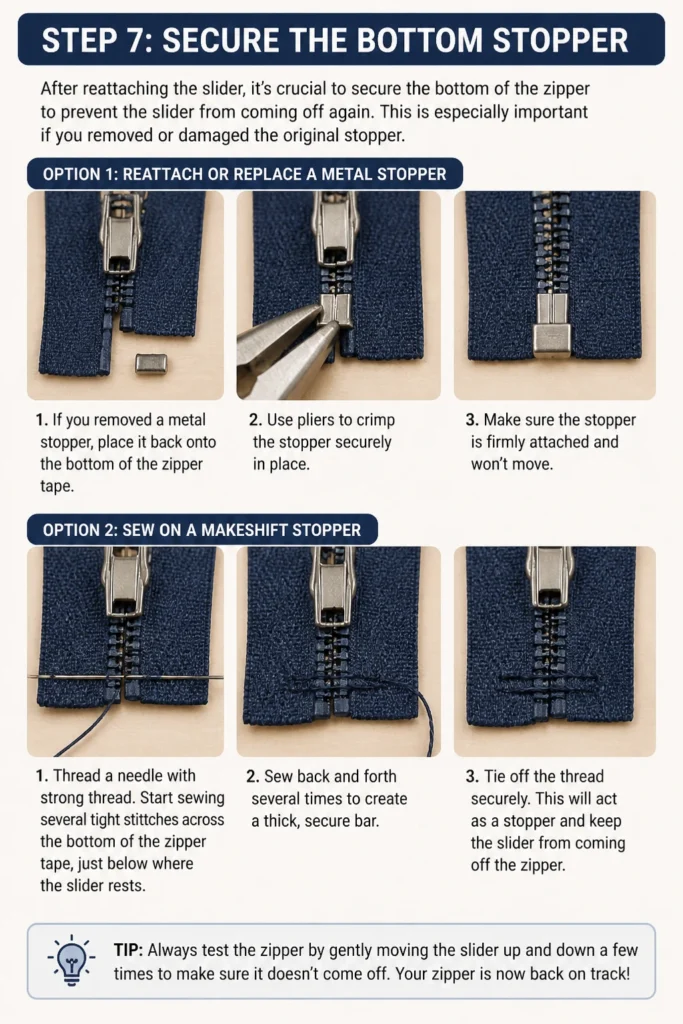
If you removed a metal stopper, crimp it back into place with pliers. If you cut stitches or need a new stopper, you can purchase a replacement metal bottom stopper from a craft store. Attach the new stopper using pliers, ensuring it’s firmly secured. Alternatively, you can create a makeshift stopper by hand-sewing a few tight stitches across the bottom of the zipper tape, just below where the slider rests.
Step 8: Test the Zipper’s Movement
With the slider back on track and the bottom secured, it’s time to test your work. Gently pull the zipper slider upwards a short distance.
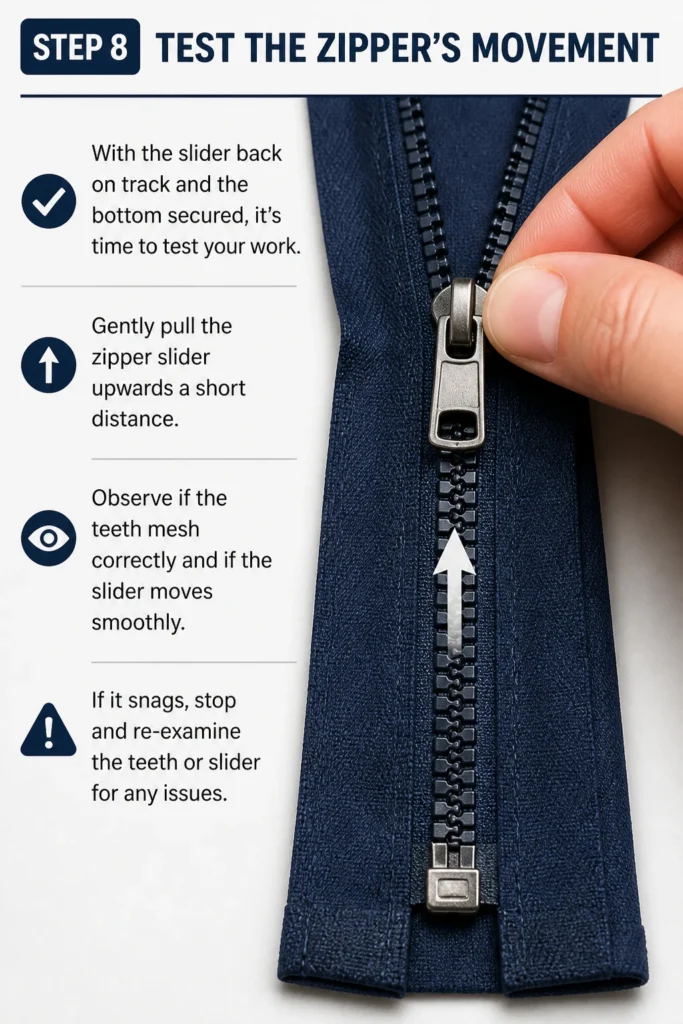
Observe if the teeth mesh correctly and if the slider moves smoothly. If it snags, stop and re-examine the teeth or slider for any issues.
Step 9: Lubricate for Smoothness
A little lubrication can make a big difference in the long-term performance of your zipper. This is especially helpful for sticky or stubborn zippers.
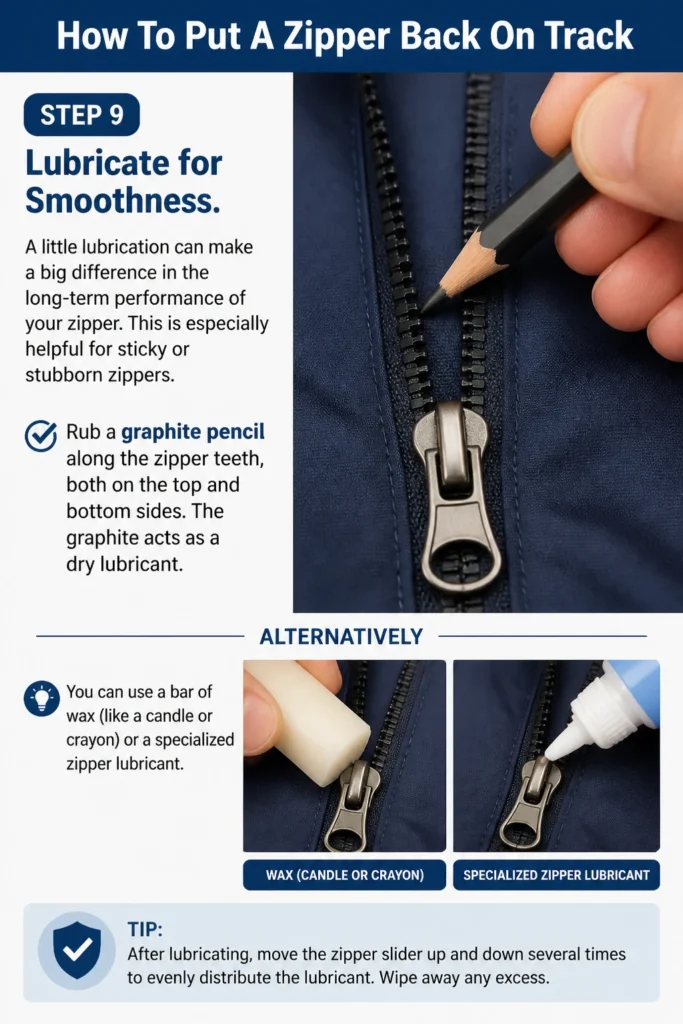
Rub a graphite pencil along the zipper teeth, both on the top and bottom sides. The graphite acts as a dry lubricant. Alternatively, you can use a bar of wax (like a candle or crayon) or a specialized zipper lubricant.
Step 10: Reinforce and Prevent Future Issues
Once your zipper is working smoothly, consider reinforcing any weak points. This can help prevent the problem from recurring.
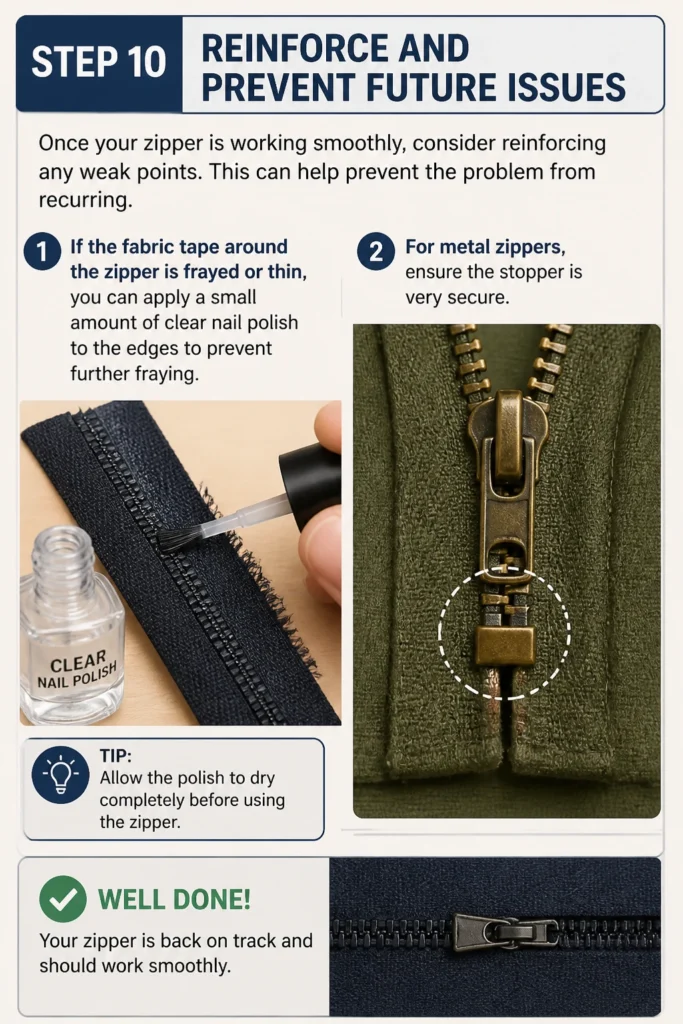
If the fabric tape around the zipper is frayed or thin, you can apply a small amount of clear nail polish to the edges to prevent further fraying. For metal zippers, ensure the stopper is very secure.
Common Mistakes to Avoid
Forcing the Zipper
Attempting to yank a stuck zipper with excessive force is a common mistake. This can bend or break the slider, tear the zipper tape, or snap the teeth off entirely. Instead, always try to understand why the zipper is stuck before applying gentle, controlled pressure. Patience is key to a successful repair.
Ignoring Bent or Damaged Teeth
Many people try to force the slider over bent or damaged teeth without straightening them first. This will only cause the slider to jam again or further damage the teeth, making the problem worse. Always inspect and carefully straighten any misaligned teeth before attempting to move the slider.
Using the Wrong Tools
Using large, blunt pliers or screwdrivers for delicate zipper work can easily damage the small components. The fine mechanisms of a zipper require precision. Always opt for needle-nose pliers and small, thin flathead screwdrivers for careful manipulation.
Neglecting the Top or Bottom Stopper
The stoppers at the ends of the zipper are crucial for keeping the slider on track. If a stopper is damaged or missing, the slider will repeatedly come off. Don’t overlook replacing or reinforcing these stoppers if they are compromised.
Troubleshooting
Zipper Keeps Getting Stuck
If your zipper frequently snags or gets stuck, the teeth might be dirty, or the slider could be slightly misaligned. First, clean the teeth thoroughly, removing any lint or debris. Then, apply a lubricant like graphite or wax. If it still sticks, carefully examine the slider’s opening; it might be slightly too wide or narrow.
You can gently squeeze the sides of the slider with pliers to narrow the opening slightly, or carefully pry it open a tiny bit with a small screwdriver if it’s too tight. Make only very small adjustments.
Zipper Teeth Don’t Mesh Properly
This usually indicates that the slider is not correctly aligned or the teeth themselves are bent. Ensure that the slider is perfectly centered and parallel to the zipper teeth when you try to close it. Re-examine each tooth for bends or damage and straighten them meticulously with needle-nose pliers.
Sometimes, the slider’s “throat” might be too wide, failing to bring the teeth together. Gently squeeze the slider’s sides with pliers, making very small adjustments, to reduce the gap.
Slider Keeps Coming Off the Bottom
If the slider detaches from the bottom of the zipper, it means the bottom stopper is either damaged, missing, or not secure enough. You will need to install a new bottom stopper or reinforce the existing one.
Purchase a metal bottom stopper from a sewing supply store and crimp it firmly into place with pliers. Alternatively, you can create a strong, tight series of hand stitches across the zipper tape, just below where the slider rests when closed, to act as a barrier.
Key Takeaways
- Patience is Paramount: Rushing or forcing a zipper will likely cause more damage. Take your time with each step.
- Detailed Inspection is Crucial: Before acting, thoroughly examine the slider, teeth, and fabric tape to understand the exact problem.
- Use the Right Tools: Precision tools like needle-nose pliers and small screwdrivers prevent accidental damage to delicate zipper components.
- Cleanliness and Lubrication Help: Keeping zipper teeth free of debris and applying a lubricant like graphite ensures smooth, lasting operation.
- Secure the Stoppers: The top and bottom stoppers are essential for keeping the slider on track; repair or replace them if damaged.
- Preventative Measures Work: Reinforcing frayed fabric or applying clear nail polish can extend the life of your zipper.
Frequently Asked Questions
Can I fix a zipper if some teeth are missing?
Fixing a zipper with missing teeth is significantly more challenging and often not a permanent repair. If only one or two teeth are missing near the top or bottom, you might be able to sew a new stopper above or below the gap, effectively shortening the usable zipper length. However, for multiple missing teeth in the middle, it’s usually best to replace the entire zipper.
What if the zipper slider itself is broken?
If the zipper slider is cracked, bent beyond repair, or its pull tab has broken off, you will need to replace the slider. Zipper repair kits often come with various sized replacement sliders. To replace it, you typically remove the top or bottom stopper, slide the old slider off, and slide a new, correctly sized slider onto the teeth, then re-secure the stopper.
How can I prevent my zipper from coming off track again?
Regular maintenance is key to preventing future issues. Keep your zippers clean and free of debris. Lubricate them periodically with a graphite pencil or zipper wax, especially on items used frequently or exposed to the elements. Ensure both top and bottom stoppers are secure and consider reinforcing any frayed fabric near the zipper ends with clear nail polish.
Our Top Recommended Finds
- Precision Needle-Nose Pliers: Essential for carefully manipulating small zipper teeth and stoppers without causing further damage.
- Zipper Repair Kit: A comprehensive kit often includes various sizes of replacement sliders, top and bottom stoppers, and often the specialized tools needed for common repairs.
- Graphite Pencil: An inexpensive and effective dry lubricant that can significantly improve zipper smoothness and prevent sticking.
Empower Your Everyday Repairs
You now have the knowledge and steps to tackle a common household frustration. Don’t let a faulty zipper render an otherwise perfectly good item useless. Taking a few minutes to repair it yourself is not only cost-effective but also incredibly satisfying.
Give these steps a try the next time a zipper goes rogue. You might be surprised at how capable you are. Your favorite coat, bag, or pair of pants will thank you for it.
Beginner-friendly templates, step-by-step guides,
and weekly project ideas in your inbox.