🎀 How To Tie A Bow With A Fork

Beginner-friendly templates, step-by-step guides,
and weekly project ideas in your inbox.
Learning to tie a perfect bow can feel like a secret art. This simple trick, however, transforms a common kitchen utensil into a powerful crafting tool. I’ve personally used this method countless times to add a touch of elegance to gifts and crafts.
This guide will walk you through each movement, ensuring your bows are consistently beautiful. You’ll master a technique that is both quick and incredibly satisfying.
Quick Overview
This technique will empower you to create neat, symmetrical bows with surprising ease. You’ll transform a simple piece of ribbon into a charming embellishment. This skill is perfect for gifts, hair accessories, or any decorative touch.
- Time needed: 5-10 minutes per bow (once mastered)
- Difficulty: Beginner
- What you’ll need: A standard dinner fork, ribbon, and scissors
Step-by-Step Instructions
Step 1: Gather Your Tools
Collect all your necessary supplies on a flat, well-lit surface. This includes your chosen ribbon, a standard dinner fork, and a sharp pair of scissors.
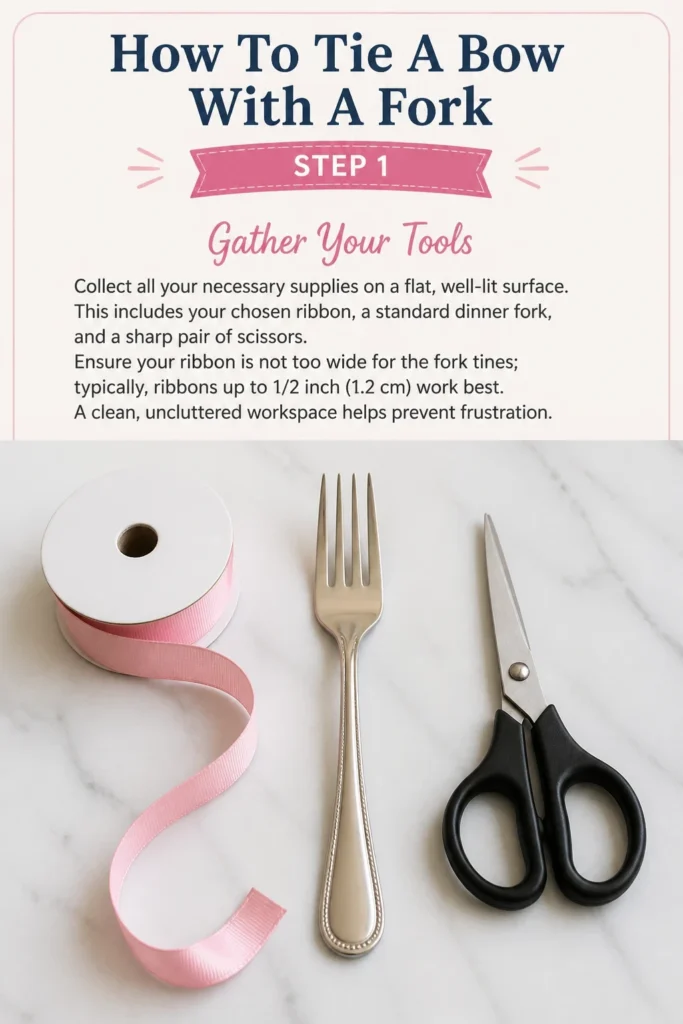
Ensure your ribbon is not too wide for the fork tines; typically, ribbons up to 1/2 inch (1.2 cm) work best. A clean, uncluttered workspace helps prevent frustration.
Step 2: Position the Ribbon
Hold your fork horizontally, tines facing away from you. Take one end of your ribbon and lay it across the middle tines of the fork.
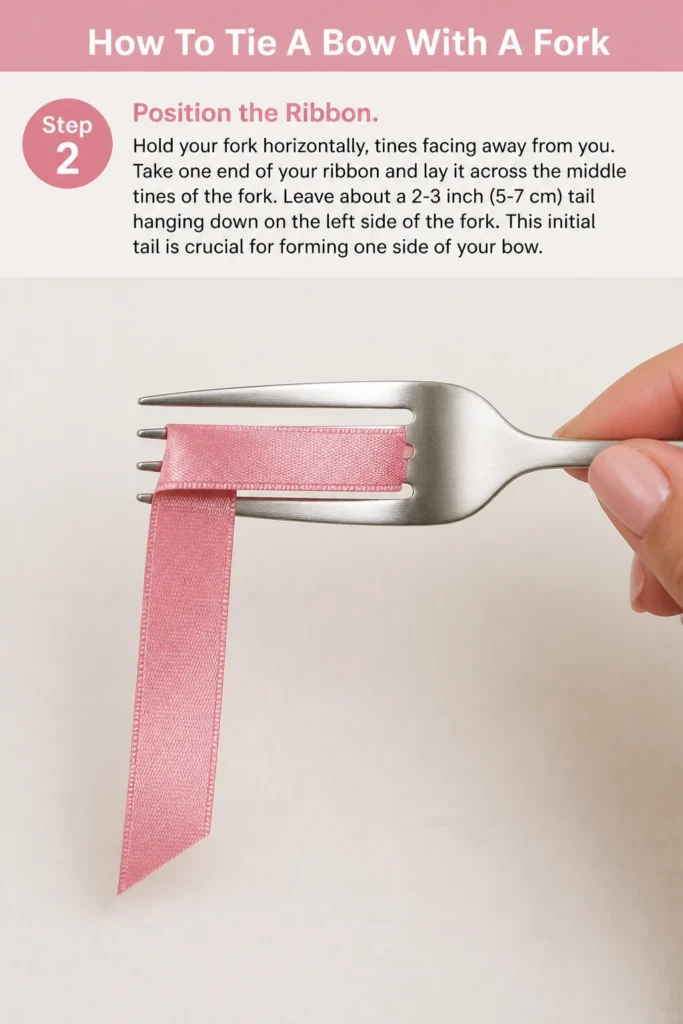
Leave about a 2-3 inch (5-7 cm) tail hanging down on the left side of the fork. This initial tail is crucial for forming one side of your bow.
Step 3: Wrap the First Side
Bring the longer, working end of the ribbon underneath the fork. Guide it up between the two middle tines, wrapping it around the back.
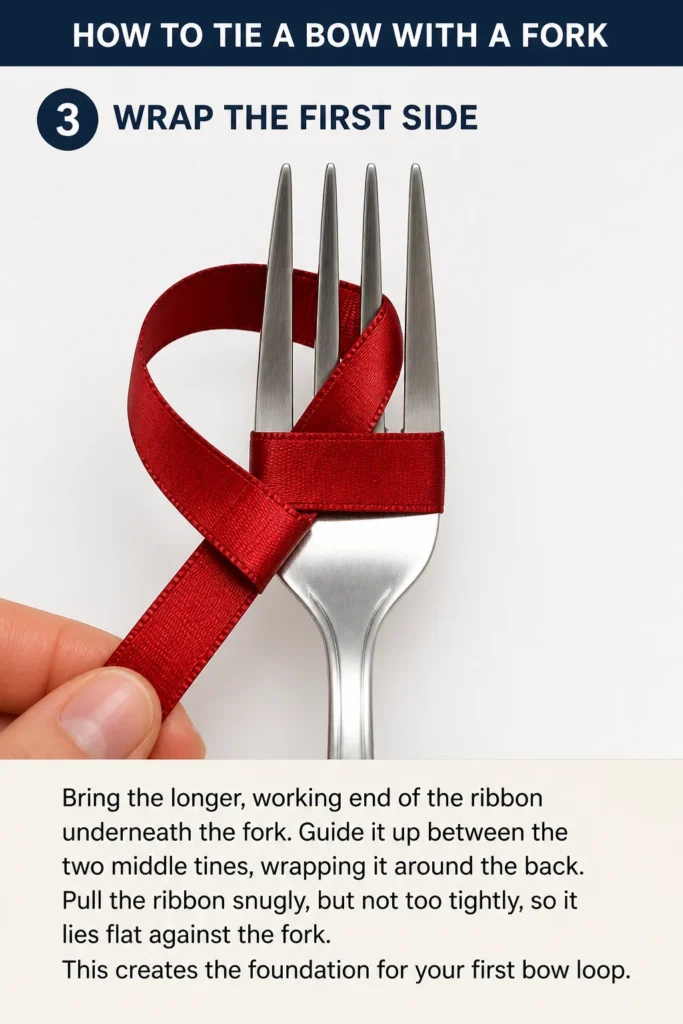
Pull the ribbon snugly, but not too tightly, so it lies flat against the fork. This creates the foundation for your first bow loop.
Step 4: Create the First Loop
Cross the working end of the ribbon over the top of the fork, going from right to left. It should pass over the initial tail you left on the left side.
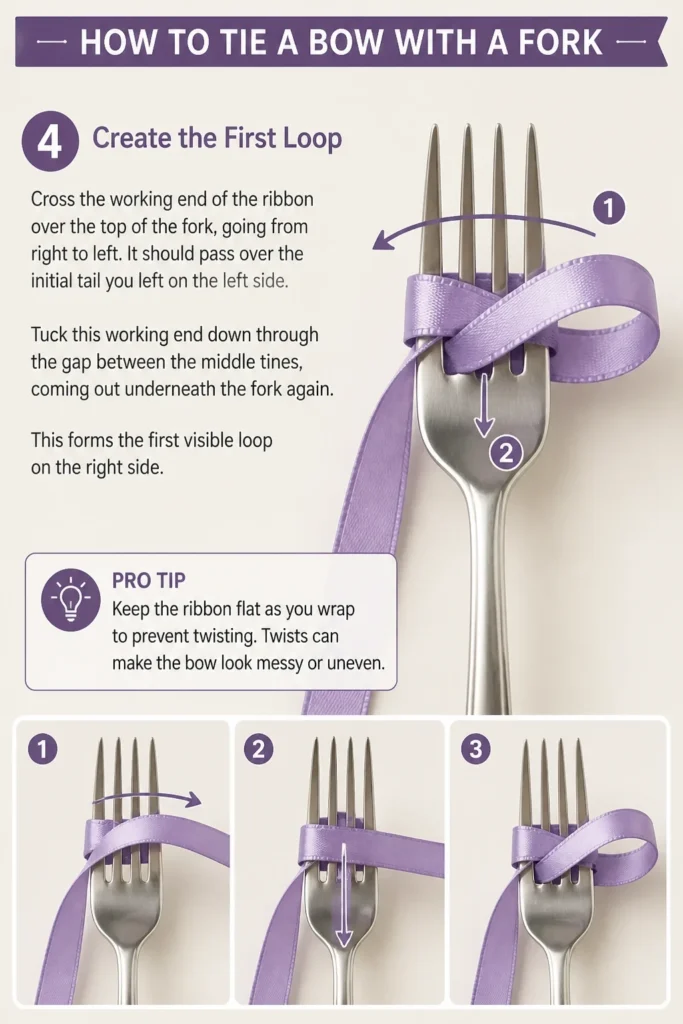
Tuck this working end down through the gap between the middle tines, coming out underneath the fork again. This forms the first visible loop on the right side.
Pro Tip: Keep the ribbon flat as you wrap to prevent twisting. Twists can make the bow look messy or uneven.
Step 5: Bring the Ribbon Through
Take the working end of the ribbon, which is now underneath the fork. Guide it up through the loop you just created on the right side.
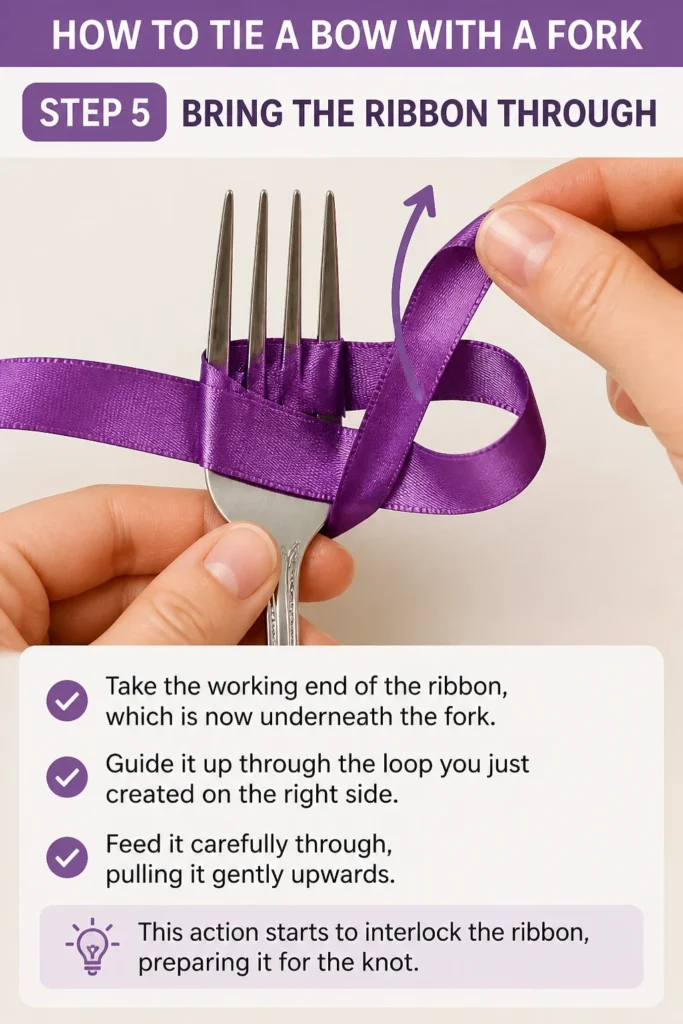
Feed it carefully through, pulling it gently upwards. This action starts to interlock the ribbon, preparing it for the knot.
Step 6: Form the Second Loop
Push the working end of the ribbon back down through the central gap, but this time, it should go over the initial tail on the left. This creates the second loop.
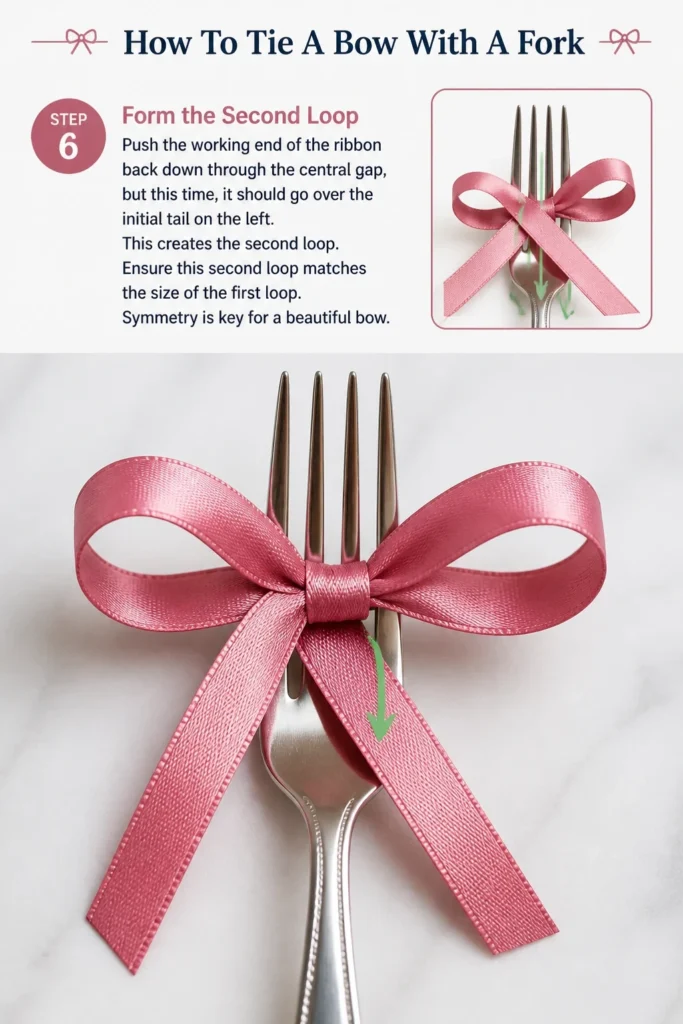
Ensure this second loop matches the size of the first loop. Symmetry is key for a beautiful bow.
Step 7: Tighten and Adjust
Carefully slide the ribbon off the tines of the fork. You will now have a loose, somewhat recognizable bow shape.
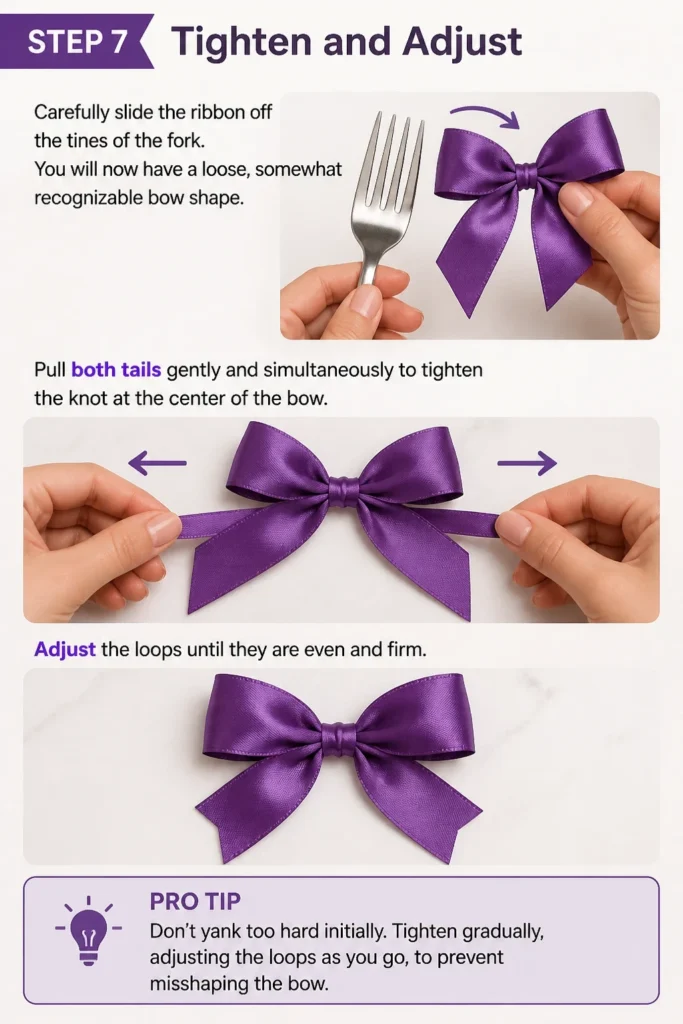
Pull both tails gently and simultaneously to tighten the knot at the center of the bow. Adjust the loops until they are even and firm.
Pro Tip: Don’t yank too hard initially. Tighten gradually, adjusting the loops as you go, to prevent misshaping the bow.
Step 8: Trim the Ends
Once your bow is perfectly shaped and tightened, use your scissors to trim the ribbon tails. You can cut them straight, at an angle, or create a V-shape for a classic finish.
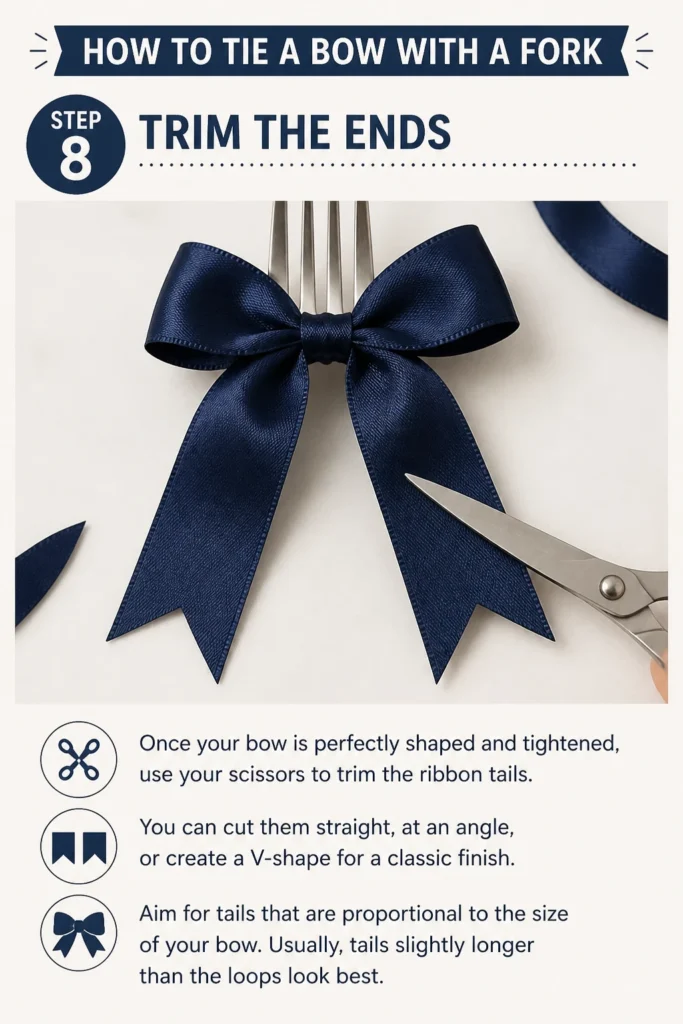
Aim for tails that are proportional to the size of your bow. Usually, tails slightly longer than the loops look best.
Common Mistakes to Avoid
Using Ribbon That’s Too Wide
Trying to use a ribbon wider than 1/2 inch (1.2 cm) often leads to frustration. The ribbon won’t fit neatly between the fork tines, making it difficult to wrap and pull through the gaps.
Stick to narrower ribbons, especially when you’re first learning. Once you’re comfortable, you can experiment with slightly wider ribbons on larger forks or by adjusting your technique.
Pulling Too Tightly Too Soon
A common error is to pull the ribbon extremely tight during the wrapping phase. This can distort the ribbon, make it difficult to slide off the fork, and result in a lopsided or crumpled bow.
Maintain a gentle, consistent tension throughout the process. Only begin to snug the knot once the bow is off the fork and you can see its overall shape.
Uneven Loop Sizes
One loop looking larger or smaller than the other is a frequent issue. This happens when you don’t pay attention to how much ribbon you’re pulling through for each loop, or when one side gets stretched more.
Consciously try to match the length of ribbon you use for each loop. Adjust them gently before fully tightening the knot to ensure perfect symmetry.
Twisted Ribbon
If your finished bow looks messy or doesn’t lie flat, the ribbon likely twisted during the wrapping process. This is especially common with satin or double-sided ribbons.
Always ensure the ribbon remains flat against the fork as you wrap and pull it through. Take your time to smooth out any twists before proceeding to the next step.
Troubleshooting
My Bow Looks Lopsided or Uneven
This usually means the loops weren’t adjusted properly before the knot was fully tightened. It can also happen if one ribbon tail was significantly longer than the other at the start.
Gently loosen the central knot slightly, if possible. Then, pull on each loop individually to redistribute the ribbon until they appear even. Once satisfied, carefully re-tighten the knot.
The Ribbon Keeps Slipping Off the Fork
If your ribbon is constantly slipping, you might not be holding it securely enough or applying consistent tension. Very slick ribbon materials can also contribute to this problem.
Try holding the fork firmly with your non-dominant hand. Use your thumb to gently press down on the initial ribbon placement to secure it. Consider trying a ribbon with a bit more texture if slippage persists.
I Can’t Get the Bow to Tighten Properly
Difficulty tightening often stems from an incorrect knot formation or the ribbon being too thick for the fork tines. If the ribbon is too stiff, it won’t cinch down well.
Review the steps for forming the knot, particularly steps 4, 5, and 6. Make sure the working end passes through the correct loops. If the ribbon is the issue, switch to a thinner, more pliable material.
Key Takeaways
- The fork method simplifies bow tying, making perfect bows accessible to everyone.
- Using the correct ribbon width, typically 1/2 inch or less, is essential for success.
- Maintain gentle, consistent tension throughout the wrapping process to avoid distortions.
- Pay close attention to forming symmetrical loops for a balanced and attractive bow.
- Practice is key; your first few bows might not be perfect, but you’ll quickly improve.
- This versatile technique can be applied to various crafting and gifting needs.
Frequently Asked Questions
Can I use any type of ribbon?
While many types of ribbon work, thinner, more pliable ribbons (like satin, grosgrain, or sheer organza) are easiest for beginners. Avoid very stiff or wide ribbons, as they are harder to manipulate around the fork tines.
What size fork should I use?
A standard dinner fork is ideal for most small bows. If you want to make slightly larger bows, you could try a serving fork, but ensure the tines are still close enough to provide structure. The key is that the ribbon fits comfortably between the tines.
How do I attach the bow to a gift or craft?
You can use a dab of hot glue or craft glue on the back of the bow to attach it securely. Alternatively, if you leave one of the ribbon tails longer, you can use it to tie the bow onto an object or through a small hole.
Can I make double bows with this method?
Yes, you can! To create a fuller double bow, simply repeat the wrapping and looping steps for a second layer of loops before tightening the knot. This adds volume and a more elaborate look to your finished bow.
Our Top Recommended Finds
- Assorted Satin Ribbon Set: Perfect for beginners, offering a variety of colors and a smooth, easy-to-work-with texture.
- Precision Craft Scissors: Essential for clean, crisp cuts on your ribbon tails, preventing fraying and giving a professional finish.
- Standard Stainless Steel Dinner Fork: A sturdy, everyday fork works perfectly and is likely already in your kitchen drawer.
Unleash Your Inner Crafter Today
You now hold the secret to effortlessly tying beautiful bows. This simple fork method will change how you approach gift wrapping and crafting forever. It’s a skill that brings joy and a polished touch to everything you create.
Why not grab some ribbon and a fork right now? Experiment with different colors and textures. You’ll be amazed at the stunning bows you can produce. Consider exploring other simple crafting hacks to further expand your creative repertoire.
Beginner-friendly templates, step-by-step guides,
and weekly project ideas in your inbox.