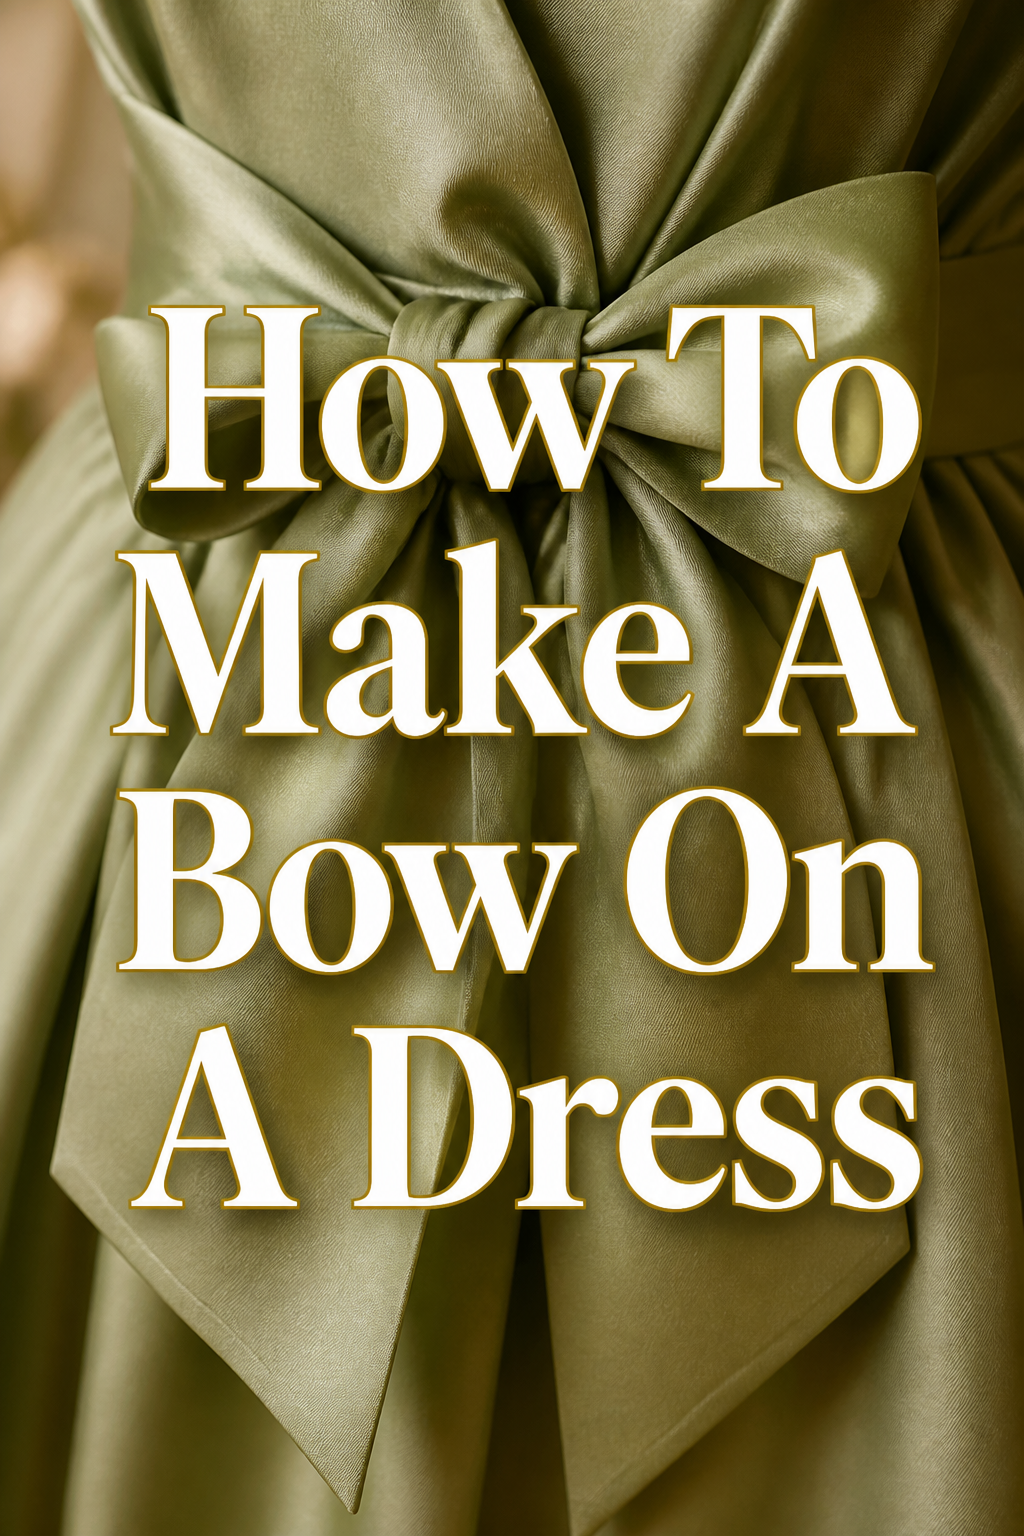
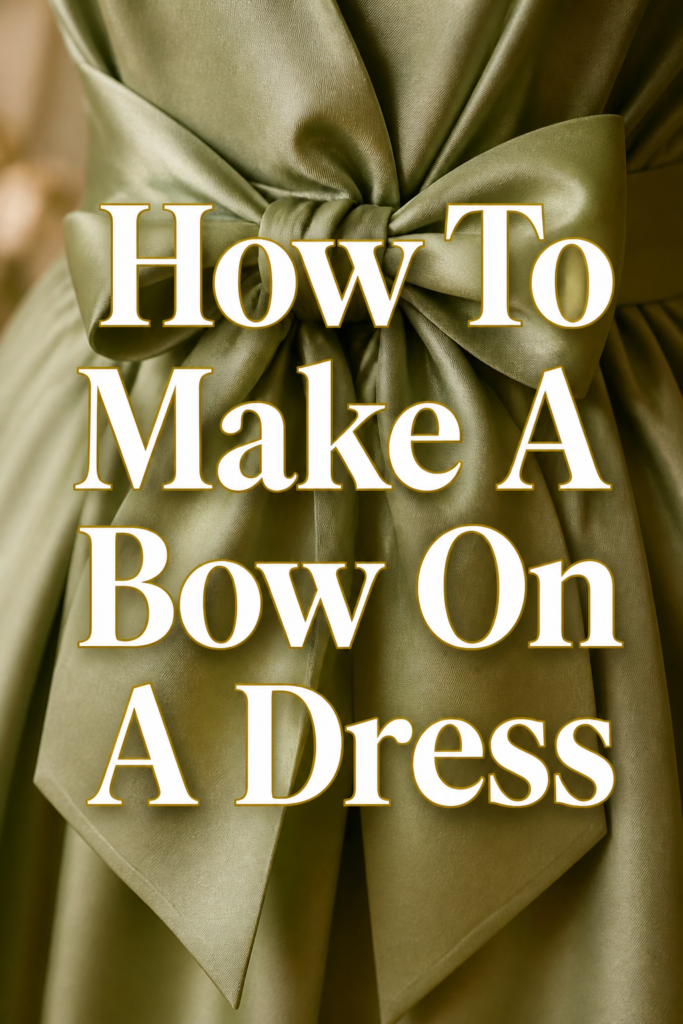
🎀 How To Make A Bow On A Dress

Beginner-friendly templates, step-by-step guides,
and weekly project ideas in your inbox.
Creating a beautiful bow on a dress can transform a simple garment into something truly special. It adds a touch of elegance, playfulness, or sophistication depending on your chosen style. I’ve spent many joyful afternoons at my sewing machine, perfecting these small yet impactful embellishments for various outfits. This guide will help you craft a lovely bow with confidence and ease.
Quick Overview
You’re about to embark on a fun project that will personalize your dress with a handmade touch. We’ll cover everything from selecting the right fabric to the final stitches.
- Time needed: 45-90 minutes (depending on sewing experience)
- Difficulty: Beginner to Intermediate
- What you’ll need: Fabric, matching thread, sewing machine (or hand-sewing kit), scissors, pins, iron.
Step-by-Step Instructions
Step 1: Choose Your Fabric Wisely
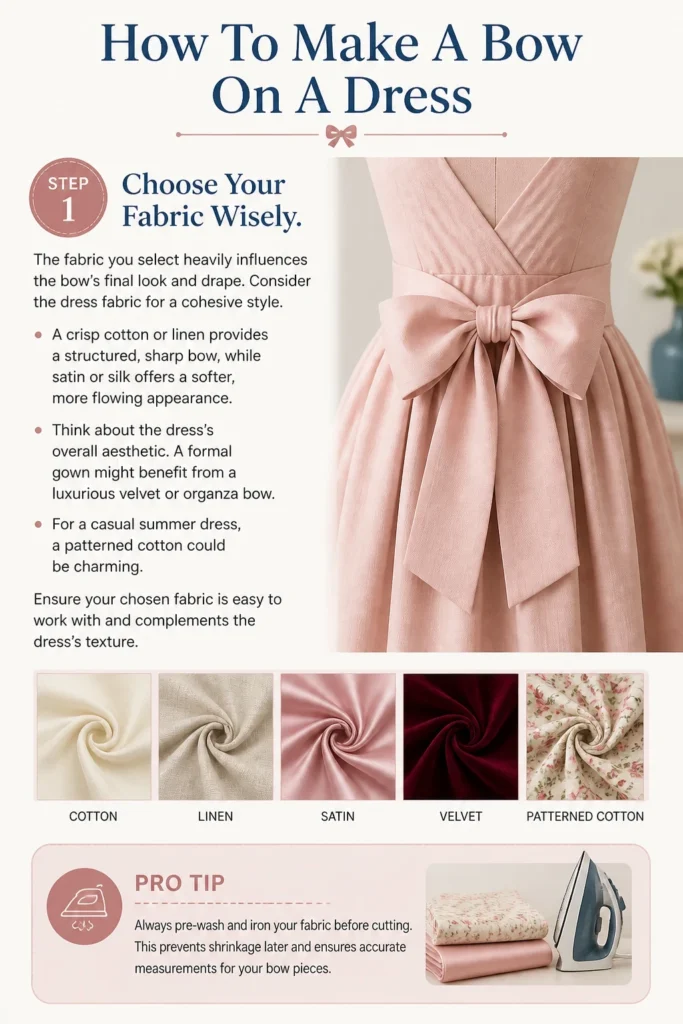
The fabric you select heavily influences the bow’s final look and drape. Consider the dress fabric for a cohesive style. A crisp cotton or linen provides a structured, sharp bow, while satin or silk offers a softer, more flowing appearance.
Think about the dress’s overall aesthetic. A formal gown might benefit from a luxurious velvet or organza bow. For a casual summer dress, a patterned cotton could be charming. Ensure your chosen fabric is easy to work with and complements the dress’s texture.
Pro Tip: Always pre-wash and iron your fabric before cutting. This prevents shrinkage later and ensures accurate measurements for your bow pieces.
Step 2: Measure and Cut Your Fabric
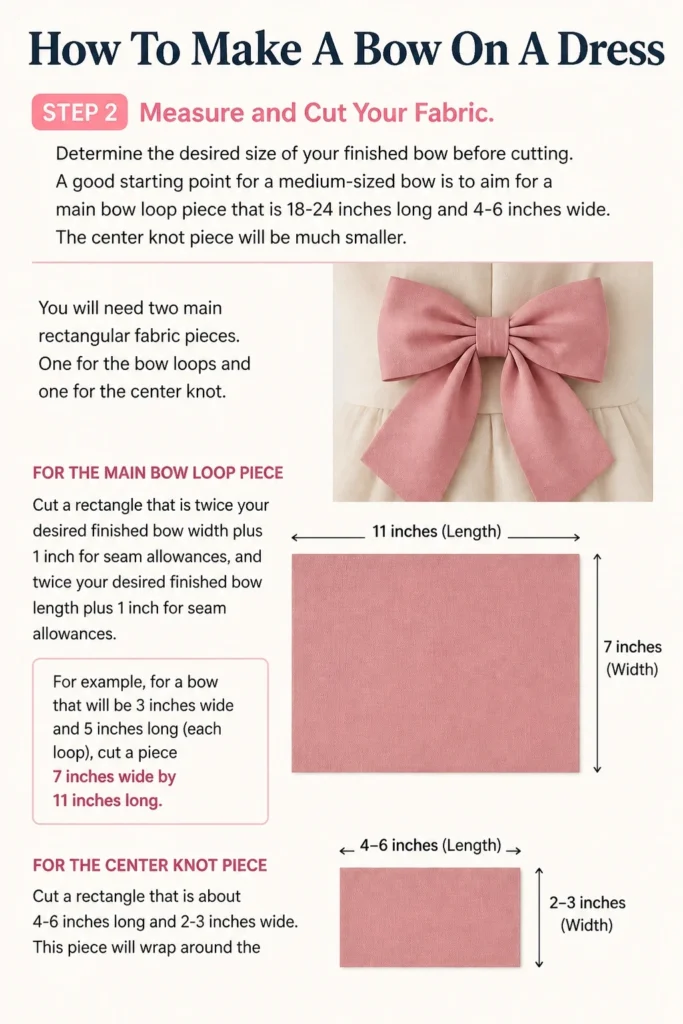
Determine the desired size of your finished bow before cutting. A good starting point for a medium-sized bow is to aim for a main bow loop piece that is 18-24 inches long and 4-6 inches wide. The center knot piece will be much smaller.
You will need two main rectangular fabric pieces. One for the bow loops and one for the center knot. For the main bow loop piece, cut a rectangle that is twice your desired finished bow width plus 1 inch for seam allowances, and twice your desired finished bow length plus 1 inch for seam allowances. For example, for a bow that will be 3 inches wide and 5 inches long (each loop), cut a piece 7 inches wide by 11 inches long.
For the center knot piece, cut a rectangle that is about 4-6 inches long and 2-3 inches wide. This piece will wrap around the center of your bow. Remember to add seam allowances to all edges.
Step 3: Prepare the Main Bow Loop Piece
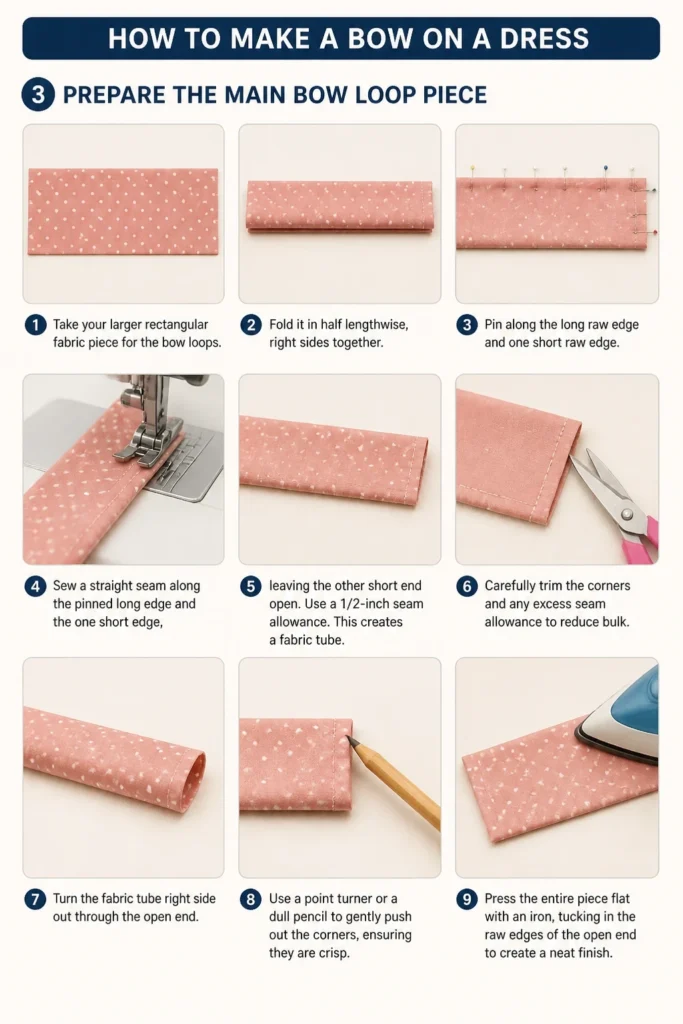
Take your larger rectangular fabric piece for the bow loops. Fold it in half lengthwise, right sides together. Pin along the long raw edge and one short raw edge.
Sew a straight seam along the pinned long edge and the one short edge, leaving the other short end open. Use a 1/2-inch seam allowance. This creates a fabric tube.
Carefully trim the corners and any excess seam allowance to reduce bulk. Turn the fabric tube right side out through the open end.
Use a point turner or a dull pencil to gently push out the corners, ensuring they are crisp. Press the entire piece flat with an iron, tucking in the raw edges of the open end to create a neat finish.
Step 4: Form the Bow Loops
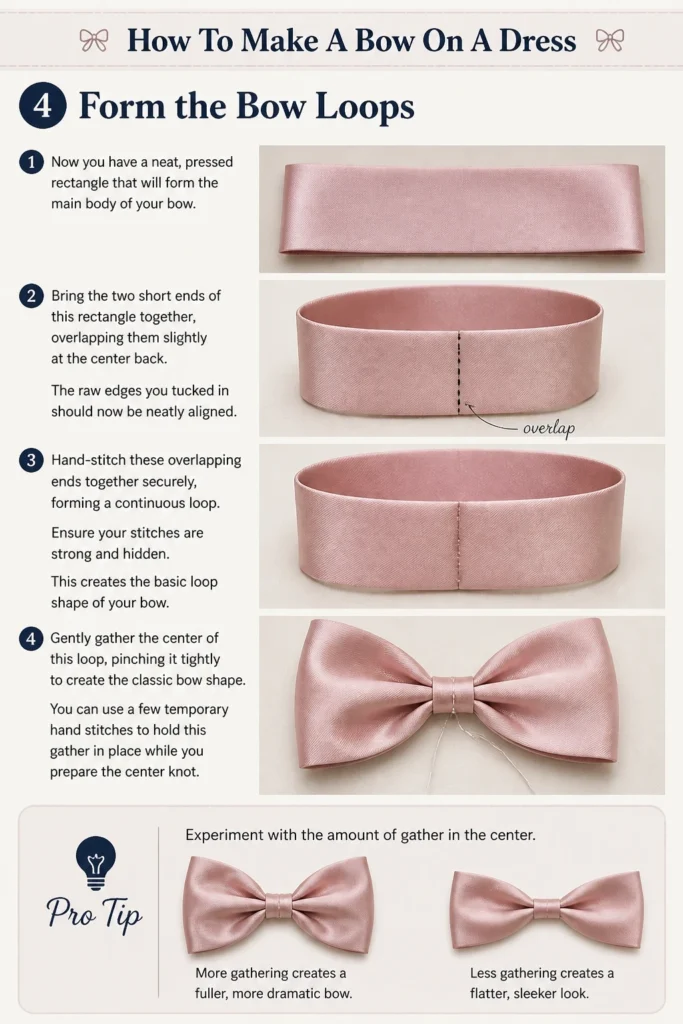
Now you have a neat, pressed rectangle that will form the main body of your bow. Bring the two short ends of this rectangle together, overlapping them slightly at the center back. The raw edges you tucked in should now be neatly aligned.
Hand-stitch these overlapping ends together securely, forming a continuous loop. Ensure your stitches are strong and hidden. This creates the basic loop shape of your bow.
Gently gather the center of this loop, pinching it tightly to create the classic bow shape. You can use a few temporary hand stitches to hold this gather in place while you prepare the center knot.
Pro Tip: Experiment with the amount of gather in the center. More gathering creates a fuller, more dramatic bow, while less creates a flatter, sleeker look.
Step 5: Create the Center Knot
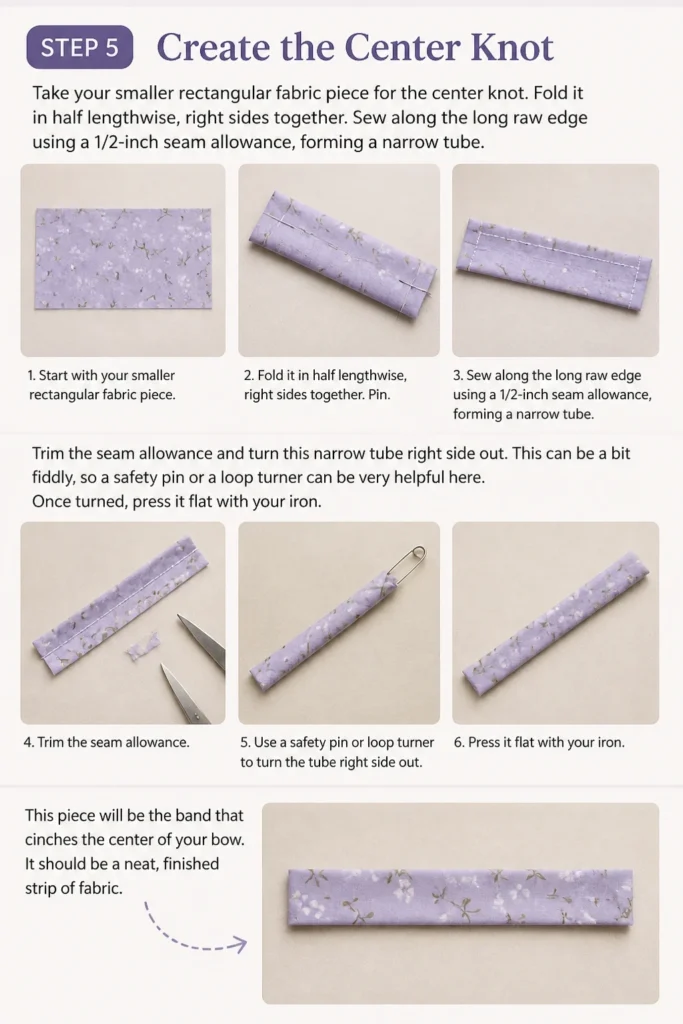
Take your smaller rectangular fabric piece for the center knot. Fold it in half lengthwise, right sides together. Sew along the long raw edge using a 1/2-inch seam allowance, forming a narrow tube.
Trim the seam allowance and turn this narrow tube right side out. This can be a bit fiddly, so a safety pin or a loop turner can be very helpful here. Once turned, press it flat with your iron.
This piece will be the band that cinches the center of your bow. It should be a neat, finished strip of fabric.
Step 6: Assemble the Bow
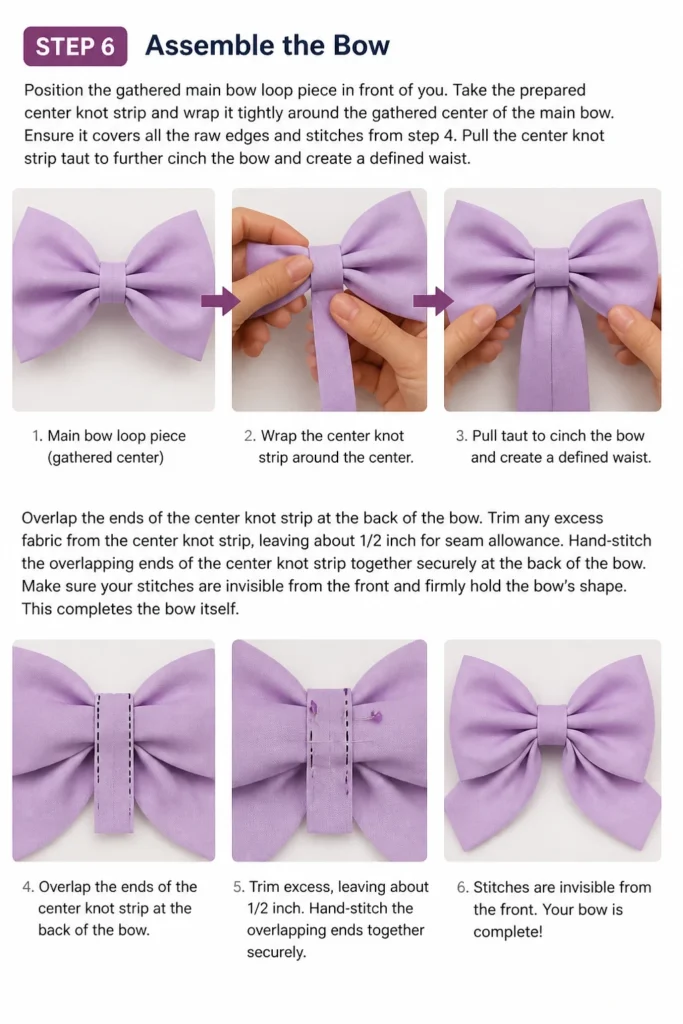
Position the gathered main bow loop piece in front of you. Take the prepared center knot strip and wrap it tightly around the gathered center of the main bow. Ensure it covers all the raw edges and stitches from step 4.
Pull the center knot strip taut to further cinch the bow and create a defined waist. Overlap the ends of the center knot strip at the back of the bow. Trim any excess fabric from the center knot strip, leaving about 1/2 inch for seam allowance.
Hand-stitch the overlapping ends of the center knot strip together securely at the back of the bow. Make sure your stitches are invisible from the front and firmly hold the bow’s shape. This completes the bow itself.
Step 7: Attach the Bow to the Dress
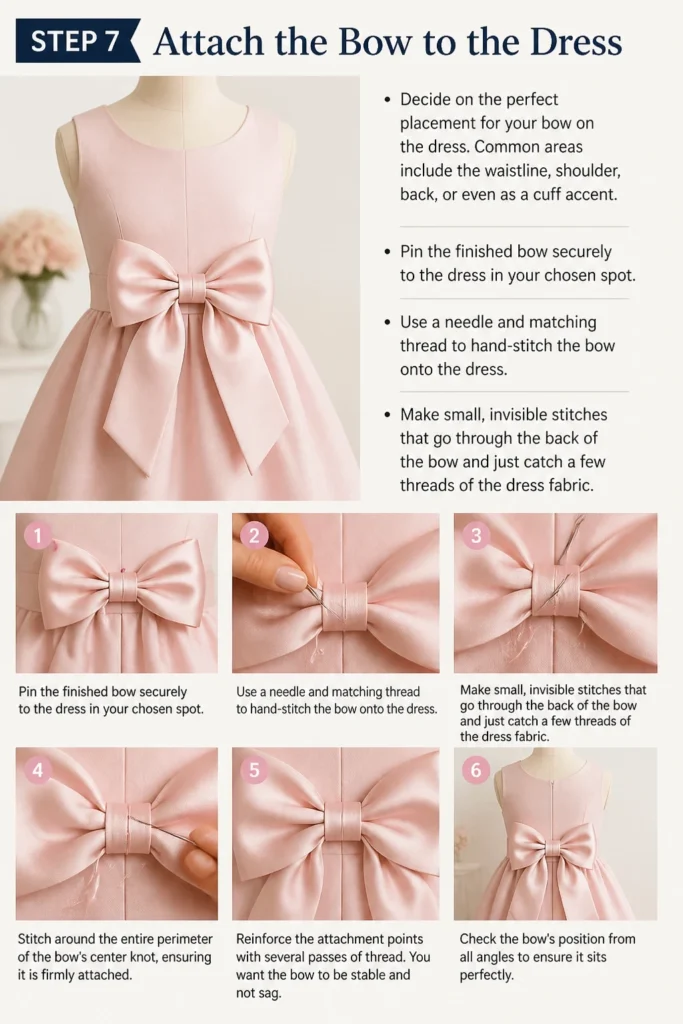
Decide on the perfect placement for your bow on the dress. Common areas include the waistline, shoulder, back, or even as a cuff accent. Pin the finished bow securely to the dress in your chosen spot.
Use a needle and matching thread to hand-stitch the bow onto the dress. Make small, invisible stitches that go through the back of the bow and just catch a few threads of the dress fabric. Stitch around the entire perimeter of the bow’s center knot, ensuring it is firmly attached.
Reinforce the attachment points with several passes of thread. You want the bow to be stable and not sag. Check the bow’s position from all angles to ensure it sits perfectly.
Step 8: Final Adjustments and Finishing Touches
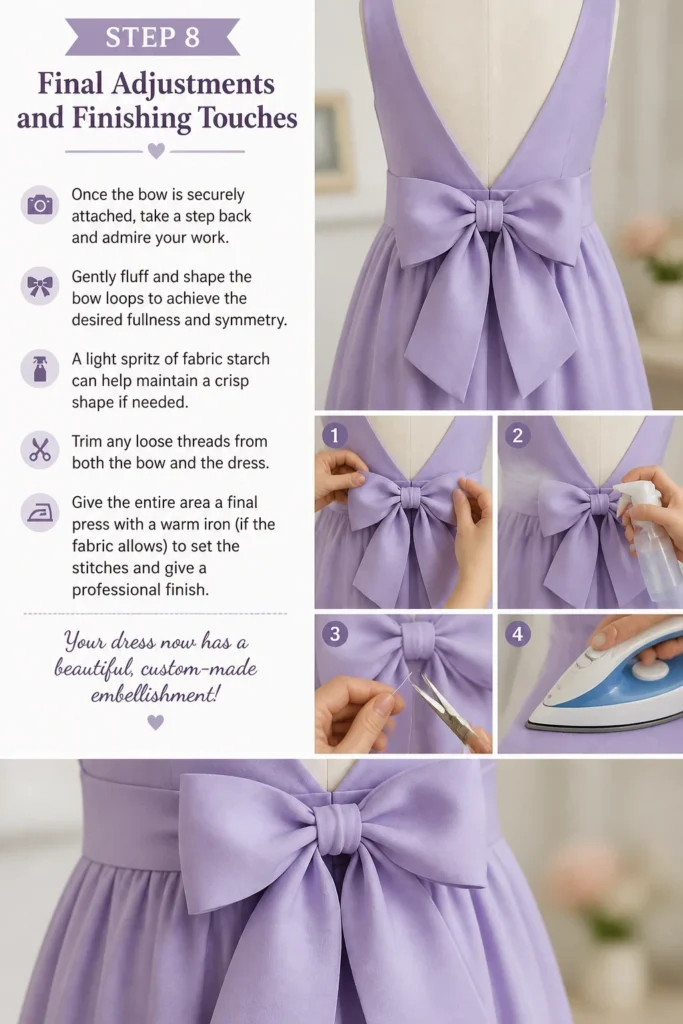
Once the bow is securely attached, take a step back and admire your work. Gently fluff and shape the bow loops to achieve the desired fullness and symmetry. A light spritz of fabric starch can help maintain a crisp shape if needed.
Trim any loose threads from both the bow and the dress. Give the entire area a final press with a warm iron (if the fabric allows) to set the stitches and give a professional finish. Your dress now has a beautiful, custom-made embellishment!
Common Mistakes to Avoid
Using the Wrong Fabric
Selecting a fabric that doesn’t match the dress’s weight or drape can make the bow look out of place. A heavy bow on a delicate fabric can pull and distort the dress. Always consider how the bow fabric will interact with the dress fabric.
Incorrect Sizing
A bow that is too large can overwhelm the dress, while one that is too small might get lost. Always measure and even mock up the bow’s size with scrap paper or fabric before cutting your final material. Proportion is key to a balanced look.
Poor Stitching
Uneven or visible stitches can detract from an otherwise beautiful bow. Take your time with all sewing, especially when attaching the bow to the dress. Use a matching thread and practice invisible hand stitches for a professional finish.
Improper Placement
Attaching the bow in an awkward or unflattering spot can ruin the dress’s silhouette. Pin the bow in several potential locations and try the dress on to see which placement best complements your figure and the dress design. Consider the overall balance of the garment.
Troubleshooting
Bow Looks Lopsided
If your bow appears uneven, it might be due to inconsistent gathering in the center or one loop being larger than the other. Gently unpick the stitches holding the center gather and re-pinch, ensuring both sides are balanced before re-stitching the center knot. Check your initial fabric cuts for symmetry.
Bow Sags
A sagging bow often indicates it’s not securely attached to the dress. Reinforce the attachment points by adding more small, firm stitches around the back of the center knot. You might also consider adding a small piece of interfacing to the bow fabric during construction for extra stiffness.
Stitches Are Visible
Visible stitches, particularly where the bow attaches to the dress, can lessen the professional appearance. Use a very fine needle and thread that precisely matches both the bow and dress fabric. Take smaller bites of fabric with your needle, ensuring the stitches only catch a few threads on the dress side, making them nearly invisible.
Key Takeaways
- Fabric choice is crucial for the bow’s drape and overall aesthetic.
- Accurate measuring and cutting prevent lopsided or ill-fitting bows.
- Pressing seams at each stage creates crisp, professional results.
- Gathering the bow’s center evenly ensures a symmetrical shape.
- Securely stitching the center knot holds the bow’s form.
- Invisible hand-stitching is key for a polished attachment to the dress.
Frequently Asked Questions
Can I make a bow without sewing?
Yes, you can! For a no-sew bow, use a fabric that doesn’t fray easily, like felt or certain types of ribbon. You can use fabric glue or hot glue to secure the folds and center knot. However, sewn bows are generally more durable and have a cleaner finish.
What’s the best fabric for a bow?
The best fabric depends on the desired look. For a crisp, structured bow, choose cotton, linen, or organza. For a soft, flowing bow, opt for satin, silk, or chiffon. Velvet adds a luxurious touch. Always consider the dress fabric for compatibility.
Where should I place the bow on my dress?
Common placements include the waistline (front or back), shoulder, neckline, or even on a sleeve cuff. Consider the dress’s design and your body shape. A bow at the natural waist can create an hourglass silhouette, while a shoulder bow adds a focal point.
How do I clean a dress with a fabric bow?
Always follow the care instructions for your dress’s main fabric. If the bow fabric is different, consider its care needs too. For delicate bows, spot cleaning or dry cleaning might be best. If machine washable, place the dress in a mesh laundry bag to protect the bow during the wash cycle.
Our Top Recommended Finds
- Sharp Fabric Shears: Essential for clean, precise cuts that prevent fraying and ensure accurate shapes.
- All-Purpose Thread Kit: Having a range of thread colors on hand makes matching your bow and dress fabric simple.
- Seam Ripper: An invaluable tool for quickly and safely correcting any sewing mistakes without damaging your fabric.
Your Dress, Elevated: Time to Create!
You now have a complete guide to making a beautiful bow for any dress. This project is a fantastic way to add a personal touch or refresh an old favorite. Don’t be afraid to experiment with different fabrics and sizes.
Take these steps and make them your own. Unleash your creativity and transform your wardrobe with this simple yet elegant embellishment. Grab your supplies today and start creating!
Beginner-friendly templates, step-by-step guides,
and weekly project ideas in your inbox.