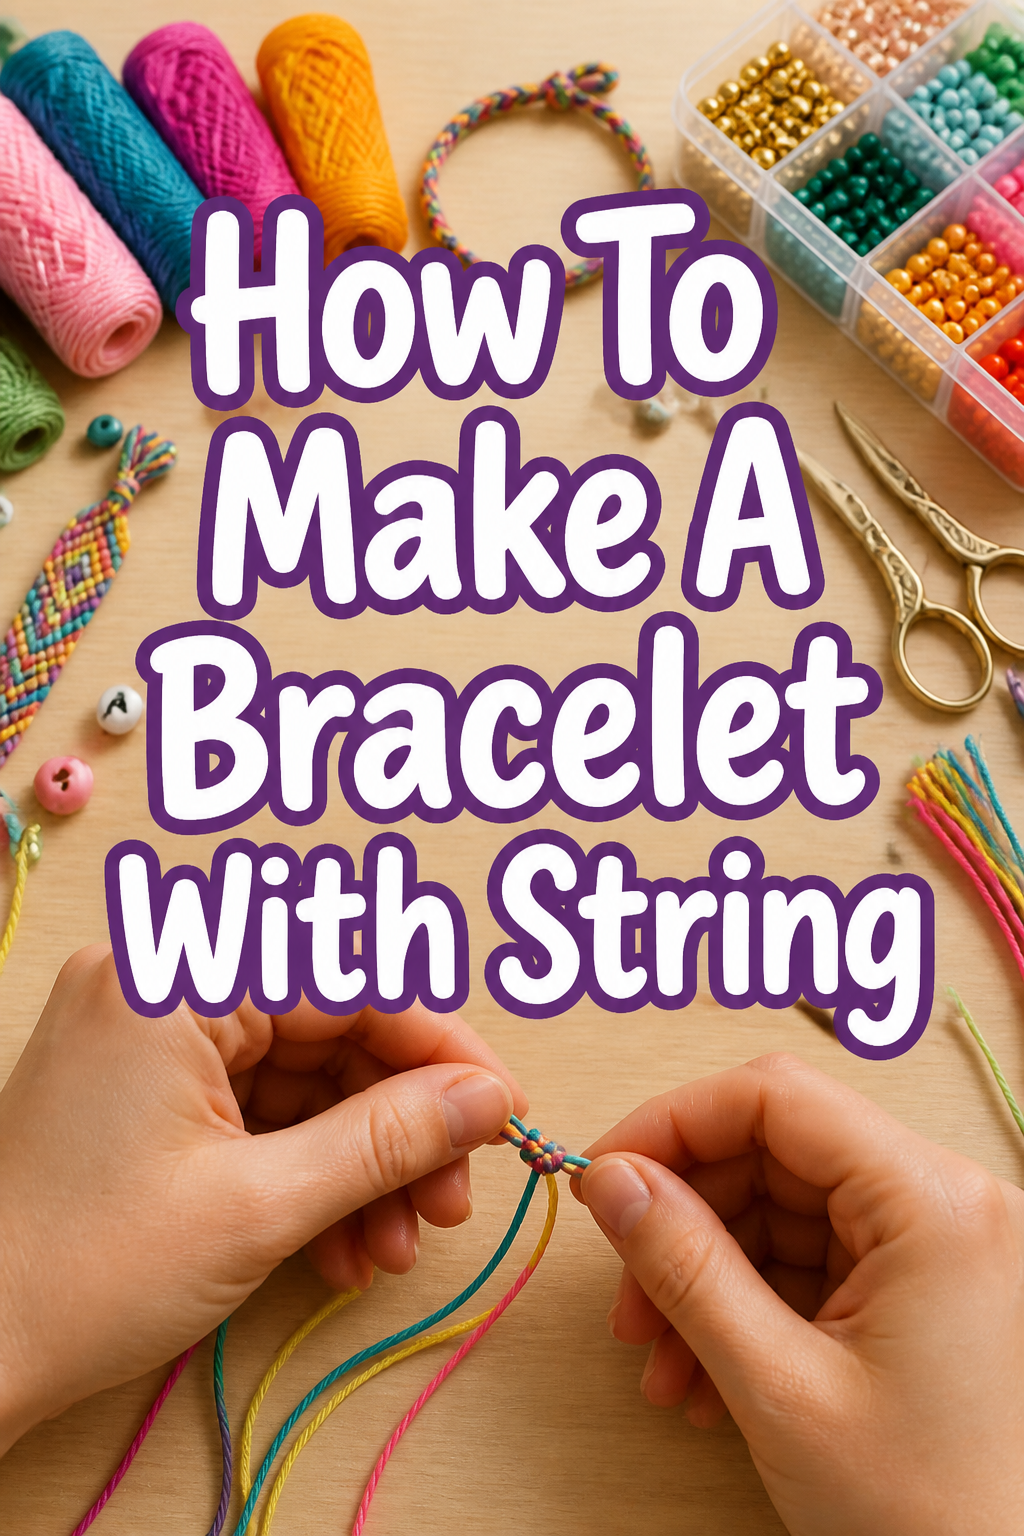
🧵 How To Make A Bracelet With String

Beginner-friendly templates, step-by-step guides,
and weekly project ideas in your inbox.
Making a string bracelet is a wonderful way to express creativity and craft something truly personal.
I remember the satisfaction of tying my first knot, creating a unique piece of wearable art.
This guide will walk you through each step, ensuring you gain confidence and a beautiful new accessory.
Quick Overview
You’re about to embark on a fun crafting journey, transforming simple string into a stylish bracelet.
This project is perfect for gifting or adding a handmade touch to your own collection.
- Time needed: 30-60 minutes (depending on complexity and experience)
- Difficulty: Beginner
- What you’ll need: Embroidery floss or craft string, scissors, tape or a clipboard
Step-by-Step Instructions
Step 1: Gather Your Materials
Before you begin, ensure you have all the necessary supplies within reach. A clear workspace helps keep everything organized and prevents frustration.
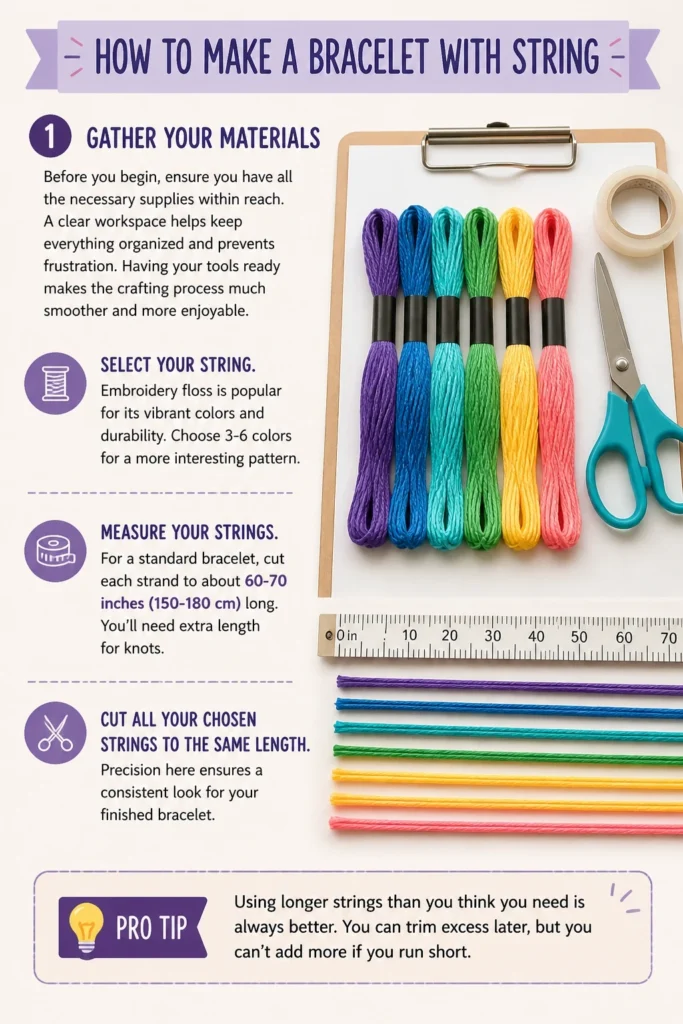
Having your tools ready makes the crafting process much smoother and more enjoyable.
- Select your string. Embroidery floss is popular for its vibrant colors and durability. Choose 3-6 colors for a more interesting pattern.
- Measure your strings. For a standard bracelet, cut each strand to about 60-70 inches (150-180 cm) long. You’ll need extra length for knots.
- Cut all your chosen strings to the same length. Precision here ensures a consistent look for your finished bracelet.
Pro Tip: Using longer strings than you think you need is always better. You can trim excess later, but you can’t add more if you run short.
Step 2: Prepare Your Strings for Knotting
Proper preparation is key to a neat and secure bracelet. This initial setup establishes the foundation for your design.
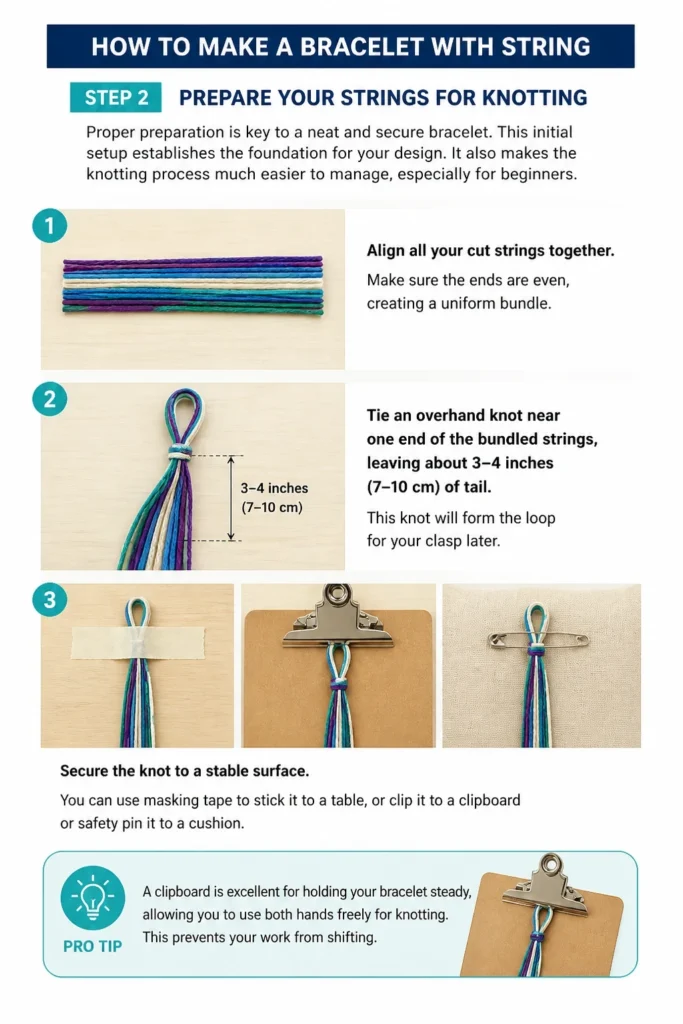
It also makes the knotting process much easier to manage, especially for beginners.
- Align all your cut strings together. Make sure the ends are even, creating a uniform bundle.
- Tie an overhand knot near one end of the bundled strings, leaving about 3-4 inches (7-10 cm) of tail. This knot will form the loop for your clasp later.
- Secure the knot to a stable surface. You can use masking tape to stick it to a table, or clip it to a clipboard or safety pin it to a cushion.
Pro Tip: A clipboard is excellent for holding your bracelet steady, allowing you to use both hands freely for knotting. This prevents your work from shifting.
Step 3: Arrange Your String Colors
The order of your strings determines the pattern of your bracelet. Experiment with different arrangements to create unique designs.
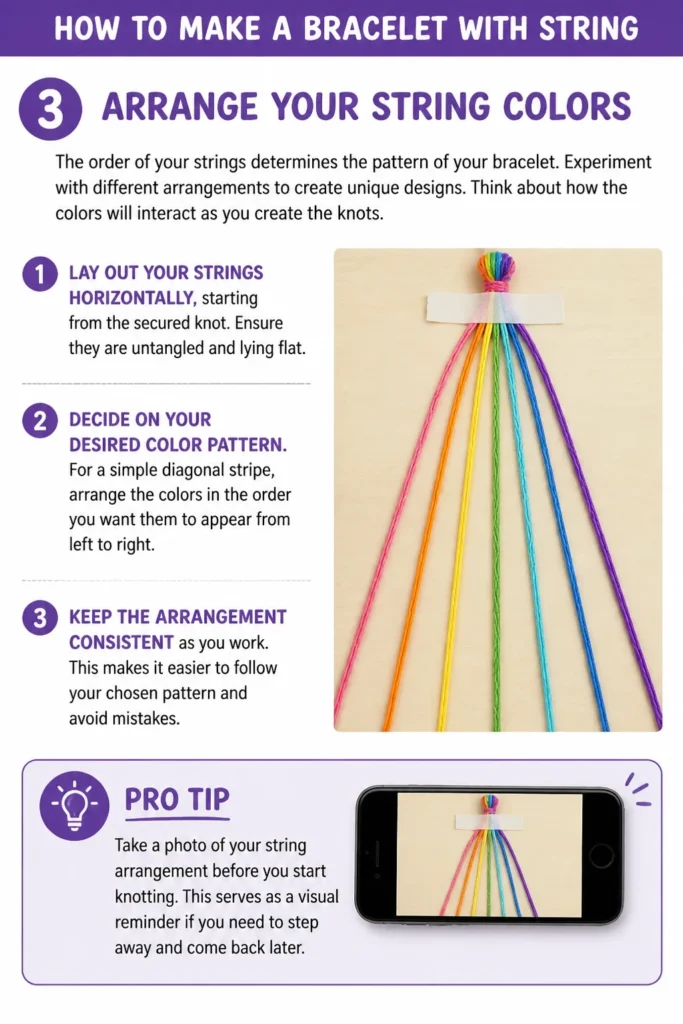
Think about how the colors will interact as you create the knots.
- Lay out your strings horizontally, starting from the secured knot. Ensure they are untangled and lying flat.
- Decide on your desired color pattern. For a simple diagonal stripe, arrange the colors in the order you want them to appear from left to right.
- Keep the arrangement consistent as you work. This makes it easier to follow your chosen pattern and avoid mistakes.
Pro Tip: Take a photo of your string arrangement before you start knotting. This serves as a visual reminder if you need to step away and come back later.
Step 4: Learn the Forward Knot (F Knot)
The forward knot is fundamental to many string bracelet patterns, creating a diagonal line. Mastering this knot is crucial for success.
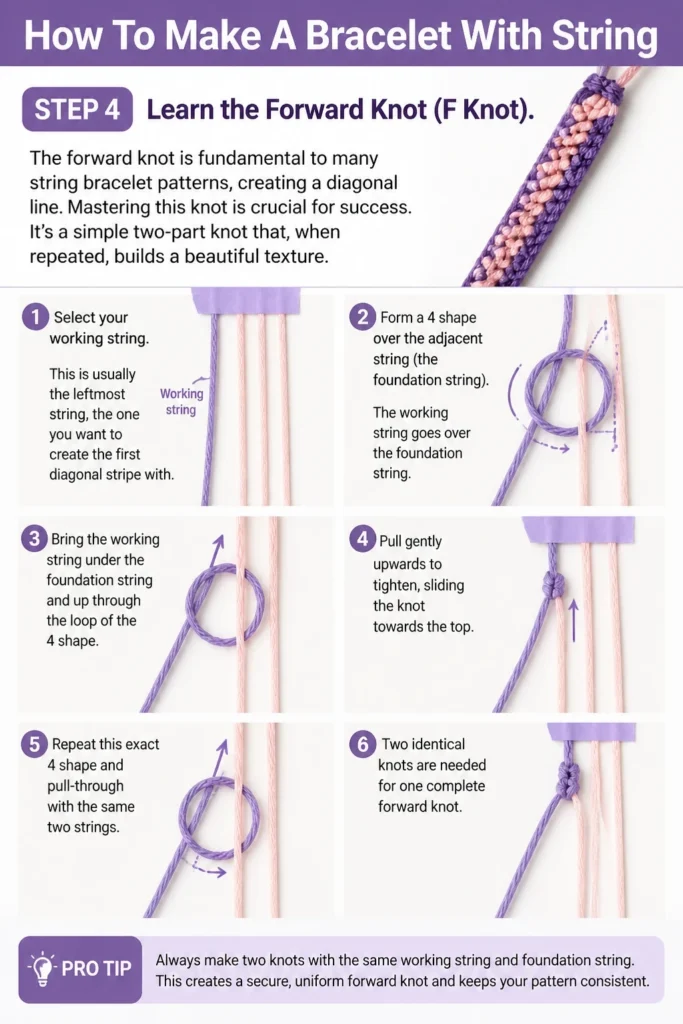
It’s a simple two-part knot that, when repeated, builds a beautiful texture.
- Select your working string. This is usually the leftmost string, the one you want to create the first diagonal stripe with.
- Form a “4” shape over the adjacent string (the foundation string). The working string goes over the foundation string.
- Bring the working string under the foundation string and up through the loop of the “4” shape. Pull gently upwards to tighten, sliding the knot towards the top.
- Repeat this exact “4” shape and pull-through with the same two strings. Two identical knots are needed for one complete forward knot.
Pro Tip: Always make two knots with the same working string around the same foundation string. This creates a secure, visible knot and ensures the pattern develops correctly.
Step 5: Create Your First Row of Knots
With the forward knot mastered, you can begin forming the first row of your bracelet’s design. This process builds the pattern across the width of your bracelet.
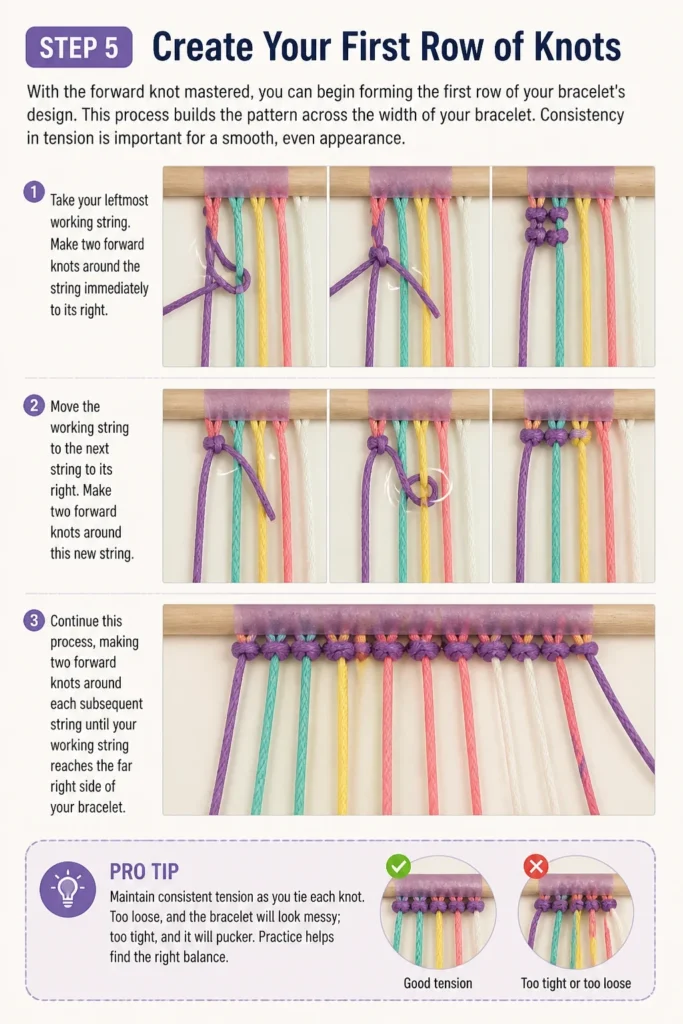
Consistency in tension is important for a smooth, even appearance.
- Take your leftmost working string. Make two forward knots around the string immediately to its right.
- Move the working string to the next string to its right. Make two forward knots around this new string.
- Continue this process, making two forward knots around each subsequent string until your working string reaches the far right side of your bracelet.
Pro Tip: Maintain consistent tension as you tie each knot. Too loose, and the bracelet will look messy; too tight, and it will pucker. Practice helps find the right balance.
Step 6: Continue Knotting Rows
After completing the first row, you’ll repeat the process with the next leftmost string. Each row adds to the length and pattern of your bracelet.
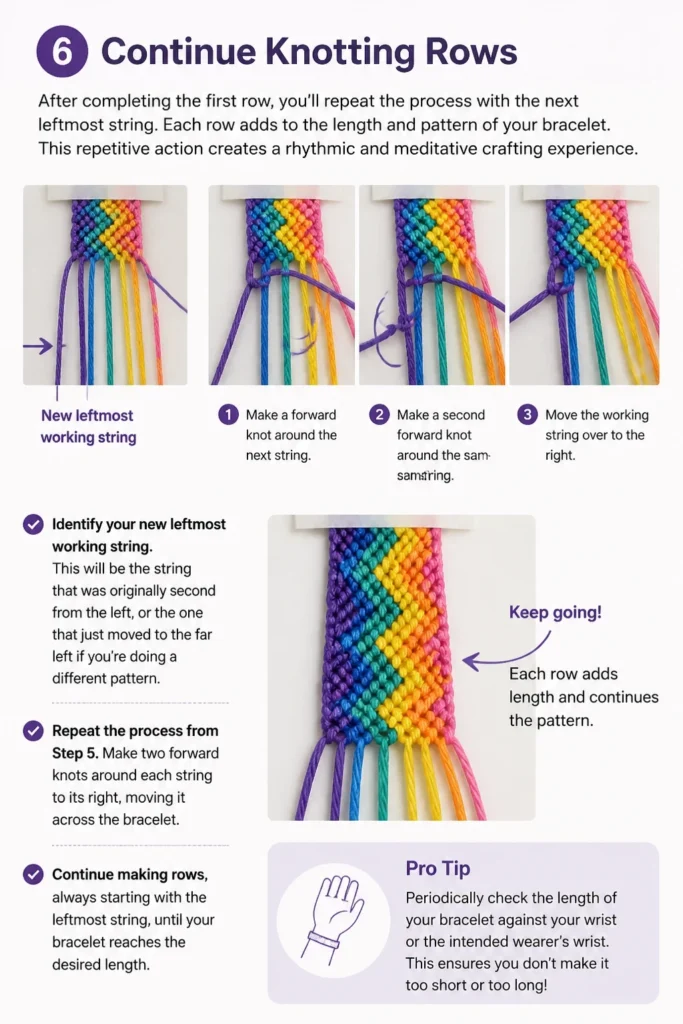
This repetitive action creates a rhythmic and meditative crafting experience.
- Identify your new leftmost working string. This will be the string that was originally second from the left, or the one that just moved to the far left if you’re doing a different pattern.
- Repeat the process from Step 5. Make two forward knots around each string to its right, moving it across the bracelet.
- Continue making rows, always starting with the leftmost string, until your bracelet reaches the desired length.
Pro Tip: Periodically check the length of your bracelet against your wrist or the intended wearer’s wrist. This ensures you don’t make it too short or too long.
Step 7: Finish Your Bracelet
Once your bracelet reaches the correct length, it’s time to secure the end and add a closure. This final step brings your creation to completion.
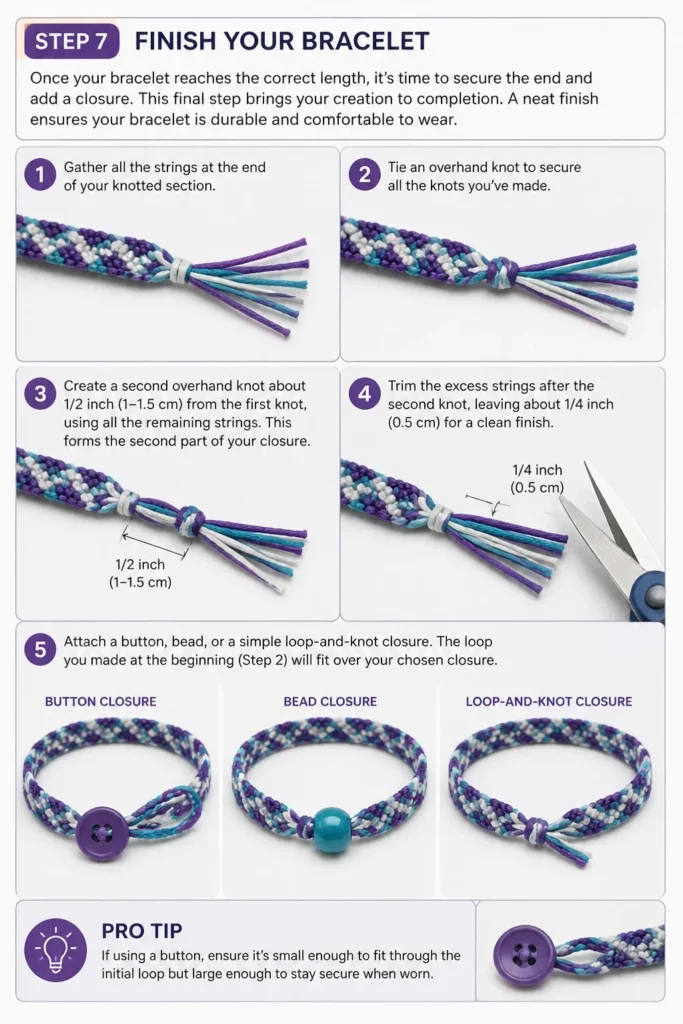
A neat finish ensures your bracelet is durable and comfortable to wear.
- Gather all the strings at the end of your knotted section. Tie an overhand knot to secure all the knots you’ve made.
- Create a second overhand knot about 1/2 inch (1-1.5 cm) from the first knot, using all the remaining strings. This forms the second part of your closure.
- Trim the excess strings after the second knot, leaving about 1/4 inch (0.5 cm) for a clean finish.
- Attach a button, bead, or a simple loop-and-knot closure. The loop you made at the beginning (Step 2) will fit over your chosen closure.
Pro Tip: If using a button, ensure it’s small enough to fit through the initial loop but large enough not to slip back out easily. Test the fit before permanently securing.
Common Mistakes to Avoid
Inconsistent Knot Tension
One of the most common pitfalls for beginners is applying uneven tension to their knots. Some knots might be too loose, while others are pulled too tight.
This results in a bracelet that looks bumpy, uneven, or even buckles in places, detracting from its overall appearance.
To avoid this, try to pull each knot with the same amount of gentle force. Practice helps develop a consistent hand, leading to a much smoother and more professional-looking bracelet.
Incorrect Knot Repetition
Many patterns, especially the forward knot, require two identical knots to be made with the same working string around the same foundation string. Forgetting the second knot is a frequent error.
If you only tie one knot, the working string will not properly advance, and your pattern will become distorted or even disappear.
Always double-check that you’ve completed both parts of the knot. This ensures the working string moves correctly and your pattern progresses as intended.
Running Out of String
Underestimating the amount of string needed is a common mistake that can halt your project unexpectedly. Knotting consumes a surprising amount of string.
If you run out of a particular color mid-bracelet, it can be very difficult to seamlessly add more, often requiring you to restart or compromise the design.
Always cut your strings generously long, even if it feels excessive. It’s much easier to trim excess at the end than to try and splice in new string during the process.
Troubleshooting
My Bracelet is Curling or Twisting
A curling or twisting bracelet often indicates uneven tension or that you’re consistently pulling knots in one direction more strongly than the other.
This can also happen if you’re not keeping your foundation strings taut while knotting around them.
Try to keep your foundation strings straight and firm, either taped down or held securely. Focus on applying even pressure when tightening each knot, pulling straight up or across rather than at an angle.
My Pattern Looks Messy or Disjointed
If your pattern isn’t forming clearly, you might be making single knots instead of double knots, or you might be knotting strings in the wrong order.
Sometimes, tangles can also pull strings out of their intended position, disrupting the design.
Carefully review your knotting technique to ensure you’re making two knots every time. Double-check your string arrangement before starting each new row to confirm the colors are in the correct sequence.
Key Takeaways
- Always cut your strings generously long to avoid running out mid-project.
- Secure your bracelet firmly to a stable surface before you begin knotting.
- Mastering the two-part forward knot is essential for creating consistent patterns.
- Maintain even tension on every knot for a smooth, professional-looking finish.
- Consistently check your string arrangement to keep your chosen pattern on track.
- Practice is key; don’t be discouraged if your first few attempts aren’t perfect.
Frequently Asked Questions
Can I use any type of string?
While you can experiment, embroidery floss is highly recommended for string bracelets. It’s durable, comes in a vast array of colors, and its strands are easy to separate and knot.
Other craft strings might be too thick, too slippery, or not hold knots as well, leading to a less satisfying result.
How do I make different patterns?
<
Beginner-friendly templates, step-by-step guides,
and weekly project ideas in your inbox.