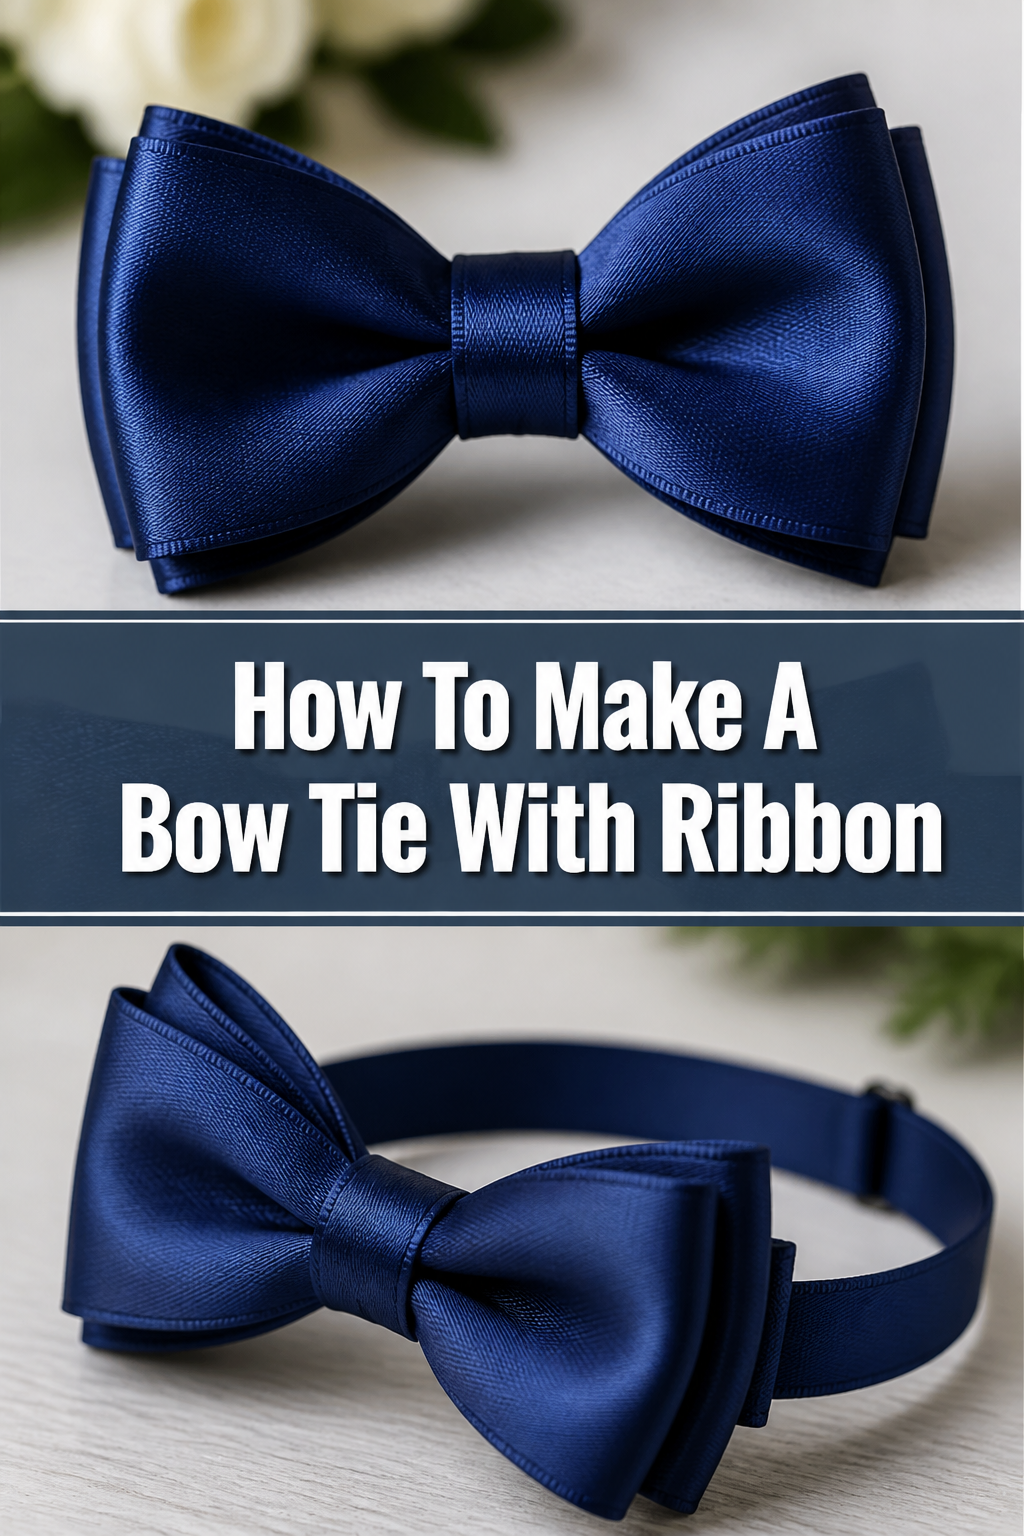
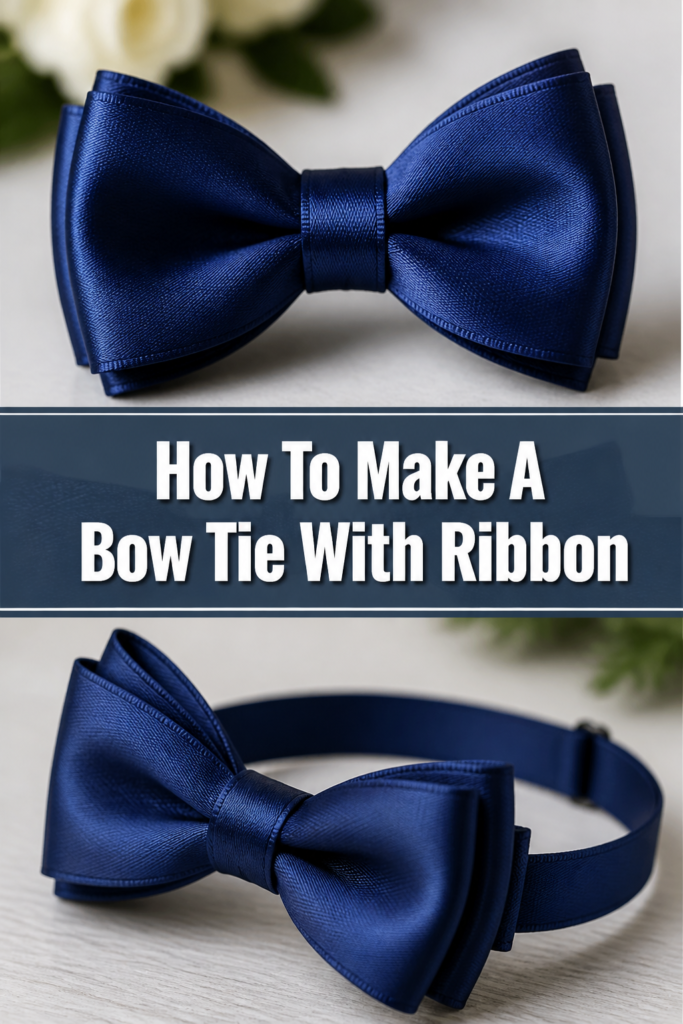
🎀 How To Make A Bow Tie With Ribbon

Beginner-friendly templates, step-by-step guides,
and weekly project ideas in your inbox.
There’s a special kind of pride that comes from wearing something you’ve crafted yourself. A handmade bow tie, especially, adds a unique touch of personality and flair to any outfit. I remember the satisfaction of making my first few, seeing the ribbon transform into a stylish accessory.
This guide shares everything I’ve learned, helping you create beautiful bow ties with confidence and ease. Trust me, it’s simpler than you might think, and the results are truly rewarding.
Quick Overview
You’re about to embark on a fun crafting adventure, transforming a simple length of ribbon into a charming, wearable bow tie. This project is perfect for adding a personalized touch to special occasions or everyday style.
By the end, you’ll have a unique accessory ready to impress.
- Time needed: 45-75 minutes (depending on experience)
- Difficulty: Beginner
- What you’ll need: Ribbon, sharp scissors, hot glue gun, hot glue sticks, matching thread, hand-sewing needle, bow tie hardware (clip or pin).
Step-by-Step Instructions
Step 1: Gather Your Materials
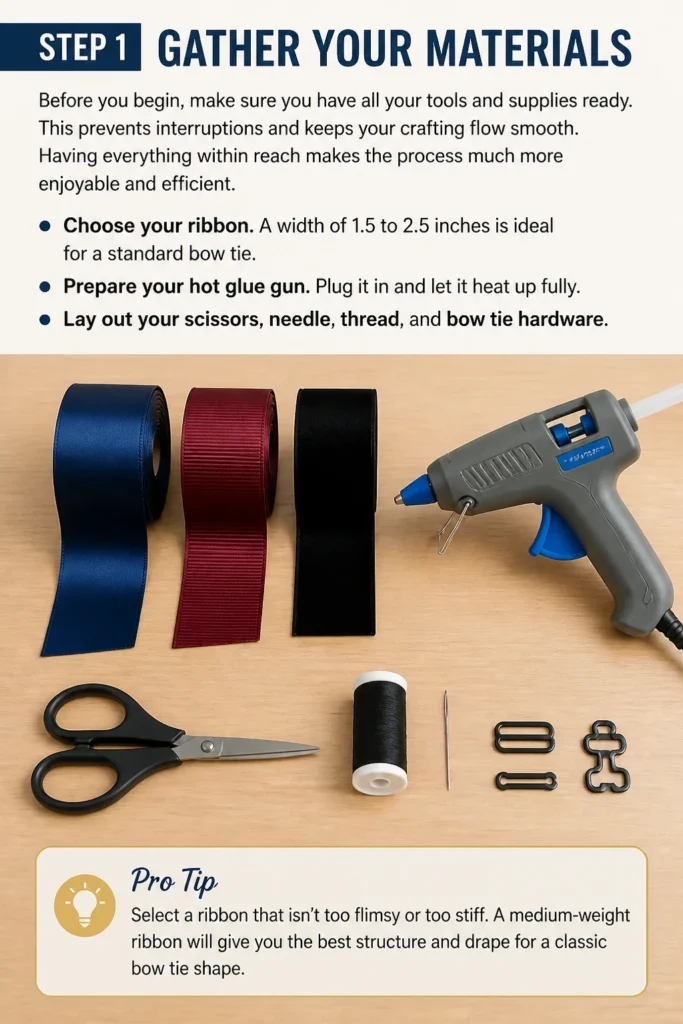
Before you begin, make sure you have all your tools and supplies ready. This prevents interruptions and keeps your crafting flow smooth. Having everything within reach makes the process much more enjoyable and efficient.
You’ll need a good quality ribbon, preferably one that holds its shape well. Satin, grosgrain, or even velvet ribbons work wonderfully.
- Choose your ribbon. A width of 1.5 to 2.5 inches is ideal for a standard bow tie.
- Prepare your hot glue gun. Plug it in and let it heat up fully.
- Lay out your scissors, needle, thread, and bow tie hardware.
Pro Tip: Select a ribbon that isn’t too flimsy or too stiff. A medium-weight ribbon will give you the best structure and drape for a classic bow tie shape.
Step 2: Measure and Cut Your Ribbon
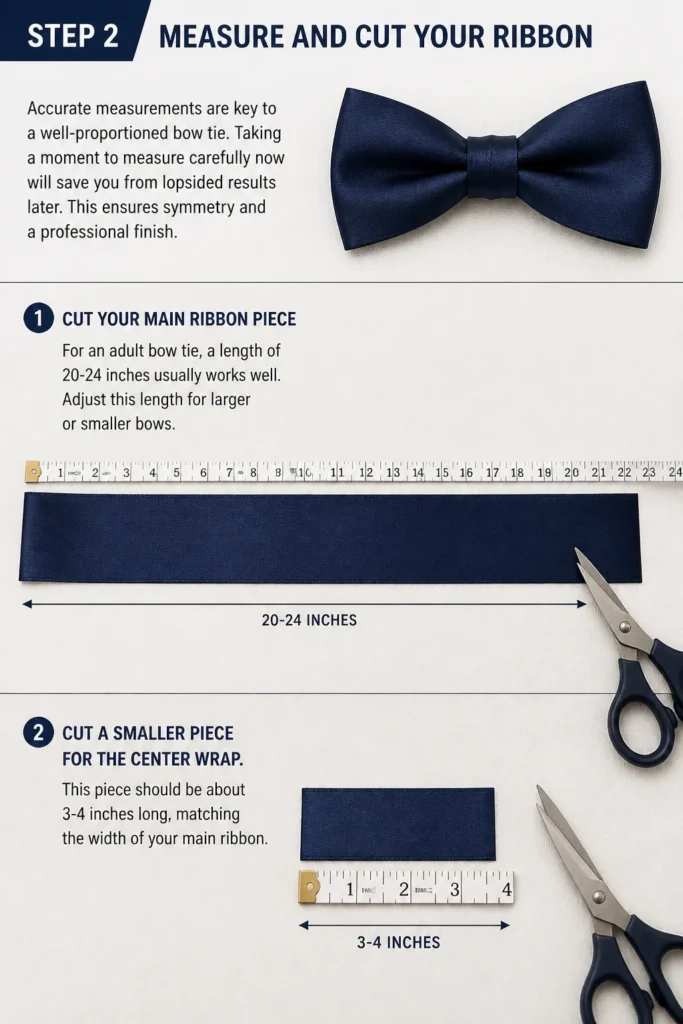
Accurate measurements are key to a well-proportioned bow tie. Taking a moment to measure carefully now will save you from lopsided results later. This ensures symmetry and a professional finish.
The main bow section needs to be long enough to create two loops and a small overlap. The center wrap piece is much shorter.
- Cut your main ribbon piece. For an adult bow tie, a length of 20-24 inches usually works well. Adjust this length for larger or smaller bows.
- Cut a smaller piece for the center wrap. This piece should be about 3-4 inches long, matching the width of your main ribbon.
Step 3: Form the Main Bow Loops
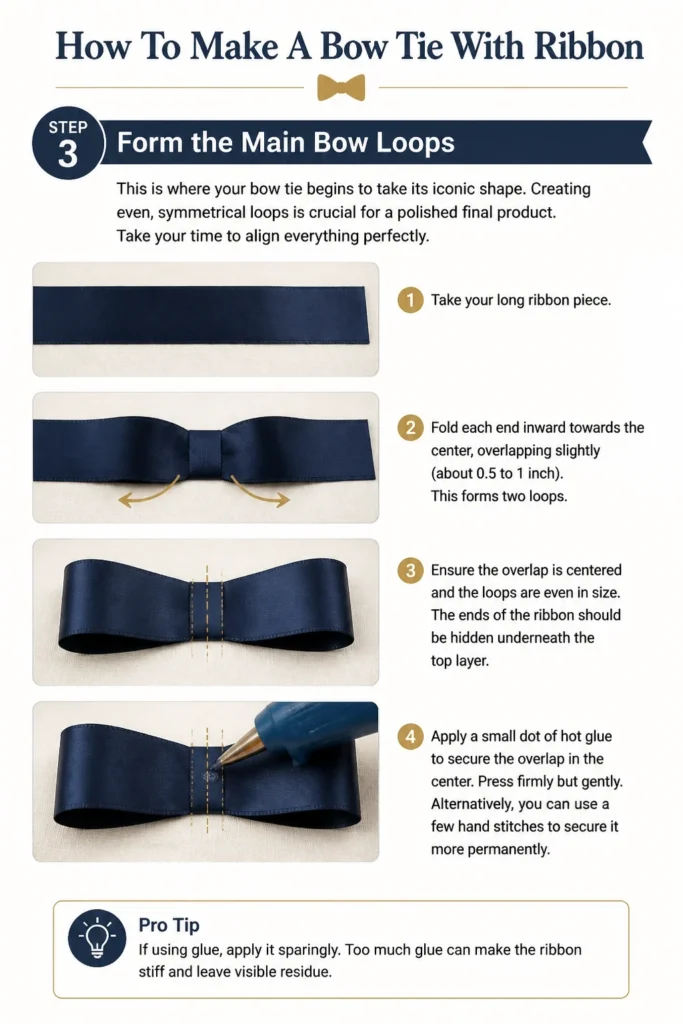
This is where your bow tie begins to take its iconic shape. Creating even, symmetrical loops is crucial for a polished final product. Take your time to align everything perfectly.
You’ll essentially be folding the ribbon to create the two main “wings” of the bow tie.
- Take your long ribbon piece. Fold each end inward towards the center, overlapping slightly (about 0.5 to 1 inch). This forms two loops.
- Ensure the overlap is centered and the loops are even in size. The ends of the ribbon should be hidden underneath the top layer.
- Apply a small dot of hot glue to secure the overlap in the center. Press firmly but gently. Alternatively, you can use a few hand stitches to secure it more permanently.
Pro Tip: If using glue, apply it sparingly. Too much glue can make the ribbon stiff and leave visible marks. A small dot is usually enough to hold it in place.
Step 4: Cinch the Center
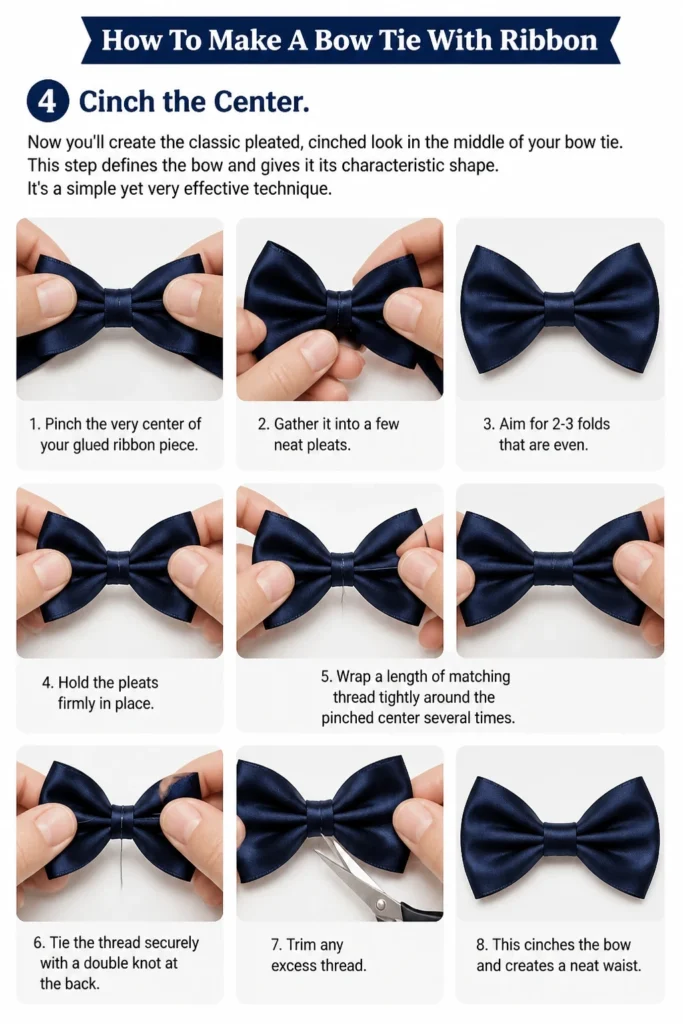
Now you’ll create the classic pleated, cinched look in the middle of your bow tie. This step defines the bow and gives it its characteristic shape. It’s a simple yet very effective technique.
This gathering creates the “knot” effect of the bow tie.
- Pinch the very center of your glued ribbon piece. Gather it into a few neat pleats. Aim for 2-3 folds that are even.
- Hold the pleats firmly in place.
- Wrap a length of matching thread tightly around the pinched center several times.
- Tie the thread securely with a double knot at the back. Trim any excess thread. This cinches the bow and creates a neat waist.
Step 5: Create and Attach the Center Knot Wrap
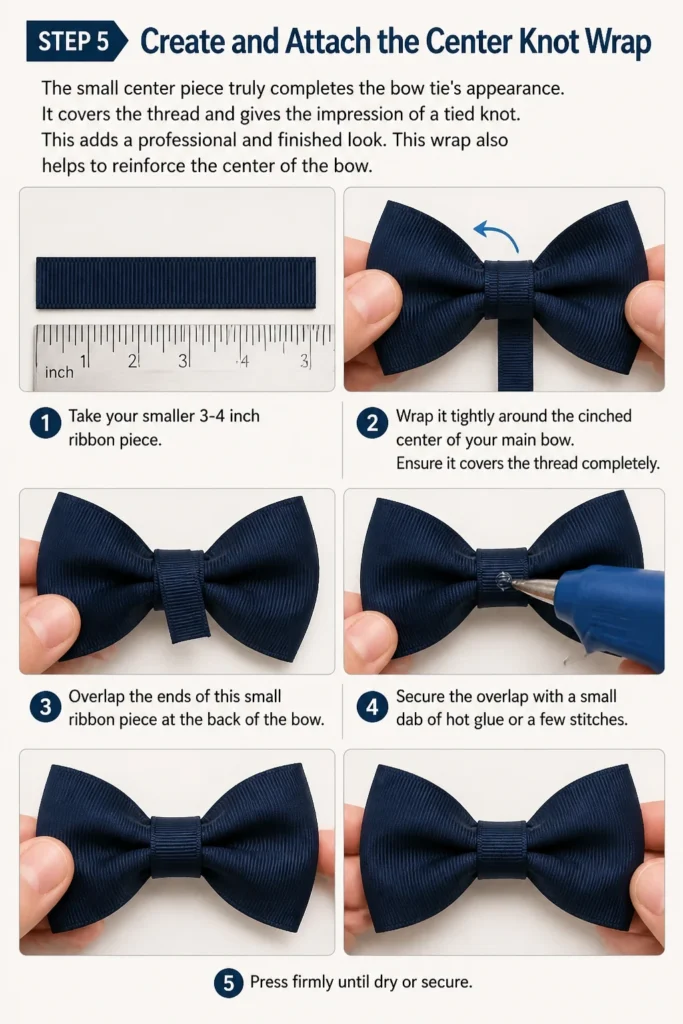
The small center piece truly completes the bow tie’s appearance. It covers the thread and gives the impression of a tied knot. This adds a professional and finished look.
This wrap also helps to reinforce the center of the bow.
- Take your smaller 3-4 inch ribbon piece.
- Wrap it tightly around the cinched center of your main bow. Ensure it covers the thread completely.
- Overlap the ends of this small ribbon piece at the back of the bow.
- Secure the overlap with a small dab of hot glue or a few stitches. Press firmly until dry or secure.
Step 6: Attach the Bow Tie Hardware
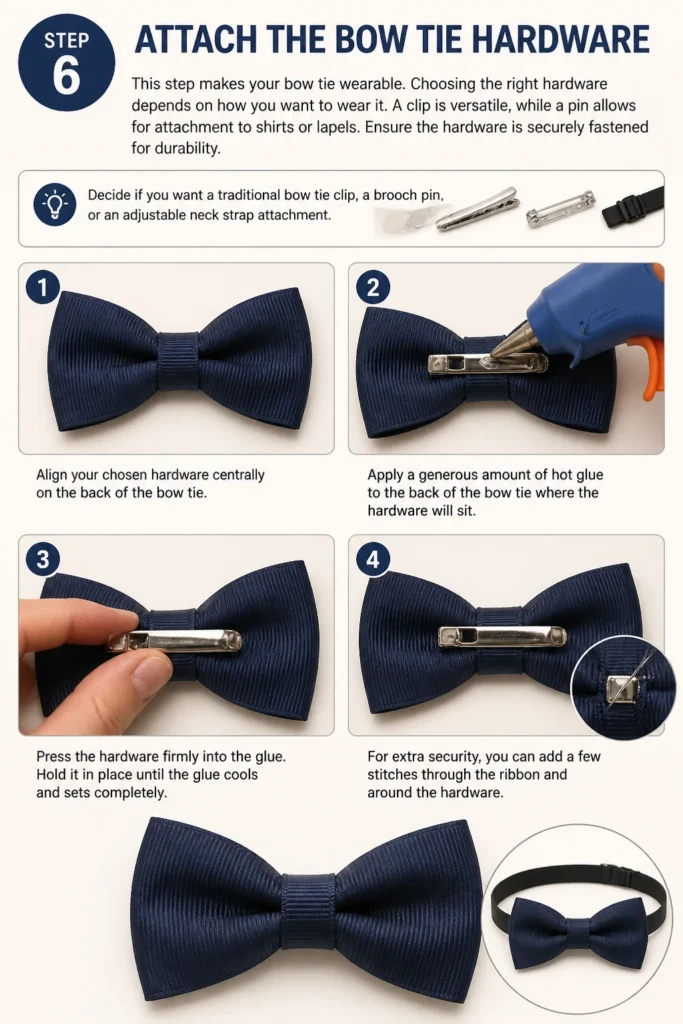
This step makes your bow tie wearable. Choosing the right hardware depends on how you want to wear it. A clip is versatile, while a pin allows for attachment to shirts or lapels.
Ensure the hardware is securely fastened for durability.
- Decide if you want a traditional bow tie clip, a brooch pin, or an adjustable neck strap attachment.
- Align your chosen hardware centrally on the back of the bow tie.
- Apply a generous amount of hot glue to the back of the bow tie where the hardware will sit.
- Press the hardware firmly into the glue. Hold it in place until the glue cools and sets completely. For extra security, you can add a few stitches through the ribbon and around the hardware.
Step 7: Refine and Adjust the Shape
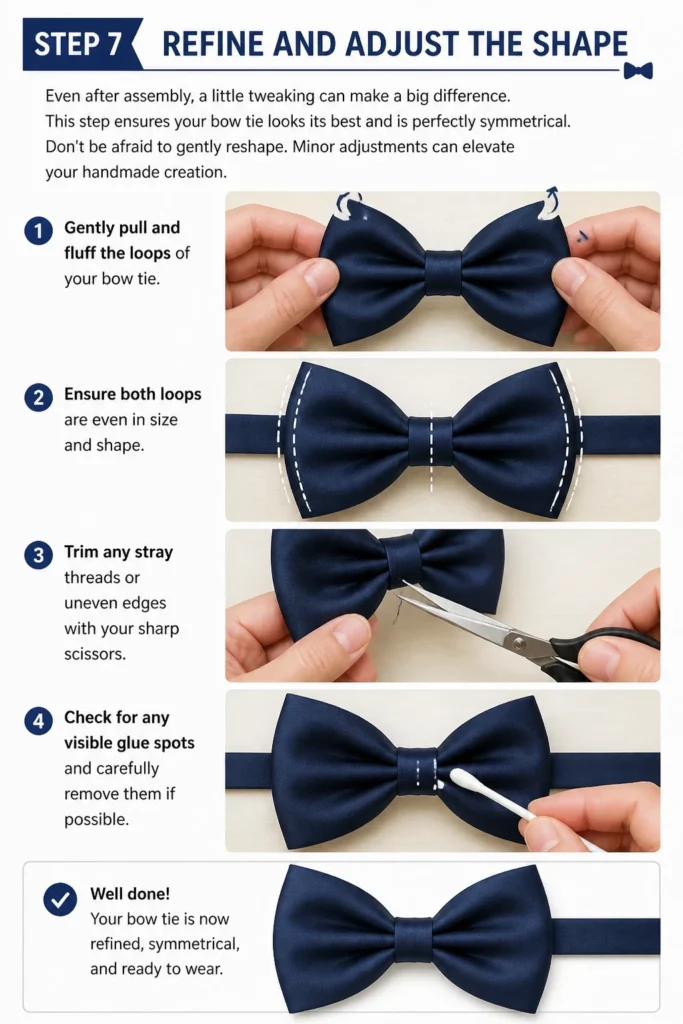
Even after assembly, a little tweaking can make a big difference. This step ensures your bow tie looks its best and is perfectly symmetrical. Don’t be afraid to gently reshape.
Minor adjustments can elevate your handmade creation.
- Gently pull and fluff the loops of your bow tie.
- Ensure both loops are even in size and shape.
- Trim any stray threads or uneven edges with your sharp scissors.
- Check for any visible glue spots and carefully remove them if possible.
Step 8: Final Inspection
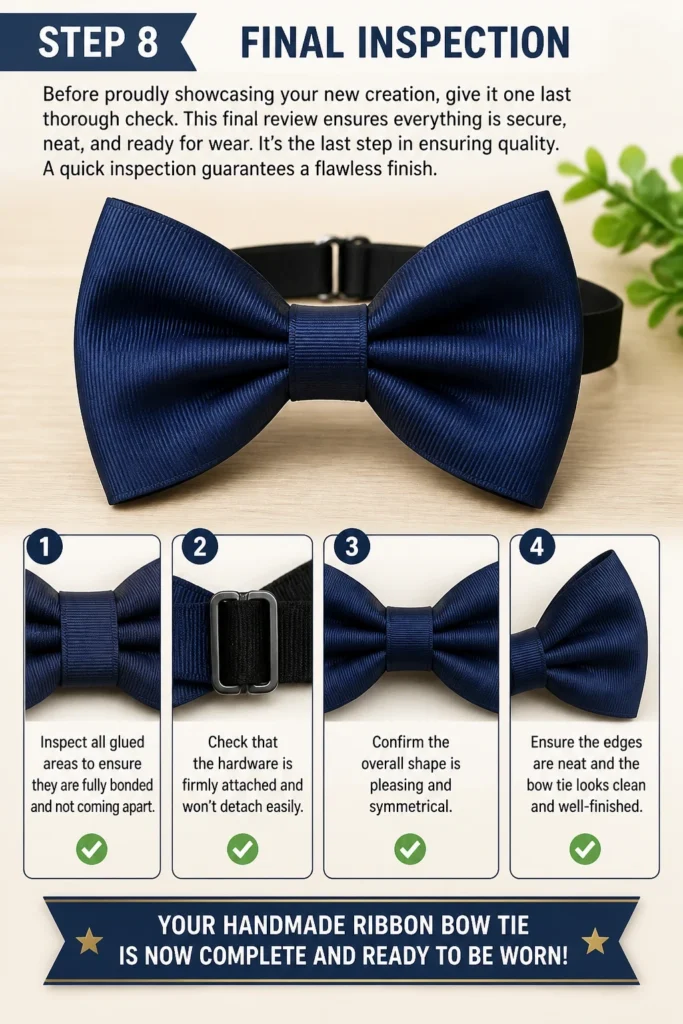
Before proudly showcasing your new creation, give it one last thorough check. This final review ensures everything is secure, neat, and ready for wear. It’s the last step in ensuring quality.
A quick inspection guarantees a flawless finish.
- Inspect all glued areas to ensure they are fully bonded and not coming apart.
- Check that the hardware is firmly attached and won’t detach easily.
- Confirm the overall shape is pleasing and symmetrical.
- Your handmade ribbon bow tie is now complete and ready to be worn!
Common Mistakes to Avoid
Using the Wrong Ribbon Type
Choosing a ribbon that is too flimsy or too stiff can drastically impact the final look of your bow tie. Flimsy ribbons like thin satin might not hold their shape, resulting in a droopy bow. Conversely, very stiff ribbons can be difficult to pleat neatly and might look rigid rather than elegant. Always opt for a medium-weight ribbon like grosgrain or a good quality satin that has some body to it.
Inaccurate Measurements
Skipping careful measurements or estimating ribbon lengths often leads to lopsided or disproportionate bow ties. If your main ribbon piece isn’t cut evenly, your loops will be uneven. Similarly, if the center wrap is too short or too long, it can look messy. Always measure twice and cut once to ensure symmetry and a professional finish.
Over-gluing or Under-stitching
Relying too heavily on hot glue can create stiff, visible patches on your ribbon, making the bow tie look amateurish. Too much glue can also seep through the fabric. On the other hand, not using enough glue or insufficient stitching means your bow tie might fall apart. Use small, precise dots of glue where needed, and reinforce key areas with discreet hand stitches for durability without bulk.
Rushing the Process
Making a bow tie requires a bit of patience, especially when forming the pleats and securing the center. Rushing through these steps can result in uneven folds, loose threads, or crooked loops. Take your time, ensure each fold is crisp, and every attachment is secure. A little extra care during the creation process will lead to a much more refined and lasting bow tie.
Troubleshooting
Bow Tie Looks Lopsided
If your bow tie appears uneven or one loop is larger than the other, it’s usually due to imprecise folding in Step 3. Gently unglue or unpick the stitches holding the main loops together. Carefully re-fold the ribbon, ensuring both ends meet evenly in the center and the loops are identical in size. Re-secure with glue or stitches, paying close attention to symmetry.
Ribbon Edges Are Fraying
Fraying edges can make your bow tie look unfinished. If you notice fraying, you have a few options. For synthetic ribbons, you can carefully use a lighter to lightly singe (heat seal) the edges, but be extremely cautious not to burn the ribbon. For natural fibers, apply a small amount of “Fray Check” liquid to the raw edges. Alternatively, fold the raw edges under slightly before gluing to hide them.
Hardware Not Staying Put
If your bow tie clip or pin is detaching, the initial glue bond might not have been strong enough, or too little glue was used. Re-attach the hardware using a more generous amount of hot glue, ensuring it covers the entire contact surface of the hardware. For added security, you can sew a few stitches through the ribbon and around the hardware’s attachment points with strong thread. Let the glue cure completely before handling.
Key Takeaways
- Always choose a medium-weight ribbon for the best shape and structure.
- Precision in measuring and cutting ensures a symmetrical and professional-looking bow tie.
- Use hot glue sparingly for a clean finish, reinforcing with stitches for durability.
- Patience during the pleating and cinching process is vital for neat results.
- Don’t be afraid to gently adjust and reshape the bow loops for perfect symmetry.
- Attaching hardware securely is crucial for a wearable and long-lasting accessory.
Frequently Asked Questions
Can I use fabric instead of ribbon?
Yes, you absolutely can use fabric! If you opt for fabric, you’ll need to cut out specific shapes, usually two main pieces for the bow and a smaller piece for the center wrap. You’ll also need to hem or finish the edges of the fabric to prevent fraying before assembling. This opens up a world of patterns and textures.
How do I make the bow tie adjustable?
To make your bow tie adjustable for different neck sizes, you’ll need specific adjustable bow tie hardware. This typically includes a hook, an eye, and a slider. You’ll attach the bow tie to one end of a fabric neck strap, and then thread the other end through the slider, hook, and eye components to create an adjustable loop.
What’s the best way to clean a ribbon bow tie?
Most ribbon bow ties are best spot-cleaned. Use a damp cloth with a very mild soap or detergent. Gently blot the soiled area, being careful not to rub too vigorously, which could damage the ribbon or dislodge glue. Allow it to air dry completely, reshaping if necessary. Avoid machine washing unless the ribbon manufacturer specifically states it’s safe.
Can I make smaller or larger bow ties with this method?
Yes, this method is highly adaptable for different sizes. Simply adjust the initial ribbon length measurements. For a smaller bow tie (e.g., for children or pets), use a shorter main ribbon piece and a narrower ribbon width. For a larger, more dramatic bow, increase both the length and width of your ribbon. The basic folding and cinching technique remains the same.
Our Top Recommended Finds
- Fiskars Amplify RazorEdge Fabric Shears: These sharp scissors make clean, precise cuts through various ribbon types, preventing frayed edges from the start. They feel great in your hand and stay sharp for a long time.
- Surebonder Mini Hot Glue Gun: A reliable hot glue gun with a fine tip allows for precise application, preventing messy glues spots. This brand offers consistent heat and a comfortable grip for intricate work.
- Assorted Grosgrain Ribbon Pack: Having a variety of colors and widths on hand encourages creativity and provides options for different projects. Grosgrain holds its shape beautifully and comes in countless hues.
Unleash Your Inner Crafter
You now have all the tools and knowledge to create beautiful ribbon bow ties. Imagine the possibilities, from classic solids to vibrant patterns, all crafted by your own hands. These handmade accessories make fantastic personalized gifts or a special treat for yourself.
Don’t let your creative spark fade. Grab your chosen ribbon and start making your first bow tie today. You might just discover a new favorite hobby, or at least a stylish new accessory!
Beginner-friendly templates, step-by-step guides,
and weekly project ideas in your inbox.