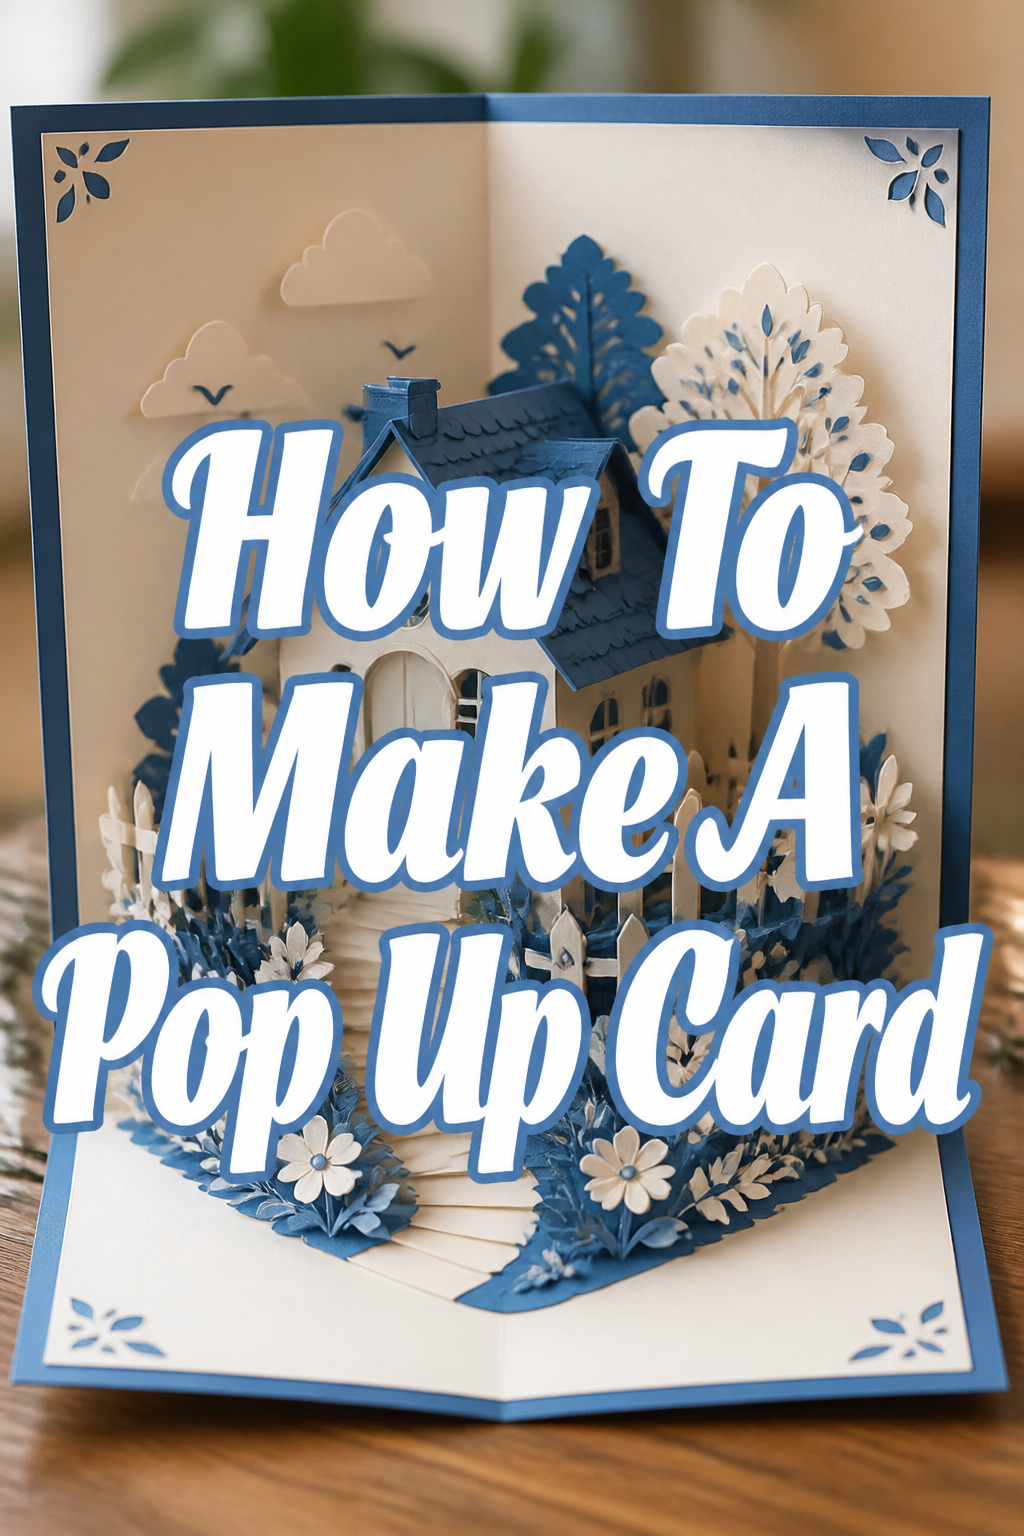
✂️ How To Make A Pop Up Card

Beginner-friendly templates, step-by-step guides,
and weekly project ideas in your inbox.
Creating a pop up card is a delightful way to add an extra layer of surprise and personalization to your greetings.
I’ve spent countless hours crafting these miniature wonders, discovering the simple secrets to making them truly pop.
This guide will walk you through each step, ensuring your handmade card brings a genuine smile.
Quick Overview
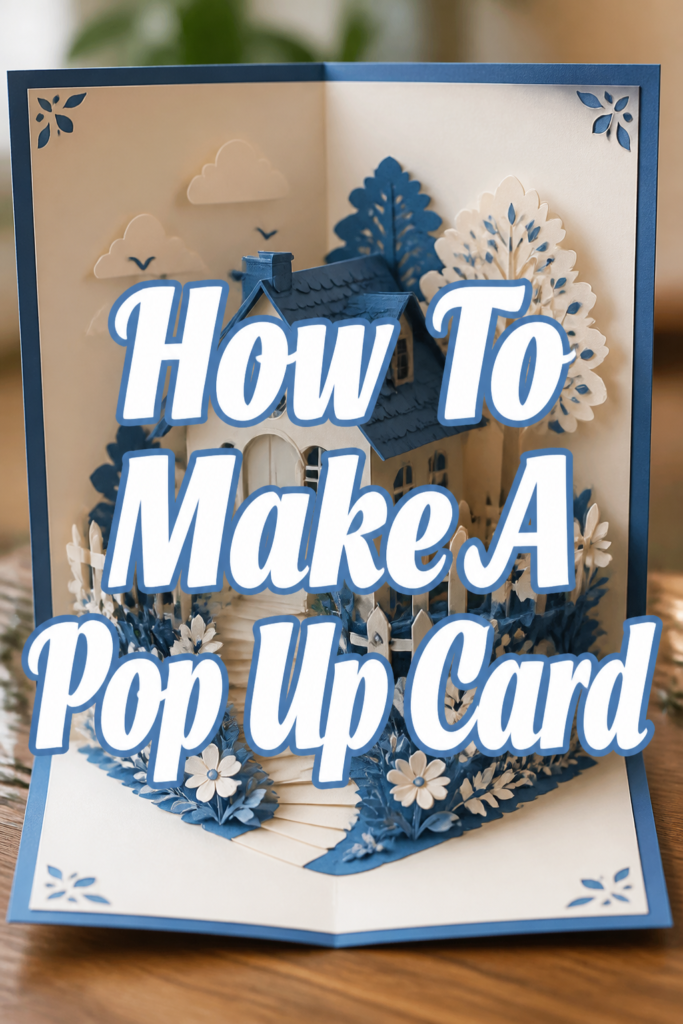
You’re about to craft a charming pop-up card, perfect for any occasion. This project is a fantastic introduction to paper engineering, transforming flat paper into a dynamic 3D scene.
By the end, you’ll have a unique card and the skills to explore more complex pop-up designs.
- Time needed: 1-2 hours
- Difficulty: Beginner
- What you’ll need: Cardstock, scissors, ruler, pencil, glue, craft knife (optional)
Step-by-Step Instructions
Step 1: Gather Your Materials
Before you begin, make sure all your tools and papers are ready. Having everything within reach makes the crafting process smoother and more enjoyable.
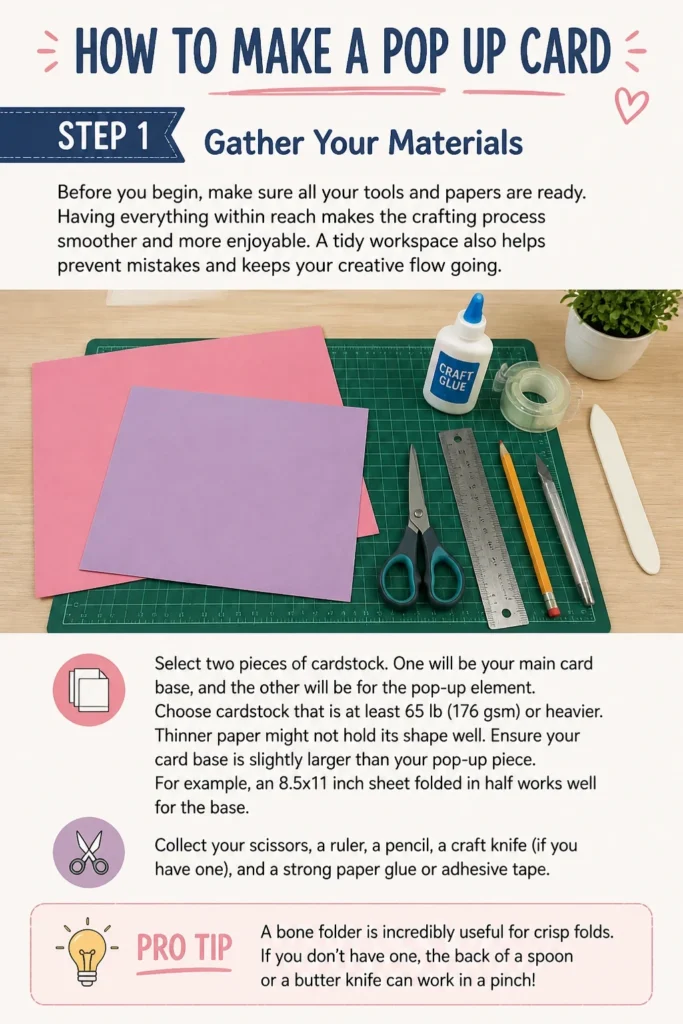
A tidy workspace also helps prevent mistakes and keeps your creative flow going.
- Select two pieces of cardstock. One will be your main card base, and the other will be for the pop-up element.
- Choose cardstock that is at least 65 lb (176 gsm) or heavier. Thinner paper might not hold its shape well.
- Ensure your card base is slightly larger than your pop-up piece. For example, an 8.5×11 inch sheet folded in half works well for the base.
- Collect your scissors, a ruler, a pencil, a craft knife (if you have one), and a strong paper glue or adhesive tape.
Pro Tip: A bone folder is incredibly useful for crisp folds. If you don’t have one, the back of a spoon or a dull butter knife can work in a pinch.
Step 2: Prepare the Card Base
The card base forms the foundation for your pop-up. A well-prepared base ensures your pop-up mechanism functions correctly and the card closes neatly.
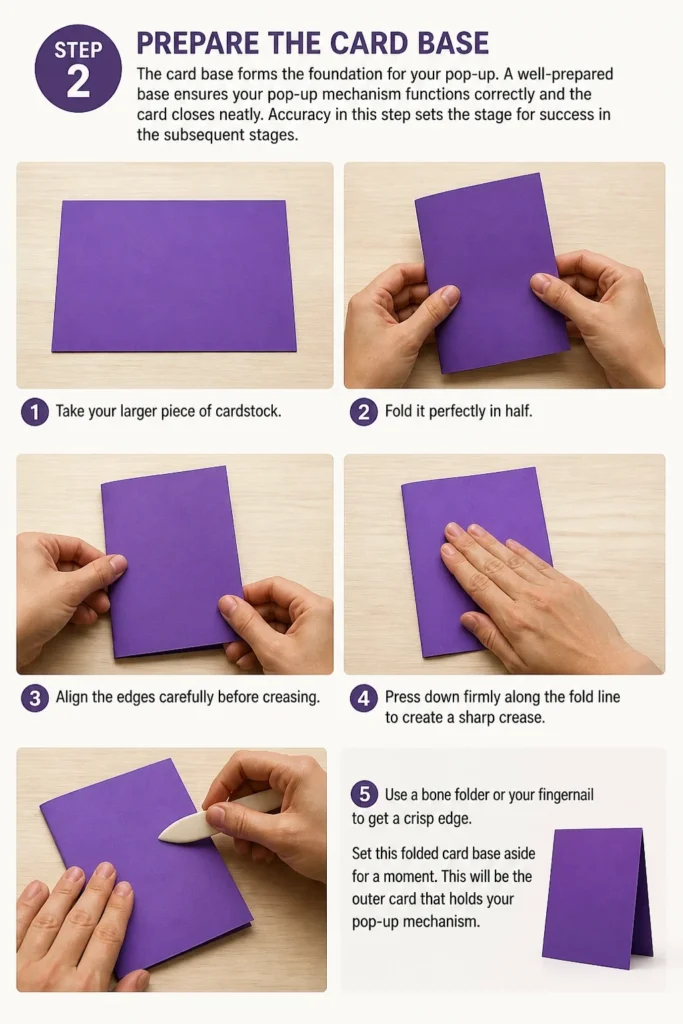
Accuracy in this step sets the stage for success in the subsequent stages.
- Take your larger piece of cardstock.
- Fold it perfectly in half. Align the edges carefully before creasing.
- Press down firmly along the fold line to create a sharp crease. Use a bone folder or your fingernail to get a crisp edge.
- Set this folded card base aside for a moment. This will be the outer card that holds your pop-up mechanism.
Step 3: Create the Pop-Up Mechanism
This is where the magic begins. You’ll be cutting and folding the inner piece of cardstock to create the “spring” that makes your element pop out.
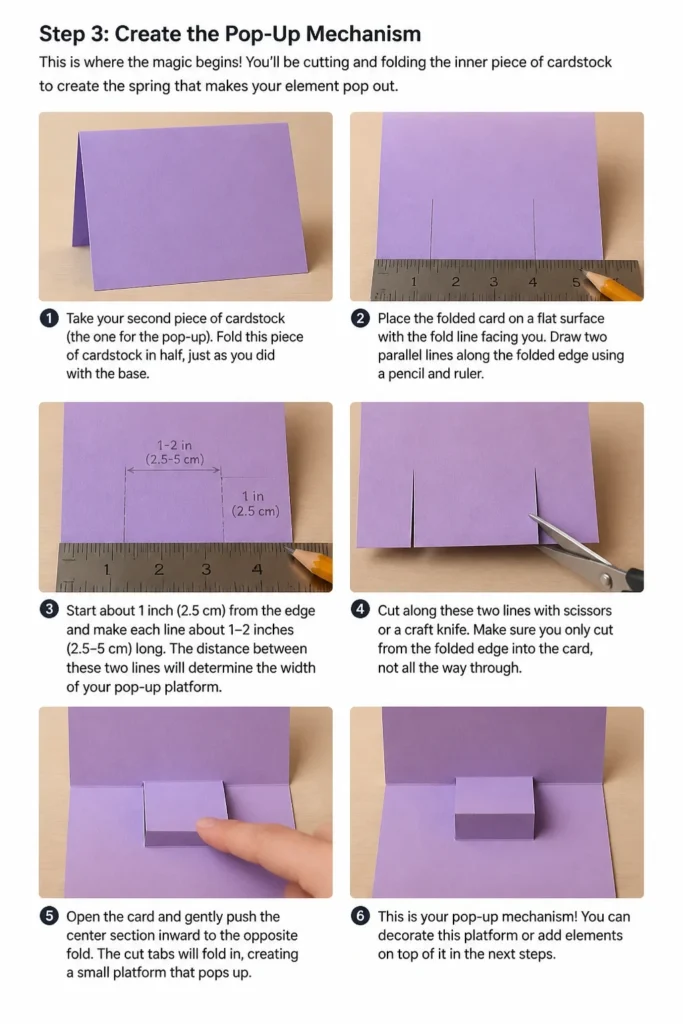
This method uses a simple parallel cut, which is ideal for beginners.
- Take your second piece of cardstock (the one for the pop-up).
- Fold this piece of cardstock in half, just as you did with the base.
- Place the folded card on a flat surface with the fold line facing you.
- Draw two parallel lines along the folded edge using a pencil and ruler. Start about 1 inch (2.5 cm) from the edge and make each line about 1-2 inches (2.5-5 cm) long. The distance between these two lines will determine the width of your pop-up platform.
- Cut along these two lines with scissors or a craft knife. Make sure you only cut from the folded edge into the card, not all the way across.
- Be careful not to cut past the end of your pencil lines.
Pro Tip: When using a craft knife, always use a cutting mat underneath to protect your work surface. Take your time and make clean, precise cuts.
Step 4: Form the Pop-Up Platform
Now that you’ve made the cuts, it’s time to transform them into the actual pop-up platform. This step involves pushing the cut section inwards.
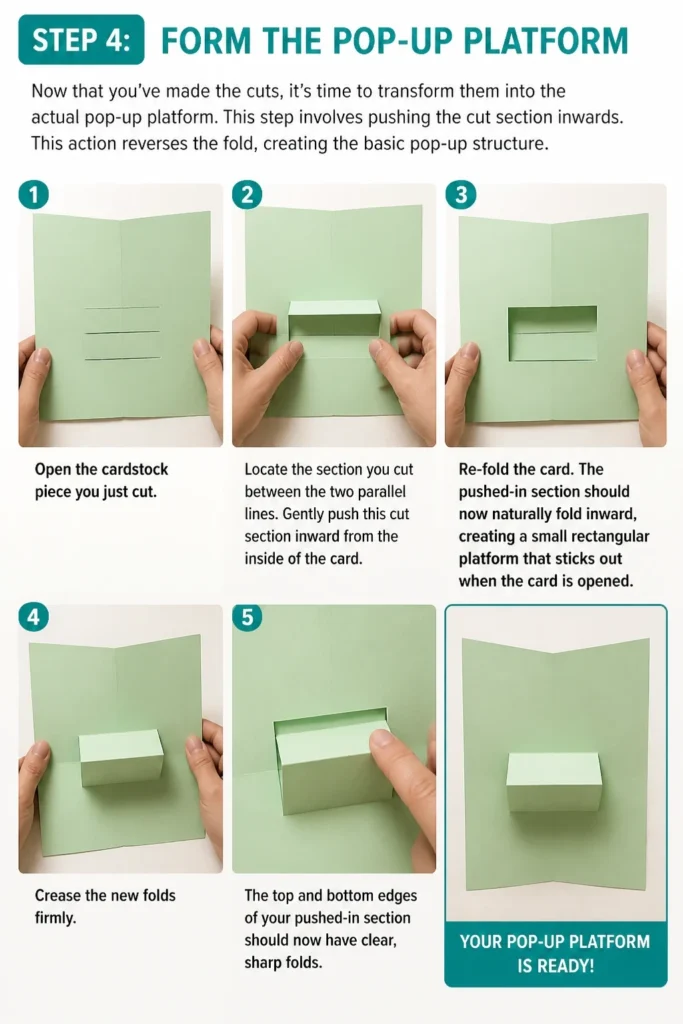
This action reverses the fold, creating the basic pop-up structure.
- Open the cardstock piece you just cut.
- Locate the section you cut between the two parallel lines.
- Gently push this cut section inward from the inside of the card.
- Re-fold the card. The pushed-in section should now naturally fold inward, creating a small rectangular platform that sticks out when the card is opened.
- Crease the new folds firmly. The top and bottom edges of your pushed-in section should now have clear, sharp folds.
Step 5: Attach the Pop-Up Piece to the Card Base
With your pop-up mechanism ready, it’s time to integrate it into your main card. Proper alignment here is key for a smooth opening and closing action.
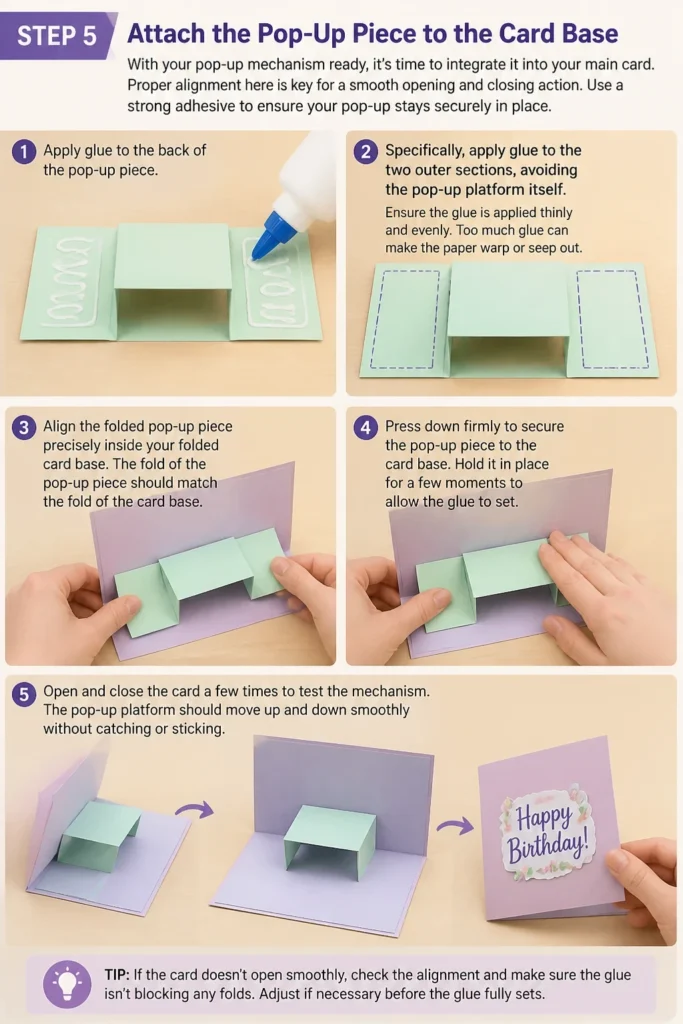
Use a strong adhesive to ensure your pop-up stays securely in place.
- Apply glue to the back of the pop-up piece. Specifically, apply glue to the two outer sections, avoiding the pop-up platform itself.
- Ensure the glue is applied thinly and evenly. Too much glue can make the paper warp or seep out.
- Align the folded pop-up piece precisely inside your folded card base. The fold of the pop-up piece should match the fold of the card base.
- Press down firmly to secure the pop-up piece to the card base. Hold it in place for a few moments to allow the glue to set.
- Open and close the card a few times to test the mechanism. The pop-up platform should move freely.
Pro Tip: Double-sided tape can be a cleaner alternative to liquid glue, especially if you’re worried about warping. Apply it close to the edges for maximum hold.
Step 6: Decorate Your Pop-Up Element
This is where your creativity truly shines! You can attach any design or image to the pop-up platform to make it come alive.
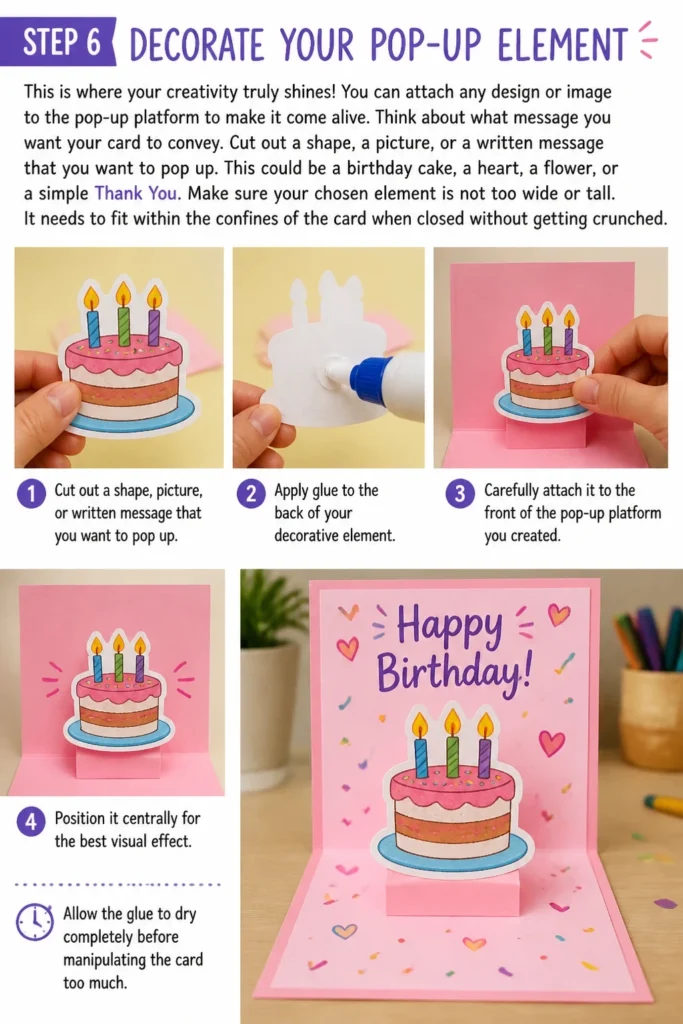
Think about what message you want your card to convey.
- Cut out a shape, a picture, or a written message that you want to pop up. This could be a birthday cake, a heart, a flower, or a simple “Thank You.”
- Make sure your chosen element is not too wide or tall. It needs to fit within the confines of the card when closed without getting crunched.
- Apply glue to the back of your decorative element.
- Carefully attach it to the front of the pop-up platform you created. Position it centrally for the best visual effect.
- Allow the glue to dry completely before manipulating the card too much.
Step 7: Finish the Card’s Exterior and Interior
The exterior and other interior panels of your card are just as important as the pop-up. They provide context and additional space for your message.
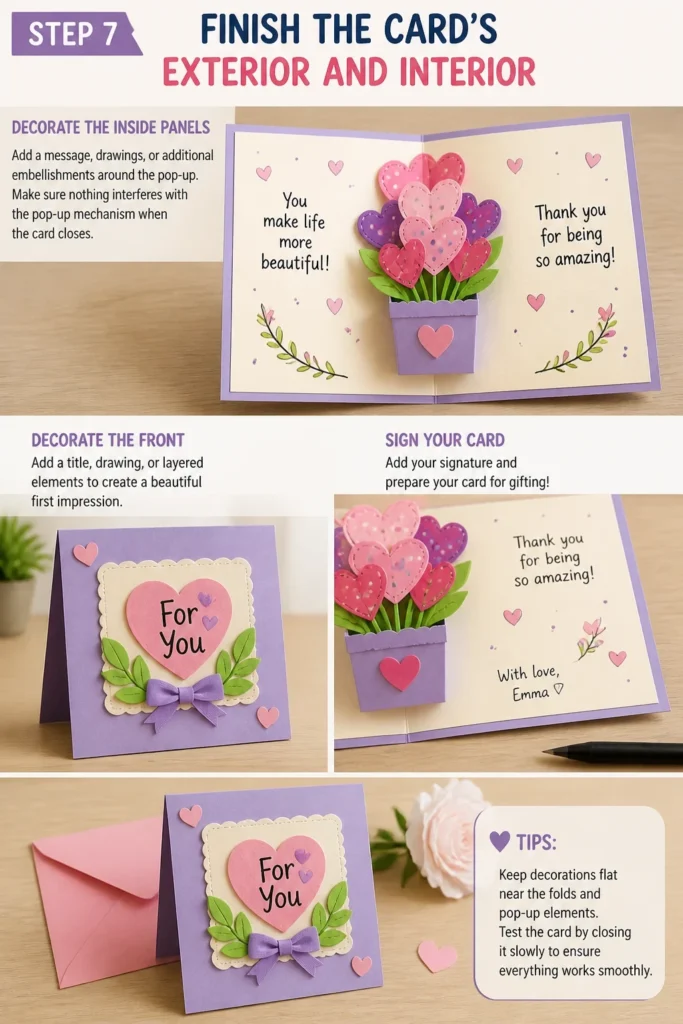
Consider decorating these areas to complement your pop-up design.
- Add a message, drawings, or additional embellishments to the inside panels of the main card, around the pop-up.
- Ensure any added elements don’t interfere with the pop-up mechanism when the card closes.
- Decorate the front of your card. This could be a simple title, a small drawing, or layered paper elements.
- Sign your card and prepare it for gifting.
Common Mistakes to Avoid
Not Scoring Your Folds
Many beginners simply fold cardstock by hand, resulting in soft, rounded creases. This makes your pop-up mechanism less precise and can cause the card to look messy.
Always score your cardstock before folding. Use a ruler and a bone folder (or a dull knife) to create a crisp indentation along the fold line. This ensures sharp, professional-looking creases that allow your pop-up to function perfectly.
Inaccurate Cuts
When cutting the parallel lines for your pop-up platform, any deviation can compromise the mechanism. If cuts are uneven or extend too far, the platform might not fold correctly or could even tear.
Measure twice and cut once. Use a ruler and a sharp pencil to mark your lines precisely. For cutting, a craft knife offers more control than scissors, especially for shorter, straight lines. Always ensure your cuts stop exactly where intended.
Using Too Much Glue
Applying a thick layer of liquid glue can warp your paper, create unsightly wrinkles, and potentially stick parts of the card together that aren’t meant to be joined. It also takes longer to dry, increasing the chance of misalignment.
Use glue sparingly. A thin, even layer is all you need. For most paper crafts, a tiny bead of glue spread thinly or a few dots in key areas are sufficient. Consider using a glue stick or double-sided tape for flatter, cleaner results.
Not Testing the Mechanism
After attaching the pop-up piece to the card base, some crafters immediately proceed to decorating without checking the pop-up’s function. This can lead to disappointment later if something isn’t aligned.
Always open and close your card several times after attaching the pop-up mechanism. This helps to “train” the folds and ensures everything moves smoothly. If there’s any sticking or resistance, address it before adding decorative elements.
Troubleshooting
Pop-Up Doesn’t Pop Out Fully
If your pop-up element seems to stick or doesn’t extend completely when the card is opened, the folds might not be sharp enough, or the paper might be too stiff.
Re-crease all the folds in your pop-up mechanism. Use a bone folder or the back of a spoon to press down firmly. Gently open and close the card repeatedly to help “break in” the paper and make the folds more pliable. Ensure no glue is inadvertently holding parts together.
Card Won’t Close Flat
When the card refuses to close flat, it usually means your pop-up element is too large, or it’s attached incorrectly, causing interference with the card’s natural fold.
Check the size of your decorative pop-up element. It must fit entirely within the card’s dimensions when closed. If it’s too big, trim it down. Also, ensure the pop-up mechanism itself is aligned perfectly with the card’s central fold. Any offset will prevent a flat closure.
Pop-Up Element Tears
Tears often occur when the paper is handled too roughly, the glue is too strong on delicate paper, or the cuts for the mechanism create weak points.
Be gentle when opening and closing your card, especially after initial assembly. If tears are a recurring issue, consider using slightly heavier cardstock for your pop-up elements. Reinforce any delicate areas with a small piece of clear tape on the back, or use a stronger adhesive designed for paper crafts.
Key Takeaways
- Preparation is key: gather all materials and ensure a clean workspace.
- Precision matters: accurate measuring, scoring, and cutting lead to a better pop-up.
- Use glue sparingly: too much adhesive can warp paper and hinder function.
- Test your mechanism: always check the pop-up’s movement before final decoration.
- Embrace creativity: personalize your pop-up with unique designs and messages.
- Practice makes perfect: don’t be discouraged if your first attempt isn’t flawless.
Frequently Asked Questions
What kind of paper is best for pop up cards?
Cardstock is ideal for pop up cards. It’s sturdy enough to hold its shape and withstand the bending and folding involved in the pop-up mechanism. Look for cardstock that is at least 65 lb (176 gsm) or heavier. Lighter paper tends to flop and won’t give you a crisp pop-up effect.
Can children make pop up cards?
Absolutely! Pop up cards are a fantastic craft for children, especially with adult supervision for cutting. Simple designs, like the parallel cut mechanism described here, are very kid-friendly. It helps develop fine motor skills, creativity, and an understanding of basic engineering principles. Just be sure to use child-safe scissors and glue.
How can I make my pop up card more complex?
Once you’ve mastered the basic parallel fold, you can explore many other pop-up techniques. Try creating multiple platforms, adding rotational elements, or using V-fold or box-fold mechanisms. Experiment with layering different shapes and sizes on your pop-up platforms to create depth and more intricate scenes. Books and online tutorials offer a wealth of advanced pop-up ideas.
What if my pop-up element is too heavy?
If your pop-up element is too heavy, the mechanism might struggle to lift it, or the paper could sag. To fix this, you can reinforce the pop-up platform with an extra layer of cardstock or use a stronger adhesive. Alternatively, consider making your pop-up element lighter by using fewer layers of paper or opting for a less dense material.
Our Top Recommended Finds
- Craft Knife: Essential for precise, straight cuts on cardstock, offering more control than scissors for intricate details.
- Bone Folder: Creates incredibly crisp, clean folds, which are crucial for a well-functioning pop-up mechanism.
- Precision Glue: A quick-drying, strong paper glue with a fine tip helps prevent messes and ensures strong bonds without warping.
Your Next Creative Adventure Awaits
You’ve now crafted a charming pop-up card, transforming simple paper into a captivating 3D surprise. This skill opens up a world of creative possibilities, from personalized greetings to intricate paper art.
Don’t stop here! Take your newfound knowledge and experiment with different shapes, colors, and themes. The joy of giving a handmade pop-up card is truly special.
Start another project today and watch your paper creations come to life!
Beginner-friendly templates, step-by-step guides,
and weekly project ideas in your inbox.