💐 How To Make A Bouquet With Paper

Beginner-friendly templates, step-by-step guides,
and weekly project ideas in your inbox.
There’s a special kind of magic in creating something beautiful with your own hands. I remember the first time I crafted a paper flower, feeling a burst of pride as it came to life from a flat sheet.
That simple act sparked a passion, and soon I was making entire paper bouquets that never wilted, bringing lasting joy to friends and family.
This guide distills years of hands-on experience, sharing all the practical tips I’ve learned to help you create stunning paper bouquets too.
Quick Overview
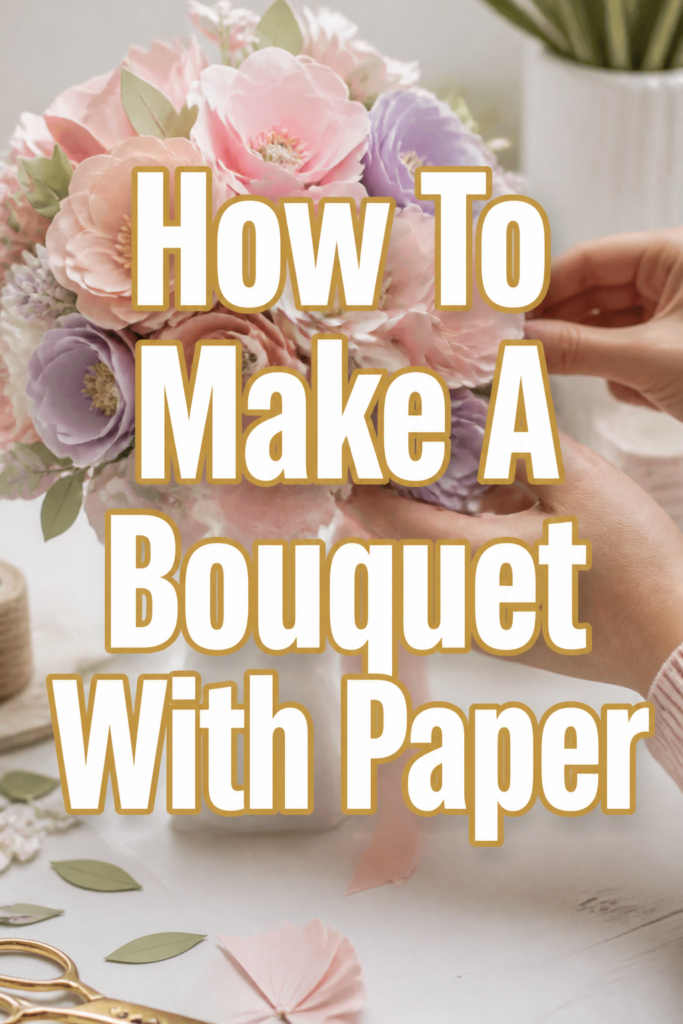
You’re about to embark on a delightful crafting journey. By the end of this guide, you will have transformed simple sheets of paper into a vibrant, lasting bouquet, perfect for gifting or decorating your home.
- Time needed: 2-4 hours (depending on complexity and number of flowers)
- Difficulty: Intermediate (beginners can follow with patience)
- What you’ll need: Paper, scissors, craft glue, floral wire, floral tape, shaping tools
Step-by-Step Instructions
Step 1: Gather Your Materials
Before you begin, make sure you have everything laid out. A well-organized workspace makes the crafting process much smoother and more enjoyable.
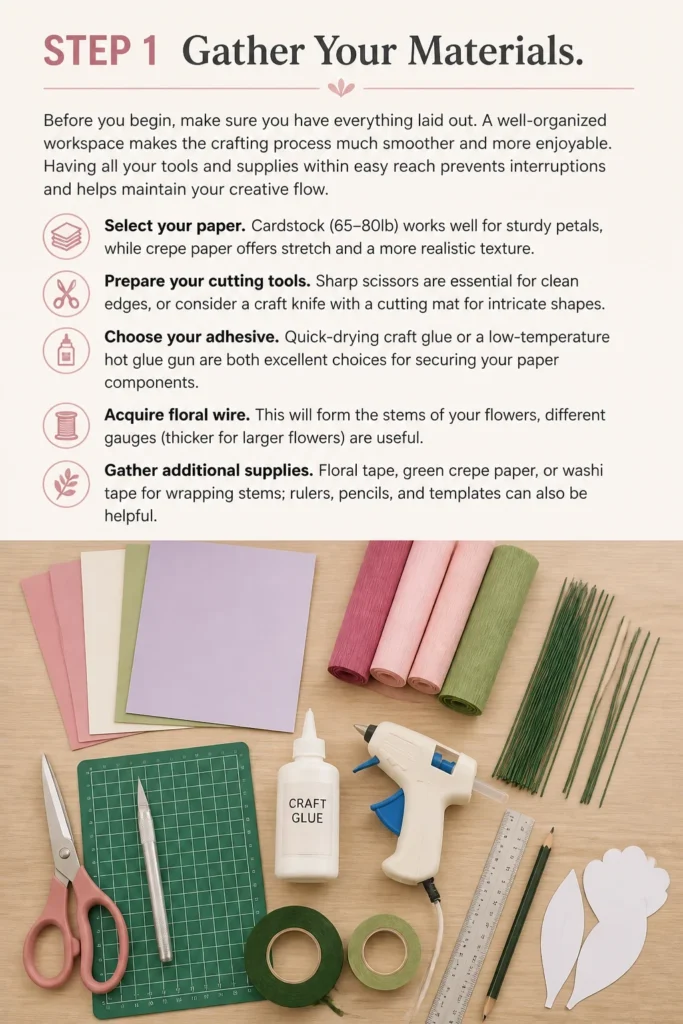
Having all your tools and supplies within easy reach prevents interruptions and helps maintain your creative flow.
- Select your paper. Cardstock (65-80lb) works well for sturdy petals, while crepe paper offers stretch and a more realistic texture.
- Prepare your cutting tools. Sharp scissors are essential for clean edges, or consider a craft knife with a cutting mat for intricate shapes.
- Choose your adhesive. Quick-drying craft glue or a low-temperature hot glue gun are both excellent choices for securing your paper components.
- Acquire floral wire. This will form the stems of your flowers; different gauges (thicker for larger flowers) are useful.
- Grab floral tape. This specialized tape adheres to itself and is perfect for wrapping stems and concealing wires.
- Find shaping tools. A ball stylus, a blunt pencil, or even just your fingers will help add dimension to your petals.
Pro Tip: Experiment with different paper types for varied effects. Heavy cardstock creates crisp, structured flowers, while crepe paper allows for beautiful ruffles and organic curves.
Step 2: Choose Your Flower Style and Template
Deciding on the type of flower you want to create is your next important step. Many beautiful paper flower styles exist, from simple rolled roses to intricate peonies.
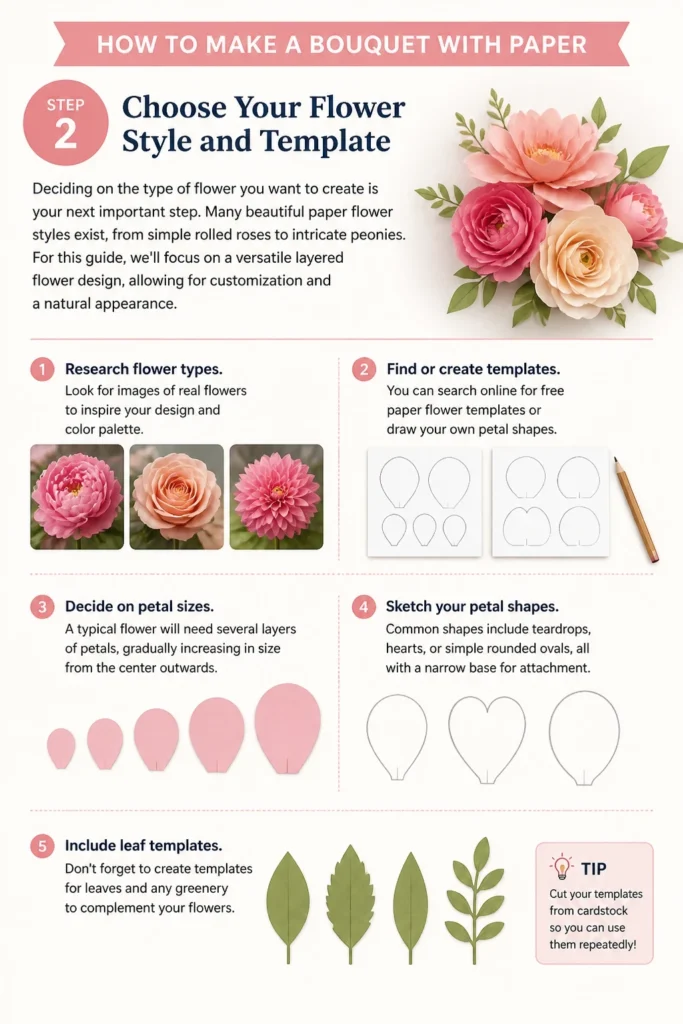
For this guide, we’ll focus on a versatile layered flower design, allowing for customization and a natural appearance.
- Research flower types. Look for images of real flowers to inspire your design and color palette.
- Find or create templates. You can search online for free paper flower templates or draw your own petal shapes.
- Decide on petal sizes. A typical flower will need several layers of petals, gradually increasing in size from the center outwards.
- Sketch your petal shapes. Common shapes include teardrops, hearts, or simple rounded ovals, all with a narrow base for attachment.
- Include leaf templates. Don’t forget to create templates for leaves to add realism and greenery to your bouquet.
Pro Tip: Start with a simpler flower like a basic rose or a daisy if you’re new to paper crafting. This builds confidence before tackling more complex designs.
Step 3: Cut Your Petals and Leaves
Precision in cutting is crucial for a professional-looking paper bouquet. Take your time with this step to ensure clean lines and consistent shapes.
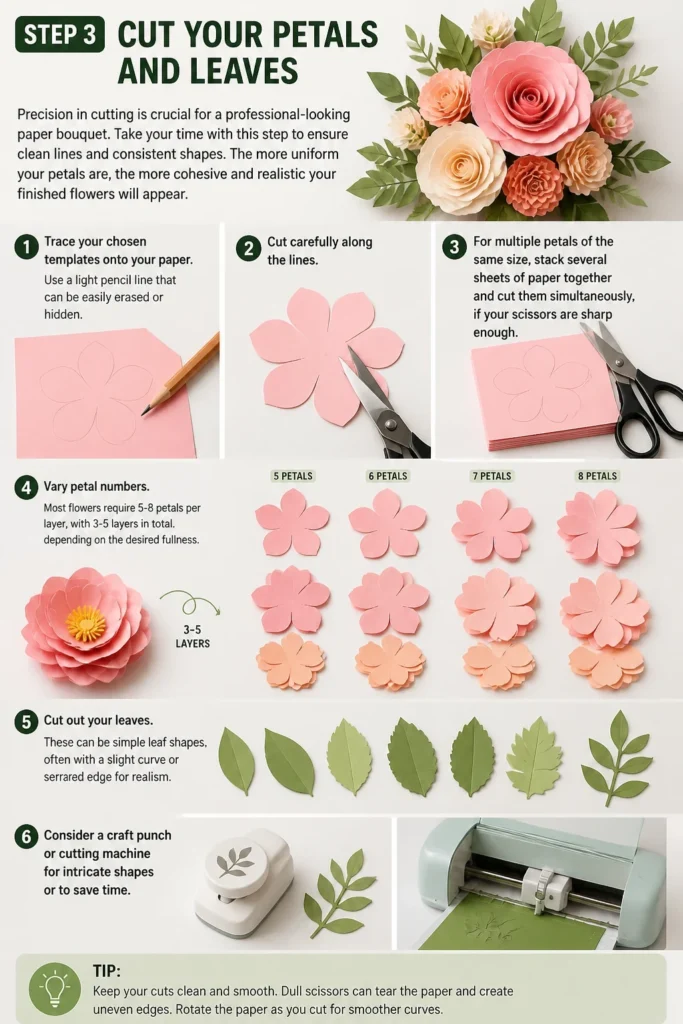
The more uniform your petals are, the more cohesive and realistic your finished flowers will appear.
- Trace your chosen templates onto your paper. Use a light pencil line that can be easily erased or hidden.
- Cut carefully along the lines. For multiple petals of the same size, stack several sheets of paper together and cut them simultaneously, if your scissors are sharp enough.
- Vary petal numbers. Most flowers require 5-8 petals per layer, with 3-5 layers in total, depending on the desired fullness.
- Cut out your leaves. These can be simple leaf shapes, often with a slight curve or serrated edge for realism.
- Consider a craft punch or cutting machine. If you’re making many flowers, these tools can save significant time and ensure perfect uniformity.
Pro Tip: When cutting, keep your scissors steady and move the paper instead of the blades. This technique helps create smoother, more continuous cuts, especially on curves.
Step 4: Shape Your Petals
Flat paper petals won’t create a realistic flower. Shaping is where you add dimension, curve, and life to each individual piece, mimicking natural growth.
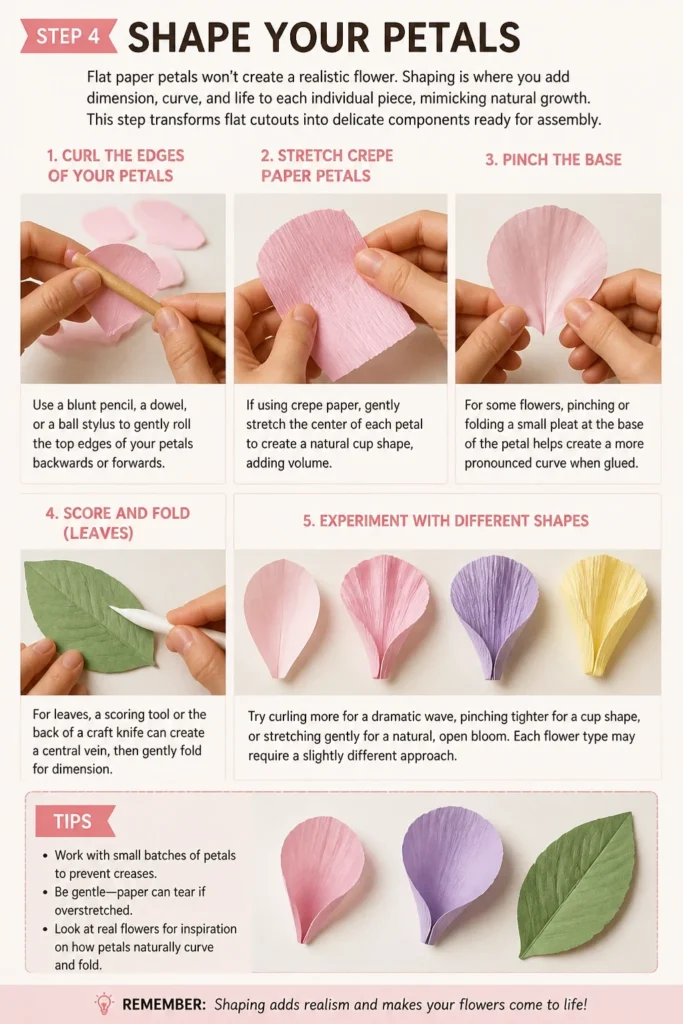
This step transforms flat cutouts into delicate components ready for assembly.
- Curl the edges of your petals. Use a blunt pencil, a dowel, or a ball stylus to gently roll the top edges of your petals backwards or forwards.
- Stretch crepe paper petals. If using crepe paper, gently stretch the center of each petal to create a natural cup shape, adding volume.
- Pinch the base. For some flowers, pinching or folding a small pleat at the base of the petal helps create a more pronounced curve when glued.
- Score and fold. For leaves, a scoring tool or the back of a craft knife can create a central vein, then gently fold for dimension.
- Experiment with different curves. Some petals might curl inwards, others outwards, to create a dynamic and varied look.
Pro Tip: Practice shaping on scrap paper first. Different papers respond differently to curling and stretching, so understanding their properties will prevent tearing or creasing your final pieces.
Step 5: Assemble Individual Flowers
Now, bring your shaped petals together to form the heart of your bouquet. This is where your careful cutting and shaping truly pay off, as the flower begins to emerge.
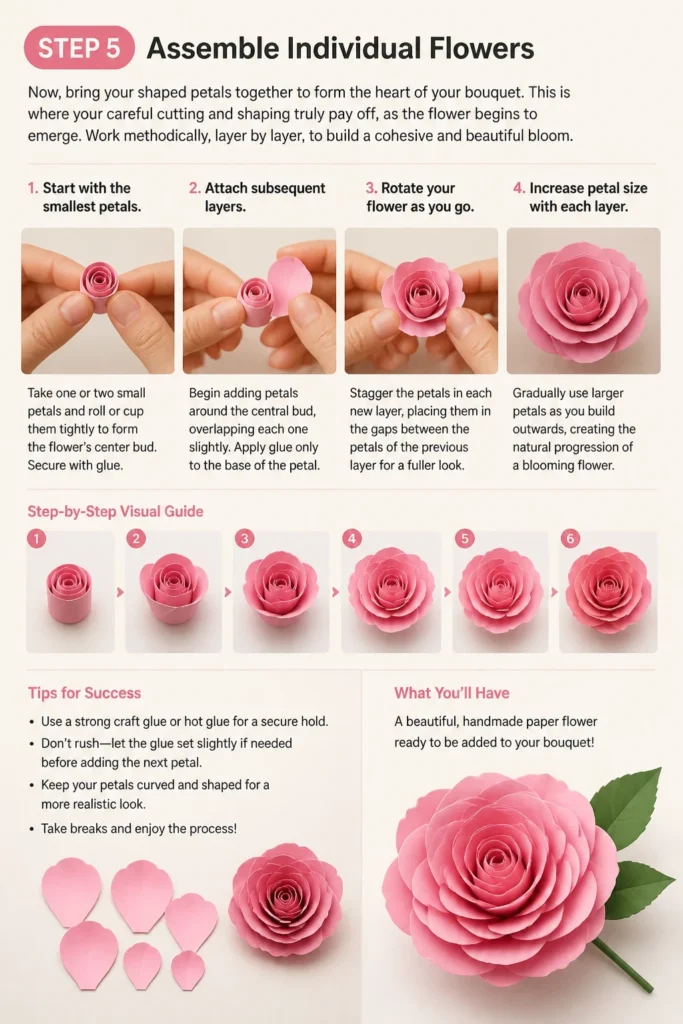
Work methodically, layer by layer, to build a cohesive and beautiful bloom.
- Start with the smallest petals. Take one or two small petals and roll or cup them tightly to form the flower’s center bud. Secure with glue.
- Attach subsequent layers. Begin adding petals around the central bud, overlapping each one slightly. Apply glue only to the base of the petal.
- Rotate your flower as you go. Stagger the petals in each new layer, placing them in the gaps between the petals of the previous layer for a fuller look.
- Increase petal size with each layer. Gradually use larger petals as you build outwards, creating the natural progression of a blooming flower.
- Add a calyx if desired. For some flowers, a small green paper calyx (the leafy part beneath the petals) can be added to the base of the flower for extra realism.
- Allow glue to dry fully. Ensure each layer is secure before moving on to the next, especially if using liquid craft glue.
Pro Tip: Use a pair of tweezers for precise placement of smaller petals. This helps prevent glue from getting on your fingers and keeps your delicate petals clean.
Step 6: Create Stems and Attach Flowers
Every beautiful flower needs a sturdy stem. This step ensures your paper creations can stand tall and be easily arranged into a cohesive bouquet.
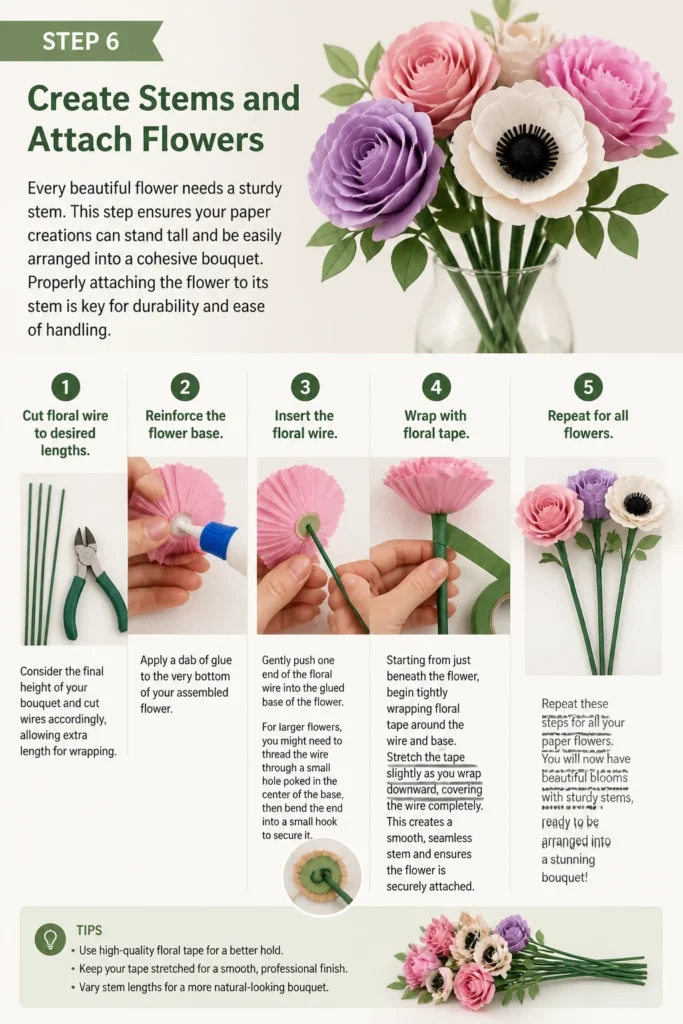
Properly attaching the flower to its stem is key for durability and ease of handling.
- Cut floral wire to desired lengths. Consider the final height of your bouquet and cut wires accordingly, allowing extra length for wrapping.
- Reinforce the flower base. Apply a dab of glue to the very bottom of your assembled flower.
- Insert the floral wire. Gently push one end of the floral wire into the glued base of the flower. For larger flowers, you might need to thread the wire through a small hole poked in the center of the base, then bend the end into a small hook to secure it.
- Wrap with floral tape. Starting from just beneath the flower, begin tightly wrapping the floral tape down the wire stem. Stretch the tape slightly as you wrap; this activates its adhesive properties.
- Add leaves to stems. As you wrap, you can secure your paper leaves to the stem at various points, using the floral tape to hold them in place.
- Continue wrapping. Go all the way down to the end of the wire, ensuring the entire stem is covered and smooth.
Pro Tip: When wrapping with floral tape, hold the tape taut and angle it downwards slightly as you rotate the stem. This creates a smooth, continuous wrap without gaps.
Step 7: Arrange Your Bouquet
Arranging is where your individual flowers come together to form a cohesive and beautiful display. Think about balance, color, and varying heights to create visual interest.
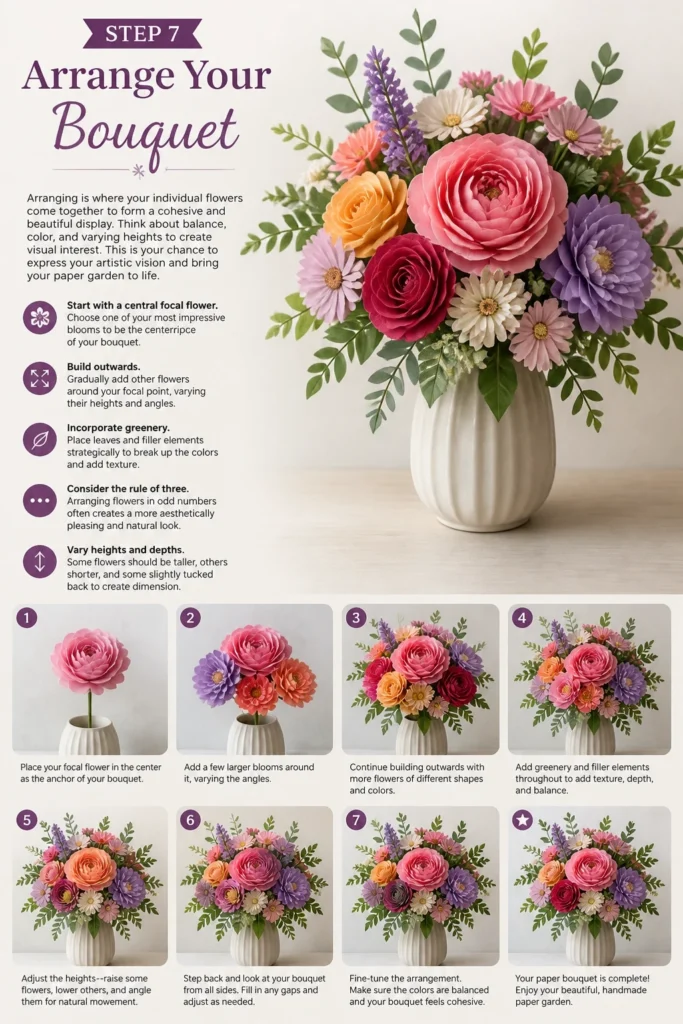
This is your chance to express your artistic vision and bring your paper garden to life.
- Start with a central focal flower. Choose one of your most impressive blooms to be the centerpiece of your bouquet.
- Build outwards. Gradually add other flowers around your focal point, varying their heights and angles.
- Incorporate greenery. Place leaves and filler elements strategically to break up the colors and add texture.
- Consider the “rule of three.” Arranging flowers in odd numbers often creates a more aesthetically pleasing and natural look.
- Vary heights and depths. Some flowers should be taller, others shorter, and some slightly recessed to give depth to the arrangement.
- Rotate your bouquet. Continuously turn the bouquet as you arrange to ensure it looks good from all angles.
Pro Tip: Use a temporary holder, like a vase or even your hand, to hold the stems together as you arrange. This allows you to step back and assess the composition before making final adjustments.
Step 8: Finish and Present Your Bouquet
The final touches elevate your paper bouquet from a collection of flowers to a polished, gift-ready presentation. This step secures your hard work and prepares it for display.
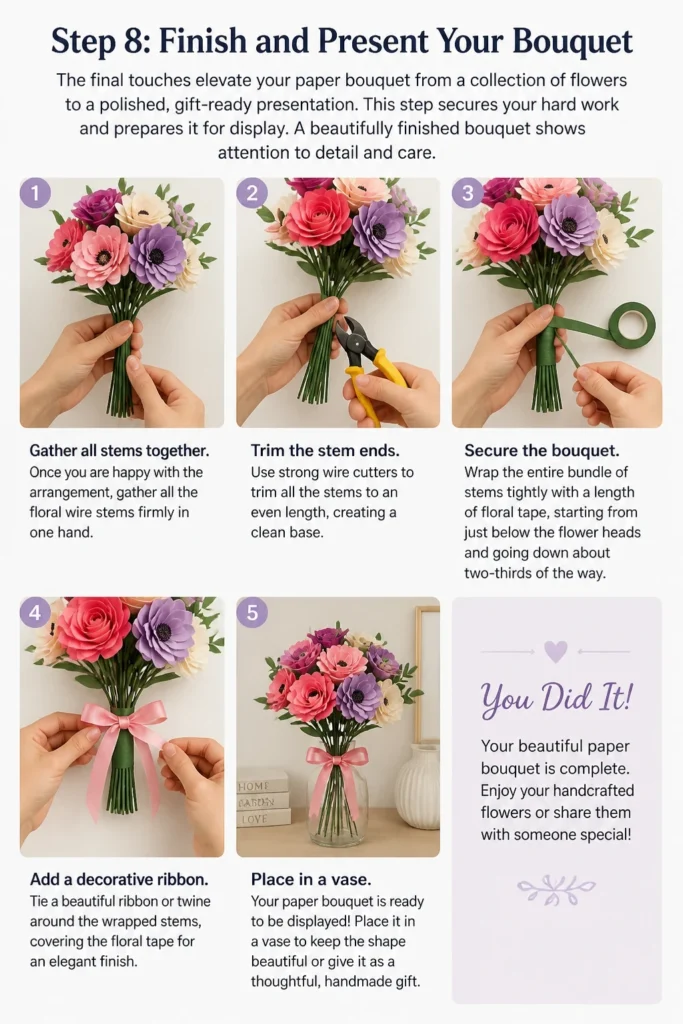
A beautifully finished bouquet shows attention to detail and care.
- Gather all stems together. Once you are happy with the arrangement, gather all the floral wire stems firmly in one hand.
- Trim the stem ends. Use strong wire cutters to trim all the stems to an even length, creating a clean base.
- Secure the bouquet. Wrap the entire bundle of stems tightly with a length of floral tape, starting from just below the flower heads and going down about two-thirds of the way.
- Add a decorative ribbon. Tie a beautiful ribbon or twine around the wrapped stems, covering the floral tape for an elegant finish.
- Place in a vase. Your paper bouquet is now ready for display in a vase, or it can be wrapped in tissue paper and presented as a gift.
- Consider a protective spray. A light coat of clear matte sealant spray can offer some protection against dust and moisture, although it’s not strictly necessary.
Pro Tip: When tying the ribbon, make sure it’s snug enough to hold the stems securely but not so tight that it crushes them. A double knot ensures it stays in place.
Common Mistakes to Avoid
Using the Wrong Paper Weight
Many beginners grab any paper available, but paper weight significantly impacts your bouquet. Thin printer paper (20lb) can be too flimsy, tearing easily and struggling to hold its shape.
Conversely, very thick cardstock (100lb+) might be too stiff to shape delicately, resulting in blocky or unnatural-looking petals. Aim for 65-80lb cardstock or good quality crepe paper for the best results, as these offer a balance of durability and flexibility.
Rushing the Petal Shaping
It’s tempting to speed through the shaping process, but flat, uncurled petals lead to lifeless flowers. Each petal needs individual attention to give it curve and dimension.
Take your time to gently curl edges, cup centers, or create pleats. This careful shaping is what transforms a two-dimensional cutout into a realistic, three-dimensional bloom.
Skimping on Adhesive
A common pitfall is using too little glue or not allowing it enough time to set. This can result in petals detaching, especially as the bouquet is handled or moved.
Ensure you apply a sufficient amount of glue to the base of each petal and hold it in place for a few seconds. If using liquid glue, allow ample drying time between layers for a truly secure flower.
Overcrowding the Bouquet
While a full bouquet looks luxurious, too many flowers crammed together can appear messy and lose their individual beauty. Each bloom needs a little space to breathe and showcase its form.
Step back periodically as you arrange and assess the balance. Don’t be afraid to remove a flower or two if the arrangement feels too dense; sometimes less is truly more for impact.
Troubleshooting
Flowers Look Flat and Lifeless
If your assembled flowers lack depth, it’s often due to insufficient petal shaping. Go back to Step 4 and focus on adding more curve and dimension to each individual petal.
You can gently re-shape existing petals by curling their edges further or cupping them with a ball tool. Ensure you’re staggering the petals in each layer during assembly, placing them in the gaps of the previous layer to build volume.
Stems Are Flimsy or Wobbly
A wobbly stem usually indicates that the floral wire is too thin for the size or weight of the flower, or it wasn’t securely attached. For larger paper flowers, always use a thicker gauge floral wire (e.g., 18-20 gauge).
When attaching the flower, ensure the wire is firmly glued into the base. If the problem is just general flimsiness, you can wrap two wires together with floral tape to create a stronger, more robust stem.
Bouquet Won’t Hold Its Shape
If your finished bouquet keeps falling apart or looks disheveled, the stems likely weren’t secured tightly enough during the final steps. The key is to wrap the entire bundle of stems very snugly with floral tape.
Start high up, just below the flower heads, and wrap downwards, stretching the tape as you go. You can also add a second layer of floral tape or a strong elastic band before tying your decorative ribbon for extra security.
Key Takeaways
- Selecting the correct paper weight is fundamental for durable, shape-holding flowers.
- Meticulous shaping of each petal adds essential dimension and realism to your blooms.
- Layering petals thoughtfully and staggering them creates a fuller, more natural flower appearance.
- Securely attaching flowers to floral wire stems ensures longevity and ease of arrangement.
- Thoughtful bouquet arrangement, considering height, color, and filler, enhances visual appeal.
- Patience and attention to detail throughout each step lead to a truly stunning finished product.
Frequently Asked Questions
What kind of paper is best for paper flowers?
For sturdy, crisp flowers, 65-80lb cardstock is excellent. Crepe paper (heavy or floral grade) is ideal for more realistic, stretchy, and ruffled petals. Specialty papers like mulberry paper or vellum can also be used for unique effects, offering different textures and transparencies to your blooms.
Can I use a cutting machine like a Cricut or Silhouette?
Absolutely! A cutting machine can be a huge time-saver, especially if you’re making many flowers or intricate designs. You can upload digital templates or design your own shapes. Just ensure your machine’s settings are appropriate for your chosen paper type to get clean cuts without tearing.
How do I make my paper bouquet last longer?
Paper bouquets are inherently long-lasting, but a few tips can help. Keep them out of direct sunlight to prevent colors from fading. Avoid high humidity or moisture, as this can warp the paper. For dusting, a soft, dry paintbrush or a can of compressed air works wonders to keep them looking fresh.
Can I add scent to my paper bouquet?
Yes, you can! A simple way is to dab a few drops of your favorite essential oil onto a small cotton ball. Then, tuck the cotton ball discreetly among the leaves or deep within the petals of one of the flowers. The scent will diffuse subtly, adding another sensory layer to your beautiful paper creation.
Our Top Recommended Finds
- Heavy Cardstock Assortment: Offers a variety of colors and a sturdy base for most paper flower projects.
- Precision Craft Scissors Set: Essential for clean, intricate cuts, making your petals look professional.
- Low-Temperature Hot Glue Gun: Provides quick adhesion without the risk of burning delicate paper or fingers.
- Floral Wire & Tape Kit: Contains various wire gauges and self-adhesive floral tape, perfect for creating realistic stems.
Your Paper Bouquet Journey Begins Now
You now possess the practical knowledge and step-by-step guidance to craft your very own paper bouquet. Each bloom you create will carry a piece of your dedication and artistic flair.
Don’t be afraid to experiment with different papers, colors, and flower styles. The joy of paper crafting lies in its versatility and the endless possibilities it offers.
Start gathering your materials today and bring your unique paper garden to life. Imagine the delight of gifting a handmade, everlasting bouquet or gracing your home with its vibrant charm!
Beginner-friendly templates, step-by-step guides,
and weekly project ideas in your inbox.