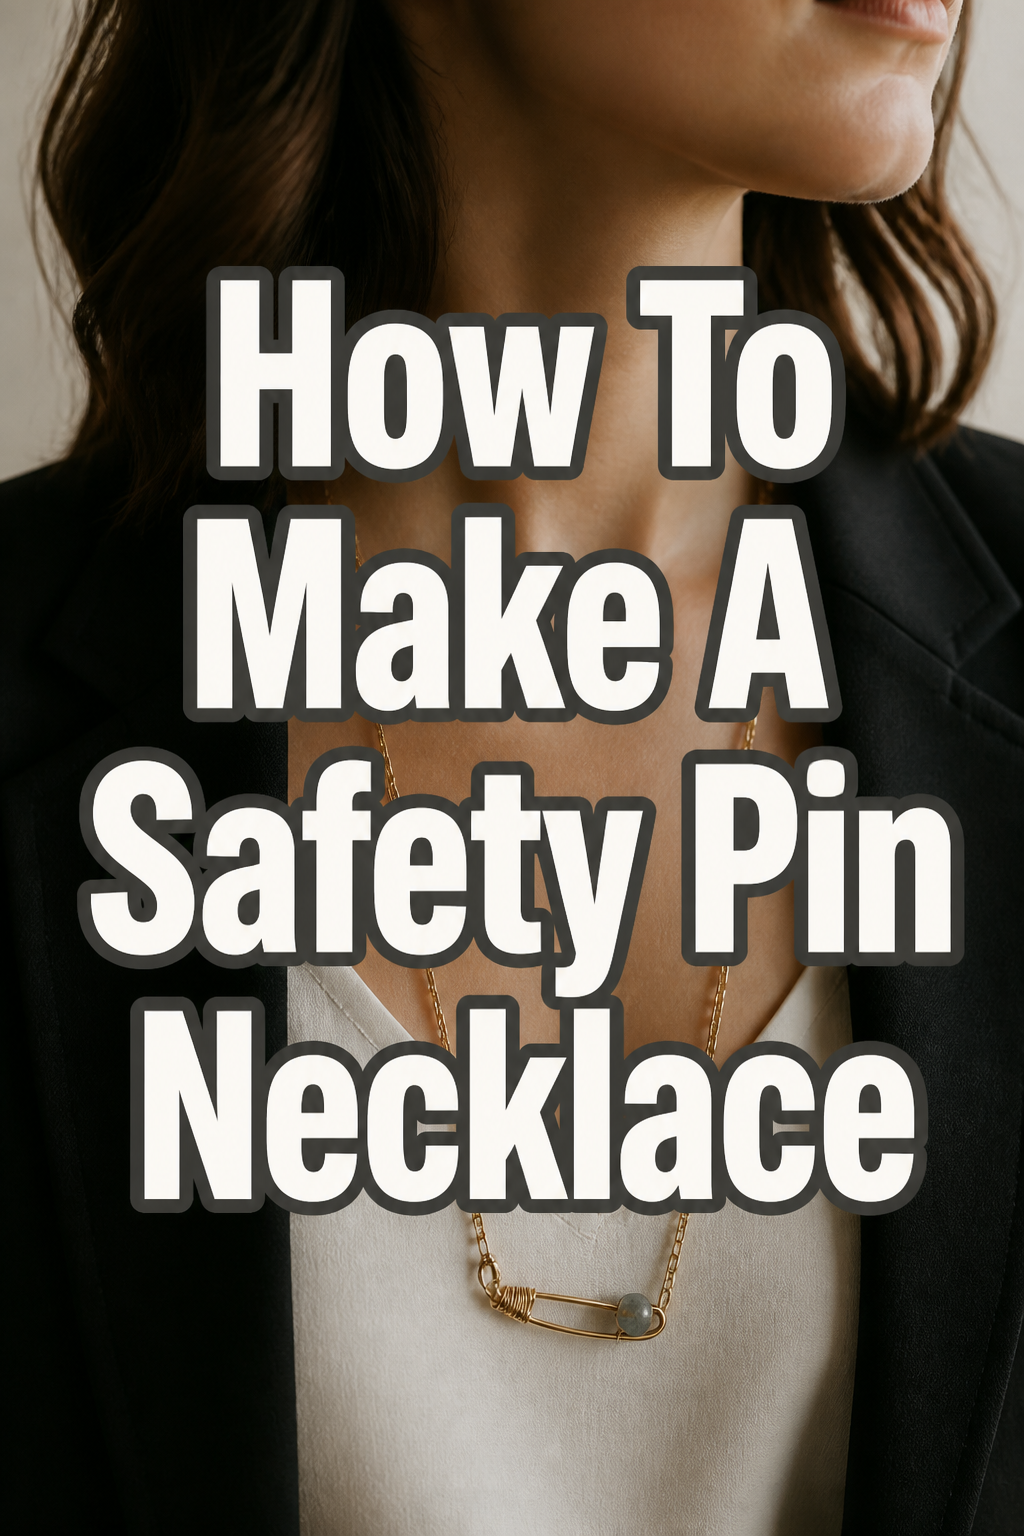
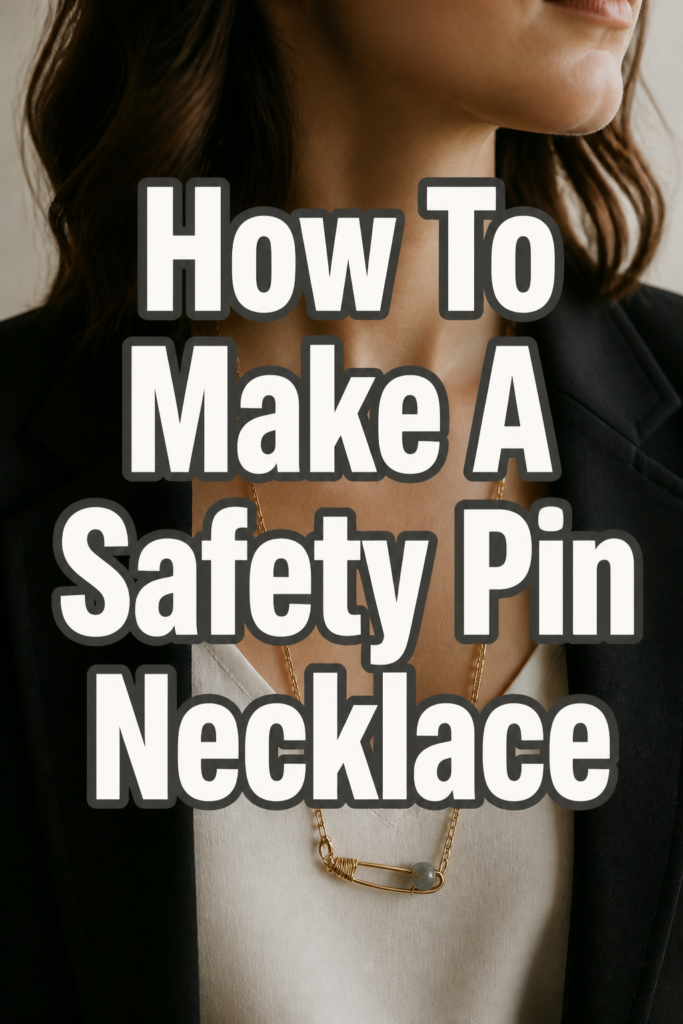
🧷 How To Make A Safety Pin Necklace

Beginner-friendly templates, step-by-step guides,
and weekly project ideas in your inbox.
There’s something uniquely satisfying about creating jewelry with your own hands.
And when that jewelry uses unconventional materials, it adds a whole new layer of personal style.
I’ve crafted several safety pin necklaces over the years, experimenting with different beads and patterns, and I’m excited to share the process to help you make your own statement piece.
Quick Overview
You’re about to transform a collection of everyday safety pins into a striking, personalized necklace.
This project is fantastic for expressing creativity and adding an edgy touch to any outfit.
- Time needed: 1-3 hours (depending on complexity)
- Difficulty: Beginner
- What you’ll need: Safety pins, beads, jewelry pliers, jump rings, necklace chain/cord, clasp.
Step-by-Step Instructions
Step 1: Gather Your Materials
Before you begin, lay out everything you’ll need. This helps ensure you won’t interrupt your creative flow searching for a missing item.
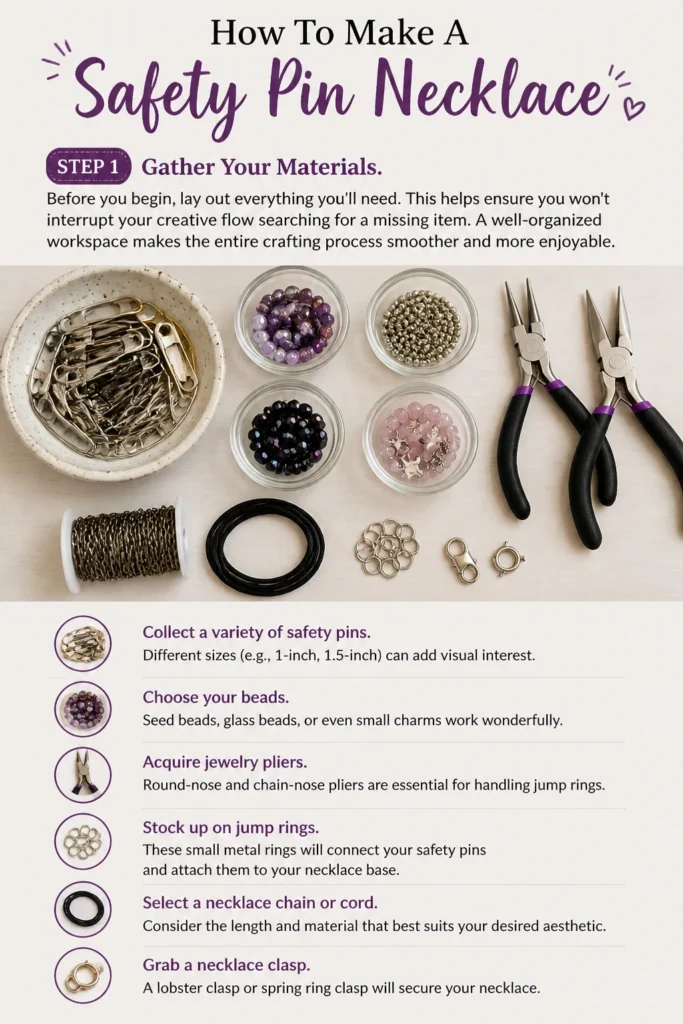
A well-organized workspace makes the entire crafting process smoother and more enjoyable.
- Collect a variety of safety pins. Different sizes (e.g., 1-inch, 1.5-inch) can add visual interest.
- Choose your beads. Seed beads, glass beads, or even small charms work wonderfully.
- Acquire jewelry pliers. Round-nose and chain-nose pliers are essential for handling jump rings.
- Stock up on jump rings. These small metal rings will connect your safety pins and attach them to your necklace base.
- Select a necklace chain or cord. Consider the length and material that best suits your desired aesthetic.
- Grab a necklace clasp. A lobster clasp or spring ring clasp will secure your finished piece.
Pro Tip: Consider a small bead mat or a piece of felt to prevent tiny beads and jump rings from rolling away during your work.
Step 2: Plan Your Design
Visualizing your necklace before assembly can save time and effort later on. This is where your creativity truly shines.
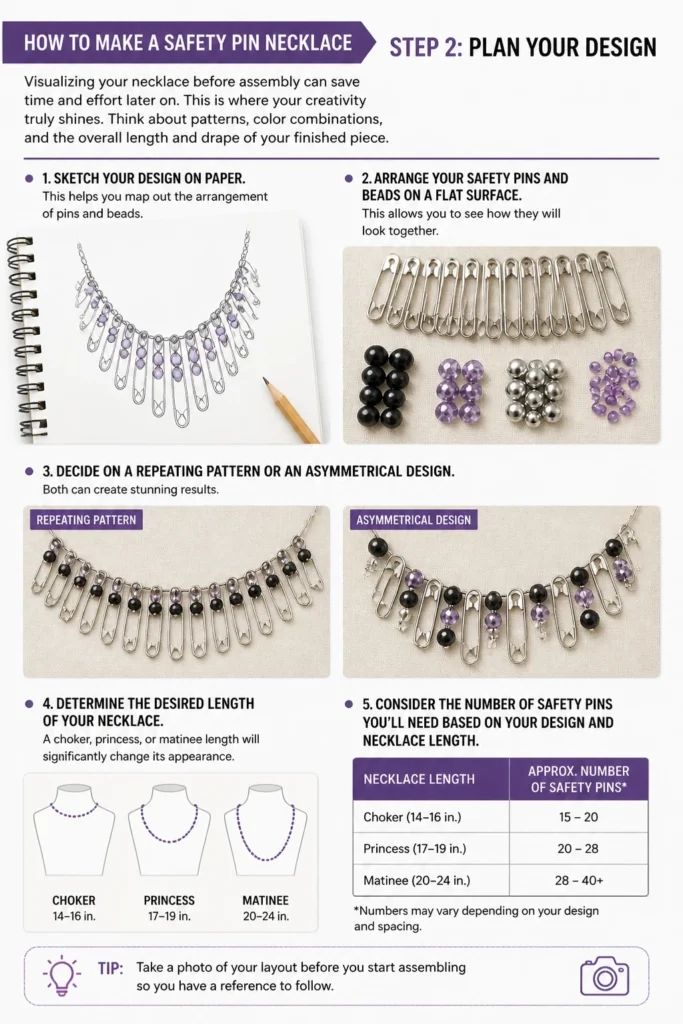
Think about patterns, color combinations, and the overall length and drape of your finished piece.
- Sketch your design on paper. This helps you map out the arrangement of pins and beads.
- Arrange your safety pins and beads on a flat surface. This allows you to see how they will look together.
- Decide on a repeating pattern or an asymmetrical design. Both can create stunning results.
- Determine the desired length of your necklace. A choker, princess, or matinee length will significantly change its appearance.
- Consider the number of safety pins you’ll need based on your design and necklace length.
Step 3: Prepare Your Safety Pins
Now it’s time to transform your ordinary safety pins into decorative elements. This step involves adding beads to each pin.
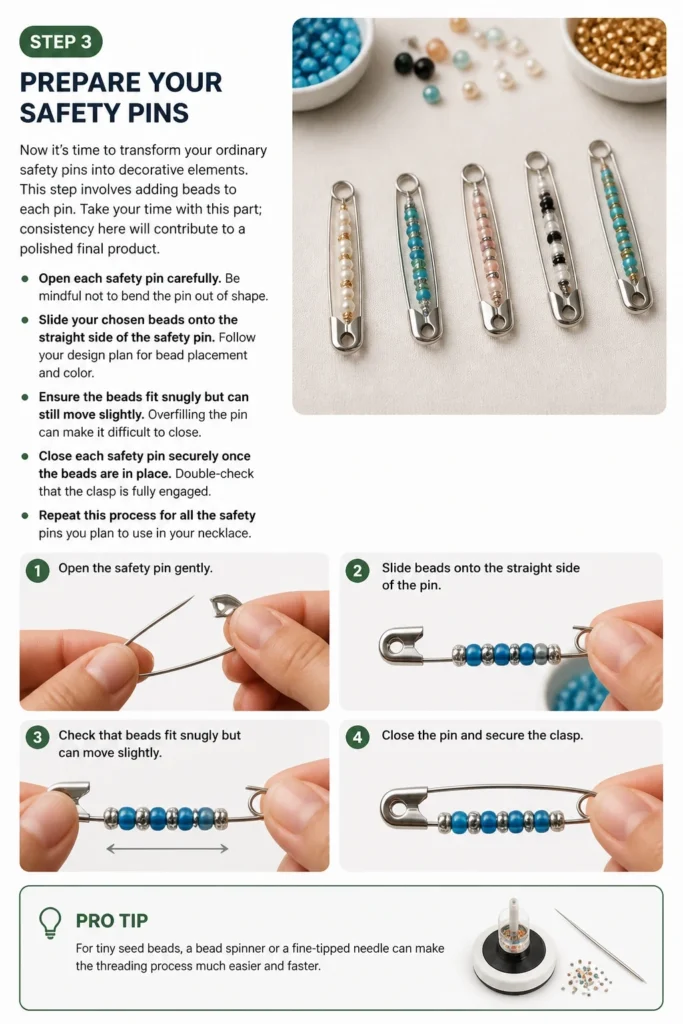
Take your time with this part; consistency here will contribute to a polished final product.
- Open each safety pin carefully. Be mindful not to bend the pin out of shape.
- Slide your chosen beads onto the straight side of the safety pin. Follow your design plan for bead placement and color.
- Ensure the beads fit snugly but can still move slightly. Overfilling the pin can make it difficult to close.
- Close each safety pin securely once the beads are in place. Double-check that the clasp is fully engaged.
- Repeat this process for all the safety pins you plan to use in your necklace.
Pro Tip: For tiny seed beads, a bead spinner or a fine-tipped needle can make the threading process much quicker and less frustrating.
Step 4: Connect the Safety Pins
This step involves linking your prepared safety pins together using jump rings. This forms the central, eye-catching part of your necklace.
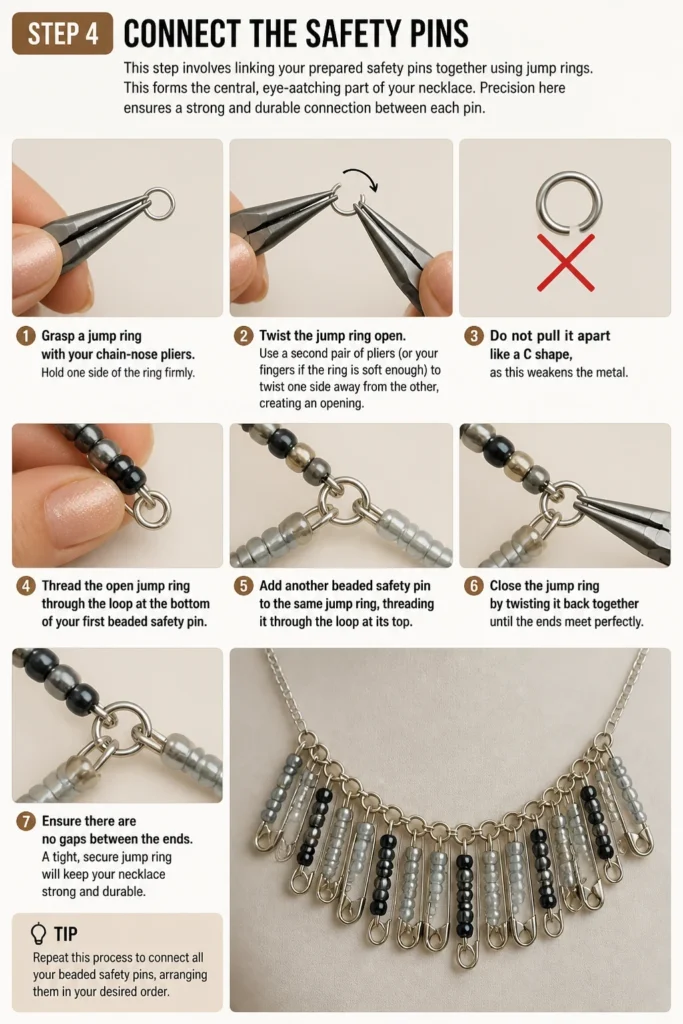
Precision here ensures a strong and durable connection between each pin.
- Grasp a jump ring with your chain-nose pliers. Hold one side of the ring firmly.
- Twist the jump ring open. Use a second pair of pliers (or your fingers if the ring is soft enough) to twist one side away from the other, creating an opening. Do not pull it apart like a “C” shape, as this weakens the metal.
- Thread the open jump ring through the loop at the bottom of your first beaded safety pin.
- Add another beaded safety pin to the same jump ring, threading it through the loop at its top.
- Close the jump ring by twisting it back together until the ends meet perfectly. Ensure there are no gaps.
- Continue this process, linking pins together according to your design. You might connect them side-by-side or create a more complex arrangement.
Step 5: Assemble the Necklace Base
With your safety pin segments prepared, it’s time to integrate them with your chosen necklace chain or cord. This defines the overall structure of your necklace.
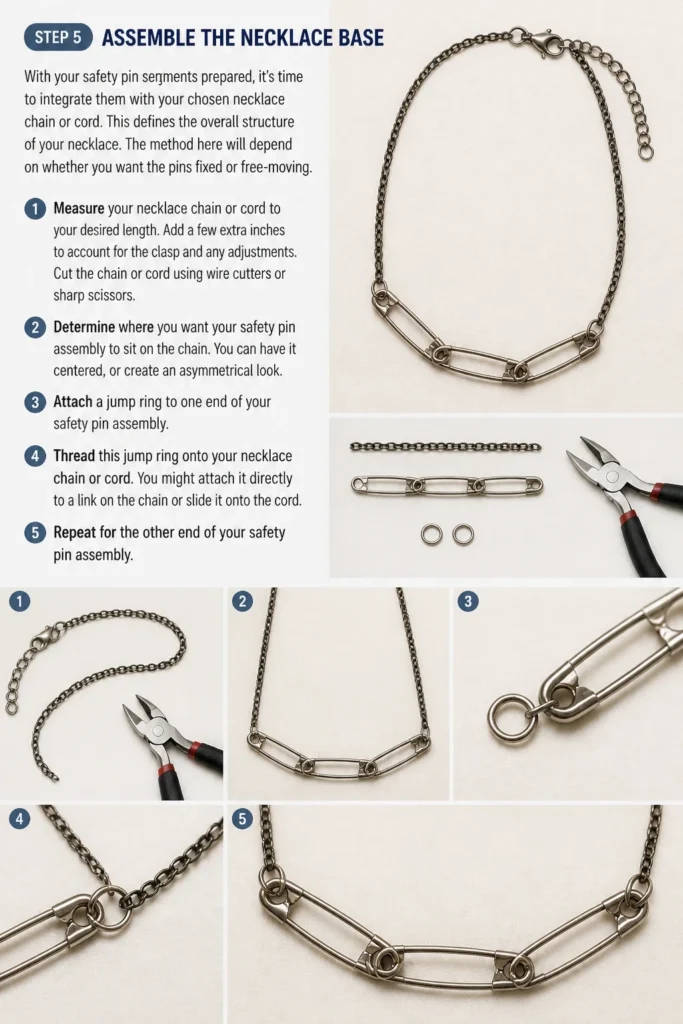
The method here will depend on whether you want the pins fixed or free-moving.
- Measure your necklace chain or cord to your desired length. Add a few extra inches to account for the clasp and any adjustments.
- Cut the chain or cord using wire cutters or sharp scissors.
- Determine where you want your safety pin assembly to sit on the chain. You can have it centered, or create an asymmetrical look.
- Attach a jump ring to one end of your safety pin assembly.
- Thread this jump ring onto your necklace chain or cord. You might attach it directly to a link on the chain or slide it onto the cord.
- Repeat for the other end of your safety pin assembly, attaching it to the chain or cord.
Pro Tip: If you want the pins to dangle freely, you can attach individual jump rings to the top loop of each safety pin and then slide those jump rings onto the chain or cord. This creates a different aesthetic.
Step 6: Add the Clasp and Finishing Touches
The clasp is crucial for making your necklace wearable and secure. This final step brings your entire project together.
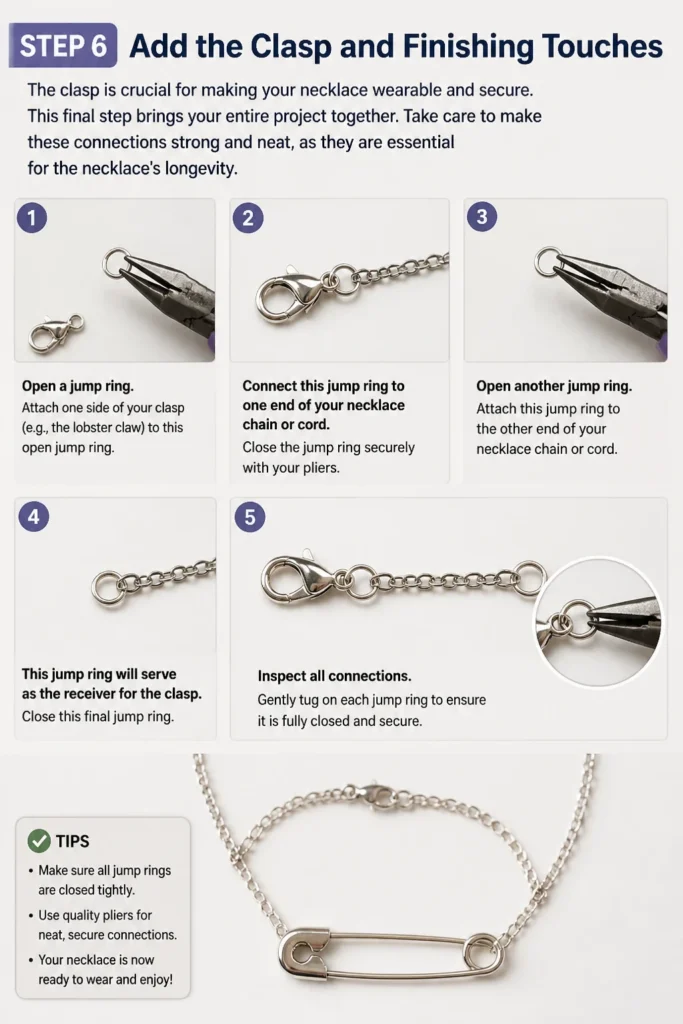
Take care to make these connections strong and neat, as they are essential for the necklace’s longevity.
- Open a jump ring.
- Attach one side of your clasp (e.g., the lobster claw) to this open jump ring.
- Connect this jump ring to one end of your necklace chain or cord.
- Close the jump ring securely with your pliers.
- Open another jump ring.
- Attach this jump ring to the other end of your necklace chain or cord. This jump ring will serve as the receiver for the clasp.
- Close this final jump ring.
- Inspect all connections. Gently tug on each jump ring to ensure it is fully closed and secure.
Step 7: Inspect and Adjust
Before proudly wearing your new creation, a final check ensures everything is perfect. This step catches any potential issues.
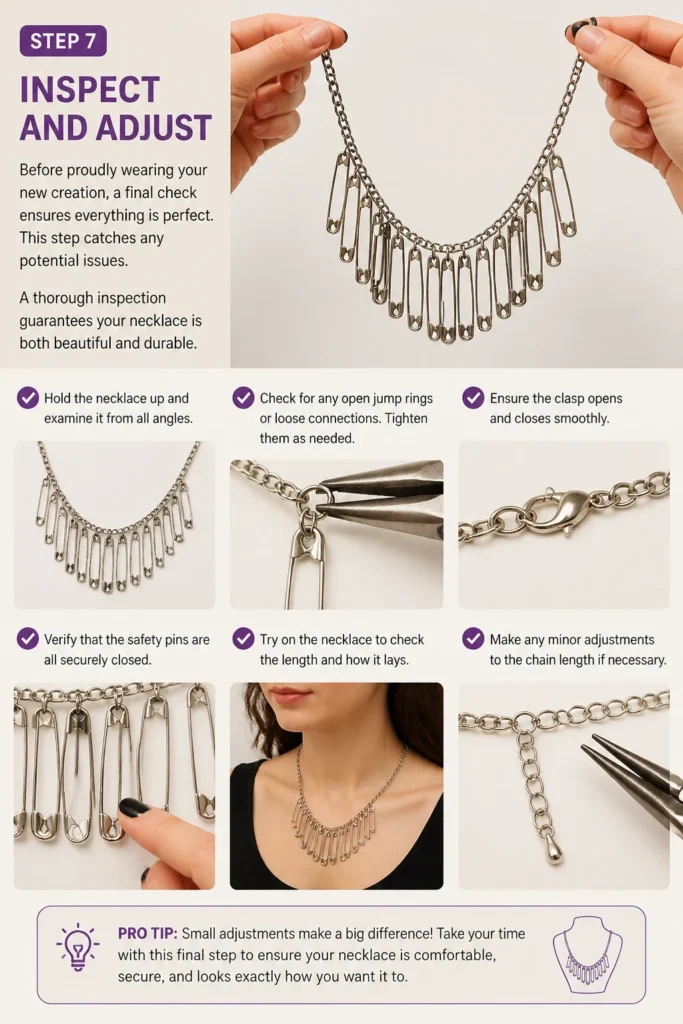
A thorough inspection guarantees your necklace is both beautiful and durable.
- Hold the necklace up and examine it from all angles.
- Check for any open jump rings or loose connections. Tighten them as needed.
- Ensure the clasp opens and closes smoothly.
- Verify that the safety pins are all securely closed.
- Try on the necklace to check the length and how it lays. Make any minor adjustments to the chain length if necessary.
Common Mistakes to Avoid
Using Weak Jump Rings
Many beginners use jump rings that are too thin or made of soft metal. These can easily pull open, causing your necklace to fall apart or lose pins.
Always opt for sturdy, thicker gauge jump rings, typically 20-gauge or 18-gauge, especially for connecting the safety pins themselves. This ensures a strong, lasting connection for your creation.
Overfilling Safety Pins with Beads
It’s tempting to cram as many beads as possible onto a safety pin for a fuller look. However, this can prevent the pin from closing properly, or cause it to bend out of shape.
Leave a small gap so the pin can close securely and the beads have a tiny bit of movement without strain. This also prevents unnecessary stress on the pin mechanism.
Improperly Opening/Closing Jump Rings
A common error is pulling jump rings apart in a “C” shape instead of twisting them. Pulling them weakens the metal and makes it difficult to achieve a secure closure, leaving a gap.
Always use two pairs of pliers to twist the jump ring open and closed, ensuring the ends meet perfectly. This maintains the integrity and strength of the ring.
Ignoring Design Balance
Sometimes, in the excitement of making, the overall balance of the necklace can be overlooked. An unbalanced design can look awkward or even feel uncomfortable when worn.
Take the time to lay out your design beforehand and frequently check the weight distribution as you assemble. This helps create a visually pleasing and comfortable piece.
Troubleshooting
Safety Pins Keep Opening
If your safety pins repeatedly pop open, it’s likely due to overfilling with beads or the pins themselves being of low quality.
Remove a few beads to reduce tension, ensuring the pin has enough room to fully engage its clasp. If the issue persists, replace the problematic pins with higher-quality ones that have a more robust closing mechanism.
Jump Rings Come Undone
Loose jump rings are a common issue, often caused by not closing them completely or using rings that are too thin. An open jump ring is a weak point in your necklace.
Carefully go back through your necklace with two pairs of pliers and ensure every jump ring is twisted shut, with no visible gap. Consider replacing any extremely thin jump rings with a thicker gauge if they consistently fail.
Necklace Lays Unevenly
An uneven drape can be frustrating and usually points to an inconsistent attachment of your safety pin elements or an imbalance in the pin arrangement.
Re-evaluate how your safety pin segments are attached to the main chain, ensuring they are evenly spaced and secured. If certain sections feel heavier, try adjusting the number or size of beads in those areas to redistribute the weight.
Key Takeaways
- Planning your design beforehand saves time and ensures a cohesive look.
- Using the correct jewelry pliers for jump rings is crucial for secure connections.
- Always choose sturdy jump rings to prevent your necklace from falling apart.
- Don’t overfill safety pins; they need space to close properly.
- Careful inspection of all connections at the end ensures durability and longevity.
- Experiment with different bead types and pin sizes to personalize your creation.
Frequently Asked Questions
Can I use different types of beads with safety pins?
Absolutely! The beauty of this project is its versatility. You can use glass beads, seed beads, plastic beads, or even small charms. Just make sure the hole in the bead is large enough to slide onto the safety pin and that the beads don’t prevent the pin from closing.
What if I don’t have jewelry pliers?
While jewelry pliers are highly recommended for ease and precision, you might be able to get by with two pairs of small needle-nose pliers or even strong tweezers for opening and closing jump rings. However, for best results and to prevent hand strain, investing in a basic set of jewelry pliers is worthwhile.
How can I make my necklace adjustable?
To make your necklace adjustable, attach a short length of extender chain to one end of your necklace, opposite the main clasp. This extender chain usually has larger loops that the clasp can hook into, allowing for varying lengths.
Can I make other jewelry pieces with this technique?
Yes, the safety pin and bead technique is incredibly adaptable! You can use it to create bracelets, earrings, or even embellishments for clothing. The core steps of preparing pins and connecting them with jump rings remain the same, just adjust the overall scale and attachment method.
Our Top Recommended Finds
- Jewelry Pliers Set: A basic set including round-nose and chain-nose pliers will cover most of your crafting needs for this project and many others.
- Assorted Jump Rings Kit: Look for a kit that offers various sizes and gauges of jump rings, preferably in different metal tones, to match your designs.
- Bead Organizer Box: A compartmentalized box helps keep your beads sorted by color and type, making selection and storage much easier.
Unleash Your Inner Jewelry Designer
You’ve now got all the knowledge and steps to create a truly unique safety pin necklace.
This isn’t just a piece of jewelry; it’s a statement, a conversation starter, and a testament to your creativity.
Don’t wait—gather your materials today and start crafting a necklace that perfectly reflects your personal style!
Beginner-friendly templates, step-by-step guides,
and weekly project ideas in your inbox.