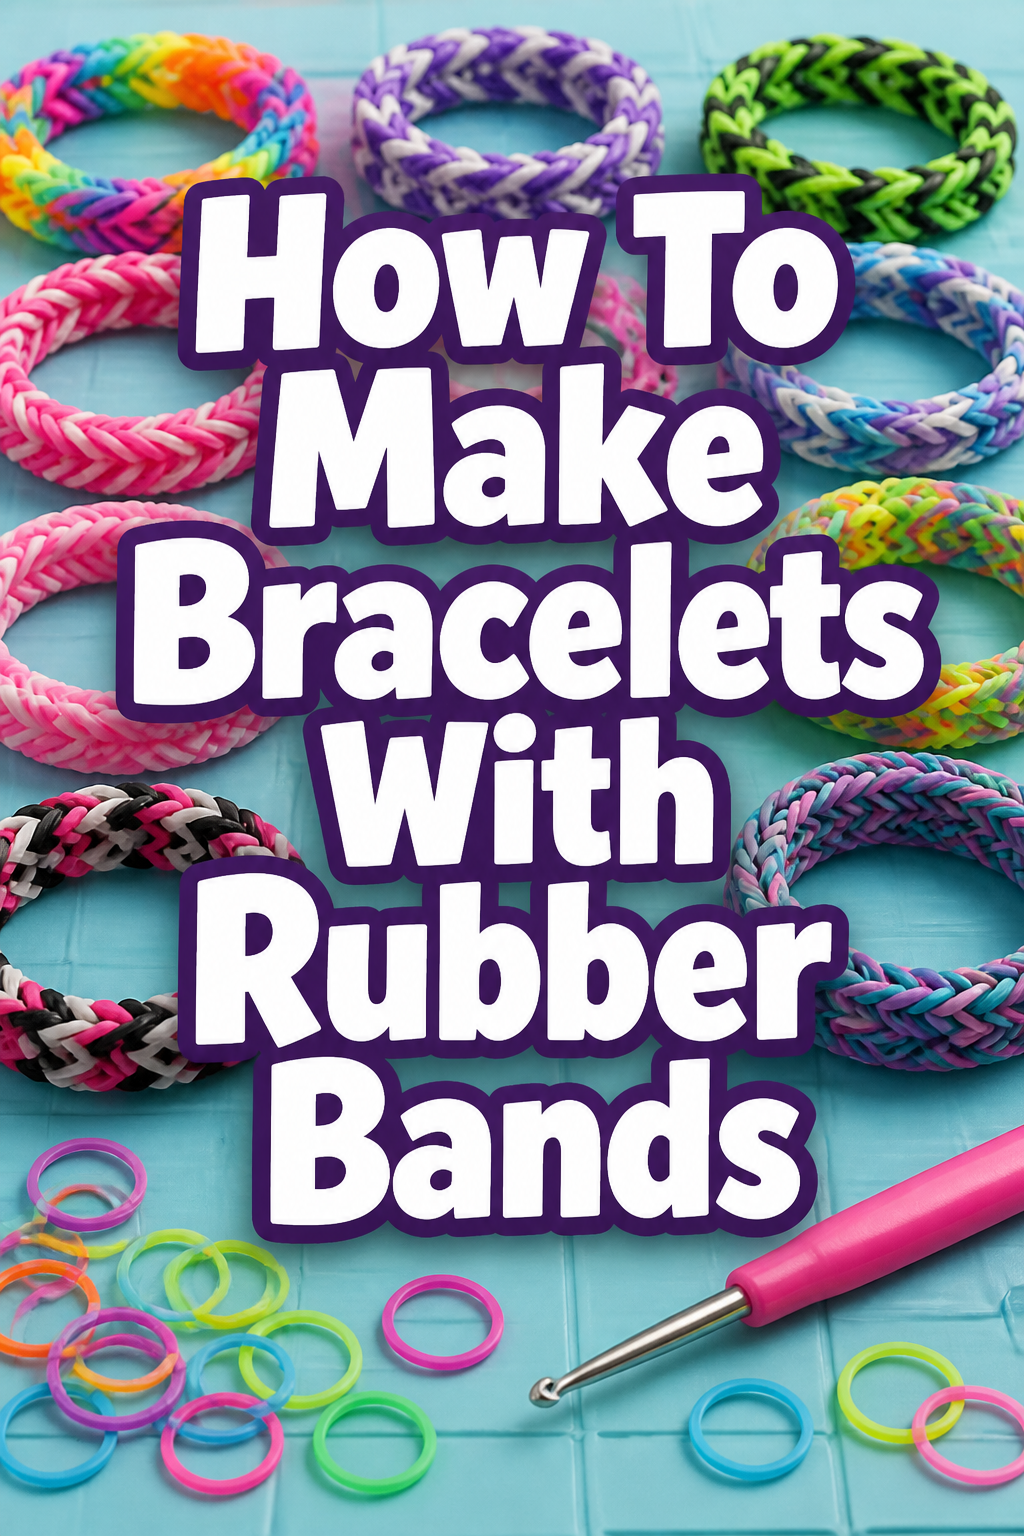
🌈 How To Make Bracelets With Rubber Bands

Beginner-friendly templates, step-by-step guides,
and weekly project ideas in your inbox.
I remember the first time I learned to make a rubber band bracelet. It felt like unlocking a secret code to endless colorful possibilities. This simple craft quickly became a cherished hobby, filling hours with creative joy.
I’ve woven countless bands into unique designs over the years, discovering all the little tricks and tips along the way. This guide shares that first-hand experience, helping you create your own vibrant accessories with confidence and ease. Get ready to transform humble rubber bands into wearable art.
Quick Overview
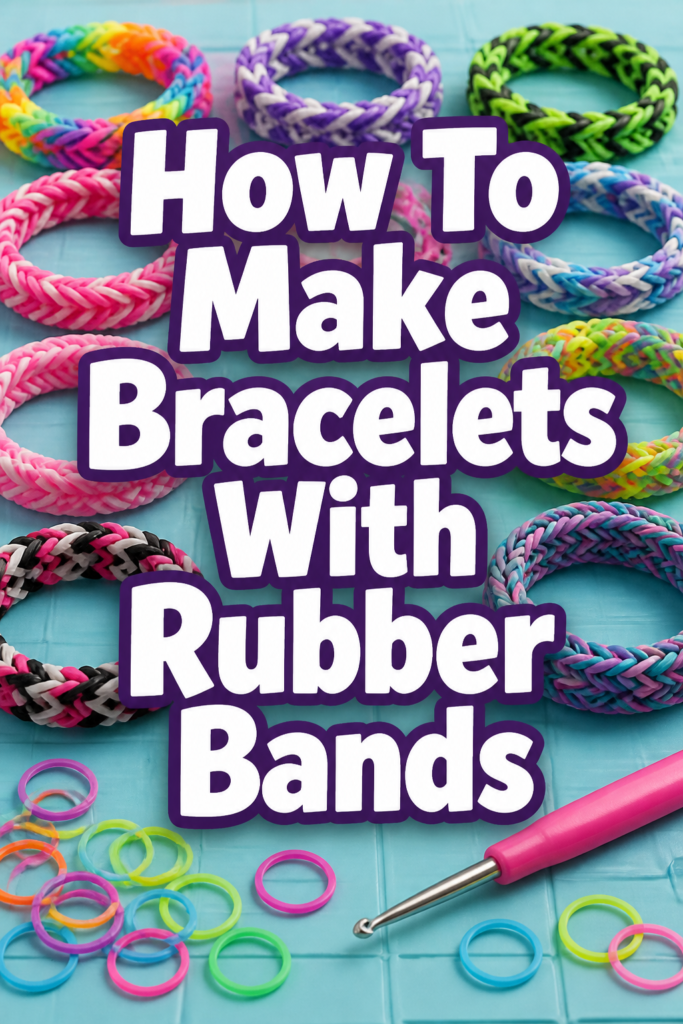
Making rubber band bracelets is a fun and rewarding activity. You’ll learn to weave colorful bands into a stylish accessory, perfect for gifting or wearing yourself. This guide focuses on the popular Fishtail design, a fantastic starting point for any beginner.
- Time needed: 15-30 minutes (for a single bracelet)
- Difficulty: Beginner
- What you’ll need: Rubber bands, a loom (or your fingers), a hook tool, S-clips or C-clips
Step-by-Step Instructions
Step 1: Gather Your Supplies
Before you begin, ensure all your materials are within reach. Having everything ready prevents interruptions and keeps your creative flow going smoothly.
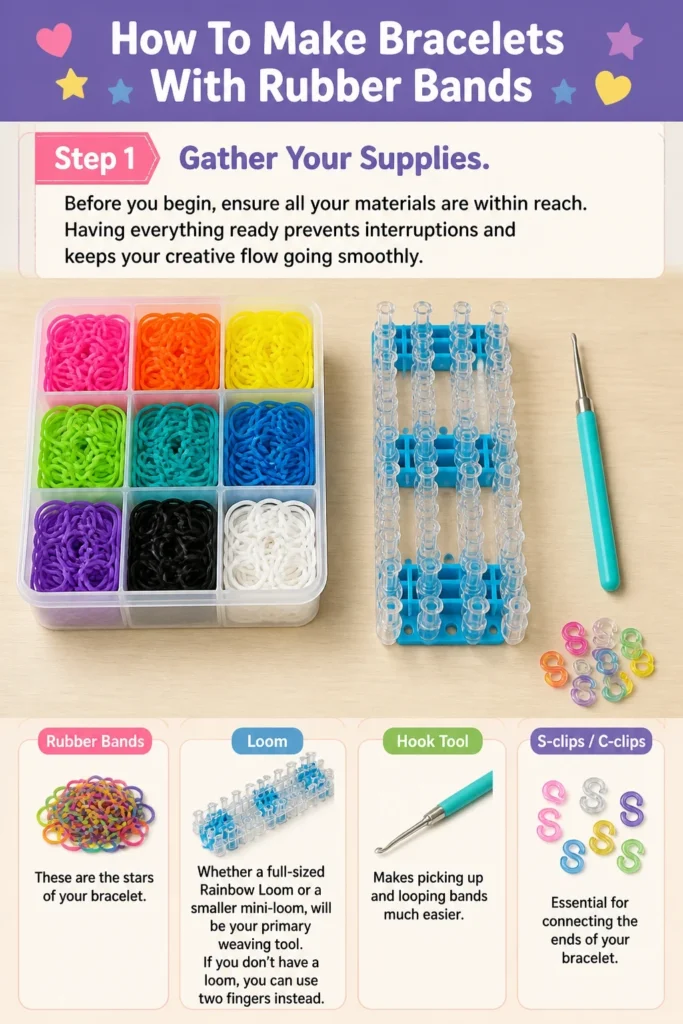
You’ll need a good selection of rubber bands in your chosen colors. These are the stars of your bracelet.
A loom, whether a full-sized Rainbow Loom or a smaller mini-loom, will be your primary weaving tool. If you don’t have a loom, you can use two fingers instead.
Don’t forget a hook tool; it makes picking up and looping bands much easier. Finally, S-clips or C-clips are essential for connecting the ends of your bracelet.
Step 2: Prepare Your Loom
If using a loom, arrange the pegs so they are offset, forming a staggered pattern. The open side of the pegs should face away from you. This setup is standard for many bracelet designs.
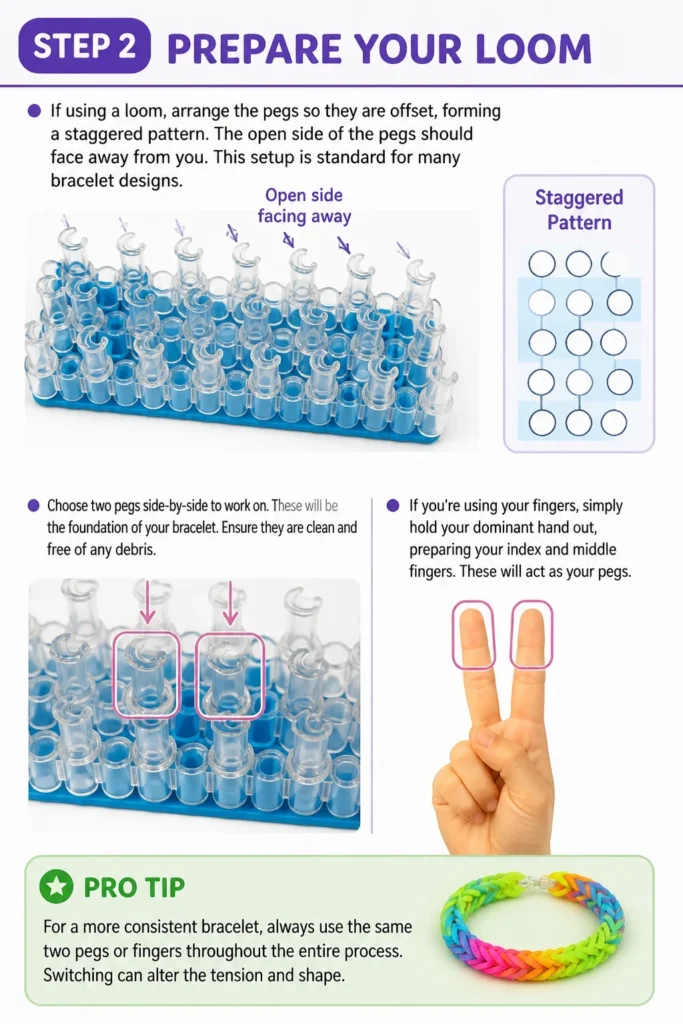
Choose two pegs side-by-side to work on. These will be the foundation of your bracelet. Ensure they are clean and free of any debris.
If you’re using your fingers, simply hold your dominant hand out, preparing your index and middle fingers. These will act as your “pegs.”
Pro Tip: For a more consistent bracelet, always use the same two pegs or fingers throughout the entire process. Switching can alter the tension and shape.
Step 3: Start the Base Loop
Take your first rubber band. Twist it into a figure-eight shape. This creates the foundational loop that holds everything together.
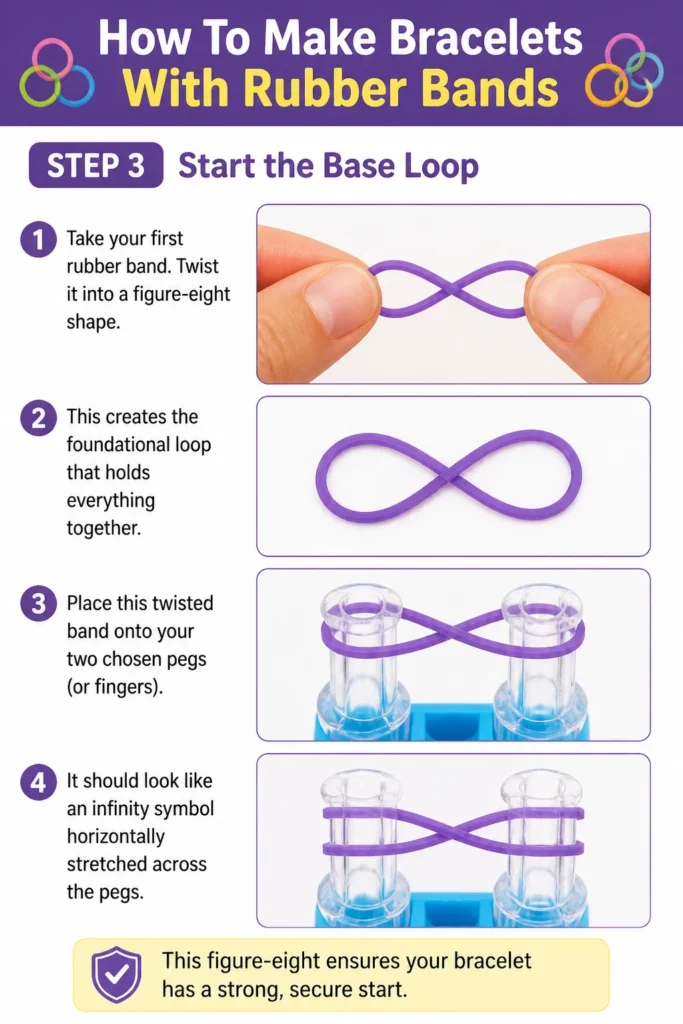
Place this twisted band onto your two chosen pegs (or fingers). It should look like an infinity symbol horizontally stretched across the pegs. This figure-eight ensures your bracelet has a strong, secure start.
Step 4: Add the Next Two Bands
Now, take a second rubber band, but do not twist this one. Simply stretch it straight across the same two pegs, placing it above the first figure-eight band.
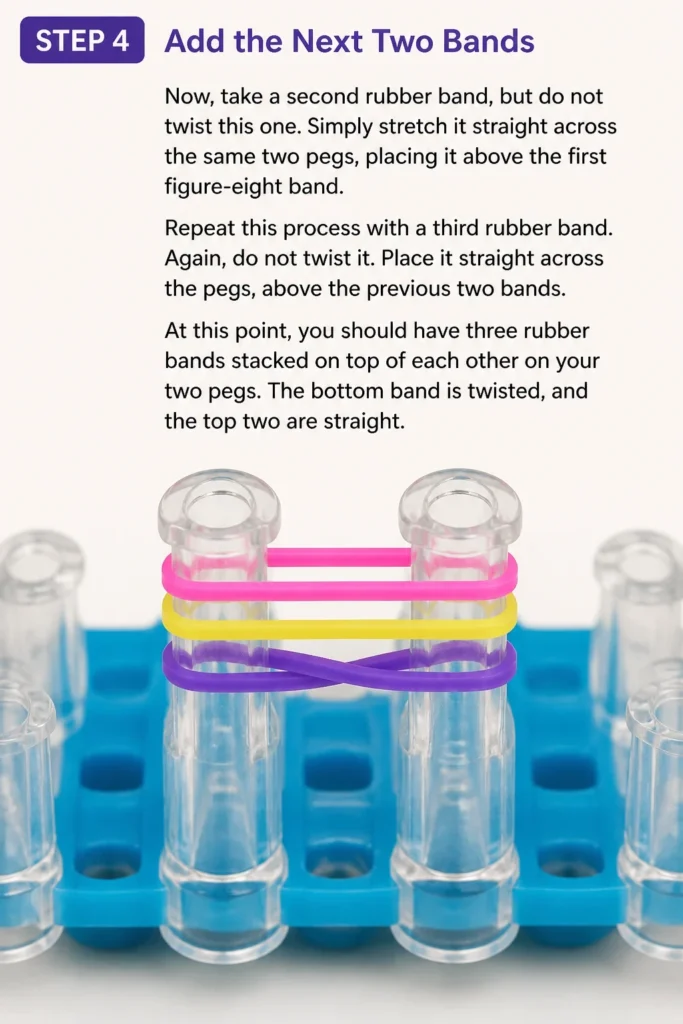
Repeat this process with a third rubber band. Again, do not twist it. Place it straight across the pegs, above the previous two bands.
At this point, you should have three rubber bands stacked on top of each other on your two pegs. The bottom band is twisted, and the top two are straight.
Step 5: Loop the Bottom Band
This is where the weaving begins. Take your hook tool and reach down to the very bottom rubber band on one of the pegs. Carefully grab only this bottom band.
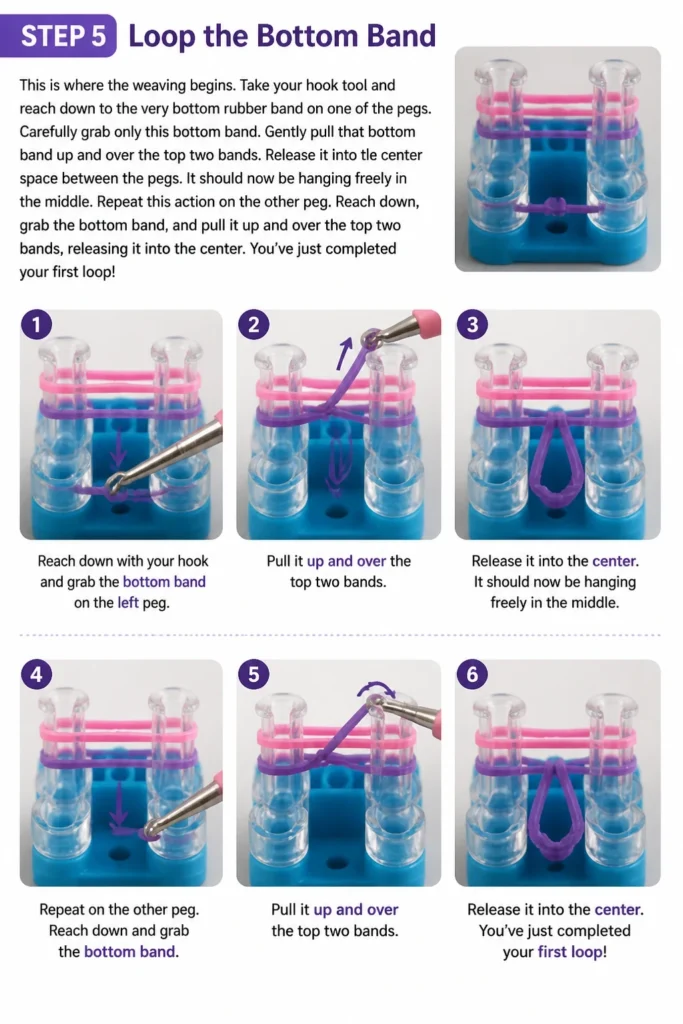
Gently pull that bottom band up and over the top two bands. Release it into the center space between the pegs. It should now be hanging freely in the middle.
Repeat this action on the other peg. Reach down, grab the bottom band, and pull it up and over the top two bands, releasing it into the center. You’ve just completed your first loop!
Step 6: Continue the Pattern
After looping the bottom bands, you should now have two rubber bands remaining on your pegs. This is the core of the Fishtail pattern.
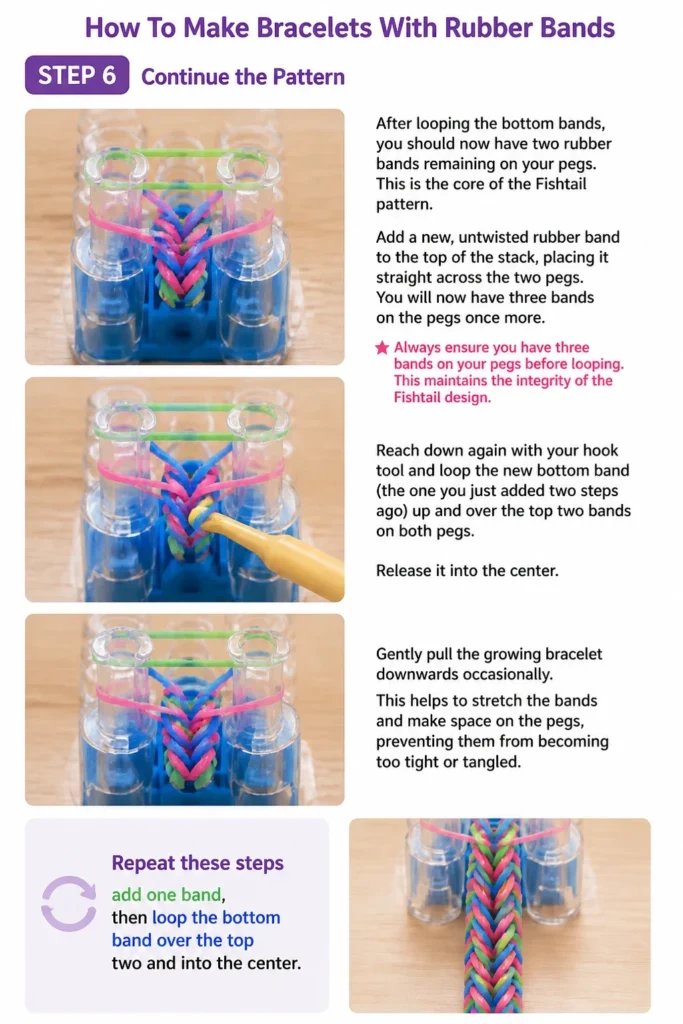
Add a new, untwisted rubber band to the top of the stack, placing it straight across the two pegs. You will now have three bands on the pegs once more.
Always ensure you have three bands on your pegs before looping. This maintains the integrity of the Fishtail design.
Reach down again with your hook tool and loop the new bottom band (the one you just added two steps ago) up and over the top two bands on both pegs. Release it into the center.
Gently pull the growing bracelet downwards occasionally. This helps to stretch the bands and make space on the pegs, preventing them from becoming too tight or tangled.
Repeat these steps: add one band, then loop the bottom band from both pegs into the center. Continue this rhythm until your bracelet reaches the desired length.
Pro Tip: Use a consistent tension when adding and looping bands. Uneven tension can lead to a bracelet that looks bumpy or stretched in places. Practice makes perfect for a smooth finish.
Step 7: Secure the Bracelet
Once your bracelet is long enough to fit comfortably around your wrist, it’s time to secure it. Stop adding new rubber bands to the pegs.
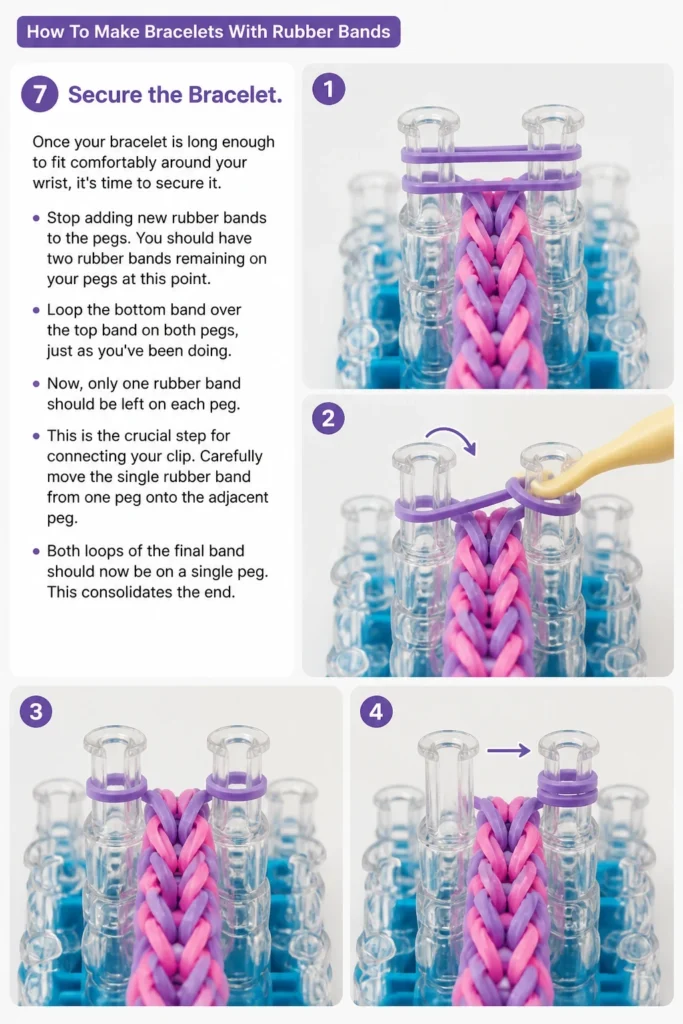
You should have two rubber bands remaining on your pegs at this point. Loop the bottom band over the top band on both pegs, just as you’ve been doing.
Now, only one rubber band should be left on each peg. This is the crucial step for connecting your clip.
Carefully move the single rubber band from one peg onto the adjacent peg. Both loops of the final band should now be on a single peg. This consolidates the end.
Step 8: Attach the Clip and Remove from Loom
Take an S-clip or C-clip. Attach one end of the clip to the two loops of the final rubber band that are now on a single peg. Make sure it’s securely fastened.
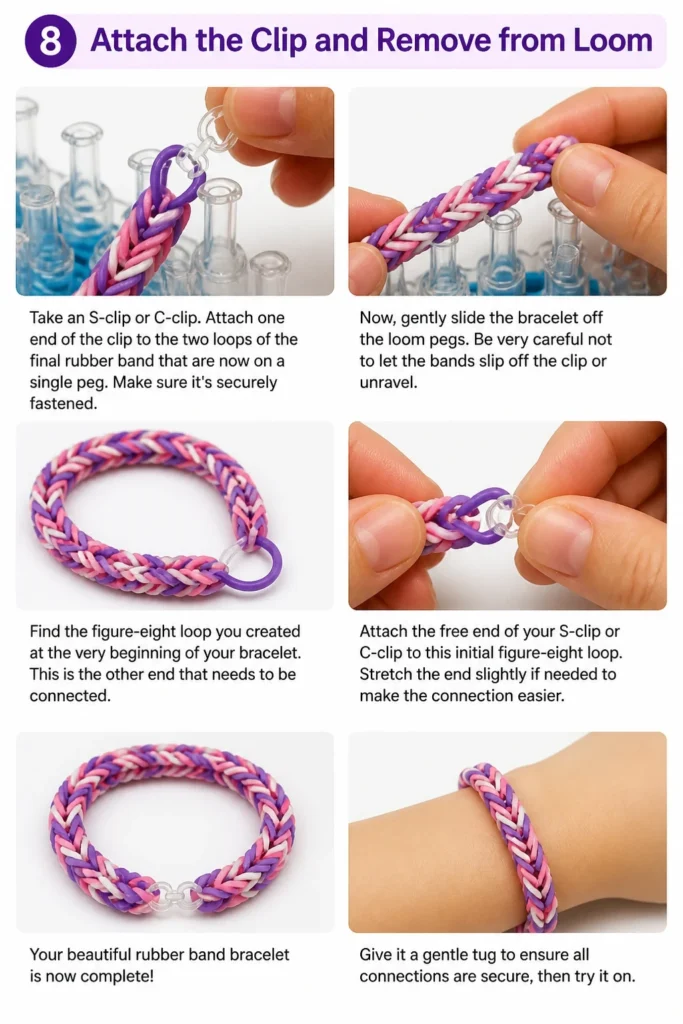
Now, gently slide the bracelet off the loom pegs. Be very careful not to let the bands slip off the clip or unravel.
Find the figure-eight loop you created at the very beginning of your bracelet. This is the other end that needs to be connected.
Attach the free end of your S-clip or C-clip to this initial figure-eight loop. Stretch the end slightly if needed to make the connection easier.
Your beautiful rubber band bracelet is now complete! Give it a gentle tug to ensure all connections are secure, then try it on.
Common Mistakes to Avoid
Skipping the Figure-Eight Twist
Forgetting to twist the very first rubber band into a figure-eight is a common oversight. This initial twist creates a strong anchor point for your bracelet. Without it, the beginning of your bracelet might be weak or unravel easily, making it difficult to attach the S-clip securely at the end. Always start with that foundational twist to ensure a sturdy base.
Pulling Too Hard
Applying excessive force while looping or pulling bands can cause several problems. Rubber bands can snap, especially if they are lower quality or old. Over-stretching bands can also lead to an uneven bracelet, where some sections are tighter or looser than others. Always use a gentle, consistent touch to protect your bands and maintain an even pattern.
Losing Track of Layers
The Fishtail pattern relies on having three bands on the pegs at all times before looping. Sometimes, beginners might accidentally loop the wrong band or forget to add a new one. This can disrupt the pattern, making your bracelet look inconsistent. Always pause to check that you have three bands on your pegs before you loop the bottom one.
Incorrect Clip Attachment
Attaching the S-clip or C-clip improperly can cause your finished bracelet to fall apart. If the clip isn’t securely fastened to both the starting and ending loops, the bracelet will unravel when worn. Ensure the clip firmly grips all loops of the end bands, providing a reliable connection that won’t come undone.
Troubleshooting
Bands Keep Breaking
If your rubber bands are snapping frequently, consider their quality. Cheaper or older bands can be more brittle and prone to breaking. Invest in a fresh pack of good-quality loom bands designed for crafting, as these are typically more durable.
You might also be pulling the bands too tightly during the looping process. Try to use a gentler hand and avoid excessive force. Sometimes, the hook tool itself can have a sharp edge; check your tool for any burrs that might be cutting the bands.
Bracelet Looks Uneven
An uneven bracelet often results from inconsistent tension. Some loops might be tighter, while others are looser, creating an irregular appearance. Focus on applying the same amount of gentle pull each time you add a new band and when you loop the bottom ones.
Ensure you are always adding one band and then looping the bottom band from both sides. Deviating from this pattern, such as accidentally looping two bands at once, can also cause inconsistencies. Practice helps build muscle memory for an even weave.
Can’t Get the Clip On
Attaching the S-clip or C-clip can be tricky, especially with small hands or tight bands. If the loops are too small, gently stretch the final rubber band loops slightly to make more room for the clip. You can use your hook tool to help pry open the loops.
Make sure you’ve consolidated the final two loops onto a single peg before attempting to attach the clip. This provides a clear, larger target for the clip to grasp securely. Patience and a steady hand are key here.
Key Takeaways
- Always start with a figure-eight twist for a strong foundation.
- Maintain three bands on your pegs before each looping action to keep the pattern consistent.
- Use a gentle, even tension throughout the entire weaving process to prevent breakage and unevenness.
- Regularly pull the growing bracelet downwards to create space and prevent bands from tightening too much on the pegs.
- Securely attach the S-clip or C-clip to both ends for a durable, wearable bracelet.
- Practice is essential; your technique will improve with each bracelet you make.
Frequently Asked Questions
What kind of rubber bands work best?
Specialized loom bands, often made from silicone or high-quality rubber, are ideal. These are designed to be stretchy, durable, and come in a vast array of colors. Avoid generic office rubber bands, as they tend to be less elastic and break more easily.
Can I make these without a loom?
Absolutely! Many designs, including the Fishtail, can be made using just your fingers. Your index and middle fingers effectively act as the two pegs of a mini-loom. It might take a little practice to get comfortable, but it’s a great option if you don’t have a loom.
How do I make different designs?
Once you master the Fishtail, a world of designs opens up. You can explore patterns like the Single Chain, Triple Single, Starburst, or even more intricate creations. Each design uses variations of adding and looping bands, often requiring different loom setups or techniques. Many video tutorials are available online to guide you.
Are these safe for sensitive skin?
Most quality loom bands are made from latex-free silicone, which is generally safe for sensitive skin. However, some cheaper bands might contain latex or other irritants. If you have known sensitivities, look for products explicitly labeled as “latex-free” or “hypoallergenic” to ensure comfort and safety.
Our Top Recommended Finds
- Large Rubber Band Refill Kit: A kit with thousands of bands in various colors ensures you never run out of creative options.
- Deluxe Loom and Hook Set: A sturdy, high-quality loom paired with a comfortable hook tool makes the weaving process much smoother.
- Craft Storage Organizer: A multi-compartment container keeps your bands sorted by color, preventing tangles and making selection easy.
Your Crafty Journey Begins Now
You’ve learned the fundamental steps to creating beautiful rubber band bracelets. This skill is more than just making an accessory; it’s about engaging your creativity and enjoying a mindful activity. Each bracelet you make will be a unique expression of your style.
Don’t stop here! Experiment with different color combinations, try out new patterns, or even combine your bracelets with charms. The possibilities are truly endless. Grab your bands and hook, and start weaving your next colorful creation today!
Beginner-friendly templates, step-by-step guides,
and weekly project ideas in your inbox.