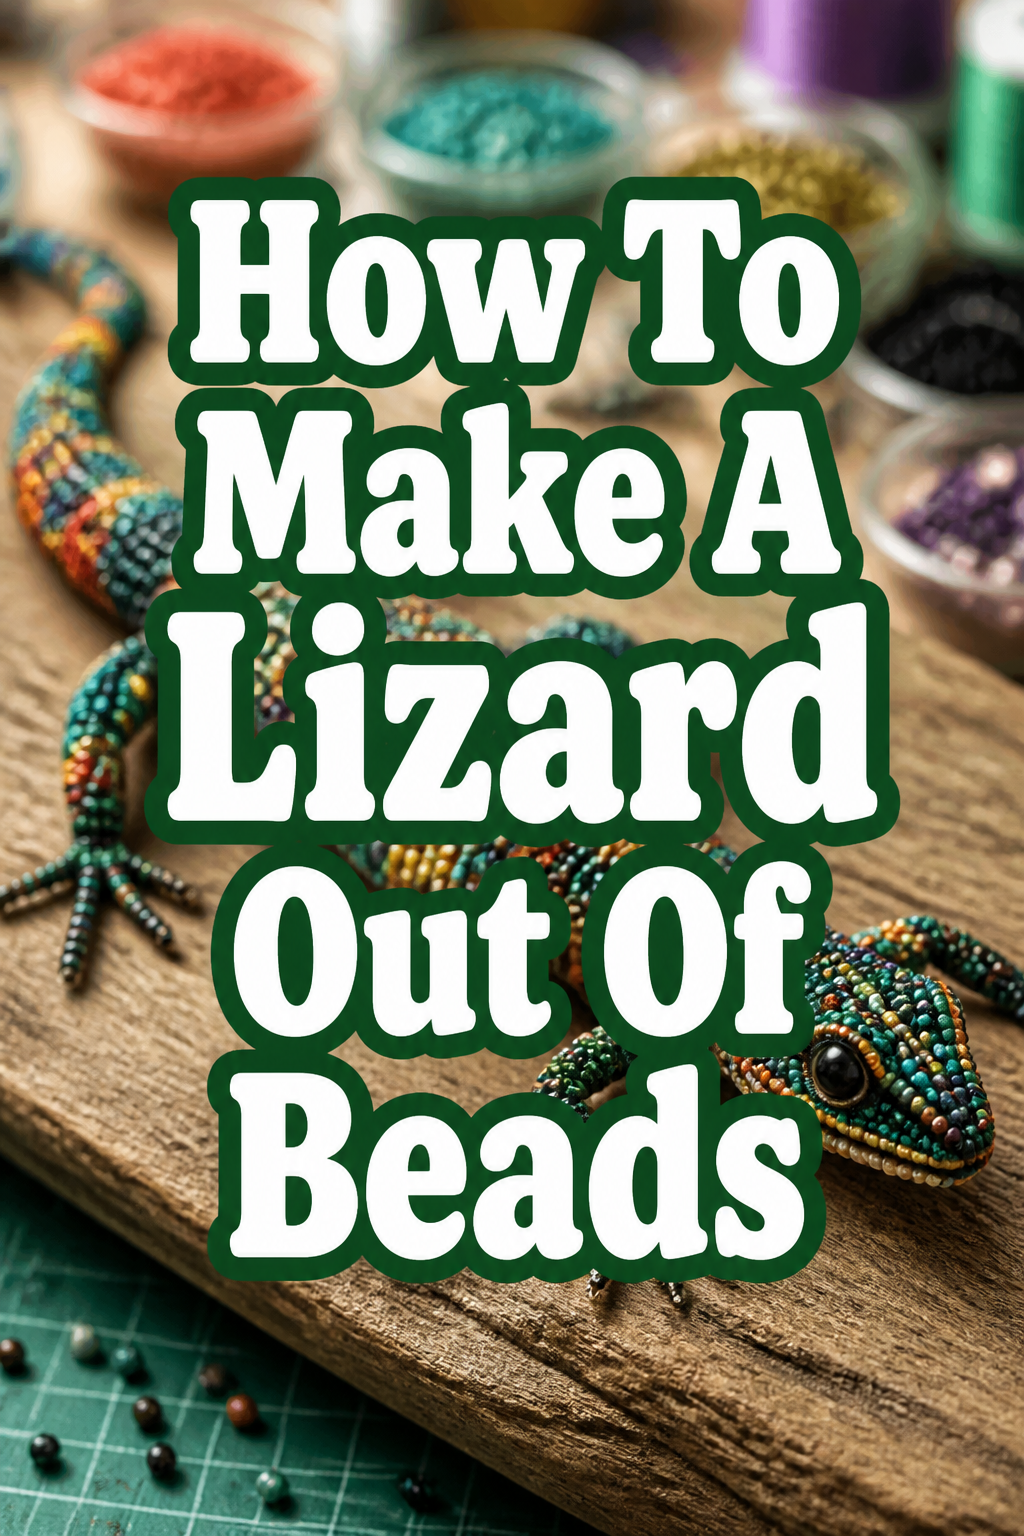
🦎 How To Make A Lizard Out Of Beads

Beginner-friendly templates, step-by-step guides,
and weekly project ideas in your inbox.
Creating a beaded lizard is a wonderfully rewarding craft. I remember making my first one years ago, feeling such a sense of accomplishment. It’s a project that combines creativity with a bit of precision.
This guide will walk you through every step, ensuring you have a fantastic, sparkling lizard to show off. You’ll gain confidence in beading techniques and end up with a charming piece.
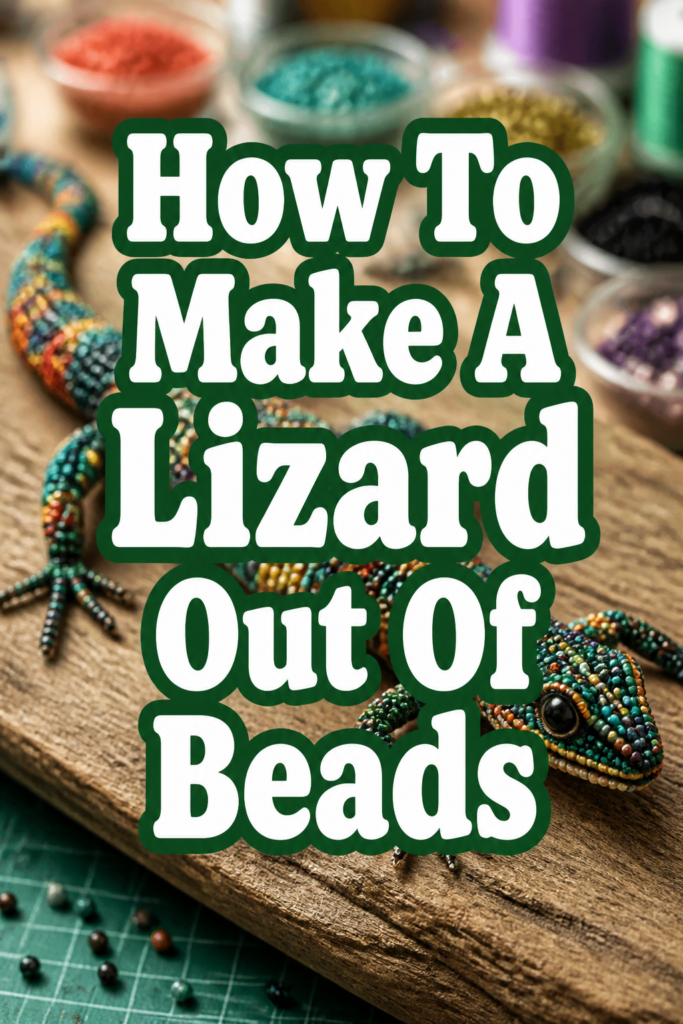
Quick Overview
Making a beaded lizard involves stringing beads onto wire to form the shape of a reptile. You’ll learn basic beading patterns and wire manipulation. It’s a fun project that yields a durable, decorative item.
- Time needed: 2-4 hours (depending on complexity and experience)
- Difficulty: Beginner to Intermediate
- What you’ll need: Seed beads, craft wire, wire cutters, round-nose pliers.
Step-by-Step Instructions
Step 1: Gather Your Supplies
Before you begin, lay out all your materials. This ensures you have everything within reach and can focus on the crafting. A well-organized workspace makes the process much smoother.
You will need an assortment of seed beads, typically size 6/0 or 8/0, in various colors for the body, belly, and eyes. Choose colors that appeal to you or mimic a real lizard. You also need craft wire, usually 24-gauge or 26-gauge, which is flexible but holds its shape.
Grab a good pair of wire cutters and small round-nose pliers. These tools are essential for cutting and shaping the wire accurately.
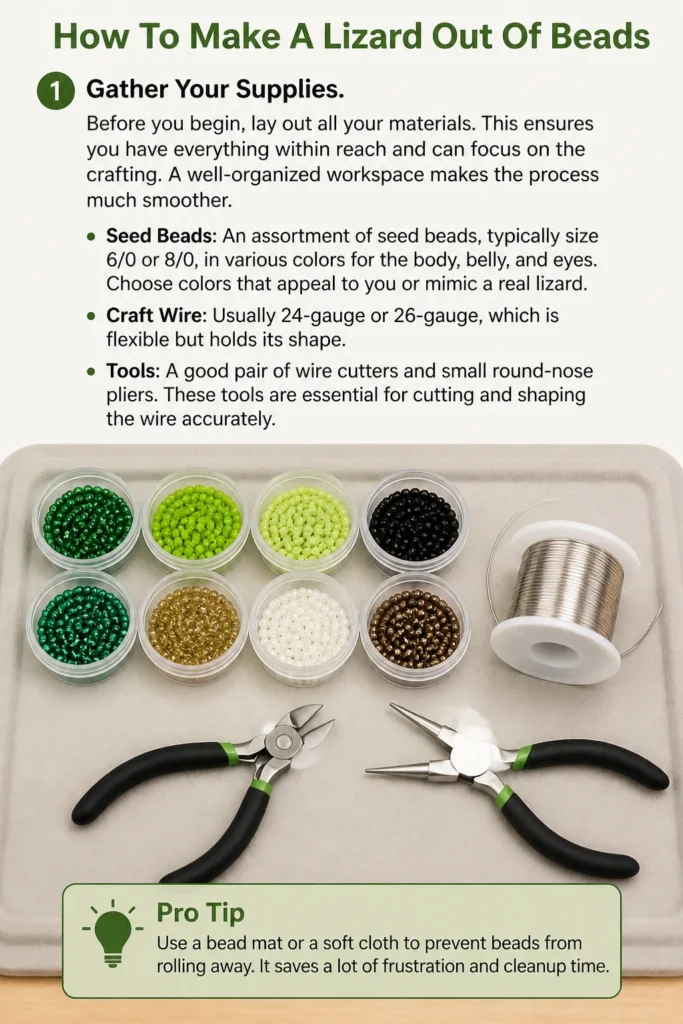
Pro Tip: Use a bead mat or a soft cloth to prevent beads from rolling away. It saves a lot of frustration and cleanup time.
Step 2: Prepare Your Wire
Cut a generous length of craft wire, about 30-36 inches (75-90 cm). This length gives you plenty of room to work without running out too soon. You can always trim excess later.
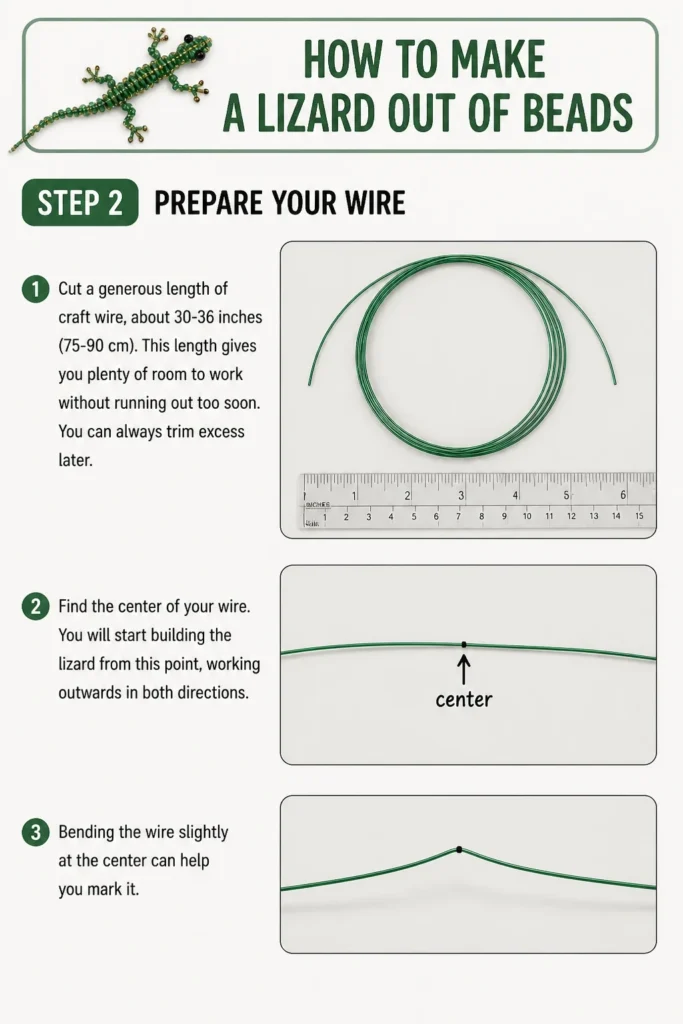
Find the center of your wire. You will start building the lizard from this point, working outwards in both directions. Bending the wire slightly at the center can help you mark it.
Step 3: Start the Head
Begin by stringing the first bead onto the center of your wire. This will be the very tip of your lizard’s nose. Push it to the center point you marked.
Now, add two more beads to one side of the wire. Take the other end of the wire and thread it back through these two new beads, pulling tightly until they sit snugly against the first bead. This forms the first row of the lizard’s head.
For the next row, string three beads onto one wire end. Pass the other wire end back through these three beads in the opposite direction. Pull both wire ends tight to secure the row.
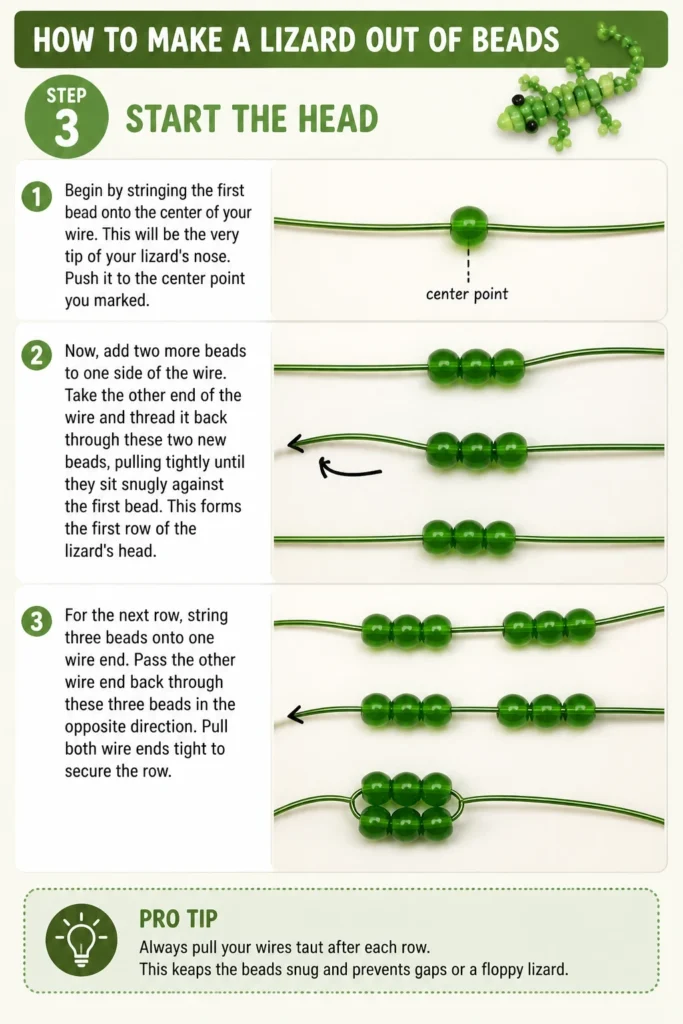
Pro Tip: Always pull your wires taut after each row. This keeps the beads snug and prevents gaps or a floppy lizard.
Step 4: Build the Body
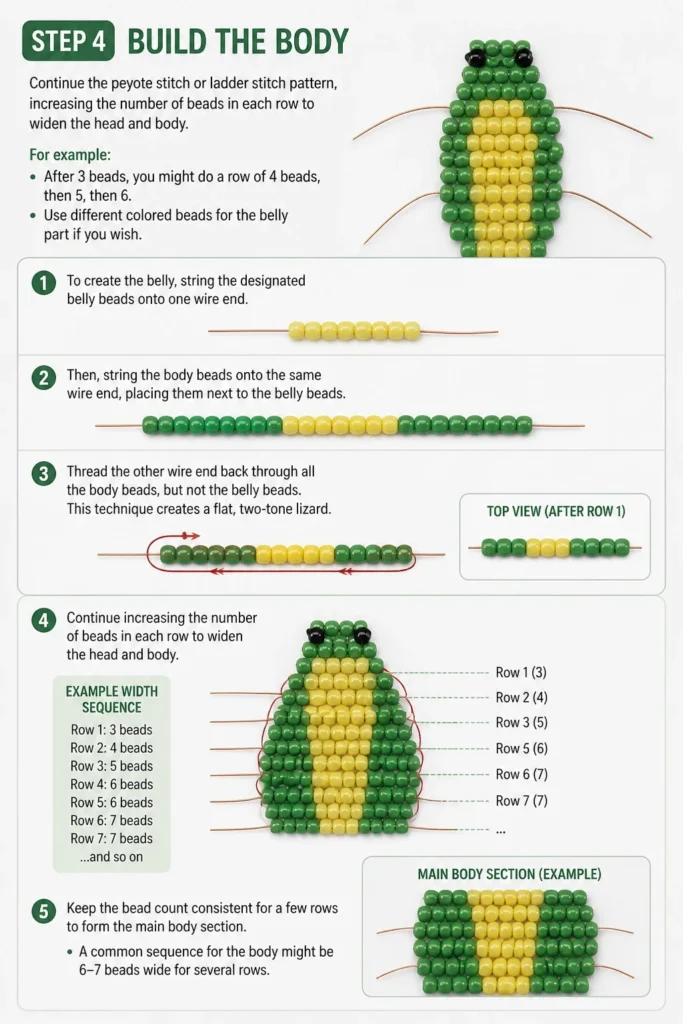
Continue the peyote stitch or ladder stitch pattern, increasing the number of beads in each row to widen the head and body. For example, after 3 beads, you might do a row of 4 beads, then 5, then 6. Use different colored beads for the “belly” part if you wish.
To create the belly, string the designated belly beads onto one wire end. Then, string the body beads onto the same wire end, placing them next to the belly beads. Thread the other wire end back through all the body beads, but not the belly beads.
This technique creates a flat, two-tone lizard. Keep the bead count consistent for a few rows to form the main body section. A common sequence for the body might be 6-7 beads wide for several rows.
Step 5: Create the Legs
When you reach the point where you want the first set of legs, you’ll need to create loops. After completing a body row, take one of the working wires and string about 8-10 beads onto it. This will be one leg.
Form a loop by threading the wire back through the second bead from the end, skipping the very last bead. Pull it tight to create a small loop for the foot. Then, thread the wire back through the remaining beads of the leg, leading it back to the main body.
Repeat this process on the other side of the same body row to create the second leg. Continue beading the body for several more rows before adding the second set of legs in the same manner.
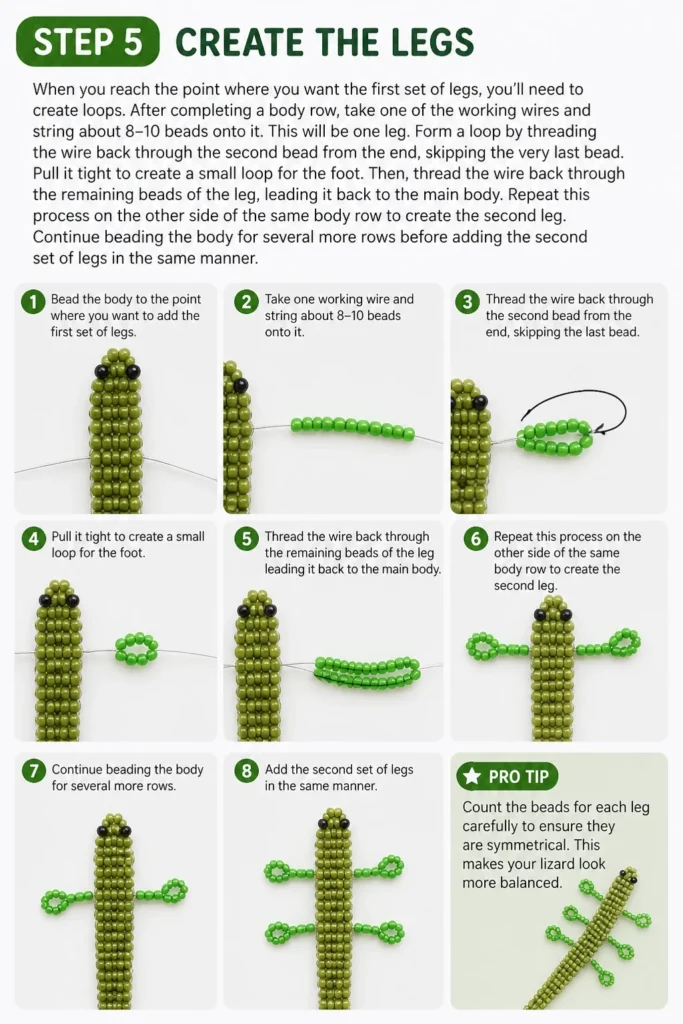
Pro Tip: Count the beads for each leg carefully to ensure they are symmetrical. This makes your lizard look more balanced.
Step 6: Form the Tail
Once you’ve added all four legs and completed the main body section, it’s time to taper the tail. Gradually decrease the number of beads in each subsequent row. For example, if your body was 6 beads wide, you might go 5, then 4, then 3, then 2, then 1.
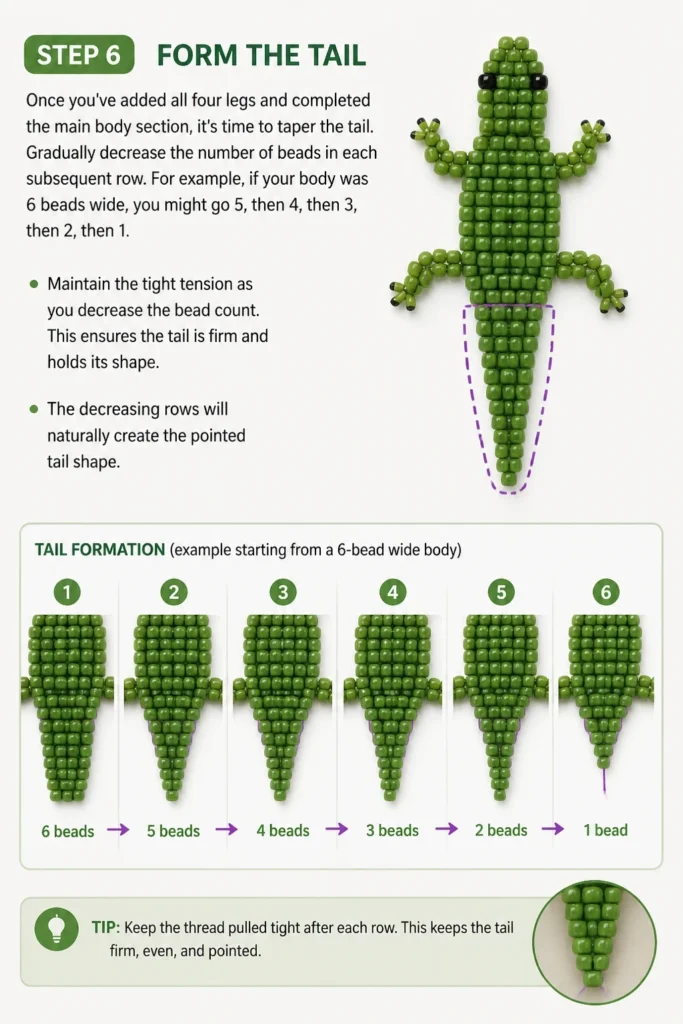
Maintain the tight tension as you decrease the bead count. This ensures the tail is firm and holds its shape. The decreasing rows will naturally create the pointed tail shape.
Step 7: Finish the Tail
When you reach the final row of one bead, thread both wires through it. Then, twist the two wire ends together tightly for about an inch (2.5 cm) to secure the tail. This prevents the beads from unraveling.
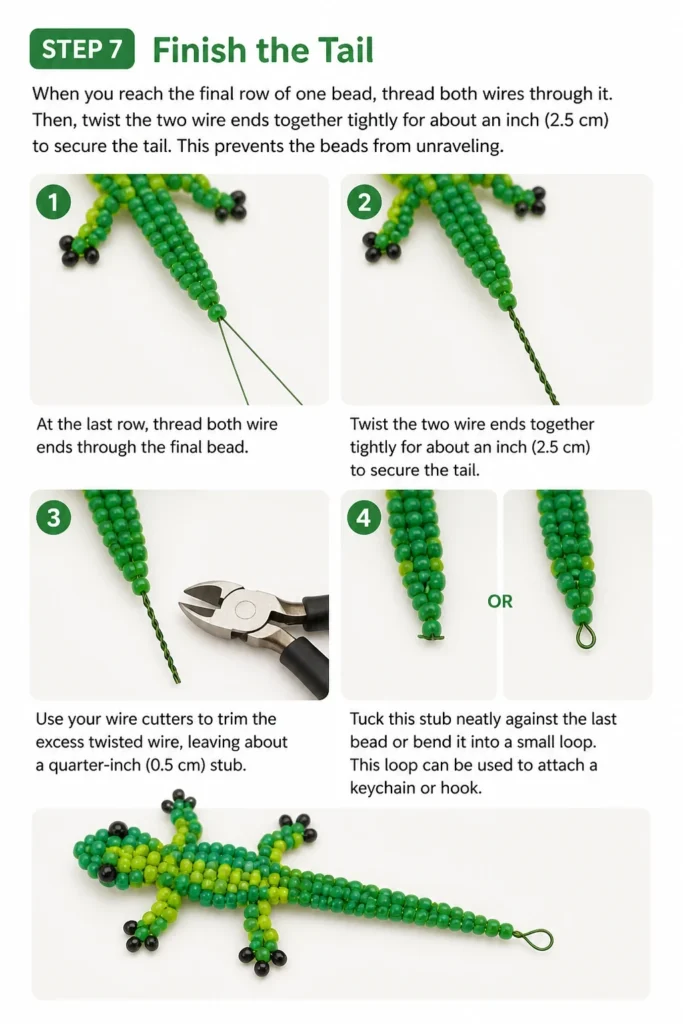
Use your wire cutters to trim the excess twisted wire, leaving about a quarter-inch (0.5 cm) stub. Tuck this stub neatly against the last bead or bend it into a small loop. This loop can be used to attach a keychain or hook.
Step 8: Add Details (Optional)
Now your lizard has its basic form. You can add small black seed beads for eyes. These are usually added during the head-beading process, by substituting two main body beads with black ones in the appropriate row.
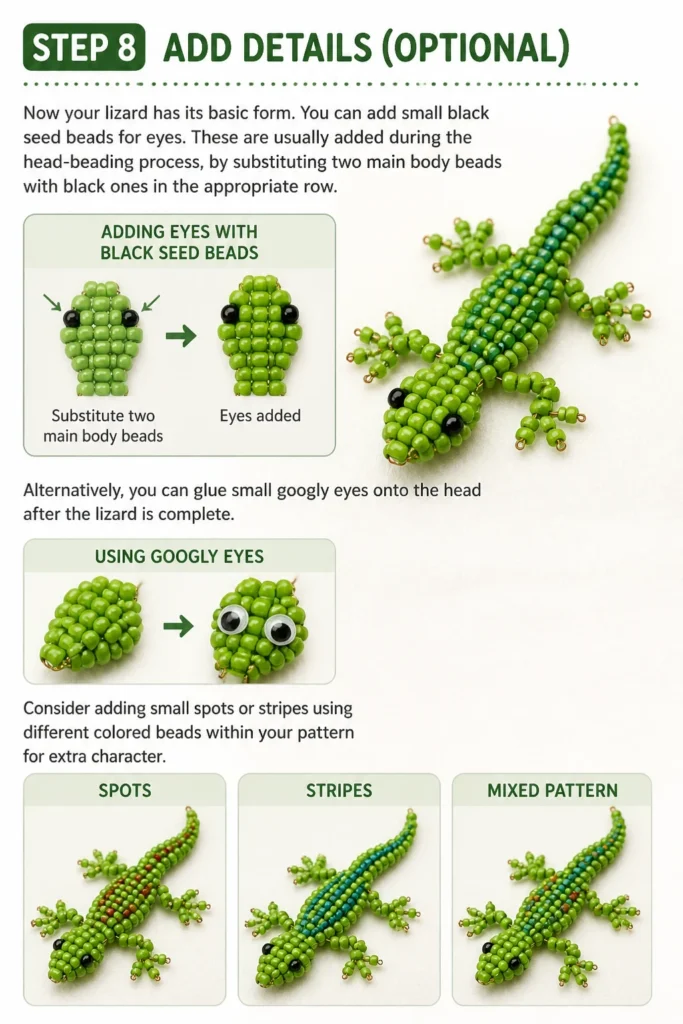
Alternatively, you can glue small googly eyes onto the head after the lizard is complete. Consider adding small spots or stripes using different colored beads within your pattern for extra character.
Step 9: Adjust and Refine
Gently bend and shape your finished lizard. You can arch its back, curl its tail, or position its legs to give it a more lifelike pose. The craft wire allows for some flexibility.
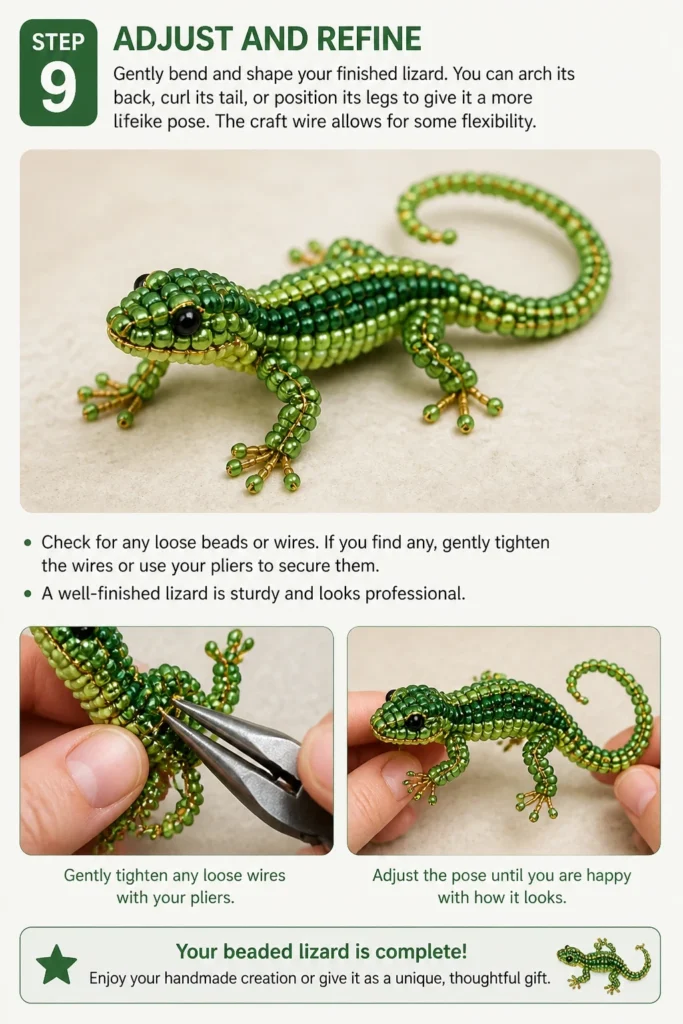
Check for any loose beads or wires. If you find any, gently tighten the wires or use your pliers to secure them. A well-finished lizard is sturdy and looks professional.
Common Mistakes to Avoid
Loose Wire Tension
One of the most common issues is not pulling the wires tight enough after each row of beads. This results in a floppy, shapeless lizard with visible gaps between beads. Always give a firm tug on both wires after threading a new row to ensure the beads sit snugly together. Consistent tension is key to a sturdy, well-formed piece.
Uneven Bead Counts
When increasing or decreasing the number of beads for the head, body, or tail, it’s easy to lose count. This leads to an asymmetrical or lopsided lizard. Double-check your bead count for each row before pulling the wires tight. Taking a moment to verify saves you from having to undo rows later.
Running Out of Wire
Starting with too short a piece of wire is a frequent mistake. You might find yourself running out of wire mid-project, which can be tricky to fix. Always cut a generous length, even if it seems like too much. It’s better to trim excess at the end than to try and add more wire mid-bead.
Ignoring Leg Symmetry
When creating the legs, it’s vital that they are the same length and attached at corresponding points on the body. If the legs are uneven or placed haphazardly, the lizard will look awkward. Count the beads for each leg loop and ensure they are attached to the same body row on either side.
Troubleshooting
Lizard is too floppy/loose
If your lizard feels too pliable and doesn’t hold its shape well, the wire tension was likely too loose during construction. While it’s hard to completely fix once done, you can try gently bending the entire piece to encourage it to hold a pose. For future projects, focus on pulling the wires firmly after every single row of beads.
Beads keep slipping off the wire
This usually happens at the beginning or end of a wire, or if the wire end isn’t secured. When starting, make sure your first few rows are tightly cinched at the center. At the end, twist the wires securely or create a small loop to prevent beads from sliding off. You can also use a temporary stopper bead at the end of a working wire.
Wire breaks during beading
If your wire snaps, it might be due to using a gauge that is too thin for the type of beads or too much stress from repeated bending. If it breaks mid-project, try to salvage it by twisting a new piece of wire onto the existing wire, very close to a bead, and carefully hiding the twist within the beadwork. You might need to gently unstring a few beads to make this repair.
Key Takeaways
- Always maintain tight wire tension for a sturdy lizard.
- Carefully count beads in each row to ensure symmetry.
- Start with a generous length of craft wire to avoid running out.
- Plan your bead colors and patterns before you begin stringing.
- Practice creating symmetrical leg loops for a balanced appearance.
- Don’t be afraid to gently shape your finished lizard for a lifelike pose.
Frequently Asked Questions
What kind of beads are best for a beaded lizard?
Seed beads are the most popular choice for beaded lizards. Sizes 6/0 (about 4mm) or 8/0 (about 3mm) work very well, offering a good balance of detail and ease of handling. Choose consistent sizes within your project for a uniform look.
Can I use fishing line instead of craft wire?
While fishing line (monofilament) can be used for some beading projects, it’s generally not ideal for this type of lizard. The craft wire is crucial because it allows the lizard to be shaped and hold its form. Fishing line is too flexible and won’t give your lizard structure.
How do I make the lizard bigger or smaller?
To make a larger lizard, simply increase the number of beads in your widest body rows and extend the length of the body and tail. For a smaller lizard, use fewer beads in each row and shorten the overall length. You can also use smaller or larger seed beads to adjust the scale.
Can I make other animals using this technique?
Absolutely! The basic peyote or ladder stitch technique used for the lizard can be adapted to create many other beaded animals. You simply adjust the bead counts and leg placements to form different shapes like snakes, geckos, or even small bugs. The principles remain the same.
Our Top Recommended Finds
- Assorted Seed Bead Kit: A kit with various colors and sizes is perfect for starting out, giving you plenty of options without buying individual tubes.
- 24-Gauge Craft Wire Spool: This gauge offers a good balance of flexibility and strength, ideal for holding the lizard’s shape.
- Mini Jewelry Pliers Set: A set including round-nose pliers and wire cutters is invaluable for precise wire work and finishing touches.
Unleash Your Inner Beading Artist
You now have all the knowledge and steps to create your very own beaded lizard. This project is more than just stringing beads; it’s about bringing a small, sparkling creature to life with your own hands. You’ll develop patience and precision, skills that transcend this craft.
Why not pick up some beads and wire today? Experiment with colors, try different sizes, and make a whole family of unique beaded lizards. The satisfaction of seeing your creation come together is truly wonderful.
Beginner-friendly templates, step-by-step guides,
and weekly project ideas in your inbox.