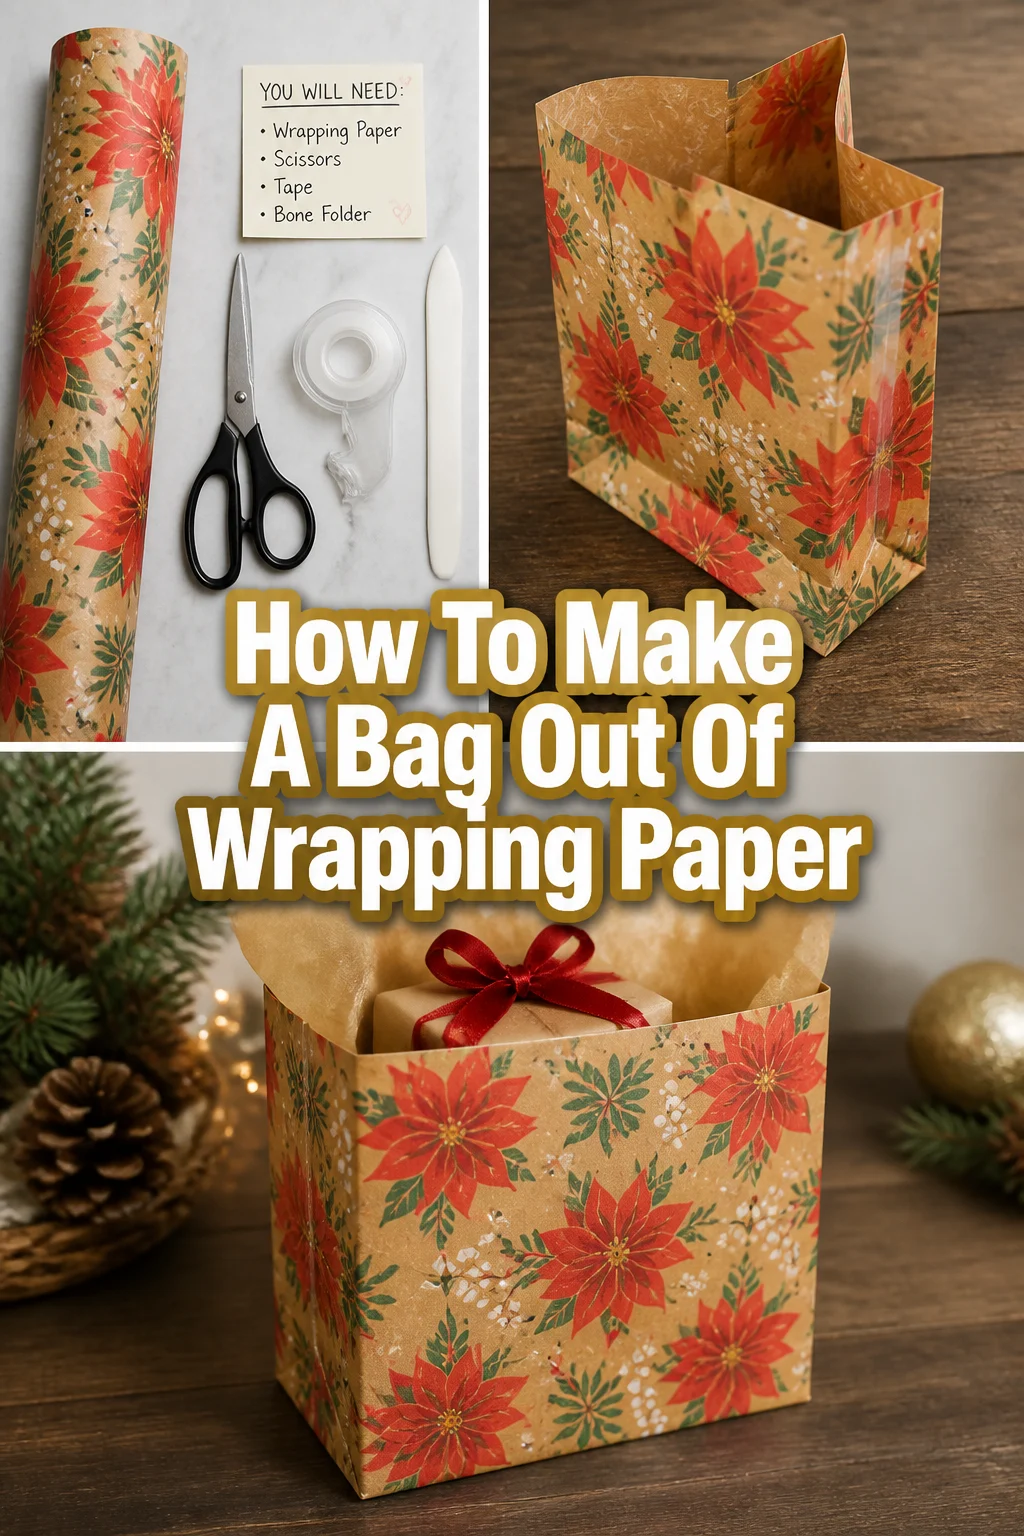
🎁 How To Make A Bag Out Of Wrapping Paper

Beginner-friendly templates, step-by-step guides,
and weekly project ideas in your inbox.
Ever found yourself with a beautifully wrapped gift, only to realize you’re out of gift bags?
Or maybe you have a small, oddly shaped item that just won’t fit a standard bag?
I’ve been there many times, and discovered a fantastic solution: making your own bag from wrapping paper. It’s a skill I’ve honed over countless last-minute gift preparations, and it adds a personal touch that store-bought bags simply can’t match.

Quick Overview
This guide will walk you through creating a sturdy, attractive gift bag using just a few common household items and your favorite wrapping paper. You’ll learn how to measure, fold, and secure your paper to form a functional and beautiful container.
- Time needed: 20-45 minutes (depending on size and experience)
- Difficulty: Beginner
- What you’ll need: Wrapping paper, scissors, ruler, pencil, strong double-sided tape or glue stick, hole punch, ribbon or string.
Step-by-Step Instructions
Step 1: Gather Your Materials
Before you begin, make sure you have everything laid out and ready to go. This prevents interruptions and keeps your crafting process smooth.
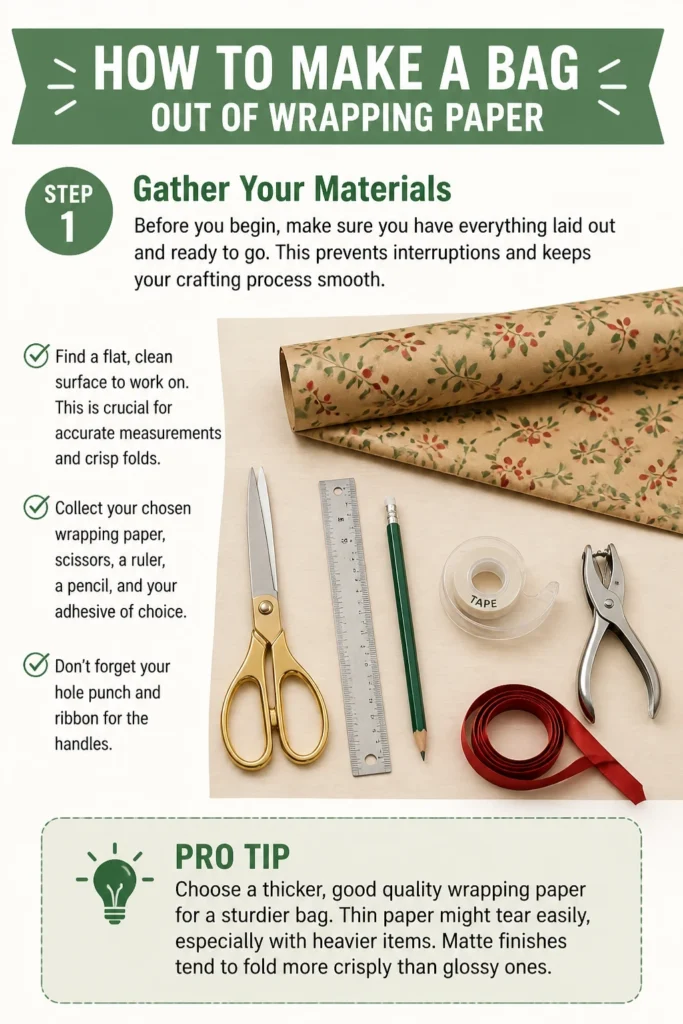
Find a flat, clean surface to work on. This is crucial for accurate measurements and crisp folds.
Collect your chosen wrapping paper, scissors, a ruler, a pencil, and your adhesive of choice. Don’t forget your hole punch and ribbon for the handles.
Pro Tip: Choose a thicker, good quality wrapping paper for a sturdier bag. Thin paper might tear easily, especially with heavier items. Matte finishes tend to fold more crisply than glossy ones.
Step 2: Measure and Cut Your Paper
The size of your bag depends entirely on what you plan to put inside. Take a moment to consider the item’s dimensions.
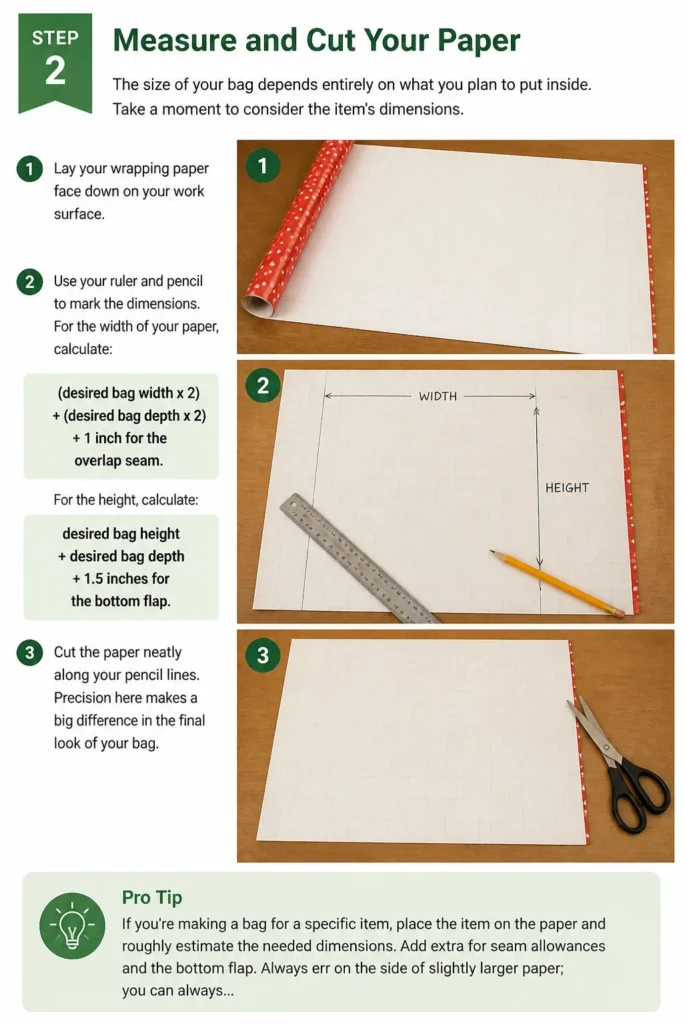
Lay your wrapping paper face down on your work surface. Use your ruler and pencil to mark the dimensions.
For the width of your paper, calculate: (desired bag width x 2) + (desired bag depth x 2) + 1 inch for the overlap seam. For the height, calculate: desired bag height + desired bag depth + 1.5 inches for the bottom flap.
Cut the paper neatly along your pencil lines. Precision here makes a big difference in the final look of your bag.
Pro Tip: If you’re making a bag for a specific item, place the item on the paper and roughly estimate the needed dimensions. Add extra for seam allowances and the bottom flap. Always err on the side of slightly larger paper; you can always trim it down.
Step 3: Form the Main Body Seam
This step creates the basic tube shape of your bag. A strong seam is essential for durability.
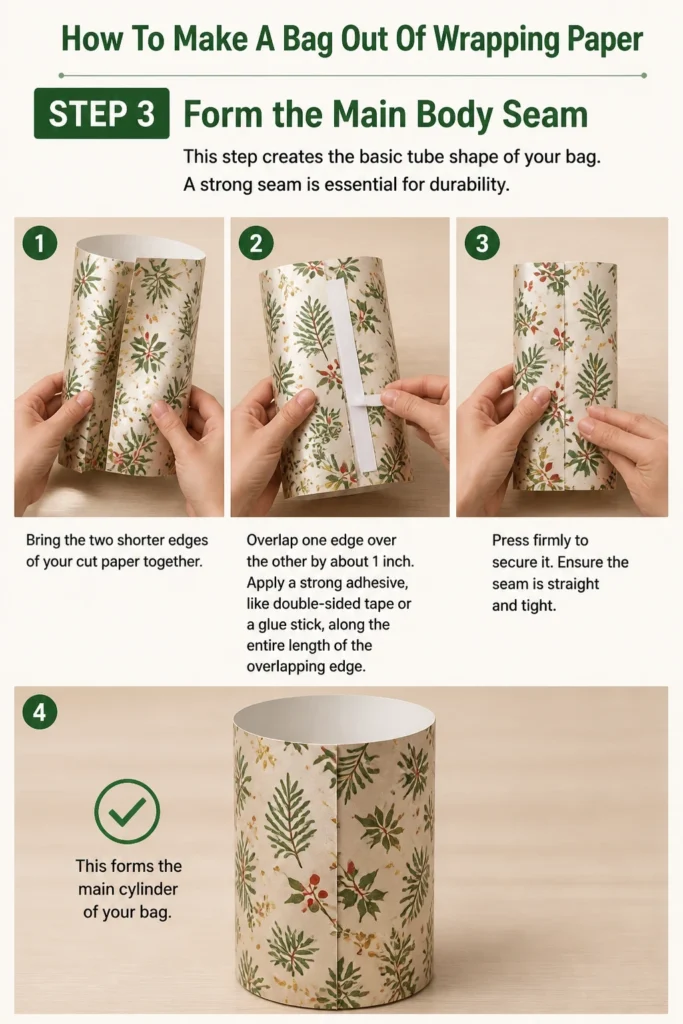
Bring the two shorter edges of your cut paper together. Overlap one edge over the other by about 1 inch.
Apply a strong adhesive, like double-sided tape or a glue stick, along the entire length of the overlapping edge. Press firmly to secure it.
Ensure the seam is straight and tight. This forms the main cylinder of your bag.
Step 4: Create the Bag Bottom
The bottom of your bag needs to be strong and flat to hold its contents. This involves a series of precise folds.
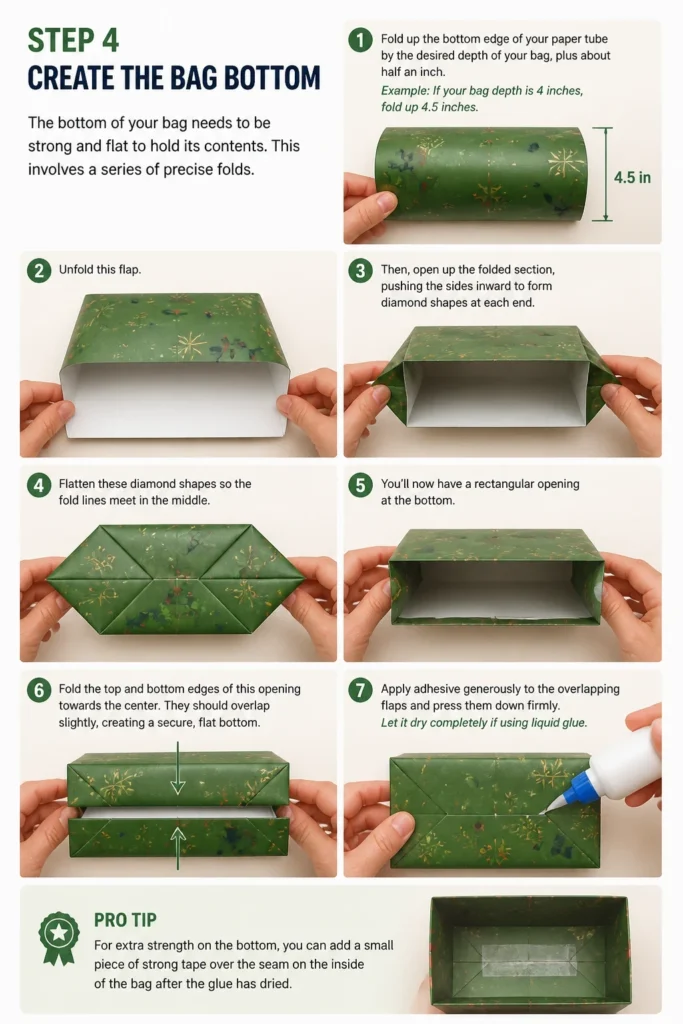
Fold up the bottom edge of your paper tube by the desired depth of your bag, plus about half an inch. For example, if your bag depth is 4 inches, fold up 4.5 inches.
Unfold this flap. Then, open up the folded section, pushing the sides inward to form diamond shapes at each end.
Flatten these diamond shapes so the fold lines meet in the middle. You’ll now have a rectangular opening at the bottom.
Fold the top and bottom edges of this opening towards the center. They should overlap slightly, creating a secure, flat bottom.
Apply adhesive generously to the overlapping flaps and press them down firmly. Let it dry completely if using liquid glue.
Pro Tip: For extra strength on the bottom, cut a piece of cardboard or cardstock to fit the exact dimensions of your bag’s base. Insert this after the bag is fully assembled, before adding the contents. This prevents sagging.
Step 5: Define the Side Gussets
Gussets give your bag its three-dimensional shape and allow it to expand when filled. This is where your bag starts to look like a real bag.
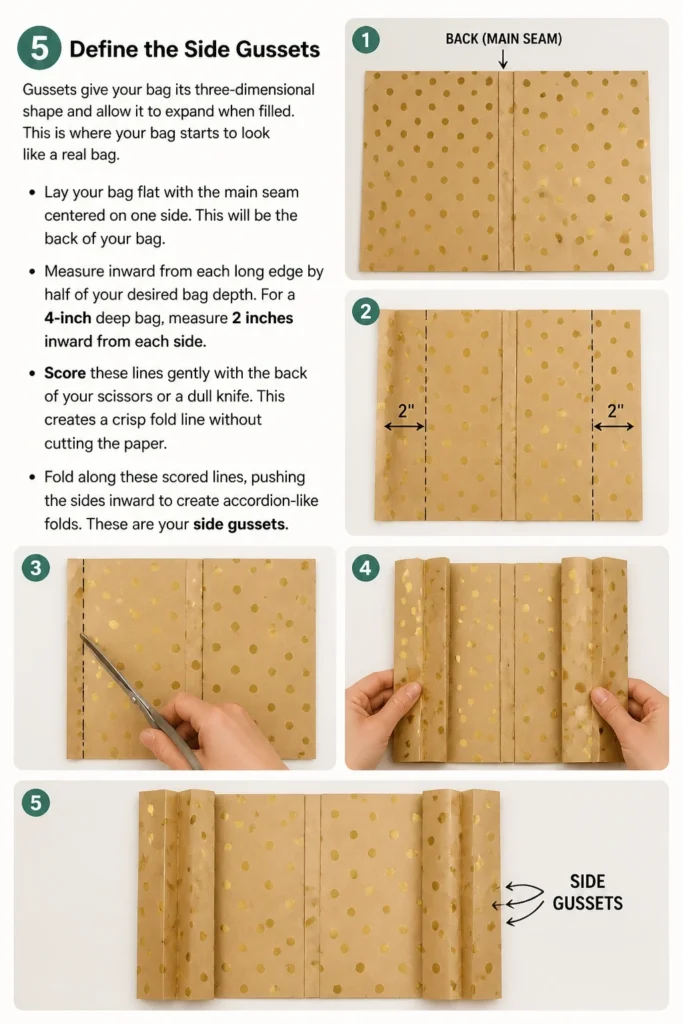
Lay your bag flat with the main seam centered on one side. This will be the back of your bag.
Measure inward from each long edge by half of your desired bag depth. For a 4-inch deep bag, measure 2 inches inward from each side.
Score these lines gently with the back of your scissors or a dull knife. This creates a crisp fold line without cutting the paper.
Fold along these scored lines, pushing the sides inward to create accordion-like folds. These are your side gussets.
Step 6: Form the Top Edge and Handles
The top of your bag needs a clean finish and strong handles for carrying. This is where your bag gets its functionality.
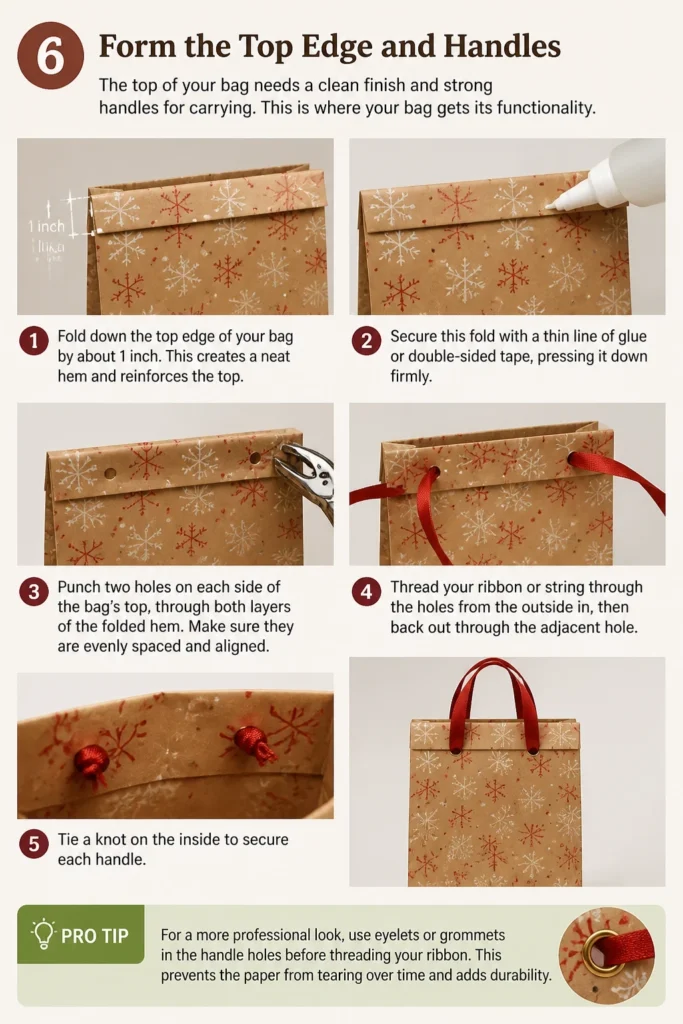
Fold down the top edge of your bag by about 1 inch. This creates a neat hem and reinforces the top.
Secure this fold with a thin line of glue or double-sided tape, pressing it down firmly.
Punch two holes on each side of the bag’s top, through both layers of the folded hem. Make sure they are evenly spaced and aligned.
Thread your ribbon or string through the holes from the outside in, then back out through the adjacent hole. Tie a knot on the inside to secure each handle.
Pro Tip: For a more professional look, use eyelets or grommets in the handle holes before threading your ribbon. This prevents the paper from tearing over time and adds durability.
Step 7: Final Touches and Reinforcement
Before you consider your bag complete, take a moment to ensure everything is secure and looks good. A little extra attention here goes a long way.
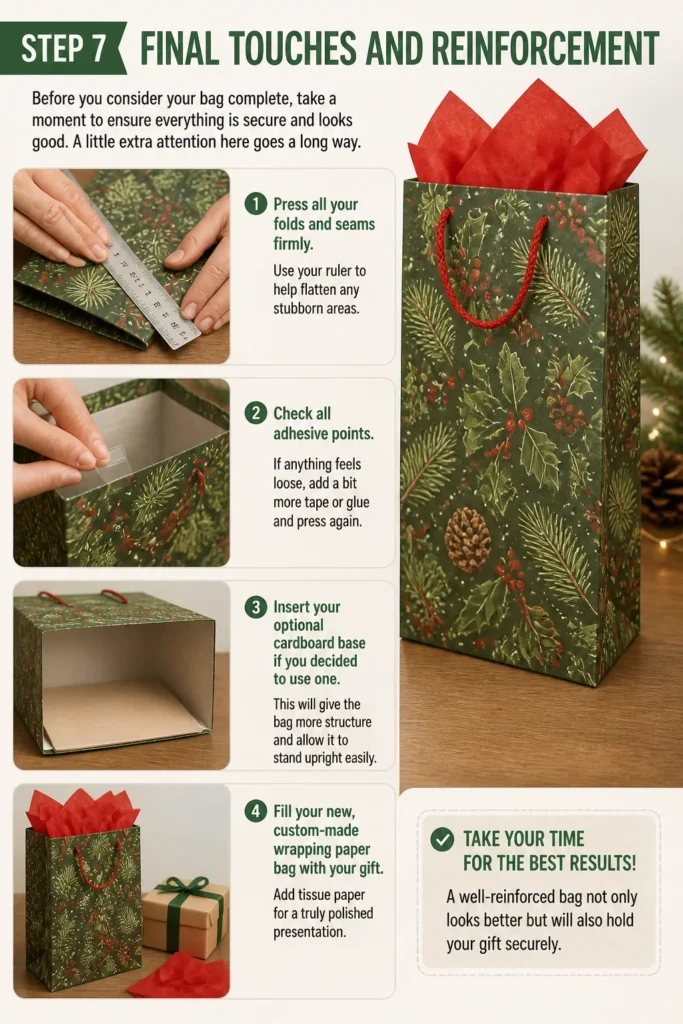
Press all your folds and seams firmly. Use your ruler to help flatten any stubborn areas.
Check all adhesive points. If anything feels loose, add a bit more tape or glue and press again.
Insert your optional cardboard base if you decided to use one. This will give the bag more structure and allow it to stand upright easily.
Fill your new, custom-made wrapping paper bag with your gift. Add tissue paper for a truly polished presentation.
Common Mistakes to Avoid
Using Too Little Adhesive
Many people underestimate how much glue or tape is needed for a sturdy bag. Skimping on adhesive will lead to seams coming apart, especially when the bag is lifted or filled with even a light item. Be generous with your glue stick or double-sided tape, ensuring full coverage on all overlapping sections.
Uneven Measurements and Folds
Precision is key when crafting a paper bag. If your initial measurements are off, or your folds aren’t straight, the bag will look lopsided or won’t stand properly. Take your time with the ruler and pencil, and use a bone folder or the edge of a ruler to achieve crisp, clean folds every time.
Ignoring Paper Grain
Wrapping paper has a grain, just like fabric. Folding against the grain can result in jagged, uneven folds or even tears. While not always obvious, try to fold with the paper’s natural flexibility. If the paper resists a fold, try adjusting its orientation slightly, especially for the main body and gusset folds.
Rushing the Drying Process
If you’re using a liquid glue, patience is a virtue. Trying to manipulate or fill the bag before the glue is completely dry will cause seams to separate and can ruin the bag’s structure. Allow ample time for the glue to set, ideally overnight for maximum strength, especially on the bottom flap.
Troubleshooting
Bag Doesn’t Stand Up Straight
This usually indicates issues with the bottom flap or the side gussets. Re-examine your bottom folds to ensure they are flat and securely glued. For the gussets, make sure the accordion folds are pushed in evenly on both sides. Adding a cardboard insert to the bottom will significantly improve stability.
Handles Rip Out Easily
Weak handle attachment is a common problem. The top hem might not be reinforced enough, or the holes are too close to the edge. Try folding down a wider top hem (e.g., 1.5-2 inches) and securing it with extra strong tape or glue. Punch holes further from the edge and consider using eyelets or reinforcing the holes with small pieces of clear packing tape before punching.
Seams Come Apart When Filled
This points directly to insufficient or weak adhesive. If using a glue stick, ensure it’s a strong craft adhesive, not a school-grade one. Double-sided tape should be permanent and heavy-duty. Apply adhesive from edge to edge on all overlaps. For existing bags, you can carefully re-glue or tape the problematic seams from the inside.
Key Takeaways
- Accurate measuring and precise folding are the foundation of a great paper bag.
- Use high-quality, strong adhesive to ensure all seams hold firmly.
- Reinforce the bag’s bottom with extra layers or a cardboard insert for stability.
- Don’t rush the drying process if using liquid glue; patience prevents tears.
- Consider eyelets for handles to enhance durability and a professional finish.
- Custom-made bags add a unique, personal touch to any gift presentation.
Frequently Asked Questions
Can I make a bag out of any type of wrapping paper?
While technically you can use any wrapping paper, thicker, sturdier varieties work best. Thin, flimsy paper is prone to tearing and won’t hold its shape as well. Consider the weight of your gift when selecting your paper.
How do I make the bag stronger for heavier gifts?
For heavier gifts, use a heavier weight wrapping paper or even craft paper. You can also reinforce all internal seams with extra tape, especially along the bottom. Doubling up the paper for the bottom flap or adding a stiff cardboard insert is highly recommended for added strength.
What if I don’t have double-sided tape?
A strong glue stick or craft glue will work perfectly as an alternative. Just be sure to apply it evenly and allow ample drying time before handling the bag. Masking tape or clear packing tape can also be used on the inside seams for reinforcement, though it might not look as clean.
Can I reuse these bags?
Yes, absolutely! If handled with care, a well-made wrapping paper bag can be reused several times. The durability depends on the paper quality, how well it was constructed, and the weight of the items it held. Store them flat to preserve their shape.
Our Top Recommended Finds
- Heavy-Duty Double-Sided Tape: Essential for strong, instant seams without waiting for glue to dry.
- Bone Folder: Creates incredibly crisp and clean folds, making your bag look professionally made.
- Craft Glue with Precision Tip: Great for detailed work and reinforcing edges, ensuring a lasting hold.
Your Next Creative Project Awaits
Now that you’ve mastered the art of crafting a custom gift bag from wrapping paper, think of all the possibilities!
This skill isn’t just for gifts; you can create unique storage solutions, party favor bags, or even decorative containers for your home.
Don’t let those beautiful rolls of wrapping paper sit idle after the holidays. Grab your supplies and start creating something wonderful today. Your creativity is the only limit!
Beginner-friendly templates, step-by-step guides,
and weekly project ideas in your inbox.