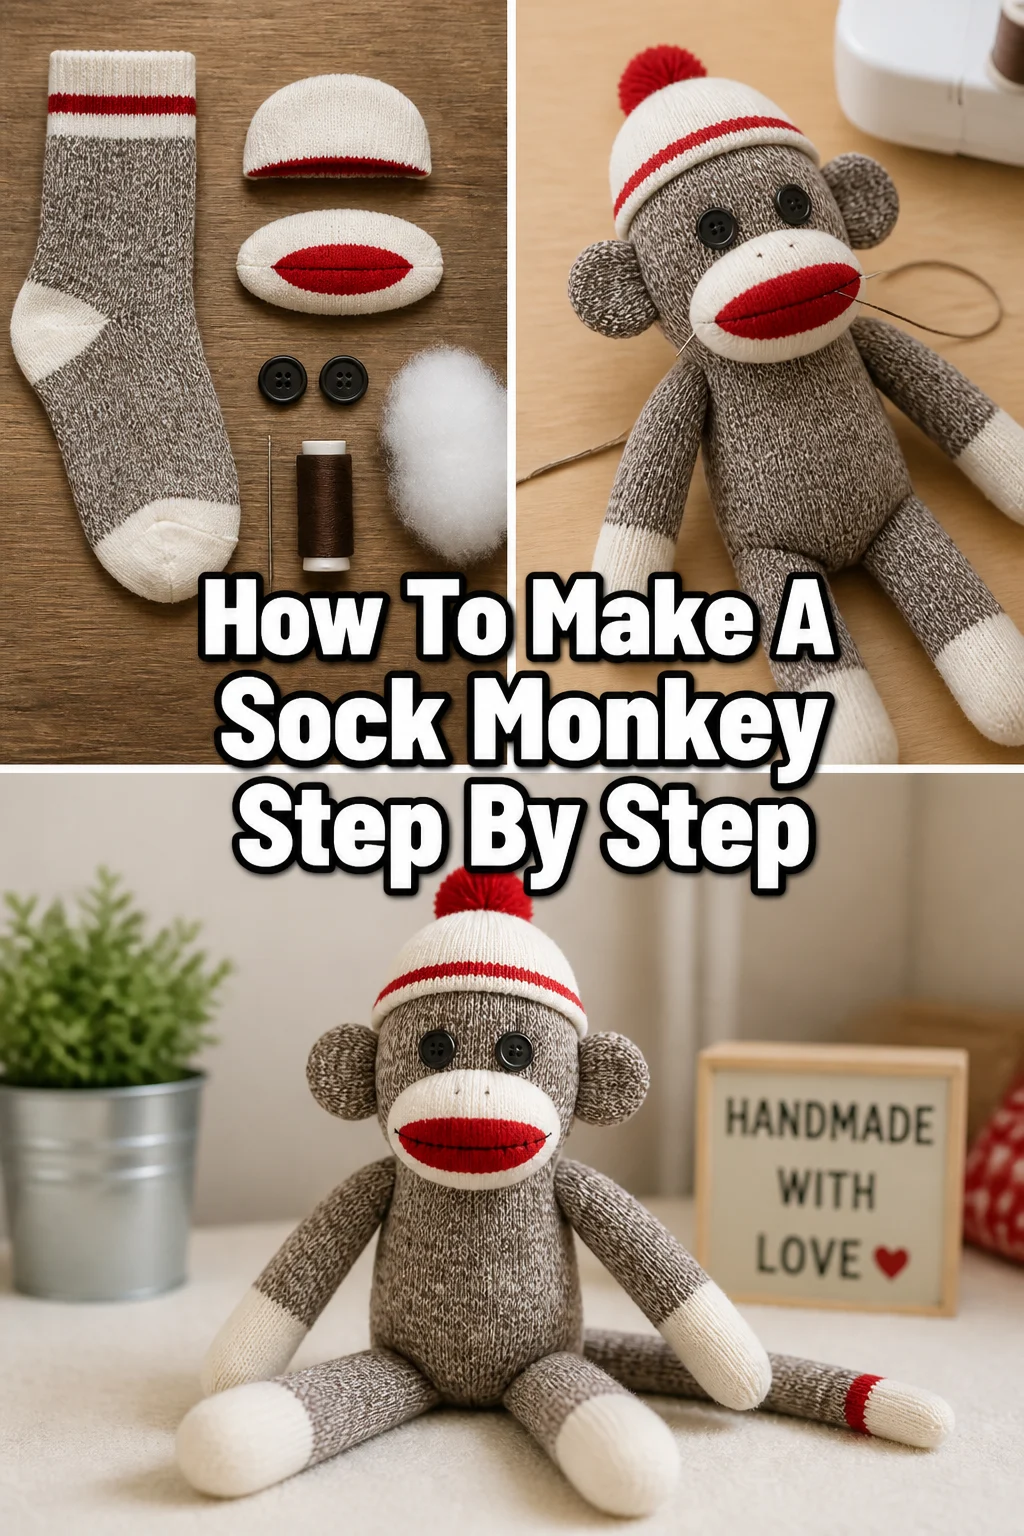
🐒 How To Make A Sock Monkey Step By Step

Beginner-friendly templates, step-by-step guides,
and weekly project ideas in your inbox.
Creating a sock monkey is a classic craft that brings a touch of nostalgia into any home.
I remember making my very first monkey from a pair of my grandfather’s work socks, and that quirky little character still sits on my shelf today.
This guide will show you exactly how to turn a simple pair of socks into a cherished handmade friend with personality and charm.

Quick Overview
Before you thread your needle, here is a high-level look at what this project entails.
- Time needed: 2 to 4 hours depending on sewing speed
- Difficulty: Intermediate (requires basic hand-sewing or machine skills)
- What you’ll need: One pair of crew-style socks, polyester fiberfill, embroidery floss, buttons, scissors, and a sewing kit.
Step-by-Step Instructions
Step 1: Select the Perfect Pair of Socks
Choose a pair of socks that have a distinct heel color, as this will become the monkey’s mouth and buttocks.
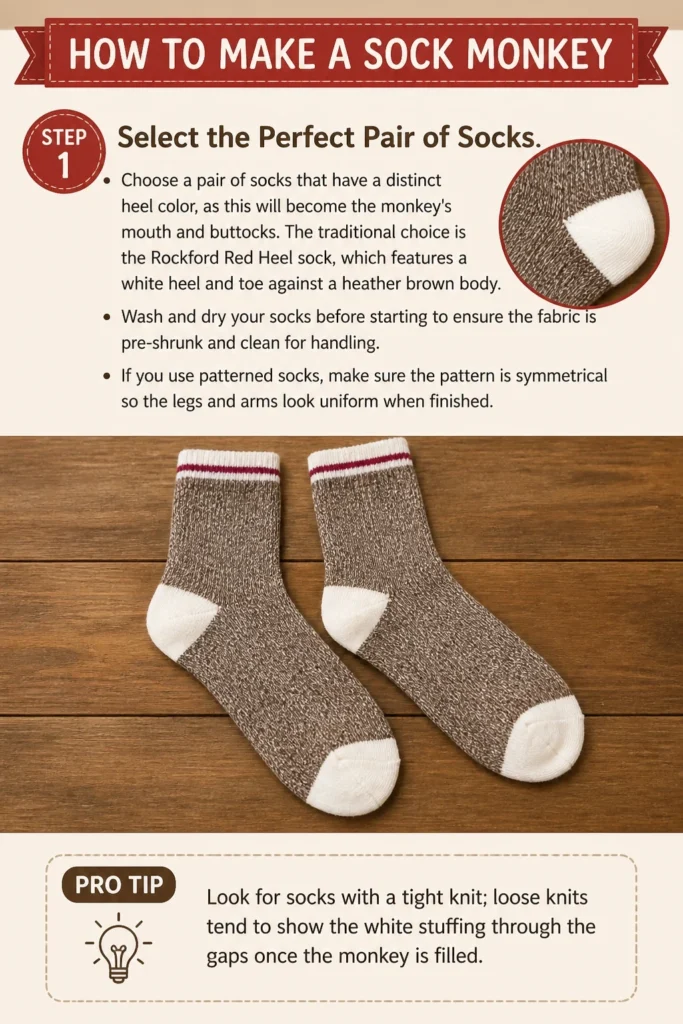
The traditional choice is the Rockford Red Heel sock, which features a white heel and toe against a heather brown body.
Wash and dry your socks before starting to ensure the fabric is pre-shrunk and clean for handling.
If you use patterned socks, make sure the pattern is symmetrical so the legs and arms look uniform when finished.
Pro Tip: Look for socks with a tight knit; loose knits tend to show the white stuffing through the gaps once the monkey is filled.
Step 2: Prepare the First Sock for the Body and Legs
Turn the first sock inside out and lay it flat with the heel facing upward toward you.
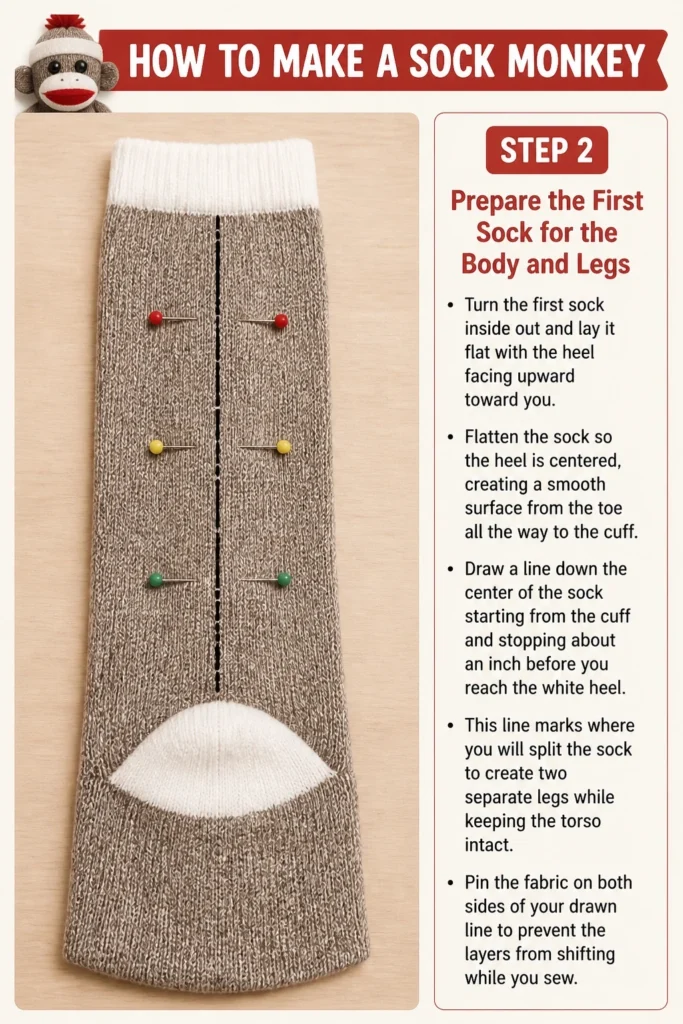
Flatten the sock so the heel is centered, creating a smooth surface from the toe all the way to the cuff.
Draw a line down the center of the sock starting from the cuff and stopping about an inch before you reach the white heel.
This line marks where you will split the sock to create two separate legs while keeping the torso intact.
Pin the fabric on both sides of your drawn line to prevent the layers from shifting while you sew.
Step 3: Sew and Cut the Legs
Stitch a seam about a quarter-inch away from the center line on both the left and right sides.
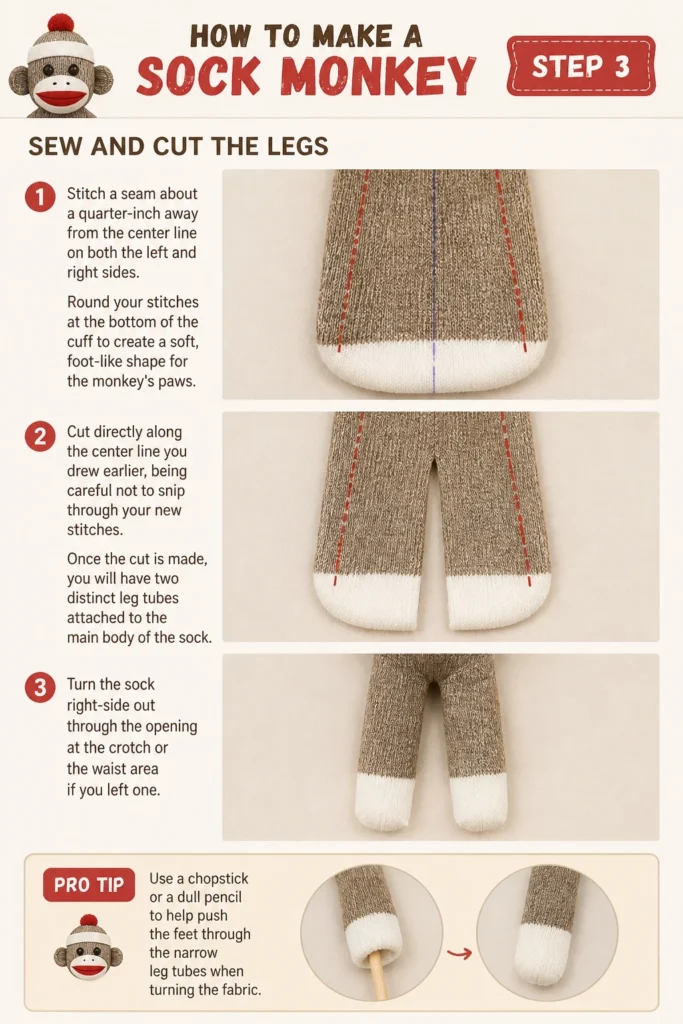
Round your stitches at the bottom of the cuff to create a soft, foot-like shape for the monkey’s paws.
Cut directly along the center line you drew earlier, being careful not to snip through your new stitches.
Once the cut is made, you will have two distinct leg tubes attached to the main body of the sock.
Turn the sock right-side out through the opening at the crotch or the “waist” area if you left one.
Pro Tip: Use a chopstick or a dull pencil to help push the feet through the narrow leg tubes when turning the fabric.
Step 4: Stuff the Body and Legs
Pull small handfuls of polyester fiberfill and fluff them up before inserting them into the toy.
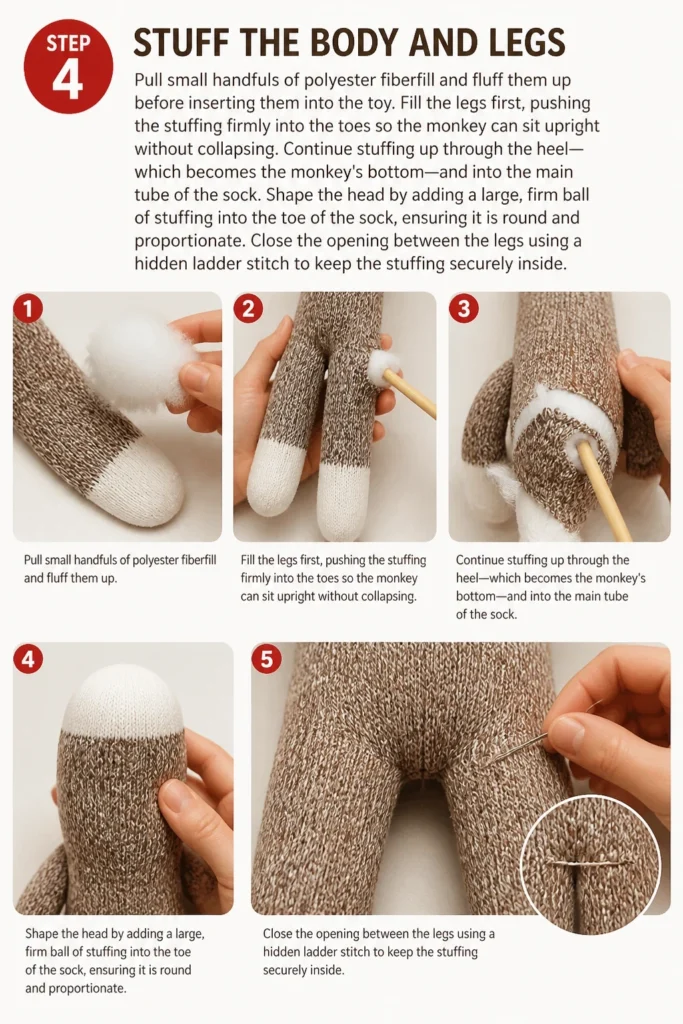
Fill the legs first, pushing the stuffing firmly into the toes so the monkey can sit upright without collapsing.
Continue stuffing up through the heel—which becomes the monkey’s bottom—and into the main tube of the sock.
Shape the head by adding a large, firm ball of stuffing into the toe of the sock, ensuring it is round and proportionate.
Close the opening between the legs using a hidden ladder stitch to keep the stuffing securely inside.
Step 5: Map Out the Second Sock
Lay the second sock flat and inside out, just as you did with the first one.
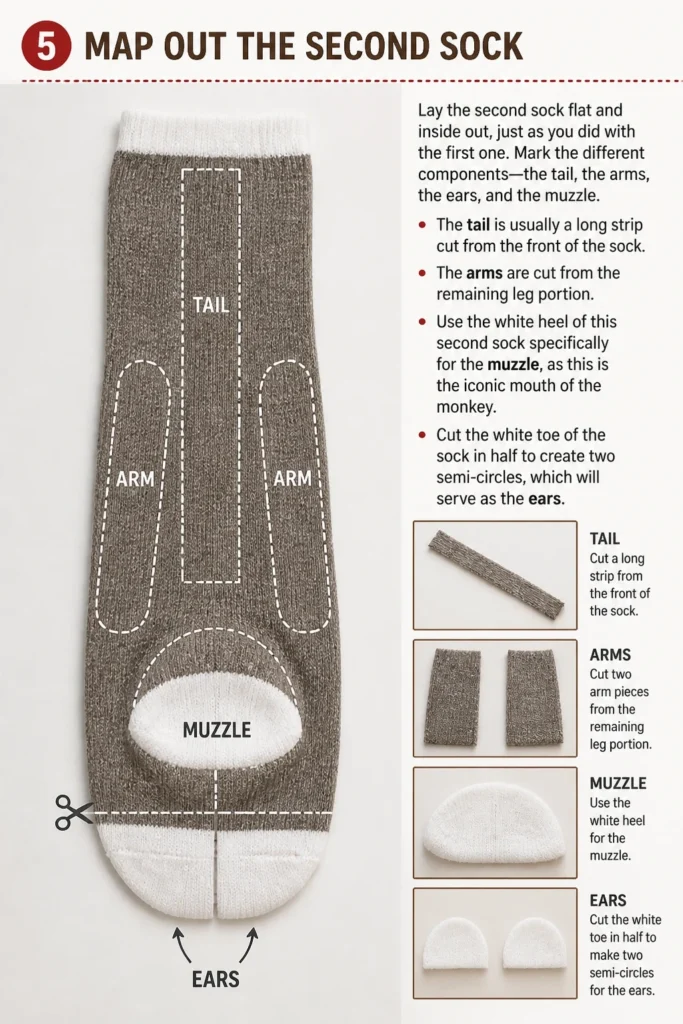
Mark the different components: the tail, the arms, the ears, and the muzzle.
The tail is usually a long strip cut from the front of the sock, while the arms are cut from the remaining leg portion.
Use the white heel of this second sock specifically for the muzzle, as this is the iconic “mouth” of the monkey.
Cut the white toe of the sock in half to create two semi-circles, which will serve as the ears.
Step 6: Construct the Arms and Tail
Fold the arm pieces in half lengthwise with the right sides facing each other.
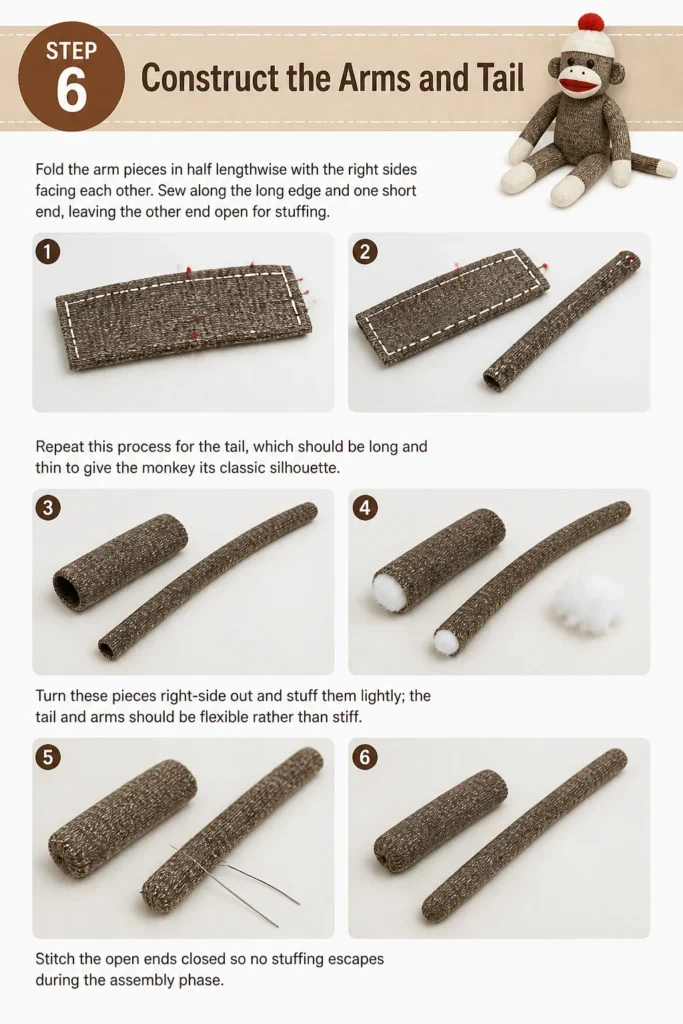
Sew along the long edge and one short end, leaving the other end open for stuffing.
Repeat this process for the tail, which should be long and thin to give the monkey its classic silhouette.
Turn these pieces right-side out and stuff them lightly; the tail and arms should be flexible rather than stiff.
Stitch the open ends closed so no stuffing escapes during the assembly phase.
Step 7: Create and Attach the Ears
Take the two semi-circle pieces you cut from the toe and sew around the curved edges while they are inside out.
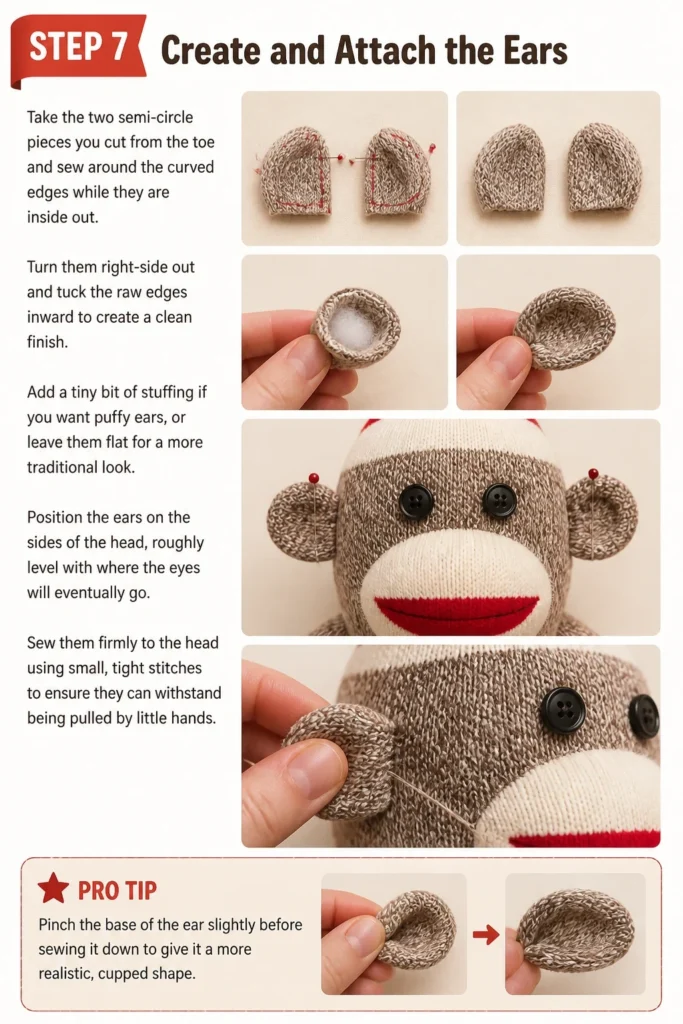
Turn them right-side out and tuck the raw edges inward to create a clean finish.
Add a tiny bit of stuffing if you want “puffy” ears, or leave them flat for a more traditional look.
Position the ears on the sides of the head, roughly level with where the eyes will eventually go.
Sew them firmly to the head using small, tight stitches to ensure they can withstand being pulled by little hands.
Pro Tip: Pinch the base of the ear slightly before sewing it down to give it a more realistic, cupped shape.
Step 8: Form the Iconic Muzzle
Take the white heel piece you set aside and fold the raw edges under by about a quarter of an inch.
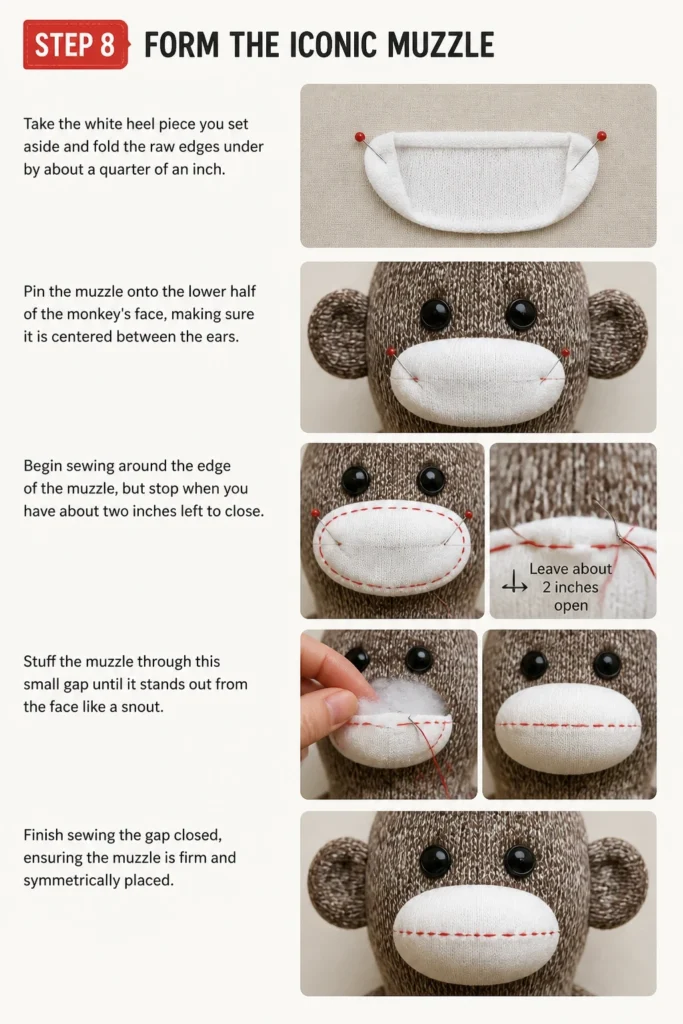
Pin the muzzle onto the lower half of the monkey’s face, making sure it is centered between the ears.
Begin sewing around the edge of the muzzle, but stop when you have about two inches left to close.
Stuff the muzzle through this small gap until it stands out from the face like a snout.
Finish sewing the gap closed, ensuring the muzzle is firm and symmetrically placed.
Step 9: Add the Face and Final Details
Select two buttons for the eyes and sew them onto the head just above the muzzle.
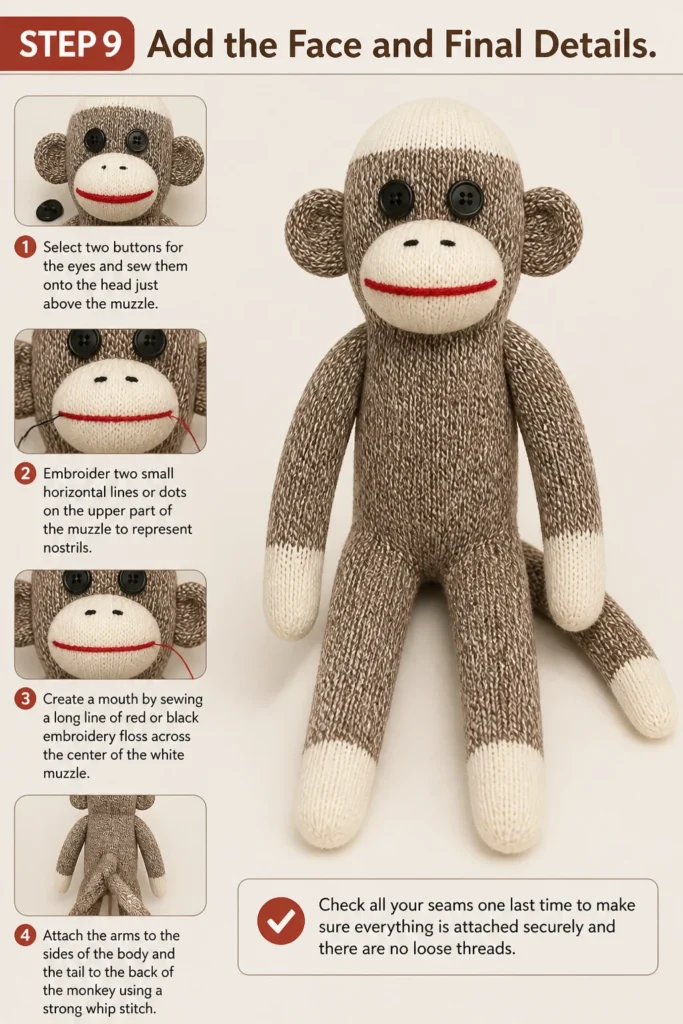
Embroider two small horizontal lines or “dots” on the upper part of the muzzle to represent nostrils.
Create a mouth by sewing a long line of red or black embroidery floss across the center of the white muzzle.
Attach the arms to the sides of the body and the tail to the back of the monkey using a strong whip stitch.
Check all your seams one last time to make sure everything is attached securely and there are no loose threads.
Common Mistakes to Avoid
Using Socks That Are Too Thin
If you choose dress socks or very thin cotton blends, the fabric will stretch significantly when you add stuffing. This often leads to a “transparent” look where the white polyester fill is visible through the fibers. It also makes the monkey prone to developing holes at the seams very quickly. Stick to thick, high-quality cotton or wool-blend socks for the best results.
Overstuffing the Limbs
It is tempting to pack as much stuffing as possible into the arms and tail to make them firm. However, overstuffed limbs tend to stick straight out and look awkward rather than floppy and cuddly. A sock monkey should have a certain level of flexibility so it can be posed or hugged comfortably. Aim for a “squishy” consistency in the limbs while keeping the head and torso firm.
Neglecting the Ladder Stitch
Many beginners use a standard whip stitch on the outside of the fabric when attaching the muzzle or closing the body. This leaves visible thread “loops” that look messy and unprofessional. Learning the ladder stitch (also known as the invisible stitch) allows you to join two pieces of fabric with the thread hidden inside the fold. This single technique is what separates a homemade-looking toy from a professional-quality craft.
Troubleshooting
The Monkey Has a Floppy Neck
A floppy neck usually happens when there is a gap in the stuffing between the head and the torso. To fix this without taking the whole thing apart, you can “massage” the stuffing from the body upward into the neck area. If that doesn’t work, you may need to open a small seam at the back of the neck and insert a small, dense “donut” of stuffing. This extra support will act as a collar and keep the head upright.
The Muzzle Looks Lopsided
Because the muzzle is a separate piece of fabric, it is easy for it to shift while you are sewing it onto the face. If you notice it looks crooked after you have finished, don’t panic. You can often use a needle to gently tug the stuffing inside the muzzle to redistribute the volume. If the actual stitching is crooked, it is best to carefully snip the threads and re-pin the muzzle before sewing it again.
Visible Thread Knots
If your thread knots are showing on the surface of the monkey, it can detract from the finished look. When starting a new thread, insert the needle about an inch away from where you want to start sewing. Bring the needle out at your starting point and pull until the knot “pops” through the fabric and hides inside the stuffing. This keeps the exterior of the toy clean and snag-free.
Key Takeaways
- Symmetry is vital when cutting your socks to ensure the monkey doesn’t look lopsided.
- Use the heel of the sock specifically for the muzzle and the buttocks to follow the traditional design.
- Small clumps of stuffing prevent the toy from looking lumpy and help you achieve a smooth finish.
- Invisible stitching techniques like the ladder stitch are essential for a professional appearance.
- Double-stitch the high-stress areas like the arms and tail to ensure the monkey lasts for years.
- Personalize your monkey with different button eyes, hats, or even a small felt heart inside.
Frequently Asked Questions
Can I make a sock monkey with a sewing machine?
Yes, you can use a sewing machine for the long straight seams of the legs, arms, and tail. However, the smaller parts like the ears, muzzle, and facial features must be done by hand. Using a machine for the initial construction can save you a lot of time and provide very strong seams. Just be sure to use a stretch needle if your socks have a lot of Lycra or elastic in them.
What is the best type of stuffing to use?
Polyester fiberfill is the standard choice because it is washable, hypoallergenic, and holds its shape well over time. Some crafters prefer to use wool batting for a heavier, more natural feel, though this can be more expensive. Avoid using cotton balls or fabric scraps, as these will clump up and make your monkey feel lumpy and uneven. If you want the monkey to have a “weighted” feel, you can add a small pouch of plastic pellets to the bottom.
How do I clean my sock monkey?
If you used buttons for eyes, it is best to spot clean the monkey with a damp cloth and mild soap. If the monkey is made entirely of fabric and embroidery, you can place it inside a pillowcase and wash it on a gentle cycle. Always air dry the monkey rather than putting it in the dryer, as high heat can damage the polyester stuffing and cause the socks to pill. Reshape the monkey by hand while it is still damp to ensure it dries in the correct position.
Do I have to use the Red Heel socks?
While the Red Heel socks are the traditional choice, you can make a sock monkey out of almost any crew-length sock. Brightly colored striped socks make for very whimsical and modern monkeys that kids often love. The only requirement is that the sock has a heel; “tube socks” without a defined heel area will not produce the classic muzzle or bottom shape. Experimenting with different textures like chenille or fuzzy socks can also create very unique results.
Our Top Recommended Finds
- Fox River Red Heel Socks: These are the authentic socks used for over a century to create the original sock monkey.
- Poly-Fil Premium Fiber Fill: This stuffing is known for its “resilience,” meaning it won’t bunch up or go flat after years of hugs.
- DMC Embroidery Floss: A high-quality thread that won’t fade or bleed when washed, perfect for the mouth and nose details.
Bring Your New Friend To Life
Now that you have the blueprint, it is time to gather your materials and start stitching.
Once you master the basic monkey, you can try making different animals like sock elephants, owls, or even dragons using similar techniques.
Set aside a quiet afternoon, put on your favorite podcast, and enjoy the meditative process of creating something by hand today.
Beginner-friendly templates, step-by-step guides,
and weekly project ideas in your inbox.