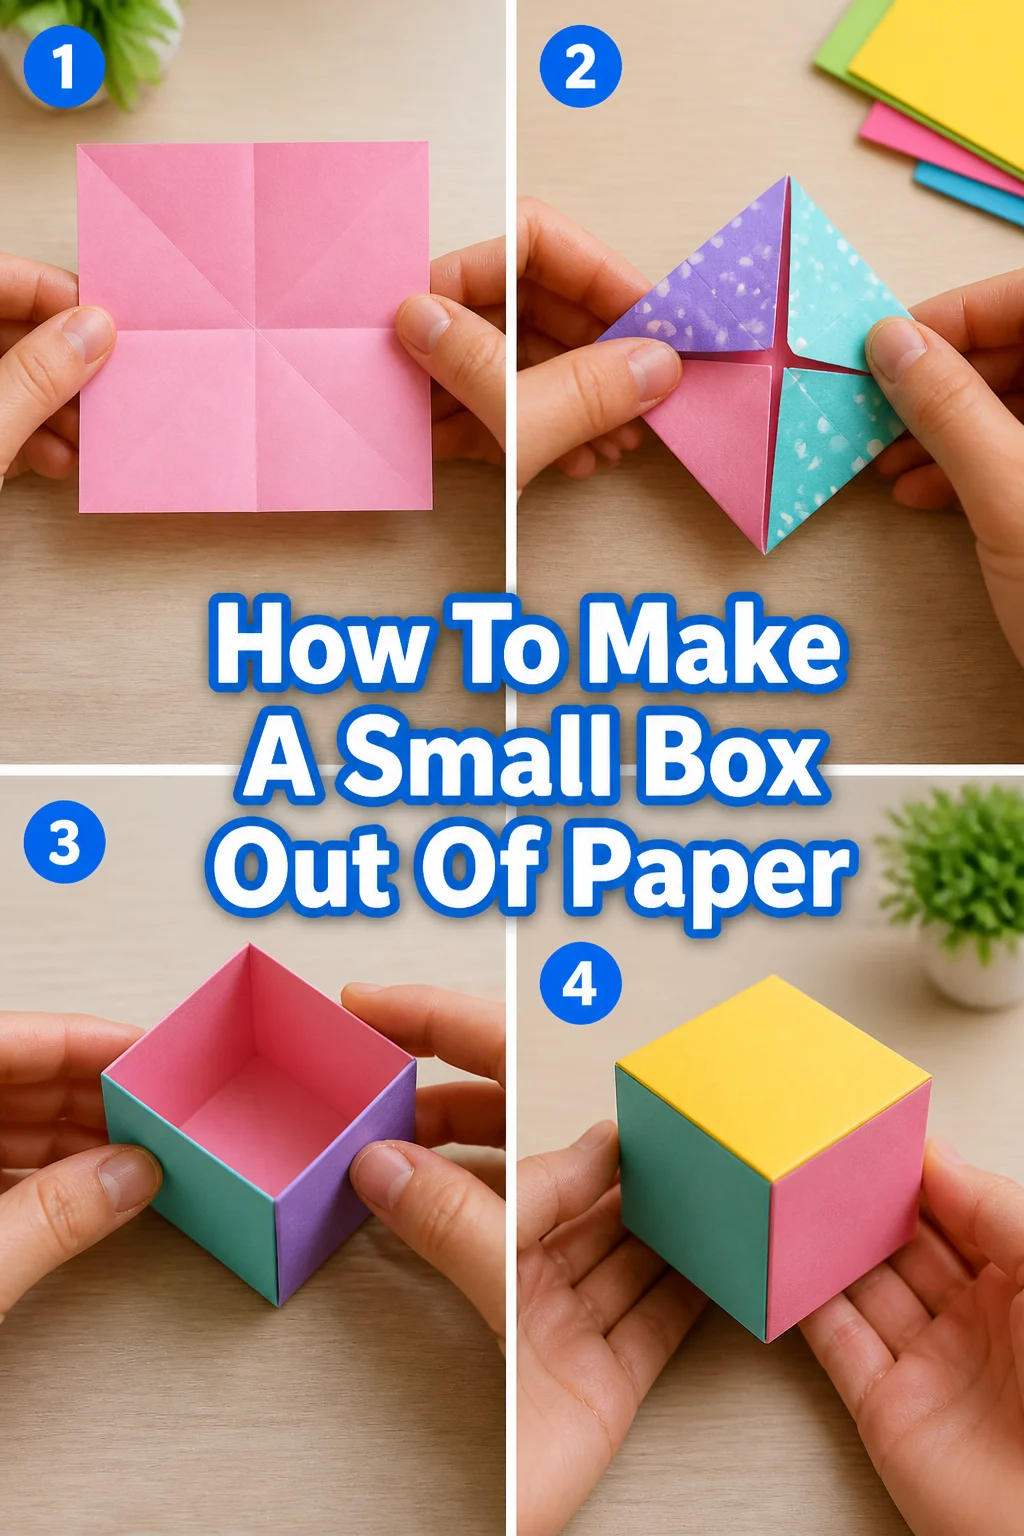
📦 How To Make A Small Box Out Of Paper

Beginner-friendly templates, step-by-step guides,
and weekly project ideas in your inbox.
I remember my first paper box, a tiny creation for a special gift.
This guide stems from years of crafting, ensuring you get clear, practical advice.
You’re about to discover the simple joy of creating something useful from a single sheet.

Quick Overview
In this guide, you’ll learn to construct a charming small paper box, perfect for organizing tiny treasures or presenting a thoughtful gift. We’ll walk through each fold and cut with precision.
- Time needed: 15-30 minutes
- Difficulty: Beginner
- What you’ll need: A sheet of paper, scissors, a ruler, a pencil, and a glue stick (optional).
Step-by-Step Instructions
Step 1: Prepare Your Paper
Choose a piece of paper that suits your vision. Standard printer paper works well for practice, but cardstock offers more durability.
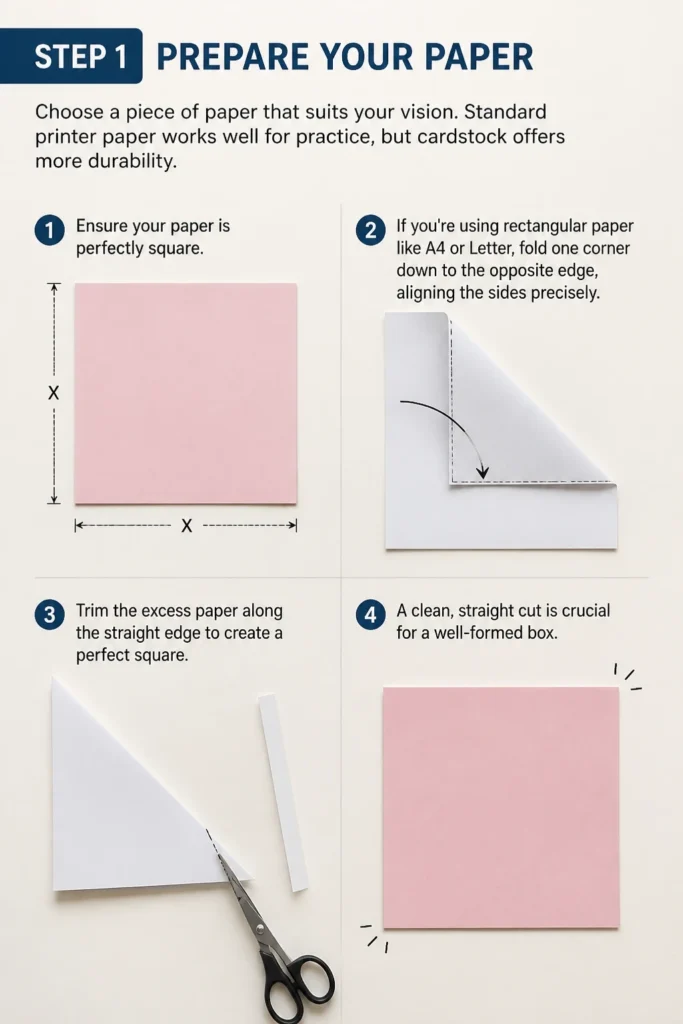
Ensure your paper is perfectly square. If you’re using rectangular paper like A4 or Letter, fold one corner down to the opposite edge, aligning the sides precisely.
Trim the excess paper along the straight edge to create a perfect square. A clean, straight cut is crucial for a well-formed box.
Step 2: Create Your Initial Folds
Place your square paper flat on your workspace, pattern side down if it has one. This ensures the pattern appears on the outside of your finished box.
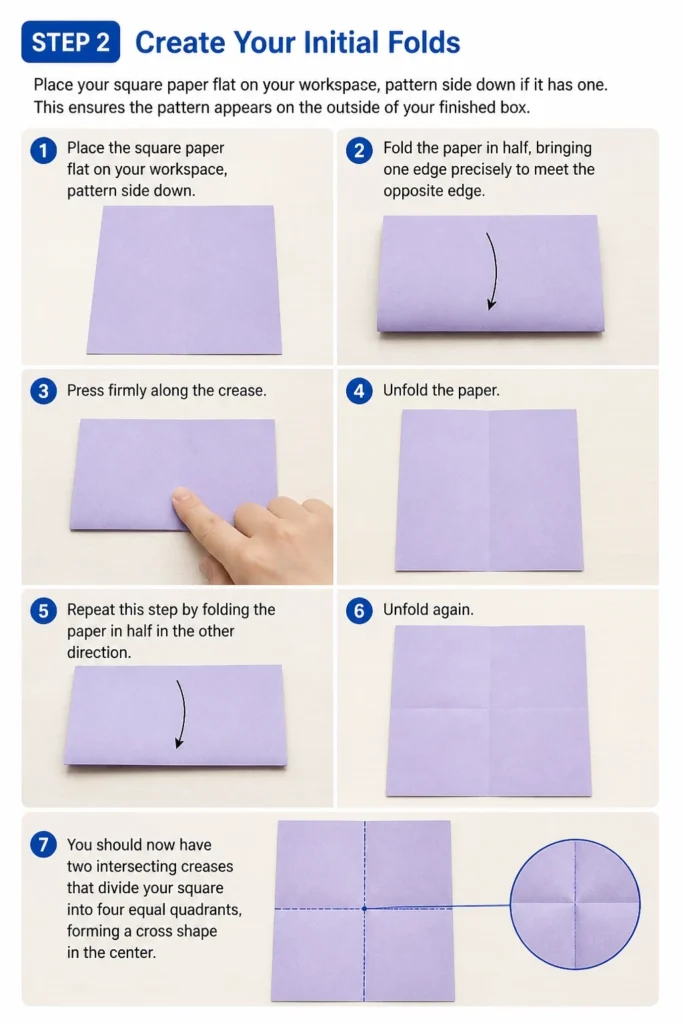
Fold the paper in half, bringing one edge precisely to meet the opposite edge. Press firmly along the crease.
Unfold the paper. Then, repeat this step by folding the paper in half in the other direction, creating a perpendicular crease.
Unfold again. You should now have two intersecting creases that divide your square into four equal quadrants, forming a cross shape in the center.
Step 3: Fold Corners to the Center
Bring each of the four corners of your square paper towards the exact center point where your two creases intersect.
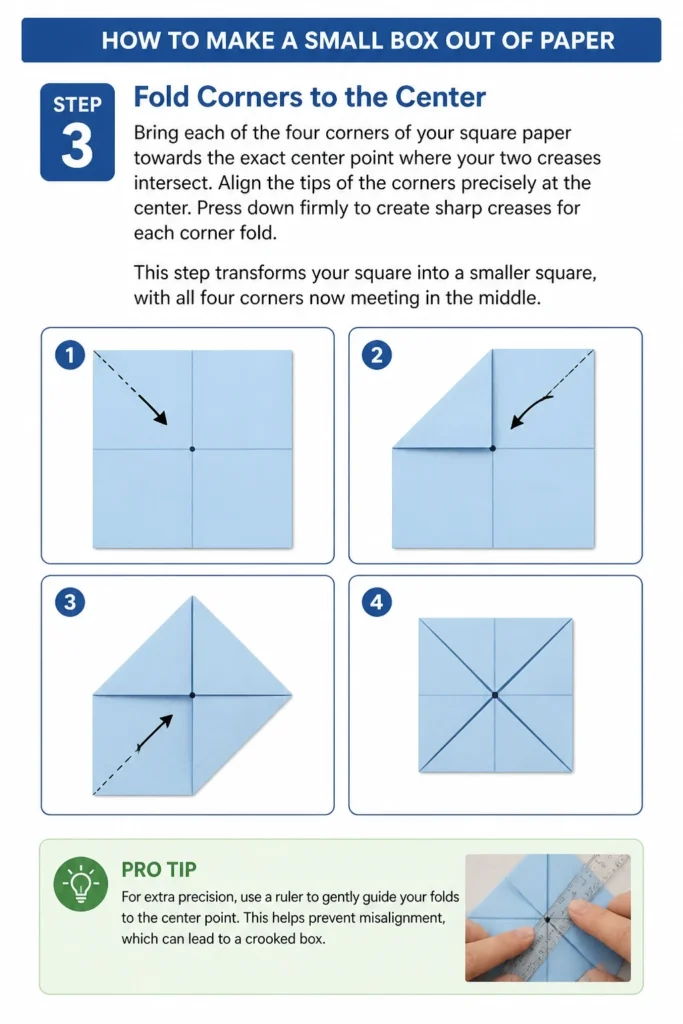
Align the tips of the corners precisely at the center. Press down firmly to create sharp creases for each corner fold.
This step transforms your square into a smaller square, with all four corners now meeting in the middle.
Pro Tip: For extra precision, use a ruler to gently guide your folds to the center point. This helps prevent misalignment, which can lead to a crooked box.
Step 4: Fold Edges to the Center
Take the bottom edge of your newly folded square and bring it up to meet the center crease line.
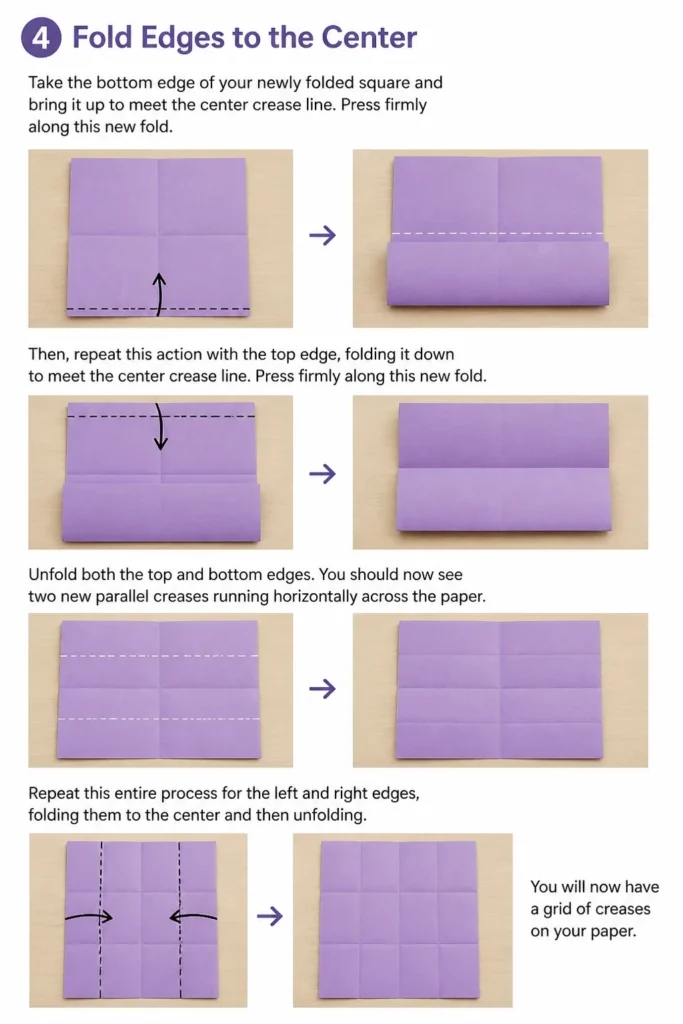
Press firmly along this new fold. Then, repeat this action with the top edge, folding it down to meet the center crease line.
Unfold both the top and bottom edges. You should now see two new parallel creases running horizontally across the paper.
Repeat this entire process for the left and right edges, folding them to the center and then unfolding. You will now have a grid of creases on your paper.
Step 5: Make Strategic Cuts
Orient your paper so that one of the long, unfolded edges is facing you. You will notice four small squares in each corner of your paper, defined by the creases.
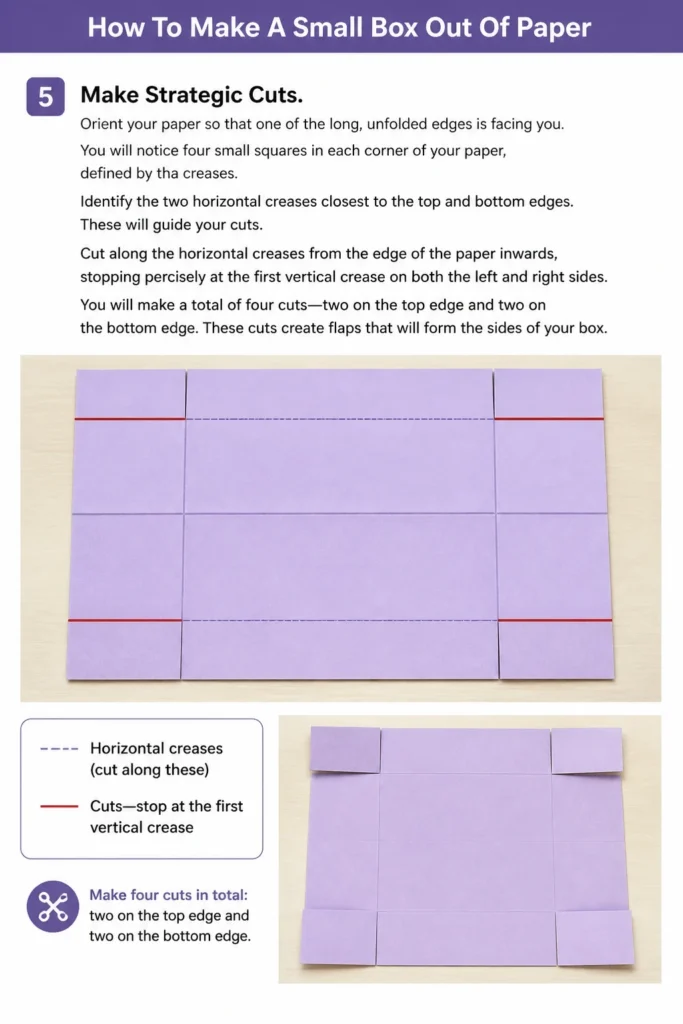
Identify the two horizontal creases closest to the top and bottom edges. These will guide your cuts.
Cut along the horizontal creases from the edge of the paper inwards, stopping precisely at the first vertical crease on both the left and right sides.
You will make a total of four cuts: two on the top edge and two on the bottom edge. These cuts create flaps that will form the sides of your box.
Step 6: Form the Side Walls
Unfold the two outermost sections of your paper, which are now defined by the cuts you just made.
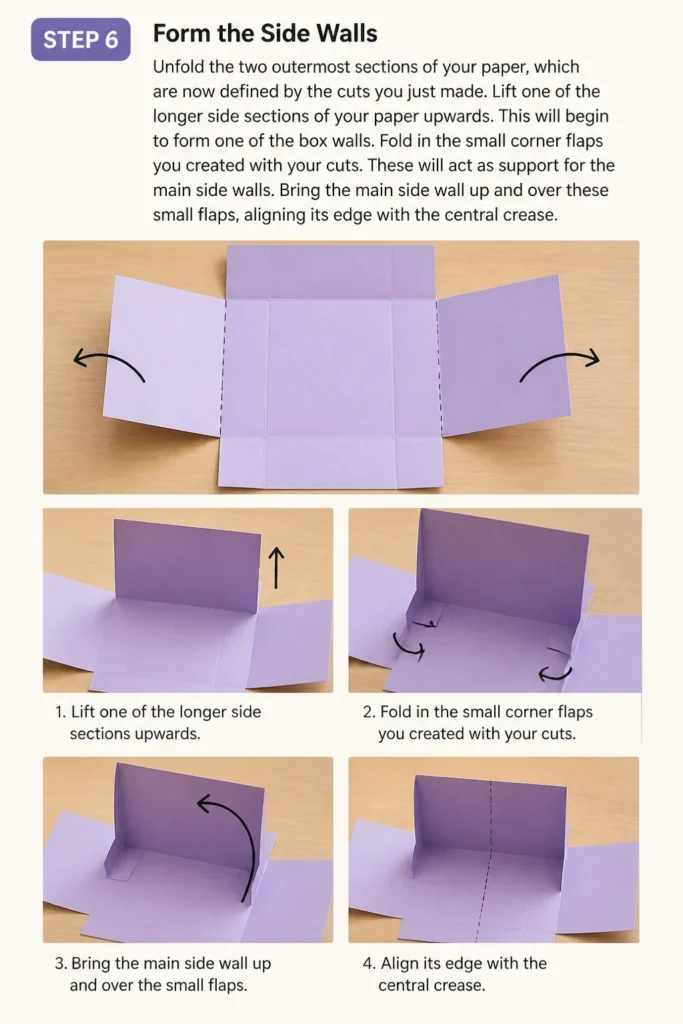
Lift one of the longer side sections of your paper upwards. This will begin to form one of the box walls.
Fold in the small corner flaps you created with your cuts. These will act as support for the main side walls.
Bring the main side wall up and over these small flaps, aligning its edge with the central crease.
Step 7: Secure the Box Structure
Carefully fold the remaining side walls upwards. The small corner flaps should now be tucked inside, supporting the main walls.
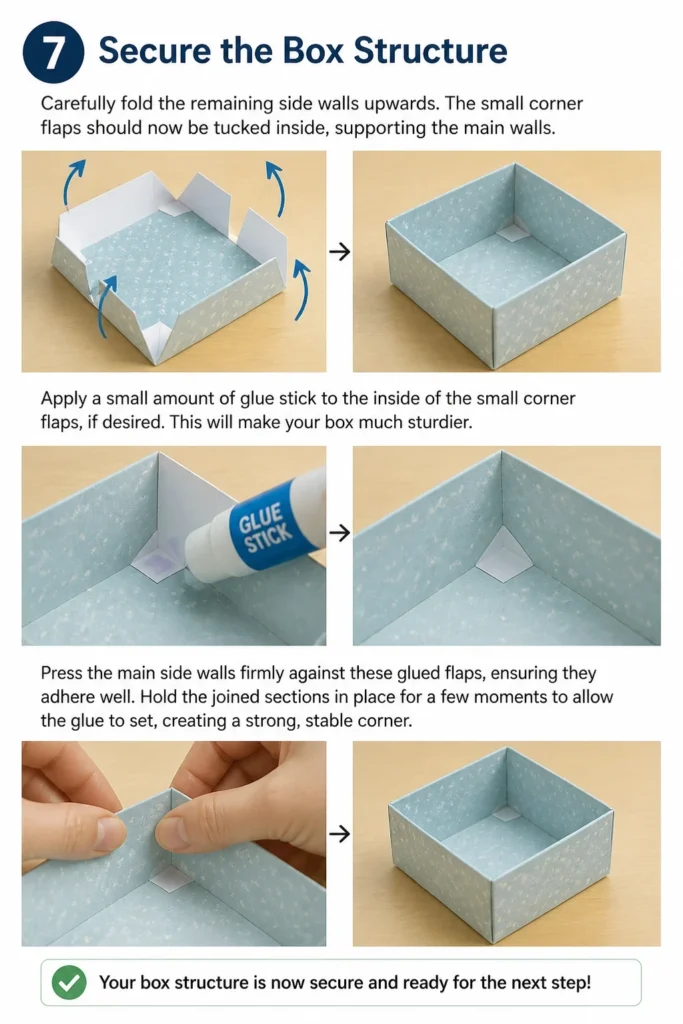
Apply a small amount of glue stick to the inside of the small corner flaps, if desired. This will make your box much sturdier.
Press the main side walls firmly against these glued flaps, ensuring they adhere well.
Hold the joined sections in place for a few moments to allow the glue to set, creating a strong, stable corner.
Step 8: Refine and Finish
Gently adjust any folds or creases to ensure they are crisp and straight. A well-creased box looks much more professional.
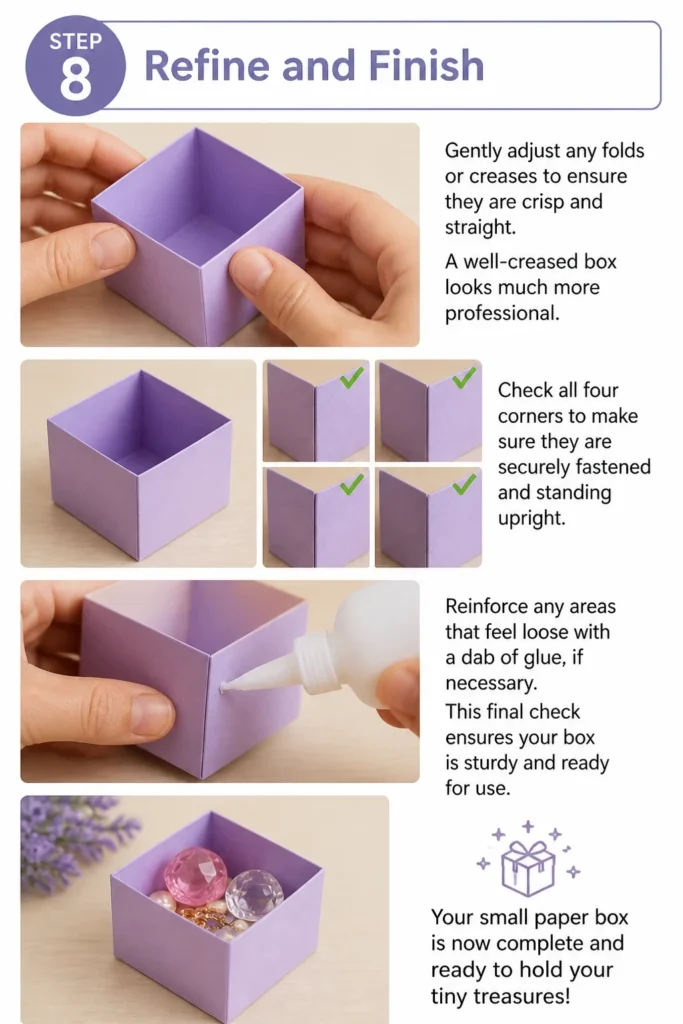
Check all four corners to make sure they are securely fastened and standing upright.
Reinforce any areas that feel loose with a dab of glue, if necessary. This final check ensures your box is sturdy and ready for use.
Your small paper box is now complete and ready to hold your tiny treasures!
Common Mistakes to Avoid
Inaccurate Initial Square
Starting with a square that isn’t perfectly square is a common pitfall. Even a slight deviation will compound with each fold, leading to a lopsided or ill-fitting box.
Always take the extra moment to measure and cut your initial paper with precision. Using a ruler and a sharp pair of scissors helps immensely here.
Unsharp Creases
Failing to press down firmly on your folds results in soft, rounded edges rather than crisp lines. This makes the box look sloppy and less defined.
Use your fingernail, a bone folder, or the edge of a ruler to really “burnish” each crease. Sharp creases are the backbone of a well-made paper box.
Misaligned Folds
When folding edges or corners to the center, it’s easy for them to drift slightly off course. Even a millimeter can throw off the symmetry of the final box.
Slow down and align edges perfectly before pressing your fold. If you notice a misalignment, unfold gently and try again, rather than forcing it.
Rushing the Cuts
Making quick, imprecise cuts can lead to uneven flaps or cuts that go too far. This compromises the structural integrity of your box’s sides.
Mark your cut lines lightly with a pencil first, then cut slowly and carefully along those lines. Precision here saves a lot of frustration later.
Troubleshooting
Box Sides Don’t Stand Up Straight
If your box sides are floppy or collapse easily, it’s likely due to unsharp creases or insufficient securing of the corner flaps.
Go back and re-crease all folds firmly. If you’re using glue, ensure you’ve applied enough to the corner flaps and held them in place until the glue sets completely.
Corners Don’t Meet Neatly
When the corners of your box look gappy or overlap, it usually points to initial misalignments in your folds, particularly when bringing the edges to the center.
Check your initial square and the accuracy of your first cross folds. Sometimes, starting over with a fresh, perfectly square sheet can resolve this issue quickly.
Box Looks Lopsided
A lopsided box is almost always a symptom of an imperfect initial square or inconsistent folding throughout the process.
Ensure your starting paper is truly square. Then, make sure each subsequent fold is symmetrical and aligns perfectly with its counterpart on the opposite side of the paper.
Key Takeaways
- Precision in your initial square cut is fundamental for a well-formed box.
- Sharp, firm creases are essential for structural integrity and a clean appearance.
- Take your time with each fold, aligning edges and corners meticulously.
- Strategic cuts create the necessary flaps for assembling the box walls.
- Securing the corner flaps with glue adds significant durability and stability.
- Practice improves your technique, leading to more professional-looking results.
Frequently Asked Questions
What kind of paper is best for making a small box?
While standard printer paper works for practice, cardstock (65-80 lb) or scrapbook paper offers better durability and a more polished finish. Thicker paper holds its shape better and is less prone to tearing.
Can I make this box without glue?
Yes, you can. Many origami boxes are designed to be entirely self-supporting through clever folding. For this specific cut-and-fold method, glue provides significant stability, but a careful folder can achieve a reasonable box without it, especially if the paper is thicker.
How can I make a lid for this box?
To make a lid, follow the exact same steps, but start with a piece of paper that is slightly larger (e.g., 1/8 to 1/4 inch larger on each side) than the paper you used for the base. This slight size difference allows the lid to fit snugly over the box.
What are some ways to decorate my paper box?
You can decorate your box in countless ways! Consider using patterned paper, stamping designs, adding stickers, drawing with markers, or gluing on embellishments like ribbons, beads, or glitter. Decorate the paper before folding for easier application.
Our Top Recommended Finds
- Quality Cardstock Pack: Provides sturdy paper in various colors, perfect for durable and attractive boxes.
- Precision Craft Scissors: Sharp, comfortable scissors make clean, straight cuts much easier and more accurate.
- Bone Folder or Creasing Tool: Helps create incredibly crisp folds without damaging your paper, essential for professional results.
Unfold Your Creativity
You’ve just crafted your very own small paper box, a testament to simple materials and a little patience.
This skill opens doors to countless projects, from personalized gift packaging to desk organizers.
Now that you’ve mastered the basics, why not experiment with different paper sizes, patterns, or even try making a matching lid? The world of paper crafting awaits your next creation.
Beginner-friendly templates, step-by-step guides,
and weekly project ideas in your inbox.