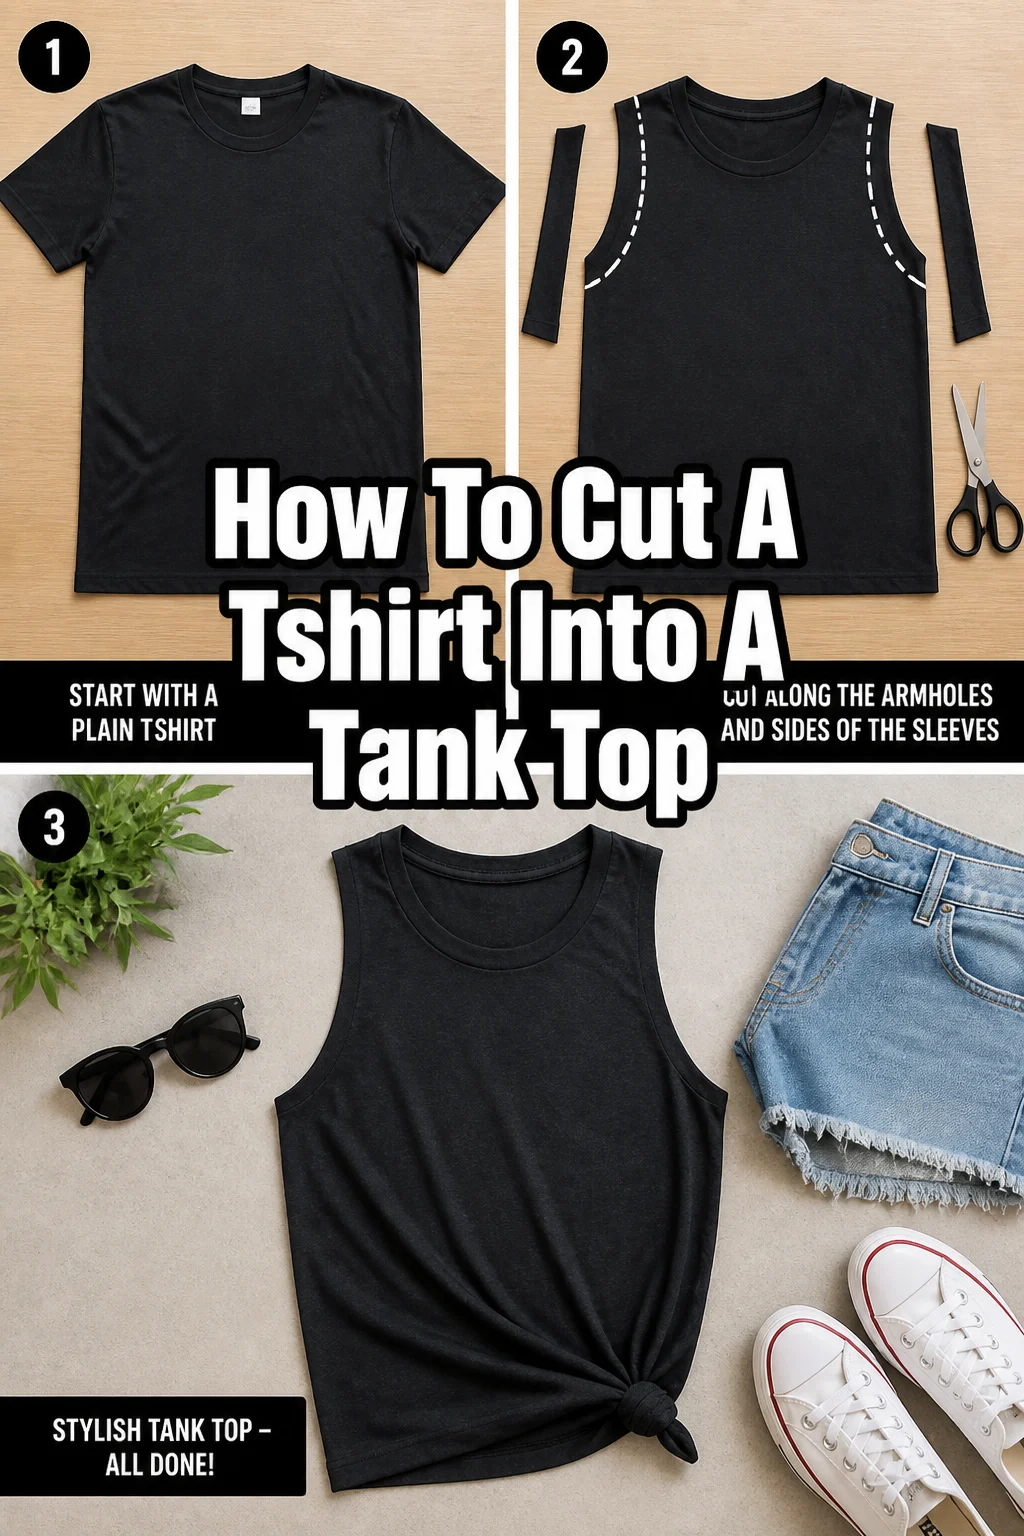
👕 How To Cut A Tshirt Into A Tank Top

Beginner-friendly templates, step-by-step guides,
and weekly project ideas in your inbox.
Do you have an old t-shirt you love but rarely wear? Maybe it’s a favorite band tee or a shirt with a cool graphic that just doesn’t fit right anymore. Transforming it into a custom tank top is a fantastic way to give it new life.
I’ve personally revived many beloved tees this way, turning them into comfy, unique tanks perfect for summer or layering. This guide will walk you through each step, ensuring a great result you’ll be proud to wear.

Quick Overview
This project is a simple yet rewarding way to upcycle your wardrobe. You’ll end up with a custom-fit tank top, perfect for casual wear or as a workout top.
- Time needed: 30-60 minutes
- Difficulty: Beginner
- What you’ll need: An old t-shirt, sharp fabric scissors, a ruler or measuring tape, fabric chalk or a washable marker, a tank top you like the fit of (for a guide), and optional pins.
Step-by-Step Instructions
Transforming your t-shirt is a straightforward process when you follow these steps carefully. Take your time, and you’ll love the outcome.
Step 1: Gather Your Supplies
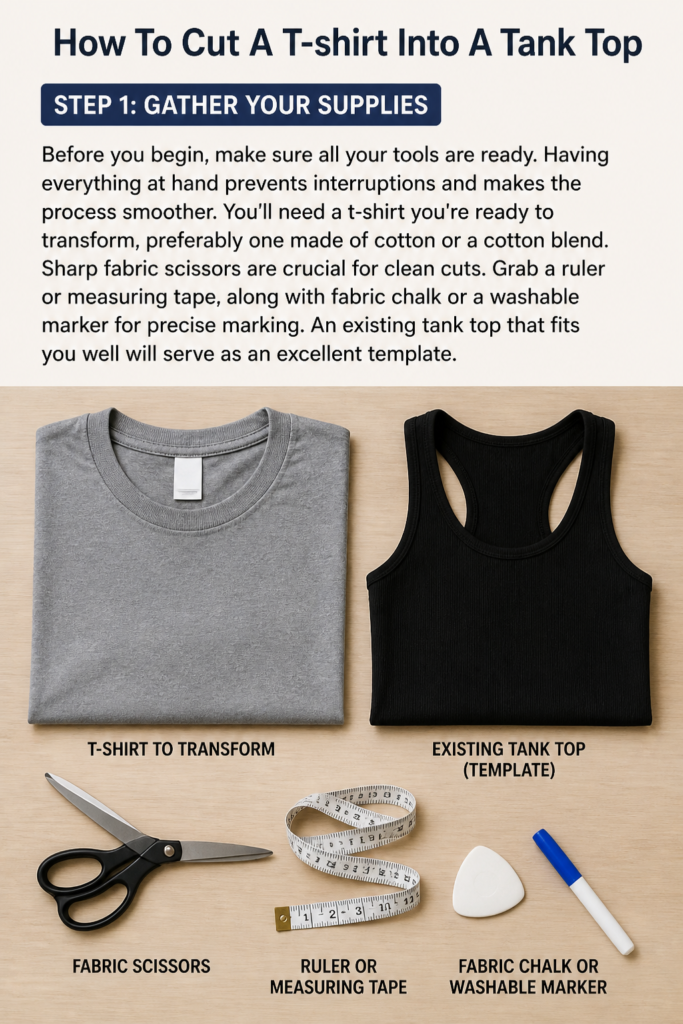
Before you begin, make sure all your tools are ready. Having everything at hand prevents interruptions and makes the process smoother.
You’ll need a t-shirt you’re ready to transform, preferably one made of cotton or a cotton blend. Sharp fabric scissors are crucial for clean cuts.
Grab a ruler or measuring tape, along with fabric chalk or a washable marker for precise marking. An existing tank top that fits you well will serve as an excellent template.
Step 2: Prepare Your T-Shirt
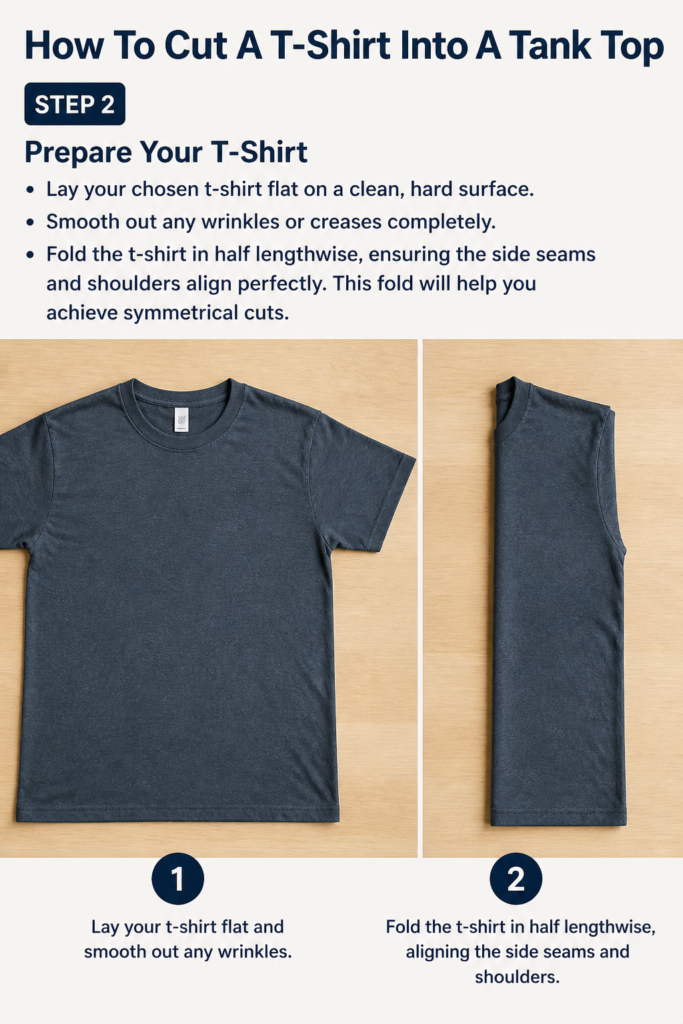
Lay your chosen t-shirt flat on a clean, hard surface. Smooth out any wrinkles or creases completely.
Fold the t-shirt in half lengthwise, ensuring the side seams and shoulders align perfectly. This fold will help you achieve symmetrical cuts.
Step 3: Define the Neckline
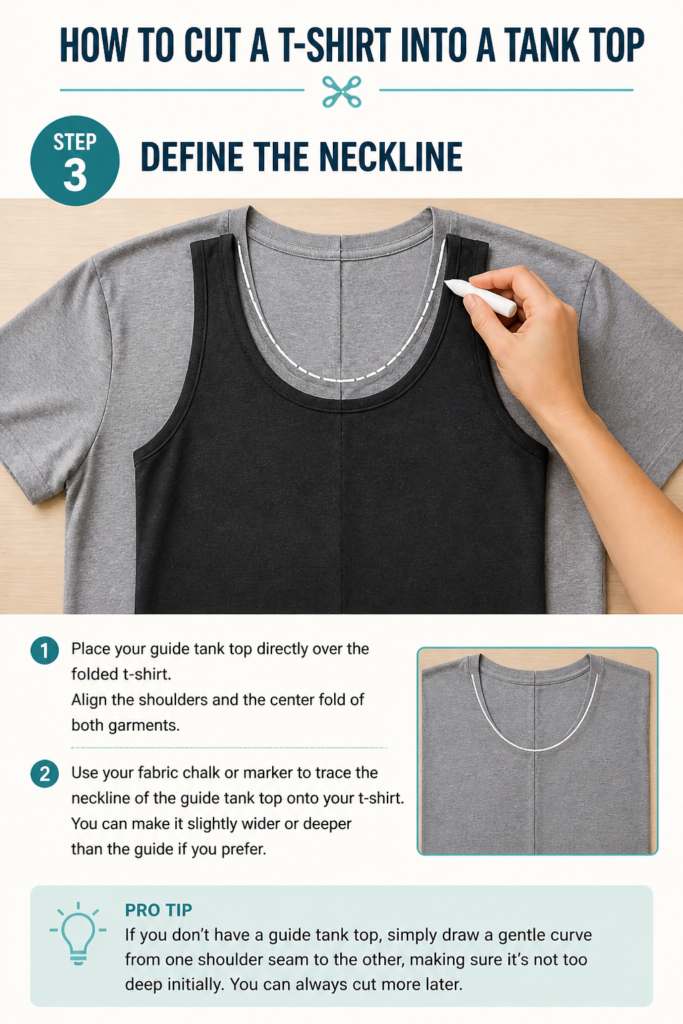
Place your guide tank top directly over the folded t-shirt. Align the shoulders and the center fold of both garments.
Use your fabric chalk or marker to trace the neckline of the guide tank top onto your t-shirt. You can make it slightly wider or deeper than the guide if you prefer.
Pro Tip: If you don’t have a guide tank top, simply draw a gentle curve from one shoulder seam to the other, making sure it’s not too deep initially. You can always cut more later.
Step 4: Mark the Armholes
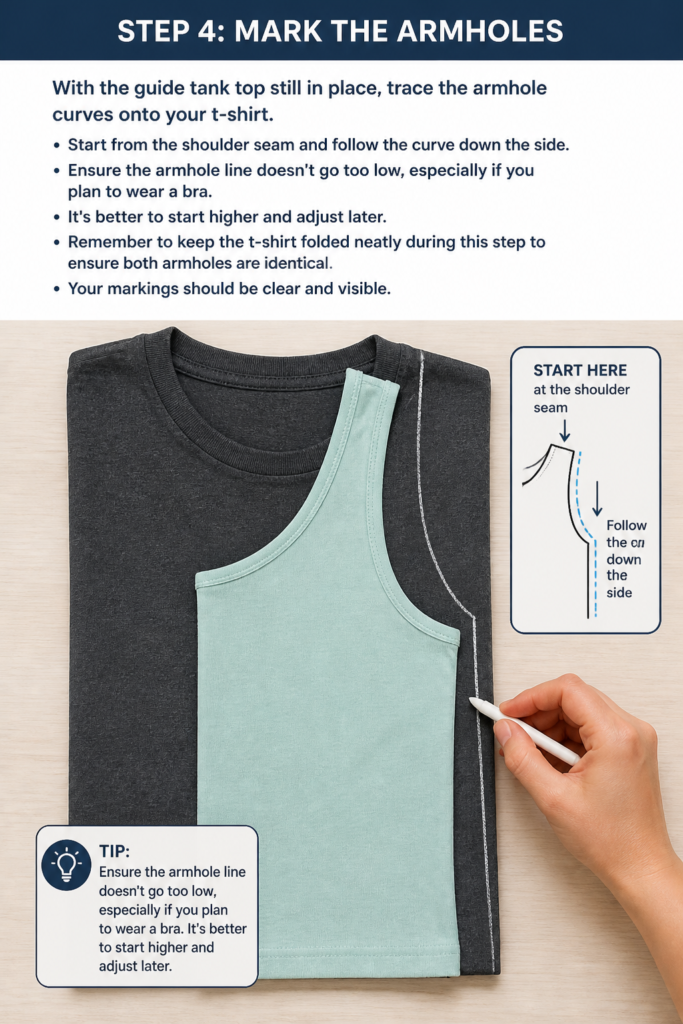
With the guide tank top still in place, trace the armhole curves onto your t-shirt. Start from the shoulder seam and follow the curve down the side.
Ensure the armhole line doesn’t go too low, especially if you plan to wear a bra. It’s better to start higher and adjust later.
Remember to keep the t-shirt folded neatly during this step to ensure both armholes are identical. Your markings should be clear and visible.
Step 5: Cut the Neckline
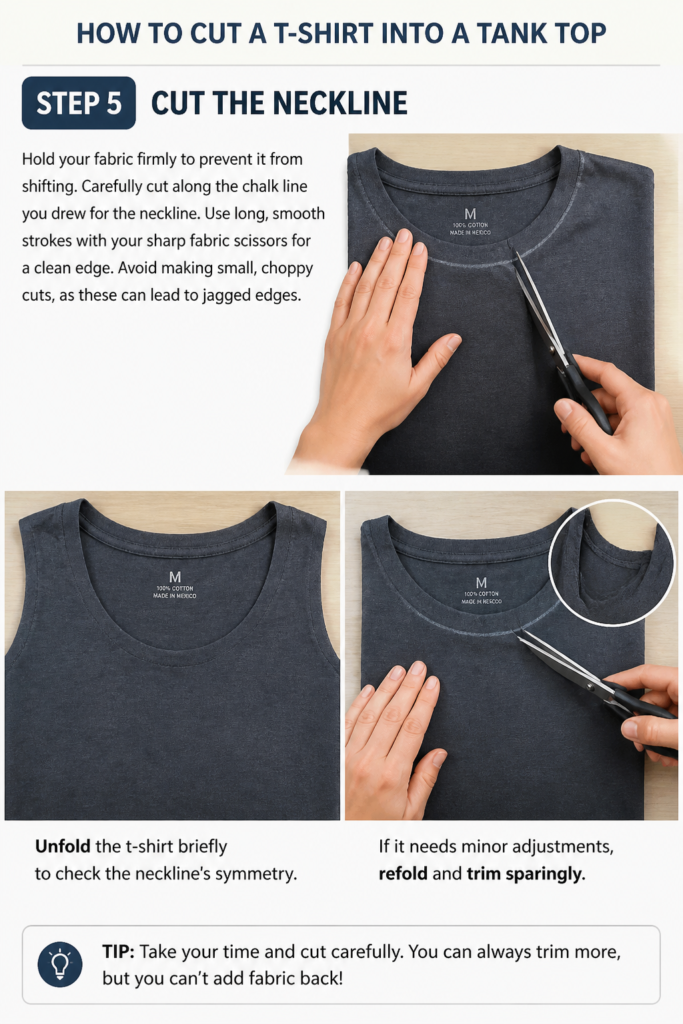
Hold your fabric firmly to prevent it from shifting. Carefully cut along the chalk line you drew for the neckline.
Use long, smooth strokes with your sharp fabric scissors for a clean edge. Avoid making small, choppy cuts, as these can lead to jagged edges.
Unfold the t-shirt briefly to check the neckline’s symmetry. If it needs minor adjustments, refold and trim sparingly.
Step 6: Cut the Armholes
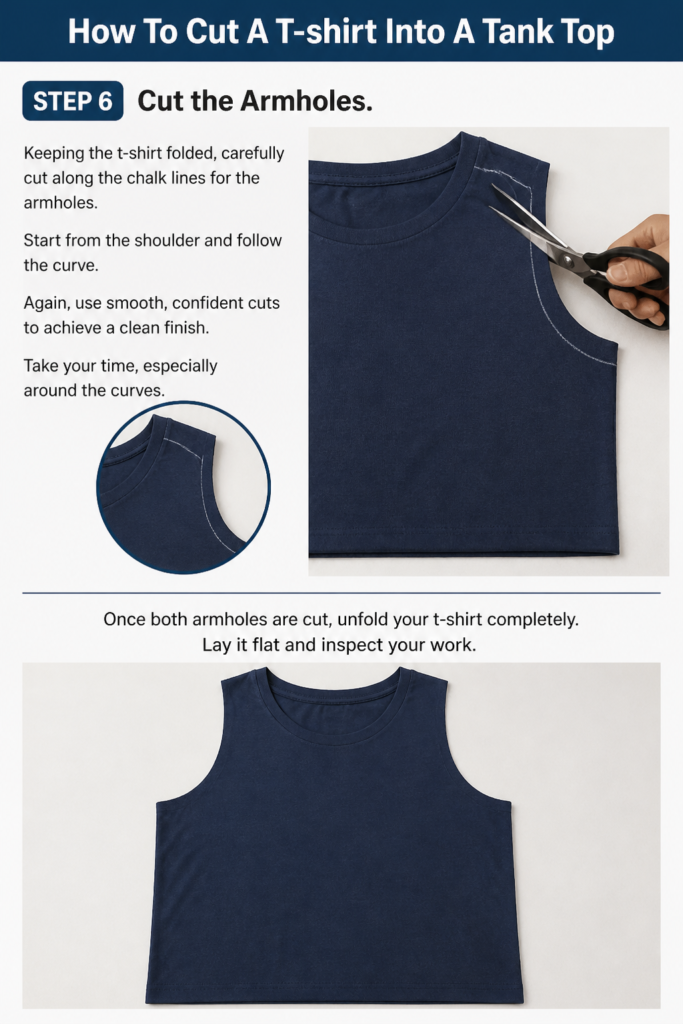
Keeping the t-shirt folded, carefully cut along the chalk lines for the armholes. Start from the shoulder and follow the curve.
Again, use smooth, confident cuts to achieve a clean finish. Take your time, especially around the curves.
Once both armholes are cut, unfold your t-shirt completely. Lay it flat and inspect your work.
Step 7: Refine Edges and Adjust
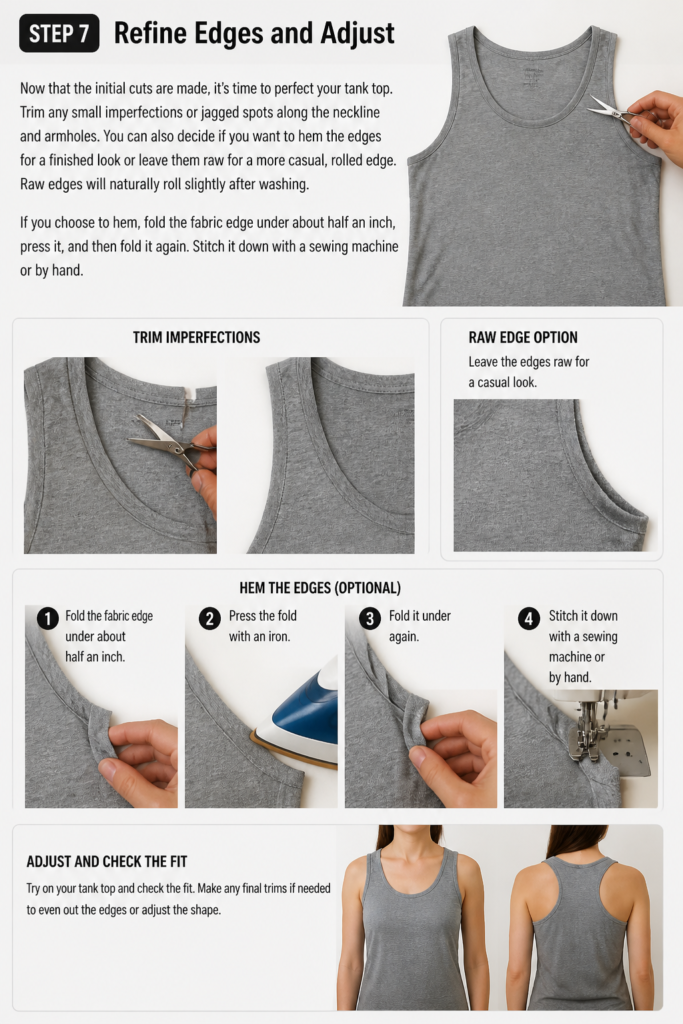
Now that the initial cuts are made, it’s time to perfect your tank top. Trim any small imperfections or jagged spots along the neckline and armholes.
You can also decide if you want to hem the edges for a finished look or leave them raw for a more casual, rolled edge. Raw edges will naturally roll slightly after washing.
If you choose to hem, fold the fabric edge under about half an inch, press it, and then fold it again. Stitch it down with a sewing machine or by hand.
Step 8: Try On and Finalize
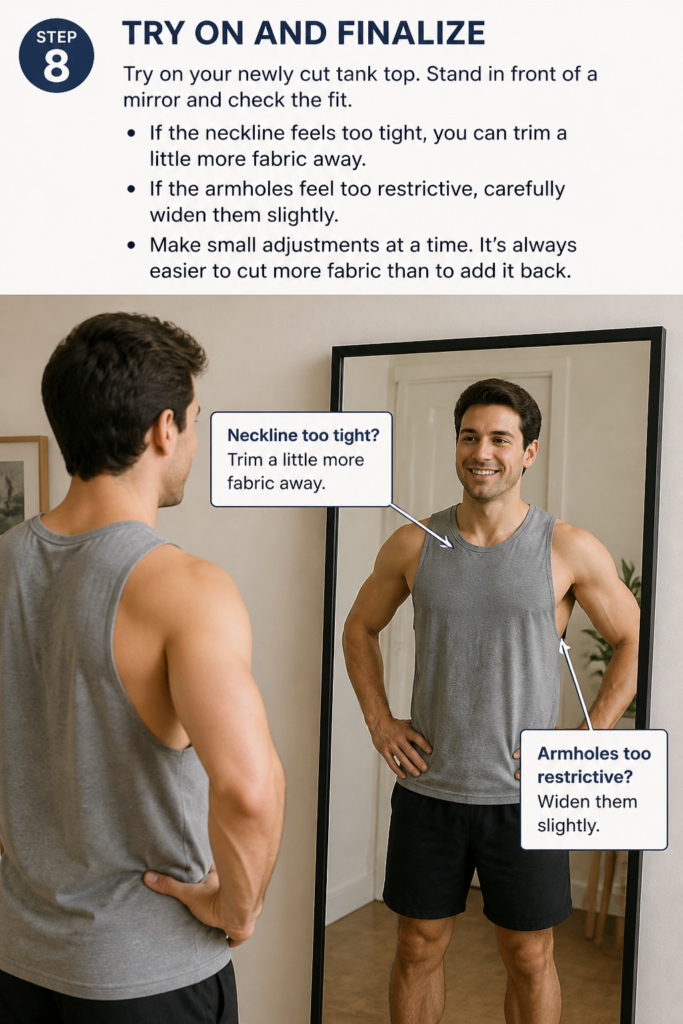
Try on your newly cut tank top. Stand in front of a mirror and check the fit.
If the neckline feels too tight, you can trim a little more fabric away. If the armholes feel too restrictive, carefully widen them slightly.
Make small adjustments at a time. It’s always easier to cut more fabric than to add it back.
Common Mistakes to Avoid
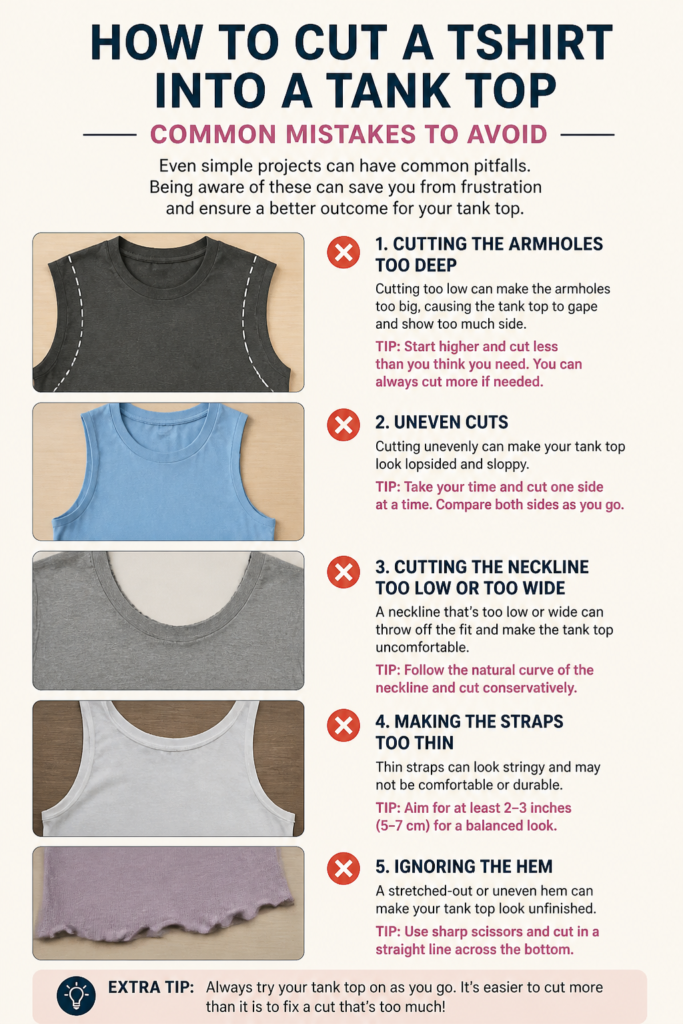
Even simple projects can have common pitfalls. Being aware of these can save you from frustration and ensure a better outcome for your tank top.
Cutting Too Much Too Soon
Many people get excited and cut too much fabric off the neckline or armholes right away. This often results in a tank top that’s too revealing or doesn’t fit well.
Always start with conservative cuts. You can always remove more fabric, but you can’t put it back once it’s cut. Make small adjustments and try the shirt on frequently.
Uneven Cuts and Jagged Edges
Rushing through the cutting process or using dull scissors can lead to wobbly, uneven lines. This makes the tank top look unprofessional.
Use sharp fabric scissors and take your time. Cut with long, smooth strokes rather than short, choppy ones. Mark your lines clearly with chalk before cutting.
Not Using a Guide or Marking First
Eyeballing cuts without any guide or markings is a recipe for disaster. You’ll likely end up with asymmetrical armholes or a crooked neckline.
Always use a guide tank top if possible, and mark your cutting lines with fabric chalk or a washable marker. This provides a clear path for your scissors and ensures symmetry.
Ignoring Fabric Stretch
Different fabrics stretch differently. A stretchy jersey knit will behave differently than a stiffer cotton. Not accounting for this can lead to an ill-fitting tank.
Consider the fabric’s stretch when marking your cuts. For very stretchy fabrics, you might want to cut slightly smaller to ensure a snug fit, knowing it will give.
Troubleshooting
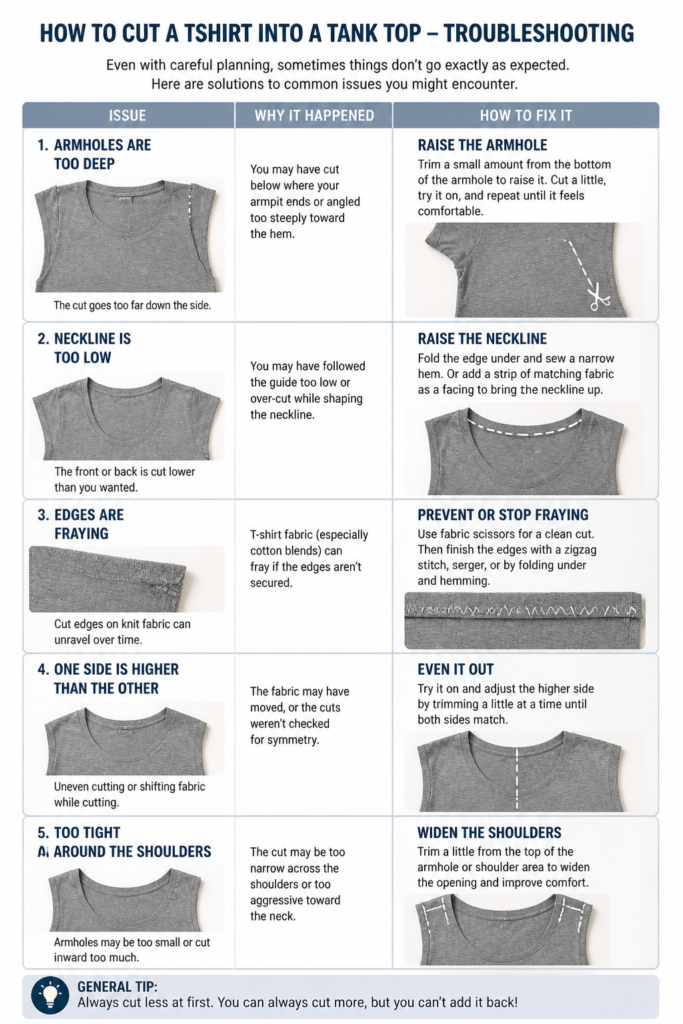
Even with careful planning, sometimes things don’t go exactly as expected. Here are solutions to common issues you might encounter.
Uneven Edges After Cutting
If your neckline or armholes look a bit wobbly or uneven after the initial cut, don’t panic. This is a common issue, especially for beginners.
Lay the tank top flat again, fold it in half, and carefully trim away any small bumps or irregularities. Use your sharp scissors to smooth out the lines, taking off only tiny bits at a time.
Armholes Feel Too Tight or Restrictive
If you’ve tried on your tank top and the armholes feel uncomfortably snug, they can be adjusted. This often happens if you’ve traced too closely to the original t-shirt armpit.
Carefully trim a small, even amount from the bottom curve of each armhole. Try it on again after each small trim until it feels comfortable. Remember to keep the cuts symmetrical.
Neckline is Too Wide or Too Deep
If your neckline ended up wider or deeper than you intended, it can be disappointing. While you can’t add fabric back, you can make a stylistic adjustment.
Consider adding a decorative element like a gathered elastic casing around the neckline to bring it in slightly. Alternatively, embrace the wider opening and layer a contrasting tank top underneath for a stylish look.
Key Takeaways
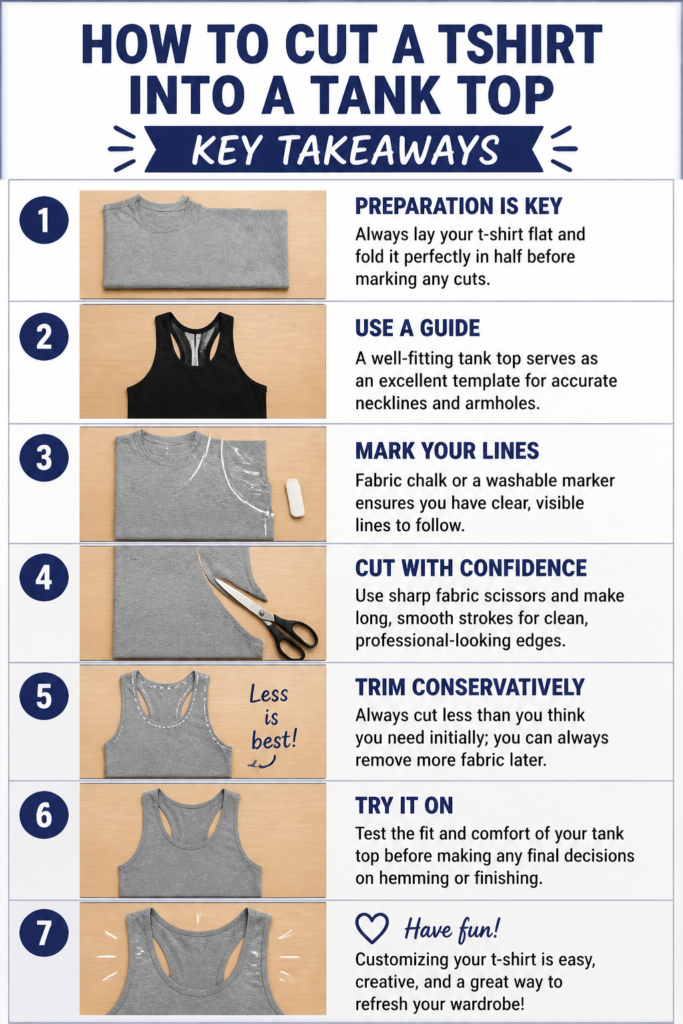
Creating your own tank top from a t-shirt is a fun and practical project. Keep these main points in mind for the best results.
- Preparation is key: Always lay your t-shirt flat and fold it perfectly in half before marking any cuts.
- Use a guide: A well-fitting tank top serves as an excellent template for accurate necklines and armholes.
- Mark your lines: Fabric chalk or a washable marker ensures you have clear, visible lines to follow.
- Cut with confidence: Use sharp fabric scissors and make long, smooth strokes for clean, professional-looking edges.
- Trim conservatively: Always cut less than you think you need initially; you can always remove more fabric later.
- Try it on: Test the fit and comfort of your tank top before making any final decisions on hemming or finishing.
Frequently Asked Questions
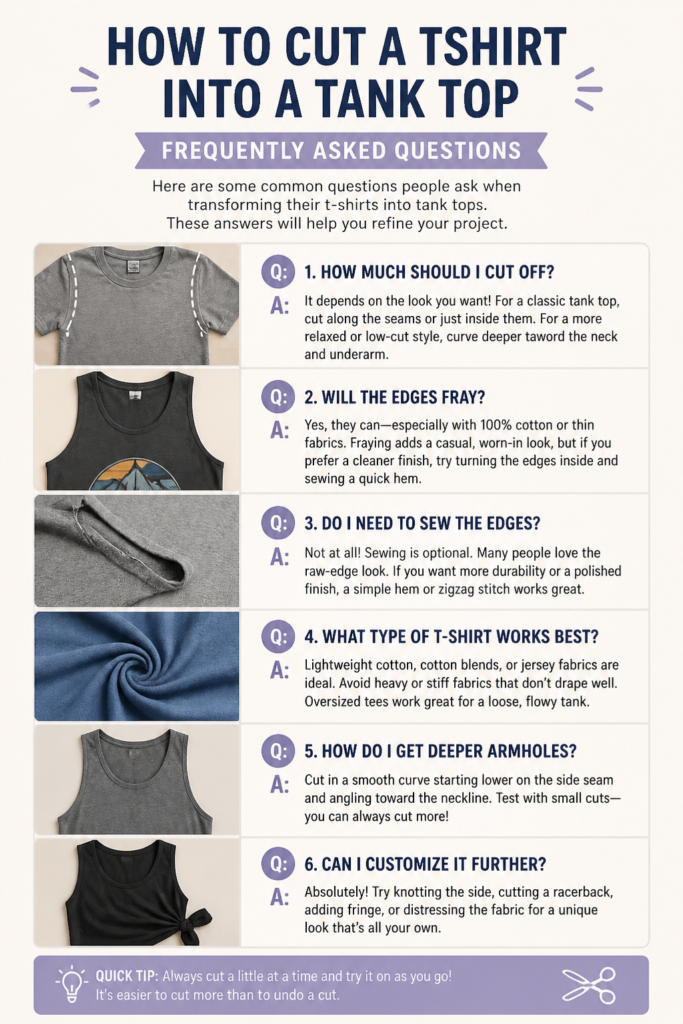
Here are some common questions people ask when transforming their t-shirts into tank tops. These answers will help you refine your project.
Can I use any t-shirt for this project?
Most cotton or cotton-blend t-shirts work wonderfully for this project. Avoid very thin or delicate fabrics that might fray excessively or be difficult to cut cleanly. Stretchy knits are generally forgiving.
How do I prevent the cut edges from fraying?
If you leave the edges raw, some fraying is natural and can contribute to a distressed look. To prevent excessive fraying, you can hem the edges by folding them under twice and stitching them down. Alternatively, a serger machine can create a professional finish.
Can I hem the edges without a sewing machine?
Yes, you absolutely can! You can hand-stitch a simple hem using a needle and thread. Alternatively, for a no-sew option, fabric glue can be used to secure the folded edges, though this might not be as durable after multiple washes.
What if I want a racerback style?
Achieving a racerback requires a slightly different marking technique. Instead of straight armholes, you’ll need to mark a curve that narrows towards the center of the back between the shoulder blades. It’s best to use a racerback tank as your guide.
Our Top Recommended Finds
Having the right tools makes all the difference in crafting projects. These items will help you achieve clean, professional results with your tank top.
- Kai 7250 10-inch Professional Shears: These fabric scissors are incredibly sharp and make cutting through fabric a breeze, ensuring clean, crisp lines.
- Dritz Disappearing Ink Marking Pen: Perfect for marking your cut lines, this pen’s ink disappears with water or over time, leaving no trace on your finished garment.
- Omnigrid 6″x24″ Ruler: A long, clear ruler is invaluable for drawing straight lines and making accurate measurements, ensuring symmetry in your cuts.
Unleash Your Inner Designer
Now that you have all the steps, it’s time to get creative. Transforming an old t-shirt into a custom tank top is a rewarding project that adds a unique piece to your wardrobe.
Don’t stop here! Once you master the basic cut, consider experimenting with different necklines, adding fringes to the bottom, or even cutting out designs on the back. Your imagination is the only limit. Grab that old t-shirt and start creating your new favorite tank top today!
Beginner-friendly templates, step-by-step guides,
and weekly project ideas in your inbox.