💉 How To Do A Stick And Poke Tattoo DIY

Beginner-friendly templates, step-by-step guides,
and weekly project ideas in your inbox.
You’re thinking about creating your own body art, a design unique to you. The allure of a hand-poked tattoo is undeniable, offering a raw, personal touch.
But going DIY means taking responsibility for your safety and the tattoo’s quality. This guide will walk you through the essential steps, ensuring you approach the process with knowledge and care. Having done a few of my own (and seen plenty go wrong), I’ve learned the critical steps to make sure yours turns out safe and clean.

Quick Overview
This guide will empower you to safely and effectively create your own stick and poke tattoo. You’ll learn everything from proper preparation to crucial aftercare, ensuring a lasting and healthy result.
- Time needed: 2-4 hours (including prep, tattooing, and cleanup)
- Difficulty: Intermediate
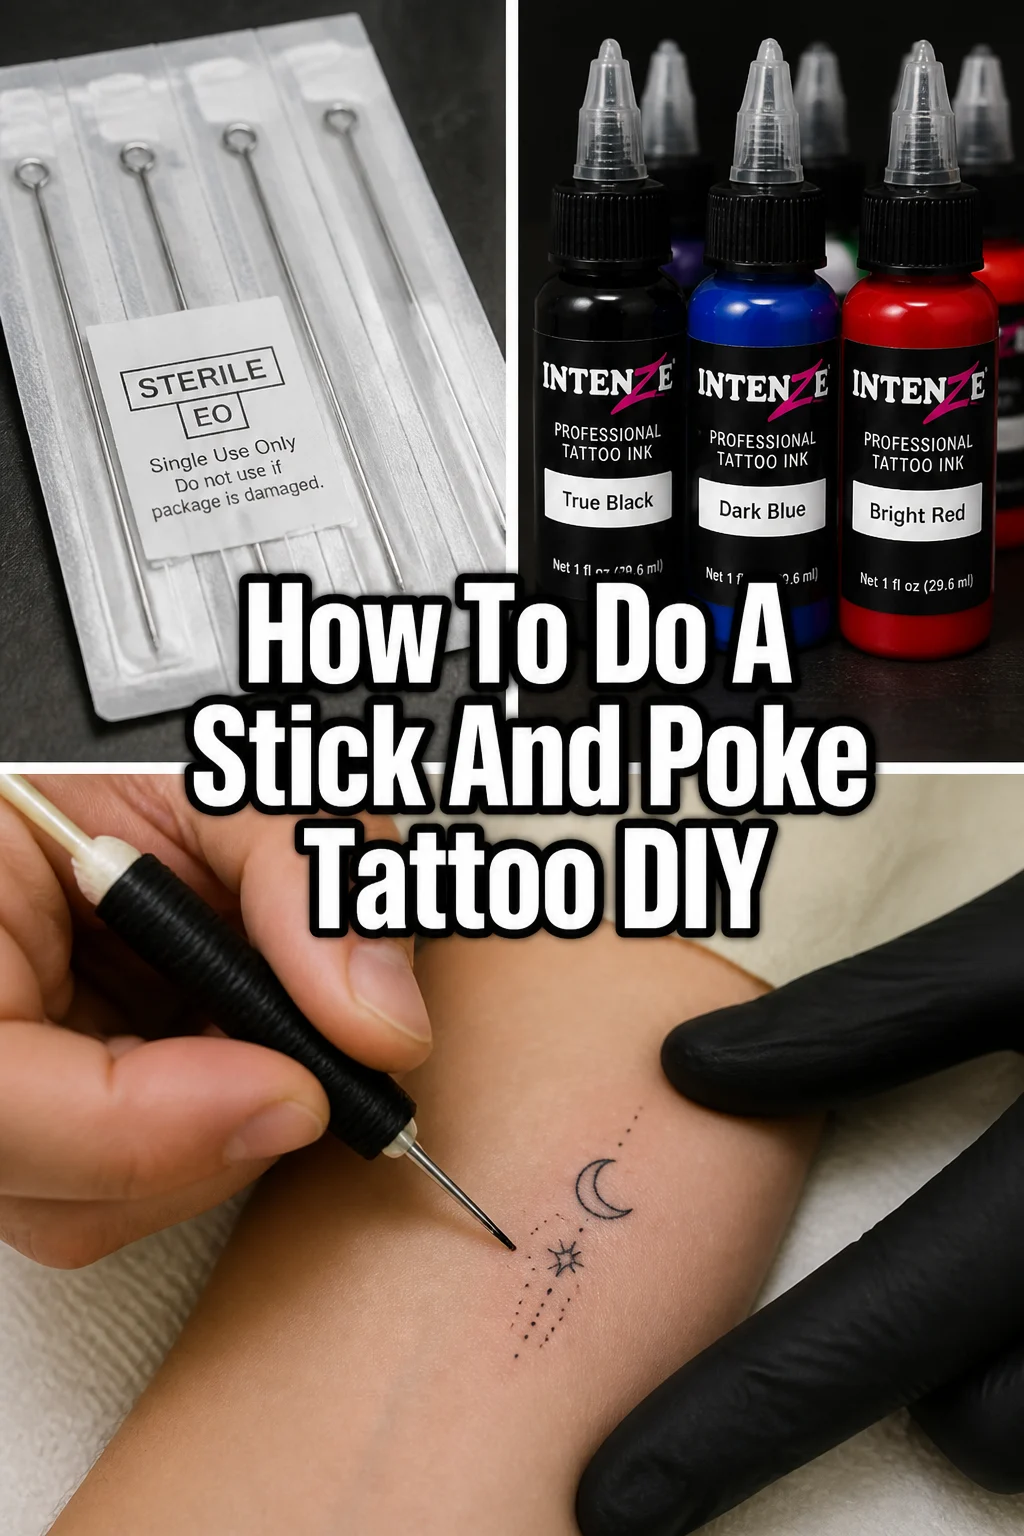
- What you’ll need: Sterile tattoo needles, professional tattoo ink, stencil paper, stencil solution, disposable gloves, rubbing alcohol, sterile gauze, aftercare balm, cling film.
Step-by-Step Instructions
Step 1: Gather Your Supplies Safely
The foundation of any successful stick and poke is sterile, appropriate equipment. Never compromise on this step. Using anything less than professional-grade, sterilized tools invites serious health risks.
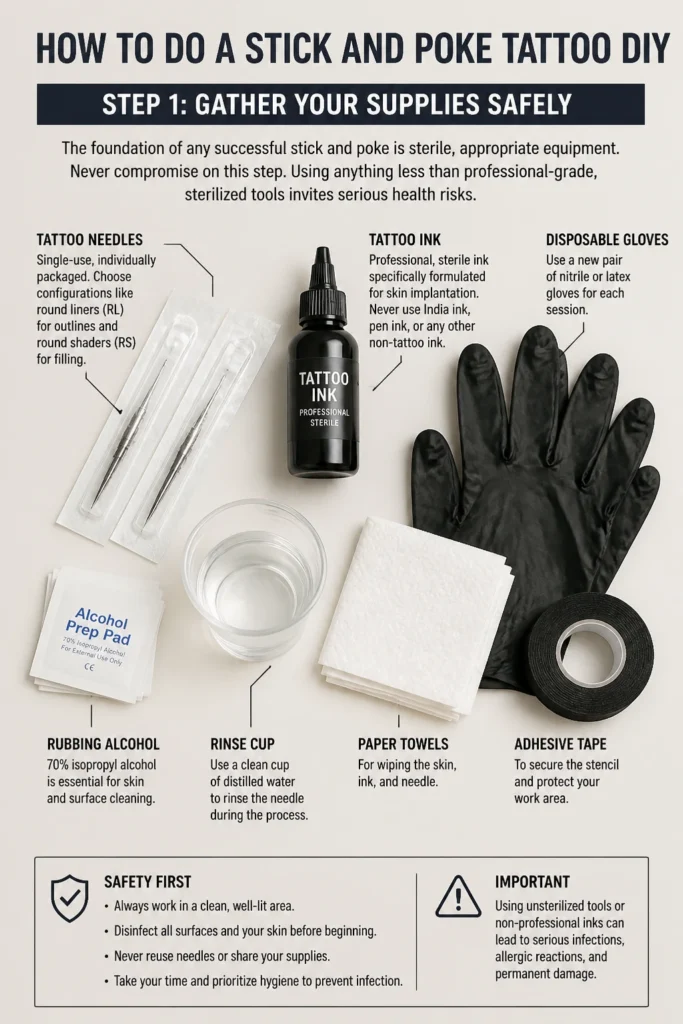
You need single-use, individually packaged tattoo needles. Look for reputable online suppliers or tattoo supply stores. These come in various configurations, like round liners (RL) for outlines and round shaders (RS) for filling.
Purchase professional tattoo ink. This is specifically formulated for skin implantation and is sterile. Do not use India ink, pen ink, or any other non-tattoo specific ink, as these can cause severe infections and allergic reactions.
Get a new pair of disposable nitrile or latex gloves for each session. Rubbing alcohol (70% isopropyl alcohol) is essential for skin preparation and surface sanitization. Sterile gauze pads are perfect for wiping excess ink.
You’ll also need a stencil marker or stencil paper and transfer solution. Small, disposable ink caps are necessary for holding your ink. Finally, grab some cling film and a gentle, fragrance-free aftercare balm.
Pro Tip: Always buy supplies from trusted tattoo supply vendors. Avoid marketplaces known for counterfeit products, as sterility cannot be guaranteed.
Step 2: Prepare Your Workspace
A clean environment is just as important as clean tools. Choose a well-lit, quiet area where you won’t be disturbed. This space should be easy to sanitize.
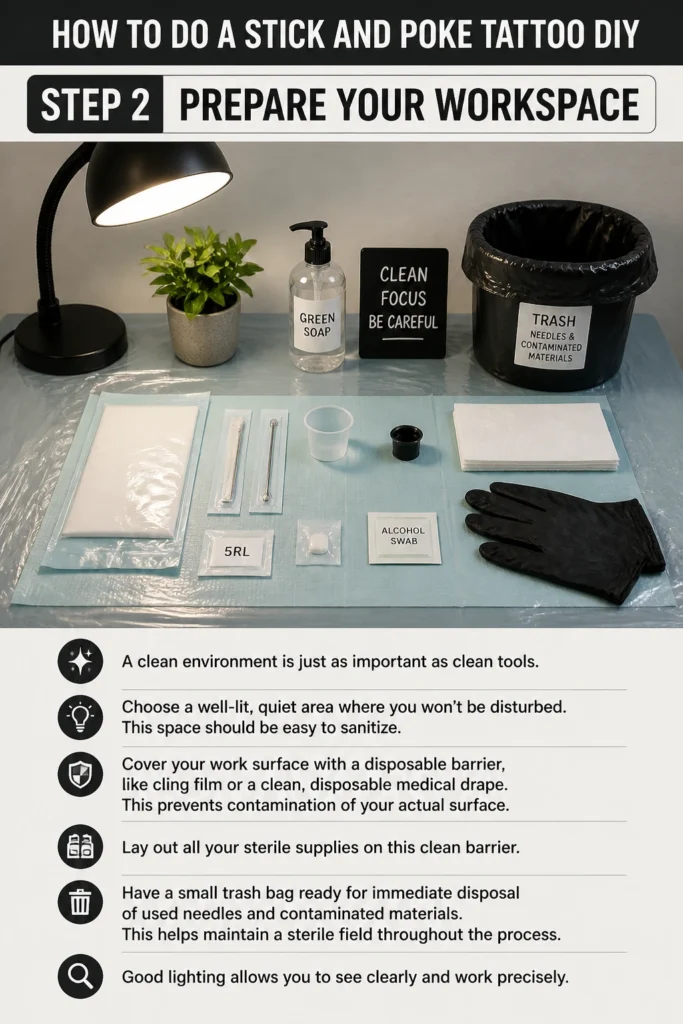
Cover your work surface with a disposable barrier, like cling film or a clean, disposable medical drape. This prevents contamination of your actual surface. Lay out all your sterile supplies on this clean barrier.
Have a small trash bag ready for immediate disposal of used needles and contaminated materials. This helps maintain a sterile field throughout the process. Good lighting allows you to see clearly and work precisely.
Step 3: Clean and Prep Your Skin
This is a critical step for preventing infection. Start by thoroughly washing the area you plan to tattoo with antibacterial soap and warm water. Make sure to rinse it completely clean.
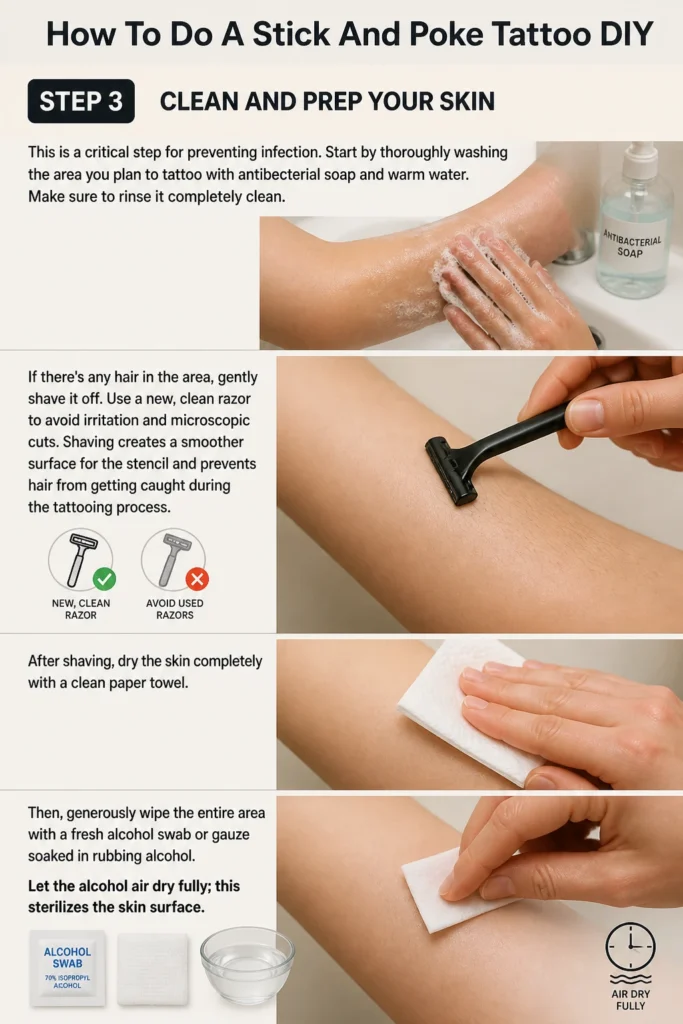
If there’s any hair in the area, gently shave it off. Use a new, clean razor to avoid irritation and microscopic cuts. Shaving creates a smoother surface for the stencil and prevents hair from getting caught during the tattooing process.
After shaving, dry the skin completely with a clean paper towel. Then, generously wipe the entire area with a fresh alcohol swab or gauze soaked in rubbing alcohol. Let the alcohol air dry fully; this sterilizes the skin surface.
Step 4: Design and Apply Your Stencil
Your design is the heart of your tattoo. You can freehand it directly onto the skin with a skin-safe marker, but a stencil offers precision and reduces errors. For stencils, print or draw your design on stencil paper.
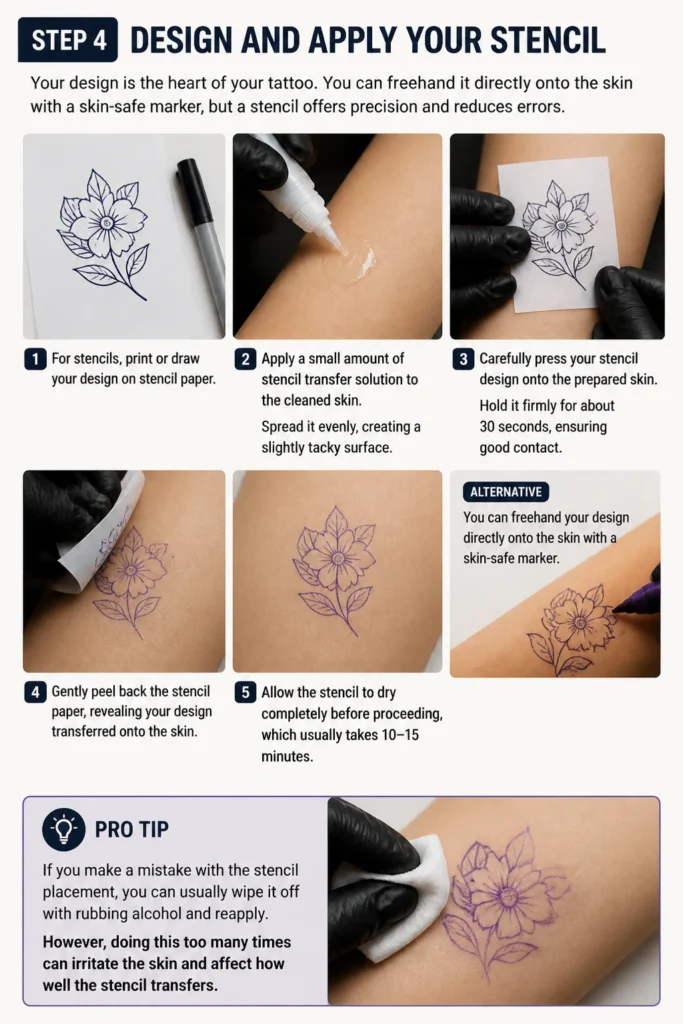
Apply a small amount of stencil transfer solution to the cleaned skin. Spread it evenly, creating a slightly tacky surface. Carefully press your stencil design onto the prepared skin.
Hold it firmly for about 30 seconds, ensuring good contact. Gently peel back the stencil paper, revealing your design transferred onto the skin. Allow the stencil to dry completely before proceeding, which usually takes 10-15 minutes.
Pro Tip: If you make a mistake with the stencil placement, you can usually wipe it off with rubbing alcohol and reapply. However, doing this too many times can irritate the skin, so try to get it right the first time.
Step 5: Load Your Needle and Begin
Put on a fresh pair of disposable gloves. These protect both you and the person being tattooed from cross-contamination. Open your sterile tattoo needle package carefully, handling the needle only by its base.
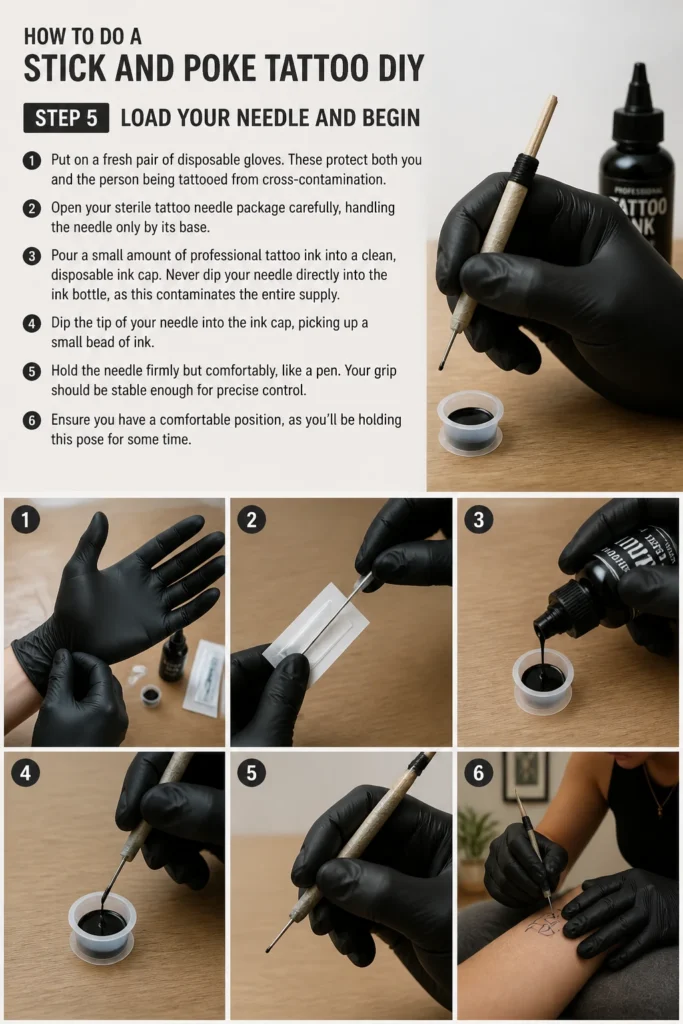
Pour a small amount of professional tattoo ink into a clean, disposable ink cap. Never dip your needle directly into the ink bottle, as this contaminates the entire supply. Dip the tip of your needle into the ink cap, picking up a small bead of ink.
Hold the needle firmly but comfortably, like a pen. Your grip should be stable enough for precise control. Ensure you have a comfortable position, as you’ll be holding this pose for some time.
Step 6: Poke with Precision
Stretch the skin taut around the area you’re tattooing. This creates a smoother surface and helps the ink penetrate evenly. Hold the needle at a slight angle, usually between 45 and 60 degrees, to the skin.
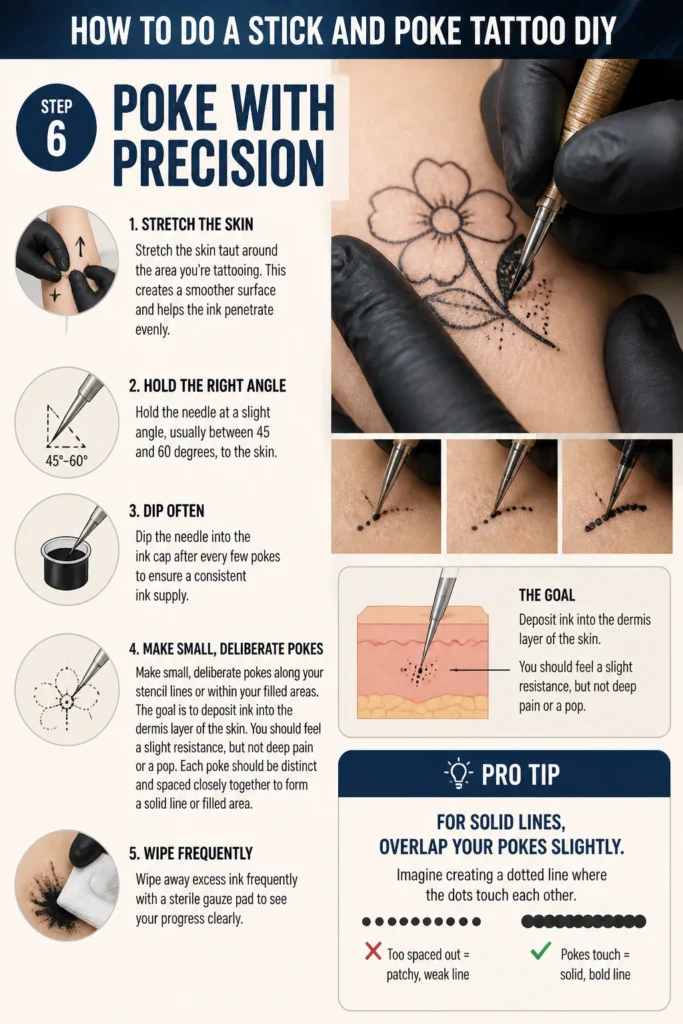
Dip the needle into the ink cap after every few pokes to ensure a consistent ink supply. Make small, deliberate pokes along your stencil lines or within your filled areas. The goal is to deposit ink into the dermis layer of the skin.
You should feel a slight resistance, but not deep pain or a “pop.” Each poke should be distinct and spaced closely together to form a solid line or filled area. Wipe away excess ink frequently with a sterile gauze pad to see your progress clearly.
Pro Tip: For solid lines, overlap your pokes slightly. Imagine creating a dotted line where the dots touch each other. Patience is key; don’t rush the process. Go over areas multiple times if needed to achieve desired saturation.
Step 7: Complete the Tattoo and Clean Up
Once your design is complete, give the tattoo a final, thorough wipe with a sterile gauze pad and a small amount of rubbing alcohol or green soap solution. This removes any remaining ink, blood, or stencil residue. Inspect your work carefully for any missed spots or areas that need more saturation.
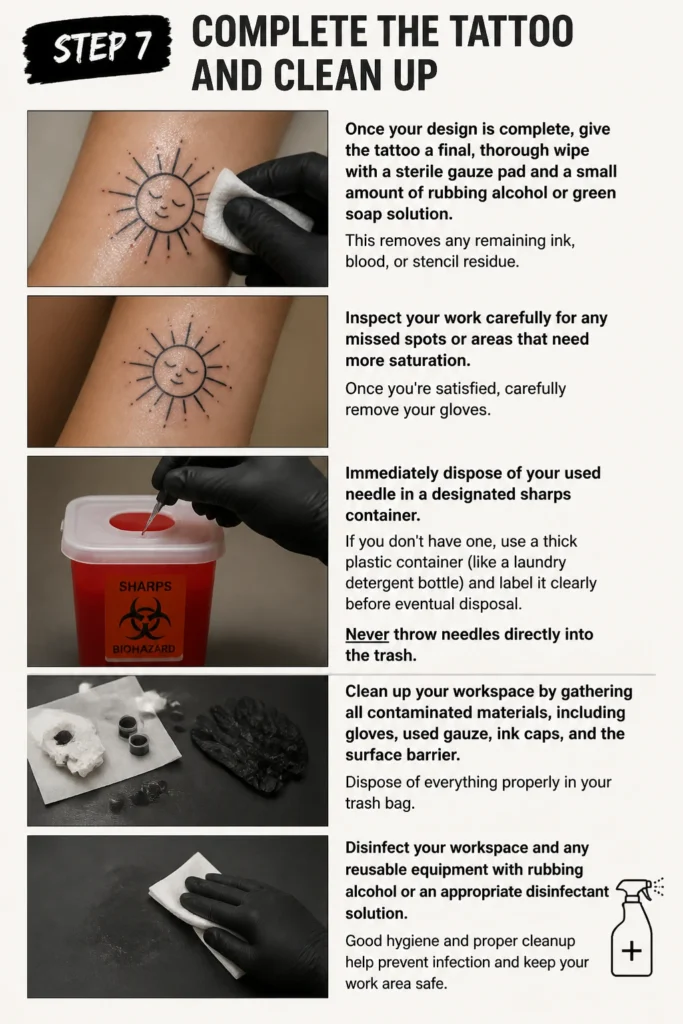
Once you’re satisfied, carefully remove your gloves. Immediately dispose of your used needle in a designated sharps container. If you don’t have one, use a thick plastic container (like a laundry detergent bottle) and label it clearly before eventual disposal. Never throw needles directly into the trash.
Clean up your workspace by gathering all contaminated materials, including gloves, used gauze, ink caps, and the surface barrier. Dispose of everything properly in your trash bag. Disinfect your work surface with rubbing alcohol or a household disinfectant.
Step 8: Aftercare is Crucial
Proper aftercare is paramount for healing and longevity. Gently wash the new tattoo with lukewarm water and a mild, fragrance-free antibacterial soap. Pat it dry with a clean paper towel; do not rub.
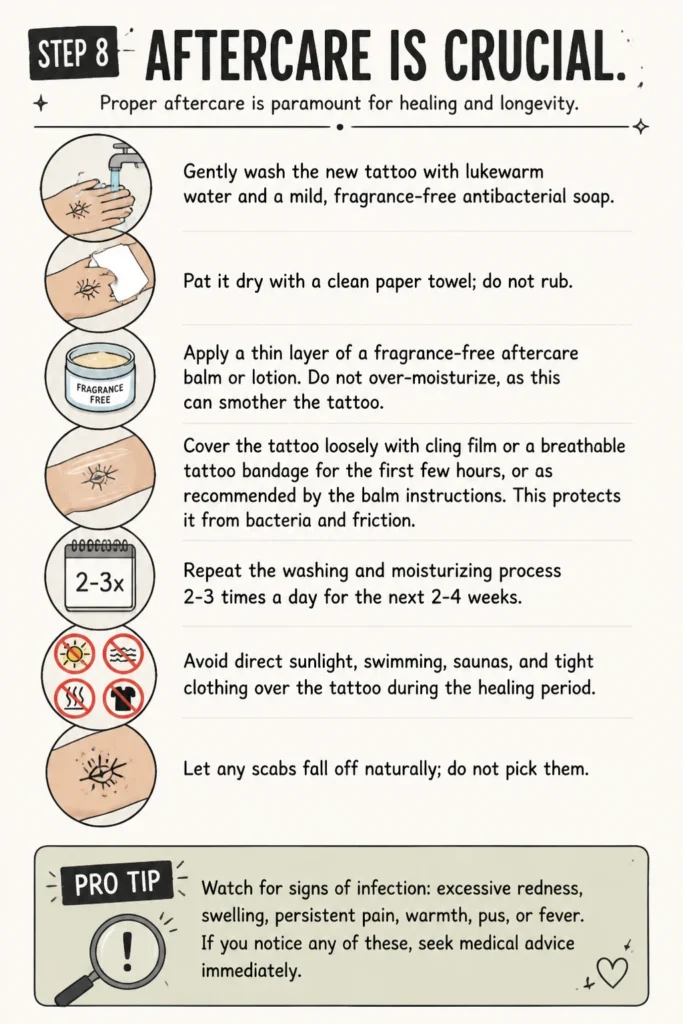
Apply a thin layer of a fragrance-free aftercare balm or lotion. Do not over-moisturize, as this can smother the tattoo. Cover the tattoo loosely with cling film or a breathable tattoo bandage for the first few hours, or as recommended by the balm instructions. This protects it from bacteria and friction.
Repeat the washing and moisturizing process 2-3 times a day for the next 2-4 weeks. Avoid direct sunlight, swimming, saunas, and tight clothing over the tattoo during the healing period. Let any scabs fall off naturally; do not pick them.
Pro Tip: Watch for signs of infection: excessive redness, swelling, warmth, pus, or fever. If you suspect an infection, seek medical attention immediately. Normal healing involves some redness and mild tenderness, but these should subside within a few days.
Common Mistakes to Avoid
Using Unsterile Equipment
This is the most dangerous mistake you can make. Reusing needles or using non-sterile items like sewing needles or safety pins can introduce bacteria, viruses, and fungi directly into your bloodstream. This risks serious infections, bloodborne diseases like hepatitis or HIV, and severe allergic reactions. Always use new, individually packaged, sterile tattoo needles and professional tattoo ink.
Going Too Deep or Not Deep Enough
Poking too deep can lead to “blowouts,” where the ink spreads out under the skin, creating blurry lines that look like bruises. This is permanent. Poking not deep enough means the ink stays in the epidermis (top layer of skin) and will quickly fade or fall out as the skin regenerates. The goal is to place the ink consistently in the dermis layer, which requires practice and a gentle touch.
Rushing the Process
Stick and poke tattoos are inherently slow and meditative. Rushing can lead to uneven lines, inconsistent ink saturation, and mistakes in your design. It also increases the chances of skin irritation or improper hygiene practices. Take your time, work slowly and deliberately, and take breaks if your hand gets tired or you lose focus. Patience results in a better tattoo.
Ignoring Aftercare
The work isn’t done when the last poke is made. Neglecting proper aftercare can lead to infections, poor healing, and a faded or patchy tattoo. Not keeping the tattoo clean and moisturized, exposing it to sun, or picking at scabs can ruin your artwork and compromise your health. Follow aftercare instructions diligently for the best outcome.
Troubleshooting
Ink Not Sticking / Fading Quickly
If your ink isn’t staying in the skin or fades rapidly, you’re likely not poking deep enough. The ink needs to reach the dermis layer to be permanent. Review your technique, ensuring you feel a slight resistance and see the ink embedded. Also, ensure your skin is stretched taut, and you’re using quality, fresh tattoo ink. Sometimes, the skin can be difficult to take ink, requiring more passes.
Blowouts (Blurry Lines)
Blowouts occur when the needle penetrates too deeply, causing the ink to spread into the fat layer beneath the dermis. This results in fuzzy, bruised-looking lines. To prevent this, reduce the pressure you apply and adjust your needle depth. Aim for a consistent, shallower poke. Blowouts are permanent, so practice on fruit or synthetic skin first to get a feel for the correct depth.
Redness/Swelling Beyond Normal
Some redness and mild swelling are normal for a new tattoo, especially in the first 24-48 hours. However, if the redness spreads, the area becomes excessively warm, painful, or you see pus, this indicates an infection. If you develop a fever or chills, seek medical attention immediately. Early signs of infection can be managed, but severe cases require professional medical care.
Key Takeaways
- Always prioritize hygiene and use sterile, single-use equipment to prevent infection.
- Use professional tattoo ink; never substitute with non-tattoo inks.
- Prepare your skin and workspace meticulously to create a clean environment.
- Practice proper needle depth and angle to avoid blowouts or faded tattoos.
- Be patient and deliberate with each poke for a clean, consistent design.
- Strictly follow aftercare instructions to ensure proper healing and tattoo longevity.
Frequently Asked Questions
Is it painful?
Yes, getting a stick and poke tattoo involves some pain, as a needle is piercing your skin repeatedly. The level of pain varies greatly depending on individual tolerance, the location of the tattoo on your body, and the specific artist’s technique. Many find it less intense than a machine tattoo, but it’s still a series of sharp, stinging sensations.
How long do stick and pokes last?
A well-done stick and poke tattoo, with proper depth and aftercare, can last a lifetime, just like a machine tattoo. However, many DIY stick and pokes tend to fade or blur over time if the ink wasn’t deposited consistently into the dermis, or if aftercare wasn’t optimal. Sun exposure and skin regeneration also play a role in longevity.
Can I use India ink?
Absolutely not. India ink, while used for art, is not sterile and contains pigments and additives not safe for implantation into human skin. Using it can lead to severe infections, allergic reactions, scarring, and permanent discoloration. Always use professional, sterile tattoo ink specifically designed for tattooing.
What if I get an infection?
If you suspect an infection (spreading redness, excessive swelling, pus, fever, severe pain), do not try to treat it yourself with home remedies. Seek medical attention immediately. A doctor can diagnose the infection and prescribe appropriate antibiotics or treatment to prevent further complications and ensure proper healing.
Our Top Recommended Finds
- Sterile Tattoo Needles: Look for individually packaged, pre-sterilized needles in various sizes (e.g., 5RL for fine lines, 9RS for shading).
- Professional Tattoo Ink: A reputable black tattoo ink (like Dynamic Black or Kuro Sumi) is a great starting point for quality and safety.
- Green Soap Concentrate: Diluted green soap is excellent for cleaning the skin during and after the tattoo process, gentle and effective.
Your Canvas Awaits
Taking on a stick and poke tattoo is a journey of self-expression and meticulous care. It’s an art form that demands respect for both the craft and your body. By following these steps, you’re not just creating a design; you’re engaging in a responsible, thoughtful process.
Remember, practice makes perfect, and safety is non-negotiable. Start with simple designs, focus on your technique, and always prioritize hygiene. Your skin is your canvas, and with the right approach, you can create meaningful, lasting art. Begin your creative adventure today, armed with knowledge and confidence.
Beginner-friendly templates, step-by-step guides,
and weekly project ideas in your inbox.