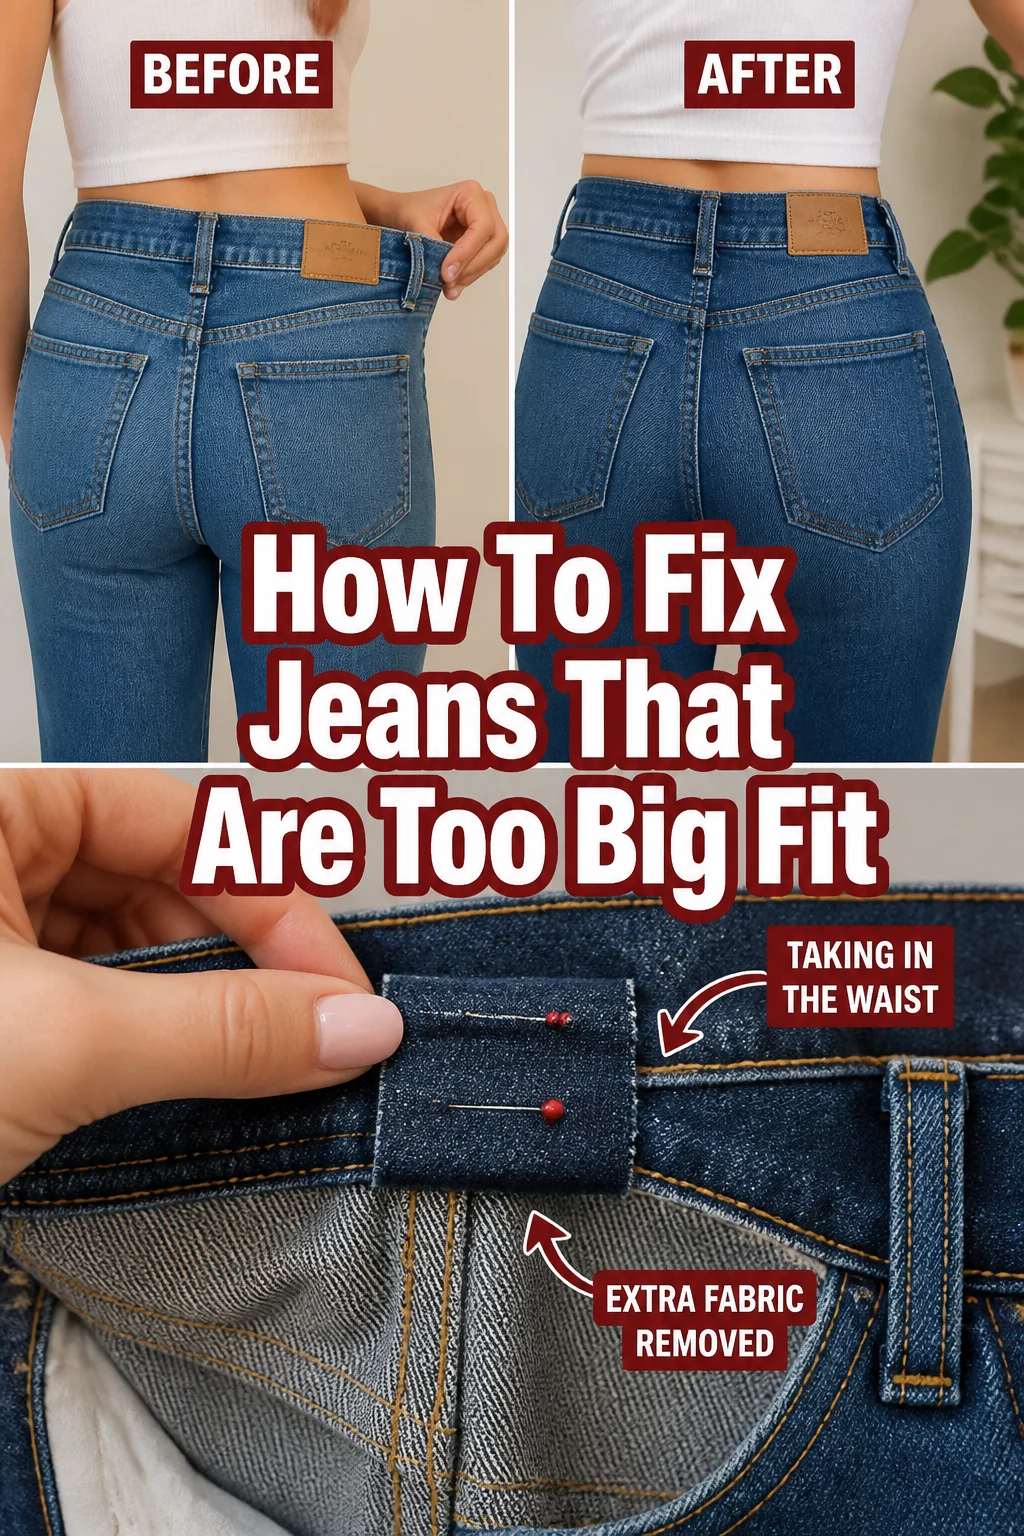
👖 How To Fix Jeans That Are Too Big Fit

Beginner-friendly templates, step-by-step guides,
and weekly project ideas in your inbox.
We’ve all been there: a favorite pair of jeans suddenly feels too loose. It’s frustrating when beloved denim no longer fits right, whether from weight loss or a sizing mistake. Having tailored countless garments, I’ll show you exactly how to get that perfect fit back.
This guide provides practical, achievable methods to transform your baggy jeans into a flattering, comfortable staple. You don’t need to be a sewing expert to achieve great results. With a few simple tools and clear steps, your denim will feel custom-made.

Quick Overview
This guide will walk you through various techniques to adjust your jeans, ensuring a better fit around the waist, hips, and legs. You’ll learn how to measure, pin, and sew (or no-sew) your way to denim perfection.
- Time needed: 1-3 hours (depending on method and experience)
- Difficulty: Beginner to Intermediate
- What you’ll need: Measuring tape, tailor’s chalk, fabric scissors, sewing pins, needle, thread (denim-weight recommended), sewing machine (optional), iron, seam ripper (optional).
Step-by-Step Instructions
Step 1: Assess the Fit and Plan Your Adjustment
Start by putting on your jeans and observing exactly where they feel too big. Are they loose in the waist, baggy in the hips, wide in the legs, or a combination? A clear assessment helps you choose the right alteration method.
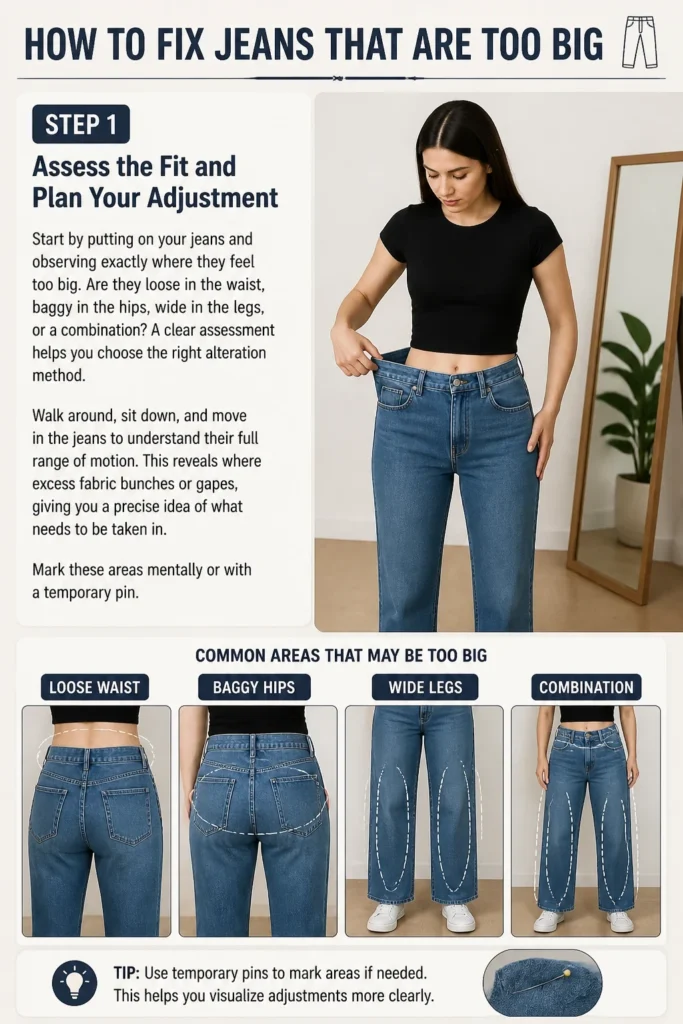
Walk around, sit down, and move in the jeans to understand their full range of motion. This reveals where excess fabric bunches or gapes, giving you a precise idea of what needs to be taken in. Mark these areas mentally or with a temporary pin.
Step 2: Gather Your Essential Tools
Before you begin, ensure you have all the necessary supplies within reach. A well-organized workspace makes the process smoother and more enjoyable. Double-check your thread color to match your jeans.
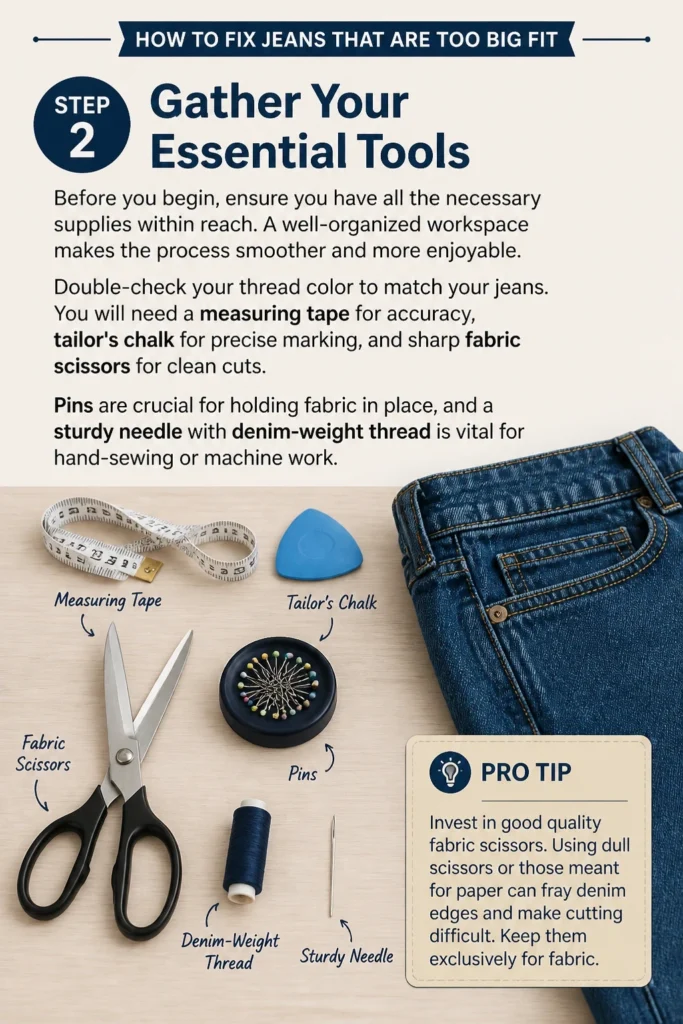
You will need a measuring tape for accuracy, tailor’s chalk for precise marking, and sharp fabric scissors for clean cuts. Pins are crucial for holding fabric in place, and a sturdy needle with denim-weight thread is vital for hand-sewing or machine work.
Pro Tip: Invest in good quality fabric scissors. Using dull scissors or those meant for paper can fray denim edges and make cutting difficult. Keep them exclusively for fabric.
Step 3: Pinpoint the Excess Fabric (Waist Adjustment)
If your jeans are too big at the waist, this is a common and relatively simple fix. Put on the jeans inside out. Pinch the excess fabric evenly at the center back seam, or at the side seams if preferred.
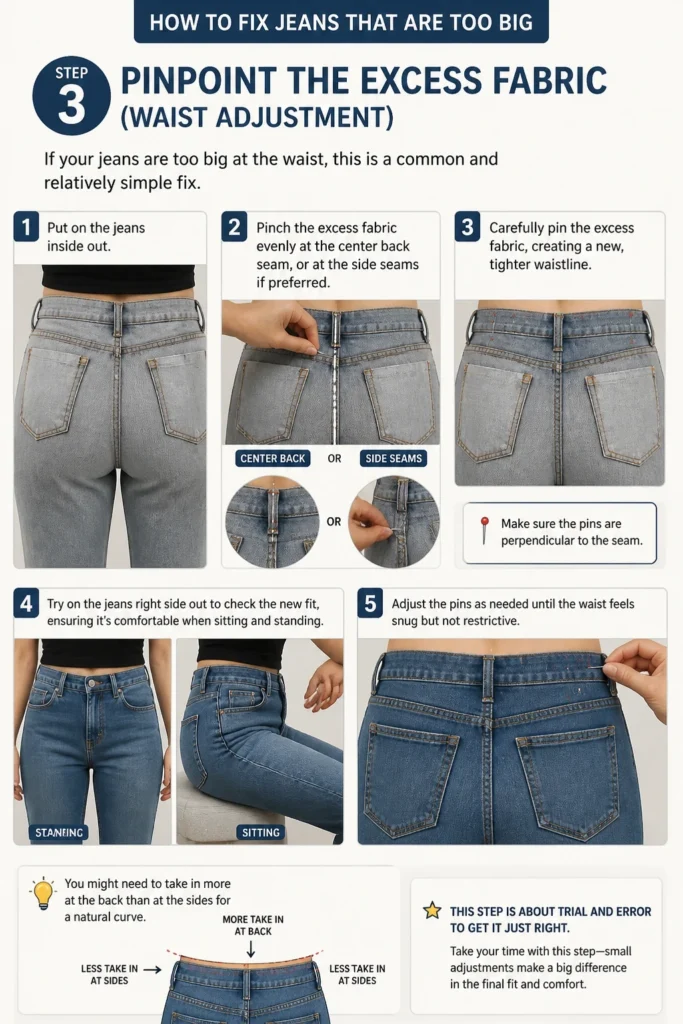
Carefully pin the excess fabric, creating a new, tighter waistline. Make sure the pins are perpendicular to the seam. Try on the jeans right side out to check the new fit, ensuring it’s comfortable when sitting and standing.
Adjust the pins as needed until the waist feels snug but not restrictive. You might need to take in more at the back than at the sides for a natural curve. This step is about trial and error to get it just right.
Step 4: Stitch the Waist Seam (No-Sew or Basic Sew)
For a quick, no-sew waist adjustment, you can use a button extender or a simple hack. Thread a shoelace or strong cord through the back belt loops and tie it securely inside, pulling the waist tighter. This is a temporary solution for a minor adjustment.
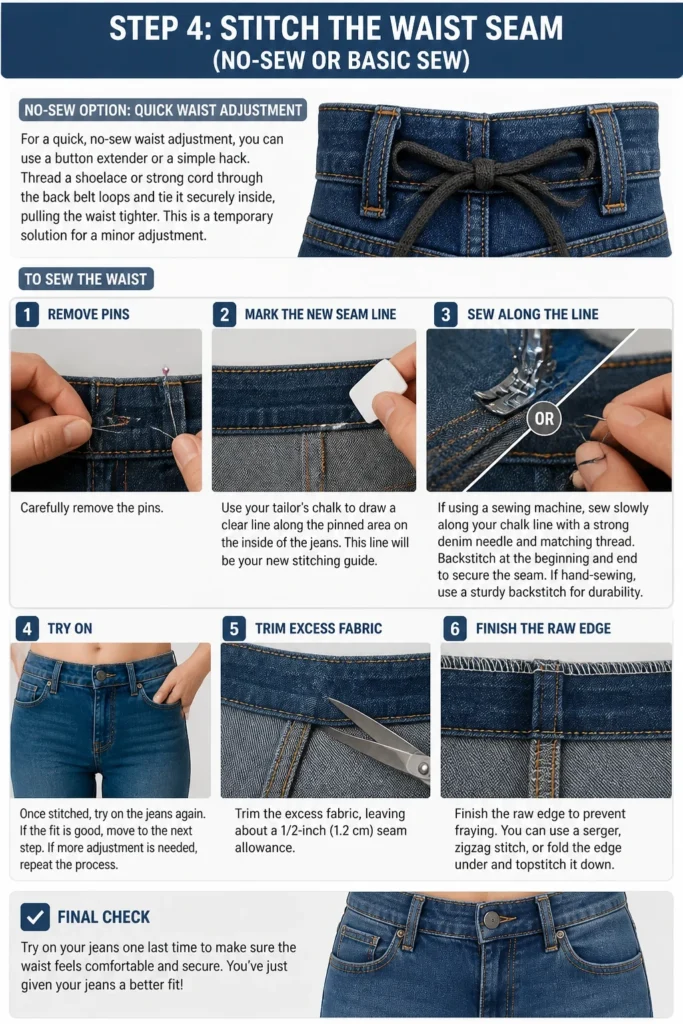
To sew the waist, carefully remove the pins. Use your tailor’s chalk to draw a clear line along the pinned area on the inside of the jeans. This line will be your new stitching guide.
If using a sewing machine, sew slowly along your chalk line with a strong denim needle and matching thread. Backstitch at the beginning and end to secure the seam. If hand-sewing, use a sturdy backstitch for durability.
Once stitched, try on the jeans again. If the fit is good, trim the excess fabric, leaving about a 1/2-inch seam allowance. Finish the raw edge with a zigzag stitch or serger to prevent fraying.
Step 5: Tapering the Legs (Side Seam Method)
If the legs are too wide, especially from the thigh down, tapering the side seams is effective. Put the jeans on inside out. Pinch the excess fabric along the outside seam of each leg, from the thigh down to the ankle.
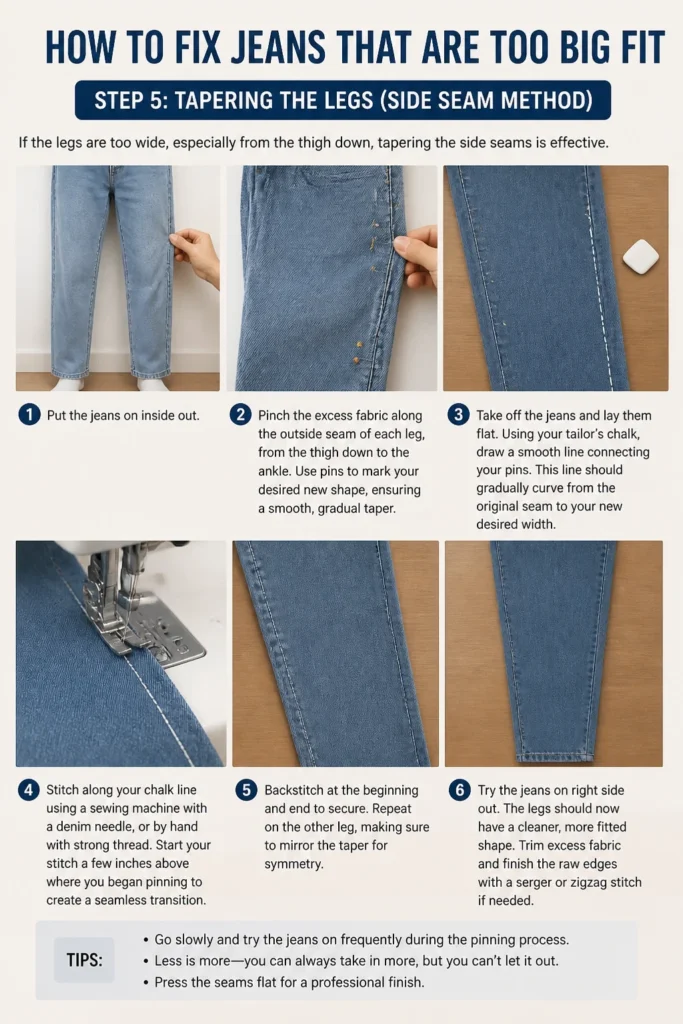
Use pins to mark your desired new shape, ensuring a smooth, gradual taper. Pay attention to how the fabric drapes around your knee and calf. Aim for symmetry between both legs.
Take off the jeans and lay them flat. Using your tailor’s chalk, draw a smooth line connecting your pins. This line should gradually curve from the original seam to your new desired width.
Stitch along your chalk line using a sewing machine with a denim needle, or by hand with strong thread. Start your stitch a few inches above where you began pinning to create a seamless transition. Backstitch at the start and end.
Pro Tip: When tapering legs, always stitch a test line on scrap denim first. This helps you get a feel for your machine’s tension and stitch length with denim fabric.
Step 6: Adjusting the Inseam (Inner Leg Method)
Adjusting the inseam is another way to slim the legs, often used in conjunction with or as an alternative to the side seam method. This is particularly useful if the inner thigh area is baggy.
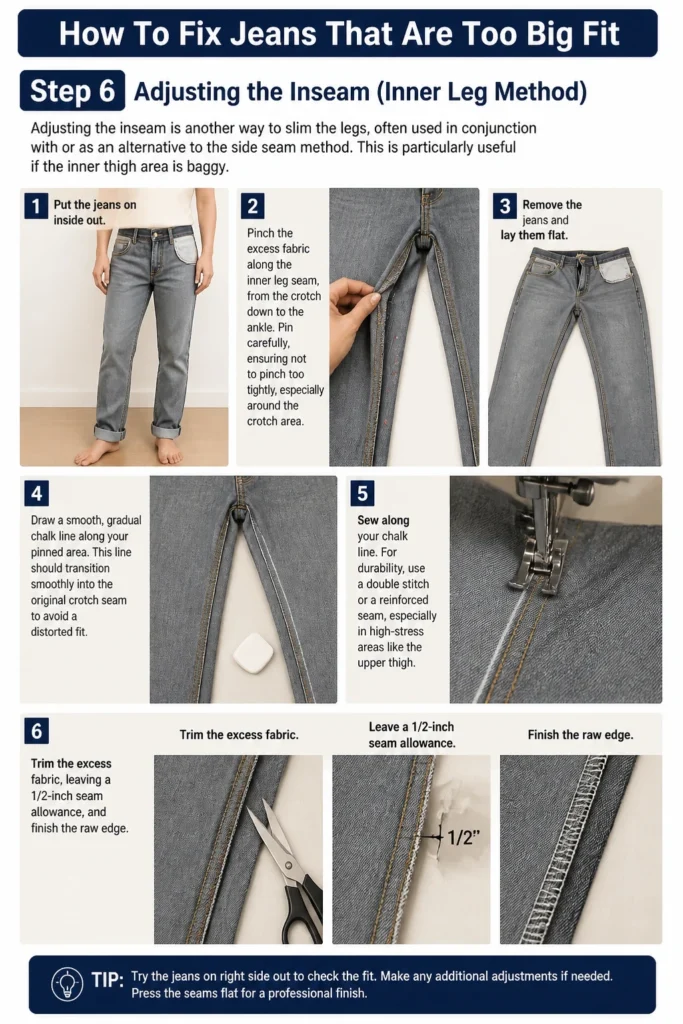
Put the jeans on inside out. Pinch the excess fabric along the inner leg seam, from the crotch down to the ankle. Pin carefully, ensuring not to pinch too tightly, especially around the crotch area.
Remove the jeans and lay them flat. Draw a smooth, gradual chalk line along your pinned area. This line should transition smoothly into the original crotch seam to avoid a distorted fit.
Sew along your chalk line. For durability, use a double stitch or a reinforced seam, especially in high-stress areas like the upper thigh. Trim the excess fabric, leaving a 1/2-inch seam allowance, and finish the raw edge.
Step 7: Hemming for Length (Optional but often needed)
After adjusting the width, you might find the length is now off. Put on your jeans and fold the hem to your desired length. Wear the shoes you typically pair with these jeans for accuracy.
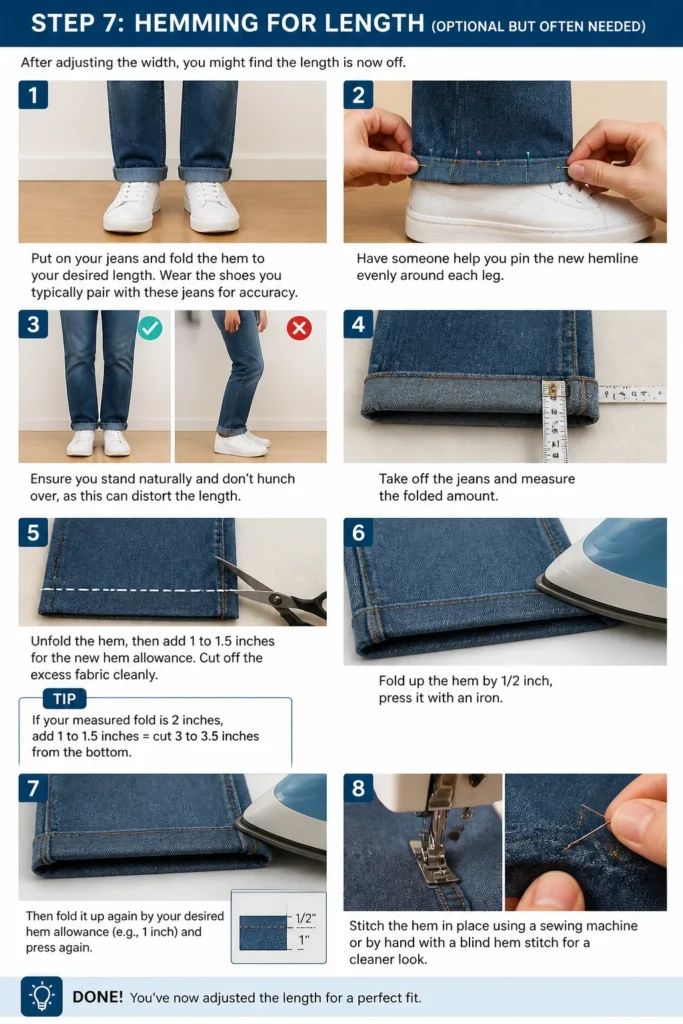
Have someone help you pin the new hemline evenly around each leg. Ensure you stand naturally and don’t hunch over, as this can distort the length.
Take off the jeans and measure the folded amount. Unfold the hem, then add 1 to 1.5 inches for the new hem allowance. Cut off the excess fabric cleanly.
Fold up the hem by 1/2 inch, press it with an iron, then fold it up again by your desired hem allowance (e.g., 1 inch) and press again. Stitch the hem in place using a sewing machine or by hand with a blind hem stitch for a cleaner look.
Step 8: Try On, Trim, and Finish
Once all your alterations are complete, try on the jeans one last time. Walk around, sit, and bend to ensure the fit is perfect and comfortable in all positions. Check for any puckering or tightness.
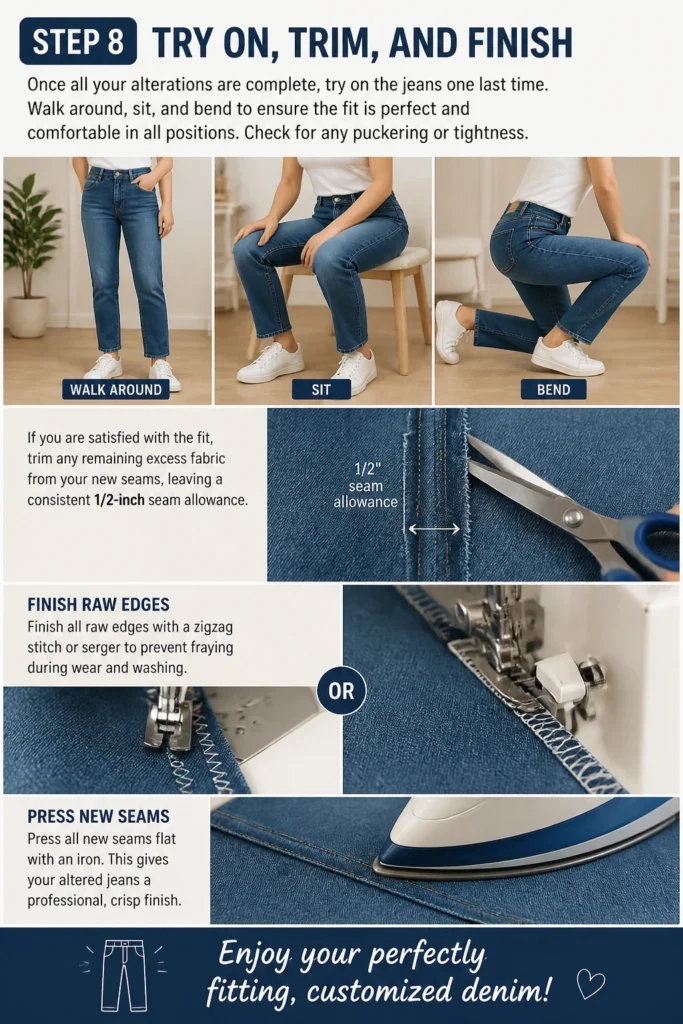
If you are satisfied with the fit, trim any remaining excess fabric from your new seams, leaving a consistent 1/2-inch seam allowance. Finish all raw edges with a zigzag stitch or serger to prevent fraying during wear and washing.
Press all new seams flat with an iron. This gives your altered jeans a professional, crisp finish. Enjoy your perfectly fitting, customized denim!
Common Mistakes to Avoid
Not Measuring Accurately
Many people rush through the measuring and pinning process, leading to an uneven or uncomfortable fit. Taking precise measurements and pinning carefully is the foundation of a successful alteration. Always try on the jeans multiple times, both inside out and right side out, to ensure the pins reflect your desired fit.
Cutting Too Much Too Soon
It is much easier to take in more fabric than to add it back. Be conservative with your initial cuts. Always stitch your new seams and try the jeans on before trimming any excess fabric. This “try before you trim” approach saves you from irreversible mistakes.
Skipping Basting or Pinning Thoroughly
Some DIYers skip basting (a temporary hand stitch) or don’t use enough pins. This can cause the fabric to shift while sewing, resulting in crooked seams or an uneven fit. Take the time to pin every few inches and consider basting curved seams for added control.
Ignoring Fabric Stretch
Denim, especially stretch denim, behaves differently than woven fabrics. When altering, remember that stretch denim will give a bit with wear. Factor this into your measurements, taking in slightly less than you might with rigid denim to avoid making the jeans too tight after a few wears.
Troubleshooting
Jeans Still Feel Loose After Adjustment
If your jeans still feel loose, it usually means you didn’t take in enough fabric. Don’t worry, this is an easy fix. Put the jeans back on, identify the areas that are still baggy, and carefully re-pin to take in more fabric. Stitch a new seam just inside your previous one, then try them on again before trimming.
Seams Look Bulky or Puckered
Bulky seams often occur when too much seam allowance is left or when the fabric isn’t pressed properly. Trim your seam allowances to about 1/2 inch and press them open or to one side with a hot iron. Puckering can be due to incorrect thread tension on a sewing machine or stitching too quickly. Adjust your machine settings or slow down your hand-stitching.
Fabric Tears Near the New Seam
Tears near a new seam indicate stress on the fabric, likely from the jeans being too tight or the seam not being reinforced enough. If the jeans are too tight, you may need to unpick the seam and let out a small amount of fabric. To prevent tears, always use strong, denim-specific thread and backstitch at the beginning and end of seams, especially in high-stress areas like the crotch or waist.
Key Takeaways
- Measure precisely and pin thoroughly to ensure an accurate fit.
- Always try on the jeans after pinning and stitching, but before trimming.
- Start with small adjustments; you can always take in more fabric later.
- Utilize strong denim thread for durable, long-lasting seams.
- Finish all raw edges to prevent fraying and maintain the garment’s integrity.
- Consider the denim’s stretch factor when making your adjustments.
Frequently Asked Questions
Can I fix jeans that are too big without sewing?
Yes, you can. For minor waist adjustments, methods like using a button extender, a shoelace threaded through back belt loops, or even a strategically placed safety pin can work. These are often temporary solutions, but they can be effective for a quick fix.
How much can I realistically take in my jeans?
You can usually take in a significant amount, especially around the waist and legs. However, major alterations that change the entire silhouette (e.g., going from a size 36 to a 28) might require professional help to maintain the integrity of the original design, like pocket placement. For most home alterations, 1-3 inches off the waist or a noticeable taper in the legs is very achievable.
Will washing affect my newly altered jeans?
Yes, washing can affect them, especially if the denim is new or raw. Always pre-wash new denim before altering if you want to account for any potential shrinkage. After altering, wash your jeans according to their care label. Finishing your seams properly (e.g., with a zigzag stitch) will help prevent fraying in the wash.
Is it better to adjust the waist or the side seams first?
Generally, it’s best to address the waist first if that’s the primary issue. A well-fitting waist helps anchor the jeans. Once the waist is comfortable, you can then assess if the legs still need tapering. Sometimes, fixing the waist alone can improve the overall drape of the jeans.
Our Top Recommended Finds
- Sharp Fabric Scissors: A dedicated pair for fabric ensures clean, precise cuts without fraying.
- Tailor’s Chalk Wheel: Provides fine, accurate lines that are easy to see and brush away.
- Denim Needles and Thread: Essential for strong seams that can withstand the thickness of denim.
Your Denim Transformation Awaits
Taking the time to adjust your jeans means more than just a better fit; it’s about reclaiming your favorite pieces and extending their life. You’ve learned the practical steps to turn ill-fitting denim into a perfectly tailored garment. This skill empowers you to customize your wardrobe to your unique shape.
Don’t let those baggy jeans sit in the back of your closet any longer. Pick up your tools and start your denim transformation today. The satisfaction of wearing perfectly fitting jeans, tailored by your own hands, is truly rewarding.
Beginner-friendly templates, step-by-step guides,
and weekly project ideas in your inbox.