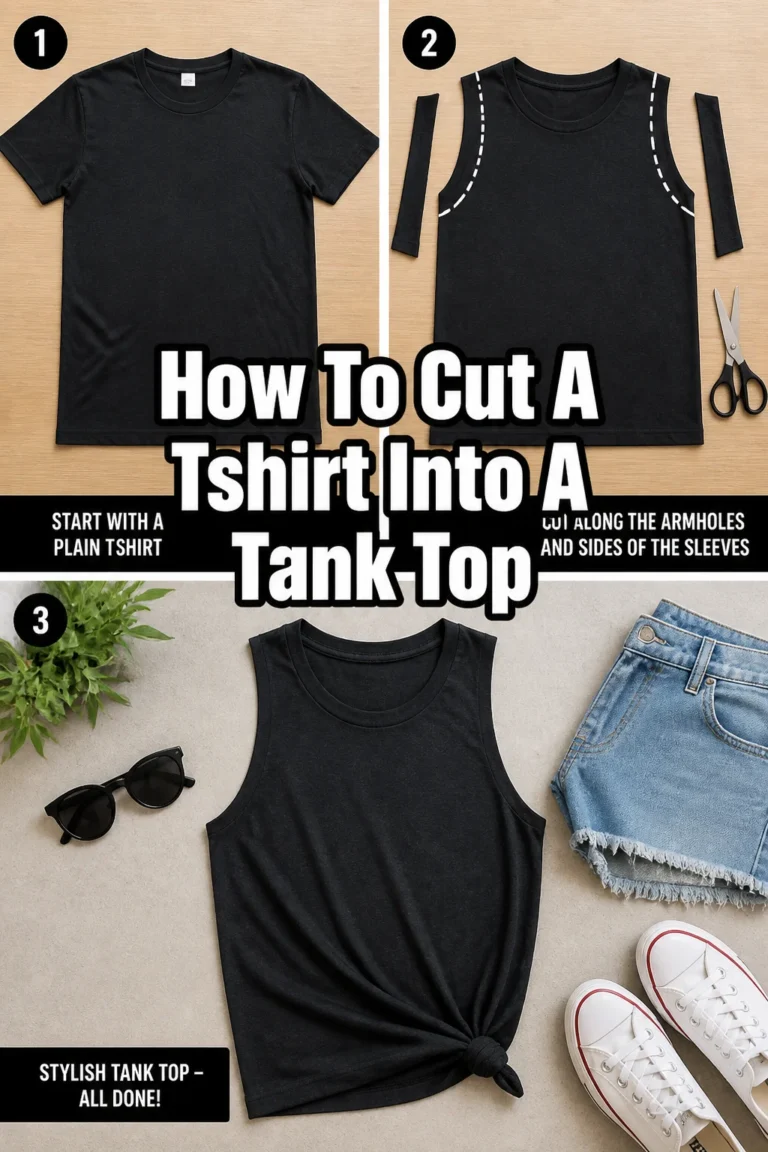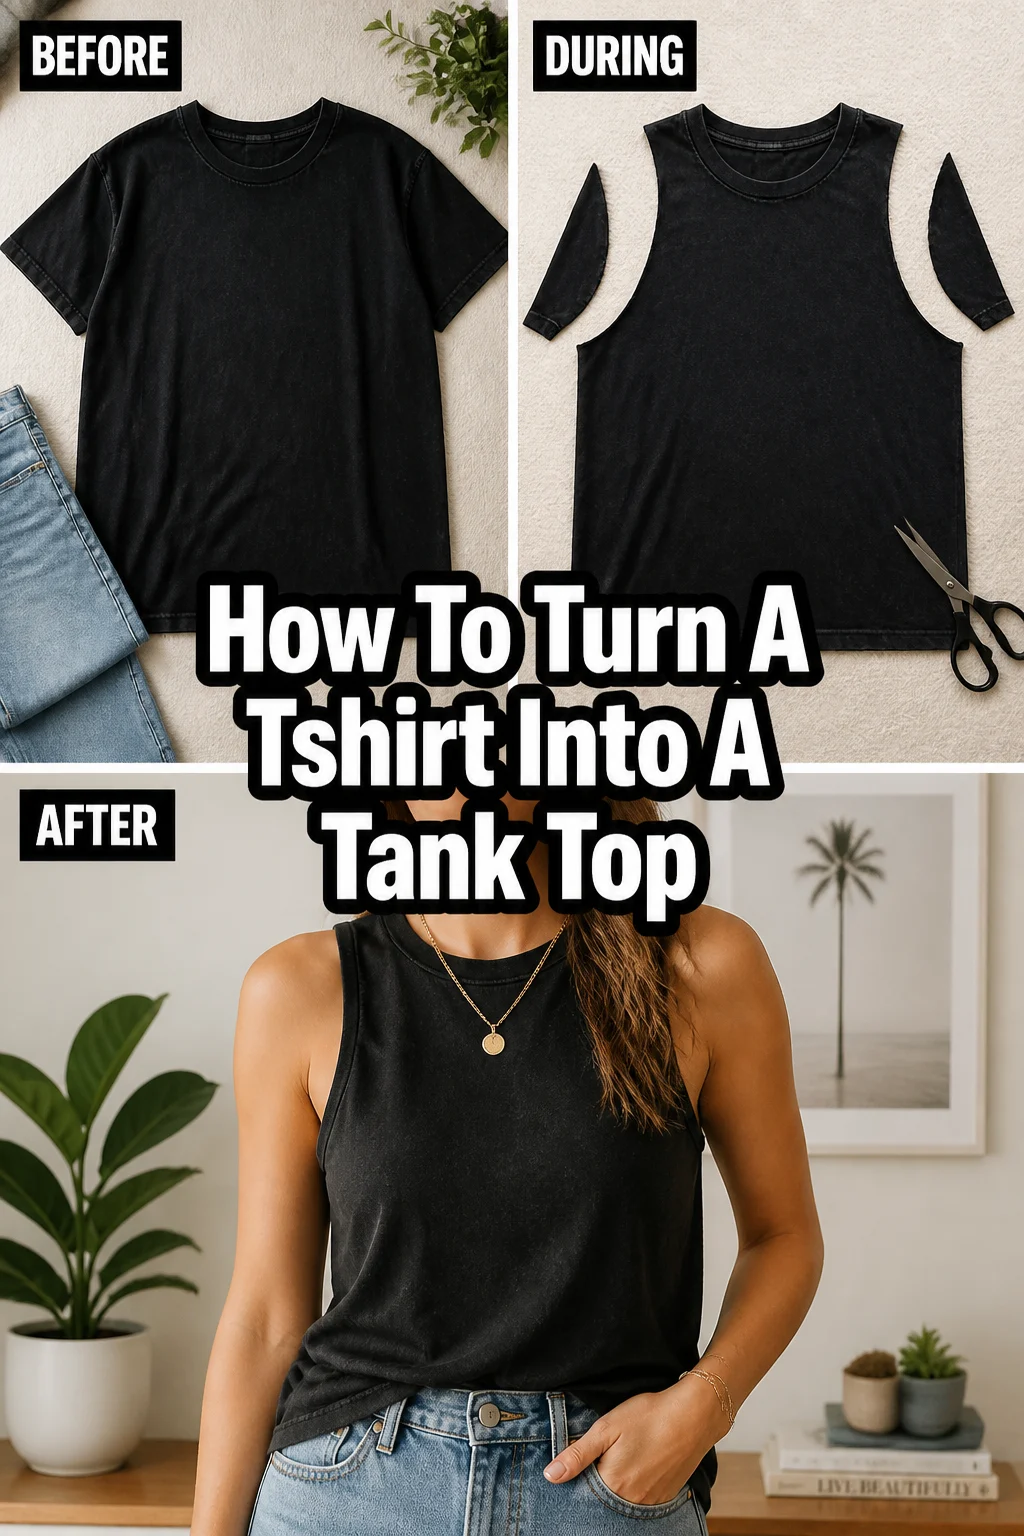
✂️ How To Turn A Tshirt Into A Tank Top

Beginner-friendly templates, step-by-step guides,
and weekly project ideas in your inbox.
Do you have a stack of old t-shirts gathering dust in your closet? Transforming them into stylish tank tops is a fantastic way to give them a second life. It’s a simple, rewarding project that lets you express your personal style.
I’ve personally upcycled countless tees over the years, discovering the best techniques through trial and error. This guide shares all those practical insights, making sure your DIY tank top turns out perfectly.

Quick Overview
This guide will walk you through transforming any basic t-shirt into a custom-fit tank top. You’ll learn how to measure, cut, and finish your new garment with professional-looking results. Get ready to refresh your wardrobe without spending a dime!
- Time needed: 30-60 minutes
- Difficulty: Beginner
- What you’ll need: A t-shirt, sharp fabric scissors, tailor’s chalk or marker, a ruler or measuring tape, an existing tank top (for tracing), sewing machine (optional, for finishing)
Step-by-Step Instructions
Step 1: Gather Your Tools and Choose Your Tee
Collect all your necessary supplies before you begin. Having everything at hand makes the process smoother and more efficient.
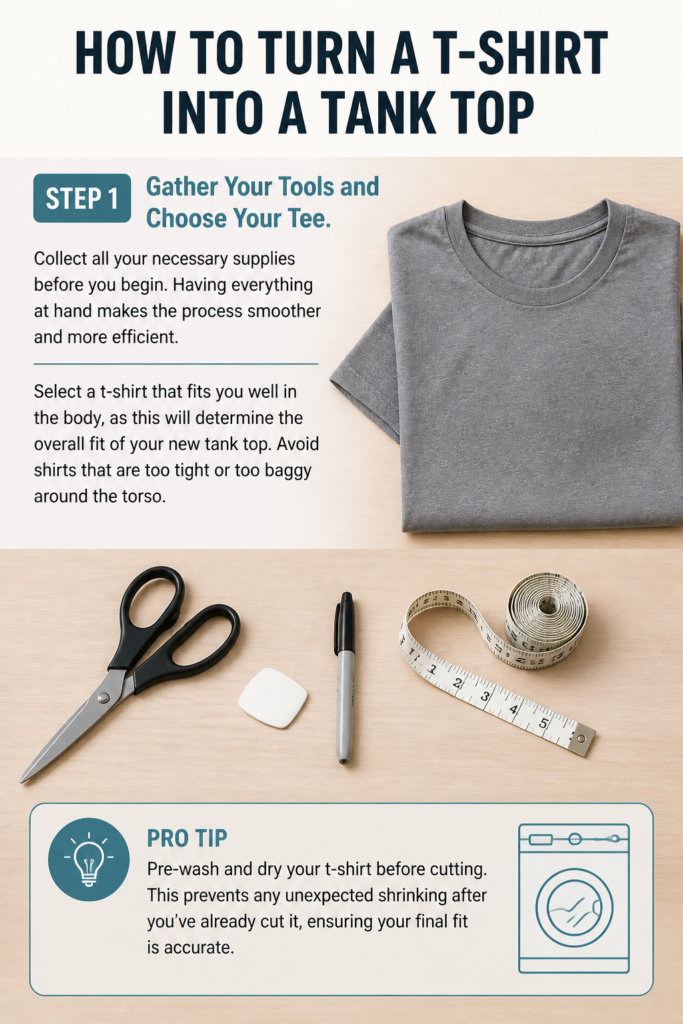
Select a t-shirt that fits you well in the body, as this will determine the overall fit of your new tank top. Avoid shirts that are too tight or too baggy around the torso.
Pro Tip: Pre-wash and dry your t-shirt before cutting. This prevents any unexpected shrinking after you’ve already cut it, ensuring your final fit is accurate.
Step 2: Find Your Ideal Template
Choose an existing tank top from your wardrobe that you love the fit and style of. This will serve as your perfect template for the new cut.
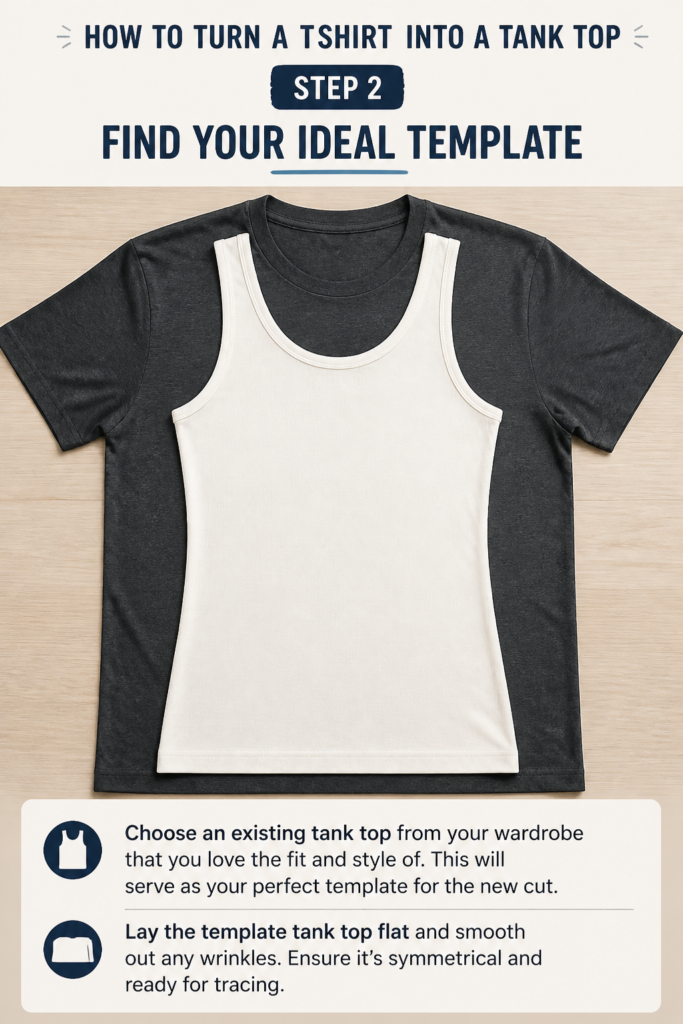
Lay the template tank top flat and smooth out any wrinkles. Ensure it’s symmetrical and ready for tracing.
Step 3: Prepare Your T-Shirt for Cutting
Lay your chosen t-shirt flat on a large, clean surface. Smooth out all wrinkles, making sure both the front and back layers are perfectly aligned.
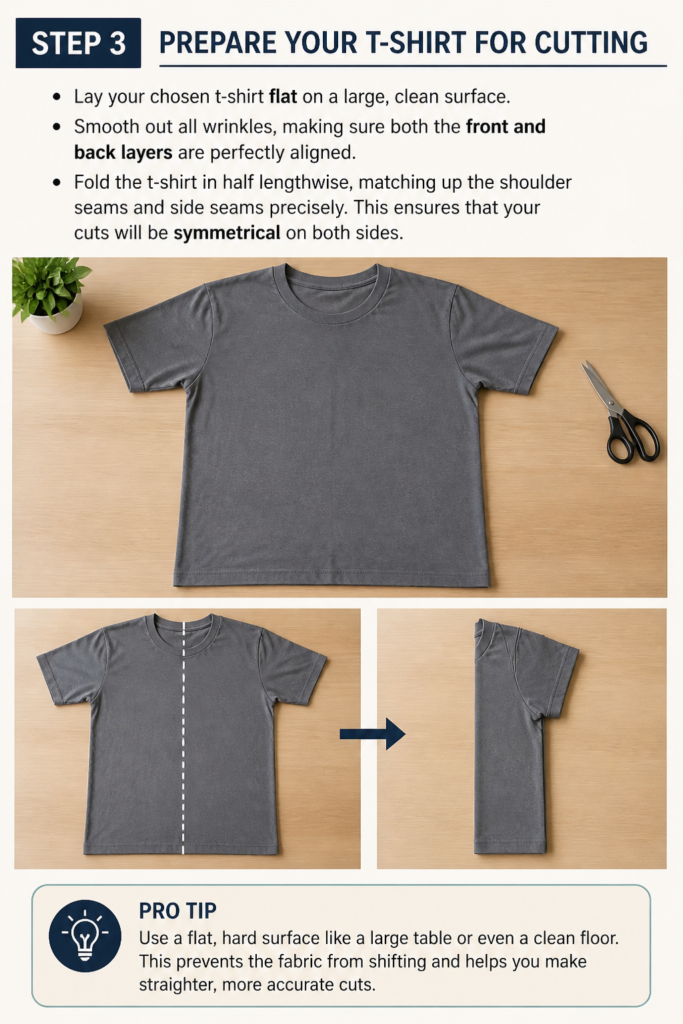
Fold the t-shirt in half lengthwise, matching up the shoulder seams and side seams precisely. This ensures that your cuts will be symmetrical on both sides.
Pro Tip: Use a flat, hard surface like a large table or even a clean floor. This prevents the fabric from shifting and helps you make straighter, more accurate cuts.
Step 4: Position and Trace Your Template
Place your template tank top on top of the folded t-shirt. Align the shoulder seam of the template with the folded edge of your t-shirt.
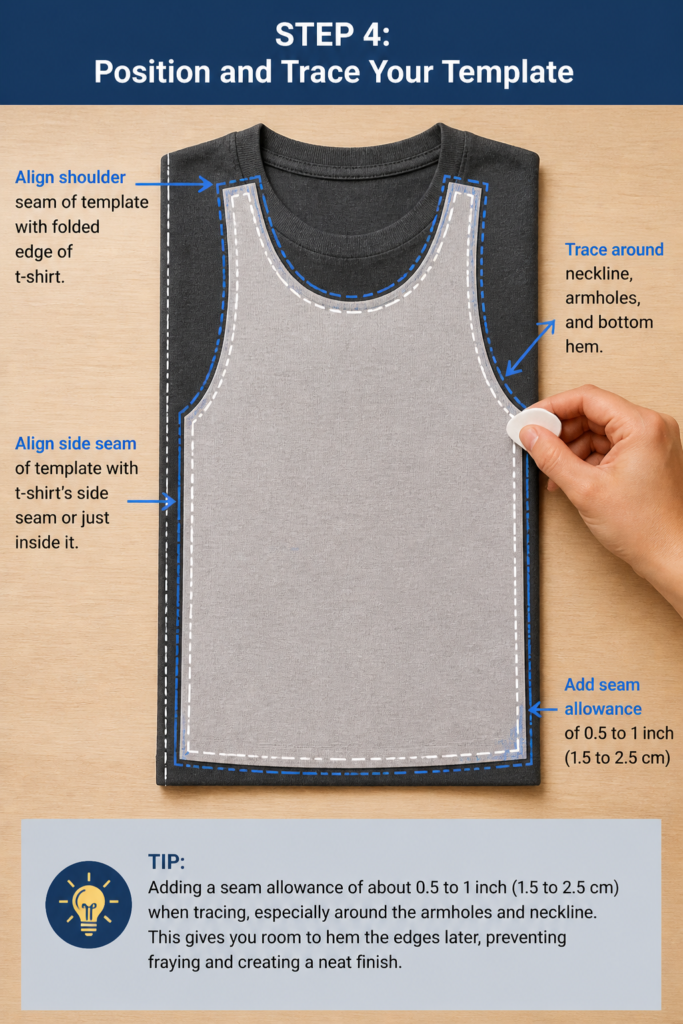
Position the template so its side seam aligns with the t-shirt’s side seam or just inside it, depending on how much you want to narrow the tank. Use tailor’s chalk or a fabric marker to trace around the neckline, armholes, and bottom hem of the template.
Add a seam allowance of about 0.5 to 1 inch (1.5 to 2.5 cm) when tracing, especially around the armholes and neckline. This gives you room to hem the edges later, preventing fraying and creating a neat finish.
Step 5: Cut the Neckline and Armholes
Cut along your chalk lines for the neckline and armholes. Take your time and use sharp fabric scissors for clean, precise edges.
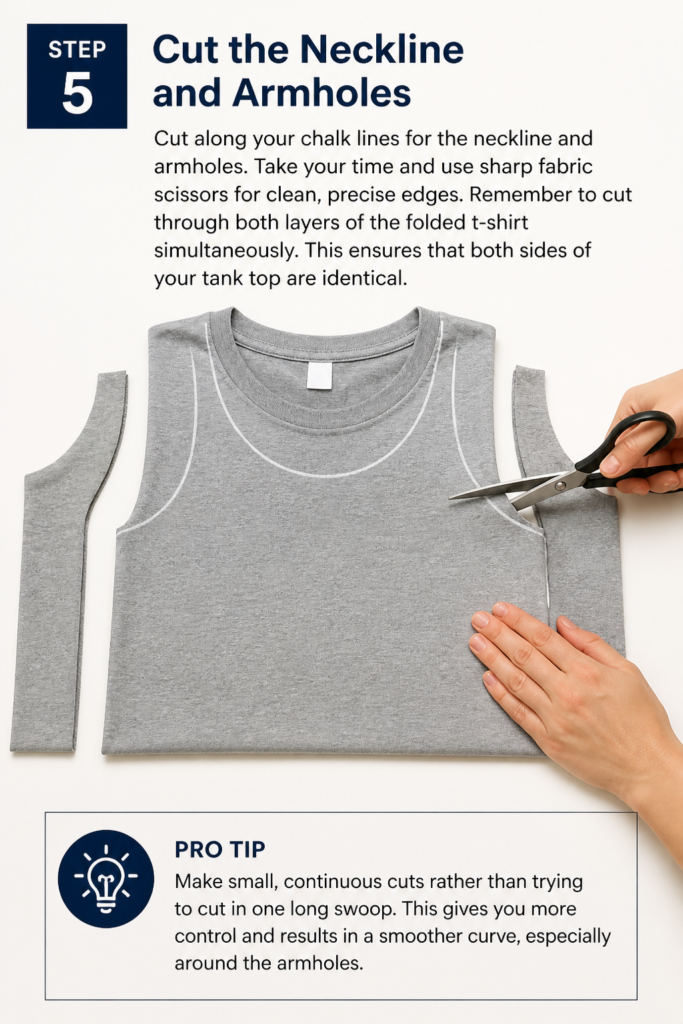
Remember to cut through both layers of the folded t-shirt simultaneously. This ensures that both sides of your tank top are identical.
Pro Tip: Make small, continuous cuts rather than trying to cut in one long swoop. This gives you more control and results in a smoother curve, especially around the armholes.
Step 6: Adjust the Side Seams (Optional)
Decide if you want to narrow the body of your tank top. If your template tank is narrower than the t-shirt, you can trace along its side seam.
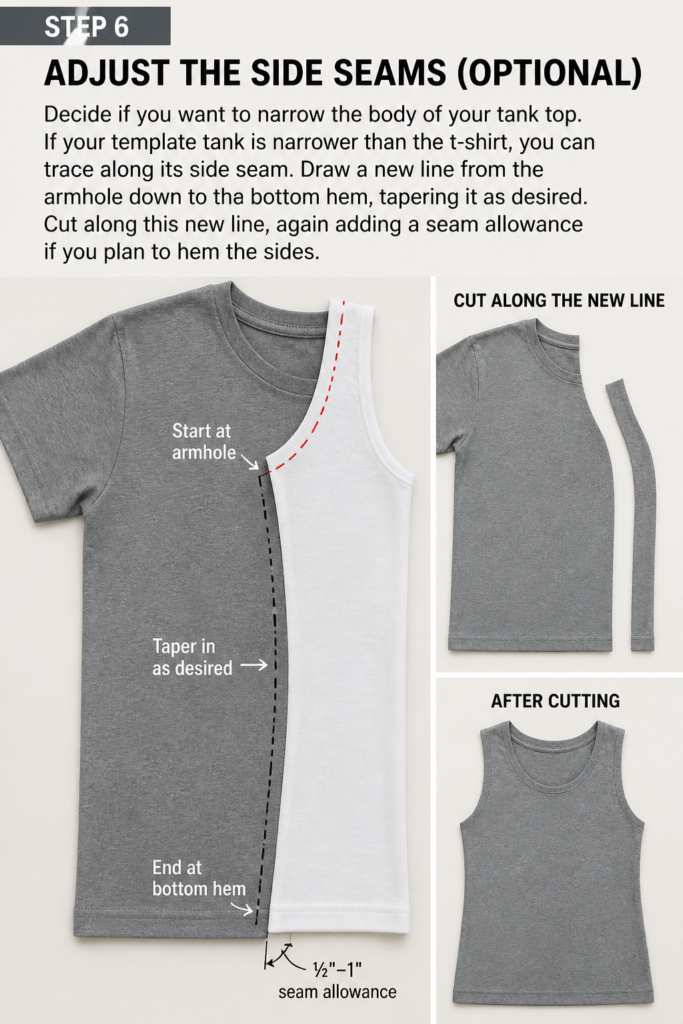
Draw a new line from the armhole down to the bottom hem, tapering it as desired. Cut along this new line, again adding a seam allowance if you plan to hem the sides.
Step 7: Trim the Hem (Optional)
Determine the desired length for your tank top. You can use your template tank top’s hemline as a guide, or simply try on the t-shirt to mark where you want the new hem to fall.
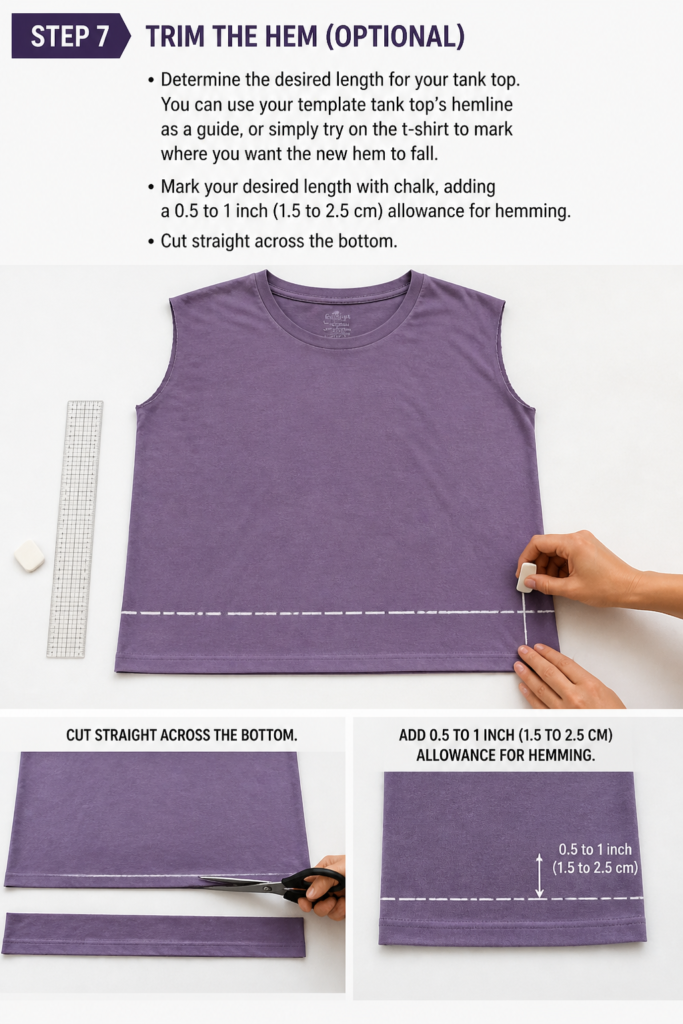
Mark your desired length with chalk, adding a 0.5 to 1 inch (1.5 to 2.5 cm) allowance for hemming. Cut straight across the bottom.
Step 8: Try On and Refine
Unfold your newly cut tank top and try it on. This is your chance to assess the fit and make any small adjustments.
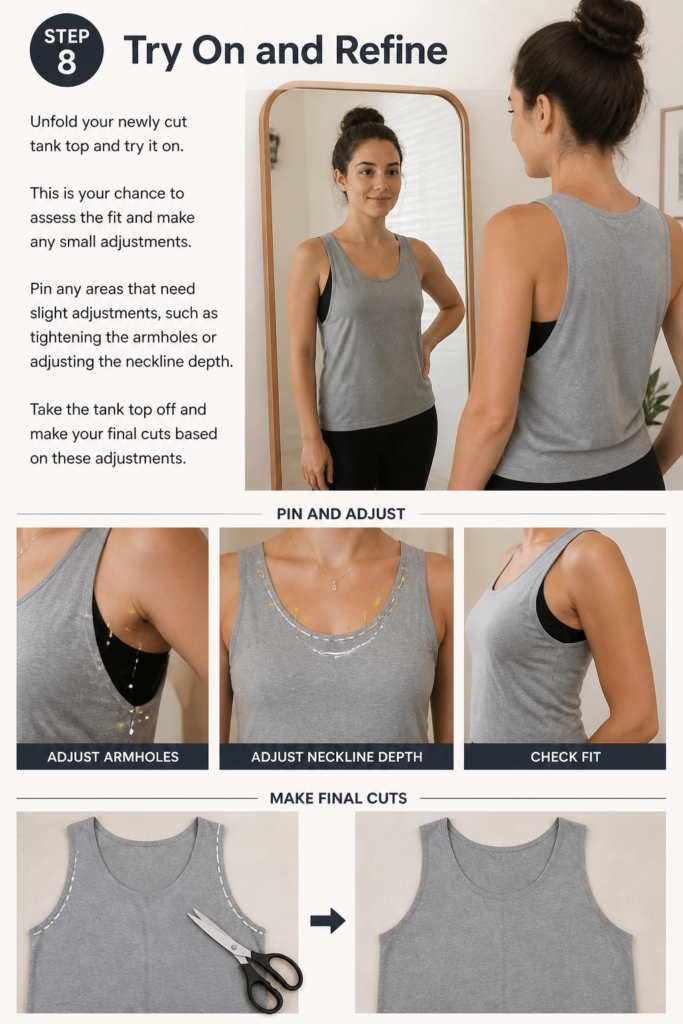
Pin any areas that need slight adjustments, such as tightening the armholes or adjusting the neckline depth. Take the tank top off and make your final cuts based on these adjustments.
Step 9: Hem the Raw Edges
Fold the raw edges of the armholes, neckline, and bottom hem inwards by about 0.5 to 1 inch (1.5 to 2.5 cm). Press these folds with an iron to create crisp lines.
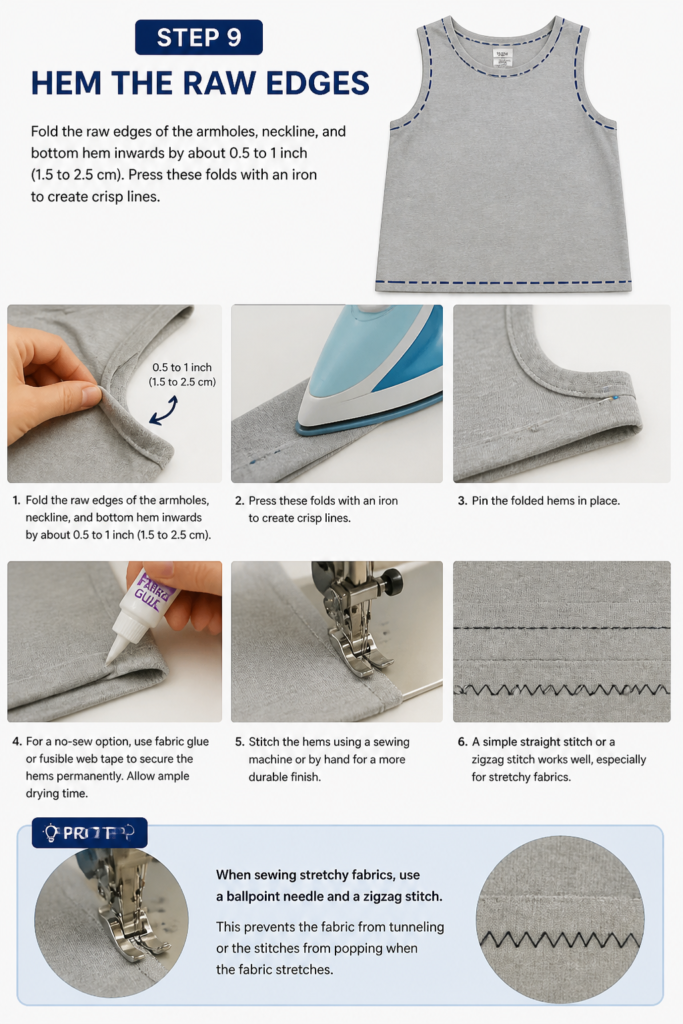
Pin the folded hems in place. For a no-sew option, use fabric glue or fusible web tape to secure the hems permanently. Allow ample drying time.
Stitch the hems using a sewing machine or by hand for a more durable finish. A simple straight stitch or a zigzag stitch works well, especially for stretchy fabrics.
Pro Tip: When sewing stretchy fabrics, use a ballpoint needle and a zigzag stitch. This prevents the fabric from tunneling or the stitches from popping when the fabric stretches.
Step 10: Final Press and Enjoy!
Give your finished tank top a final press with an iron. This smooths out any wrinkles and sets the hems, giving your new garment a professional, polished look.
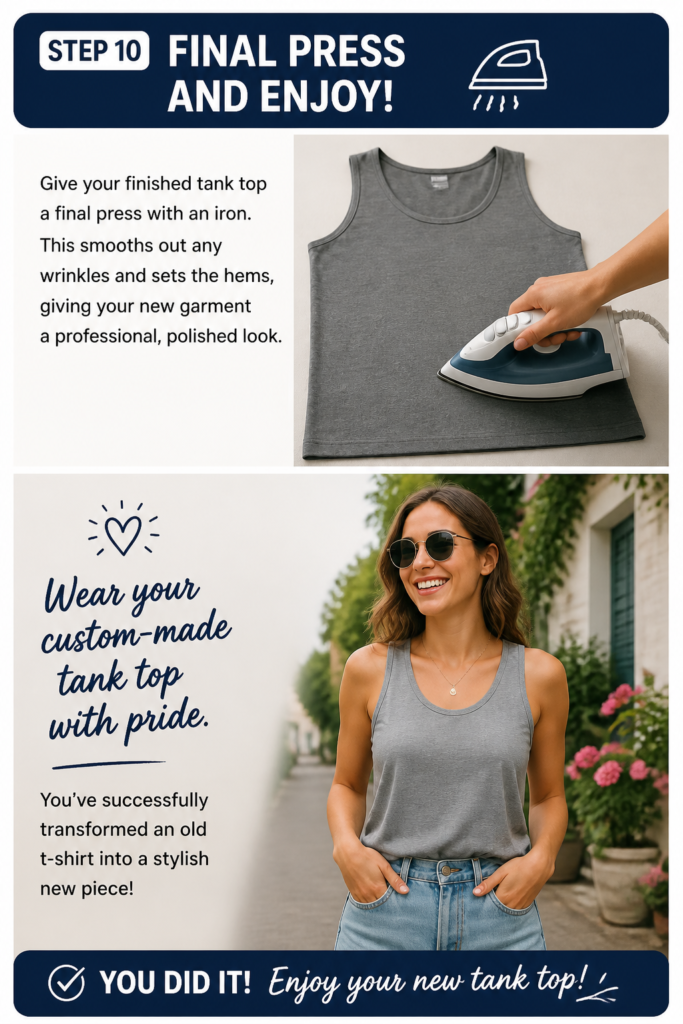
Wear your custom-made tank top with pride. You’ve successfully transformed an old t-shirt into a stylish new piece!
Common Mistakes to Avoid
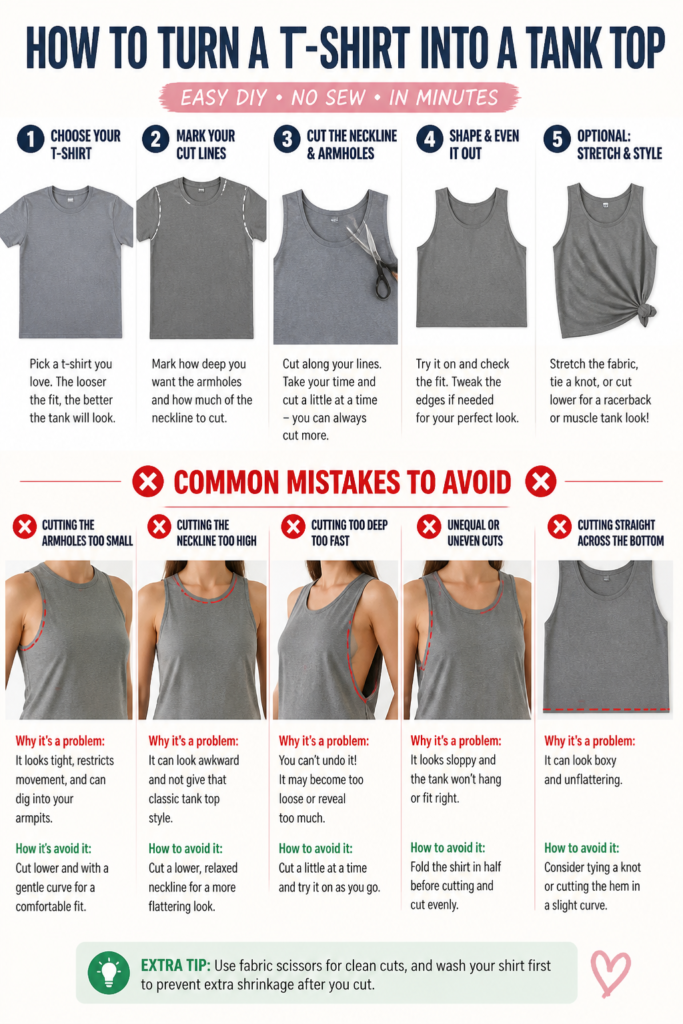
Cutting Too Much Too Soon
Many beginners get excited and cut too close to their desired final line, especially around the armholes and neckline. This leaves no room for error or for hemming, often resulting in a tank top that’s too small or has raw, fraying edges.
Always add a seam allowance (0.5 to 1 inch) around all cut edges. You can always trim more fabric if needed, but you can’t add it back once it’s gone. Err on the side of caution and cut conservatively.
Ignoring Fabric Stretch
T-shirt fabric is typically knit and has some stretch. If you cut it without considering its stretch properties, your tank top might end up distorted or ill-fitting. Cutting on the bias or stretching the fabric while cutting can lead to uneven edges.
Lay your t-shirt flat and smooth, ensuring it’s not stretched or distorted while tracing and cutting. When hemming, avoid pulling the fabric too taut; let it lie naturally to maintain its shape.
Skipping the Hemming Step
Leaving raw edges, especially on knit fabrics, will lead to fraying and unraveling over time, making your tank top look unfinished and worn out quickly. While a “raw edge” look can be intentional, it’s often best to finish edges for durability.
Always hem your cut edges, either by sewing, using fabric glue, or fusible web. This not only prevents fraying but also gives your tank top a much more professional and polished appearance, extending its lifespan.
Using Dull Scissors
Attempting to cut fabric with dull scissors is a recipe for frustration and uneven results. Dull blades will chew through the fabric, creating jagged edges and making it difficult to follow your tracing lines accurately.
Invest in a good pair of sharp fabric scissors specifically for textiles. Keep them separate from paper scissors to maintain their sharpness. Clean, sharp cuts are essential for a neat finish.
Troubleshooting
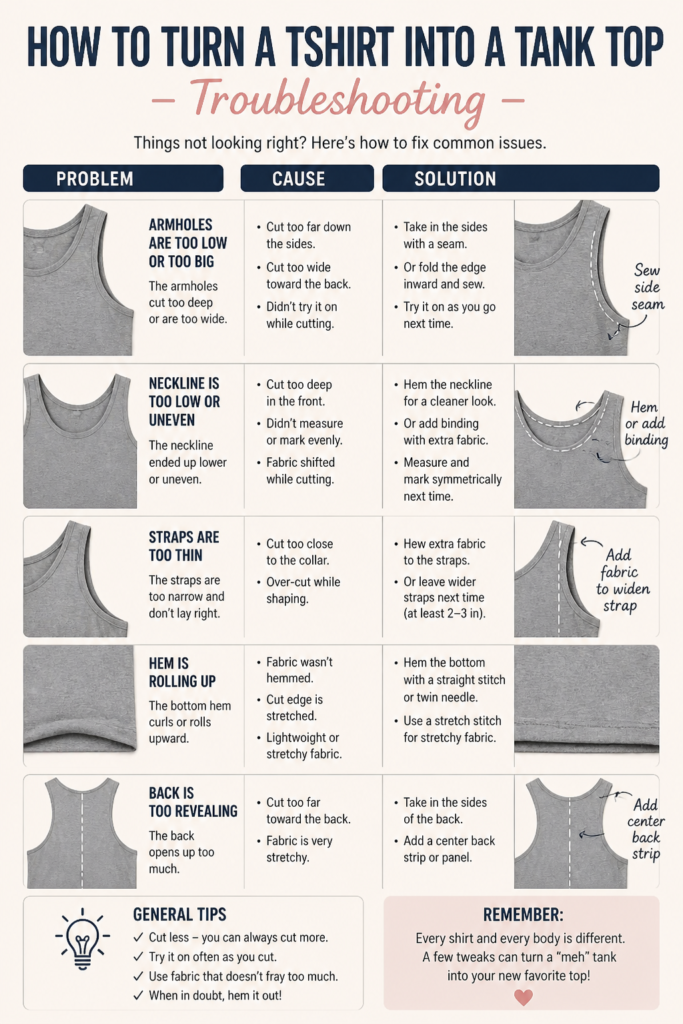
Uneven Armholes or Neckline
If you notice one armhole or side of the neckline is higher or wider than the other after cutting, don’t panic. This is a common issue, especially if the fabric shifted during cutting or if your template wasn’t perfectly aligned.
Fold your tank top in half lengthwise again, carefully aligning all seams. Use your chalk to mark the shorter or narrower side as your guide. Trim the longer or wider side to match, making small adjustments until both sides are symmetrical.
Tank Top Feels Too Loose
Sometimes, after cutting, the tank top might feel a bit too wide or baggy for your liking. This can happen if your template was slightly looser than intended, or if your t-shirt fabric has more stretch than anticipated.
Try the tank top on inside out. Pinch the excess fabric along the side seams until you achieve your desired fit. Mark these new lines with chalk, then carefully stitch along them. Trim the excess fabric, leaving a small seam allowance, and hem the new seams if desired.
Hemming Causes Fabric to Ripple or Stretch
When sewing hems on stretchy t-shirt fabric, it can sometimes ripple or stretch out, making the hem look wavy rather than flat. This often occurs if you’re pulling the fabric too much or using the wrong stitch.
Use a walking foot on your sewing machine if you have one, as it helps feed both layers of fabric evenly. Switch to a ballpoint needle and a zigzag stitch (a narrow one works best). Avoid pulling the fabric as you sew; let the machine guide it gently.
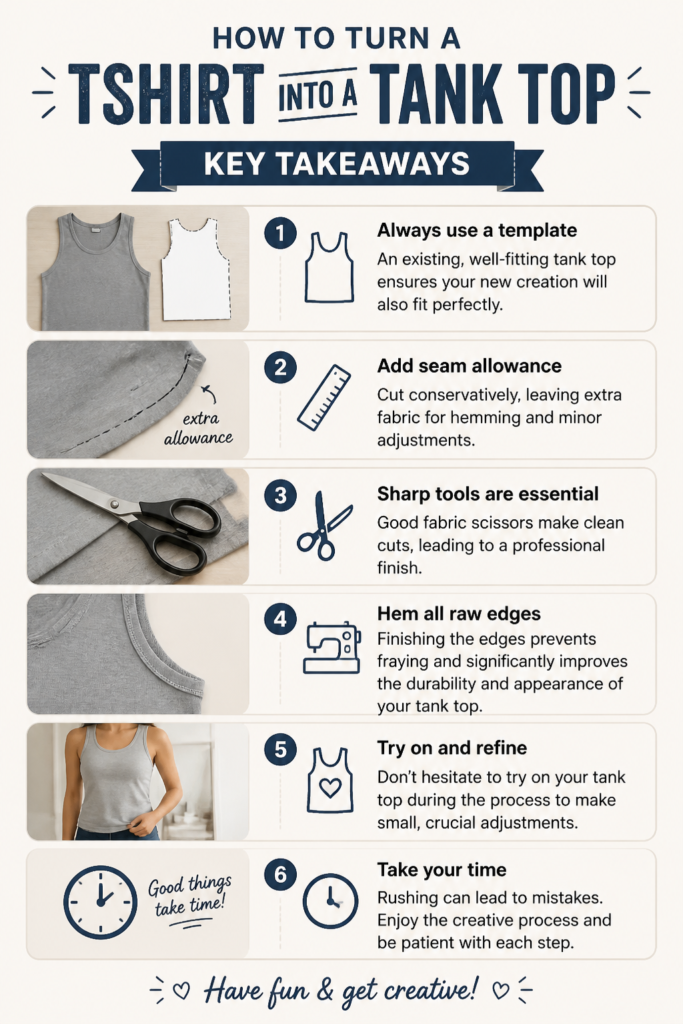
Key Takeaways
- Always use a template: An existing, well-fitting tank top ensures your new creation will also fit perfectly.
- Add seam allowance: Cut conservatively, leaving extra fabric for hemming and minor adjustments.
- Sharp tools are essential: Good fabric scissors make clean cuts, leading to a professional finish.
- Hem all raw edges: Finishing the edges prevents fraying and significantly improves the durability and appearance of your tank top.
- Try on and refine: Don’t hesitate to try on your tank top during the process to make small, crucial adjustments.
- Take your time: Rushing can lead to mistakes. Enjoy the creative process and be patient with each step.
Frequently Asked Questions
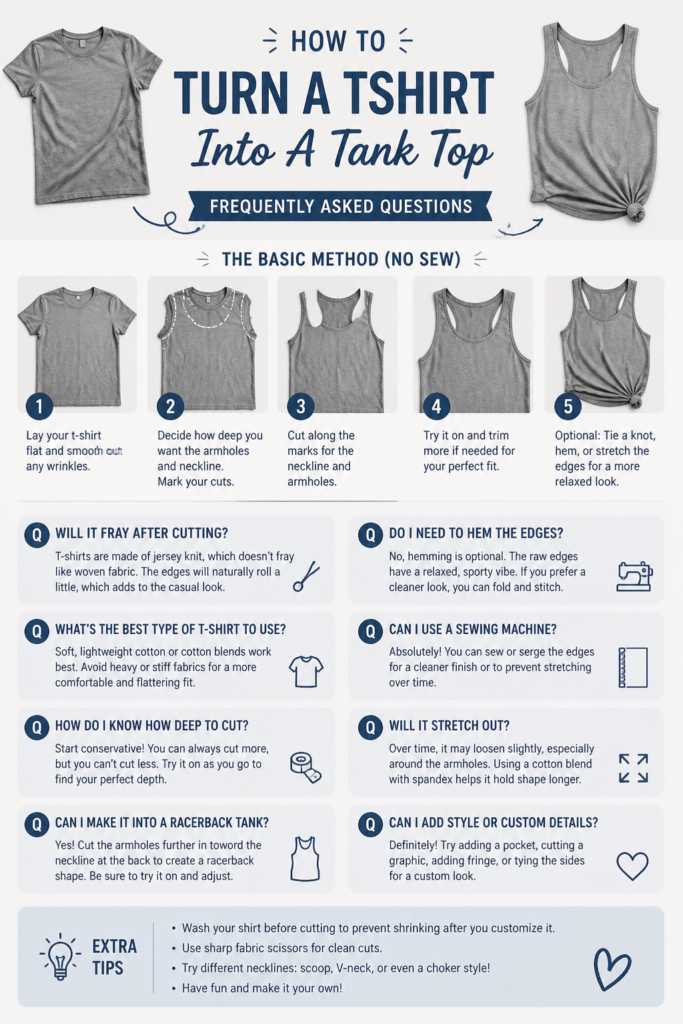
Can I use any t-shirt for this project?
Most t-shirts made from knit fabrics (like cotton jersey) work well. Avoid t-shirts with very thick seams or unusual cuts, as they might be harder to transform smoothly. A comfortable, well-fitting tee is always the best starting point.
Do I need a sewing machine?
No, a sewing machine is not strictly necessary. You can use fabric glue or fusible web tape for a no-sew option to finish your hems. However, sewing provides a more durable and professional finish that will withstand many washes.
How do I prevent the fabric from fraying?
The best way to prevent fraying is to hem all raw edges. Whether you sew them, use fabric glue, or fusible web, enclosing the raw edge will stop the fabric fibers from unraveling. Some knit fabrics fray less than others, but hemming is always recommended.
What if my t-shirt has a graphic I want to keep?
When selecting your t-shirt and positioning your template, be mindful of any graphics. Try to align your cuts so the graphic remains centered and intact on the front of your new tank top. Sometimes, a graphic might dictate a slightly different neckline or armhole shape to preserve it.
Our Top Recommended Finds
- Fiskars Amplify Fabric Scissors: These scissors make cutting through multiple layers of fabric effortless and precise, ensuring clean edges every time.
- Dritz Disappearing Ink Marking Pen: Perfect for tracing your lines without leaving permanent marks, as the ink vanishes over time or with water.
- HeatnBond Ultrahold Iron-On Adhesive: An excellent no-sew option for quickly and securely hemming edges, providing a strong, lasting bond.
Transform Your Wardrobe, One Tee at a Time
You’ve just unlocked a simple yet powerful way to refresh your style and extend the life of your favorite t-shirts. This project is more than just cutting fabric; it’s about creativity, sustainability, and personal expression. Each tank top you create carries a unique story and a touch of your own hands.
Why wait for inspiration to strike? Gather an old t-shirt and your tools today. Give that forgotten tee a brand new purpose and add a unique, custom-made piece to your collection. The satisfaction of wearing something you made yourself is truly unmatched.
Beginner-friendly templates, step-by-step guides,
and weekly project ideas in your inbox.