How To Draw A Skeleton Hand On Your Hand

Beginner-friendly templates, step-by-step guides,
and weekly project ideas in your inbox.
Ever wanted to transform your hand into a spooky, artistic statement? It’s a fantastic way to add a unique touch to your look, whether for Halloween, a costume party, or just for fun. I’ve personally experimented with countless temporary body art designs, and mastering the skeleton hand is both rewarding and surprisingly achievable. This guide will walk you through every detail, ensuring your bony creation looks eerily realistic.

Quick Overview
Transforming your hand into a skeleton masterpiece is an engaging project that yields impressive results. You’ll learn the techniques for sketching, outlining, and shading to create a convincing bony effect. This guide focuses on practical steps to help you achieve a striking design.
- Time needed: 45-75 minutes (includes drawing and setting)
- Difficulty: Beginner to Intermediate (with a little patience)
- What you’ll need: Black eyeliner (liquid pen or pencil), white eyeliner/kohl pencil, makeup setting spray, small mirror, cotton swabs, makeup remover.
Step-by-Step Instructions
Step 1: Gather Your Artistic Arsenal
Before you begin, lay out all your necessary tools. Having everything within reach prevents interruptions and keeps your creative flow going. Good quality products make a big difference in the final look and ease of application.
Choose a black liquid eyeliner pen with a fine tip for crisp lines. This is crucial for detailing bone edges.
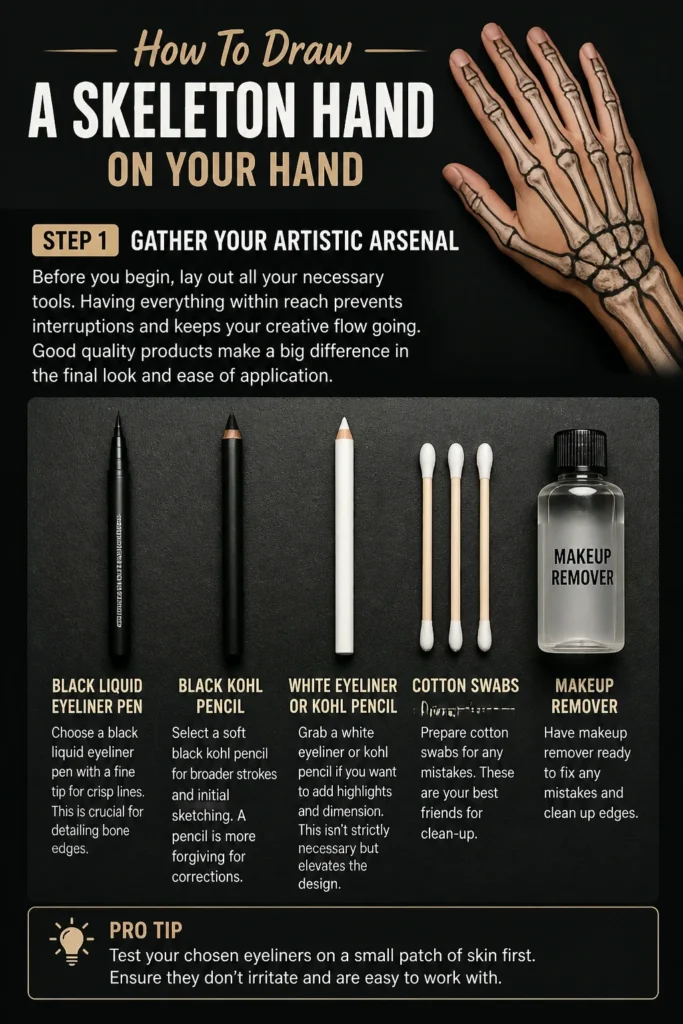
Select a soft black kohl pencil for broader strokes and initial sketching. A pencil is more forgiving for corrections.
Grab a white eyeliner or kohl pencil if you want to add highlights and dimension. This isn’t strictly necessary but elevates the design.
Prepare cotton swabs and makeup remover for any mistakes. These are your best friends for clean-up.
Pro Tip: Test your chosen eyeliners on a small patch of skin first. Ensure they don’t irritate and are easy to work with. Some formulas smudge less than others.
Step 2: Prepare Your Canvas for Creation
Your hand is the canvas, and proper preparation ensures the makeup adheres well and lasts longer. A clean, smooth surface is key for precise drawing. This step also involves finding the right environment.
Wash your hand thoroughly with soap and water. Make sure it’s completely dry before applying any makeup.
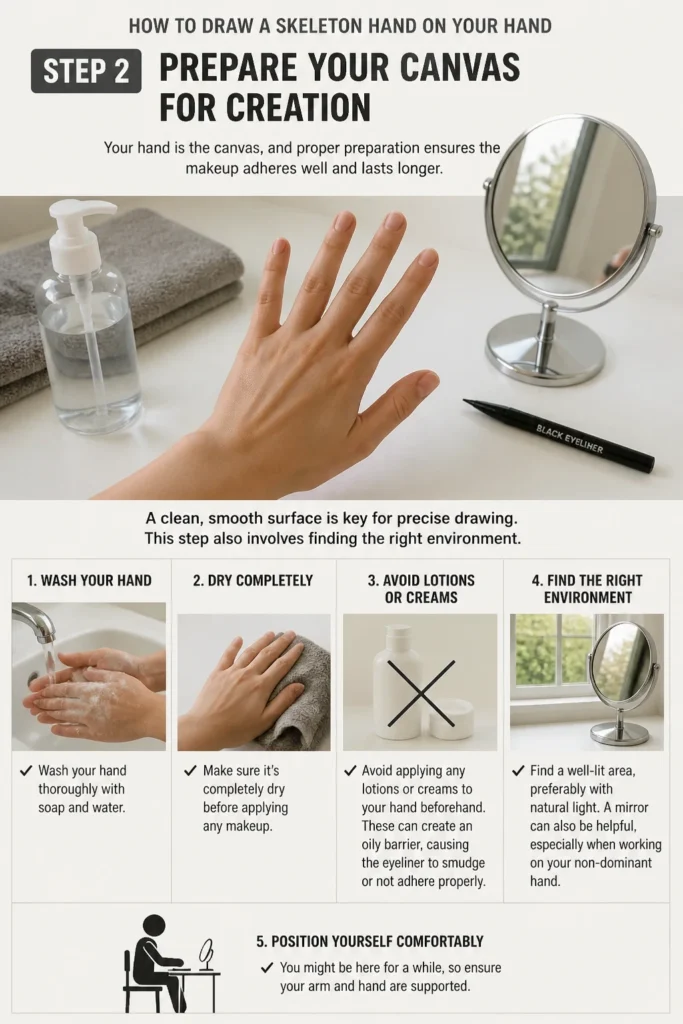
Avoid applying any lotions or creams to your hand beforehand. These can create an oily barrier, causing the eyeliner to smudge or not adhere properly.
Find a well-lit area, preferably with natural light. A mirror can also be helpful, especially when working on your non-dominant hand.
Position yourself comfortably. You might be here for a while, so ensure your arm and hand are supported.
Step 3: Map Out the Basic Bone Structure
This initial sketch is the blueprint for your skeleton hand. Don’t press too hard; these lines are just guides. Focus on the general placement of the major bones.
Start with your non-dominant hand. Use your black kohl pencil for this step, as it’s easier to erase.
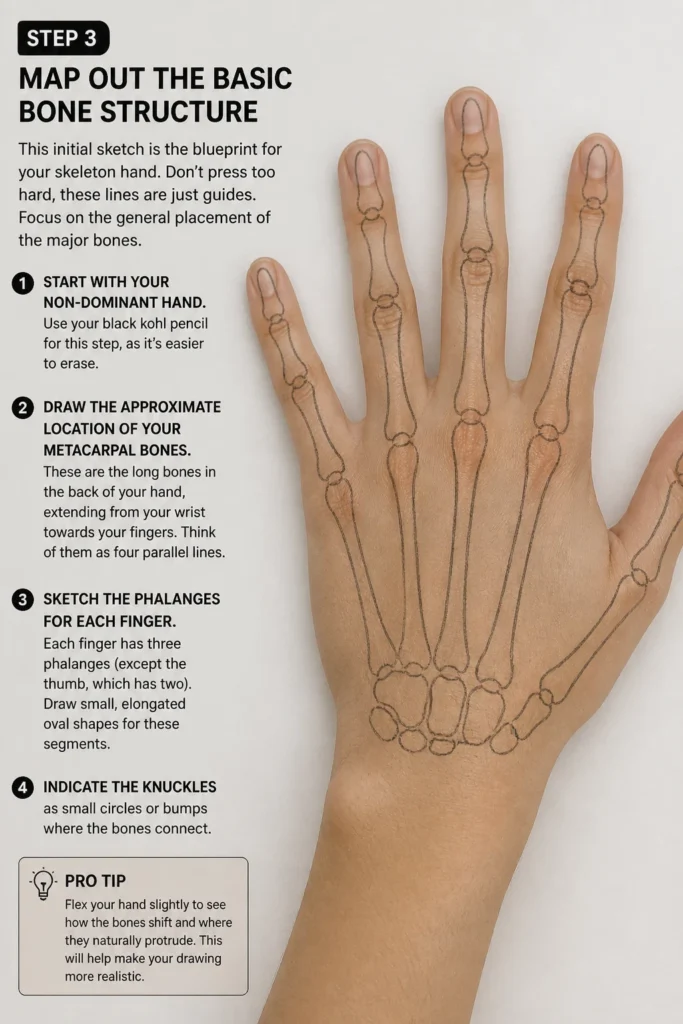
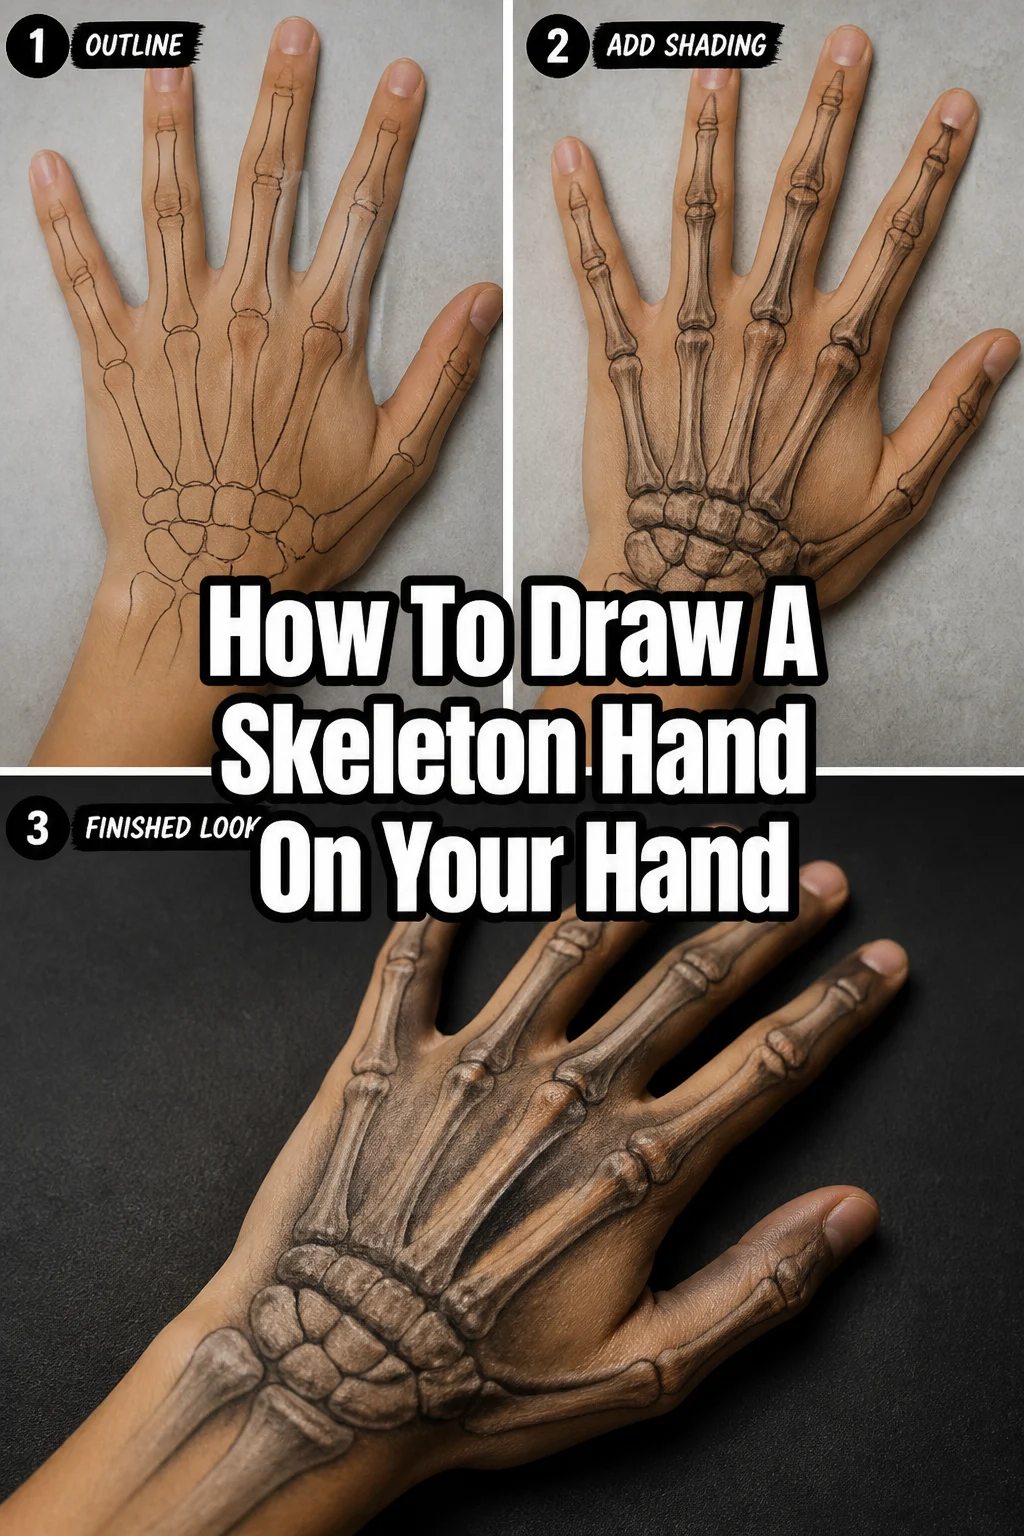
Draw the approximate location of your metacarpal bones. These are the long bones in the back of your hand, extending from your wrist towards your fingers. Think of them as four parallel lines.
Sketch the phalanges for each finger. Each finger has three phalanges (except the thumb, which has two). Draw small, elongated oval shapes for these segments.
Indicate the knuckles as small circles or bumps where the bones connect. Don’t worry about perfection at this stage; just get the proportions right.
Pro Tip: Flex your hand slightly to identify where your bones and knuckles naturally protrude. This helps you place your initial guide lines more accurately. Use a reference image of a skeleton hand if you’re unsure.
Step 4: Outline and Define the Bones
Now it’s time to give your bones a more solid form. This step involves creating the distinct shapes of each bone segment. Use a slightly firmer hand, but still be ready to correct.
Trace over your kohl pencil sketch with your fine-tip black liquid eyeliner. Create the distinct, slightly curved shapes of the metacarpals and phalanges.
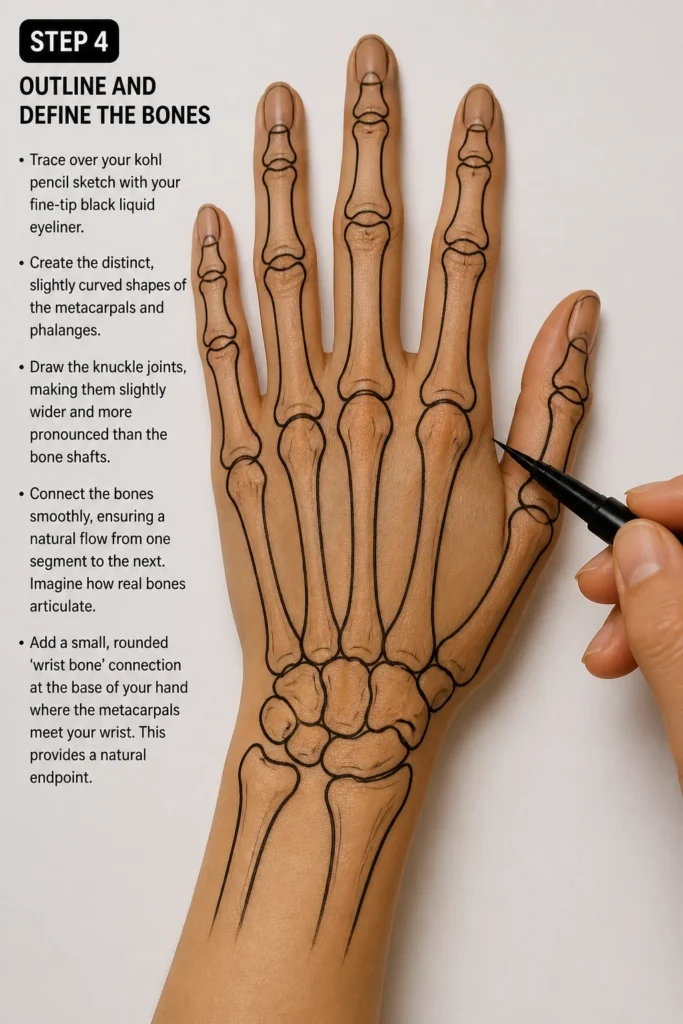
Draw the knuckle joints, making them slightly wider and more pronounced than the bone shafts. Skeletons have prominent joints.
Connect the bones smoothly, ensuring a natural flow from one segment to the next. Imagine how real bones articulate.
Add a small, rounded ‘wrist bone’ connection at the base of your hand where the metacarpals meet your wrist. This provides a natural endpoint.
Step 5: Add Depth Through Shading and Details
This is where your skeleton hand truly comes to life, or rather, to death. Shading creates the illusion of three-dimensionality, making the bones appear to pop out. Details add realism.
Fill in the spaces between the bones with black eyeliner. This creates the dark, hollow areas that contrast with the white of the bones.
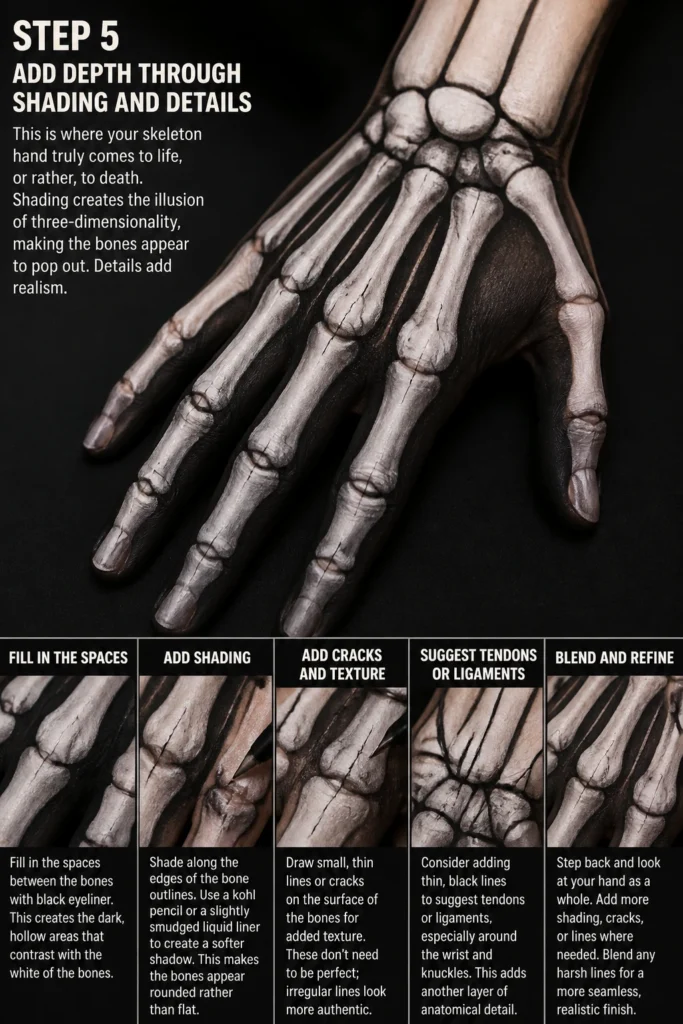
Shade along the edges of the bone outlines. Use a kohl pencil or a slightly smudged liquid liner to create a softer shadow. This makes the bones appear rounded rather than flat.
Draw small, thin lines or cracks on the surface of the bones for added texture. These don’t need to be perfect; irregular lines look more authentic.
Consider adding thin, black lines to suggest tendons or ligaments, especially around the wrist and knuckles. This adds another layer of anatomical detail.
Pro Tip: For softer shading, draw a line with your kohl pencil and then gently smudge it with a clean cotton swab or your fingertip. Build up the darkness gradually.
Step 6: Introduce Highlights (Optional but Recommended)
Highlights are the secret to making your skeleton hand truly stand out. They catch the light and enhance the illusion of bone structure. This step brings the design to a professional level.
Use your white eyeliner or kohl pencil for this step. A fine-tip white liner is ideal.
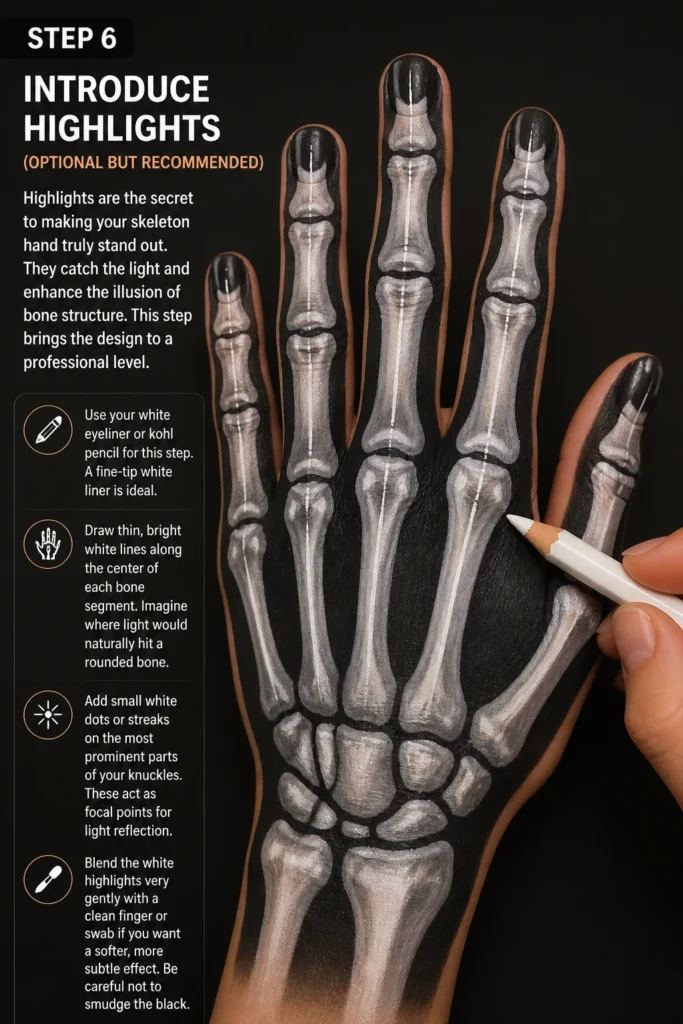
Draw thin, bright white lines along the center of each bone segment. Imagine where light would naturally hit a rounded bone.
Add small white dots or streaks on the most prominent parts of your knuckles. These act as focal points for light reflection.
Blend the white highlights very gently with a clean finger or swab if you want a softer, more subtle effect. Be careful not to smudge the black.
Step 7: Refine, Clean Up, and Perfect
Take a moment to step back and examine your work. This is your chance to make any final adjustments, sharpen lines, and clean up stray marks. Precision here elevates the overall look.
Review your entire design in the mirror. Look for any smudges, uneven lines, or areas that need more definition.
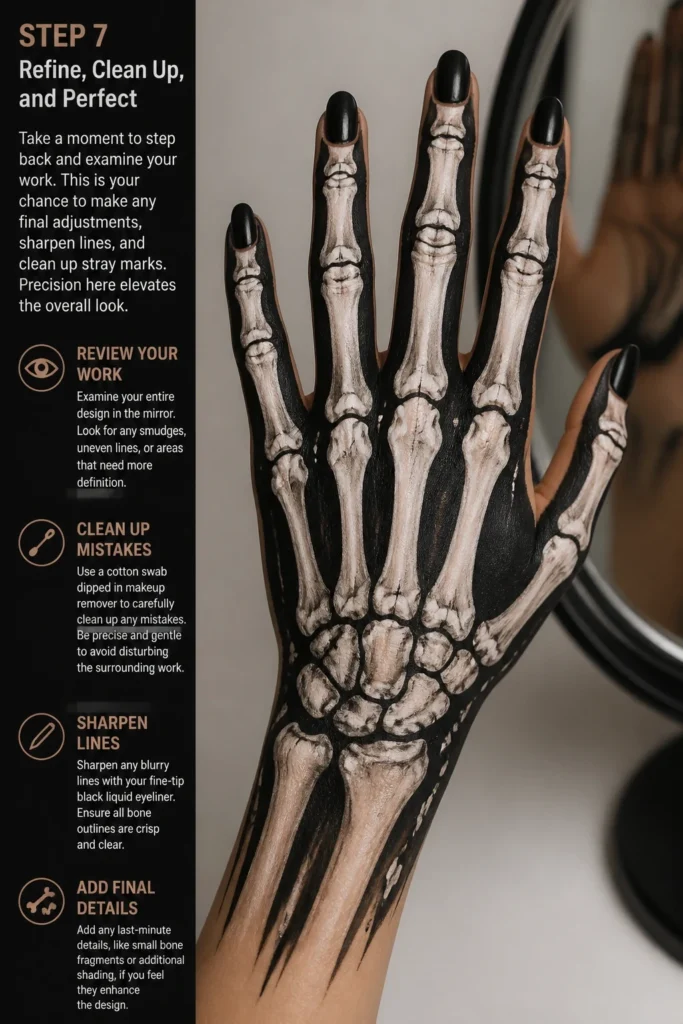
Use a cotton swab dipped in makeup remover to carefully clean up any mistakes. Be precise and gentle to avoid disturbing the surrounding work.
Sharpen any blurry lines with your fine-tip black liquid eyeliner. Ensure all bone outlines are crisp and clear.
Add any last-minute details, like small bone fragments or additional shading, if you feel they enhance the design.
Step 8: Set Your Spooky Masterpiece
The final, crucial step is to lock your design in place. This prevents smudging and helps your skeleton hand last longer. Don’t skip this, especially if you plan to wear it out.
Hold your makeup setting spray about 8-12 inches away from your hand. Close your eyes if spraying near your face.
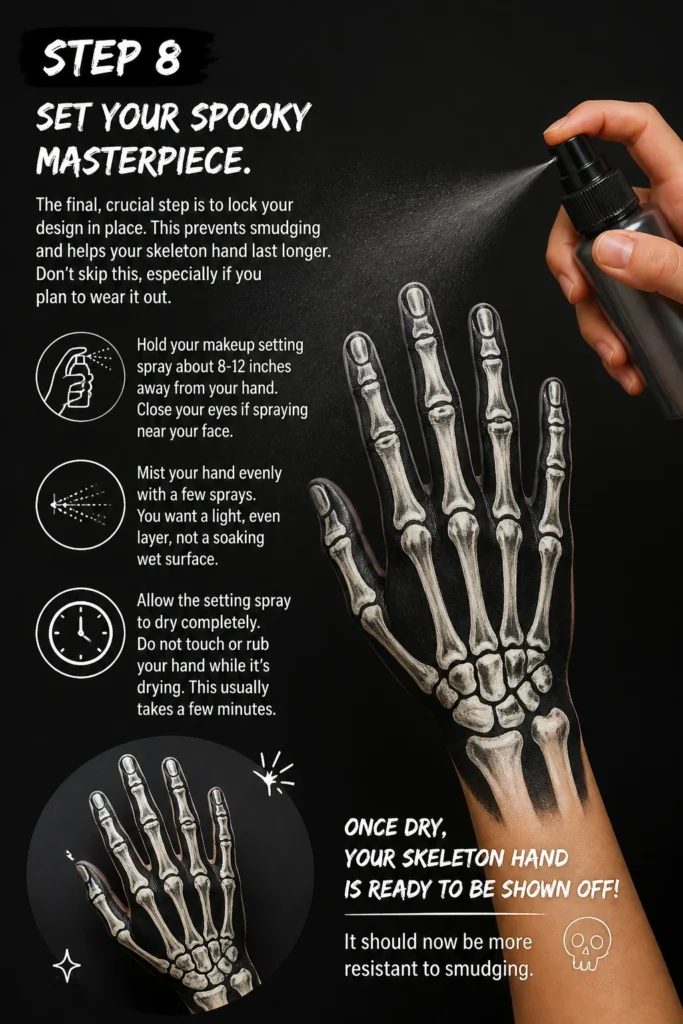
Mist your hand evenly with a few sprays. You want a light, even layer, not a soaking wet surface.
Allow the setting spray to dry completely. Do not touch or rub your hand while it’s drying. This usually takes a few minutes.
Once dry, your skeleton hand is ready to be shown off! It should now be more resistant to smudging.
Common Mistakes to Avoid
Rushing the Initial Sketch
Skipping the light sketch or drawing too quickly often leads to disproportionate bones and an overall uneven design. The initial blueprint guides your hand and ensures anatomical accuracy. Take your time during Step 3 to lightly map out all the bones. This foundation is essential for a convincing final product.
Ignoring Hand Anatomy
Many beginners draw generic bone shapes without considering the actual structure of a hand. This results in an unrealistic or cartoonish look. Pay attention to how your own bones and knuckles articulate. Use reference images of skeleton hands to understand the unique curves and connections of metacarpals and phalanges.
Applying Too Much Product at Once
Heavy application of eyeliner, especially liquid, can lead to smudging, thick lines, and a messy appearance. It’s much harder to remove excess product than to add more. Work in light layers, building up color and definition gradually. This gives you more control and allows for easier corrections.
Forgetting to Set the Design
After all your hard work, failing to use a setting spray means your design is highly susceptible to smudging and fading. Without a protective layer, a simple touch or brush against clothing can ruin your art. Always finish with a good quality makeup setting spray to lock in your design and extend its wear.
Troubleshooting
Lines Are Smudging Easily
If your lines are smudging, it’s often due to either oil on the skin, too much product, or insufficient drying time. Ensure your hand is completely clean and dry before starting. Apply eyeliner in thin layers, allowing each layer to dry slightly before adding more. A good setting spray applied at the end will significantly help.
Design Looks Flat and Unrealistic
A flat design usually lacks proper shading and highlights. Real bones have depth and dimension. Go back to Step 5 and Step 6. Focus on filling in the spaces between the bones with darker shades and adding subtle shadows along the bone edges. Then, introduce bright white highlights where light would naturally hit to make the bones appear rounded and prominent.
Difficulty Drawing with Non-Dominant Hand
Drawing with your non-dominant hand can be challenging and frustrating. Practice is key here. Start with simpler designs or just basic bone outlines on your non-dominant hand. Use a mirror to help guide your movements, as it can sometimes make the process feel more intuitive. Don’t be afraid to take breaks and come back to it.
Key Takeaways
- Preparation is paramount: A clean, dry hand and organized tools set the stage for success.
- Sketch lightly first: Use a kohl pencil to map out bone placement before committing with liquid liner.
- Focus on anatomy: Reference real skeleton hands to ensure your bone shapes and articulation are convincing.
- Build depth with shading: Use darker tones in the gaps and softer shadows on bone edges for a 3D effect.
- Highlights add realism: White eyeliner can make bones pop and appear more rounded.
- Always set your artwork: A good makeup setting spray protects your design from smudges and prolongs its life.
Frequently Asked Questions
What kind of makeup is best for a skeleton hand?
For crisp lines and good contrast, a fine-tip black liquid eyeliner pen is ideal. A soft black kohl pencil is excellent for initial sketching and shading. For highlights, a white kohl pencil or liquid eyeliner works well. Always use cosmetic-grade products safe for skin.
How long will the skeleton hand design last?
With proper preparation and a good makeup setting spray, your skeleton hand design can last several hours, even through light activity. Avoid rubbing or getting your hand wet, as this will cause it to fade or smudge more quickly.
Can I use permanent markers or acrylic paints?
No, absolutely do not use permanent markers, acrylic paints, or any non-cosmetic products on your skin. These can cause severe skin irritation, allergic reactions, or be very difficult and potentially harmful to remove. Stick to makeup products designed for skin.
Is it hard to remove the design?
No, the design should be relatively easy to remove. Use your regular makeup remover, micellar water, or soap and water. Gently rub with a cotton pad or cloth until all the makeup is gone. Follow up with moisturizer to keep your skin hydrated.
Our Top Recommended Finds
- Fine-Tip Liquid Eyeliner Pen: Essential for precise bone outlines and intricate details. Look for waterproof or long-wear formulas.
- Soft Black Kohl Eyeliner Pencil: Perfect for initial sketching, filling in gaps, and creating subtle shading effects.
- Makeup Setting Spray: A non-negotiable for locking in your design, preventing smudges, and extending wear time.
Unleash Your Inner Artist: Start Drawing Today!
Creating a skeleton hand on your own hand is more than just drawing; it’s an exploration of anatomy, light, and shadow. Each line you draw brings you closer to a captivating piece of temporary art. It’s a fantastic skill to develop, offering endless possibilities for creative expression.
Don’t wait for a special occasion. Grab your tools, find a comfortable spot, and begin your artistic journey. Practice makes perfect, and every attempt refines your technique. Share your creations, experiment with different styles, and most importantly, have fun with it!
Beginner-friendly templates, step-by-step guides,
and weekly project ideas in your inbox.