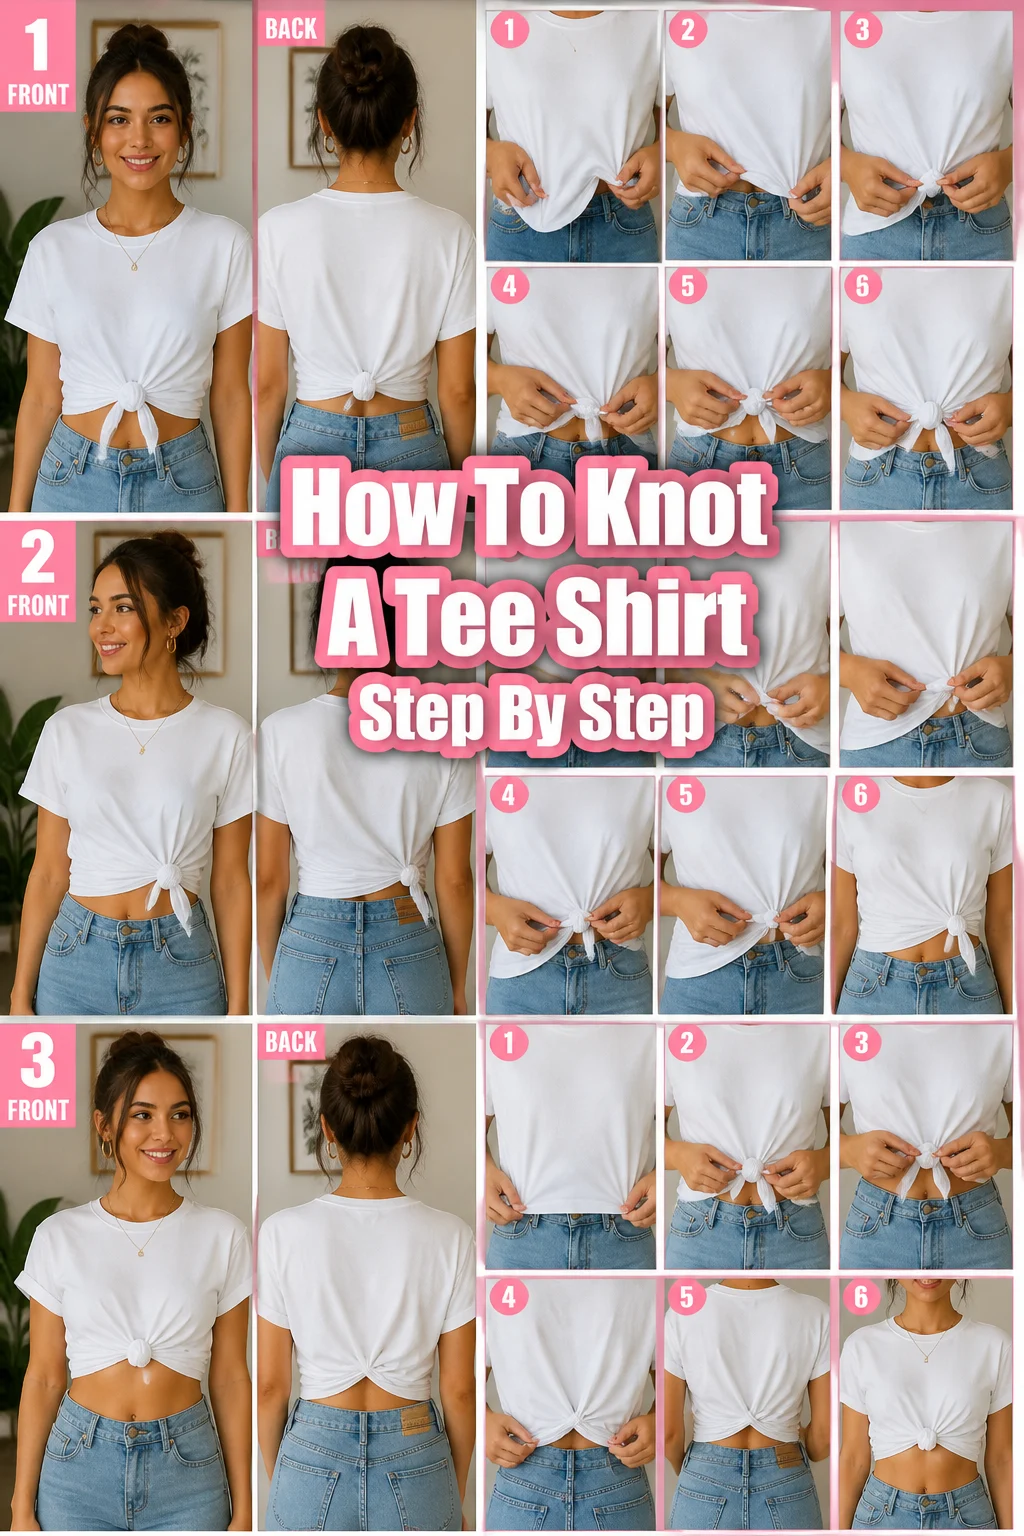
👕 How To Knot A Tee Shirt Step By Step

Beginner-friendly templates, step-by-step guides,
and weekly project ideas in your inbox.
Remember that moment you saw someone effortlessly sporting a perfectly knotted tee shirt, looking casually chic? I certainly do. It’s a simple style trick that instantly transforms a basic top, adding flair and defining your silhouette. After years of experimenting with different fabrics and techniques, I’ve refined the art of the perfect tee shirt knot.
This guide will walk you through everything you need to know, from the basic technique to advanced styling tips. You’ll soon be knotting your tees like a pro, creating versatile looks for any occasion.

Quick Overview
Transforming your tee shirt with a stylish knot is easier than you think. This guide will help you master various knotting techniques to elevate your everyday wardrobe. You’ll be adding a personalized touch to your outfits in no time.
- Time needed: 2-5 minutes
- Difficulty: Beginner
- What you’ll need: A tee shirt (any style), a mirror (optional, but helpful)
Step-by-Step Instructions
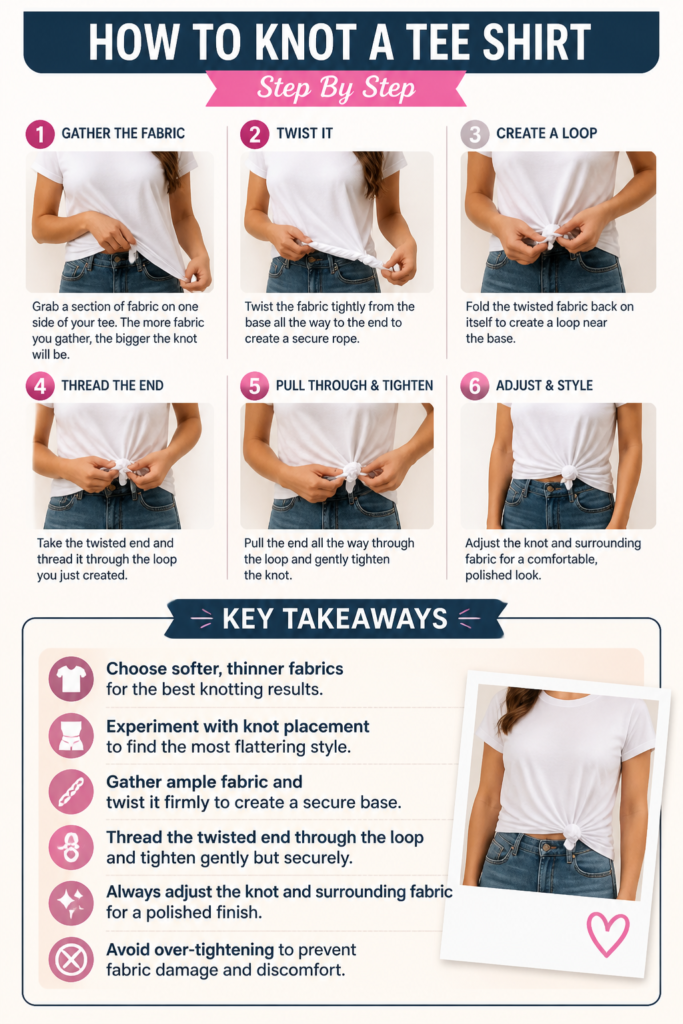
Step 1: Choose Your Tee Shirt Wisely
Start by selecting the right tee shirt for knotting. Thinner, softer fabrics like cotton blends or modal work best, as they are more pliable and create a cleaner knot. Stiffer, thicker tees can result in a bulky or awkward knot.
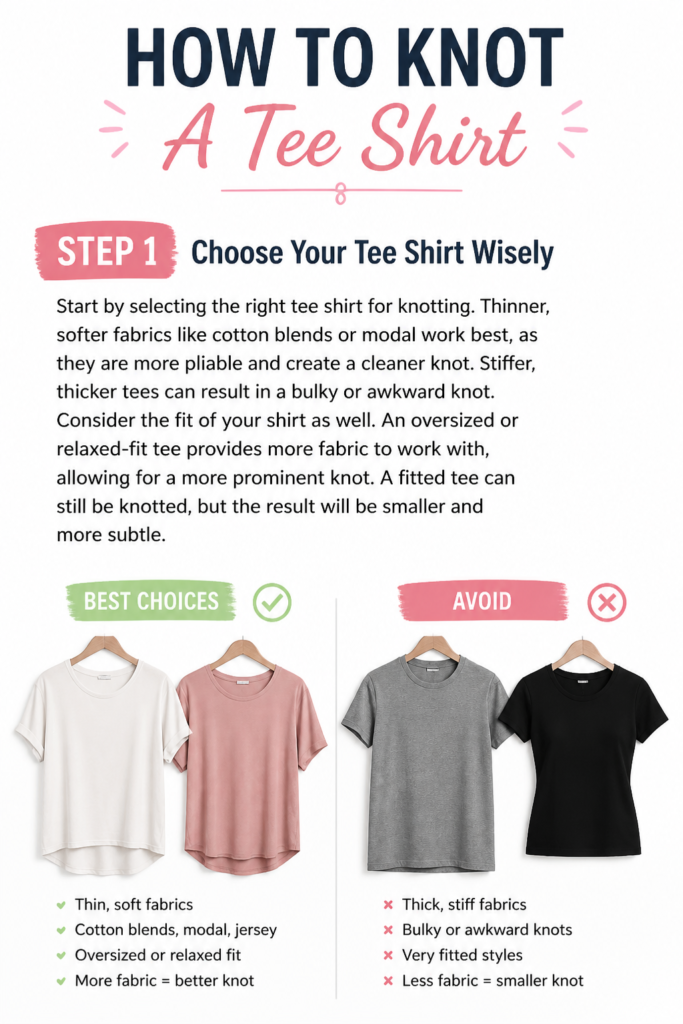
Consider the fit of your shirt as well. An oversized or relaxed-fit tee provides more fabric to work with, allowing for a more prominent knot. A fitted tee can still be knotted, but the result will be smaller and more subtle.
Step 2: Determine Your Knot Placement
Think about where you want the knot to sit on your body. Common placements include the center front, to the side at the hip, or even higher up under the bust for a cropped effect. Your desired look will influence how much fabric you gather.
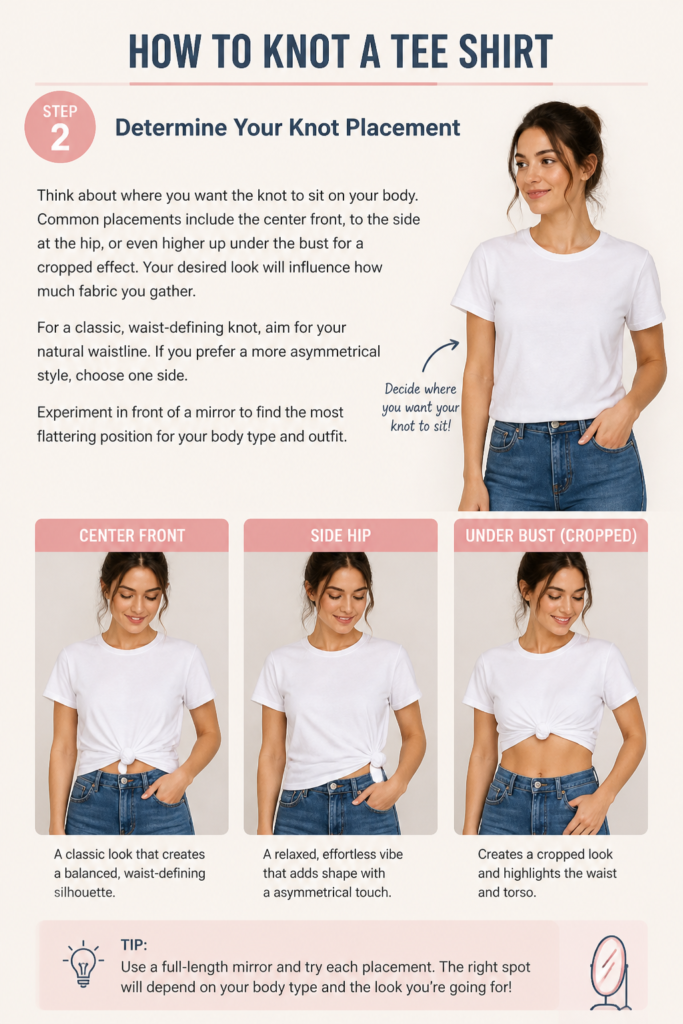
For a classic, waist-defining knot, aim for your natural waistline. If you prefer a more asymmetrical style, choose one side. Experiment in front of a mirror to find the most flattering position for your body type and outfit.
Step 3: Gather the Fabric
Hold the bottom hem of your tee shirt with one hand. Begin to gather the fabric upwards from the hem towards your chosen knot placement. Collect enough fabric to form a substantial bunch that you can comfortably grip.
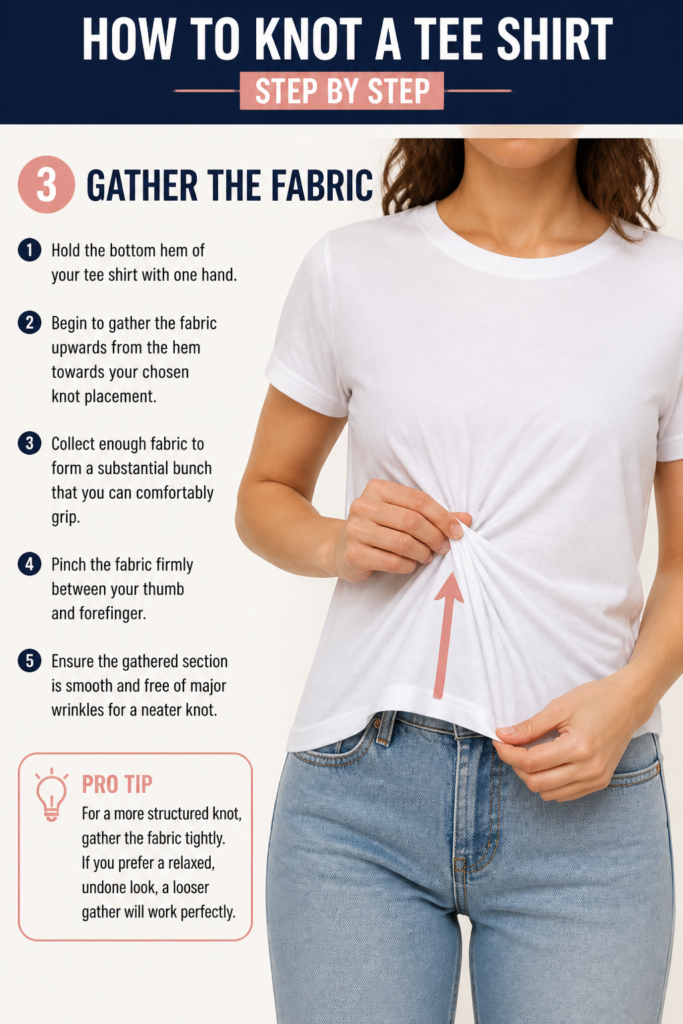
Pinch the fabric firmly between your thumb and forefinger. Ensure the gathered section is smooth and free of major wrinkles for a neater knot. The amount of fabric you gather directly impacts the size of your finished knot.
Pro Tip: For a more structured knot, gather the fabric tightly. If you prefer a relaxed, undone look, a looser gather will work perfectly.
Step 4: Twist the Fabric
Once you have a firm grip on the gathered fabric, begin to twist it. Rotate the fabric in one direction, either clockwise or counter-clockwise, forming a tight spiral. Continue twisting until you have a firm, rope-like section.
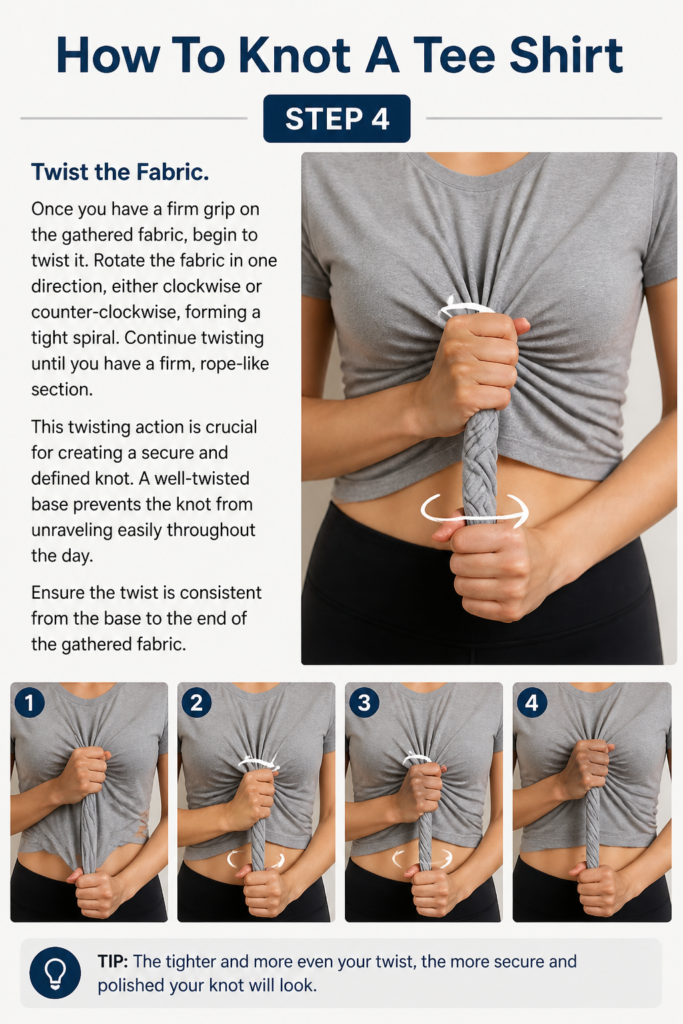
This twisting action is crucial for creating a secure and defined knot. A well-twisted base prevents the knot from unraveling easily throughout the day. Ensure the twist is consistent from the base to the end of the gathered fabric.
Step 5: Form the Loop
With the twisted fabric still held firmly, gently fold it back on itself to create a loop. The size of this loop will determine the overall size and prominence of your knot. A larger loop creates a bolder statement.
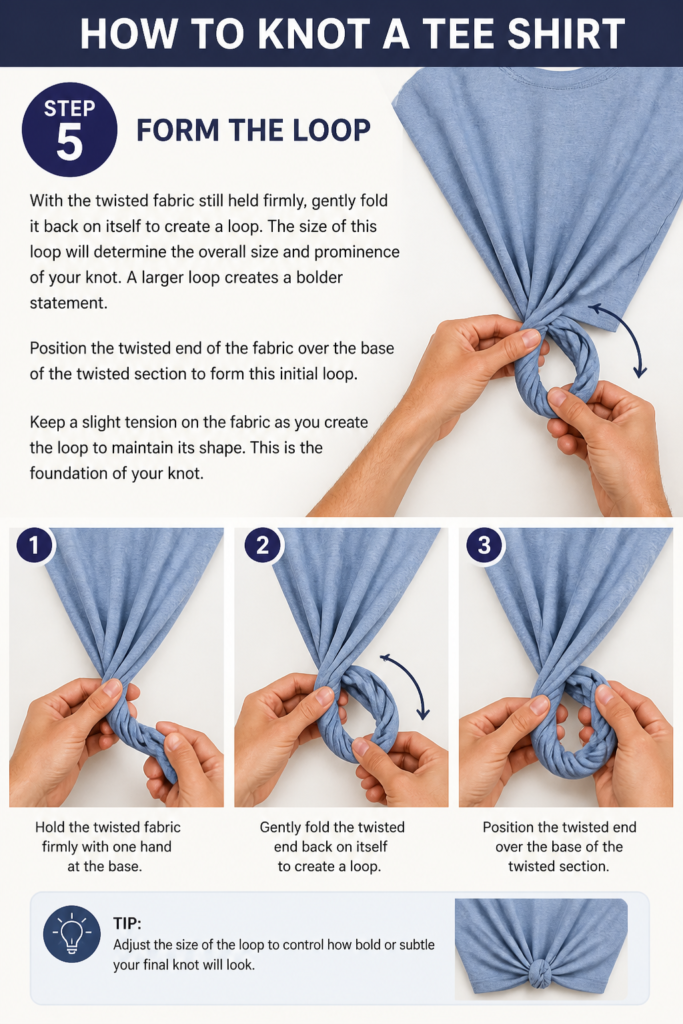
Position the twisted end of the fabric over the base of the twisted section to form this initial loop. Keep a slight tension on the fabric as you create the loop to maintain its shape. This is the foundation of your knot.
Step 6: Thread Through the Loop
Take the loose end of the twisted fabric and thread it through the loop you just created. Push the end completely through the loop, pulling it out the other side. This action begins to secure the knot.
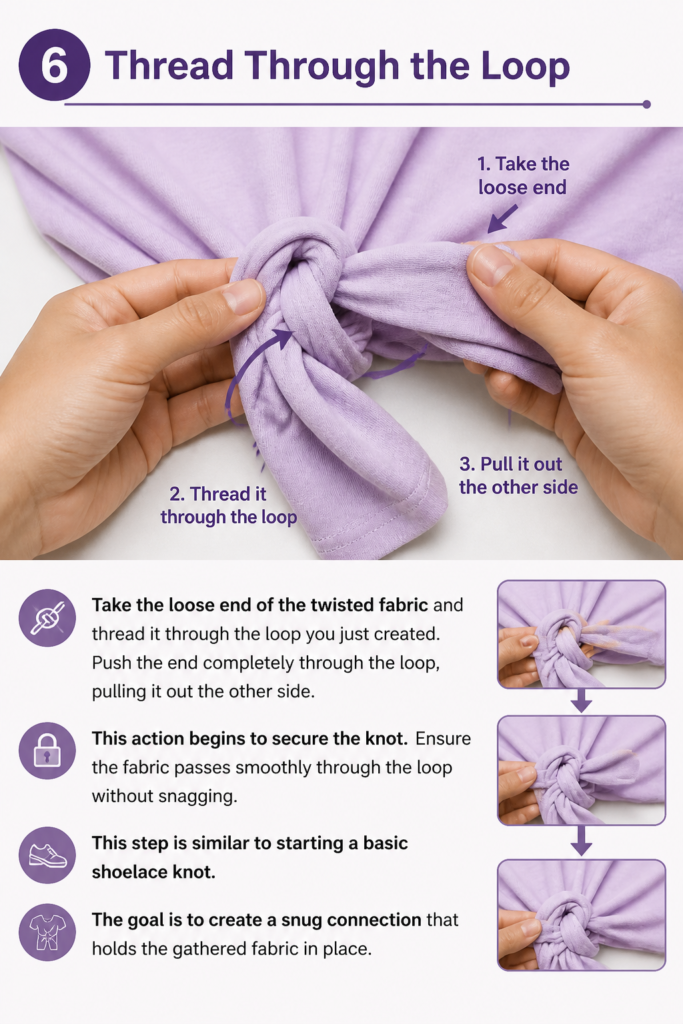
Ensure the fabric passes smoothly through the loop without snagging. This step is similar to starting a basic shoelace knot. The goal is to create a snug connection that holds the gathered fabric in place.
Step 7: Tighten the Knot
Once the end is threaded through, gently pull both the loop and the loose end of the fabric in opposite directions. This action will tighten the knot, making it secure and compact. Adjust the tension until you achieve your desired look.
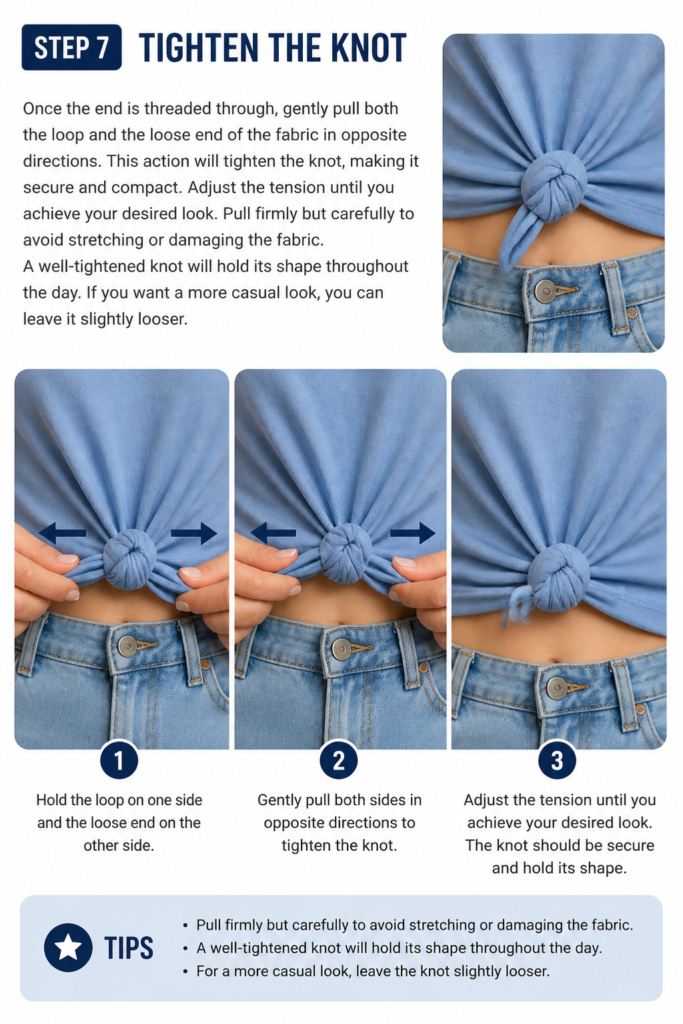
Pull firmly but carefully to avoid stretching or damaging the fabric. A well-tightened knot will hold its shape throughout the day. If you want a more casual look, you can leave it slightly looser.
Step 8: Adjust and Style
After tightening, take a moment to adjust the knot. Smooth out any wrinkles around the knot and ensure it sits evenly. You can gently tug at the fabric around the knot to create a more relaxed drape or to fine-tune its position.
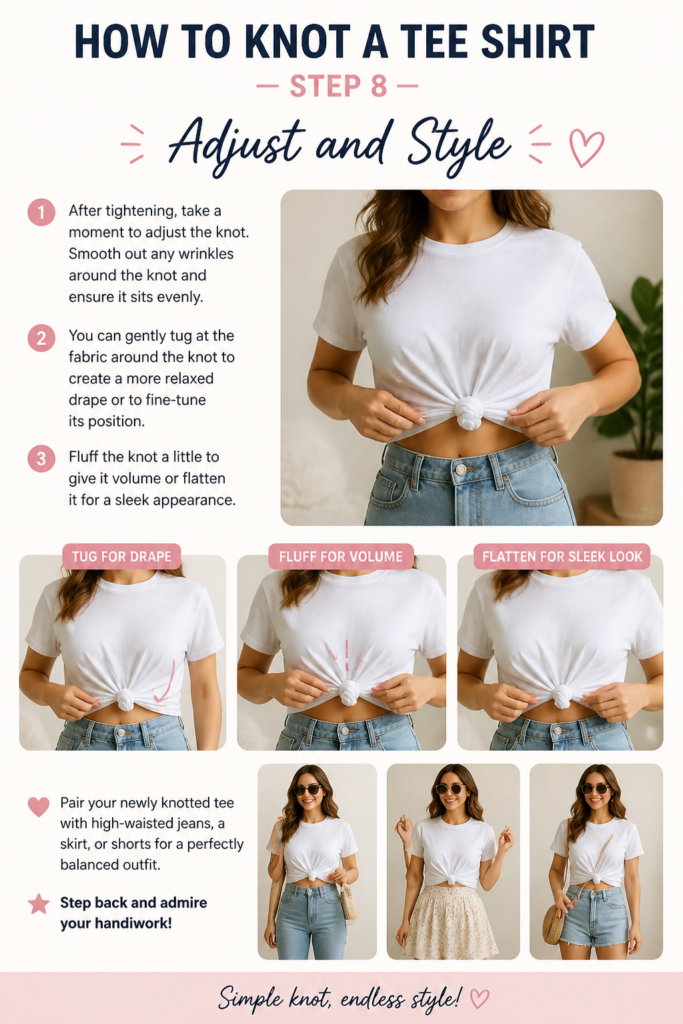
Fluff the knot a little to give it volume or flatten it for a sleek appearance. Pair your newly knotted tee with high-waisted jeans, a skirt, or shorts for a perfectly balanced outfit. Step back and admire your handiwork!
Common Mistakes to Avoid
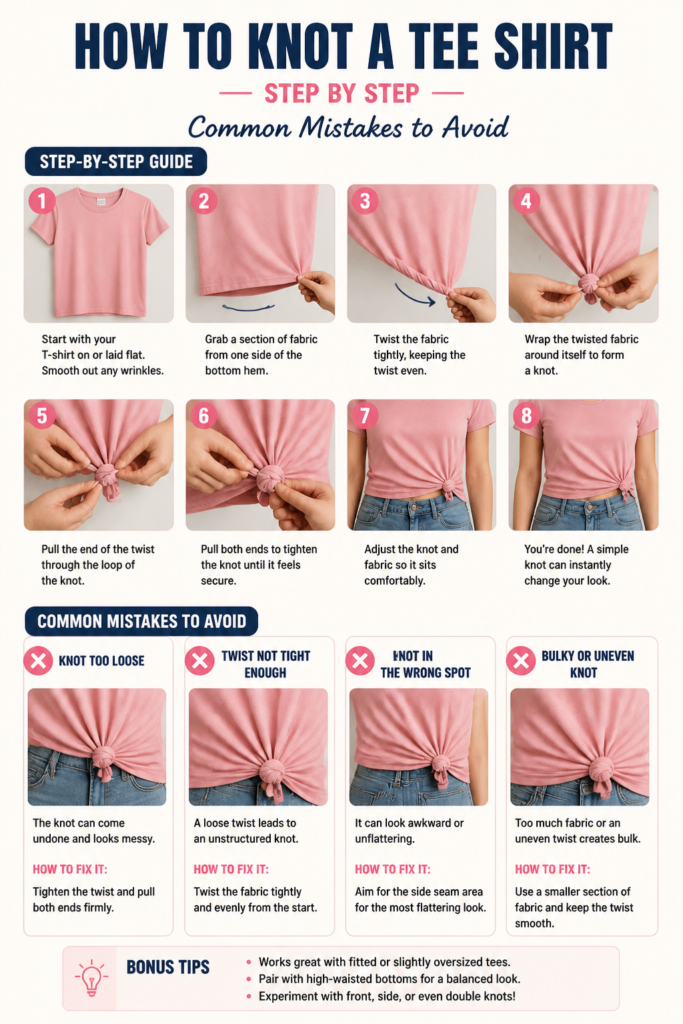
Gathering Too Little Fabric
One common error is not gathering enough fabric for the knot. This results in a tiny, flimsy knot that easily comes undone or looks insignificant against the rest of the shirt. It fails to create the desired impact or shape.
Always ensure you collect a generous amount of fabric from the hem. More fabric allows for a fuller, more substantial knot that holds its shape better and makes a stronger style statement. Don’t be shy with your gather.
Not Twisting Enough
Failing to adequately twist the gathered fabric is another frequent mistake. If the fabric isn’t twisted tightly into a rope-like shape, the knot will be loose, messy, and prone to unraveling. It won’t have the crisp definition you want.
Take your time to twist the fabric firmly and consistently before forming the loop. A tight twist provides the necessary structure and tension for a secure and neat knot that stays in place all day long.
Over-tightening the Knot
While a secure knot is good, pulling too hard can stretch the fabric or create an unsightly, puckered effect around the knot. This can damage the tee shirt and make the area look strained rather than stylish.
Tighten the knot until it feels firm and secure, but stop before you see any signs of fabric distortion or stress. A gentle yet firm pull is key to achieving a neat, well-formed knot without causing damage.
Incorrect Placement
Placing the knot in an awkward or unflattering position can detract from your overall look. A knot that’s too high, too low, or off-center without intention can make your outfit feel unbalanced or uncomfortable.
Experiment with different placements in front of a mirror to find what works best for your body and the specific tee shirt. Consider your outfit’s silhouette and where the knot will best enhance it.
Troubleshooting
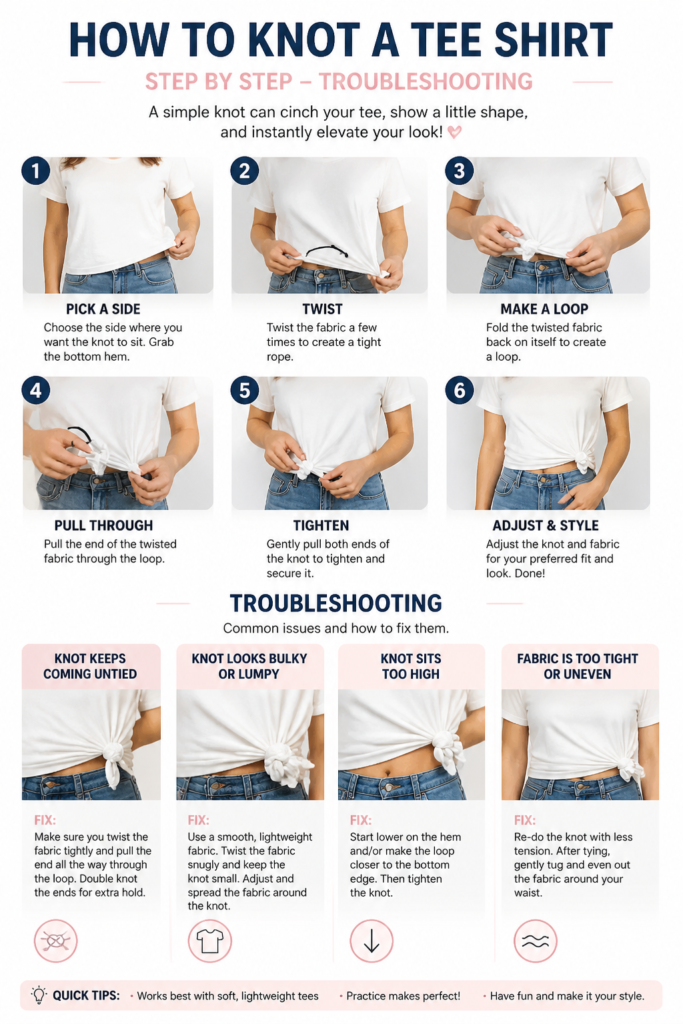
Knot Keeps Coming Undone
If your knot isn’t staying put, it’s likely due to insufficient twisting or not pulling it tight enough. A loose initial twist won’t provide the necessary friction to hold the knot in place. Fine, slippery fabrics can also contribute to this issue.
Retwist the gathered fabric more firmly, creating a denser, rope-like structure. Then, when forming and tightening the knot, pull with a bit more deliberate force. For very slippery fabrics, consider a double knot for extra security.
Knot Looks Bulky or Messy
A bulky or messy knot often happens when too much fabric is gathered from a thicker tee shirt, or the fabric isn’t smoothed before twisting. Wrinkles caught in the knot can also make it appear untidy.
Try gathering slightly less fabric, especially with heavier materials. Before twisting, gently smooth out the fabric to remove any major creases. If your shirt is very thick, opt for a smaller, simpler knot.
Knot Feels Uncomfortable
If the knot is digging into your skin or feels restrictive, its placement might be too tight against your body, or the knot itself is too large for the amount of fabric available. This can be particularly noticeable when sitting.
Adjust the knot’s position slightly to a more comfortable spot, perhaps a little looser or further from your skin. You can also try a smaller knot by gathering less fabric, which reduces its overall bulk.
Key Takeaways
- Choose softer, thinner fabrics for the best knotting results.
- Experiment with knot placement to find the most flattering style.
- Gather ample fabric and twist it firmly to create a secure base.
- Thread the twisted end through the loop and tighten gently but securely.
- Always adjust the knot and surrounding fabric for a polished finish.
- Avoid over-tightening to prevent fabric damage and discomfort.
Frequently Asked Questions
Can I knot any type of tee shirt?
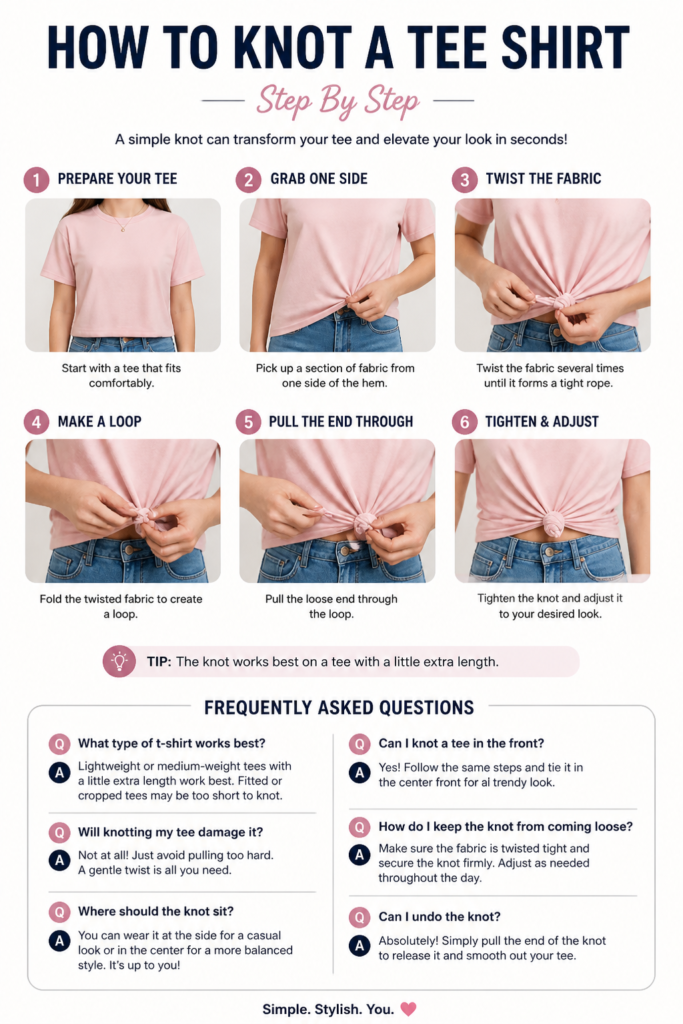
While you can technically knot any tee shirt, some fabrics and fits work much better than others. Softer, thinner materials like jersey, modal, or lightweight cotton blends are ideal. Stiffer or very thick tees can result in a bulky or less refined knot. Oversized or relaxed-fit shirts also provide more fabric for a prominent knot.
Will knotting damage my tee shirt?
When done correctly and gently, knotting should not damage your tee shirt. The key is to avoid over-tightening the knot, which can stretch or stress the fabric. If you consistently knot a shirt in the exact same spot, very delicate fabrics might show some wear over time, but this is rare with most standard tee materials.
How do I make the knot stay all day?
The secret to a long-lasting knot lies in how well you twist the fabric. Ensure you create a firm, consistent twist in the gathered fabric before forming the loop. When you tighten the knot, pull it securely, but not so hard that it distorts the fabric. For extra security, especially with slippery fabrics, you can make a double knot.
What are some other knot styles I can try?
Beyond the basic single knot, you can experiment with a “bunny ear” knot (creating two loops), a “tie-up” knot (using two loose ends tied together), or even a “side crop” knot where you gather fabric high on one side for an asymmetrical cropped look. Each style offers a unique aesthetic, so play around to find your favorites.
Our Top Recommended Finds
- Soft Cotton Blend Tees: Perfect for a smooth, easy knot that drapes beautifully. Look for brands known for their quality basics.
- Fabric Softener: Can make even slightly stiffer tees more pliable and easier to knot, giving a softer feel.
- Lint Roller: Keep your newly knotted tee looking pristine by quickly removing any lint or fuzz before heading out.
Unleash Your Inner Stylist
Mastering the tee shirt knot is a small skill with a big impact on your wardrobe. It’s a fantastic way to add personality, define your shape, and refresh even your oldest tees. Now that you have the steps, it’s time to put them into practice.
Don’t just read about it; grab your favorite tee and start experimenting today. Try different placements, varying tightness, and see how this simple trick can transform your entire outfit. You might discover a new signature style!
Beginner-friendly templates, step-by-step guides,
and weekly project ideas in your inbox.