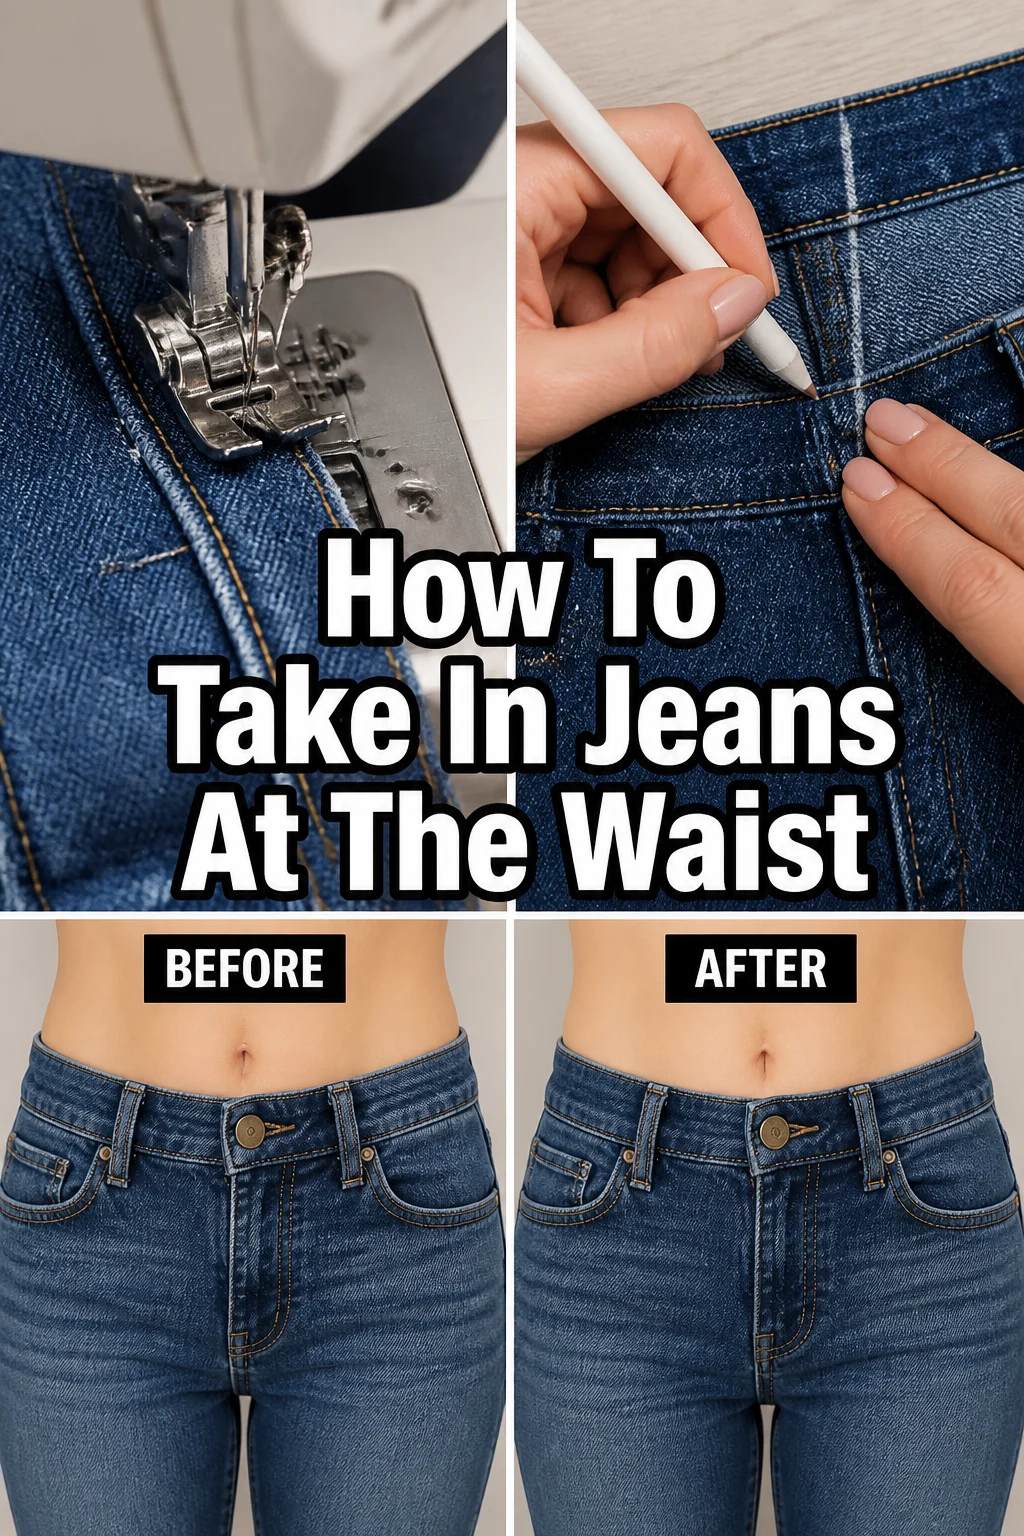
👖 How To Take In Jeans At The Waist

Beginner-friendly templates, step-by-step guides,
and weekly project ideas in your inbox.
There’s nothing quite like the frustration of finding a perfect pair of jeans, only for the waist to gape awkwardly at the back.
I’ve certainly been there, wrestling with ill-fitting denim that just doesn’t hug my curves right.
Learning to take in jeans at the waist transformed my wardrobe, and now you can achieve that custom-tailored feel too.

Quick Overview
This guide will walk you through transforming your loose-waisted jeans into a perfectly fitting pair.
You’ll learn how to remove excess fabric at the back, creating a flattering silhouette.
- Time needed: 1-3 hours (depending on sewing experience and jeans construction)
- Difficulty: Intermediate (requires basic sewing skills and patience)
- What you’ll need: Sewing machine (recommended) or hand-sewing needle, strong denim thread, sharp fabric scissors, seam ripper, tailor’s chalk or fabric marker, measuring tape, straight pins, iron, ironing board.
Step-by-Step Instructions
Step 1: Assess and Prepare Your Jeans
Try on your jeans to identify the exact amount of excess fabric. Stand naturally and find where the waist feels too loose.
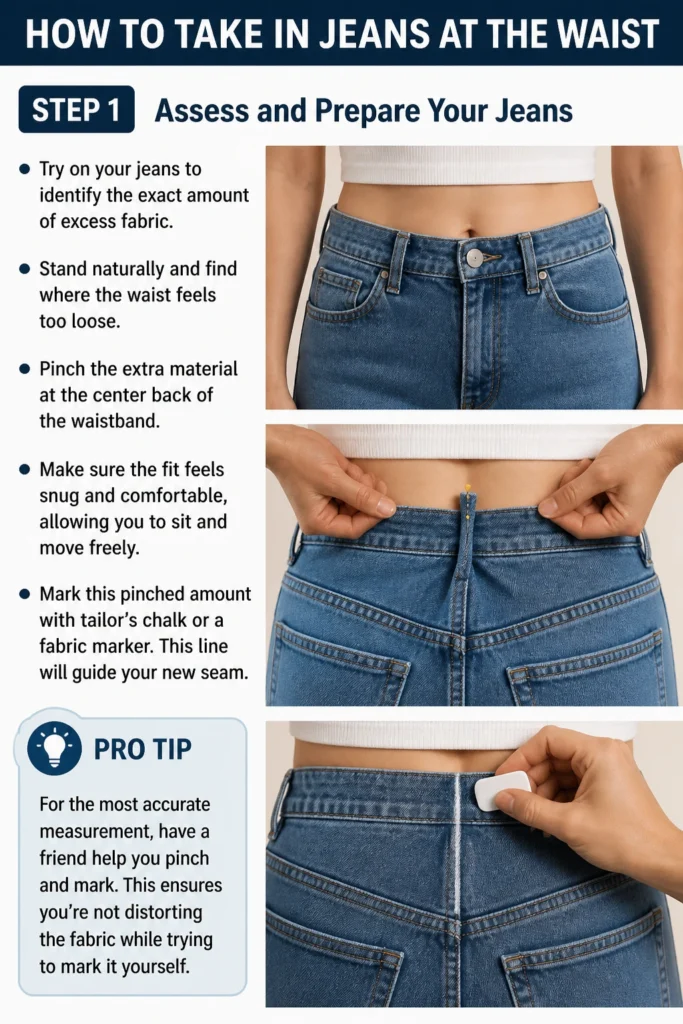
Pinch the extra material at the center back of the waistband. Make sure the fit feels snug and comfortable, allowing you to sit and move freely.
Mark this pinched amount with tailor’s chalk or a fabric marker. This line will guide your new seam.
Pro Tip: For the most accurate measurement, have a friend help you pinch and mark. This ensures you’re not distorting the fabric while trying to mark it yourself.
Step 2: Deconstruct the Waistband
Lay your jeans flat on a clean surface. Locate the center back seam of the waistband.
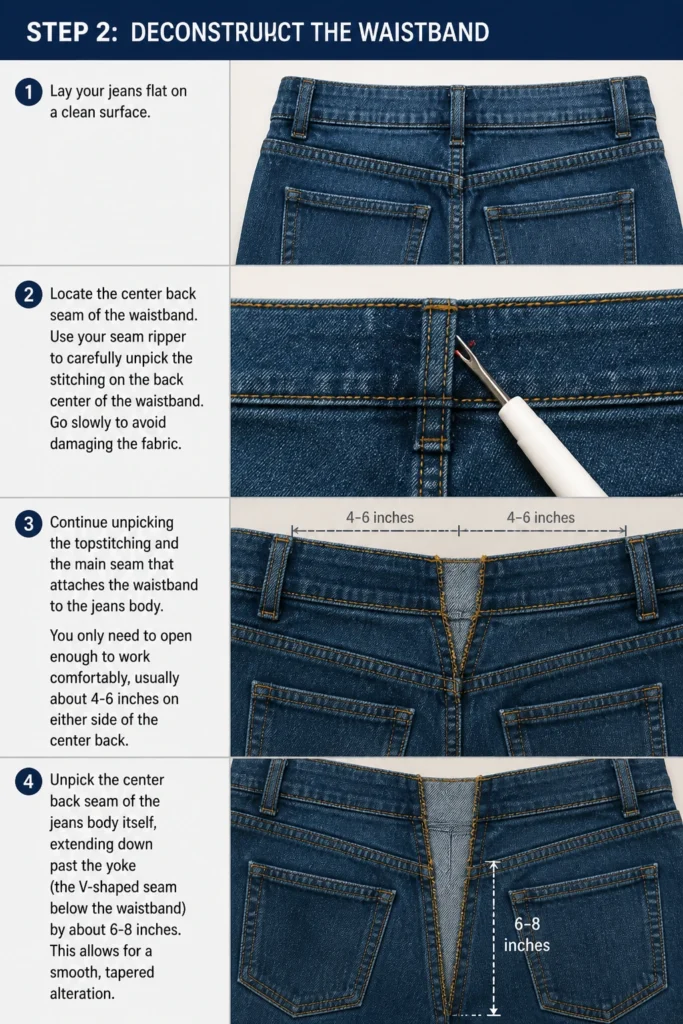
Use your seam ripper to carefully unpick the stitching on the back center of the waistband. Go slowly to avoid damaging the fabric.
Continue unpicking the topstitching and the main seam that attaches the waistband to the jeans body. You only need to open enough to work comfortably, usually about 4-6 inches on either side of the center back.
Unpick the center back seam of the jeans body itself, extending down past the yoke (the V-shaped seam below the waistband) by about 6-8 inches. This allows for a smooth, tapered alteration.
Step 3: Mark the New Seam Line
Turn your jeans inside out. The opened center back seam will now be exposed.
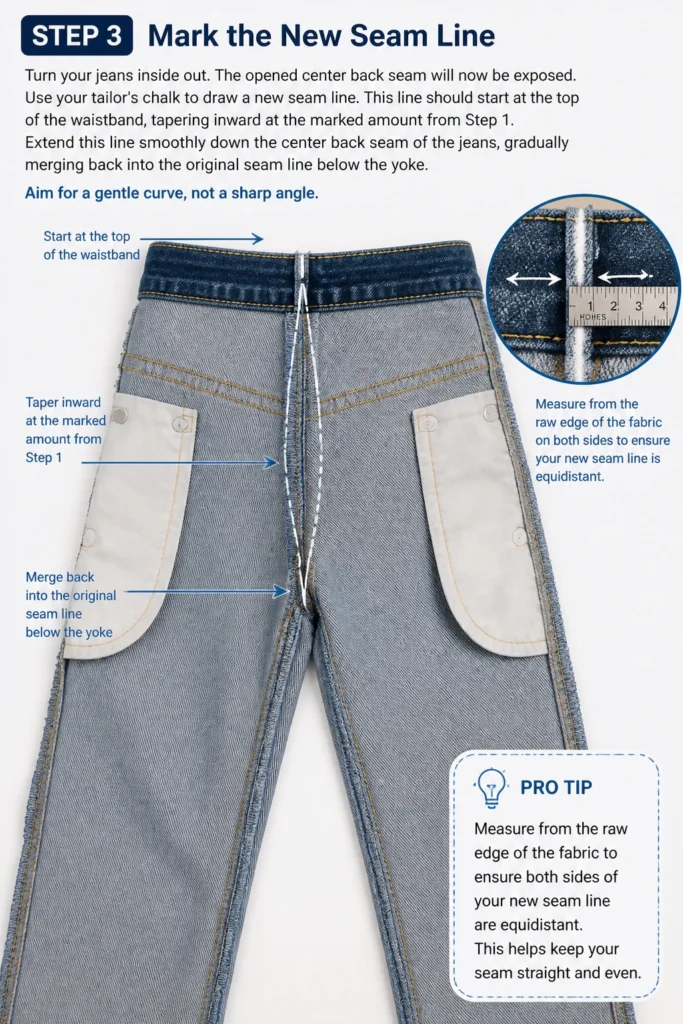
Use your tailor’s chalk to draw a new seam line. This line should start at the top of the waistband, tapering inward at the marked amount from Step 1.
Extend this line smoothly down the center back seam of the jeans, gradually merging back into the original seam line below the yoke. Aim for a gentle curve, not a sharp angle.
Pro Tip: Measure from the raw edge of the fabric to ensure both sides of your new seam line are equidistant. This helps keep your seam straight and even.
Step 4: Stitch the New Center Back Seam
Pin the fabric along your new chalk line. Ensure the denim layers are perfectly aligned and flat.
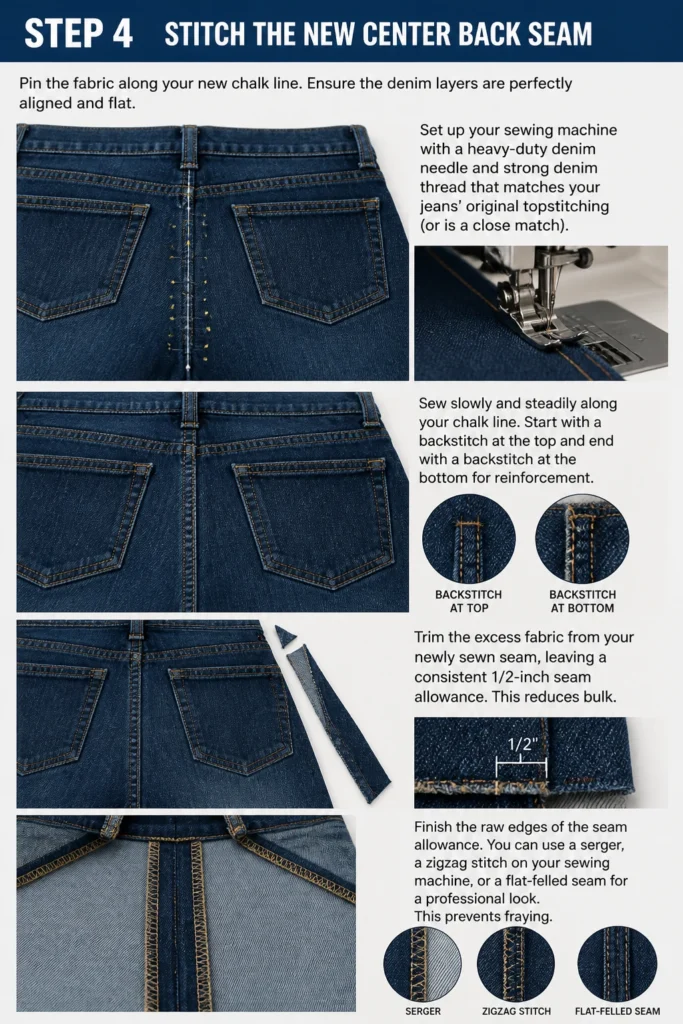
Set up your sewing machine with a heavy-duty denim needle and strong denim thread that matches your jeans’ original topstitching (or is a close match).
Sew slowly and steadily along your chalk line. Start with a backstitch at the top and end with a backstitch at the bottom for reinforcement.
Trim the excess fabric from your newly sewn seam, leaving a consistent 1/2-inch seam allowance. This reduces bulk.
Finish the raw edges of the seam allowance. You can use a serger, a zigzag stitch on your sewing machine, or a flat-felled seam for a professional look. This prevents fraying.
Step 5: Reattach the Waistband
Fold the waistband in half lengthwise, right sides together. Stitch the raw edges of the waistband closed at the center back, matching the new seam line you just created on the jeans body.
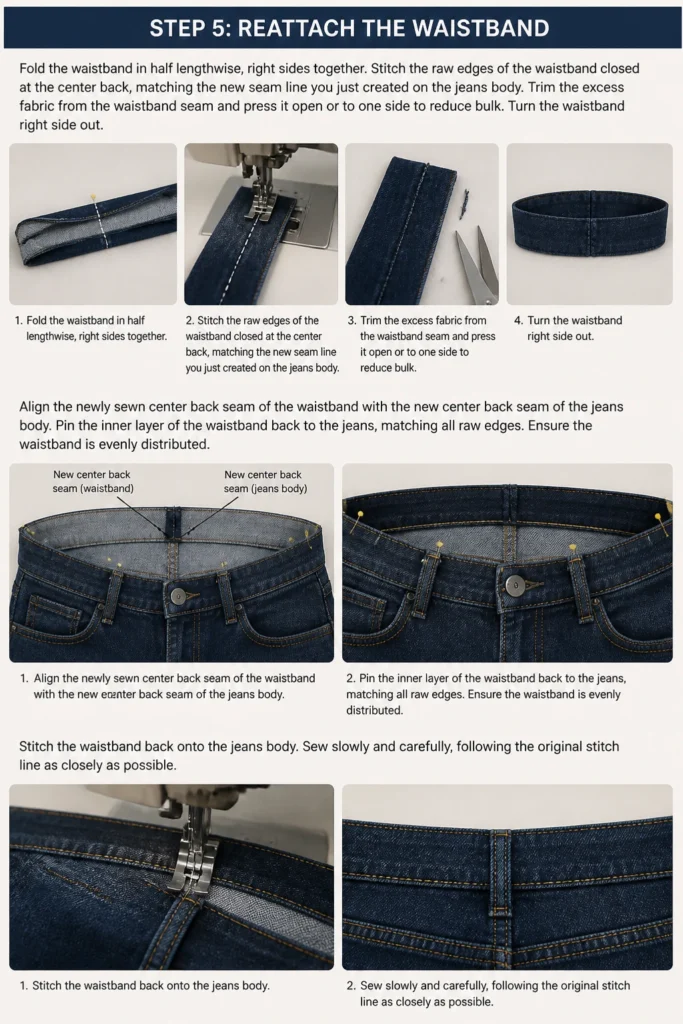
Trim the excess fabric from the waistband seam and press it open or to one side to reduce bulk.
Turn the waistband right side out. Align the newly sewn center back seam of the waistband with the new center back seam of the jeans body.
Pin the inner layer of the waistband back to the jeans, matching all raw edges. Ensure the waistband is evenly distributed.
Stitch the waistband back onto the jeans body. Sew slowly and carefully, following the original stitch line as closely as possible.
Step 6: Topstitch and Finish
Press the waistband seam allowance upwards towards the waistband. This creates a clean finish.
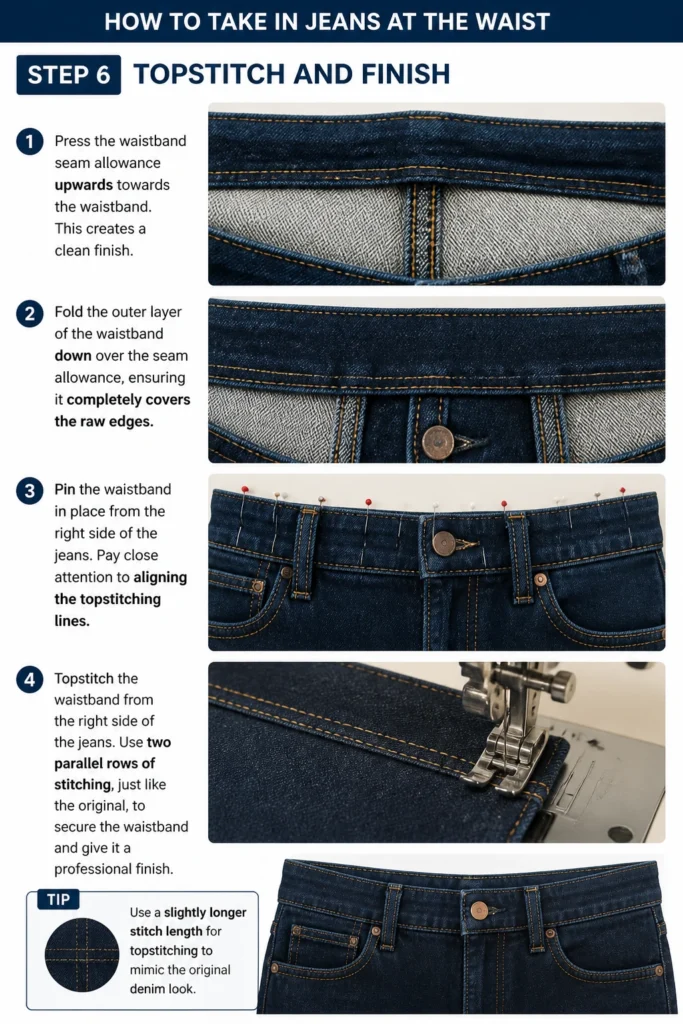
Fold the outer layer of the waistband down over the seam allowance, ensuring it completely covers the raw edges.
Pin the waistband in place from the right side of the jeans. Pay close attention to aligning the topstitching lines.
Topstitch the waistband from the right side of the jeans. Use two parallel rows of stitching, just like the original, to secure the waistband and give it a professional finish.
Use a slightly longer stitch length for topstitching to mimic the original denim look.
Step 7: Reattach Belt Loops and Tags (If Applicable)
Reattach any belt loops that you removed or unpicked during the deconstruction phase. Position them back in their original spots.
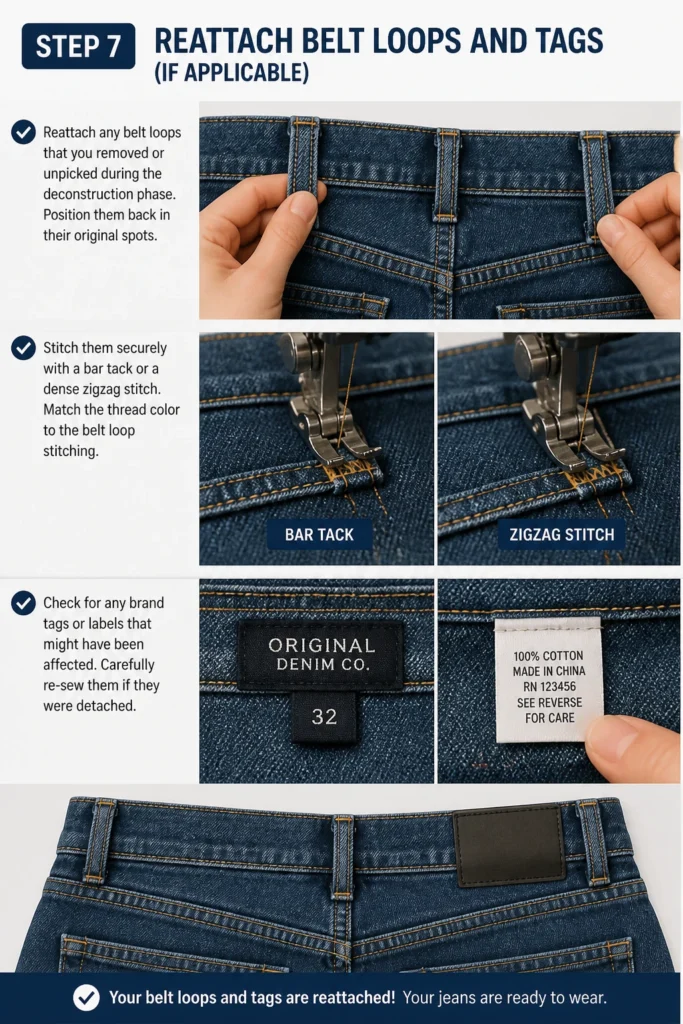
Stitch them securely with a bar tack or a dense zigzag stitch. Match the thread color to the belt loop stitching.
Check for any brand tags or labels that might have been affected. Carefully re-sew them if they were detached.
Step 8: Final Press and Try On
Give your newly altered jeans a thorough press with a hot iron and steam. Press all seams flat and crisp.
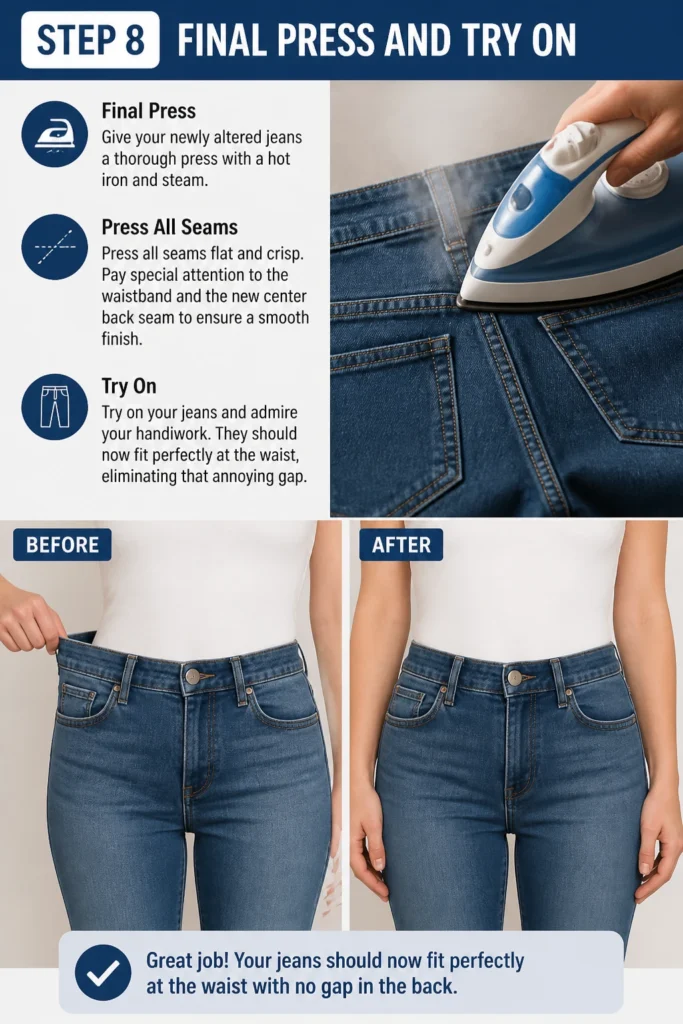
Pay special attention to the waistband and the new center back seam to ensure a smooth finish.
Try on your jeans and admire your handiwork. They should now fit perfectly at the waist, eliminating that annoying gap.
Common Mistakes to Avoid
Not Trying On Accurately
Many people make the mistake of measuring their jeans while they’re off their body. This doesn’t account for the way fabric drapes or stretches when worn.
Always try on your jeans and pinch the excess directly on your body. This ensures you’re removing the correct amount for your specific shape and comfort.
Ripping Too Much or Too Roughly
The seam ripper is a powerful tool, but it requires a delicate touch. Ripping too quickly can tear the denim, especially near stress points or buttonholes.
Take your time when unpicking stitches. Go slowly, one stitch at a time if necessary, to avoid creating holes or weakening the fabric.
Uneven Seams
A wobbly or uneven seam will be noticeable, especially on the center back of jeans. It can also cause the fabric to pull or pucker uncomfortably.
Use tailor’s chalk and a ruler to draw a precise, smooth line before you sew. Pin extensively and sew slowly to maintain a straight and consistent seam.
Skipping Finishing Steps
It’s tempting to skip pressing or finishing seam allowances, especially when you’re eager to wear your jeans. However, these steps are crucial for durability and appearance.
Pressing sets stitches and helps fabric lie flat, while finishing raw edges prevents fraying and ensures your alteration lasts through many washes.
Troubleshooting
Still Too Loose or Too Tight
If your jeans are still slightly off after the first alteration, don’t despair. It’s often easier to take in a little more than to add fabric back.
Carefully unpick the new center back seam and waistband stitches. Re-mark your desired fit and sew again, taking care with your new measurements.
If they’re too tight, you may need to unpick the seam and sew a slightly shallower curve, reducing the amount of fabric removed. This is why it’s better to take out less initially.
Bulky Seam at the Back
A bulky seam can be uncomfortable and visually unappealing. This often happens if too much fabric is left in the seam allowance or if it’s not pressed properly.
Trim your seam allowance down to 1/2 inch or even 3/8 inch if your fabric allows. Press the seam open or to one side, using a lot of steam to flatten the denim.
Consider grading the seam allowance (trimming one layer slightly shorter than the other) to further reduce bulk, especially in thicker denim.
Waistband Doesn’t Match Up
Sometimes, after reattaching the waistband, it can seem slightly off-kilter or not perfectly aligned with the jeans body. This is a common challenge.
Ensure that when you re-stitch the waistband, you’re matching the original stitch line as closely as possible. Pin extensively around the entire waistband before sewing.
If there’s a slight discrepancy, you might need to ease in a small amount of fabric or unpick a small section and re-pin more carefully. Pressing can also help to smooth out minor misalignments.
Key Takeaways
- Accuracy is paramount: Always try on your jeans and mark the exact excess while wearing them.
- Patience with the seam ripper: Go slow to avoid damaging your denim.
- Precision in stitching: Draw clear chalk lines and sew steadily for neat, durable seams.
- Don’t skip the finish: Pressing and edge finishing are essential for a professional look and longevity.
- Heavy-duty tools matter: Use denim needles and strong thread for best results.
- Practice makes perfect: Don’t be discouraged if your first attempt isn’t flawless; every stitch improves your skill.
Frequently Asked Questions
Can I take in jeans at the waist by hand?
Yes, taking in jeans at the waist can definitely be done by hand. It will require a strong hand-sewing needle, such as a denim needle, and sturdy thread.
Hand-sewing will take considerably longer and requires very tight, even stitches for durability, but it’s a perfectly viable option if you don’t have a sewing machine.
What if my jeans have a yoke?
Most jeans have a yoke, which is the V-shaped panel below the waistband at the back. When taking in the waist, you’ll extend your new seam line down through the center of this yoke.
The key is to create a smooth, gradual curve that tapers from the amount you’re removing at the waist down into the original seam below the yoke, avoiding any sharp angles.
What kind of thread should I use?
For alterations on jeans, it’s crucial to use a strong, durable thread. Heavy-duty polyester or specific denim thread is ideal.
Match the color as closely as possible to the original topstitching thread on your jeans for the most professional and seamless look.
Can this method work for jeans that are too big all over?
This guide specifically addresses taking in jeans at the waist. While it can improve the fit if the waist is the primary issue, it won’t effectively resize jeans that are too big through the hips, thighs, or seat.
For a full resizing, a more complex alteration involving side seams or multiple panels would be necessary, which is typically a job for a professional tailor.
Our Top Recommended Finds
- Sharp Fabric Scissors: A dedicated pair of sharp fabric scissors makes clean cuts, essential for denim.
- Quality Seam Ripper: A comfortable, sharp seam ripper with a good grip can save you time and frustration.
- Heavy Duty Denim Needles: These needles are stronger and sharper, designed to penetrate thick denim without breaking or bending.
Embrace Your Perfect Fit
You’ve now armed yourself with the knowledge and steps to transform your favorite jeans from ill-fitting to perfectly tailored.
This skill not only saves you money but also ensures your clothing truly flatters your unique shape.
Don’t let a gaping waistband stop you from feeling confident; grab your tools and start stitching today!
Beginner-friendly templates, step-by-step guides,
and weekly project ideas in your inbox.