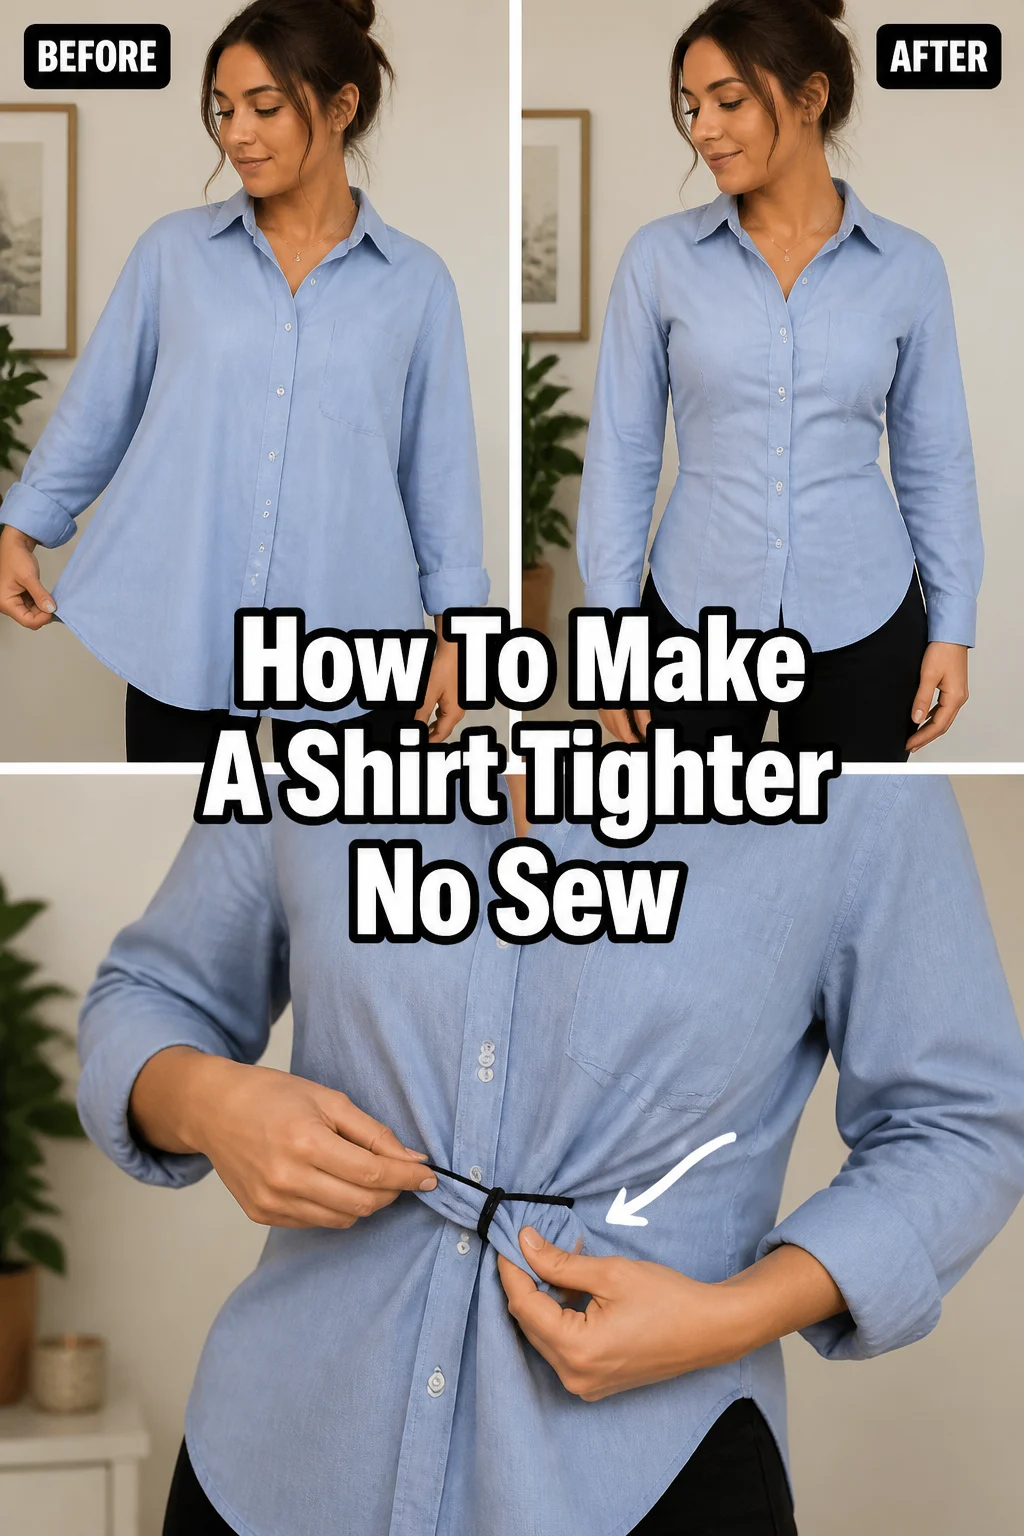
👕 How To Make A Shirt Tighter No Sew

Beginner-friendly templates, step-by-step guides,
and weekly project ideas in your inbox.
Ever found a shirt you adore, but it just doesn’t sit right?
It’s a common frustration when your favorite top feels baggy or shapeless.
Having personally navigated the world of ill-fitting garments, I’ve perfected these no-sew solutions to give you that tailored look effortlessly.

Quick Overview
Transforming a loose shirt into a perfectly fitted one doesn’t require a needle and thread. This guide will show you several clever, temporary methods.
- Time needed: 5-15 minutes per method
- Difficulty: Beginner
- What you’ll need: Shirt, hair ties/rubber bands, safety pins, fashion clips, belt (optional)
Step-by-Step Instructions
Step 1: Understand Your Shirt’s Material and Cut
Before you begin, take a moment to assess your shirt. The fabric type and original cut will influence which no-sew method works best.
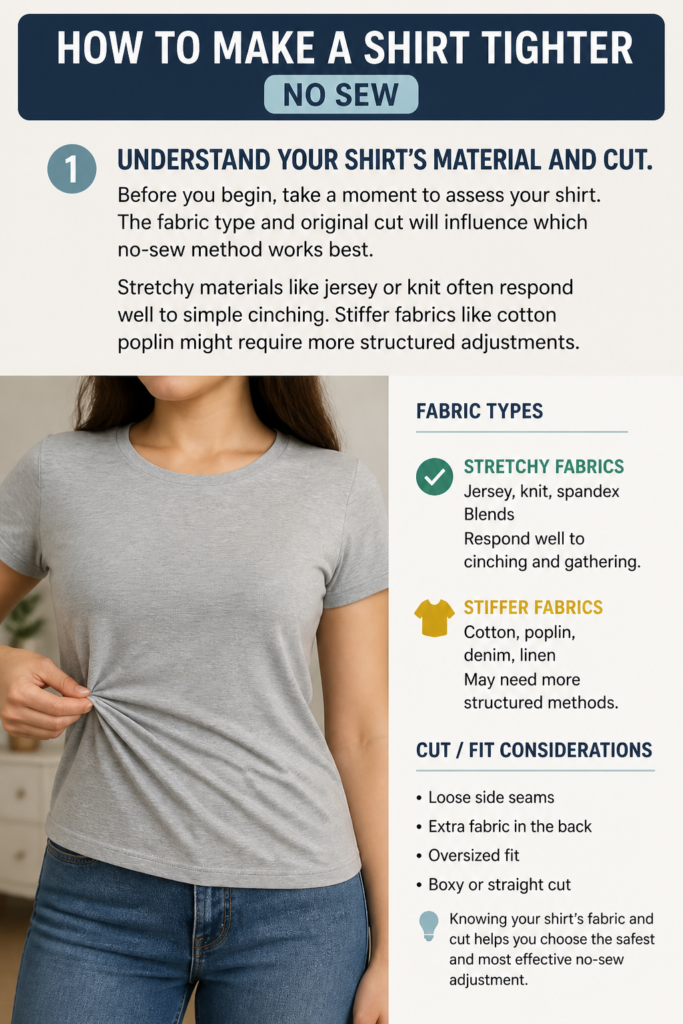
Stretchy materials like jersey or knit often respond well to simple cinching. Stiffer fabrics like cotton poplin might require more structured adjustments.
Step 2: The Classic Side Knot
This is perhaps the simplest and most popular method for instant tightening. It works wonderfully for casual shirts and t-shirts, adding a relaxed yet defined waist.
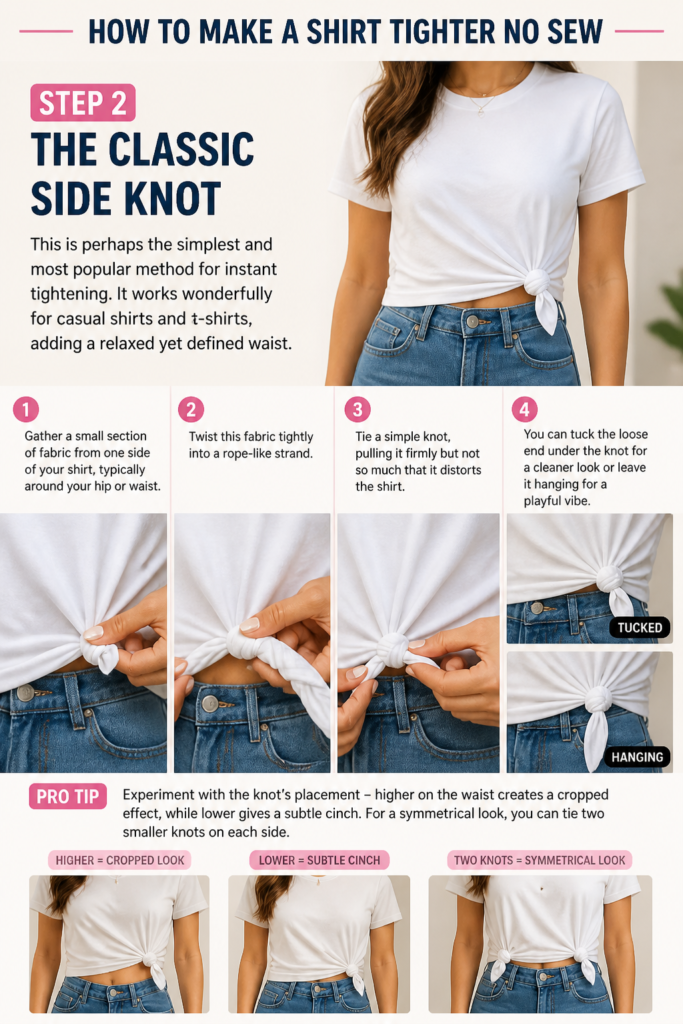
Gather a small section of fabric from one side of your shirt, typically around your hip or waist. Twist this fabric tightly into a rope-like strand.
Tie a simple knot, pulling it firmly but not so much that it distorts the shirt. You can tuck the loose end under the knot for a cleaner look or leave it hanging for a playful vibe.
Pro Tip: Experiment with the knot’s placement – higher on the waist creates a cropped effect, while lower gives a subtle cinch. For a symmetrical look, you can tie two smaller knots on each side.
Step 3: The Stylish Front Knot
A front knot offers a similar tightening effect to the side knot but brings the focal point forward. This method is great for adding visual interest to plain shirts.
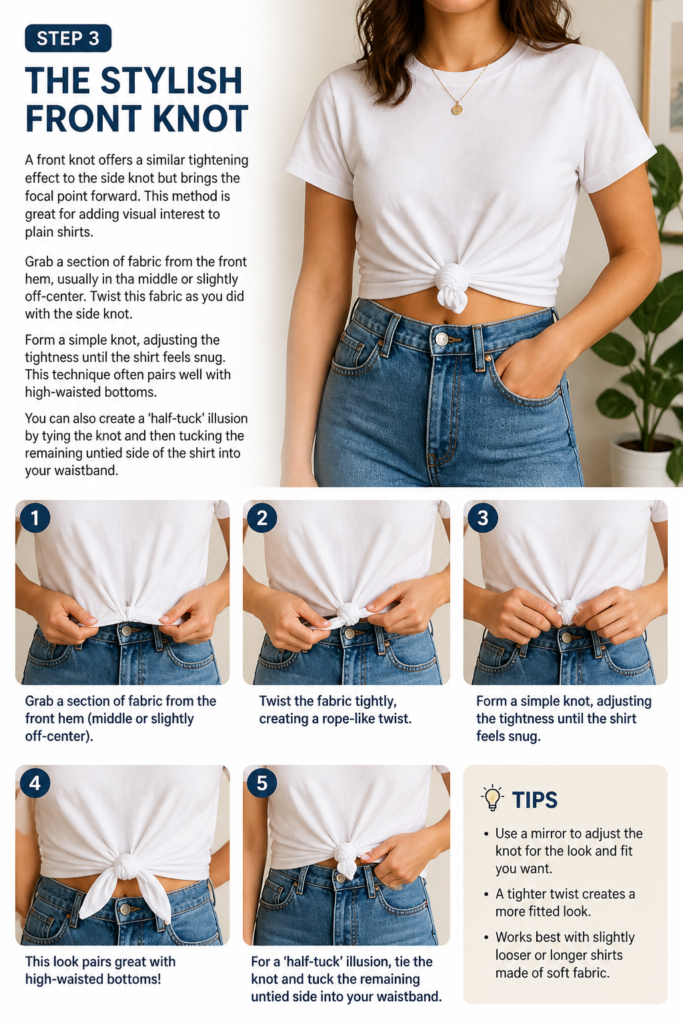
Grab a section of fabric from the front hem, usually in the middle or slightly off-center. Twist this fabric as you did with the side knot.
Form a simple knot, adjusting the tightness until the shirt feels snug. This technique often pairs well with high-waisted bottoms.
You can also create a ‘half-tuck’ illusion by tying the knot and then tucking the remaining untied side of the shirt into your waistband.
Step 4: The Discreet Back Cinch with a Hair Tie
For a more tailored and less obvious tightening, the back cinch is a fantastic solution. This method works well for blouses or button-downs you want to look fitted.
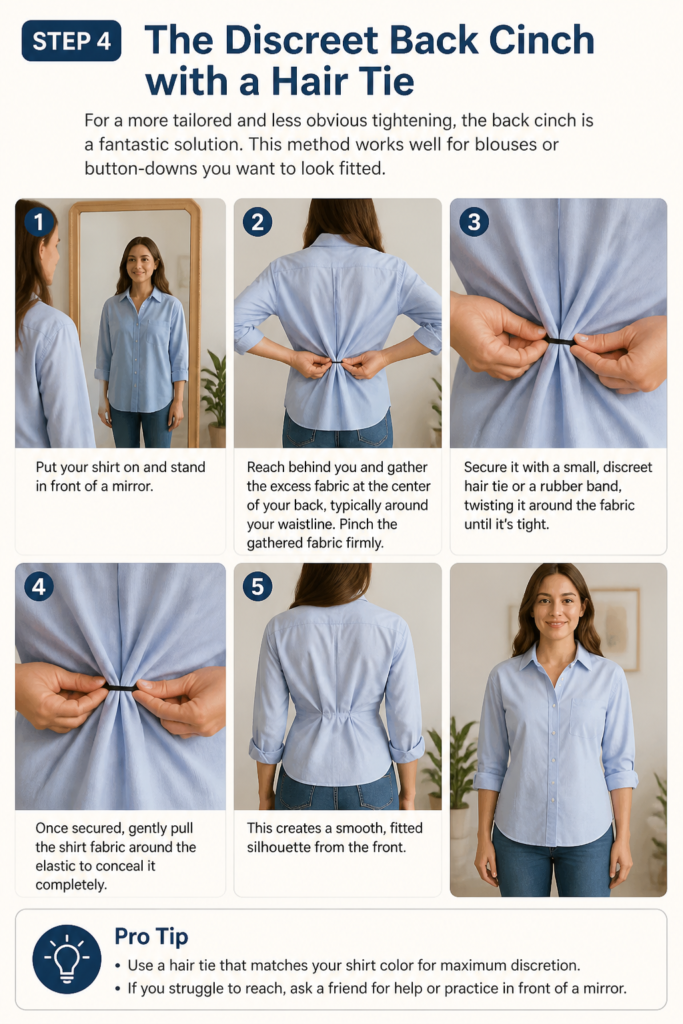
Put your shirt on and stand in front of a mirror. Reach behind you and gather the excess fabric at the center of your back, typically around your waistline.
Pinch the gathered fabric firmly. Secure it with a small, discreet hair tie or a rubber band, twisting it around the fabric until it’s tight.
Once secured, gently pull the shirt fabric around the elastic to conceal it completely. This creates a smooth, fitted silhouette from the front.
Pro Tip: Use a hair tie that matches your shirt color for maximum discretion. If you struggle to reach, ask a friend for help or practice in front of a mirror.
Step 5: The Hidden Safety Pin Trick
Safety pins are your secret weapon for precise and invisible tightening. They offer more control over where and how much you cinch the fabric.
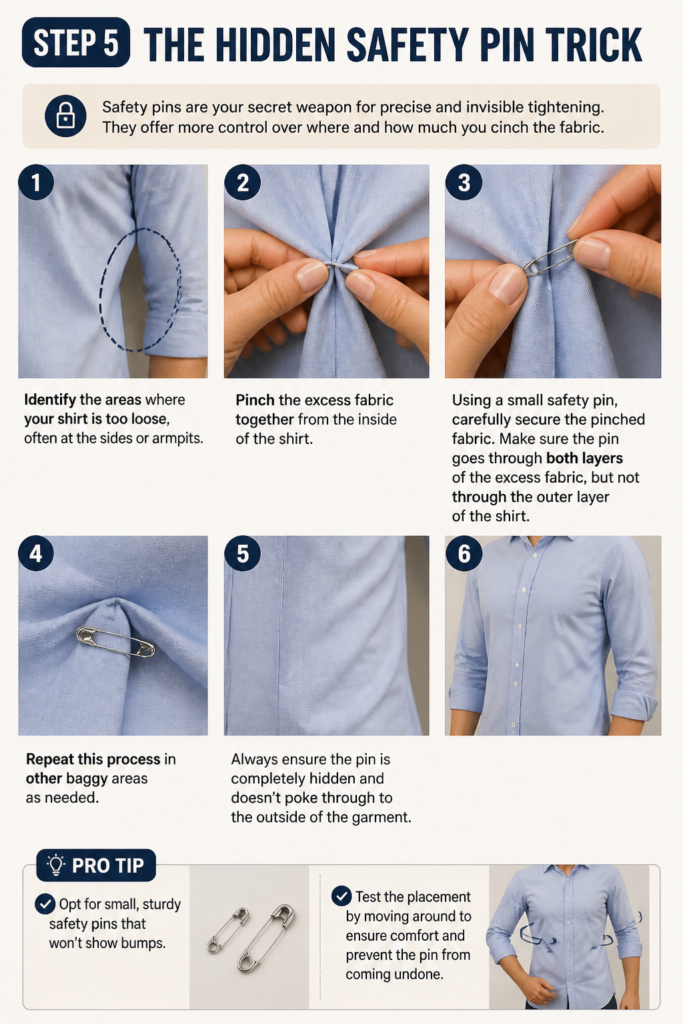
Identify the areas where your shirt is too loose, often at the sides or armpits. Pinch the excess fabric together from the inside of the shirt.
Using a small safety pin, carefully secure the pinched fabric. Make sure the pin goes through both layers of the excess fabric, but not through the outer layer of the shirt.
Repeat this process in other baggy areas as needed. Always ensure the pin is completely hidden and doesn’t poke through to the outside of the garment.
Pro Tip: Opt for small, sturdy safety pins that won’t show bumps. Test the placement by moving around to ensure comfort and prevent the pin from coming undone.
Step 6: Employing Fashion Clips or Brooches
Fashion clips, often designed for scarves or cardigans, can also cleverly cinch a shirt. Brooches offer a similar decorative and functional solution.
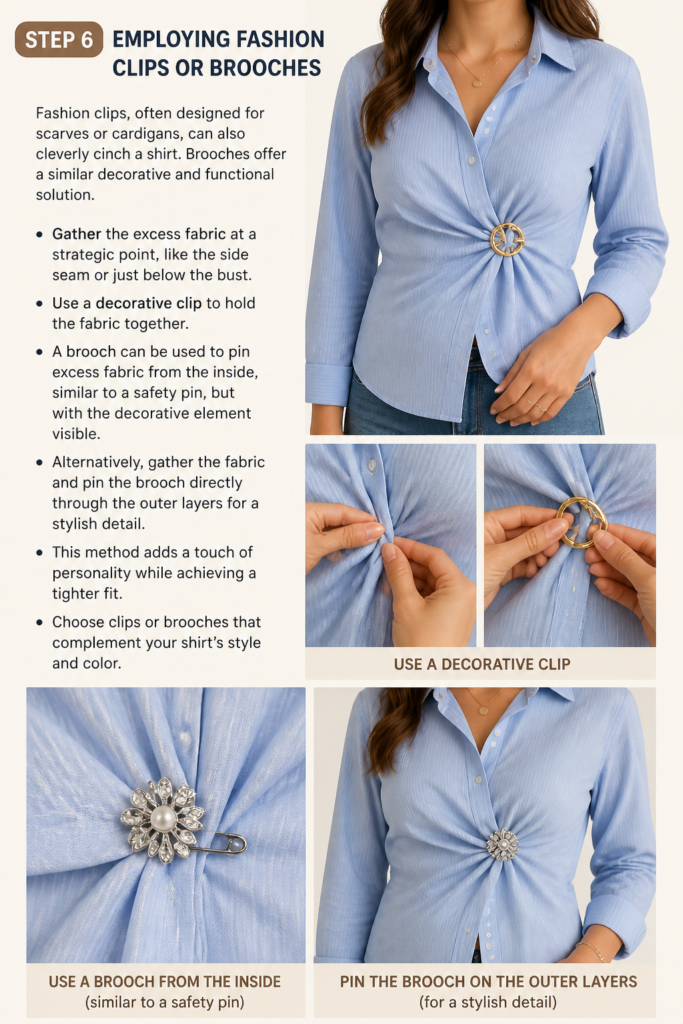
Gather the excess fabric at a strategic point, like the side seam or just below the bust. Use a decorative clip to hold the fabric together.
A brooch can be used to pin excess fabric from the inside, similar to a safety pin, but with the decorative element visible. Alternatively, gather the fabric and pin the brooch directly through the outer layers for a stylish detail.
This method adds a touch of personality while achieving a tighter fit. Choose clips or brooches that complement your shirt’s style and color.
Step 7: The Belted Approach for Definition
While not directly making the shirt tighter, a belt can create the illusion of a tighter, more defined waist. This works especially well with longer or oversized shirts.
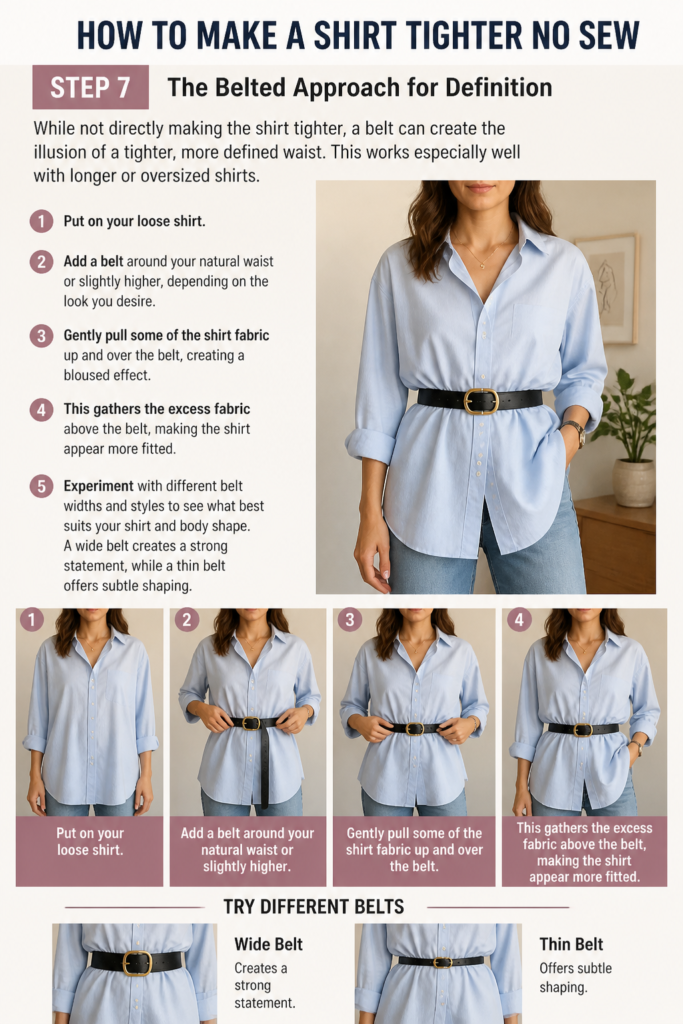
Put on your loose shirt. Add a belt around your natural waist or slightly higher, depending on the look you desire.
Gently pull some of the shirt fabric up and over the belt, creating a bloused effect. This gathers the excess fabric above the belt, making the shirt appear more fitted.
Experiment with different belt widths and styles to see what best suits your shirt and body shape. A wide belt creates a strong statement, while a thin belt offers subtle shaping.
Step 8: Strategic Tucking and Layering
Sometimes, the simplest method is the most effective. Strategic tucking can eliminate bulk, and layering can create a more structured look.
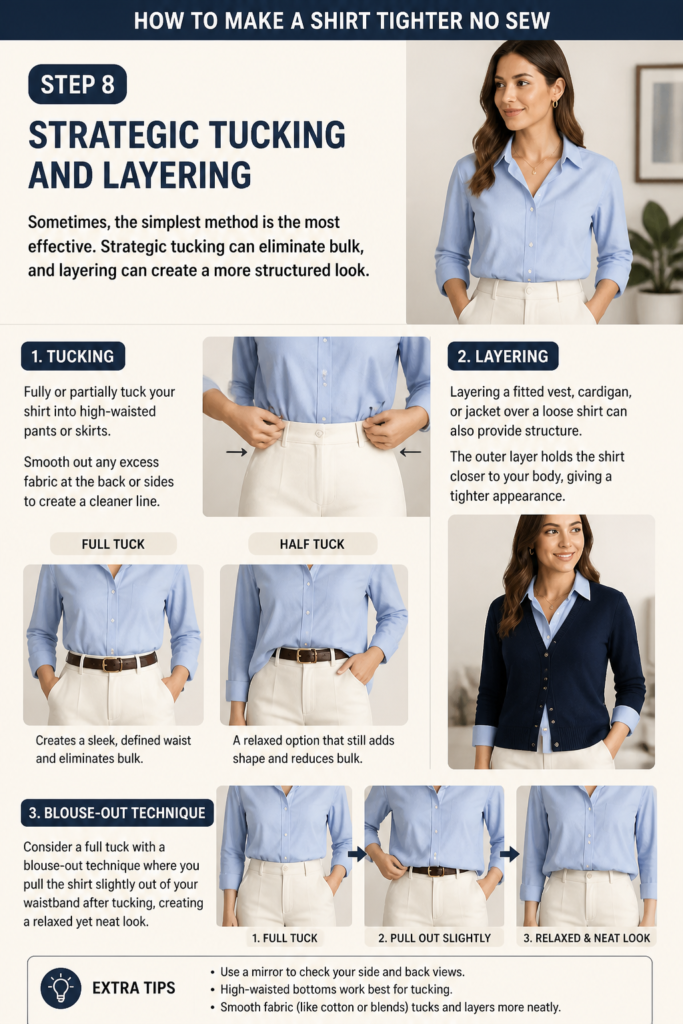
For tucking, fully or partially tuck your shirt into high-waisted pants or skirts. Smooth out any excess fabric at the back or sides to create a cleaner line.
Layering a fitted vest, cardigan, or jacket over a loose shirt can also provide structure. The outer layer holds the shirt closer to your body, giving a tighter appearance.
Consider a full tuck with a “blouse-out” technique where you pull the shirt slightly out of your waistband after tucking, creating a relaxed yet neat look.
Common Mistakes to Avoid
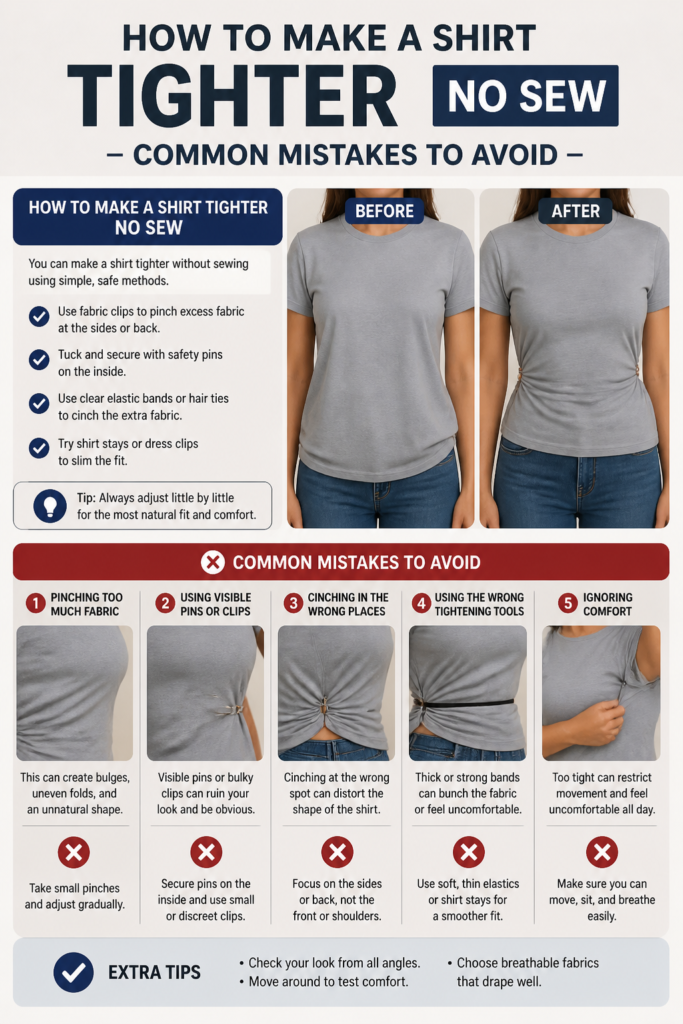
Over-Tightening in One Spot
Attempting to gather all the excess fabric in a single, large knot or cinch can lead to an unnatural, lumpy appearance. This creates an awkward silhouette and can make the shirt uncomfortable.
Instead, distribute the tightening across multiple, smaller adjustments. Use a combination of methods, like a small back cinch and a subtle side pin, to achieve a balanced and smooth fit.
Using Visible or Unsuitable Fasteners
Employing large, contrasting safety pins or flimsy elastic bands that snap can ruin your shirt’s aesthetic and even damage the fabric. Visible fasteners draw unwanted attention to the adjustment.
Always opt for small, discreet safety pins that match your shirt, or hair ties that blend in. Ensure any clips or brooches are intentionally decorative and securely fastened.
Ignoring Fabric Type and Drape
Trying to force a stiff, structured cotton shirt into a soft, flowing drape with a simple knot might not yield the desired results. Different fabrics behave differently when manipulated.
Consider the fabric’s natural drape. Knots work best on softer, more flexible materials. Stiffer fabrics might benefit more from hidden pins or belting to maintain their structure.
Creating Uneven or Asymmetrical Adjustments
Making a large adjustment on one side without balancing it on the other can result in a lopsided or crooked shirt. This can look messy and unprofessional.
Always check your reflection from all angles after making adjustments. Aim for symmetry, even if the method is inherently asymmetrical, by ensuring the overall fit appears balanced.
Troubleshooting
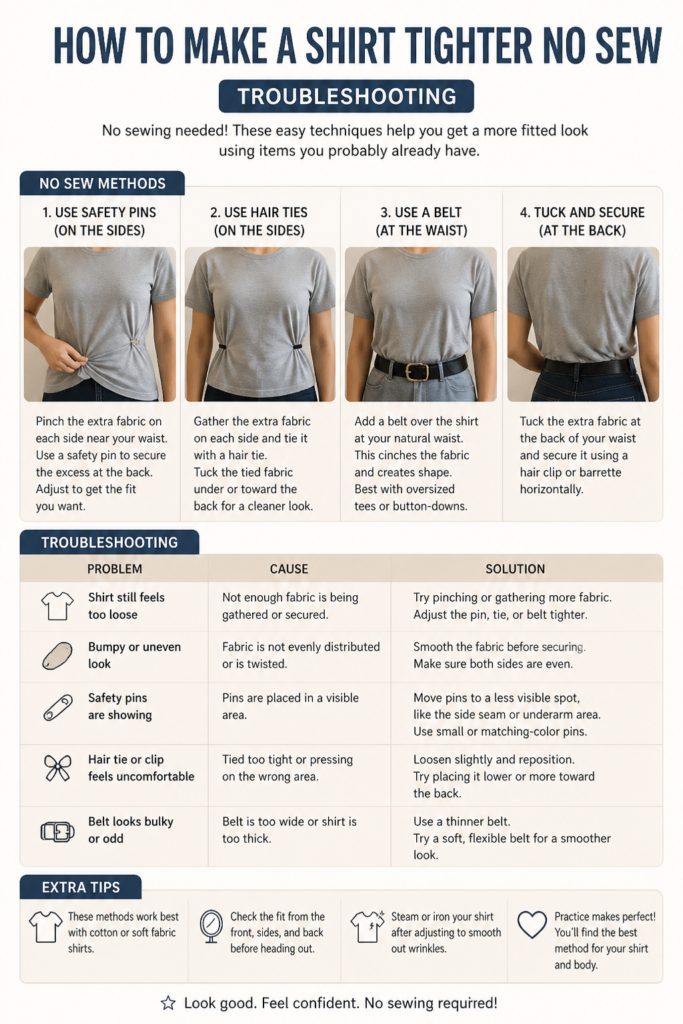
Shirt Still Looks Baggy After Adjustments
If your shirt still seems loose, you might not be gathering enough fabric or distributing the adjustments effectively. A single small knot might not be enough for a very oversized shirt.
Try combining methods. For instance, use a hidden back cinch with a small side knot. Also, re-evaluate how much fabric you’re gathering; don’t be afraid to take a bit more.
Adjustments Feel Uncomfortable or Dig In
Discomfort usually means your knots are too tight, or pins are pressing against your skin. The goal is a fitted look, not restricted movement.
Loosen knots slightly, or reposition pins away from sensitive areas like armpits or ribs. Ensure pins are flat against the fabric and not poking outwards. You should be able to move freely.
Fasteners Keep Coming Undone
If your hair ties are slipping or safety pins are popping open, the fastener might be too weak for the amount of fabric or tension. Cheap or flimsy fasteners won’t hold up.
Use stronger, thicker hair ties or sturdier safety pins. For knots, ensure they are pulled tight enough to secure but not so tight they strain the fabric. Double-knot if necessary.
Key Takeaways
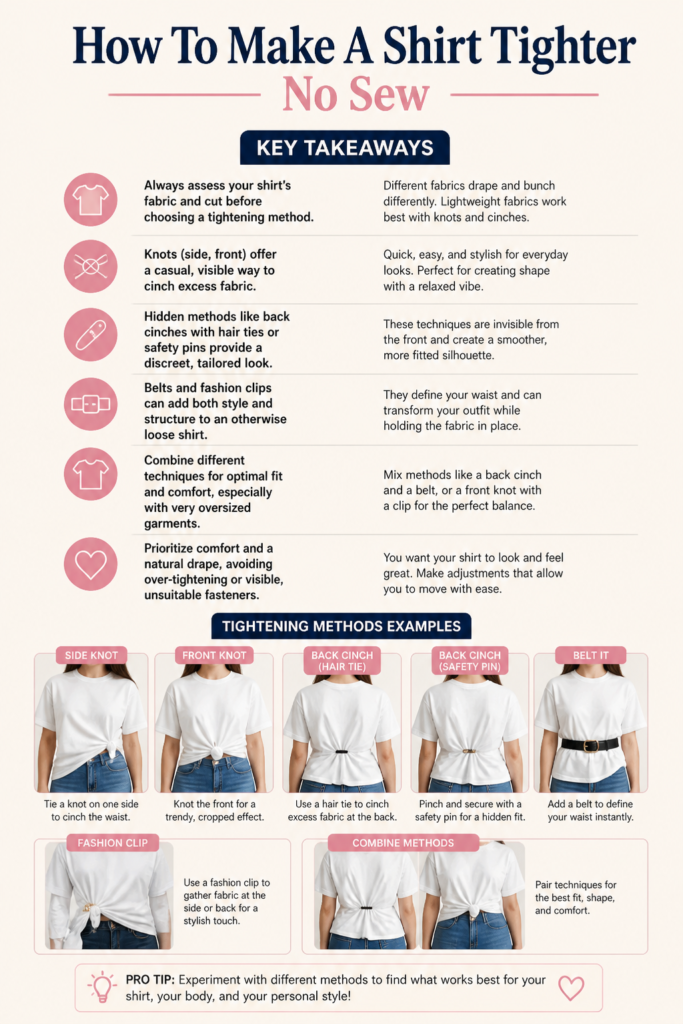
- Always assess your shirt’s fabric and cut before choosing a tightening method.
- Knots (side, front) offer a casual, visible way to cinch excess fabric.
- Hidden methods like back cinches with hair ties or safety pins provide a discreet, tailored look.
- Belts and fashion clips can add both style and structure to an otherwise loose shirt.
- Combine different techniques for optimal fit and comfort, especially with very oversized garments.
- Prioritize comfort and a natural drape, avoiding over-tightening or visible, unsuitable fasteners.
Frequently Asked Questions
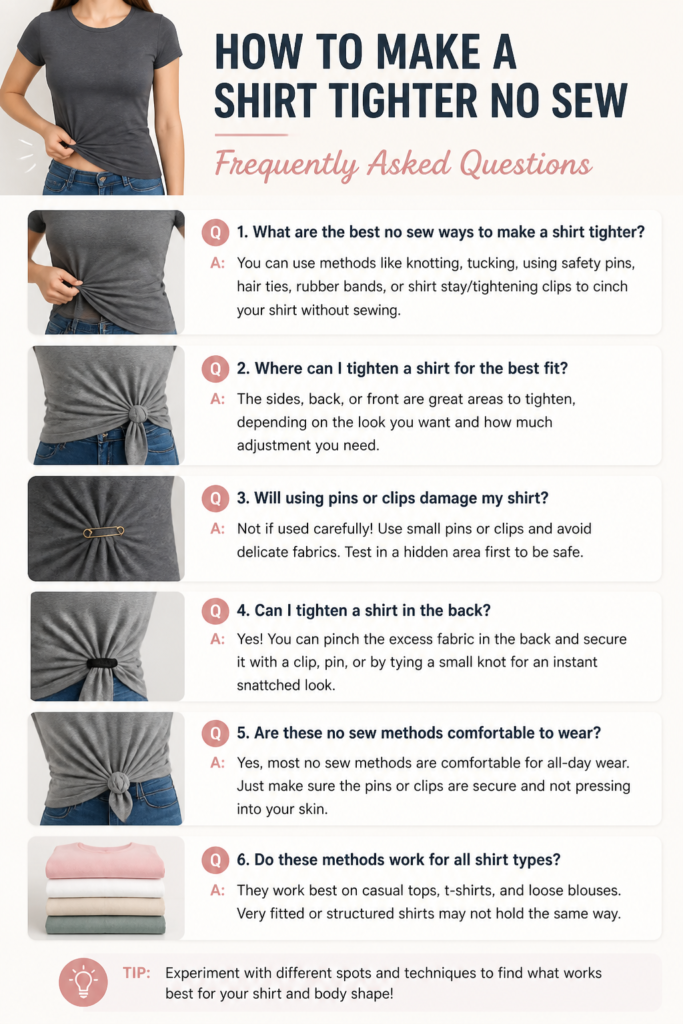
Can these methods work on all types of shirts?
Most no-sew methods are highly versatile and work on a wide range of shirts, from t-shirts and blouses to button-downs. However, the best method often depends on the fabric’s drape and thickness. Stiff fabrics might not knot as well as soft, flowy ones.
Will these methods damage my shirt?
When done correctly, these no-sew methods should not damage your shirt. Always use appropriate fasteners like small, blunt safety pins or soft hair ties. Avoid excessive pulling or using sharp objects that could tear the fabric.
How long do these adjustments last?
These adjustments are temporary and designed for single wear. Knots might loosen slightly throughout the day with movement, and pins can sometimes come undone. It’s always a good idea to check your adjustments periodically, especially if you’re very active.
Can I wash my shirt with these adjustments still in place?
No, it is highly recommended to remove all knots, pins, hair ties, and clips before washing your shirt. Leaving them in can damage both the shirt and your washing machine, and also prevent the shirt from getting properly cleaned.
Our Top Recommended Finds
- Small, Discreet Safety Pins: Essential for invisible tightening, ensuring they’re sturdy enough to hold fabric without showing.
- Fabric Hair Ties (Elastic): Ideal for the hidden back cinch, providing a gentle yet firm hold without snagging.
- Fashion Clips or Brooches: For adding a decorative element while cinching, choose ones with secure clasps.
Embrace Your Perfect Fit
You don’t need a sewing machine or a tailor to achieve a flattering silhouette. These no-sew techniques empower you to transform your wardrobe with ease.
Experiment with different methods and find what works best for each of your favorite shirts. A well-fitting garment boosts confidence and elevates your entire look.
Start experimenting today and discover the joy of perfectly tailored outfits, all without a single stitch.
Beginner-friendly templates, step-by-step guides,
and weekly project ideas in your inbox.