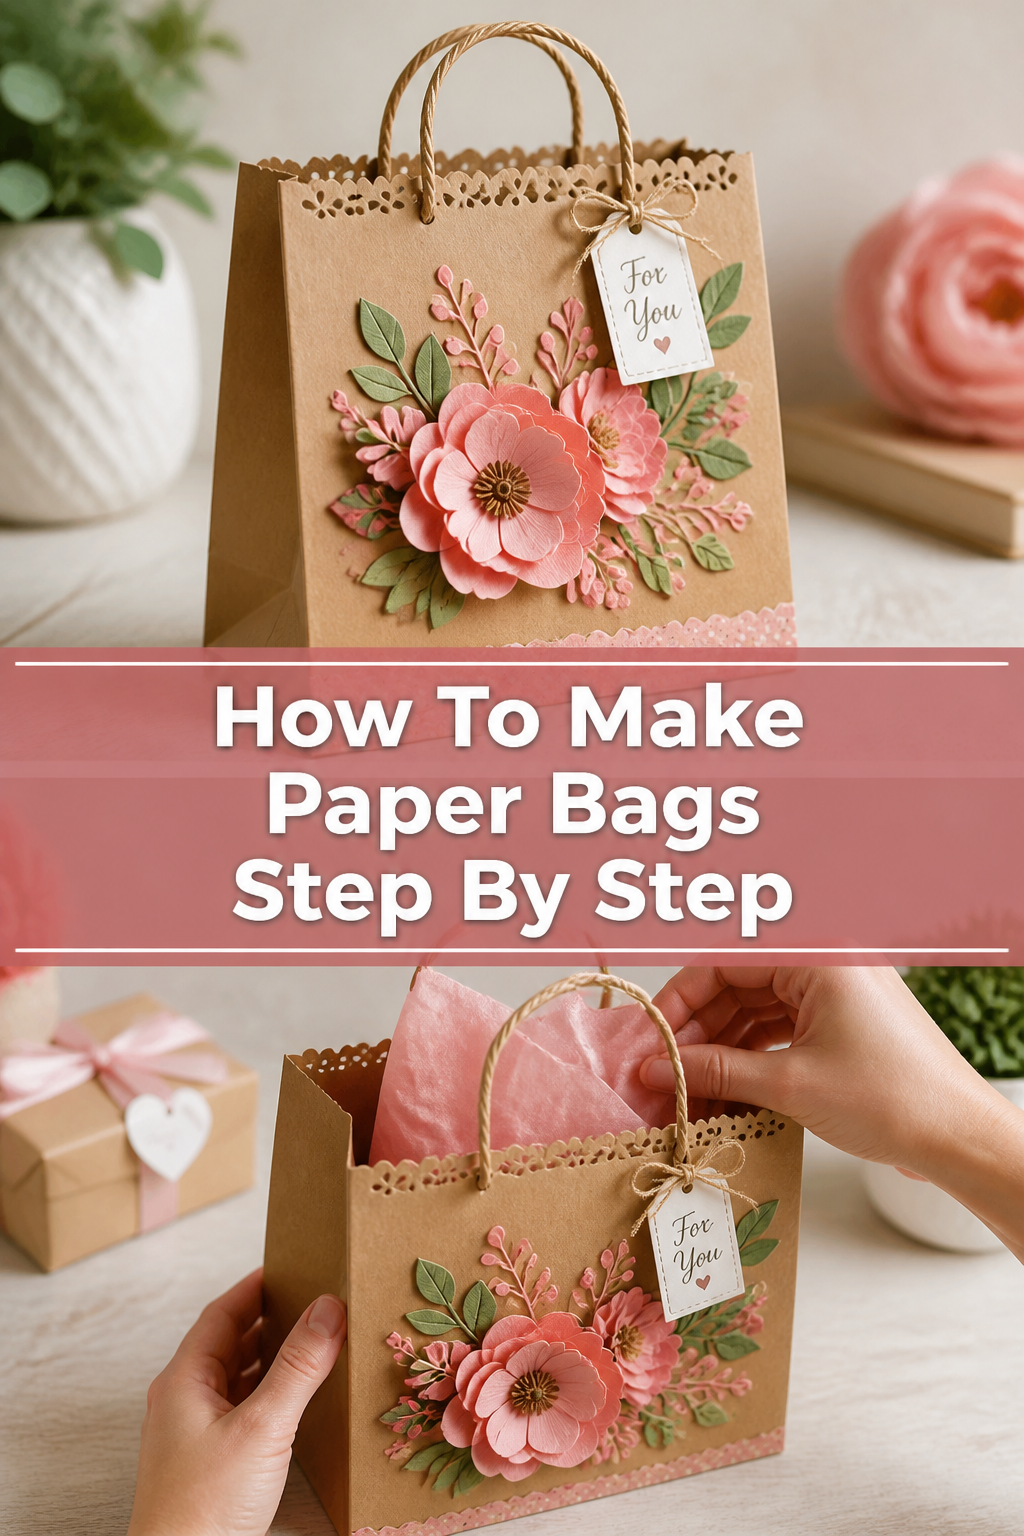
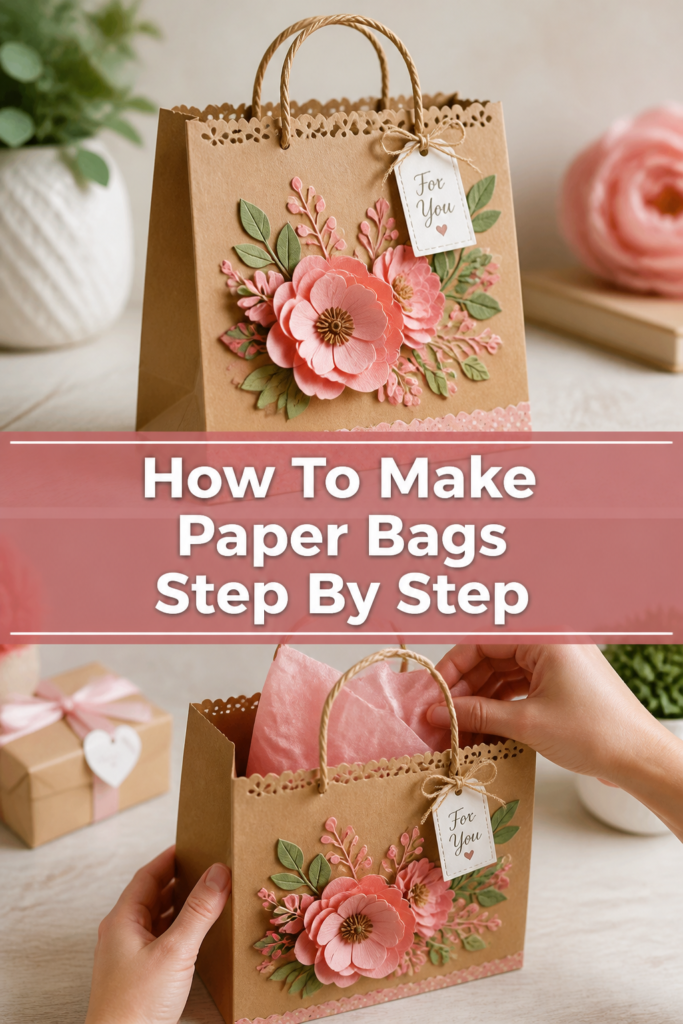
🛍️ How To Make Paper Bags Step By Step
I remember making my first paper bag for a homemade gift. It felt so much more special than a store-bought one. This guide draws on years of crafting experience to simplify the process for you. Soon, you’ll be crafting custom paper bags for any occasion.
Quick Overview
You’re about to embark on a fun and rewarding crafting journey. This guide will teach you how to create sturdy, attractive paper bags from scratch. They are perfect for gifts, storage, party favors, or even just organizing small items around the house.
- Time needed: 30-60 minutes (depending on bag size and your experience)
- Difficulty: Beginner
- What you’ll need: Paper, ruler, pencil, scissors, glue, optional hole punch, and string for handles
Step-by-Step Instructions
Step 1: Gather Your Materials
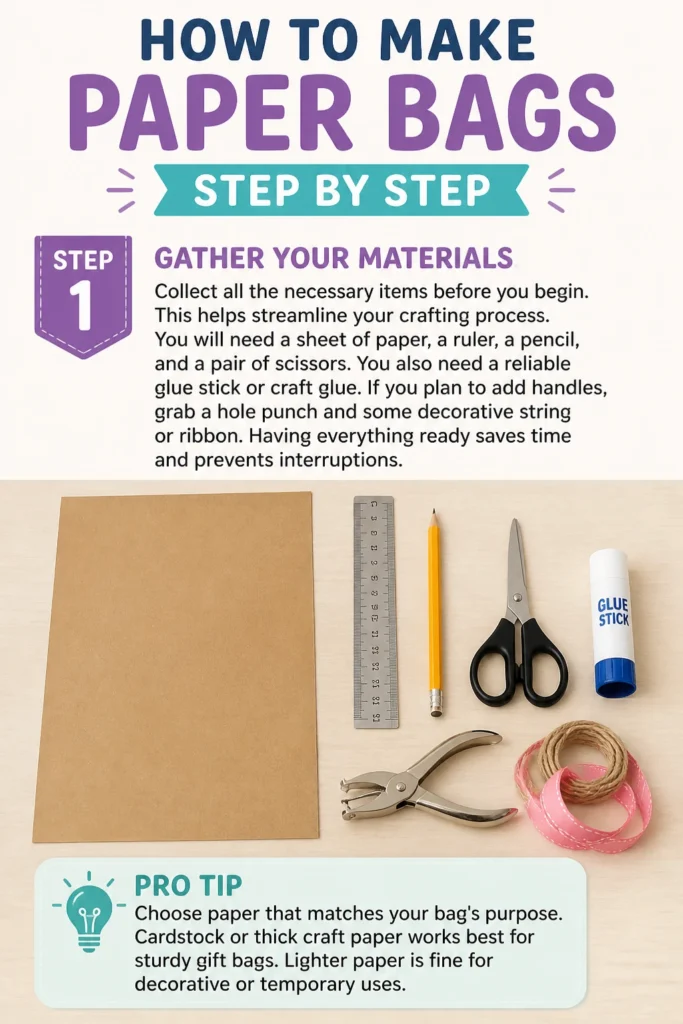
Collect all the necessary items before you begin. This helps streamline your crafting process. You will need a sheet of paper, a ruler, a pencil, and a pair of scissors.
You also need a reliable glue stick or craft glue. If you plan to add handles, grab a hole punch and some decorative string or ribbon. Having everything ready saves time and prevents interruptions.
Pro Tip: Choose paper that matches your bag’s purpose. Cardstock or thick craft paper works best for sturdy gift bags. Lighter paper is fine for decorative or temporary uses.
Step 2: Prepare Your Paper
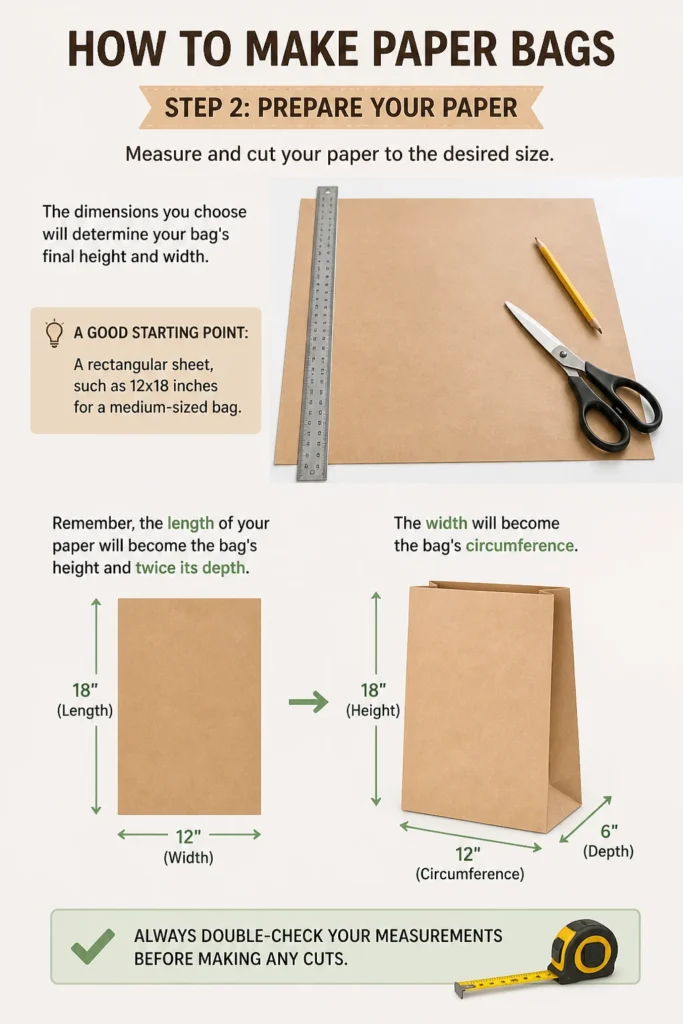
Measure and cut your paper to the desired size. The dimensions you choose will determine your bag’s final height and width. A good starting point is a rectangular sheet, such as 12×18 inches for a medium-sized bag.
Remember, the length of your paper will become the bag’s height and twice its depth. The width will become the bag’s circumference. Always double-check your measurements before making any cuts.
Step 3: Create the Bag Body
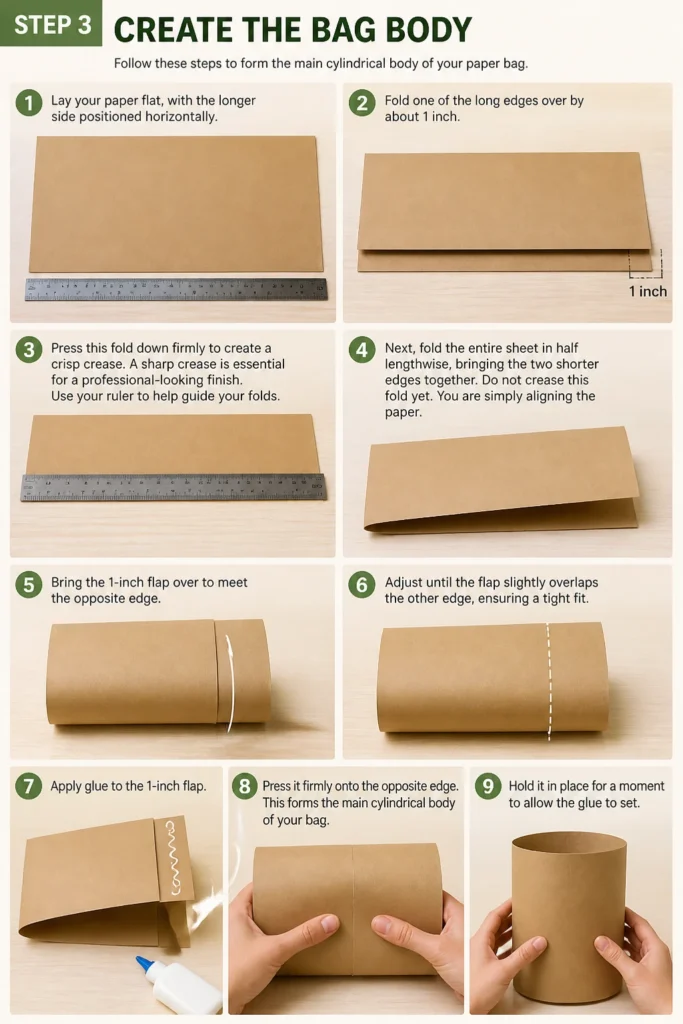
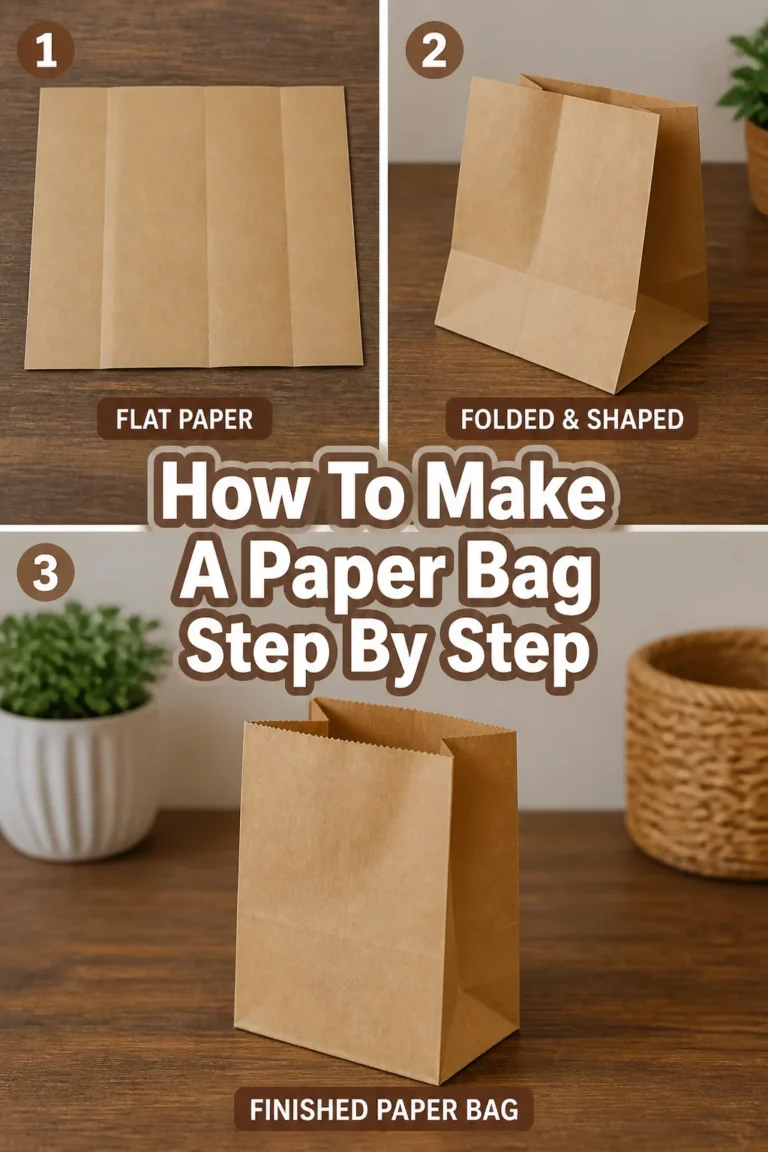
Lay your paper flat, with the longer side positioned horizontally. Fold one of the long edges over by about 1 inch. This creates a flap that will be used for gluing the bag together.
Press this fold down firmly to create a crisp crease. A sharp crease is essential for a professional-looking finish. Use your ruler to help guide your folds.
Next, fold the entire sheet in half lengthwise, bringing the two shorter edges together. Do not crease this fold yet. You are simply aligning the paper.
Bring the 1-inch flap over to meet the opposite edge. Adjust until the flap slightly overlaps the other edge, ensuring a tight fit. Apply glue to the 1-inch flap and press it firmly onto the opposite edge.
This forms the main cylindrical body of your bag. Hold it in place for a moment to allow the glue to set. You now have a tube of paper.
Step 4: Form the Bag Bottom
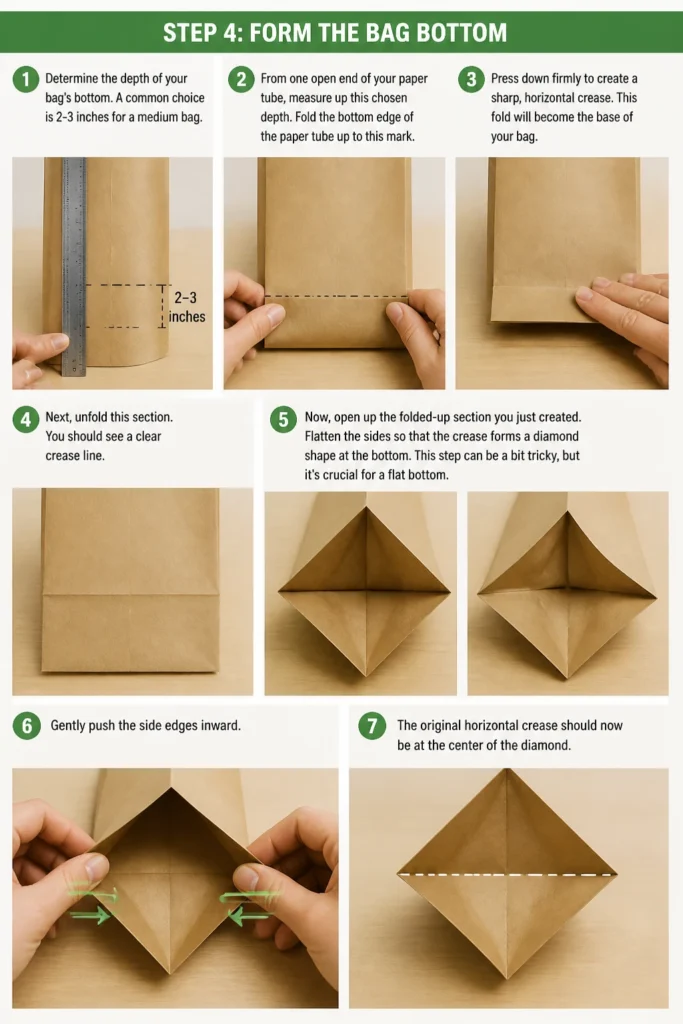
Determine the depth of your bag’s bottom. A common choice is 2-3 inches for a medium bag. From one open end of your paper tube, measure up this chosen depth.
Fold the bottom edge of the paper tube up to this mark. Press down firmly to create a sharp, horizontal crease. This fold will become the base of your bag.
Next, unfold this section. You should see a clear crease line. Now, open up the folded-up section you just created. Flatten the sides so that the crease forms a diamond shape at the bottom.
This step can be a bit tricky, but it’s crucial for a flat bottom. Gently push the side edges inward. The original horizontal crease should now be at the center of the diamond.
Step 5: Secure the Sides
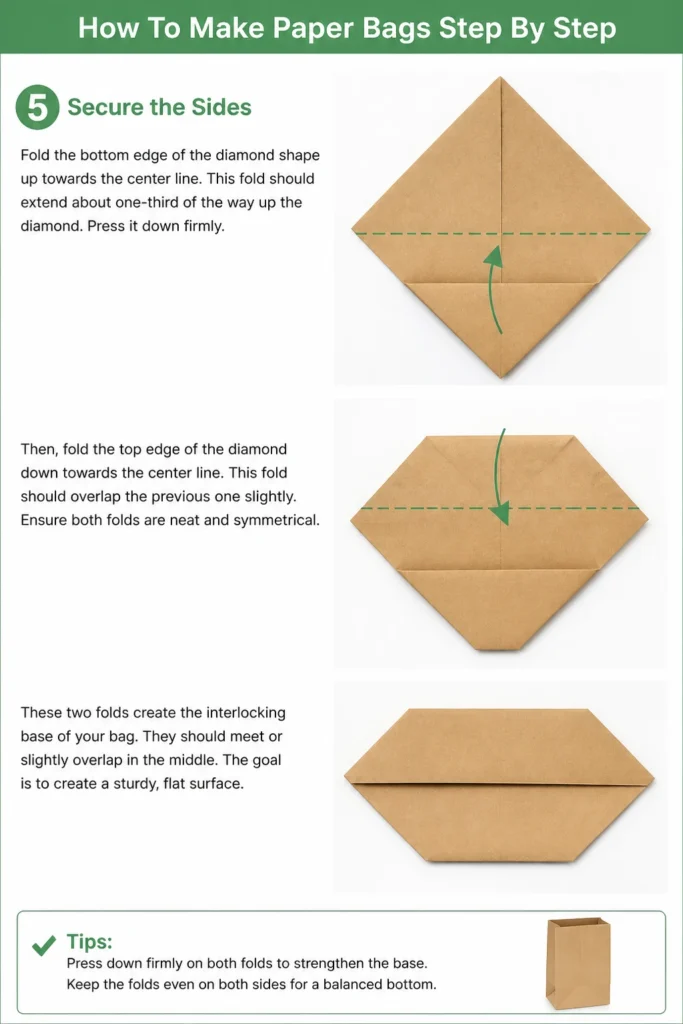
Fold the bottom edge of the diamond shape up towards the center line. This fold should extend about one-third of the way up the diamond. Press it down firmly.
Then, fold the top edge of the diamond down towards the center line. This fold should overlap the previous one slightly. Ensure both folds are neat and symmetrical.
These two folds create the interlocking base of your bag. They should meet or slightly overlap in the middle. The goal is to create a sturdy, flat surface.
Step 6: Fold and Glue the Bottom
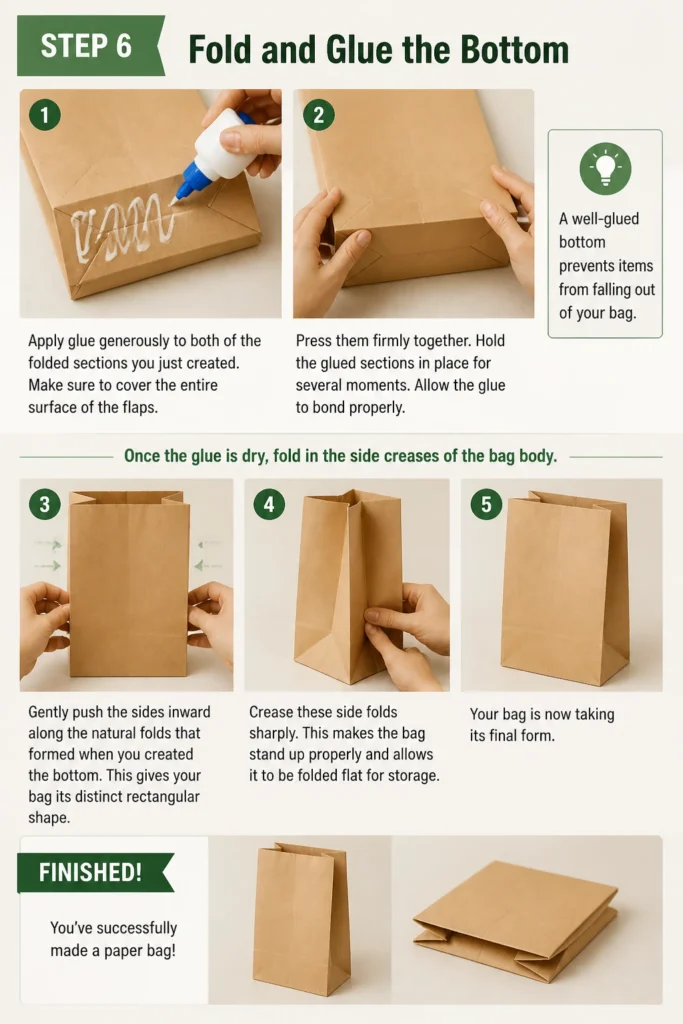
Apply glue generously to both of the folded sections you just created. Make sure to cover the entire surface of the flaps. Press them firmly together.
Hold the glued sections in place for several moments. Allow the glue to bond properly. A well-glued bottom prevents items from falling out of your bag.
Once the glue is dry, fold in the side creases of the bag body. Gently push the sides inward along the natural folds that formed when you created the bottom. This gives your bag its distinct rectangular shape.
Crease these side folds sharply. This makes the bag stand up properly and allows it to be folded flat for storage. Your bag is now taking its final form.
Step 7: Add Handles (Optional)
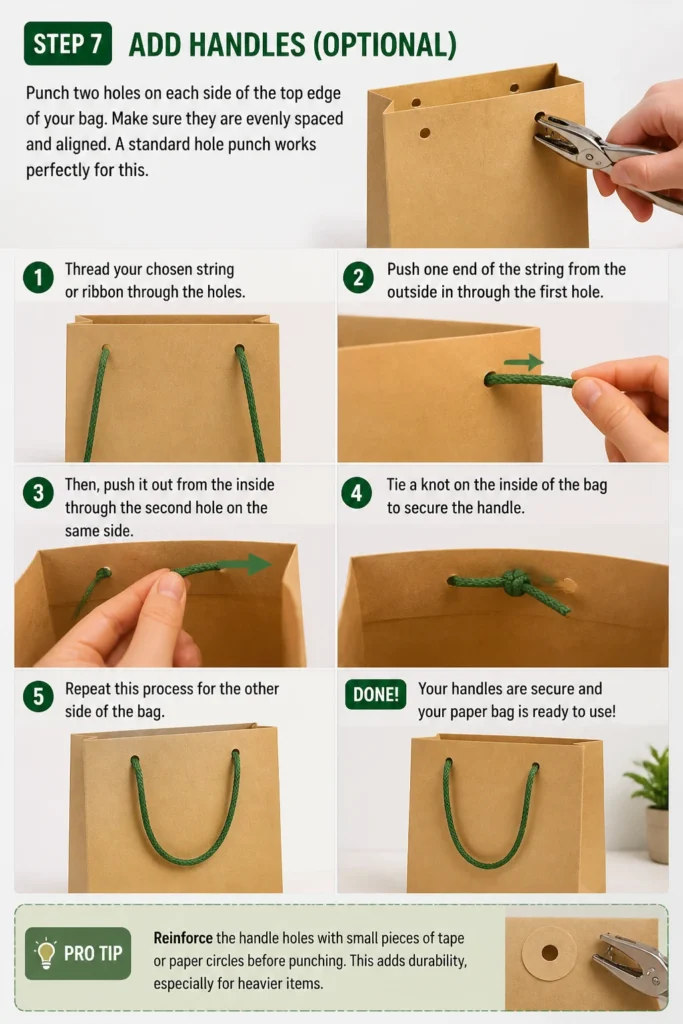
Punch two holes on each side of the top edge of your bag. Make sure they are evenly spaced and aligned. A standard hole punch works perfectly for this.
Thread your chosen string or ribbon through the holes. Push one end of the string from the outside in through the first hole. Then, push it out from the inside through the second hole on the same side.
Tie a knot on the inside of the bag to secure the handle. Repeat this process for the other side of the bag. You can use any sturdy string, ribbon, or even rope.
Pro Tip: Reinforce the handle holes with small pieces of tape or paper circles before punching. This adds durability, especially for heavier items.
Step 8: Decorate Your Bag
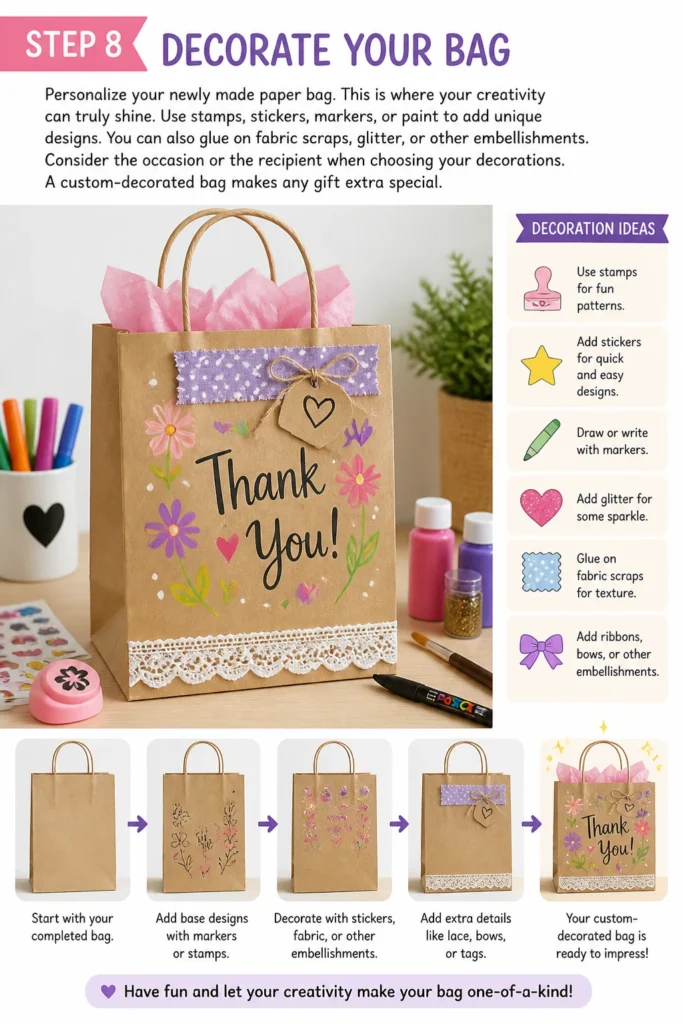
Personalize your newly made paper bag. This is where your creativity can truly shine. Use stamps, stickers, markers, or paint to add unique designs.
You can also glue on fabric scraps, glitter, or other embellishments. Consider the occasion or the recipient when choosing your decorations. A custom-decorated bag makes any gift extra special.
Common Mistakes to Avoid
Using Too Little Glue
Applying too little adhesive is a frequent error. This can lead to seams coming apart, especially at the bottom of the bag. Always use a generous amount of glue, ensuring full coverage on the flaps. Press firmly and allow adequate drying time for a strong bond.
Not Creasing Folds Sharply
Failing to create sharp creases results in a flimsy, unprofessional-looking bag. Each fold should be pressed down firmly, ideally with a ruler or bone folder. Crisp creases provide structural integrity and a neat appearance, making your bag much sturdier.
Improperly Sizing the Paper
Incorrect paper dimensions can lead to a bag that is too wide, too narrow, or has an awkward height-to-depth ratio. Before cutting, visualize your final bag. Measure carefully and consider the proportions. A little planning here saves frustration later.
Rushing the Drying Process
Impatience with glue drying is a common pitfall. If you handle the bag before the glue is fully set, seams can shift or detach. Always allow ample time for the glue to dry completely. This ensures maximum strength and durability for your finished paper bag.
Troubleshooting
Bag Looks Flimsy or Collapses Easily
If your bag isn’t holding its shape well, the problem often lies in the paper choice or lack of sharp creases. Ensure you’re using paper of adequate thickness, like cardstock or heavy craft paper. Revisit your folds, pressing each one down firmly with a ruler or bone folder to create strong structural lines.
Another cause might be insufficient glue on the seams. Make sure all glued sections have full coverage and were pressed together for enough time to bond. You can reinforce the inside seams with extra strips of paper and glue for added strength.
Glue Doesn’t Hold
When glue fails to bond, several factors could be at play. The most common issue is not allowing enough drying time. Different glues have varying drying periods, so check the product instructions. Ensure the surfaces being glued are clean and free of dust or oils.
You might also be using the wrong type of glue for your paper. A strong craft glue or a high-quality glue stick is usually best for paper crafts. If the paper is very thick or coated, you might need a more specialized adhesive. Apply pressure to the glued areas for a few minutes while the glue starts to set.
Bottom of the Bag Isn’t Flat
A wobbly or uneven bag bottom usually stems from the folding process in Step 4 and 5. When creating the diamond shape for the bottom, ensure the side folds are symmetrical. The two flaps you fold up and down should meet or overlap precisely in the center.
Take your time during these steps to align everything perfectly. Use your ruler to guide your folds and ensure they are straight. If the bottom is still slightly uneven, you can carefully re-crease the side folds of the bag after the bottom glue has dried, gently pushing them inward to square up the base.
Key Takeaways
- Accurate measurements are crucial for a well-proportioned and functional paper bag.
- Sharp, firm creases ensure your bag has structural integrity and a professional appearance.
- Allowing glue to dry fully is essential for strong, durable seams that won’t come apart.
- Experimenting with different paper types and thicknesses can enhance your bag’s strength and look.
- Adding handles and decorative elements truly personalizes your creation and makes it special.
- Practice improves your technique; don’t be discouraged if your first bag isn’t perfect.
Frequently Asked Questions
What kind of paper is best for making paper bags?
Cardstock or heavy craft paper, around 65-80 lb (176-216 gsm), generally works best. This thickness provides good durability and allows the bag to hold its shape well. For lighter-duty bags, scrapbook paper or even thick wrapping paper can be used.
Can I make different sizes of paper bags using this method?
Absolutely! This method is highly adaptable to various sizes. Simply adjust your initial paper dimensions. Remember that the length of your paper determines the bag’s height and twice its depth, while the width determines its circumference. Scale your measurements accordingly.
How can I make the bag stronger for heavier items?
To increase strength, use heavier cardstock or layer two sheets of thinner paper together with spray adhesive. You can also reinforce the bottom by cutting an extra piece of cardstock to fit snugly inside the bag’s base. For handles, use sturdy rope and reinforce the punch holes with grommets or tape.
What if I don’t have a ruler or bone folder for creasing?
You can still achieve crisp folds without specialized tools. A straight edge like a credit card, the back of a knife (handle carefully!), or even the edge of another piece of paper can substitute for a ruler. For creasing, your thumbnail or the edge of a sturdy piece of cardboard can work in place of a bone folder.
Our Top Recommended Finds
- Assorted Craft Paper Pack: A variety of colors and patterns will spark your creativity for different occasions.
- Precision Craft Knife and Mat: For super clean cuts and intricate designs, a craft knife offers more control than scissors.
- Strong Craft Glue (e.g., Tacky Glue): A reliable liquid glue ensures secure bonds, especially for thicker papers and embellishments.
Your Journey into Paper Bag Crafting Begins
You now have all the knowledge to create beautiful, custom paper bags. Imagine the joy of presenting a gift in a bag you made yourself, or organizing your space with personalized containers. This skill is incredibly versatile and rewarding.
Don’t wait to give it a try. Gather your materials today and start crafting your first paper bag. You might be surprised at how quickly you master the technique and begin exploring new designs. Happy crafting!