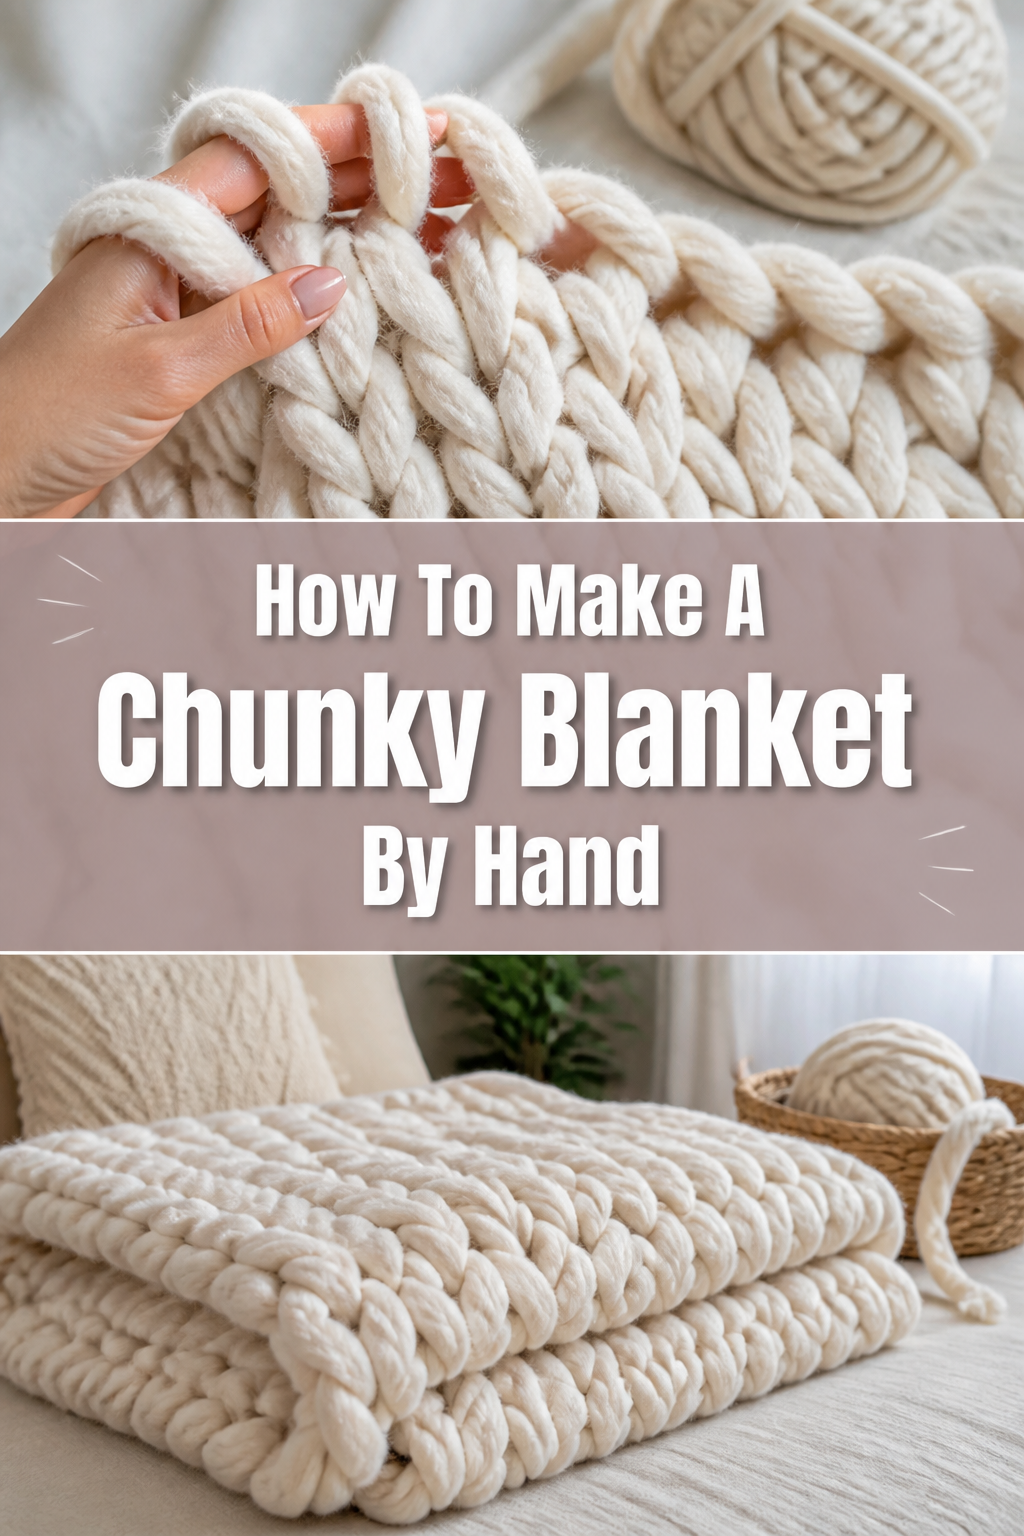
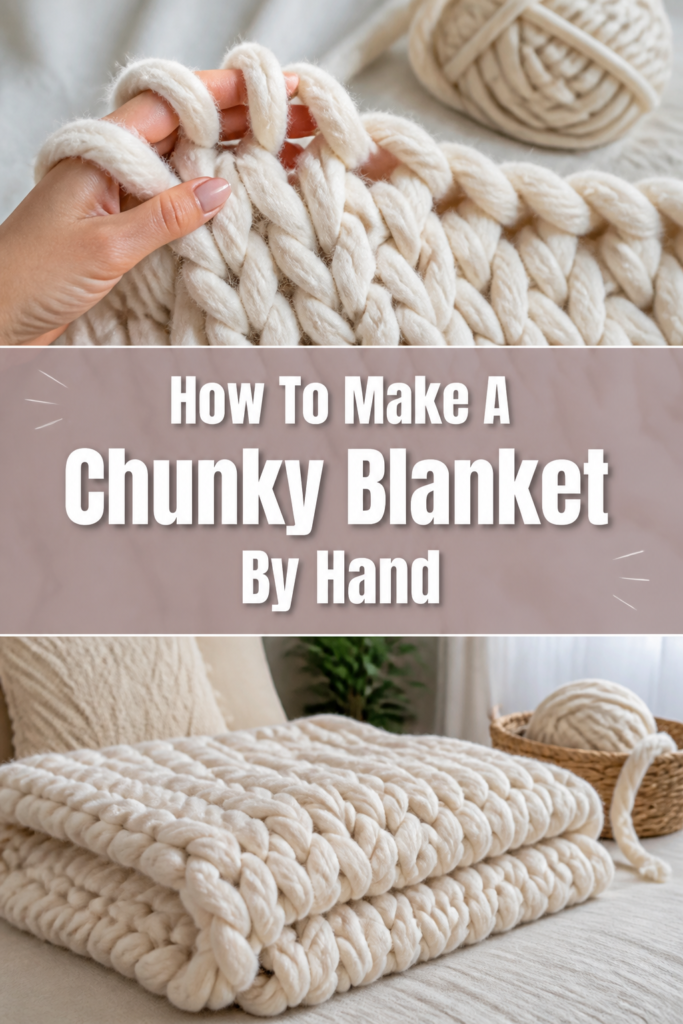
🧶 How To Make A Chunky Blanket By Hand

Beginner-friendly templates, step-by-step guides,
and weekly project ideas in your inbox.
There’s a unique satisfaction that comes from creating something beautiful with your own hands.
I remember the first chunky blanket I made; it felt incredibly daunting at first, but soon transformed into a meditative and rewarding process.
This guide will walk you through every step, helping you craft a luxurious, cozy blanket you’ll cherish, drawing from my own experience to make it straightforward.
Quick Overview
You’re about to embark on a delightful crafting journey. By the end, you’ll have a gorgeous, oversized chunky blanket, perfect for snuggling.
This method, often called arm knitting, requires no needles or complex tools, just your hands and some super bulky yarn.
- Time needed: 2-4 hours (depending on blanket size and speed)
- Difficulty: Beginner
- What you’ll need: Super bulky chenille yarn, a flat surface
Step-by-Step Instructions
Step 1: Gather Your Materials
First things first, let’s get organized. The most crucial item is your yarn.
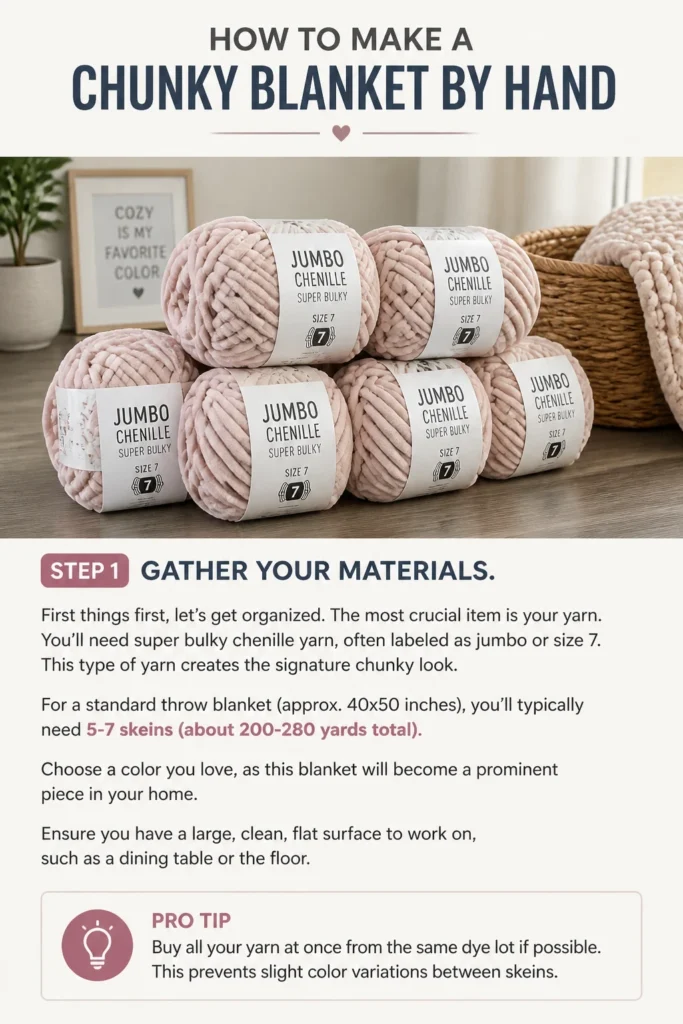
You’ll need super bulky chenille yarn, often labeled as “jumbo” or “size 7”. This type of yarn creates the signature chunky look.
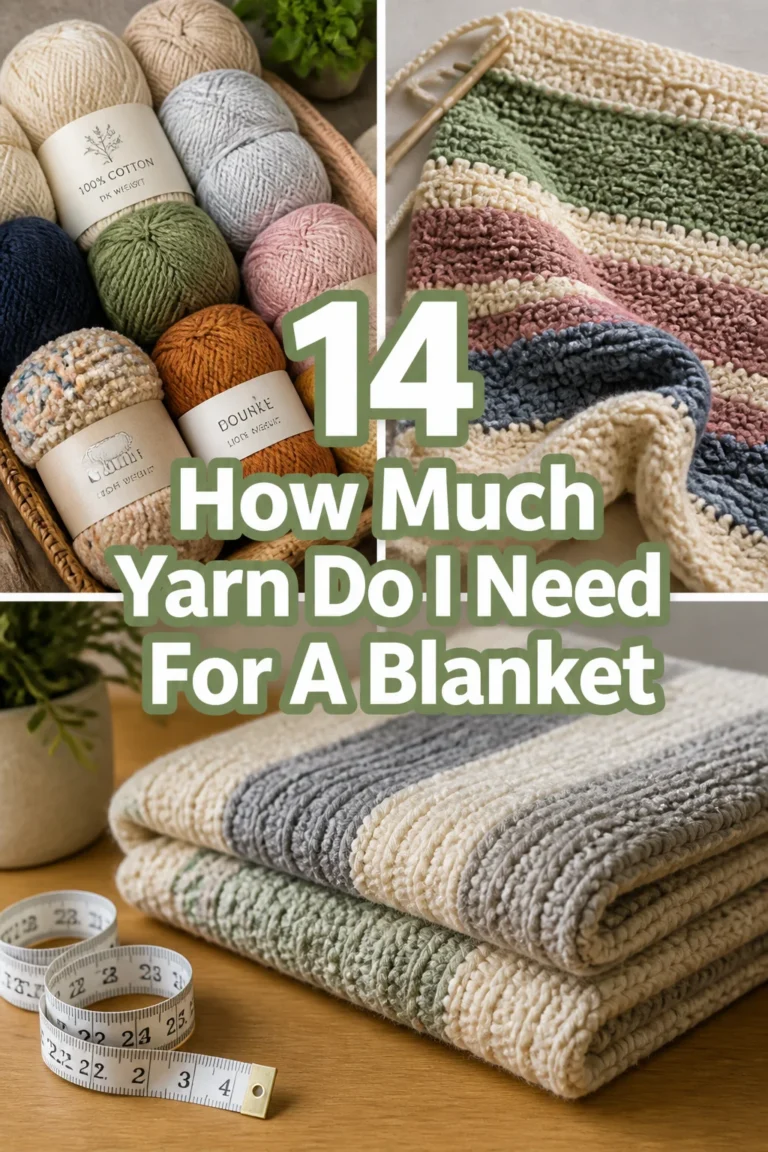
For a standard throw blanket (approx. 40×50 inches), you’ll typically need 5-7 skeins (about 200-280 yards total).
Choose a color you love, as this blanket will become a prominent piece in your home.
Ensure you have a large, clean, flat surface to work on, such as a dining table or the floor.
Pro Tip: Buy all your yarn at once from the same dye lot if possible. This prevents slight color variations between skeins.
Step 2: Create a Slip Knot
To begin, unroll a good length of yarn, about 6-8 feet, from one of your skeins. This will be your working yarn.
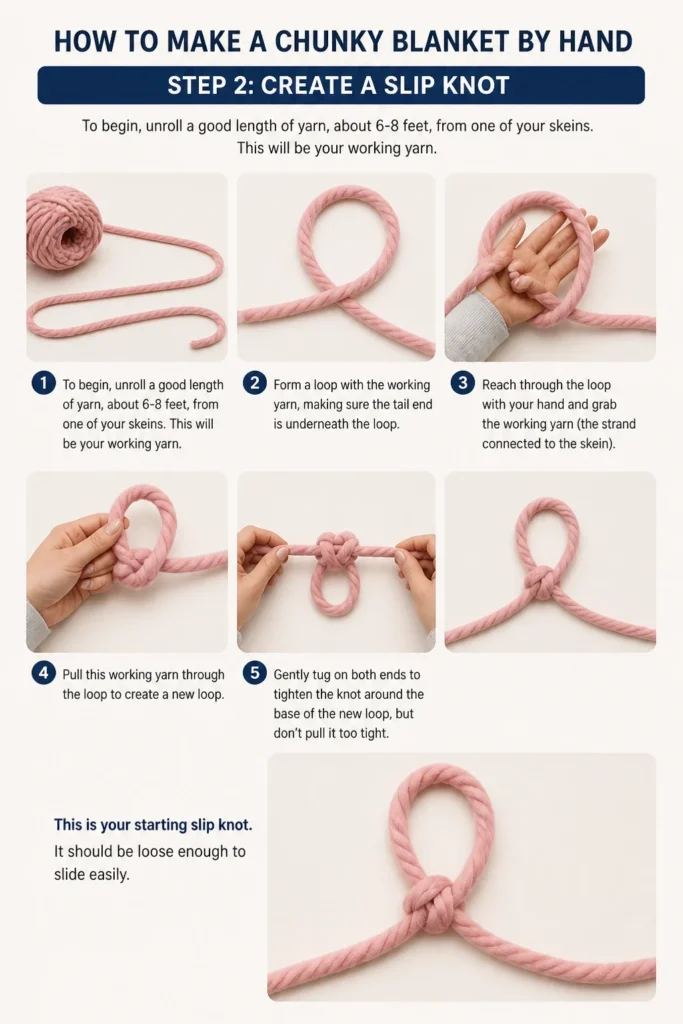
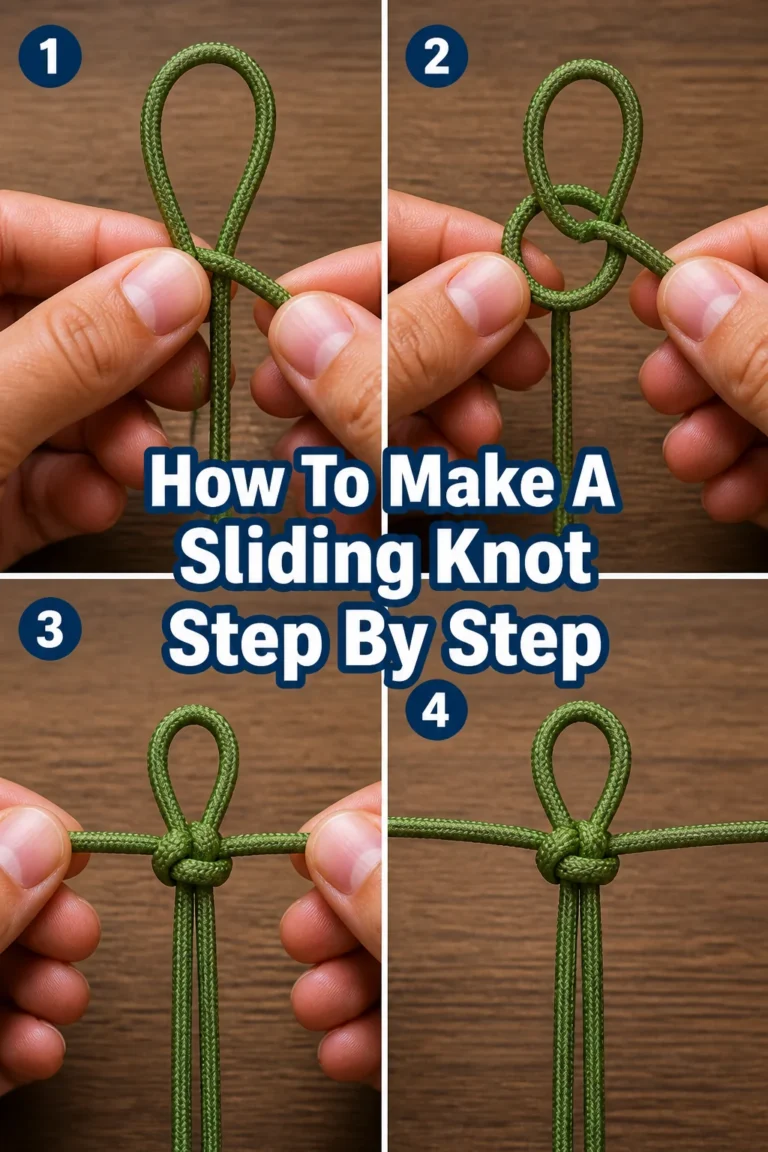
Form a loop with the working yarn, making sure the tail end is underneath the loop.
Reach through the loop with your hand and grab the working yarn (the strand connected to the skein).
Pull this working yarn through the loop to create a new loop. Gently tug on both ends to tighten the knot around the base of the new loop, but don’t pull it too tight.
This is your starting slip knot. It should be loose enough to slide easily.
Step 3: Cast On Your First Row
Place the slip knot onto your dominant arm (the one you write with).
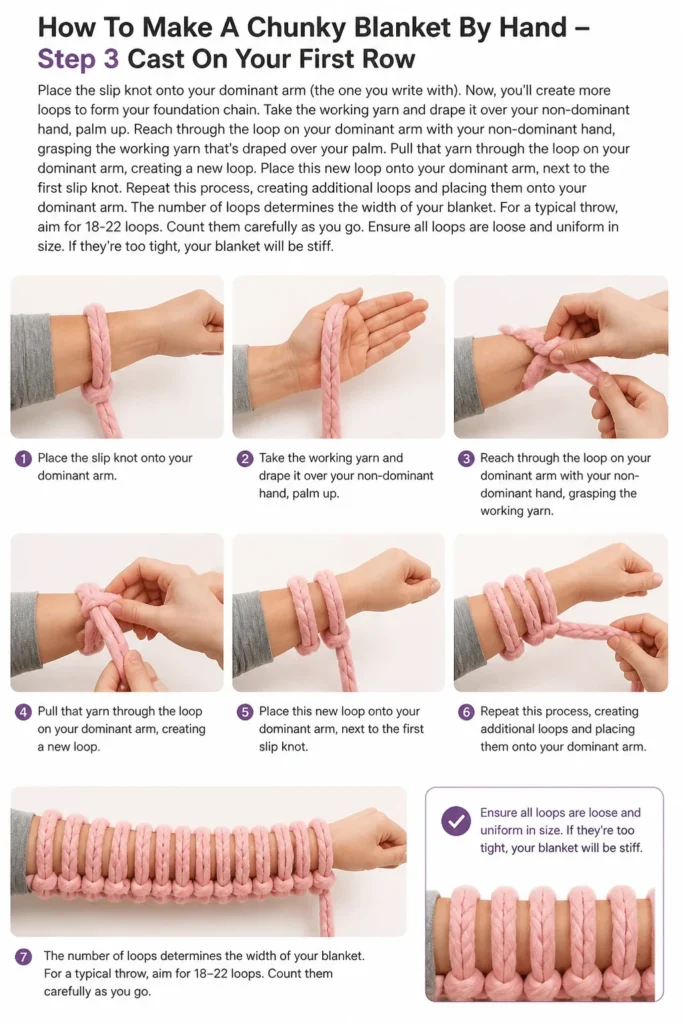
Now, you’ll create more loops to form your foundation chain. Take the working yarn and drape it over your non-dominant hand, palm up.
Reach through the loop on your dominant arm with your non-dominant hand, grasping the working yarn that’s draped over your palm.
Pull that yarn through the loop on your dominant arm, creating a new loop.
Place this new loop onto your dominant arm, next to the first slip knot.
Repeat this process, creating additional loops and placing them onto your dominant arm.
The number of loops determines the width of your blanket. For a typical throw, aim for 18-22 loops. Count them carefully as you go.
Ensure all loops are loose and uniform in size. If they’re too tight, your blanket will be stiff.
Step 4: Knit the First Row
Once you have your desired number of loops on your dominant arm, you’re ready to knit.
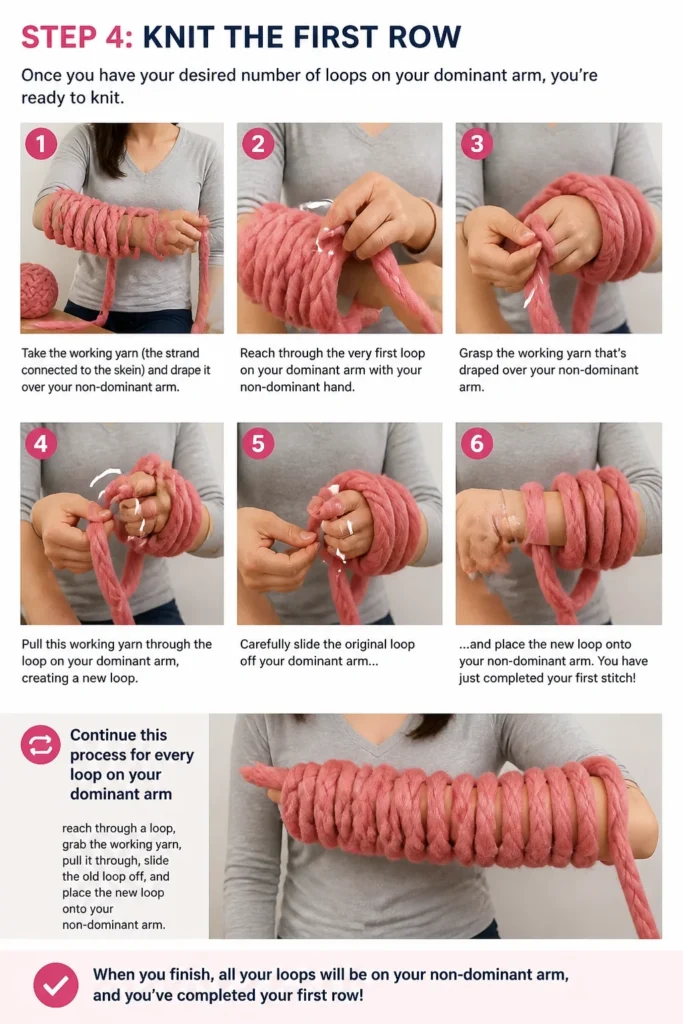
Take the working yarn (the strand connected to the skein) and drape it over your non-dominant arm.
Reach through the very first loop on your dominant arm with your non-dominant hand.
Grasp the working yarn that’s draped over your non-dominant arm.
Pull this working yarn through the loop on your dominant arm, creating a new loop.
Carefully slide the original loop off your dominant arm and place the new loop onto your non-dominant arm.
You have just completed your first stitch!
Continue this process for every loop on your dominant arm: reach through a loop, grab the working yarn, pull it through, slide the old loop off, and place the new loop onto your non-dominant arm.
When you finish, all your loops will have transferred from your dominant arm to your non-dominant arm.
Step 5: Continue Knitting Rows
Now that all loops are on your non-dominant arm, you’ll simply switch arms and repeat the knitting process.
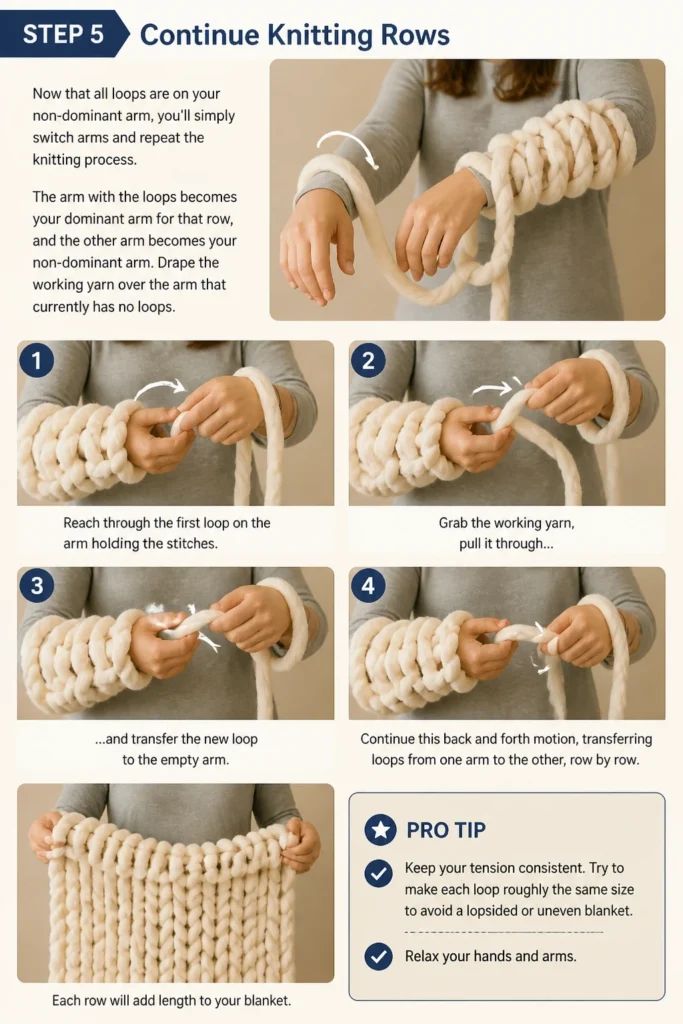
The arm with the loops becomes your “dominant” arm for that row, and the other arm becomes your “non-dominant” arm.
Drape the working yarn over the arm that currently has no loops.
Reach through the first loop on the arm holding the stitches, grab the working yarn, pull it through, and transfer the new loop to the empty arm.
Continue this back and forth motion, transferring loops from one arm to the other, row by row.
Each row will add length to your blanket.
Pro Tip: Keep your tension consistent. Try to make each loop roughly the same size to avoid a lopsided or uneven blanket. Relax your hands and arms.
Step 6: Check Your Tension and Progress
Periodically, lay your blanket flat to check your work. Look for any stitches that appear much larger or smaller than others.
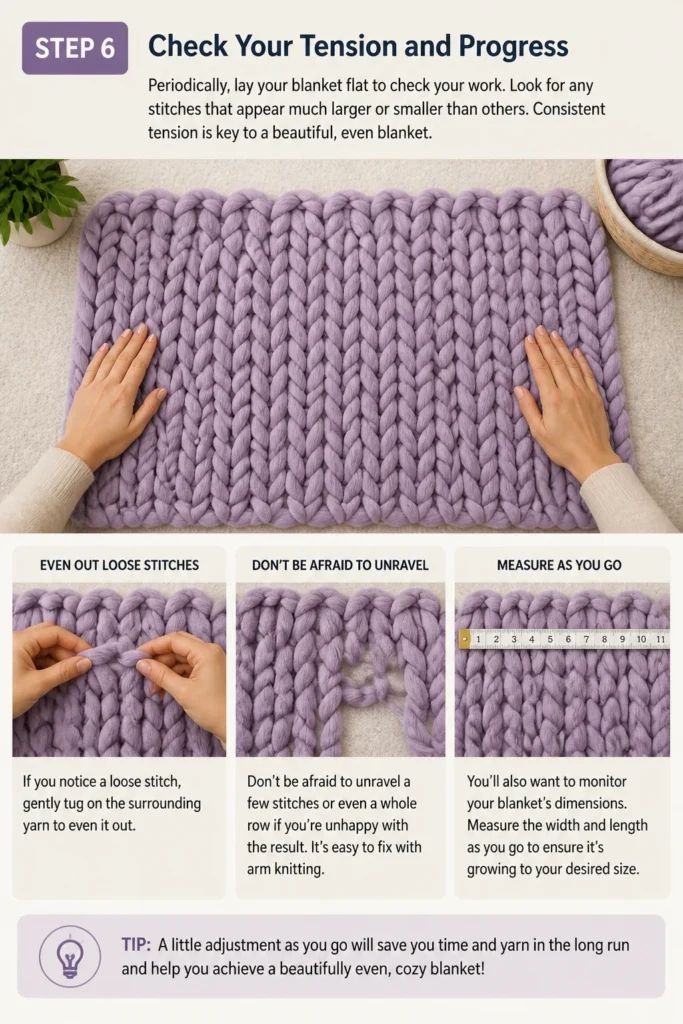
Consistent tension is key to a beautiful, even blanket. If you notice a loose stitch, gently tug on the surrounding yarn to even it out.
Don’t be afraid to unravel a few stitches or even a whole row if you’re unhappy with the result. It’s easy to fix with arm knitting.
You’ll also want to monitor your blanket’s dimensions. Measure the width and length as you go to ensure it’s growing to your desired size.
Step 7: Measure Your Blanket
Decide on the final dimensions for your blanket. A common throw size is around 40×50 inches.
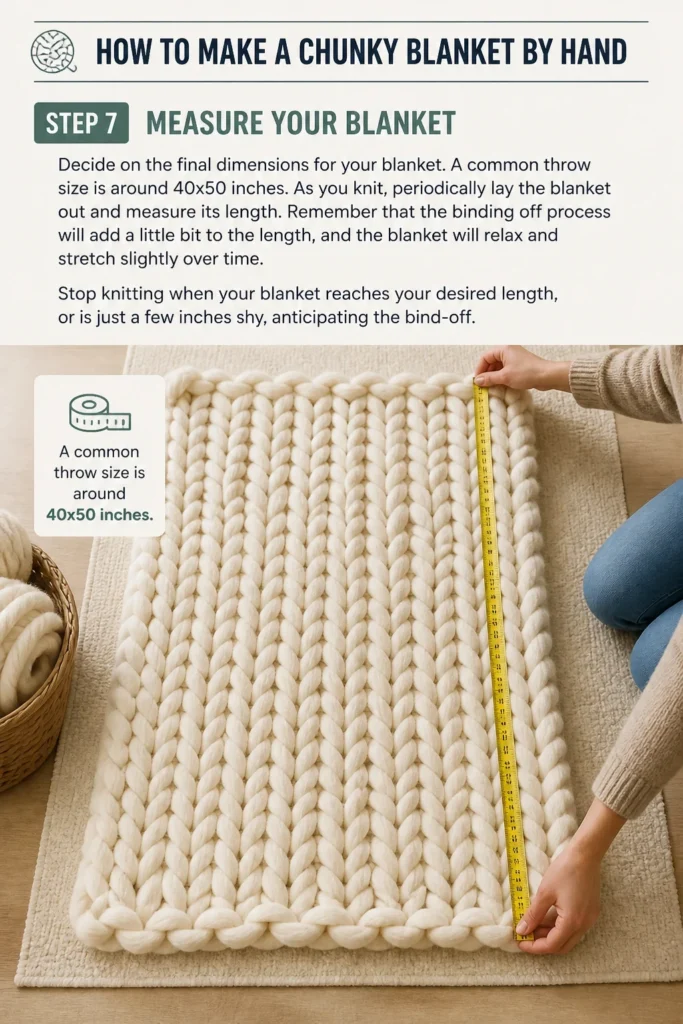
As you knit, periodically lay the blanket out and measure its length.
Remember that the binding off process will add a little bit to the length, and the blanket will relax and stretch slightly over time.
Stop knitting when your blanket reaches your desired length, or is just a few inches shy, anticipating the bind-off.
Step 8: Bind Off Your Stitches
This step secures your work and prevents the blanket from unraveling.
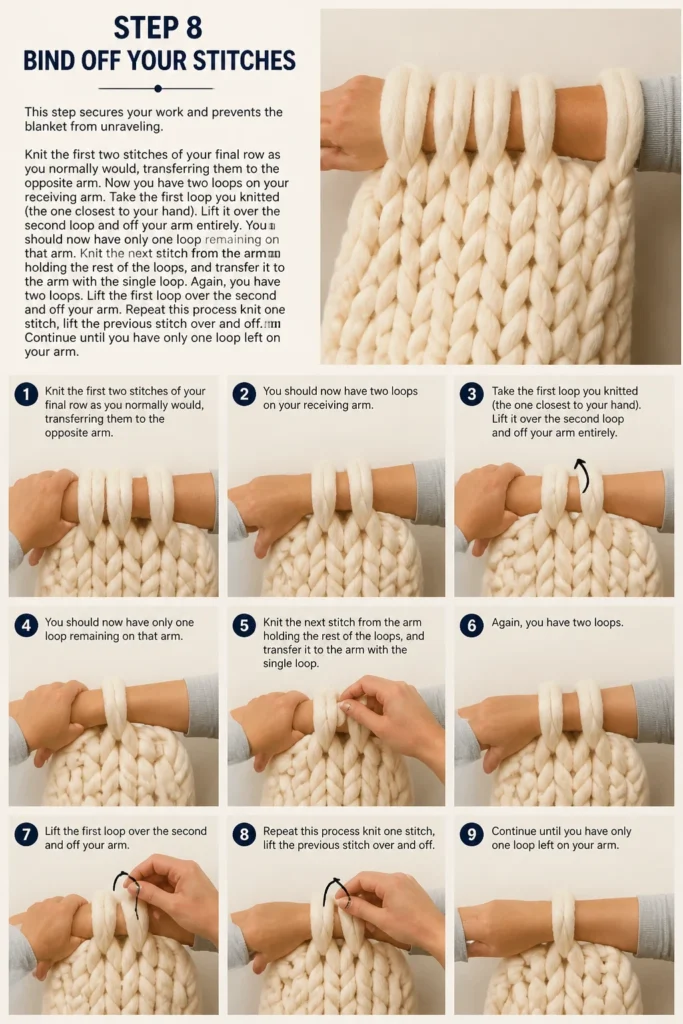
Knit the first two stitches of your final row as you normally would, transferring them to the opposite arm.
Now you have two loops on your receiving arm. Take the first loop you knitted (the one closest to your hand).
Lift it over the second loop and off your arm entirely. You should now have only one loop remaining on that arm.
Knit the next stitch from the arm holding the rest of the loops, and transfer it to the arm with the single loop.
Again, you have two loops. Lift the first loop over the second and off your arm.
Repeat this process: knit one stitch, lift the previous stitch over and off. Continue until you have only one loop left on your arm.
Step 9: Weave In Ends
Once you have that very last loop remaining after binding off, cut your working yarn, leaving a tail about 12-18 inches long.
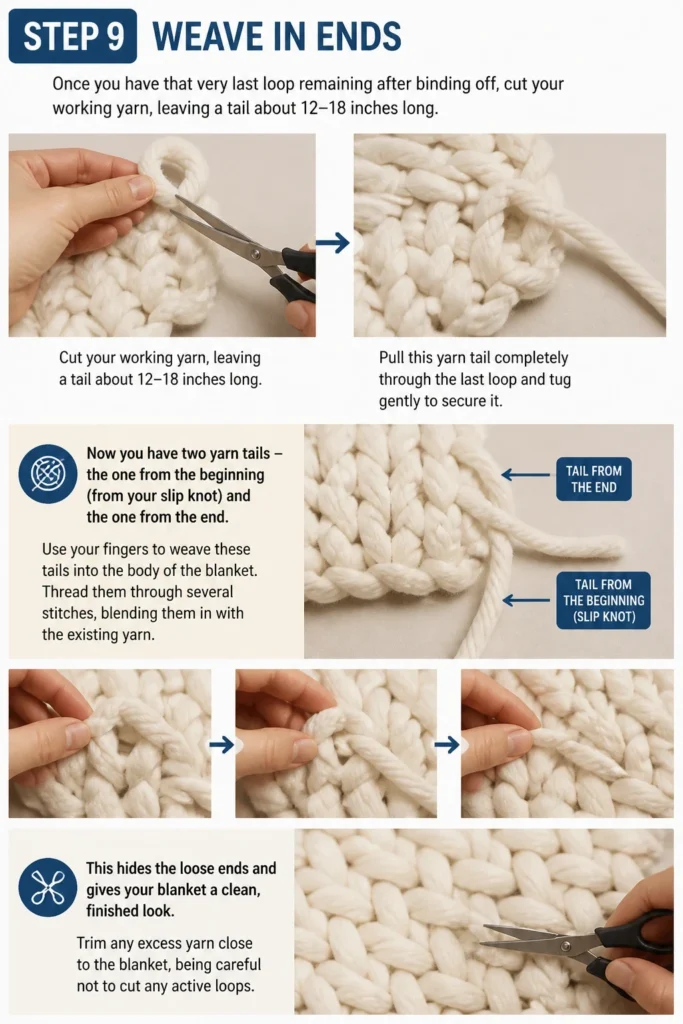
Pull this yarn tail completely through the last loop and tug gently to secure it.
Now you have two yarn tails: the one from the beginning (from your slip knot) and the one from the end.
Use your fingers to weave these tails into the body of the blanket. Thread them through several stitches, blending them in with the existing yarn.
This hides the loose ends and gives your blanket a clean, finished look.
Trim any excess yarn close to the blanket, being careful not to cut any active loops.
Step 10: Fluff and Enjoy Your Creation
Your chunky blanket is complete! Give it a good shake and a gentle fluff.
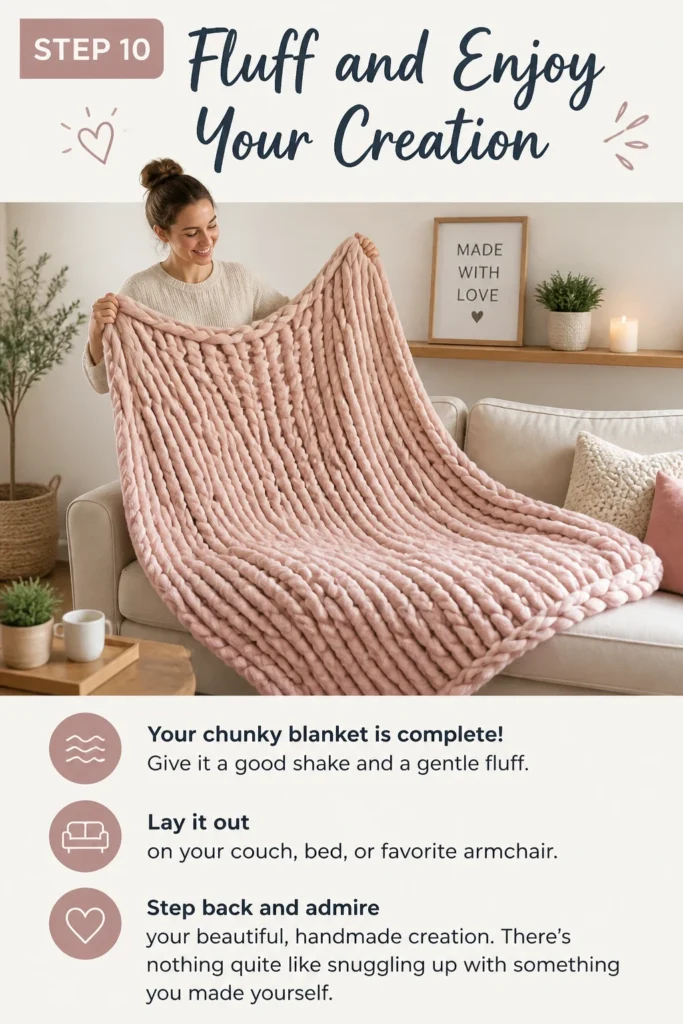
Lay it out on your couch, bed, or favorite armchair.
Step back and admire your beautiful, handmade creation.
There’s nothing quite like snuggling up with something you made yourself.
Common Mistakes to Avoid
Inconsistent Tension
One of the most frequent issues beginners face is varying tension. Some stitches might be very loose, while others are too tight.
This leads to an uneven-looking blanket with wavy edges or a lumpy texture. Practice keeping your loops consistently sized.
Try to relax your arms and hands. If a loop feels too tight, gently stretch it out before continuing. If it’s too loose, a slight tug on the working yarn can help.
Running Out of Yarn
It’s incredibly frustrating to be nearing the end of your blanket only to realize you don’t have enough yarn.
Always overestimate your yarn needs slightly, especially if you’re unsure about your tension, as tighter stitches use more yarn.
Refer to yarn labels for yardage and project recommendations, and consider buying an extra skein just in case. You can always return unopened skeins.
Incorrect Stitch Count
Losing or gaining stitches can make your blanket width inconsistent, leading to a trapezoid shape instead of a rectangle.
Carefully count your loops at the end of each row, especially in the beginning. If you find you have too many or too few, unravel the last row and correct it.
This small check can save you a lot of frustration later on.
Binding Off Too Tightly
A common error is binding off the final row with too much tension. This can create a stiff, tight edge that pulls the blanket in, making it feel constricted.
When binding off, ensure your loops are just as relaxed and consistent as the rest of the blanket’s stitches. Aim for a soft, flexible edge.
If it feels too tight, don’t hesitate to undo a few bind-off stitches and redo them more loosely.
Troubleshooting
My Blanket Edges Are Uneven
Uneven edges often stem from inconsistent tension, especially on the first and last stitches of each row.
Ensure you are always picking up the last loop from the previous row correctly and that your first and last stitches are not significantly tighter or looser than the rest.
Practice keeping every loop uniform. If it’s a major issue, you might need to unravel a few rows and restart, focusing on evenness.
The Blanket Looks Too Loose/Holey
This usually indicates that your tension is too loose. The loops are too large, creating gaps in the fabric.
Try to make your loops slightly smaller. When you pull the working yarn through to create a new loop, don’t pull it as far out.
A gentle tug on the working yarn after forming a loop can help tighten it to a more desirable size before transferring it to your arm.
I Keep Dropping Stitches
Dropping stitches can happen if your loops are too loose or if you’re working too quickly.
Slow down and be mindful when transferring loops between your arms. Make sure each loop is fully on your arm before moving to the next.
If you drop a stitch, quickly pick it up before it unravels too far. You can often re-thread the yarn back into place with your fingers.
Key Takeaways
- Choose super bulky chenille yarn for that signature chunky look and feel.
- Maintain consistent tension throughout the entire knitting process for an even blanket.
- Count your stitches frequently, especially in the early rows, to ensure a consistent width.
- Don’t be afraid to unravel and redo sections; it’s easy with arm knitting and helps achieve a better result.
- Bind off your stitches loosely to create a soft, flexible finished edge.
- Weave in all yarn tails securely for a clean and professional appearance.
Frequently Asked Questions
Can I wash my chunky blanket?
Most super bulky chenille yarns are machine washable on a delicate cycle with cold water. It’s best to air dry or tumble dry on very low heat to prevent shrinking or damage to the fibers. Always check your specific yarn label for care instructions.
What if my arms get tired?
Arm knitting can be a workout! Take breaks as needed. You can carefully slide your loops onto a long, sturdy object like a broom handle or a large PVC pipe during a break to rest your arms without losing your progress.
How do I make a larger or smaller blanket?
To make a larger blanket, simply cast on more stitches for increased width and knit more rows for increased length. For a smaller blanket, cast on fewer stitches and knit fewer rows. Adjust your yarn quantity accordingly.
Do I need any special tools?
No, that’s the beauty of it! This method is entirely done by hand, using your arms as knitting needles. No hooks, needles, or complicated gadgets are required, just your yarn and your hands.
Our Top Recommended Finds
- Jumbo Chenille Yarn: Look for brands specifically labeling their yarn as “Jumbo” or “Size 7” for the best chunky results.
- Large Yarn Bowl: Keeps your yarn from rolling away and tangling while you work, making the process smoother.
- Fabric Scissors: A sharp pair of scissors will make cutting yarn tails clean and easy.
Your Cozy Creation Awaits
You now have all the knowledge and steps needed to create a truly special chunky blanket by hand.
Imagine the warmth and comfort this unique piece will bring to your home, a testament to your creativity and effort.
Don’t let hesitation stop you. Pick out your favorite yarn, set aside a few hours, and start your crafting adventure today.
Once you master this, you might even consider exploring other hand-knitting projects like chunky pillows or pet beds!
Beginner-friendly templates, step-by-step guides,
and weekly project ideas in your inbox.