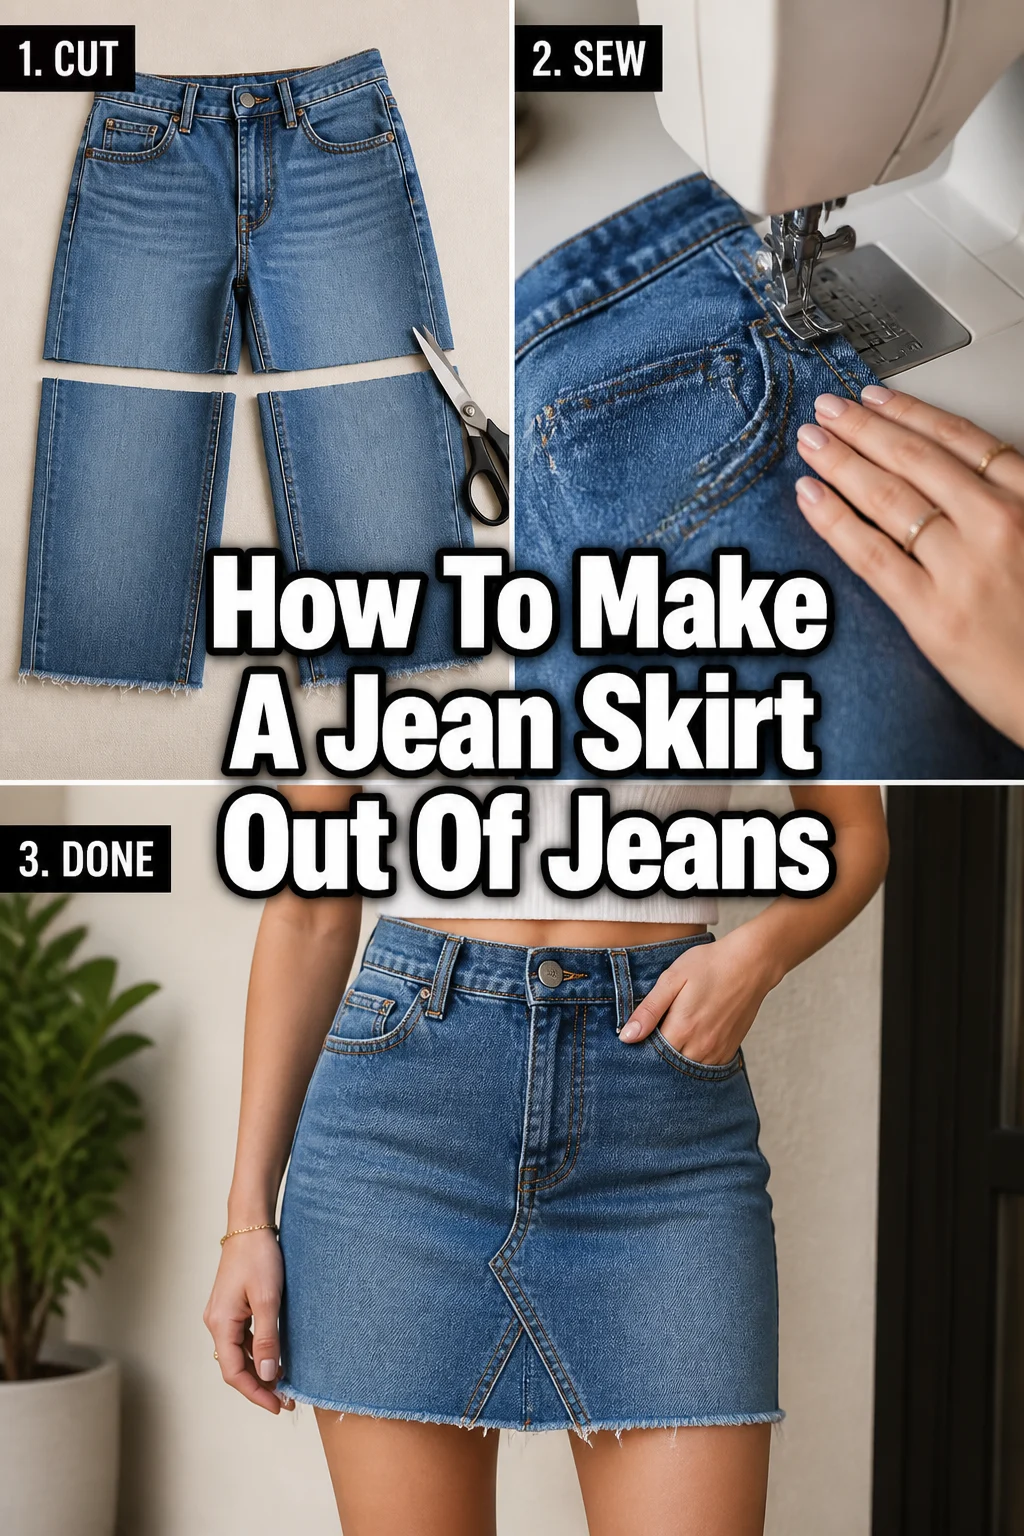
🧵 How To Make A Jean Skirt Out Of Jeans

Beginner-friendly templates, step-by-step guides,
and weekly project ideas in your inbox.
Finding the perfect denim skirt can feel like a mission impossible when you are browsing retail stores.
I started making my own skirts from old jeans years ago when I realized that my favorite pairs of pants always wore out in the inner thighs first.
By following this method, I have saved dozens of high-quality denim pieces from the landfill while creating a custom wardrobe that fits me perfectly.

Quick Overview
Transforming pants into a skirt is a classic upcycling project that rewards patience and precise cutting.
- Time needed: 90 to 120 minutes
- Difficulty: Beginner to Intermediate
- What you’ll need: Old jeans, fabric scissors, seam ripper, sewing machine, denim needles, and matching thread.
Step-by-Step Instructions
Step 1: Select Your Base Denim
Choose a pair of jeans that fits you well in the waist and hips.
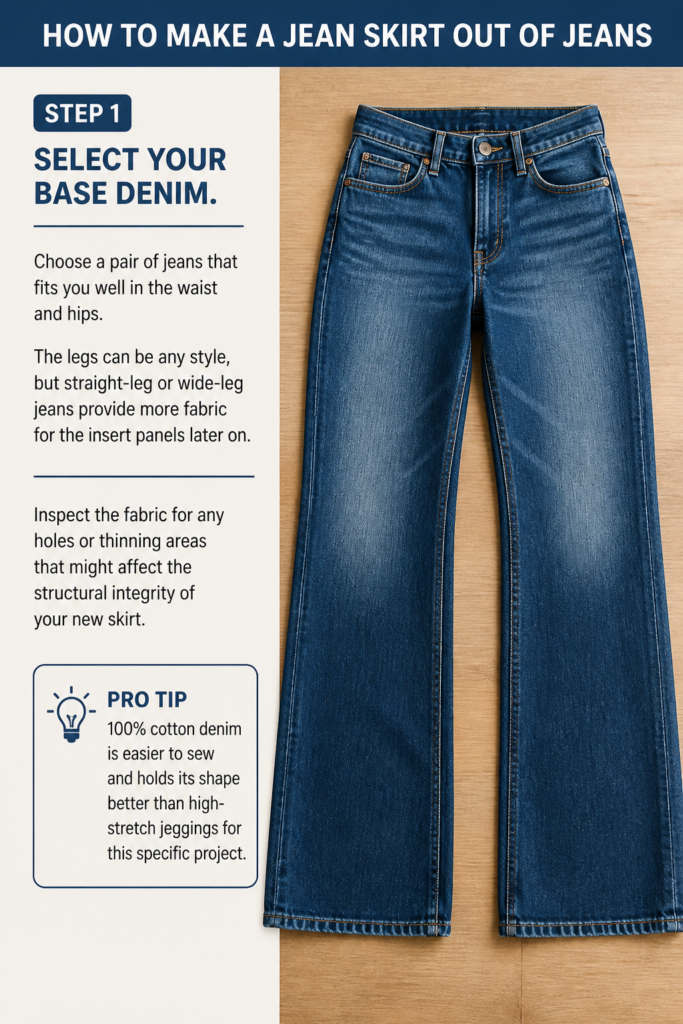
The legs can be any style, but straight-leg or wide-leg jeans provide more fabric for the “insert” panels later on.
Inspect the fabric for any holes or thinning areas that might affect the structural integrity of your new skirt.
Pro Tip: 100% cotton denim is easier to sew and holds its shape better than high-stretch jeggings for this specific project.
Step 2: Determine Your Desired Length
Put the jeans on and stand in front of a full-length mirror to visualize the final look.
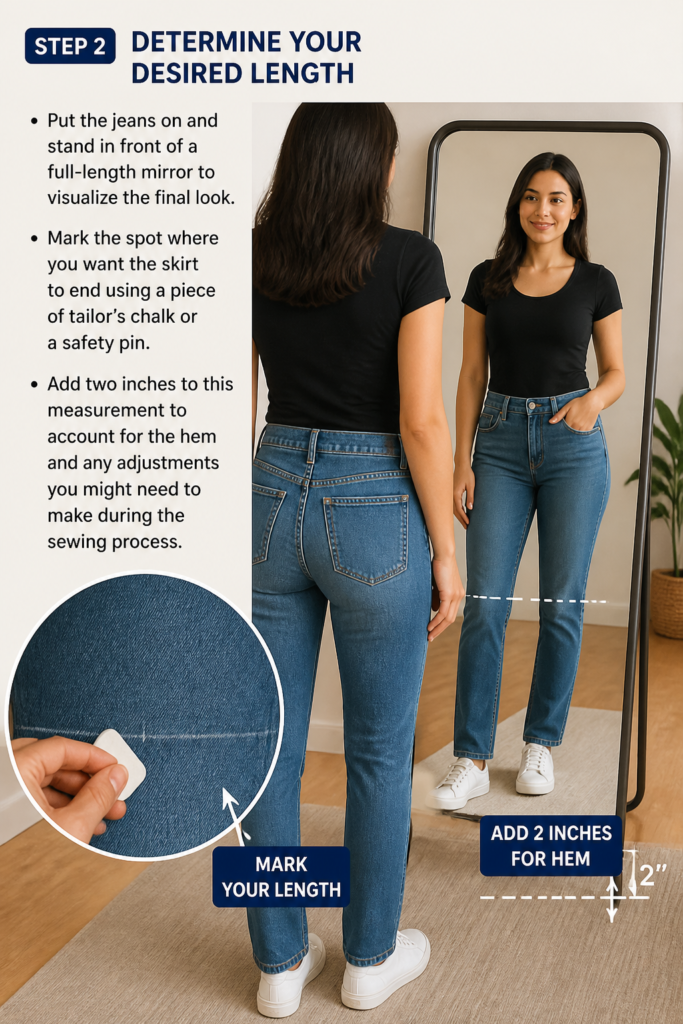
Mark the spot where you want the skirt to end using a piece of tailor’s chalk or a safety pin.
Add two inches to this measurement to account for the hem and any adjustments you might need to make during the sewing process.
Step 3: Cut the Legs
Lay the jeans flat on a large table or the floor, ensuring the seams are lined up perfectly.
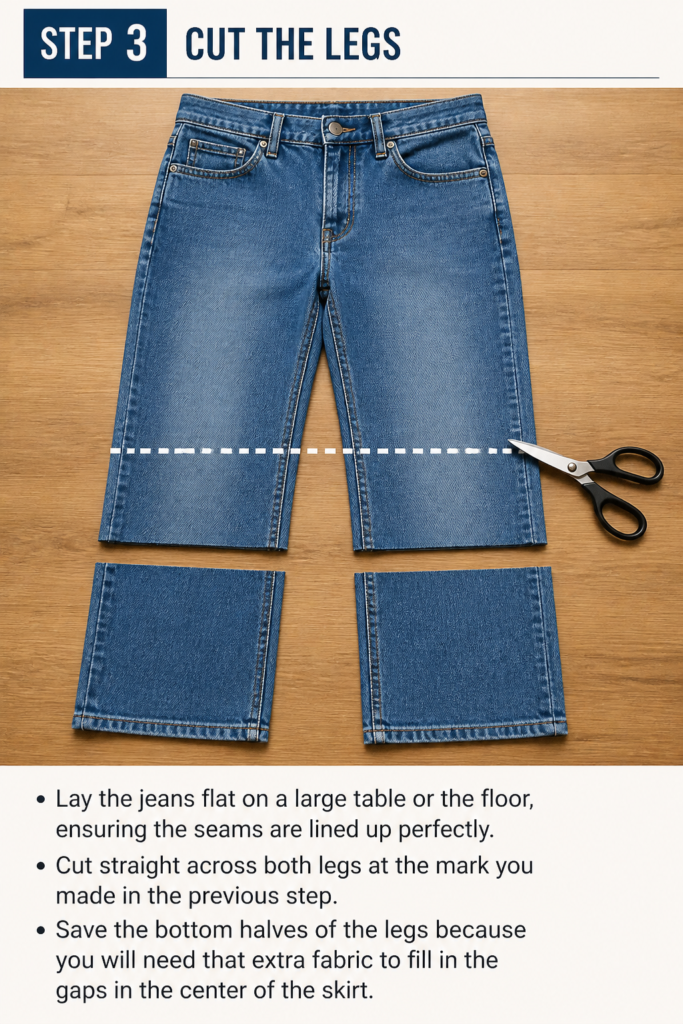
Cut straight across both legs at the mark you made in the previous step.
Save the bottom halves of the legs because you will need that extra fabric to fill in the gaps in the center of the skirt.
Step 4: Open the Inner Seams
Grab your seam ripper and begin opening the entire inner leg seam (the inseam) of the jeans.
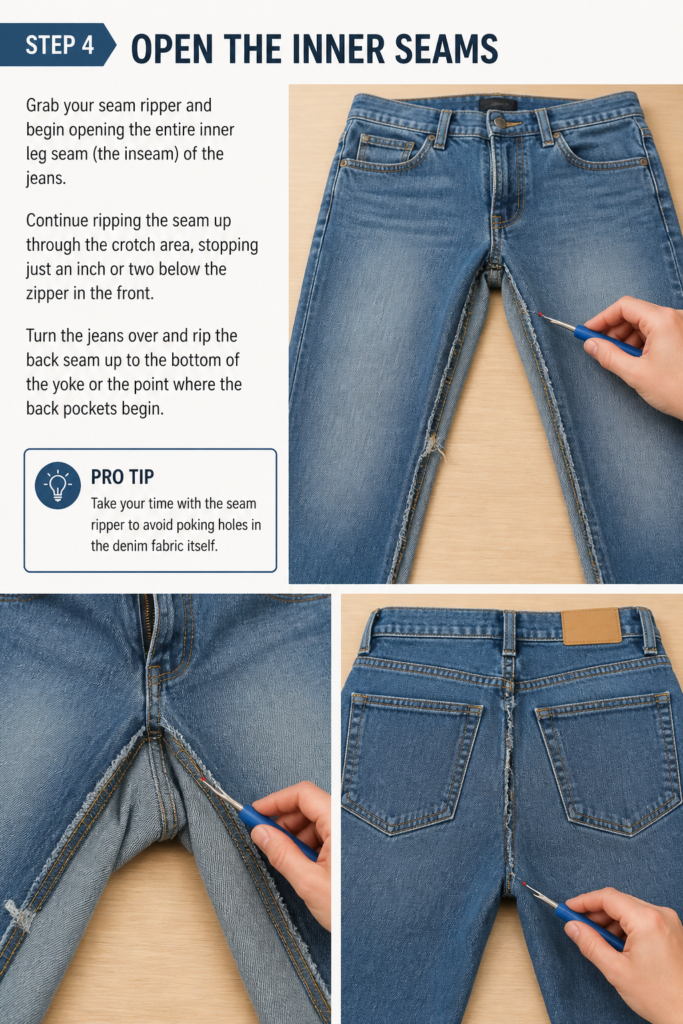
Continue ripping the seam up through the crotch area, stopping just an inch or two below the zipper in the front.
Turn the jeans over and rip the back seam up to the bottom of the yoke or the point where the back pockets begin.
Pro Tip: Take your time with the seam ripper to avoid poking holes in the denim fabric itself.
Step 5: Flatten the Crotch Curve
Lay the jeans flat so the front panels overlap each other in the center.
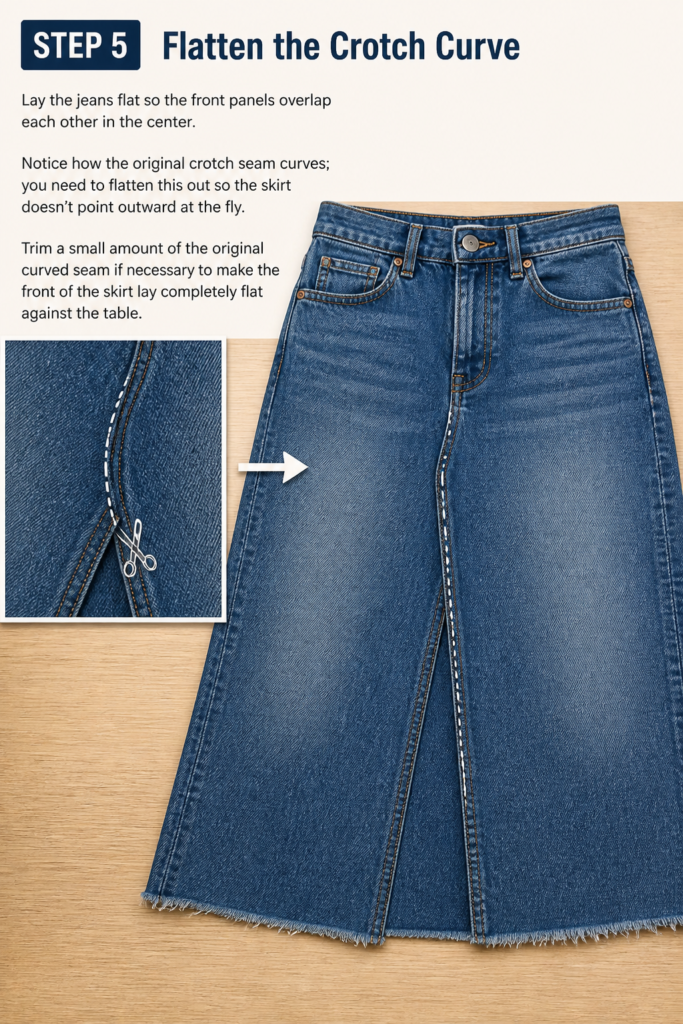
Notice how the original crotch seam curves; you need to flatten this out so the skirt doesn’t “point” outward at the fly.
Trim a small amount of the original curved seam if necessary to make the front of the skirt lay completely flat against the table.
Step 6: Create the Front Insert
Take one of the scrap pieces from the legs you cut off earlier and cut it open to create a flat sheet of fabric.
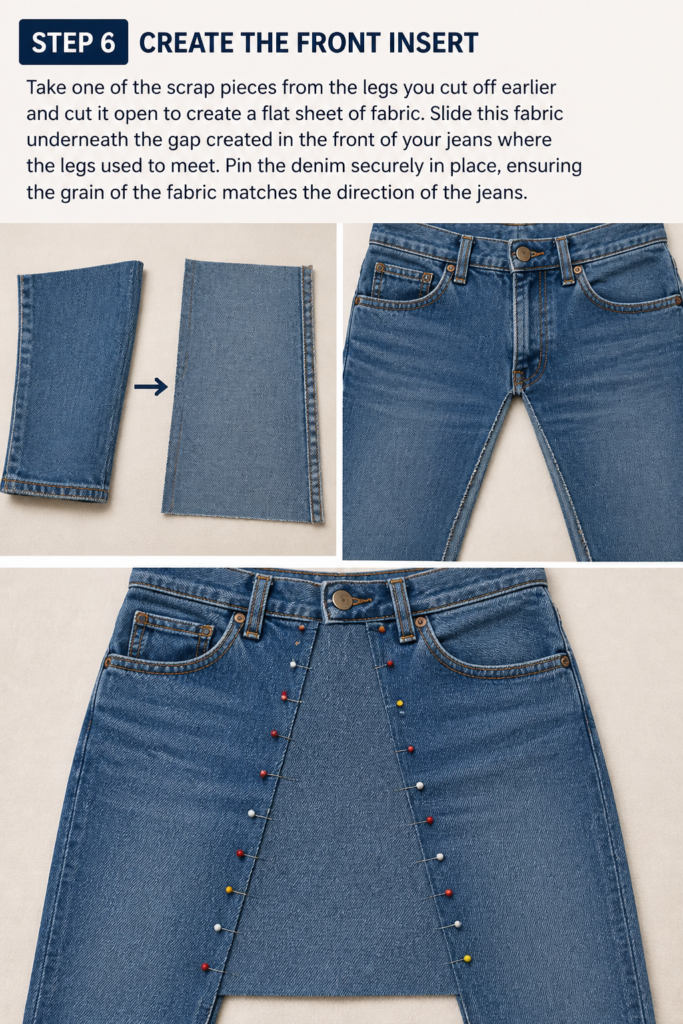
Slide this fabric underneath the gap created in the front of your jeans where the legs used to meet.
Pin the denim securely in place, ensuring the grain of the fabric matches the direction of the jeans.
Step 7: Sew the Front Panel
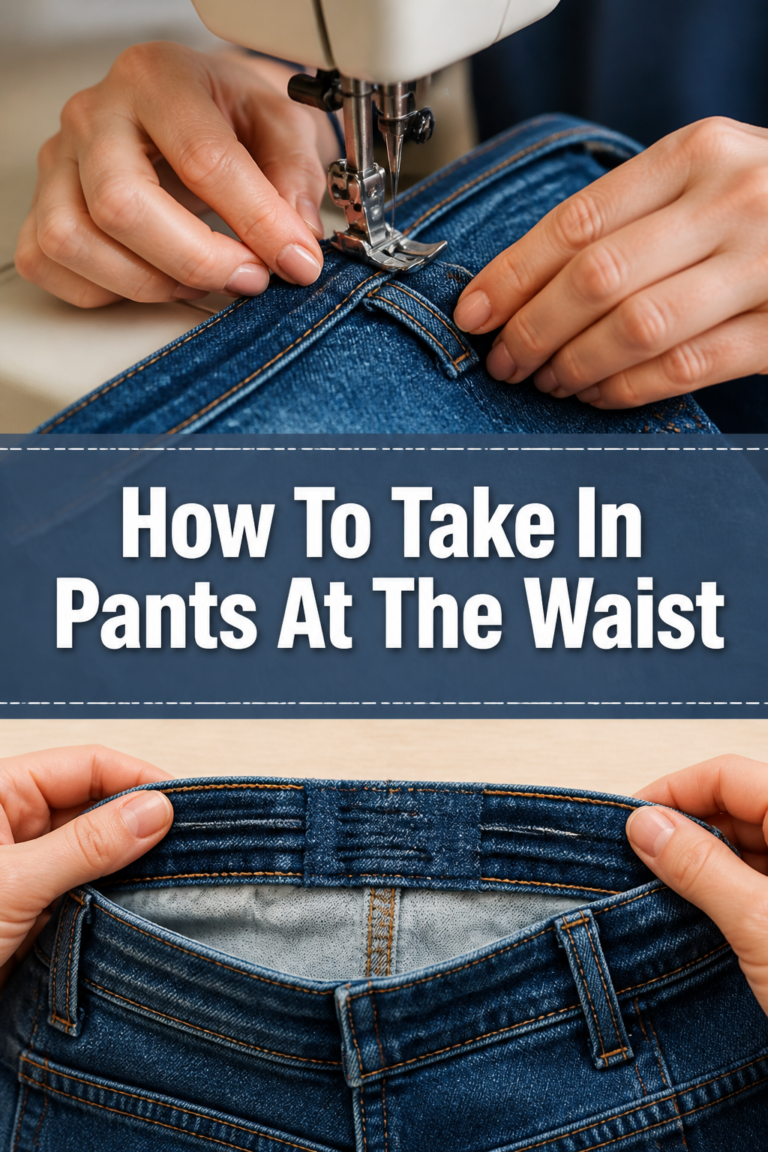
Thread your machine with heavy-duty denim thread that matches the original topstitching of your jeans.
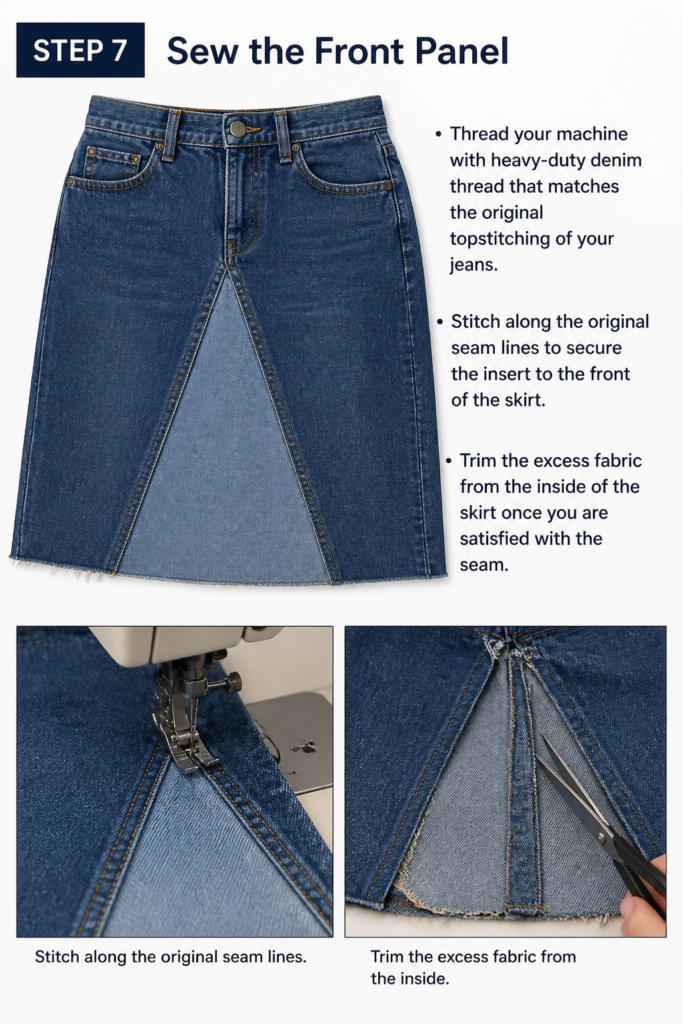
Stitch along the original seam lines to secure the insert to the front of the skirt.
Trim the excess fabric from the inside of the skirt once you are satisfied with the seam.
Step 8: Repeat for the Back Panel
Flip the skirt over and repeat the overlapping and pinning process for the back side.
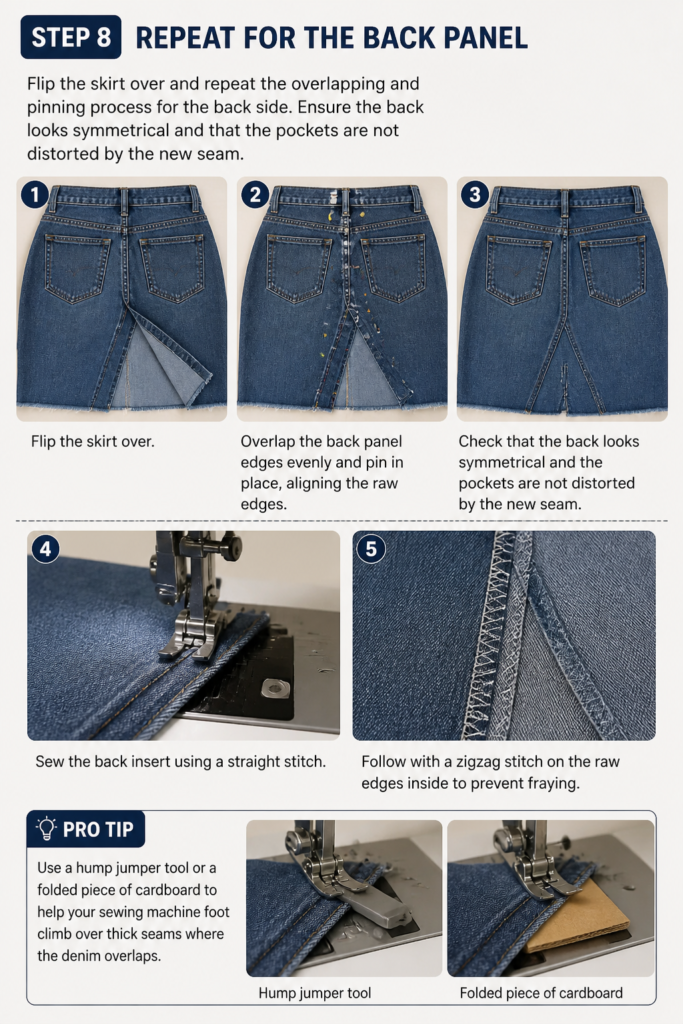
Ensure the back looks symmetrical and that the pockets are not distorted by the new seam.
Sew the back insert using a straight stitch, followed by a zigzag stitch on the raw edges inside to prevent fraying.
Pro Tip: Use a “hump jumper” tool or a folded piece of cardboard to help your sewing machine foot climb over thick seams where the denim overlaps.
Step 9: Level and Hem the Bottom
Try the skirt on one last time to check for any unevenness in the length.
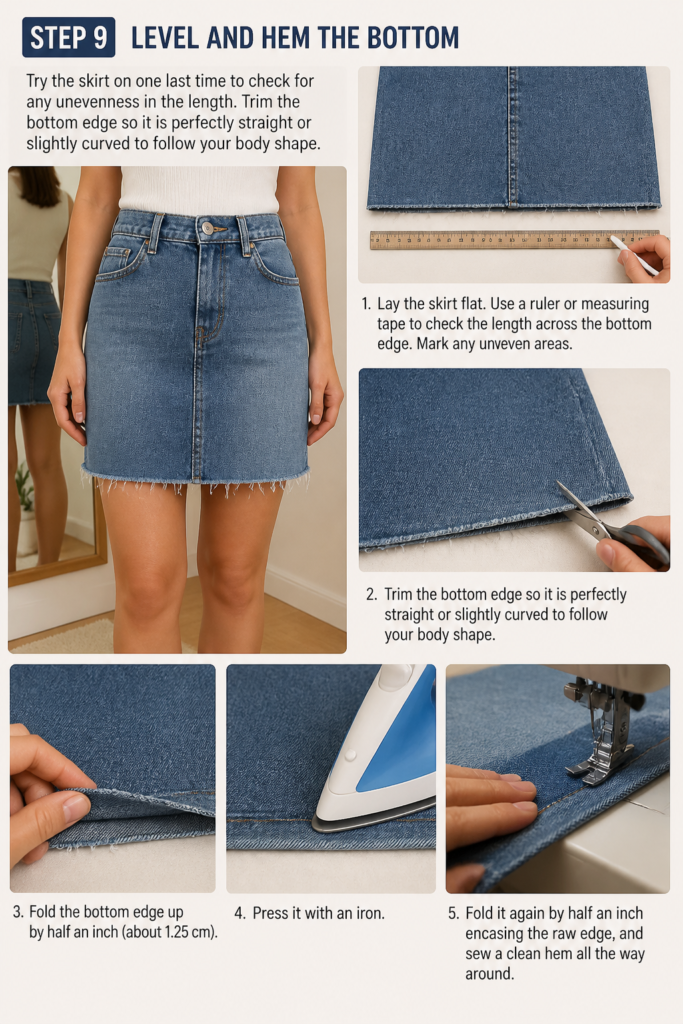
Trim the bottom edge so it is perfectly straight or slightly curved to follow your body shape.
Fold the bottom edge up by half an inch, press it with an iron, fold it again, and sew a clean hem all the way around.
Common Mistakes to Avoid
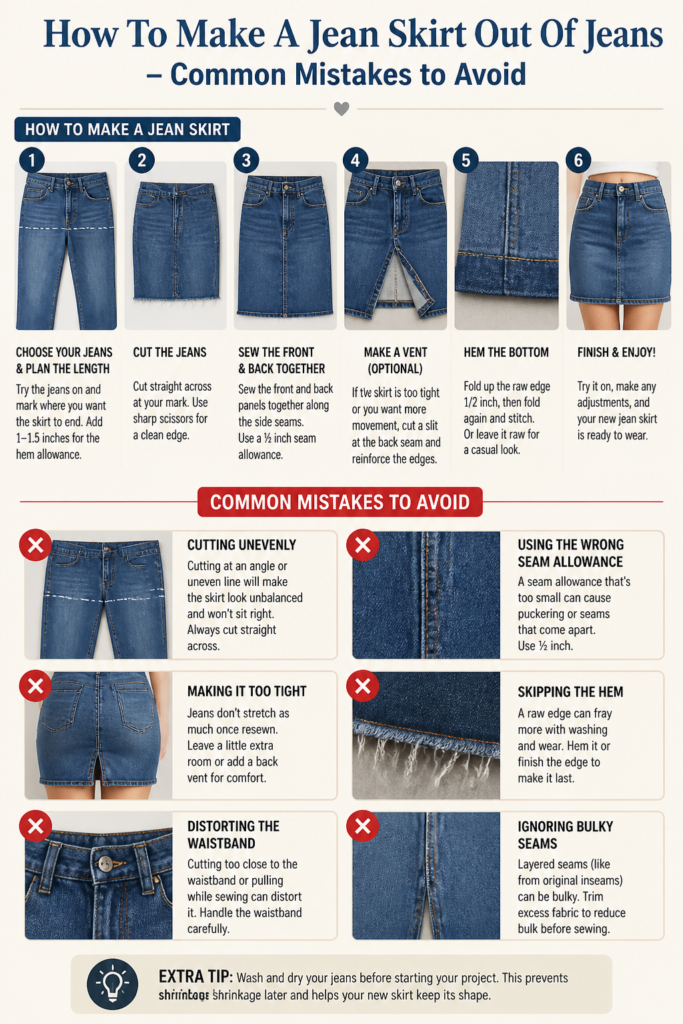
Cutting Too Short Initially
Many beginners cut the jeans exactly at the length they want the finished skirt to be.
This leaves no room for the hem or for the fabric that gets “lost” when you flatten the crotch curve.
Always leave at least two to three inches of extra length until the very last step of the process.
Using a Standard Sewing Needle
Denim is a very dense, tough fabric that will easily snap a standard universal sewing needle.
Attempting to sew through multiple layers of denim with the wrong needle can also damage your machine’s timing.
Invest in a pack of size 90/14 or 100/16 denim needles before you start this project.
Ignoring the Back Rise
The back of a pair of jeans is naturally longer than the front to accommodate the shape of the body.
If you cut the legs perfectly straight across while the jeans are flat, the back of the skirt might end up looking shorter than the front when worn.
Always check the side profile in a mirror before doing your final hem to ensure the skirt looks level from all angles.
Troubleshooting
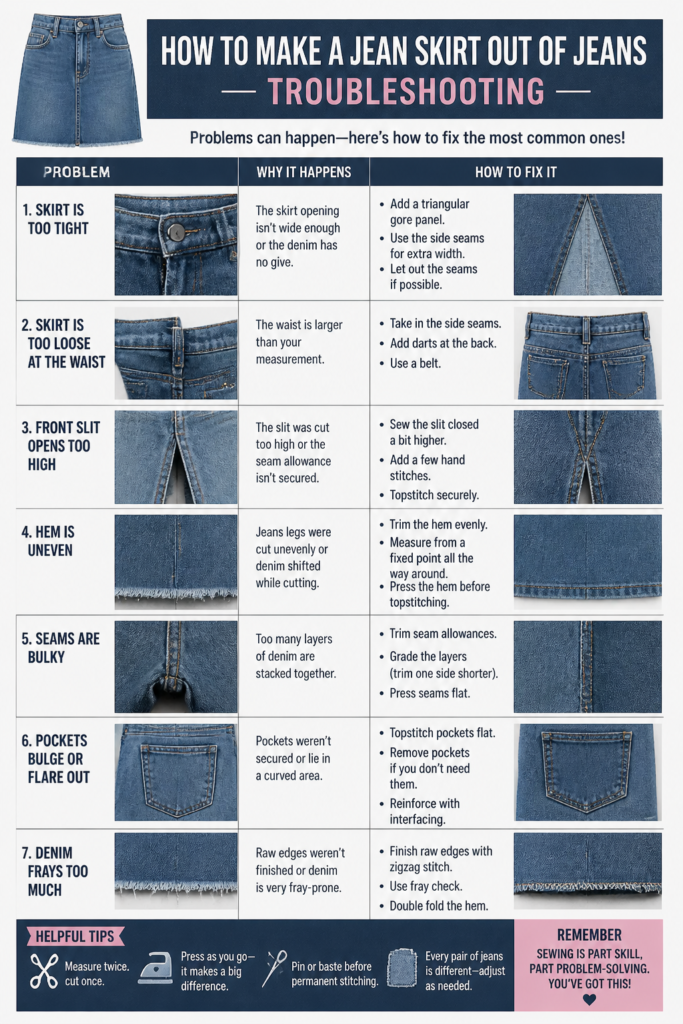
The Front Crotch Area is Bulging
This usually happens because the original curved seam of the fly hasn’t been flattened enough.
To fix this, you may need to unpick the seam and overlap the fabric more aggressively.
Pressing the area with a high-heat steam iron can also help the denim fibers relax and lay flatter.
The Sewing Machine is Skipping Stitches
Skipped stitches are a sign that the needle is struggling to penetrate the thick layers of denim.
Make sure you are using a dedicated denim needle and try slowing down your sewing speed significantly.
You can also manually turn the handwheel of your machine when going over the thickest intersections of the seams.
The Hem is Rippling or Wavy
Rippling often occurs when the fabric is stretched as it passes under the presser foot.
Avoid pulling the denim through the machine; let the feed dogs do the work of moving the fabric.
Using a walking foot attachment can also help feed the top and bottom layers of denim through the machine at the same rate.
Key Takeaways
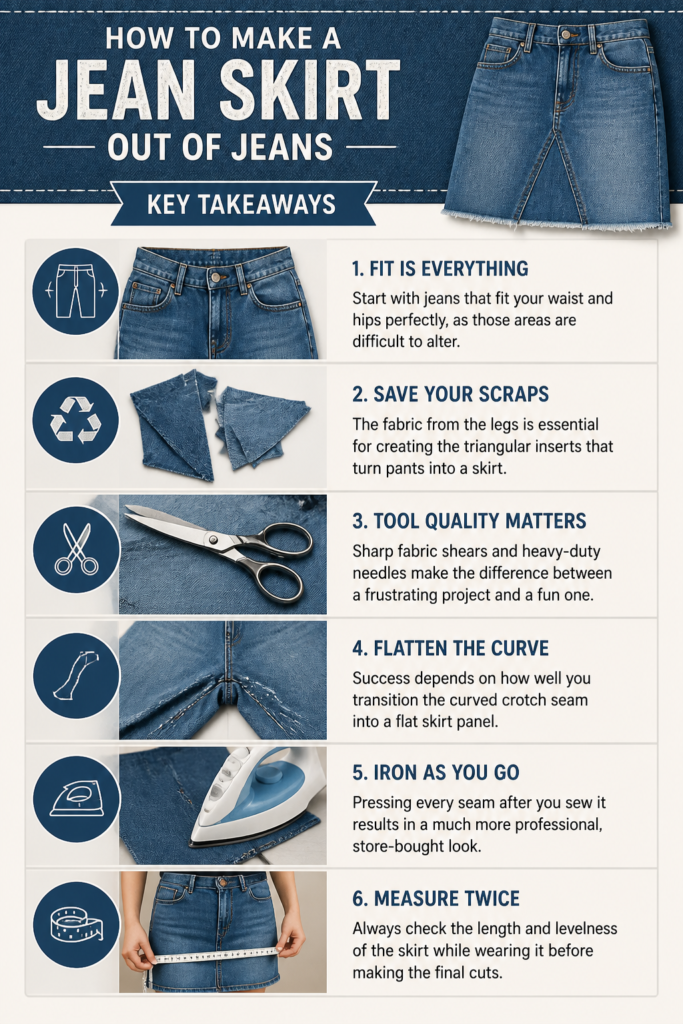
- Fit is everything: Start with jeans that fit your waist and hips perfectly, as those areas are difficult to alter.
- Save your scraps: The fabric from the legs is essential for creating the triangular inserts that turn pants into a skirt.
- Tool quality matters: Sharp fabric shears and heavy-duty needles make the difference between a frustrating project and a fun one.
- Flatten the curve: Success depends on how well you transition the curved crotch seam into a flat skirt panel.
- Iron as you go: Pressing every seam after you sew it results in a much more professional, store-bought look.
- Measure twice: Always check the length and levelness of the skirt while wearing it before making the final cuts.
Frequently Asked Questions
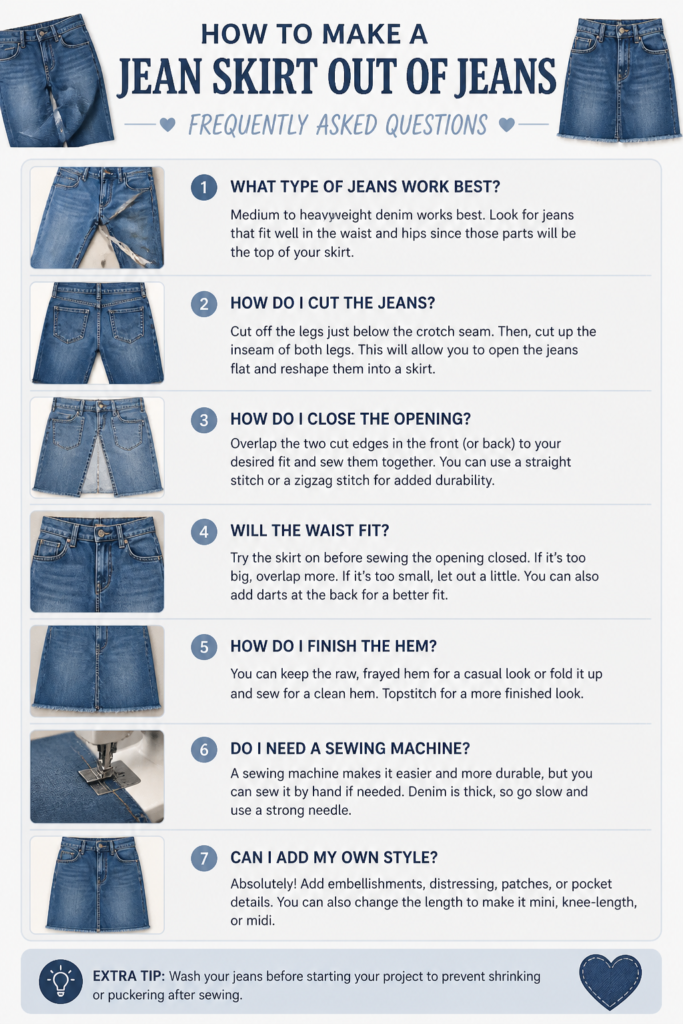
Can I make a skirt out of stretchy jeans?
Yes, you can use stretch denim, but it presents unique challenges during the sewing process.
Stretch fabric tends to warp and wave when you sew the center inserts, so you should use plenty of pins or fabric glue to keep things stable.
A ballpoint needle might be necessary if the denim has a very high Lycra content.
How do I make the skirt look professional and not DIY?
The secret to a professional finish is matching the topstitching thread perfectly to the original color.
Most jeans use a specific shade of copper or gold thread that is thicker than standard all-purpose thread.
Using a longer stitch length (around 3.0mm to 3.5mm) for the visible seams will also mimic the factory look.
What if I don’t have enough fabric for the inserts?
If your jeans were very short or narrow, you might not have enough leg scrap to fill the gaps.
You can use a contrasting fabric, like a patterned cotton or a different shade of denim, to create a “patchwork” style.
This is a great way to add personal flair to your skirt while solving a material shortage.
Do I have to hem the bottom?
You can leave the bottom edge raw for a trendy, frayed aesthetic that is very common in modern fashion.
To do this, simply sew a straight line about half an inch from the bottom edge to act as a “stay stitch.”
This prevents the fraying from traveling too far up the skirt over time as you wash it.
Our Top Recommended Finds
- Singer Heavy Duty Sewing Machine: This machine is built to handle multiple layers of thick fabric like denim without stalling.
- Gingher 8-Inch Knife Edge Dressmaker’s Shears: Having a very sharp set of scissors is vital for cutting through heavy denim cleanly.
- Dritz Seam Ripper with Ergonomic Handle: Since you will be doing a lot of unpicking, a comfortable grip will save your hands from cramping.
Mastering Your New Upcycling Skills
Now that you have successfully turned a pair of jeans into a skirt, you can apply these same skills to other denim projects.
Consider experimenting with different lengths, such as a midi-length skirt made from oversized men’s jeans or a micro-mini from a pair of worn-out shorts.
You can also try adding embroidery, distressing the fabric with sandpaper, or adding lace trim to the hem to further customize your creation.
The more you practice working with denim, the more comfortable you will become with its unique weight and texture.
Take a look through your closet or visit a local thrift store today to find your next project piece.
Beginner-friendly templates, step-by-step guides,
and weekly project ideas in your inbox.