🕯️ How To Get Candle Wax Out Of Jars

Beginner-friendly templates, step-by-step guides,
and weekly project ideas in your inbox.
Have you ever found yourself with a beautiful candle jar, empty and ready for a new purpose, but still clinging to stubborn wax remnants? It’s a common dilemma for candle lovers everywhere. I’ve personally repurposed countless jars over the years, discovering the most effective methods through trial and error. This guide shares proven techniques to get your jars sparkling clean, ready for their next life.
Quick Overview
This guide will walk you through several effective methods to remove residual candle wax, ensuring your jars are clean and ready for reuse or recycling. You’ll learn how to safely and efficiently tackle even the most persistent wax.
- Time needed: 15-45 minutes (per jar, depending on method)
- Difficulty: Beginner
- What you’ll need: Hot water, freezer, butter knife/spoon, soap, sponge, paper towels, boiling water (optional)
Step-by-Step Instructions
Step 1: Prepare Your Workspace
Before you begin, gather all your necessary tools. Lay down old newspapers or paper towels on a flat, heat-resistant surface. This will protect your countertops from any melted wax spills or water splashes.
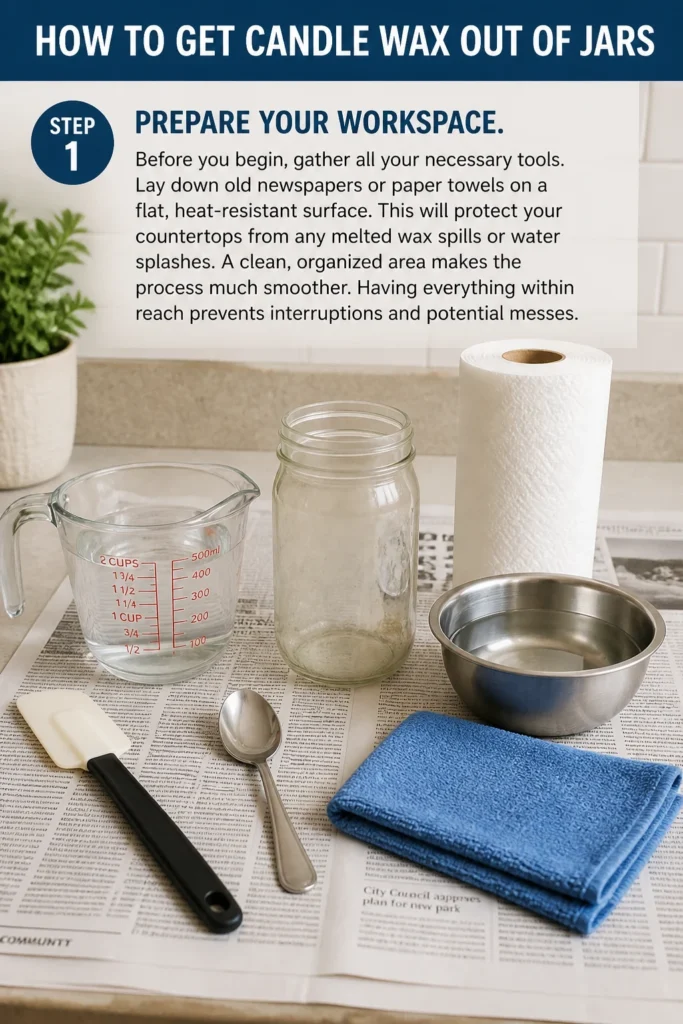
A clean, organized area makes the process much smoother. Having everything within reach prevents interruptions and potential messes.
Step 2: Choose Your Method – The Hot Water Bath
This is often the simplest and most common method for removing wax. It’s especially effective for jars with a small amount of wax remaining at the bottom. The heat from the water gently melts the wax, allowing it to float to the surface.
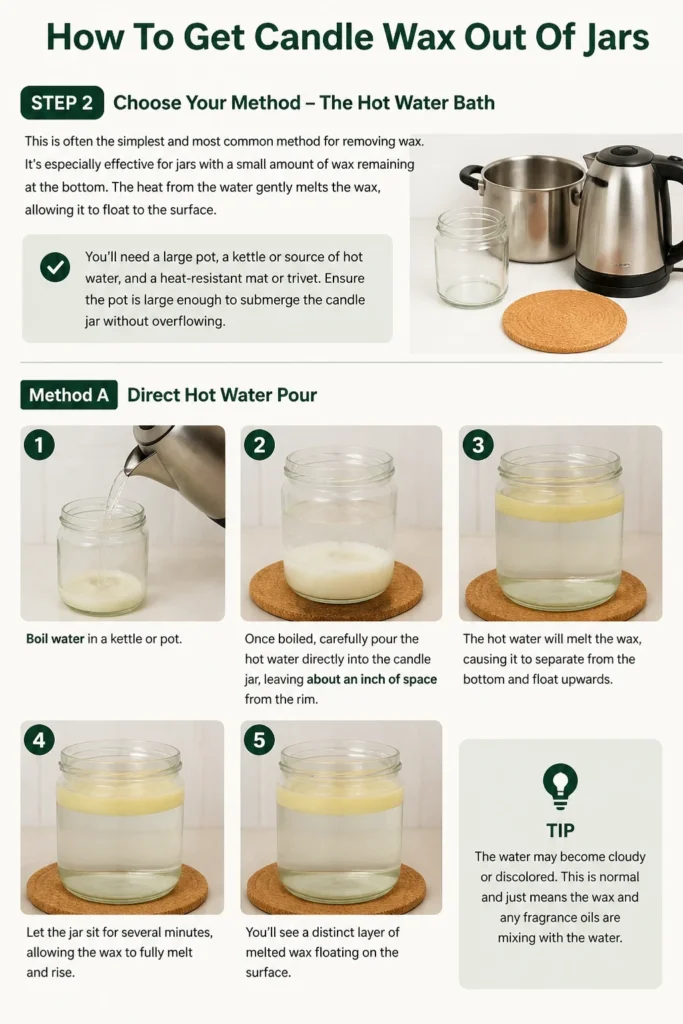
You’ll need a large pot, a kettle or source of hot water, and a heat-resistant mat or trivet. Ensure the pot is large enough to submerge the candle jar without overflowing.
Method A: Direct Hot Water Pour
Boil water in a kettle or pot. Once boiled, carefully pour the hot water directly into the candle jar, leaving about an inch of space from the rim. The hot water will melt the wax, causing it to separate from the bottom and float upwards.
Let the jar sit for several minutes, allowing the wax to fully melt and rise. You’ll see a distinct layer of melted wax forming on the surface of the water.
Pro Tip: Place a folded paper towel or cloth at the bottom of your sink before pouring the hot water. This absorbs the impact and prevents potential damage to the jar from thermal shock.
Method B: Double Boiler (Water Bath)
If you’re hesitant to pour hot water directly into the jar, or if the jar is delicate, use a double boiler method. Place the candle jar into a larger pot. Fill the larger pot with water, ensuring the water level is below the rim of the candle jar.
Gently heat the water in the larger pot on the stove. As the water heats, it will slowly warm the candle jar, melting the wax inside. The wax will loosen and may even float as a solid piece.
Step 3: Remove the Melted Wax
Once the wax has completely melted and floated to the top (Method A), or loosened from the bottom (Method B), let the water cool. As the water cools, the wax will solidify again, forming a disc on the surface. This makes it easy to remove.
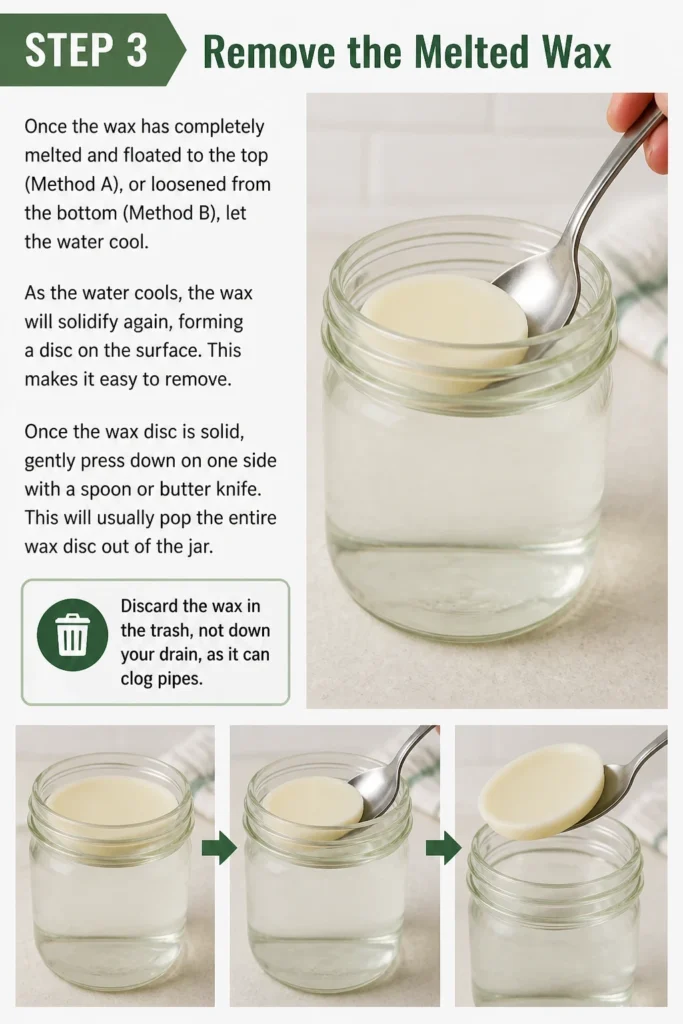
Once the wax disc is solid, gently press down on one side with a spoon or butter knife. This will usually pop the entire wax disc out of the jar. Discard the wax in the trash, not down your drain, as it can clog pipes.
Step 4: The Freezing Method
This technique is excellent for jars with a larger, more stubborn chunk of wax. Extreme cold makes wax brittle, causing it to shrink and detach from the glass. It’s a clean and relatively mess-free option.
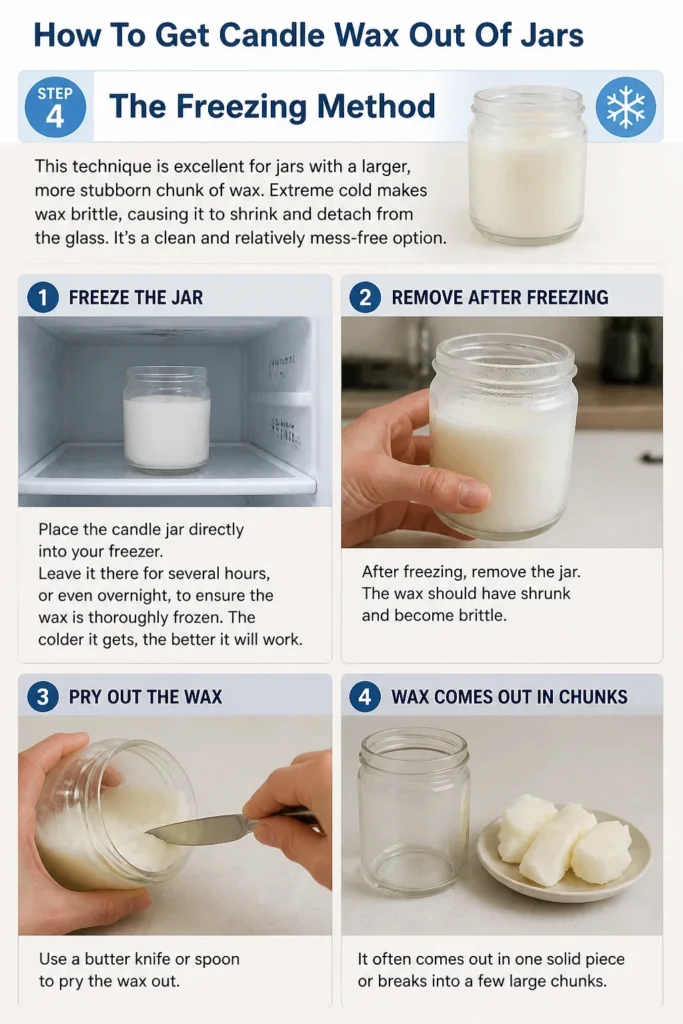
Place the candle jar directly into your freezer. Leave it there for several hours, or even overnight, to ensure the wax is thoroughly frozen. The colder it gets, the better it will work.
After freezing, remove the jar. The wax should have shrunk and become brittle. Use a butter knife or spoon to pry the wax out. It often comes out in one solid piece or breaks into a few large chunks.
Step 5: Scrape and Clean Residual Wax
Regardless of the method you choose, you might find small bits of wax still clinging to the jar. This is perfectly normal and easily addressed. A butter knife, spoon, or even a credit card edge works well for gently scraping.
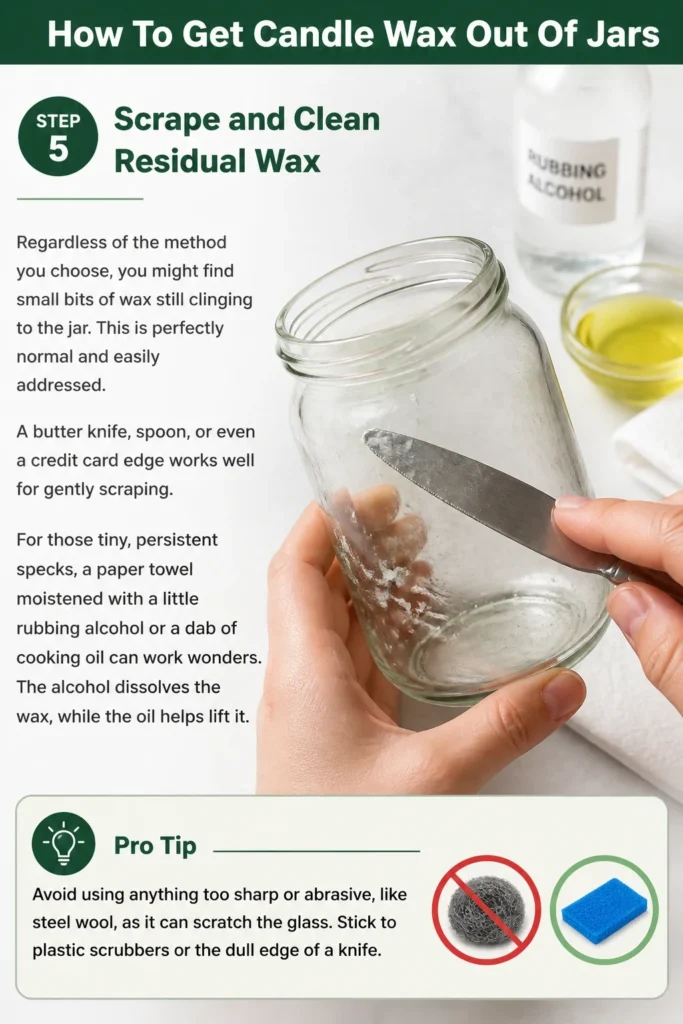
For those tiny, persistent specks, a paper towel moistened with a little rubbing alcohol or a dab of cooking oil can work wonders. The alcohol dissolves the wax, while the oil helps lift it.
Pro Tip: Avoid using anything too sharp or abrasive, like steel wool, as it can scratch the glass. Stick to plastic scrubbers or the dull edge of a knife.
Step 6: Tackle the Wick Tab
At the very bottom of most candle jars, you’ll find a metal wick tab. This tab is usually secured with a strong adhesive. It can be a bit tricky to remove, but patience is key.
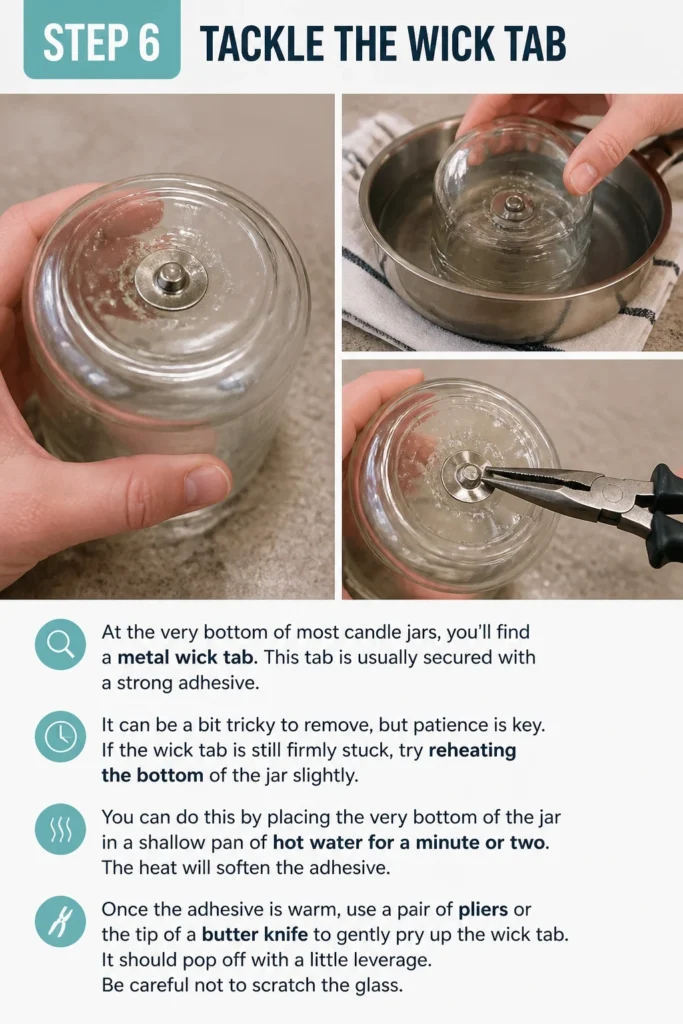
If the wick tab is still firmly stuck, try reheating the bottom of the jar slightly. You can do this by placing the very bottom of the jar in a shallow pan of hot water for a minute or two. The heat will soften the adhesive.
Once the adhesive is warm, use a pair of pliers or the tip of a butter knife to gently pry up the wick tab. It should pop off with a little leverage. Be careful not to scratch the glass.
Step 7: Final Wash and Polish
After removing all the wax and the wick tab, the jar is ready for its final cleaning. Wash the jar thoroughly with warm, soapy water. Use a sponge or bottle brush to scrub away any remaining residue.
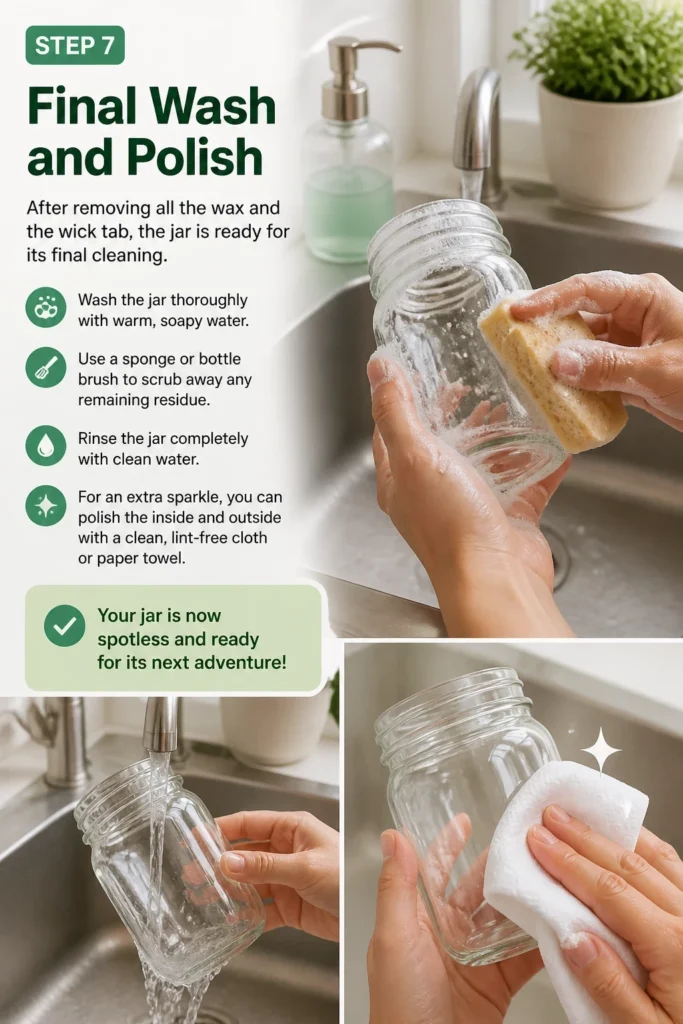
Rinse the jar completely with clean water. For an extra sparkle, you can polish the inside and outside with a clean, lint-free cloth or paper towel. Your jar is now spotless and ready for its next adventure!
Common Mistakes to Avoid
Pouring Wax Down the Drain
Never pour melted wax down your sink drain. Wax solidifies as it cools, and it will inevitably clog your pipes over time, leading to expensive plumbing issues. Always dispose of wax in the trash. Scrape it into a waste bin once it’s solid.
Using Excessive Force
When scraping or prying out wax, avoid using too much force. Glass jars can break or chip if you apply excessive pressure, especially when cold or if using sharp tools. Work gently and patiently to prevent accidents and damage to the jar.
Overheating or Rapid Temperature Changes
While heat is essential for melting wax, extreme or rapid temperature changes can cause glass to crack or shatter due to thermal shock. Always introduce heat gradually. Do not pour boiling water into a cold jar, or place a hot jar directly into cold water.
Using Abrasive Cleaners on Glass
Harsh abrasive cleaners or scrubbers like steel wool can scratch the surface of your glass jar, making it look dull and cloudy. Stick to soft sponges, cloths, and non-abrasive cleaning solutions to keep your jars pristine. A little dish soap and warm water are usually all you need.
Troubleshooting
Wax Won’t Budge After Freezing
If the wax doesn’t pop out easily after freezing, it might not have been cold enough for long enough. Place the jar back in the freezer for a few more hours, or even overnight. Ensure the wax is thoroughly chilled and brittle before trying again. Sometimes, a gentle tap on a hard surface (while holding the jar securely) can also help dislodge stubborn wax after freezing.
Stubborn Residue After Cleaning
Even after washing, you might find a greasy film or faint wax residue. For this, try wiping the inside of the jar with a paper towel dampened with rubbing alcohol or white vinegar. These solvents are excellent for cutting through greasy films and leaving glass sparkling clean. A small amount of cooking oil can also help dissolve wax residue before a final soapy wash.
Wick Tab Won’t Come Off
The adhesive on wick tabs can be very strong. If it’s still stuck, try applying a little more heat directly to the bottom of the jar. You can use a hairdryer on a low setting for a minute or two, or place the very bottom of the jar in a shallow pan of hot water. Once warm, use pliers for a better grip to twist and pull the tab off. If necessary, a small amount of Goo Gone or similar adhesive remover can be used (follow product instructions carefully).
Key Takeaways
- The hot water bath and freezing methods are the most effective ways to remove bulk candle wax.
- Always dispose of wax in the trash, never down the drain, to prevent plumbing issues.
- Use gentle tools like butter knives or spoons to avoid scratching or breaking glass jars.
- Prevent thermal shock by introducing temperature changes gradually to glass containers.
- Rubbing alcohol or white vinegar can effectively remove stubborn greasy residues after wax removal.
- Patience is key, especially when dealing with stubborn wick tabs and their adhesives.
Frequently Asked Questions
Can I put candle jars in the dishwasher to clean them?
While some candle jars are technically dishwasher safe, it’s generally not recommended for initial wax removal. The dishwasher’s heat might melt the wax, but it could also redeposit it onto other dishes or clog the dishwasher’s filter. It’s best to remove the bulk of the wax first using one of the methods described, then run the empty, wax-free jar through the dishwasher for a final sanitize.
Is it safe to microwave a candle jar to melt the wax?
No, it is generally not safe to microwave a candle jar. Many candle jars have metal wick tabs at the bottom, which can cause sparks and damage your microwave. Additionally, glass can heat unevenly in a microwave, leading to cracking or shattering. Stick to the hot water bath or freezing methods for safety.
What can I do with the removed wax?
You can get creative with leftover wax! If you have enough, you can melt it down and create new candles. Combine different colors for a unique look. You can also use small pieces as fire starters for campfires or fireplaces. Some people even use wax bits to lubricate sticky drawers or squeaky hinges.
How can I remove the label from the jar?
Once the jar is clean and dry, you can often remove labels by soaking the jar in warm, soapy water for 10-15 minutes. This softens the adhesive. Then, use a scraper or your fingernail to peel it off. For stubborn labels or sticky residue, rubbing alcohol, white vinegar, or a specialized adhesive remover like Goo Gone can be very effective.
Our Top Recommended Finds
- Long-handled Bottle Brush: Essential for reaching the bottom of tall or narrow jars, ensuring a thorough scrub.
- Plastic Scraper Tool Set: Gentle yet effective for removing stubborn wax bits and adhesive without scratching the glass.
- Heat-Resistant Silicone Mat: Provides a safe surface for handling hot jars and prevents damage to countertops.
Transform Your Jars: A Fresh Start Awaits
Taking the time to clean out your empty candle jars is a small act with big rewards. You’re not just decluttering; you’re unlocking a world of creative possibilities for reuse. From stylish storage containers to charming plant holders or even homemade candle refills, your beautifully cleaned jars are blank canvases waiting for their next purpose.
Don’t let those lovely jars gather dust in a cupboard. Grab your supplies, pick a method, and give them a new lease on life today. You’ll be amazed at how satisfying it is to see them sparkling clean and ready for their next chapter. Get started now and enjoy the journey of repurposing!
Beginner-friendly templates, step-by-step guides,
and weekly project ideas in your inbox.